Are you looking for a way to organize data on your Web page into rows and columns? Or to divide your page into sections for placing headers, footers, and navigation links? This chapter shows you how to use HTML tables to do all of this. You create tables using an outer <TABLE> tag and various other tags within it. A <TR> tag defines a row in a table, and <TD> tags define data cells within the row. In addition to organizing data with tables, you can add color or background images behind the data in tables.

Understanding Table Structure 98
Add a Table 100
Assign a Table Border 102
Adjust Cell Padding and Spacing 104
Adjust Cell Width and Height 106
Add Column Labels 108
Add a Background Color to Cells 109
Insert a Background Image 110
Create Newspaper-Style Columns 111
Adjust the Table Size 112
Change Cell Alignment 114
Extend Cells across Columns and Rows 116
Change Table Alignment 118
HTML tables enable you to effectively present large amounts of data in rows and columns. Tables can include text, images, and multimedia. For example, you can use tables to display a company's sales results or a grid of photos in an online photo gallery. You can also use tables to organize the overall structure of a Web page. For example, you can create a two-column table that organizes a list of navigational links in one column and the main text and image content in another.
Table Structure
Every table is basically a rectangle containing rows and columns. The places where the columns and rows intersect are called cells. Each cell can hold Web page content. Using HTML attributes, you can set the size of an entire table as well as the size of particular cells. You can also turn borders of a table and its cells on or off, depending on whether you want to draw attention to the table's structure.
Cell Spanning
Cells can span two or more columns or rows to form bigger containers for data. For example, a table may include a title cell at the top that spans multiple columns across the table (
Traditional Tables
You can use a traditional table, like the table shown here, on a Web page to present data in a tabular format. For example, you might insert a table to hold a list of products and prices or to display a class roster. You can set a fixed width and height for the table to make it fit in with the rest of the page content.
Presentation Tables
You can use a presentation-style table to showcase the content on the page in interesting ways. Instead of defining an exact size, you can specify a table size using percentages. Whenever the user resizes his or her browser window, the table resizes as well. This allows for a more "liquid" layout. This type of table is good for page layouts as well as data tables. See "Create Newspaper-Style Columns" for an example of a presentation table.

Table Elements
The building blocks of HTML tables are the <TABLE>, <TR>, and <TD> tags. The <TABLE> element defines the table itself. The <TR> tag defines a table row. The <TD> tag defines the table data, or cell content, within each row. In addition to these codes, you can assign table headers, adjust the alignment of data, and add background colors and images.
Table Borders
You can control the width of the borders in your table using a BORDER attribute. To turn off borders, you can set the BORDER value to 0, or leave the attribute unset because no borders is the default in most browsers. Visible borders can be useful for traditional data tables to show where cells begin and end (
Table Backgrounds
Table backgrounds can help delineate table cell structure just like borders. You can use a different color in table heading cells to set off those cells from the data cells. In presentation tables, background colors can set off headers, navigation, and footer sections of a page from the main content. You can also add background images to a table just as you can to an entire Web page.

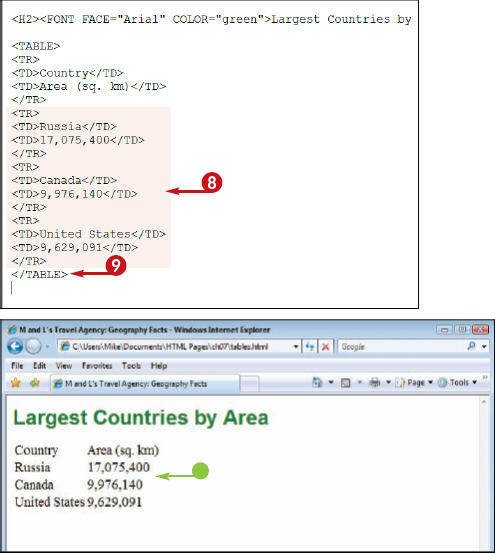
You can insert a table onto your page to organize data or control the page layout. HTML tables are made up of cells arranged into rows and columns. You can assign different page elements to different cells to control the positioning of those elements on the page. Cells can hold text, images, and other Web page content. You define the placement of a table on a page with the <TABLE> tag. Inside the <TABLE> tag, you can define rows with the <TR> tag and data cells within those rows with <TD> tags.


To make it easier to distinguish between rows, type each row tag on a new line.


Note
If you want your first row to include bold column labels, you can use the
<TH>tag instead of<TD>. See the section "Add Column Labels" to learn more.

To make it easier to distinguish between cells, you can place each cell on a new line in your HTML document.


The Web browser displays the data in a tabular format.

Note
See the sections "Assign a Table Border" and "Adjust Cell Padding and Spacing" to learn more
Note
How do I set a size for a table?
You can set the dimensions of a table as exact pixel values or as percentages of the browser window using the <TABLE> tag's WIDTH and HEIGHT attributes. If you want to set a fixed size and have the entire table width visible in browsers, set the width at 750 pixels or less because most users surf the Web with their monitors set to at least 800 pixels in width. For more information, see the section "Adjust the Table Size."
What is the best way to build a table?
Before you start coding your table, draw it out on paper to organize the cell contents, designate column headers and rows, and determine its general layout and size. When you are ready to begin coding, start by typing the tags to define the table structure, putting numbers in the cells as placeholders. You can check the structure in a Web browser to see how it looks and then return to your editor and start filling in the real cell data.
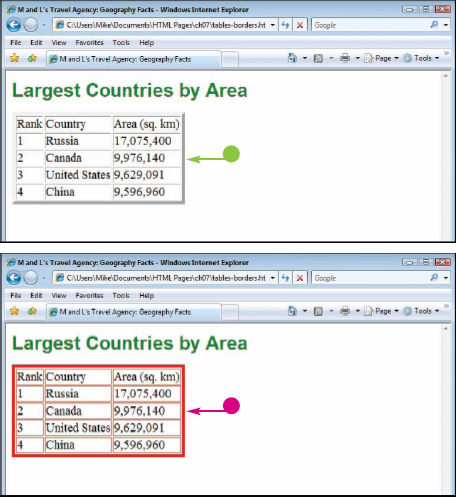
Table borders make your cells easier to distinguish and give the table a visible structure on a page. A border is simply a line that appears around the table as well as around each cell within the table. By default, a table does not have a border unless you specify one. You can use the BORDER attribute to turn table borders on or off.
When you set a border thickness, it applies only to the outer edge of the table, not to the cells within the table. Border thickness is measured in pixels. Borders appear gray unless you specify a color. See the section "Adjust Cell Padding and Spacing" to learn how to control interior borders.
Note
See the section "Add a Table" to learn how to create a basic table


Note
Can I specify a border with a style sheet?
Yes. In your style sheet, type TABLE or TD. Then type {BORDER: VALUES}, replacing VALUES with a border size (in pixels), border style, and border color, separating the values with spaces. For example, to create a 1-pixel, solid-red border, type {BORDER: 1px solid red}. See Chapter 10 to learn more about applying borders with style sheets.
Do I need to add borders if I am using a table as a layout for my Web page?
No. It is usually not a good idea to use the BORDER attribute for presentation tables. With a presentation table, you want the table structure to define different sections of the page invisibly. If you assign a border, a browser adds a border to every section, which can distract from your page content.
You can use padding to add space between the border and the contents of a cell. Padding can make table content more legible. You can use spacing to increase the border size or distance between cells. Increasing the spacing can add emphasis to the borders when you have borders turned on. Padding and spacing size is measured in pixels. If you leave padding and spacing attributes out, most browsers add 1 pixel of padding and 2 pixels of spacing by default.


Note
What happens if I set the spacing and padding values to 0?
If you set the CELLSPACING and CELLPADDING values to 0, the browser removes any spacing or padding between the cells. You may use this technique to make images in adjacent cells appear as a single image. You can set the BORDER attribute to 0 as well to remove the border between cells. Most browsers also remove the border if you leave the BORDER attribute unspecified.
How do I control the padding on just one side of a cell?
The CELLPADDING attribute applies padding to all sides of cells equally. To control padding on just one side of a cell, you can apply a style rule to a <TD> tag using style sheets. For example, you can apply 10 pixels of padding to the top of a table cell using the padding-top property. See Chapter 11 for information on controlling padding with style sheets.
You can control a cell's width using the WIDTH attribute and its height using the HEIGHT attribute. This enables you to allocate more space to columns or rows that have more content. If you do not set a specific width or height, the content of the cell determines the cell's size.
You can specify dimensions using a pixel value or using a percentage relative to the width or height of the overall table. You can also specify the height and width of the overall table. See the section "Adjust the Table Size" for details.

Note
See the section "Adjust the Table Size" to set the height of the entire table

Note
If I want to precisely control the dimensions in my table, do I need to set a width and height for all the cells?
If you have a table with more than one cell, no. Setting a width of one cell also sets the width for all the cells above or below, and setting the height of a cell also sets the height for all the cells to the left or right. Because of this, you only need to set the width or height once for each row or column.
Can I set the width for a single cell and not have it affect the other cells?
When you change the width of a cell, all the cells in the same column adjust to the same width. If you want one cell to span one or more columns, you can use another set of codes to control the individual cell width. See the section "Extend Cells across Columns and Rows" to learn more.
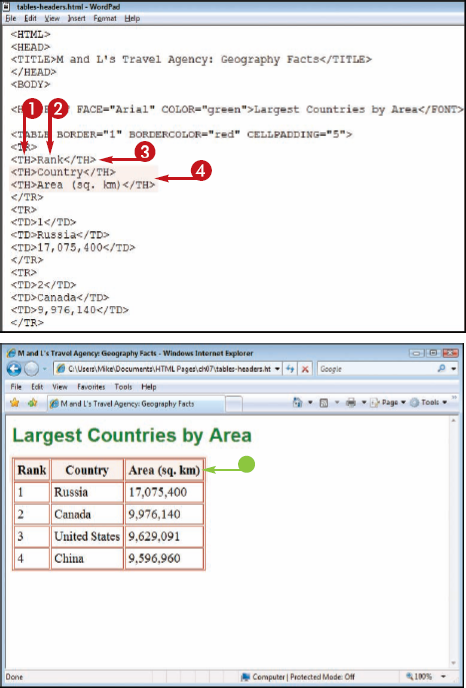
If you are building a table to populate with data, you can add descriptive labels, also called headers, to the top of each column using the <TH> tag. For example, if your table lists products and prices, your column headers might include labels such as Product Number, Product Name, and Price. You can also add headers to the cells on the sides to label the rows of a table. Column headers appear in bold type and are centered within each cell.
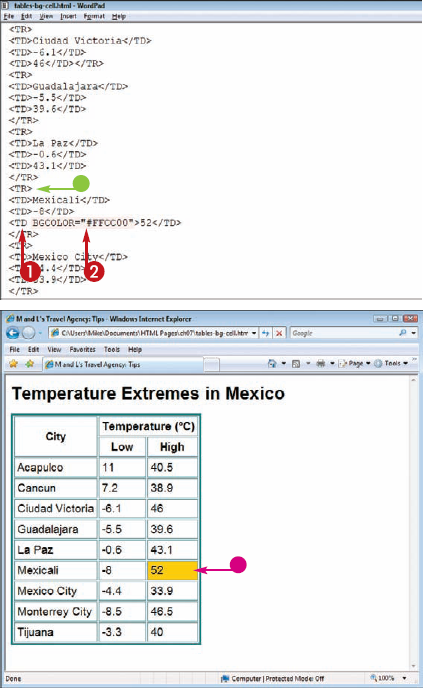
You can add color to individual cells in your table or to certain rows and columns. You can use background color to draw attention to the cell contents or to distinguish header cells from data cells.
When applying a background color, be careful not to choose a color that makes the table data difficult to read. See Chapter 4 to learn more about setting color values in HTML. You can apply a background color to an entire table by adding a BGCOLOR attribute to the <TABLE> tag.
Note
See Chapter 4 to learn more about assigning color values.
The Web browser displays the background color in the cell, row, or column.
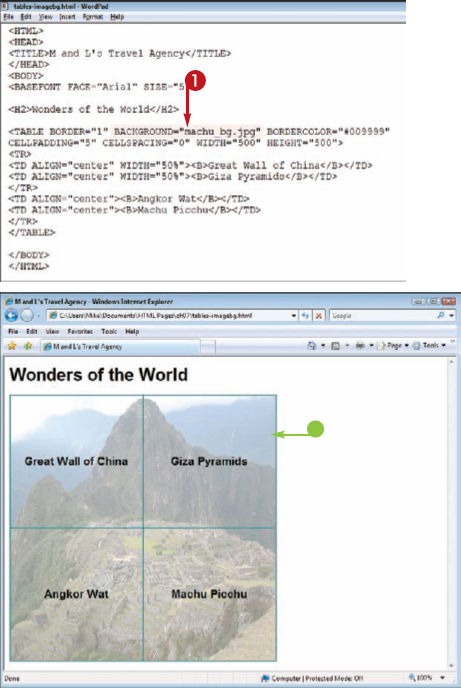
You can add a background image to appear behind your entire table. Background images can give your table a more interesting design by complementing the data that appears in the table cells.
When using an image as a background, be careful the design and colors do not clash with the table data or make it illegible. You may need to change the text color to make the text stand out from the underlying background image or lighten the image in an image editor. See Chapter 4 to learn how to assign color to text.
You can use the table format to present columns of text on your Web page, much like a newspaper. For example, you may want to organize your text into two or three columns. Paragraphs of text are contained within each column. This is an example of using a table for presentation purposes — that is, to lay out sections of content on the page. You can use the vertical alignment attribute to make each column align at the top of the table.
Note
See the section "Add a Table" to learn how to create a basic table.
The Web browser displays the text as columns on the page.

You can control the exact size of a table using the WIDTH and HEIGHT attributes in the <TABLE> tag. You can specify a table size in pixels or set the size as a percentage of the browser window.
When setting a width in pixels, limit the value to 750 pixels or less to ensure the table fits on the screen. If you prefer a more flexible table, set the size as a percentage. This allows the table to be resized if the browser window is resized.
Note
The
HEIGHTattribute is not as well supported as theWIDTHattribute and may not display properly in all browsers.

You can add a height setting if your table needs one by typing
HEIGHT="?"in the<TABLE>tag.Note
The
HEIGHTattribute is not as well supported as theWIDTHattribute and may not display properly in all browsers.
Note
Is it possible to set a table too small for its contents?
No. If you accidentally set a size too small for the contents, the browser ignores the measurements and tries to make the table fit as best it can. On the other hand, if you set a table too wide, users can be forced to scroll to see parts of the table. For best results, do not make your table wider than 750 pixels.
To what size does a browser set my table if I do not specify an exact width?
If you do not set a width using the WIDTH attribute, the browser sizes the table based on the cell contents. When text is in the table, the browser expands a table far enough to fit its largest contents, but not past the right edge of the browser window. If a table contains large images, it may have to extend beyond the browser's viewing area to accommodate the images.
You can control the alignment of data within your table cells using the ALIGN and VALIGN attributes. The ALIGN attribute controls horizontal alignment: left, center, and right. By default, all table data you enter into cells is left-aligned. The VALIGN attribute controls vertical alignment: top, middle, and bottom. By default, the table data is vertically aligned to appear in the middle of each cell.
You can add alignment attributes to a single cell, a row, or all the data in the table. To learn how to position a table on the page, see the section "Change Table Alignment."
The Web browser displays the table with the specified alignment.

Note
How do I justify data in a table cell?
Justification sets both left and right alignment and stretches the text to span the area between the cell borders. Although there is an ALIGN value for justification, justify, not all Web browsers currently support the setting.
The empty cells in my bordered table look broken. What can I do about this?
If you put no data or blank spaces inside a <TD> or <TH> tag, some browsers do not display the border for that cell. This can make the table look broken. You can fix this by adding a , or non-breaking space, to the empty tag. This forces the browser to display a border for the empty cell. For more about and other special characters, see Chapter 3.
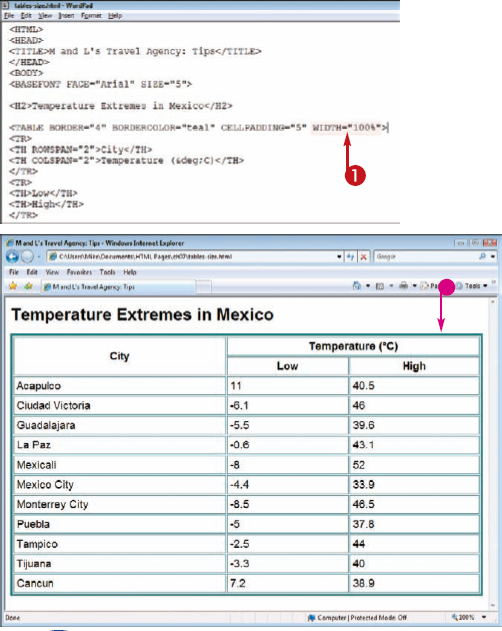
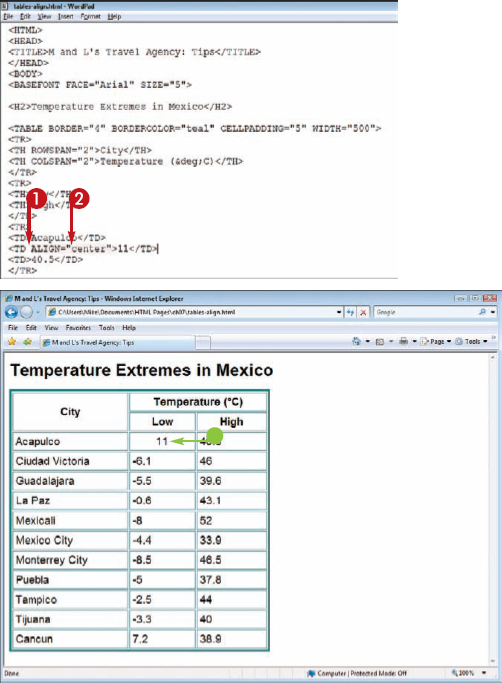
You can create a larger cell in your table by extending the cell across two or more columns or rows. The ability to span cells, also called merging cells, allows you to create unique cell structures within your table. For example, you might include a large cell across the top of a table to hold a heading or an image. For presentation tables, you might include a long cell down the side of a table to create an area for navigation.
The Web browser displays the cell spanning the designated number of columns.

If you are using the HTML from the previous example, also remove the blank data cell in the city row.
The Web browser displays the cell spanning the designated number of rows.


Note
Can I extend a cell across columns and rows at the same time?
Yes. If you add the COLSPAN and ROWSPAN attributes to the same row or header tag, you can make a cell span across and down in the table. Just remember to remove cells in the columns and rows that you want the current cell to span.
How can I set off a row that spans the top of my table?
You can create a title cell for a table by creating a top cell that spans all the cells beneath it. To set that cell off from the others, you can add a background color. See the section "Add a Background Color to Cells" for more information. You can also make that cell a header cell by using the <TH> tag. See the section "Add Column Labels" for details.
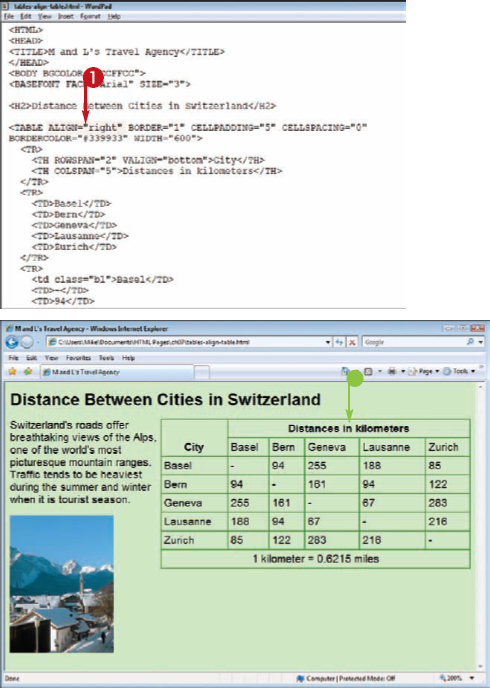
You can control the positioning of a table on your Web page using the ALIGN attribute. You can use this attribute to center a table or align it on the left or right side of the page. The ALIGN attribute also determines the way in which text wraps around your table element. For example, if you align the table to the right, text wraps around the left side of the table.
Note
Text does not wrap around a centered table, but it does wrap around those that are left- or right-aligned.
To stop text from wrapping, type
<BR CLEAR="?">before the text, replacing ? with the alignment value you want to clear.The Web browser displays the table with wrapping text.
Note
If you do not specify an alignment value, tables are left-aligned and do not have text wrapping.

Note
How do I control line breaks in a cell?
To create a line break in a cell, you can use the <BR> tag or the <P> tag. These are the same text formatting tags used for regular page text. See Chapters 3 and 4 to learn more about line breaks and other text formatting.
How can I indent a table from the left or right side?
You can indent a table using a style sheet rule. Apply MARGIN-LEFT to indent a left-aligned table or MARGIN-RIGHT to indent a right-aligned table. See Chapters 9, 10, and 11 to learn more about style sheets.