
In This Chapter
Touring the AutoCAD 2010 screens
Comparing the new and the classic looks
Browsing AutoCAD's menus
Going bar hopping: title bars, the menu bar, toolbars, and the status bar
Unraveling the Ribbon
Practicing with palettes
Discovering the drawing area
Using online help
AutoCAD 2010 is a fully fledged and thoroughly up-to-date member of the Windows world, but if you skipped AutoCAD 2009, or you're using Windows XP, or you've yet to kick the tires of the Microsoft Office 2007 suite, you may not recognize much in AutoCAD's newest release. But the title bar says "AutoCAD 2010," so you must be in the right place!
Like the rest of the book, this chapter is written for someone who has used other Windows programs but has little or no experience with AutoCAD. If you are experienced with recent releases of AutoCAD, some of this chapter may be old hat (even if it does look different). Here and throughout the rest of the book, I show you how to do things with AutoCAD's implementation of Microsoft's Fluent User Interface (or FUI for short). In the "Going for that classic look" sidebar later in this chapter, I show you how to make the new version look a lot like an old one.
Note
The very first time you launch AutoCAD 2010, a new Initial Setup routine asks you to specify the industry you work in, whether you want to include 3D or drawing management tools (not in AutoCAD LT), and which template you want to use to start new drawings. AutoCAD then creates a new workspace named (what else?) Initial Setup Workspace and a new profile named ... (I don't need to tell you that, do I?). You can create multiple initial setups (sounds oxymoronic, doesn't it?) through the Options dialog box. By default, AutoCAD 2010 opens in this new Initial Setup Workspace.
Note
A profile is a collection of settings including support file paths, drawing window colors, default file format to save to, and a whack of other user preferences. Profiles are handy if more than one person works on your computer, or for different support paths for different clients. You create or modify profiles in the Options dialog box, which you can access from the Application Menu. Note that AutoCAD LT does not support profiles.
Because there are so many possible permutations of the Initial Setup Workspace, for this book I use the 2D Drafting & Annotation workspace instead, and if you want to follow along, I recommend you do the same by following these steps:
Click the Workspace Switching button at the bottom right of the AutoCAD window.
AutoCAD 2010 displays the name of the current workspace on the button. Clicking the button displays a menu listing all available workspaces (see Figure 2-1).
Choose 2D Drafting & Annotation from the menu.
Depending on what you selected during initial program setup, AutoCAD turns on or off Ribbon panels and, in a few seconds, settles down to the standard 2D Drafting & Annotation workspace.

If you've been away from AutoCAD for a while, you may be asking, "Where are my toolbars? Where is my menu?" Unlike older Windows programs, AutoCAD 2010 sports just one toolbar — the Quick Access toolbar on the application title bar, right next to the Application button (known informally as the Big Red A) — and doesn't sport a menu bar in this environment. Instead, the 2D Drafting & Annotation workspace sports two major interface items:
Note
The Application Menu: Clicking the Application button at the top-left corner of the AutoCAD window opens AutoCAD 2010's Application Menu. Unlike AutoCAD 2009's menu browser, which replicated the entire pull-down menu system, AutoCAD 2010's Application Menu presents file-related commands only; here you can create new drawings, open existing drawings, save files, or print your masterpieces.
The Ribbon: The Ribbon replaces the menus, toolbars, many of the palettes, and the dashboard of earlier releases. Where the Application Menu focuses on file management, the Ribbon is where you find commands to create and modify drawing objects. The Autodesk programmers made a best guess at a task-based approach to drafting and organized the old interface items into panels of related tools.
I discuss both of these items in more detail in the following sections. For the dyed-in-the-wool traditionalists, you can reset the AutoCAD 2010 environment so it looks pretty much like it did in AutoCAD 2008. I show you how a little later in the chapter.
Whether you're a total newcomer, an experienced user from a few releases back, or an AutoCAD 2008 or 2009 ace, I can guarantee that finding your way around AutoCAD 2010 is going to be a challenging experience.
If you're already familiar with the Microsoft Office 2007 suite, you may recognize some program features, such as the Ribbon and the Application Menu, which you use for choosing commands or changing system settings. But even if AutoCAD's new look does seem a little familiar in places, many aspects of the program's appearance — and some of the ways in which you work with it — are quite different from other Windows programs. Depending on the workspace you've chosen to use, you can, in many cases, tell the program what to do in at least five ways — pick a toolbar button, pick from a pull-down menu, pick a tool button from a Ribbon panel, type on the keyboard, or pick from a right-click menu — none of which is necessarily the best method to use for every task.
Tip
Slick as they are, Ribbon panels and browsing through the Application Menu aren't always the most efficient way of doing things. When you want to get real work done, you need to combine the Ribbon panels with other methods — especially entering options with the keyboard or choosing them from the right-click menus. I show you how throughout this book.
Note
As I explain at the beginning of this chapter, the first time you start AutoCAD 2010, the program opens by default in the Initial Setup Workspace, but I suggest you switch to the 2D Drafting & Annotation workspace while you read this book.
Note
A workspace is a collection of menus, palettes, toolbars, and/or Ribbon panels tailored for specific tasks, such as 3D modeling or 2D drafting.
After that, AutoCAD remembers which workspace you last used and opens in that one. Either three or four standard workspaces are created when you install AutoCAD 2010 (make that either two or three with AutoCAD LT 2010):
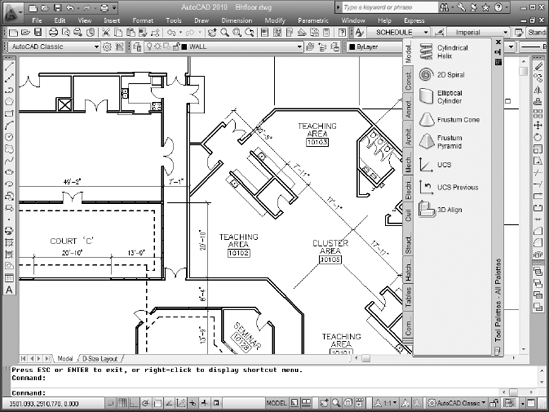
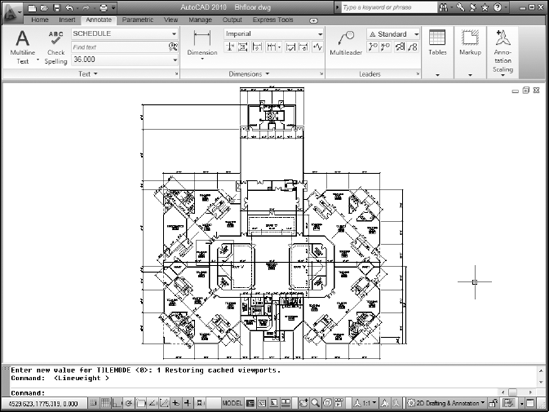
2D Drafting & Annotation: This workspace (as shown in Figure 2-2) is configured for a 2D drafting environment, with Ribbon tabs and panels optimized for technical drawing in two dimensions.
3D Modeling: This Ribbon-based workspace is configured for a 3D modeling environment, with navigation, visualization, and modeling tools suitable for working in 3D. This workspace isn't included in AutoCAD LT because LT doesn't do 3D.
AutoCAD Classic: This workspace is configured for a 2D drafting environment, with toolbars and tool palette arrangements similar to those in AutoCAD 2008 and earlier. In AutoCAD LT this workspace is called AutoCAD LT Classic.
Initial Setup Workspace: This workspace is created if you (or whoever installed your AutoCAD) answer a series of questions about the type of drafting you do during program installation. If you skip this routine, the workspace is not created.

Whether you're running AutoCAD 2010 in Windows Vista or XP, most of AutoCAD's default screen (refer to Figure 2-2) is pretty different from traditional Windows fare. Yes, you have title bars and a status bar, but the rest of the interface might look foreign. I cover the familiar stuff first.
Like most Windows programs, AutoCAD has a title bar at the top of its application window that reminds you which program you're in (not that you'd ever mistake the AutoCAD 2010 window for, say, FreeCell — or even AutoCAD 2008!).
At the right side of the program title bar is the standard set of three Windows control buttons: Minimize, Maximize/Restore, and Close.
Each nonmaximized drawing window within the AutoCAD program window has its own title bar, as shown in Figure 2-3. You can use the control buttons on a drawing window's title bar to minimize, maximize/restore, or close that drawing instead of the entire AutoCAD program.
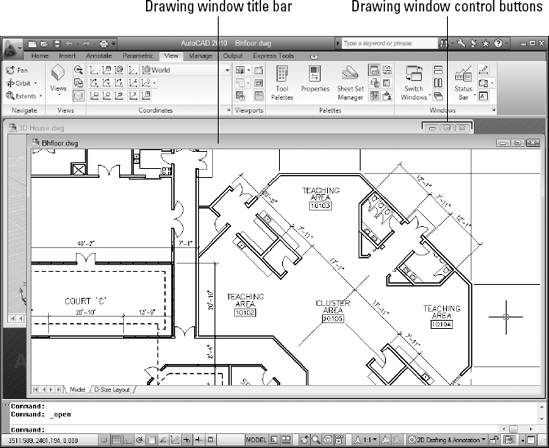
As in other Windows programs, if you maximize a drawing's window, it expands to fill the entire drawing area. In AutoCAD 2010's 2D Drafting & Annotation workspace, a maximized drawing window's control buttons have migrated south, from the menu bar (which isn't there anymore) to the upper-right corner of the drawing area itself. To unmaximize (restore) the drawing so that you can see any other drawings that you have open, click the lower Restore button.
The program title and drawing name are centered in the title bar instead of being off to the left, beside a program icon. The AutoCAD title bar also has a couple of devices added to it:
InfoCenter: Forced out of its old home in the menu bar to a new location at the right side of the program title bar, this is Information Central for AutoCAD. Type a keyword and click the binoculars for more information, or click the satellite dish to connect to the Communication Center and check for updates.
You can save InfoCenter topics to a Favorites list, and you can access or sign up for the AutoCAD Subscription Center (alas, not included in the price of admission). Access to the online help is via the question-mark button at the end of the InfoCenter panel.
Quick Access toolbar: This permanent toolbar (the only one common to all workspaces) contains frequently used commands in an easily accessible location. You can add and remove tool buttons by clicking the down arrow at the right end of the Quick Access toolbar and selecting or deselecting the ones you want to add or remove, respectively.
Tip
If you're floundering around looking for the commands you used to be able to find, a life preserver is hiding in the drop-down menu at the right end of the Quick Access toolbar. Click Show Menu Bar, and the old familiar classic menu appears above the Ribbon.
Note
The Application Menu is accessible from all workspaces. Where AutoCAD 2009's Menu Browser (which lived in the same place) basically duplicated the classic pull-down menu structure, AutoCAD 2010's Application Menu follows Microsoft's Fluent User Interface (or FUI — honest!) and places file management commands here, and places all drawing and editing commands on the Ribbon. The Application Menu is divided into ten categories, as follows:
New: Create a new drawing from a list of templates or create a new sheet set (not in AutoCAD LT, and in any case, I don't cover sheet sets in this book).
Open: Open an existing drawing or sheet set for editing, or import data from a MicroStation DGN file into a new AutoCAD drawing.
Save: Save the current drawing in the current location; if the current drawing hasn't been saved, you're prompted for a filename and a location.
Save As: Save the current drawing to a new filename and/or location and make the newly named or located file the current drawing. Also save the drawing as a template (DWT) or standards (DWS) file, or export a paper space layout to a new drawing.
Export: Save the current drawing to a variety of Design Web Format (DWF) files, or a PDF, a DGN or another file format. I discuss these formats in Chapters 18 and 20.
Print: Print a single drawing or multiple drawings, create or modify named page setups, and manage plotters and plot styles (I cover most of these operations in Chapter 16).
Publish: Send a 3D model to an outside 3D printing service or create an archived sheet set. AutoCAD LT doesn't support 3D or sheet sets, and neither of these topics is covered in this book.
Send: E-mail the current drawing file or create a Zip file containing the current drawing and any associated files needed to display the drawing completely (most often, those associated files are external references, which I introduce in Chapter 18).
Drawing Utilities: Set file properties or drawing units; purge unused blocks, layers, and styles from the current drawing; and audit or recover damaged drawings.
Close: Close the current drawing or close all drawings. If any drawings have been changed, you're prompted to save before AutoCAD closes the file.
In addition to the Application Menu's actual file menu items, a few other features are worth a mention:
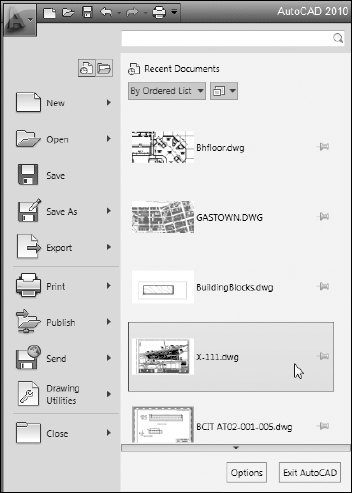
Recent Documents: If you choose this option, the right pane displays a list of drawings you've recently edited but that aren't currently open. You can show them in a simple list or as thumbnail images, as shown in Figure 2-4. You can also pin them to stop them from scrolling off the list. Naturally enough, clicking one of the icons opens the drawing.
Open Documents: Choose this option to see what's already open, and click an item to switch to it. This is equivalent to pressing Ctrl+Tab to switch between open documents in any Windows program and works the same basic way as the new Quick View Drawings feature, described in the "Looking for Mr. Status Bar" section, later in the chapter.
Options: Click this button to open the Options dialog box, where you can make hundreds of system settings. You can also open Options by typing OP (the alias for the OPTIONS command).
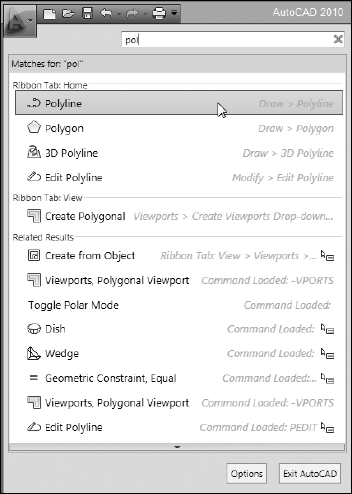
Search: If you're not sure of a command name or you want help on a topic, just start typing in the Application Menu's search bar. AutoCAD 2010 very quickly displays a categorized list, complete with links to start commands or to access the online help (see Figure 2-5).
It's a whole new racetrack in AutoCAD 2010. In AutoCAD 2008 and prior releases, you bounced around a bunch of palettes, toolbars, and dashboard panels to find the commands you wanted. Now everything (well ... almost everything) lives in one place: the Ribbon.
The primary interface element in both the 2D Drafting & Annotation and 3D Modeling workspaces is the Ribbon, an adjustable area that contains different collections of tabbed, task-oriented collections of panels. Some panels — those marked with a little black triangle on the panel label — have more tools concealed on a slideout (see Figure 2-6). Click the panel label to open the slideout. You can click the pushpin icon to pin open the slideout — otherwise, it will slide away home after you click a button.
Note
In AutoCAD 2010, you can click-and-drag a Ribbon panel and pull it into the drawing area. So if, for example, you find yourself doing a whack of dimensioning, but you also want to move away from the Annotate tab to other Ribbon tabs, you can drag the Dimensions panel into the drawing, and it will stay put, even as you switch to other panels or tabs. Just be sure to put it back where it came from when you're finished with it (as your mom used to say).
Autodesk's programmers see the Ribbon as an alternative way of interacting with the program. Theoretically, the Ribbon eliminates the need for menus and separate toolbars, although the change-averse may think otherwise. The Ribbon is fully customizable, but I don't get into customizing AutoCAD in this book — if you want to find out more, check out the Customization Guide in the AutoCAD 2010 online help.
By default, the Ribbon is docked at the top of the screen, but it can be docked against any edge, anchored to the left or right side of the AutoCAD window, or floated. To gain some screen space, you can click the little white button to the right of the last tab on the Ribbon's tab bar to minimize the Ribbon, first to tabs and panel labels, and then to tabs only. Click one more time to revert to the full Ribbon.
Instead of menus of grouped commands like Draw, Modify, Insert, and so forth, the tabs are organized by task as follows:
Home: The Home tab contains Draw, Modify, Layers, Annotation, Block, Properties, Utilities, and Clipboard panels. Some panels may be displayed as collapsed depending on your screen resolution (the Annotation Scaling panel at the right end of the Annotate tab in Figure 2-6 is in a collapsed state). I cover most of the commands in these panels in other parts of the book.
Insert: This tab groups Block and Reference panels, as well as Import commands and a series of commands for working with nongraphical information, including fields and data links. I do cover blocks (Chapter 17) and external references (Chapter 18), but importing and data tools are beyond the scope of this book and aren't covered.
Annotate: The Annotate tab expands on the minimalist Annotation panel on the Home tab, with many more options for creating text, dimensions, leaders, and tables, as well as markup functions and a few annotation scaling tools.
Note
Parametric: This new tab is home for one of AutoCAD 2010's best new features — parametric drawing. You can apply geometric or dimensional parameters or constraints to drawing objects so that, say, two circles are always concentric or the length of a rectangle is always twice its width. (AutoCAD LT is limited in this department: You can modify or delete existing constraints, but you need the full version to create them.) I introduce parametric drawing in Chapter 19.
View: The View tab contains tools and panels for controlling drawing display, working with user coordinate systems and viewports, loading various palettes, and organizing Windows functions such as cascading open files or displaying different parts of the application window. I explain viewports in Chapter 5 but don't address the other functions in this tab. For most 2D drafting, you seldom need to change the user coordinate system, and most functions in the other panels are more conveniently handled in other parts of the program.
Manage: This tab contains panels that access the Action Recorder, CAD Standards (neither of which is in AutoCAD LT), and a set of drawing management and customization tools. I don't cover anything on the Manage tab in this book.
Output: Panels on this tab let you get those drawings off your hands by printing, publishing, or simply sending them electronically to others. I cover some of these functions in Chapter 16. Autodesk Seek is a replacement for Content Search in AutoCAD 2009; after it's set up, it lets you link to various manufacturers' Web sites and download AutoCAD-compatible files.
Tip
The Export to Impression panel on the Output tab is usable only if you're a subscription customer, and then only for the full version of AutoCAD (not AutoCAD LT). So for many people, this panel is a waste of space. You can hide it by right-clicking the panel label and then choosing Panels and deselecting Export to Impression.
Express Tools: The Express Tools are an invaluable set of custom commands that will streamline your work procedures in pretty well every aspect of AutoCAD. They're officially unsupported, but they've been an install option for many releases now, and mostly, they work very well. You get this tab only if you have the full version of AutoCAD — the Express Tools are not available in AutoCAD LT.
Going for that classic look
Like it or not, the Ribbon-based interface isn't going to go away any time soon. I didn't care for the 2D Drafting & Annotation workspace when it first showed up in AutoCAD 2007, but thanks to the Ribbon, I'm now sold on it. AutoCAD 2010's 2D Drafting & Annotation workspace is where I spend most of my time, and that's what nearly all the figures in this book show.
Unlike Microsoft's Office 2007 suite, which dragged longtime users kicking and screaming into the new Fluent User Interface, AutoCAD users can stay with the old interface. The easiest way to go back to the future is to switch workspaces using (what else?) the Workspace Switching button on the status bar. Select AutoCAD Classic, and presto — this is (almost) your father's AutoCAD! You end up with a menu bar; some familiar-looking toolbars docked to the top, left, and right sides of the drawing area; and a floating tool palette near the middle of the display.
The new interface lets you add bits of the old one, too. You can display the classic drop-down list by clicking the down arrow at the right end of the Quick Access toolbar and choosing Show Menu Bar. It's slightly trickier displaying classic toolbars, but the most straightforward way — assuming that you know the name of the toolbar you want to open — is to type –TOOLBAR (don't omit the hyphen!) and press Enter; then type the name of the toolbar (for example, LAYERS) and press Enter again.
For the rest of the book I focus on 2D drafting, by far the easiest way of getting your feet wet with AutoCAD. (Just don't be dripping water on your computer.) And if you're not back there already, I suggest that you use the Workspace Switching button to return to the 2D Drafting & Annotation workspace. After you make the switch, AutoCAD displays the interface shown earlier in Figure 2-2.
Like all good Windows programs, AutoCAD has tooltips, those short descriptions that appear in little text boxes when you hover the mouse pointer over a button. In AutoCAD 2010, tooltips display two levels of information. When you hover the mouse pointer over a tool button, you first see a quick identification of the command. If you keep hovering, a longer description of the icon's function, often with a graphic image, appears in an extended tooltip. Helpful as they are when you're starting with AutoCAD, you'll probably want to remove these training wheels sooner or later. You can do so in the Options dialog box. (See the online help for more information.)
The application status bar (see Figure 2-7) appears at the bottom of the AutoCAD screen. The status bar displays and allows you to change several important drawing modes, aids, and settings that affect how you draw and edit in the current drawing. I introduce them in this section.
You can set status bar buttons to display icons or the traditional text labels that will be familiar to users of previous versions. To switch from one style to the other, right-click any of the drawing mode buttons at the left side of the status bar and select or deselect Use Icons.
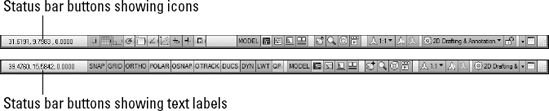
Some of these status bar settings won't make complete sense until you've used the AutoCAD commands that they influence, but here's a brief description, with references to detailed descriptions of how to use each setting, starting at the left end of the status bar (and note that not all buttons are displayed at all times, so Figure 2-7 doesn't show all the buttons listed):
Coordinates of the crosshairs: The coordinates readout displays the current X,Y,Z location of the crosshairs in the drawing area, with respect to the origin point (whose coordinates are 0, 0, 0). Chapter 7 describes AutoCAD's coordinate conventions and how to use this area of the status bar.
Tip
If the coordinates in the lower-left corner of the screen are grayed out, coordinate tracking is turned off. Click the coordinates so that they appear in dark numbers that change when you move the crosshairs in the drawing area.
SNAP, GRID, and ORTHO mode: These three buttons control three of AutoCAD's tools that help with precision drawing and editing:
See Chapter 4 for instructions on how to configure these modes and Chapter 7 for information about why, when, and how to use them in actual drawing operations.


When you turn on running object snap, AutoCAD continues to hunt for object snap points. Chapter 7 contains detailed instructions on how to use this feature.
When you turn on object snap tracking, AutoCAD hunts in a more sophisticated way for points that are derived from object snap points. Chapter 7 briefly describes this advanced feature.


As I describe in the section "Down the main stretch: The drawing area," later in this chapter, AutoCAD's drawing area is composed of two overlapping environments: Model space is where you create your model geometry, and paper space is where you compose your drawing sheet to document that geometry. Clicking this button when the Model tab is active (that is, you're in full-screen model space) switches you to a paper space layout. A completed layout includes viewports, which reveal the objects in model space at a particular scale. (I tell you more about viewports and layouts in Chapter 5.) After you switch to a paper space layout, clicking this button toggles between paper space and model space within the layout. The button label switches from MODEL to PAPER to show you which space you're in.


The next six buttons control the size and appearance of AutoCAD's annotative objects — things like text, dimensions, hatching, and so forth. Annotative objects are complex, so don't worry if you don't understand at this point — remember, in this chapter, I'm just showing you what the buttons do. Because annotative objects means text more than anything else, I explain this feature in Chapter 13.
The remaining status bar icons, with the exception of Clean Screen at the very end, live in a special area of the status bar called the tray. The tray displays icons that represent drawing services, and most do not appear at all times. These tray icons include


Status Bar Menu: When you click the easy-to-miss, downward-pointing arrow near the right end of the status bar, you open a menu with options for toggling off or on each status bar button. Now you can decorate your status bar to your taste. You can also turn on the drawing status bar. Doing so moves the three annotation scaling buttons described above to a separate drawing-specific status bar. (My personal preference is to leave it turned off.)

Several status bar buttons, including Snap, Polar Tracking, Object Snap, and Object Snap Tracking, sport right-click menus that offer a speedier way of setting options. With some of the other buttons, such as Grid and Dynamic Input, you right-click the button and choose Settings to open the Drafting Settings dialog box to specify options. Chapters 4 and 6 give you specific guidance about when and how to change these settings.
The infamous command window (or command line, or command prompt, or command area, whatever you want to call it), shown in Figure 2-8, is a throwback to the dark ages of AutoCAD. It puzzles newcomers and delights AutoCAD aficionados. Despite the promise of AutoCAD's heads-up dynamic input, for now at least, the hard truth is that you have to come to like — or at least tolerate — the command window if you want to become at all comfortable using AutoCAD.
You should cotton on and cozy up to the command window because it's still AutoCAD's primary communications conduit with you. AutoCAD sometimes displays prompts, warnings, and error messages in the command window that dynamic input doesn't show — there simply isn't room in the dynamic input tooltip to show as much information as you get at the command window. True, when using dynamic input, you can press the down-arrow key to see more options. But which is less efficient: moving your eyes down the screen to glance at the command window or taking your eyes right off the screen to find the down-arrow key on your keyboard?
Despite (or is it because of?) AutoCAD's long heritage as the most successful CAD software for personal computers, newcomers are still astonished at the amount of typing they have to do. Some more-modern programs have much less dependency on the keyboard than AutoCAD, but as you get used to it, you'll find that no other input method gives you as much flexibility as pounding the ivories ... oops, wrong keyboard!
Typing at your computer's keyboard is an efficient way to run some commands and the only way to run a few others. Instead of clicking a button or a menu choice, you can start a command by typing the command name and then pressing Enter. Even better, for most common commands, you can type the keyboard shortcut for a command name and press Enter. Most of the keyboard shortcuts (called aliases) for command names are just one or two letters — for example, L for the LINE command and CP for the COPY command. Most people who discover how to use the shortcuts for the commands that they run most frequently find that their AutoCAD productivity improves noticeably. Even if you're not worried about increasing your productivity with this technique, several everyday commands are nowhere to be found on the Ribbon. If you want to run those commands, you have to type them!
Tip
Not all command aliases are as obvious as L for LINE (for example, CP for COPY or — believe it or not — T for MTEXT). To see a complete list of command aliases, look in the AutoCAD (or the AutoCAD LT) Program Parameters (PGP) file by going to the Manage tab and clicking Edit Aliases on the Customization panel. Windows Notepad opens with the acad.pgp (or acadlt.pgp) file loaded. Scroll down to the section headed "Sample aliases for AutoCAD commands." I don't recommend changing anything, but it's a good idea to print this file and pin up the aliases section over your desk.
After you've started a command — whether from a Ribbon panel tool button or by typing — the dynamic input tooltip and the command window are where AutoCAD prompts you with options for that command. You activate one of these options by typing the uppercase letter(s) in the option and pressing Enter.
Tip
In many cases, you can activate a command's options by right-clicking in the drawing area and choosing the desired option from the menu that appears, instead of by typing the letter(s) for the option and pressing Enter.
Warning
I like dynamic input. Really, I do. But sometimes it fights with normal command input, and that can make things really confusing. In the following chapters, I tell you when to be wary.
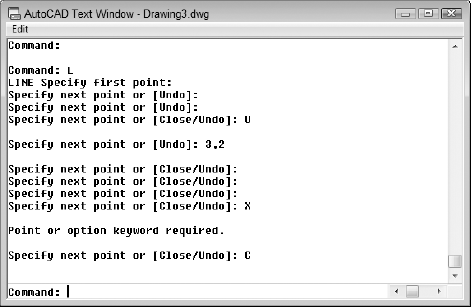
The following sequence demonstrates how you use the keyboard to run commands and to view and select options. If you have dynamic input toggled on, your results are going to be different from what I say, so I suggest you click the DYN button to turn it off, temporarily at least. In the following steps, watch the command window, and pay attention to messages from AutoCAD:
Type L and press Enter.
AutoCAD starts the LINE command and displays the following prompt in the command window:
LINE Specify first point:
Click a point anywhere in the drawing area.
The command window prompt changes to
Specify next point or [Undo]:
Click another point anywhere in the drawing area.
AutoCAD draws the first line segment.
Click a third point anywhere in the drawing area.
AutoCAD draws the second line segment and prompts
Specify next point or [Close/Undo]:
The command line now displays two options, Close and Undo, separated by a slash.
Type U and press Enter.
AutoCAD undoes the second line segment.
Type 3,2 (without any spaces) and press Enter.
AutoCAD draws a new line segment to the point whose X coordinate is 3 and Y coordinate is 2.
Click several more points anywhere in the drawing area.
AutoCAD draws additional line segments.
Type X and press Enter.
X isn't a valid option of the LINE command, so AutoCAD displays an error message and prompts you again for another point:
Point or option keyword required.
Specify next point or [Close/Undo]:
Note
Option keyword is programmer jargon for the letter(s) shown in uppercase that you type to activate a command option. This error message is AutoCAD's way of saying, "I don't understand what you mean by typing X. Either specify a point or type a letter that I do understand."
Type C and press Enter.
AutoCAD draws a final line segment, which creates a closed figure and ends the LINE command. A blank command line returns, indicating that AutoCAD is ready for the next command:
Command:
AutoCAD displays the AutoCAD Text Window, which is simply an enlarged, scrollable version of the command window, as shown in Figure 2-9.
Tip
The normal three-line command window usually shows you what you need to see, but occasionally you want to review a larger chunk of command-line history ("What was AutoCAD trying to tell me a minute ago?!").
Press the F2 key again.
AutoCAD closes the AutoCAD Text Window.
Here are a few other tips and tricks for effective keyboarding:
Use the Esc key to bail out of the current operation. Sometimes you might get confused about what you're doing in AutoCAD and/or what you're seeing in the command window or the dynamic input tooltip. If you need to bail out of the current operation, just press Esc one or more times until you see a blank command line —
Command:at the bottom of the command window, with nothing after it. As in most other Windows programs, Esc is the cancel key. Unlike many other Windows programs, AutoCAD keeps you well informed of whether an operation is in progress. The blank command line indicates that AutoCAD is resting, waiting for your next command.Press Enter to accept the default action. Some command prompts include a default action in angled brackets. For example, the first prompt of the POLYGON command is
Enter number of sides <4>:
Note
The default here is four sides, and you can accept it simply by pressing Enter. (That is, you don't have to type 4 first.)
AutoCAD uses two kinds of brackets when it prompts.
Command options appear in regular square brackets:
[Close/Undo].To activate a command option, type the letter(s) that appear in uppercase and then press Enter. The dynamic input tooltip doesn't display options in brackets; instead, you press the down-arrow key to display additional command options in rows next to the crosshairs.
A default value or option appears in angled brackets:
<4>.To choose the default value or option, simply press Enter. Default values in angled brackets appear in both the dynamic input tooltip and the command-line prompts.
Tip
You don't always have to press the Enter key to forward your input to AutoCAD. Depending on what you're doing, you can often right-click and pick Enter from the top of the shortcut menu. And most efficient of all, even for the most inept typists, you can use the spacebar as an Enter key — as long as you're not entering text.
Watch the command line. You can discover a lot about how to use the command line simply by watching it after each action that you take. When you click a toolbar button or menu choice, AutoCAD types the name of the command automatically and displays it in the dynamic input tooltip and at the command line. If you're watching the command line, you'll absorb the command names more or less naturally.
Note
When AutoCAD echoes commands automatically in response to your toolbar and menu clicks, it usually adds one or two extra characters to the front of the command name:.
AutoCAD usually puts an underscore in front of the command name (for example,
_LINEinstead ofLINE). The underscore is an Autodesk programmers' trick that enables non-English versions of AutoCAD to understand the English command names that are embedded in the menus.AutoCAD sometimes puts an apostrophe in front of the command name and any underscore (for example,
'_ZOOMinstead ofZOOM). The apostrophe indicates a transparent command; you can run the command in the middle of another command without canceling the first command. For example, you can start the LINE command, run the ZOOM command transparently, and then pick up where you left off with the LINE command.
Leave the command line in the default configuration. The command window, like most other parts of the AutoCAD screen, is resizable and movable. The default location (docked at the bottom of the AutoCAD screen) and size (three lines deep) work well for most people. Resist the temptation to mess with the command window's appearance — at least until you're comfortable with using the command line.
Right-click in the command window for options. If you right-click in the command window, you see a menu with some useful choices, including Recent Commands — the last six commands that you ran.
Press the up- and down-arrow keys to cycle through the stack of commands that you've used recently. This is another handy way to recall and rerun a command. Press the left- and right-arrow keys to edit the command line text that you've typed or recalled.
Note
Most Windows users are familiar with Alt-key shortcuts. Press the Alt key in traditional Windows programs, and your menu bar lights up with one character of each menu item underlined. You type the underlined letter to open the menu or execute the command. AutoCAD 2010's implementation of the Fluent User Interface has an equivalent, called KeyTips, and they work in much the same way. In Figure 2-10, I've just pressed the Alt key. If I tap the A key now, the Annotate tab will open with a new set of KeyTips, and I can keep tapping the keys to execute a specific command.
Palettes are refined (well-mannered) versions of dialog boxes. Unlike regular dialog boxes, which insist on your undivided attention as long as they're open, palettes stay discreetly in the background as you carry on with other tasks. AutoCAD still has many dialog boxes, but over the past several releases, quite a few former dialog boxes have been replaced by palettes.
AutoCAD 2010 contains more than a dozen palettes (more than a half-dozen in AutoCAD LT). Unless noted otherwise, you can open any of these palettes from the Palettes panel of the View tab. The more commonly used palettes are
Properties and DesignCenter: These two palettes are used to control object properties and named objects (layers, blocks, and so on), respectively. Chapter 6 shows you how.
Tool Palettes: Each tool palette holds content (drawing symbols and hatch patterns) and/or commands (not regular AutoCAD commands — what would be the point? — but macros that make commands do specific things) instead of paints. You can create your own tool palettes, but the ones that come with AutoCAD contain dozens of symbols you can drag into your drawing — check 'em out!
Sheet Set Manager: Provides tools for managing all of a project's drawings as a sheet set. Chapter 5 gives you some brief theory on why you might want to use sheet sets and how to do so. (AutoCAD LT does not support sheet sets.)
External References: Used to attach external files to the current drawing; file types include raster images, Drawing Web Format (DWF, or DWFx) files, PDF files, MicroStation DGN files, and other drawing files. I discuss attaching external reference files in Chapter 18.
Markup Set Manager: Displays design and drafting review comments from users of Autodesk Design Review. For more information on markup sets, see the online help.
QuickCalc: A handy pushbutton scientific calculator that hides out on the Home tab's Utilities panel. You'll know if you need this.
Layer Properties Manager: The main control center for managing the layers on your drawing had been basically unchanged for the past 15 years. AutoCAD 2009 palettized the Layer Properties Manager so it not only stays open while you're doing other things, but also applies any changes you make instantly in the drawing. The Layer Properties Manager can be found on the Layers panel of the Home tab.
Tip
Using the View and Home tabs is one way of opening palettes. Alternatively, several palettes have keyboard shortcuts. You can toggle these by pressing Ctrl+1 (Properties), Ctrl+2 (DesignCenter), Ctrl+3 (Tool Palettes), Ctrl+4 (Sheet Set Manager), Ctrl+7 (Markup Set Manager), or Ctrl+8 (QuickCalc).
After all these warmup laps, you're probably itching for the main event — the AutoCAD drawing area. This is where you do your drawing, of course. In the course of creating drawings, you click points to specify locations and distances, click objects to select them for editing, and zoom and pan to get a better view of what you're working on.
Most of this book shows you how to interact with the drawing area, but you should know a few things up front.
One of the initially disorienting things about AutoCAD is that finished drawings can be composed of objects drawn in different spaces, which AutoCAD indicates with either two status bar buttons, or two or more tabs at the bottom left of the drawing area:
Model space is where you create and modify the objects that represent things in the real world — walls, widgets, waterways, or whatever.
Paper space is where you create particular views of these objects for plotting, usually with a title block around them. Paper space comprises one or more layouts, each of which can contain a different arrangement of model space views and different title block information.
When you click the Model button on the status bar, or the Model tab, you see pure, unadulterated model space, as shown in Figure 2-11. When you click the Layout button, you see a paper space layout, as shown in Figure 2-12. A completed layout usually includes one or more viewports, which are windows that display all or part of model space at a particular scale. A layout also usually includes a title block or other objects that exist only in the layout and don't appear when you click the Model tab. (Think of the viewport as a window looking into model space and the title block as a frame around the window.) Thus, a layout displays model space and paper space objects together, and AutoCAD lets you draw and edit objects in either space. See Chapter 5 for information about creating paper space layouts and Chapter 16 for the lowdown on plotting them.
When a layout is current, you can move the crosshairs back and forth between model space and paper space while remaining in the layout. You can't be in both spaces at the same time, however; if paper space is current, you can click directly over a model space object, but it won't be selected. Similarly, if model space is current, you can't select anything in paper space. To move between the two spaces, double-click inside a viewport to switch to model space or outside a viewport to switch to paper space.
Tip
This back-and-forth double-clicking is necessary only when you're drawing things while viewing one of the paper space layouts or adjusting the view of the drawing objects within the viewport. In practice, you probably won't draw very much using this method. Instead, you'll do most of your drawing on the Model tab, and after you've set up a paper space layout, click its layout tab only when you want to plot.

Here are a few other things to know about the AutoCAD drawing area:
Efficient, confident use of AutoCAD requires that you continually glance from the drawing area to the command window (to see those all-important prompts!) and then back up to the drawing area. This sequence is not a natural reflex for most people, and that's why the dynamic input tooltip at the crosshairs was introduced. But you still get information from the command line that you don't get anywhere else. Get in the habit of looking at the command line after each action that you take.
Clicking at random in the drawing area is not quite as harmless in AutoCAD as it is in many other Windows programs. When you click in the AutoCAD drawing area, you're almost always performing some action — usually specifying a point or selecting objects for editing. Feel free to experiment, but look at the command line after each click. If you get confused, press Esc a couple of times to clear the current operation and return to the naked command prompt.
In most cases, you can right-click in the drawing area to display a menu with some options for the current situation.
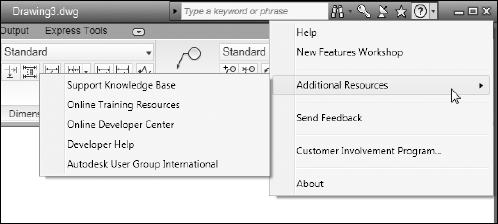
The full AutoCAD 2010 Help menu is accessible only as a drop-down list on the program title bar (as always, pressing F1 at any time opens the online help window). Click the down arrow beside the question mark to open the menu (see Figure 2-13) to see what's available. I describe most of the help options here:
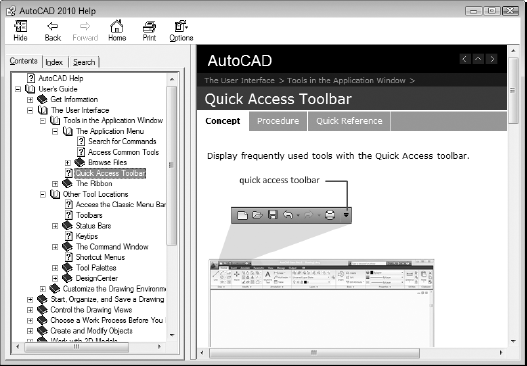
Help: The main AutoCAD 2010 online help system, as shown in Figure 2-14, uses the same help engine as the Microsoft Office programs, Internet Explorer, and other modern Windows applications. As with these other programs, AutoCAD's help is context-sensitive; for example, if you start the LINE command and just don't know what to do next, Help will . . . er, help. Click the Contents tab to browse through the various online reference manuals, click the Index tab to look up commands and concepts, and click the Search tab to look for specific words. In this book, I sometimes direct you to the AutoCAD online help system for information about advanced topics.
New Features Workshop: This describes the new and enhanced features in AutoCAD 2010. It's especially useful for people who are upgrading from a previous AutoCAD release.
Additional Resources: Most of the choices in the Additional Resources submenu connect you to various parts of Autodesk's Web site. The most useful is probably the Support Knowledge Base. From this link, you can search the Autodesk Knowledge Base, download software updates, and get help from Web- and newsgroup-based discussion groups.
Note
AutoCAD is one program with which you really need to take advantage of the online help resources. AutoCAD contains many commands, options, and quirks. (Alas, the quirks aren't listed in the online help.) Everyone from the greenest beginner to the most seasoned expert can find out something by using the AutoCAD online help. Take a moment to peruse the Contents tab of the main help system so that you know what's available. Throughout this book, I direct you to pages in the help system that I think are particularly useful, but don't be afraid to explore on your own when you get stuck or feel curious.