
Lesson Files | Lessons > Lesson_04 > 04_Desert_Theme.key Lessons > Lesson_04 > 04_Desert_Content.key Lessons > Lesson_04 > 04_Desert_End.key Lessons > Lesson_04 > Backgrounds Lessons > Lesson_04 > Theme Images |
Time | This lesson takes approximately 60 minutes to complete. |
Goals | Create a custom theme Create a slide with a media placeholder Save and share a theme Apply a new theme to an existing presentation |
Keynote ’09 includes more than 40 Apple-designed themes, but it also lets you customize existing themes or design a new one.
With a custom theme, you can combine a unique set of background images, fonts, colors, shapes, and table and chart styles to create a distinctive look for your slideshow. Whether you’re a company looking to reinforce its brand or a teacher reinforcing your students’ learning, a custom theme can strengthen your presentation.

What’s more, custom themes are easy to recycle. If you build a theme with customization in mind, you can update the look of an entire presentation with just a few mouse clicks. This makes it easy to personalize your presentation for each new audience and thereby improve the overall impact of your slideshow.
Keynote provides the tools to create uniquely themed presentations, whether you just want to tweak an existing theme’s colors and add a logo, or design one from scratch.
In this lesson, we’ll create our own custom theme from start to finish for a presentation about the deserts in the southwestern United States. Customizing a theme can be a bit intimidating at first, because Keynote offers lots of modification options and a wealth of components to use. However, the result is very rewarding and can become a big time-saver for your future projects.
Keynote never faces you with a completely blank canvas, because you choose a theme from the Theme Chooser whenever you open the application or create a new document (choose File > New in Theme Chooser).
To create a custom theme, we’ll begin by creating as blank a canvas as we can: a starter file. You can use any theme as a starting point; simply choose the theme that most closely matches the style you’d like to use, and delete the parts of the theme you don’t want.
We’ll use the Kyoto theme as the starting point for this exercise. This theme has a gently organic feel that suits our Southwest subject matter and includes several layouts with prominent photos.
Open Keynote; or, if Keynote is already open, choose File > New from Theme Chooser.
Choose the Kyoto theme. Set the size to 1280 × 720 pixels, and click Choose.
A new document is created based on the theme.
Choose View > Show Master Slides to see the master slides for this theme.
Master slides contain all of the layout options for a slide that you can use in a presentation.
In the master slide navigator, drag the resize handle down to see more of the slide masters.

You will remove a few masters from the theme to simplify it.
Select the Photo – Horizontal master and press Delete.
Repeat the selection and deletion commands for the following master slide types:
Title, Bullets & Photo
Title & Bullets – Left
Title & Bullets – Right
Choose File > Save. Name the file Desert Theme.key and save it to the Lesson_04 folder.
Now that we’ve got our blank Desert theme, the first step is to create a theme for our title slides. Opening each section of your presentation with a title slide helps your audience to follow your organization and signifies when you’re about to address a new topic.
In the master slide navigator, select the Title & Subtitle slide.
Open the Master Slide inspector and click Appearance.
Navigate to Lesson_04 > Backgrounds > BG_1.jpg, and click Open.
More Info
This new background was created using Adobe Photoshop Elements. The existing background from the Kyoto theme was exported as a visual reference, and then a photo of desert rock was added. You can use the graphics tool of your choice to create backgrounds.

Now that the background is updated, let’s tweak the text so that it better matches the color and style of the background.
Select the title text box.
Let’s change the text from all capitals to upper- and lowercase.
Choose Format > Font > Capitalization > None to remove any automated capitalization from the text.

Let’s change the text so that it is larger and easier to read.
In the format bar, set the font to Georgia, Bold, 90 pt.
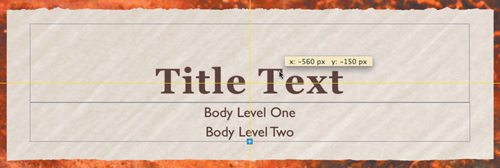
The text looks good, but the text box is not large enough to contain a two-line title.
Drag up the center selection handle at the top edge of the text box until the box is big enough to include two lines of text (a height of 200 px works well).

You may want to change the body text so that it is a better match for the title text.
Select the entire body level text box and change the font to Gill Sans, Regular, 36 pt.
Drag down the center selection handle at the bottom edge of the text box until the box is big enough for two lines of text (around 100 px in height).

The text is easier to read and a good match for the background. However, the text color could be a better match. Let’s change both text boxes at once.
Click the title text box. Shift-click the body text box to add this text to the selection.
In the format bar, click the Text Color well and choose Show Colors.
The Colors window opens; here you can specify a color. Let’s select a dark red from the background.
In the Colors window, click the magnifying glass icon and then select a dark red from the upper right corner of the slide.
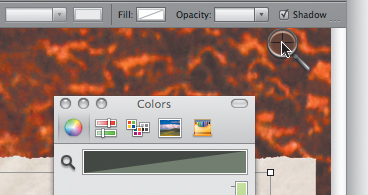
The text color updates. You can store the color for reuse later.
Drag the color into an empty square in the color palette at the bottom of the Colors window.

To complete this set of adjustments, center the text and review the slide.
Drag the two text boxes down at the same time until the alignment guides pop up to indicate vertical and horizontal alignment on the slide.
Because the two text boxes are both active, Keynote shows alignment guides based on both objects and their relationship to the entire layout.
Choose File > Save to save your work.
For more practice, you could update the next six master slides with the following changes:
Element | Background | Title | Body |
|---|---|---|---|
Title & Bullets | BG_2.jpg | Georgia Bold, cream color, 96 pt | Gill Sans, dark red color, 36 pt |
Title & Bullets – 2 Column | BG_2.jpg | Georgia Bold, cream color, 96 pt | Gill Sans, dark red color, 36 pt |
Bullets | BG_3.jpg | Gill Sans, dark red color, 36 pt | |
Blank | BG_4.jpg | ||
Title – Top | BG_2.jpg | Georgia Bold, cream color, 96 pt | |
Title – Center | BG_1.jpg | Georgia Bold, dark red color, 90 pt |
Another important slide master that you’ll frequently use is the Photo – Vertical master slide, which prominently features a single photo next to descriptive text. In this case, we’ll customize the Photo – Vertical master slide to display bullet points of information next to that same strong visual.
In the master slide navigator, select the Photo – Vertical master.
Open the Master Slide inspector and click Appearance.
Click Choose to select a file for the slide background. Navigate to Lesson_04 > Backgrounds > BG_3.jpg, and click Open.
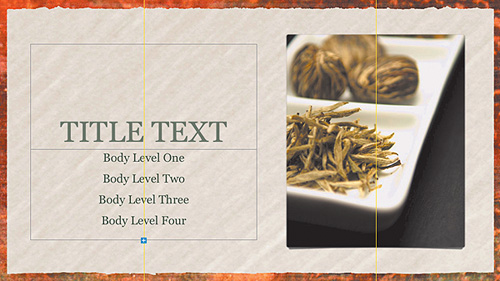
You can format the photo on the slide with something related to the theme.
On the canvas, select the photo and choose Insert > Choose.
Navigate to Lesson_04 > Theme Images > Rocks.jpg. Click Insert.
The image is added to the slide, but it needs to be resized and reformatted.
Note
The image on this master was defined as an image placeholder. If you add photos to a slide master that previously didn’t have placeholders, select the slide master and open the Master Slide inspector. (The Master Slide inspector will not open unless a master is selected.) Then choose the placeholder object and select the Define as Media Placeholder checkbox.
Open the Graphic inspector.
From the Stroke pop-up menu, choose Line.
From the Line Style pop-up menu, choose the rough line, located at the bottom of the menu.

Set the line’s color to the same dark red you stored earlier in the Colors window.
Choose a width of 15 px (pixels).
The picture is attractively formatted, but let’s make it a little larger.
Click the Edit Mask button.
Resize the mask to a width of approximately 450 px and a height of 625 px; then press Return.
Drag the photo so that it is centered vertically on the slide.

The picture is now sized correctly; next, let’s format the text to match the style we created earlier in the lesson.
Return to the Title & Subtitle master slide.
Click in the title text box.
Choose Format > Copy Style.
Return to the Photo – Vertical master slide and select the title text.
Choose Format > Paste Style.
The text updates to match the previously used formatting.
Resize the title text box to a height of 250 px.

Drag the text box until it’s aligned with the top of the photo.
Tip
If you don’t see alignment guides while lining up the top edges, choose Keynote > Preferences. Select the “Show guides at object edges” checkbox.

Now let’s format the bullet text on the slide.
Select the entire body level text box and change the font to Gill Sans, Regular, 36 pt. Make the font color the same dark red that you stored earlier.
In the format bar, click the Align Left button.

Let’s add bullets to the text and indent them.
Open the Text inspector and click Bullets.
From the Bullets & Numbering pop-up menu, choose Text Bullets and choose the first bullet from the pop-up list. Leave the Size field set to 125% so that the bullets are slightly larger than the text.
Set Bullet Indent to 15 px and Text Indent to 25 px so that a separation exists between the edge of the text box, the bullet, and the first character of text.

Select Body Level Two and enter a value of 40 px for Bullet Indent. Select Body Level Three and set Bullet Indent to 65 px. Then select Body Level Four and set Bullet Indent to 90 px.

The indentation is now very clearly presented, but let’s add some extra space between the bullet lines.
Choose Edit > Select All to select all of the text, then in the Text inspector, click the Text button to change the space between lines.
In both the Before Paragraph and After Paragraph fields, enter a value of 16 pt.

Resize the body text box so that the top edge touches the title text box.
Resize the body text box so that the bottom edge touches the bottom of the photo.

Choose File > Save to save your work.
Congratulations! You’ve formatted the background, a media placeholder, title text, and bullets for your custom theme. The skills you’ve used in this lesson can be applied to any master slides.
Thus far while building the custom theme, we’ve been saving it as a presentation file. Now it’s time to save the modifications we’ve made as a new custom theme.
Saving a theme allows you to apply your unique formatting to an existing presentation or to create an entirely new presentation based on that theme.
To save time, we’ll work with a fully designed version of the custom theme, which has been completed for you.
Close all Keynote documents (save your changes).
Choose File > Open, and navigate to the Lesson_04 folder.
Open 04_Desert_Theme.key.
This file contains final versions of all the master slides, along with a few sample slides.
Choose File > Save Theme.
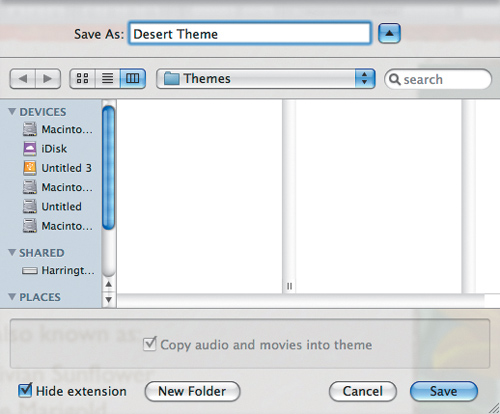
A sheet opens with the default Themes folder selected to store custom themes.
Name your theme Desert Theme. Click Save to save the theme.
The theme file is saved in your Themes folder and will appear near the bottom of the Theme Chooser when you first open Keynote or when you open the Theme Chooser.
After you’ve created a theme, be sure to back it up. Not only will you have a backup copy, but you can also share your theme more easily with other Keynote users.
In the Finder, locate your custom theme in Macintosh HD > Users > [your home folder] > Library > Application Support > iWork > Keynote > Themes.
Select Desert Theme.kth, and then drag the file to a removable device such as a hard drive or USB thumb drive , or to a connected server such as your iDisk. When your pointer turns into a + (plus sign), release the mouse button to copy the file to the backup drive.

The file is now backed up. You can also share it with other users by attaching it to an email or by lending them the drive.
Return to Keynote, save your work, and close all open Keynote files.
The customized theme file is ready and can be applied to an existing presentation. The text for this exercise has already been entered on slides. However, the slides are generic and require styling and images.
Choose File > Open, navigate to the Lesson_04 folder, and open 04_Desert_Content.key.
You can now apply a theme to this presentation.
Choose File > Choose Theme to open the Theme Chooser. Select the newly created Desert Theme and click Choose.
Custom themes appear near the bottom of the Theme Chooser.

The Desert Theme is applied to your presentation. Because the slide masters of both presentations used the same names (Bullets, Blank, and so on), Keynote matches the new formatting to the appropriate slide.
The slides now match the template. You may want to further customize the slides to complete your presentation. Here are a few suggested areas to tweak.
If text is too big to fit in a text box, select the text box, and in the format bar, select the Auto-shrink checkbox.

You can adjust the size of photos by dragging the selection handle above the Edit Mask button.
If you’d like to adjust which part of a photo is showing in the slide, double-click any masked image and drag the image to relocate it within its mask.
Choose File > Save to save your reformatted, custom presentation.