
Lesson Files | Lessons > Lesson_14 > Photos Lessons > Lesson_14 > 14_Event_Planner_Final.numbers |
Time | This lesson takes approximately 60 minutes to complete. |
Goals | Use a Numbers template Add media to a spreadsheet Use Address Book cards Edit and sort data Use steppers, sliders, and checkboxes Modify and save styles Publish to the Internet with iWeb |
When it comes to getting organized, Numbers and its many useful templates should be your starting point. You’ll find templates to help you organize home improvement projects, vacations, sports teams, and even your home inventory.
In this lesson, you’ll organize an event and learn how Numbers can integrate your contact information to build a list of guests. Then, you’ll calculate an event budget as Numbers helps you choose among several event options. You’ll also learn how to add graphics to improve the appearance of your spreadsheet. With the help of Numbers, let’s get organized.

The Template Chooser in Numbers includes many templates worth exploring. For this exercise, you will open the Event Planner template and use it to organize a wedding. You will modify the template to include custom images and data, and adjust the formatting of cells. Finally, you’ll publish your wedding spreadsheet to the Internet using iWeb.
To select a template:
Open Numbers, if necessary. If the Template Chooser is not open, choose File > New from Template Chooser.
Select a template. For this exercise, click the Personal category, and then, in the Template Chooser window, select Event Planner.
Click Choose to open a new document based on the template.
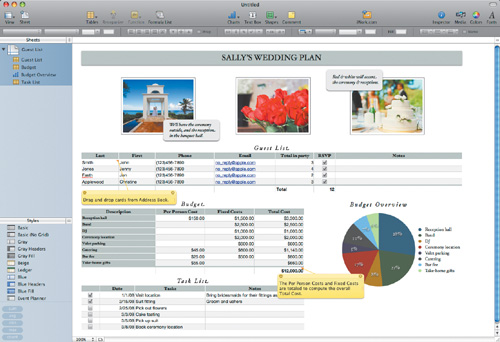
The template opens with placeholder text and images.
Double-click the placeholder text Sally’s Wedding Plan and change it to Martin & Lauren’s Local Reception.
Select the title text by dragging; then, in the format bar, click the Bold button.

Choose File > Save. Name the document Event_Planner.numbers and save it to your hard drive.
While spreadsheets often focus on data, Numbers ’09 also offers you a flexible graphics canvas. Using graphics, you can personalize a spreadsheet with a company logo, add custom shapes, or even insert relevant photos. As with the other iWork applications, you can use the Media Browser to add photos and movies to your spreadsheet.
Note
If you plan to share your spreadsheet as a Numbers file, you can insert rich multimedia such as audio and video that will be viewable by other Numbers users. For example, a movie or sound file could play if you double-click its icon. Adding media to your spreadsheet is a useful way to share clips for another person to review or to organize audio records.
Although the Media Browser is an easy tool for browsing photos, it’s not the only available browser. If you haven’t added photos to your iPhoto or Aperture library, you can also access them in the Finder and drag them directly into your spreadsheet.
Open a Finder window and navigate to the Lesson_14 folder. Open the Photos folder. The folder contains three photos for use in your spreadsheet.
Drag the first photo, Wedding 01.jpg, onto the first placeholder image at the top of your spreadsheet.

You can also change the placeholder images by using a menu command. Click the second image placeholder to select it.
Choose Insert > Choose and navigate to the second photo, Wedding 02.jpg, in the Lesson_14 folder.
Use either method to add a third photo, Wedding 03.jpg.
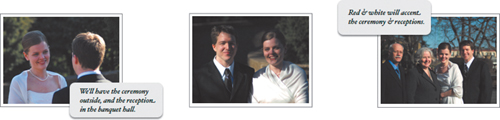
The spreadsheet now has three custom photos. The photo captions, however, should be updated.
Click inside the first rounded rectangle to replace the text. Type the text We invite you to celebrate our marriage.
Click inside the second rounded rectangle and type For those who couldn’t be in Washington, DC…celebrate with us locally.

Choose File > Save to save your work.
You can adjust the exposure, saturation, and other properties of an image without ever leaving Numbers. This flexibility allows you to make instant graphics changes when you see your images combined on the page. In this exercise, you’ll explore the Adjust Image window.
Click the second picture to select it.
Choose View > Show Adjust Image.
The Adjust Image window opens.

Drag the Adjust Image window to reposition it so that you can clearly see the entire image you want to modify.
Click the Enhance button to automatically adjust the image.
The Enhance function spreads the red, green, and blue tones evenly across the histogram and subtly fixes the image’s color balance.
Drag the Brightness slider to the right to increase the image’s white level.
A value of approximately 20 brightens up the image so that the faces are easier to see.
Drag the Contrast slider to the right to change the balance between the light and dark areas of the image.
A value of 16 keeps the image from looking washed out.
Drag the Saturation slider to the right to intensify the colors.
A value of 60 makes the trees and skin tones richer without looking artificial.

Before

After
Adjust the other two images to suit yourself, and then close the Adjust Image window.
In iWork, you can choose to enclose an image inside a graphical border. These borders are called picture frames, and they help draw attention to your photos and reduce visual clutter. The template applies a picture frame to the three photos, and you’ll customize that frame.
Click the first photo to select it.
Shift-click photos 2 and 3 to add them to the selection.
By selecting all three photos, you can adjust them simultaneously.
In the toolbar, click the Stroke pop-up menu.
Choose the picture frame thumbnail, and choose the black photo-corner-style frame. A simple frame is applied to all three images.

The frames for the three photos change. While the toolbar provides quick access to the picture frames, you can modify them in detail using the Graphic inspector.
Open the Graphic inspector and drag the Scale slider to 75% to reduce the size of the frames’ corners and border.

Save your work by choosing File > Save.
Numbers ’09 includes several templates that can use information from the Address Book application. By using contact information, Numbers can save you a lot of time when including contacts in your spreadsheets. Instead of retyping contact information, you can drag those contacts directly from Address Book.
For this lesson, you will add contact information from Address Book to your wedding reception spreadsheet. Because you are using your own contacts, your results won’t exactly match the figures in this exercise. If you haven’t yet added contacts to Address Book, you’ll have to enter seven or more contacts to perform this exercise.
Note
Numbers looks at a table’s header row to map Address Book fields. The header row title should match the field names in Address Book. Make sure that the header row for the table is turned on. You can quickly access this control in the format bar. You can find a complete list of fields in the Numbers online help.
Select the placeholder contacts in the table by clicking the first cell and dragging until you’ve selected cells A2 through E5. Then press Delete to remove the placeholder contacts.
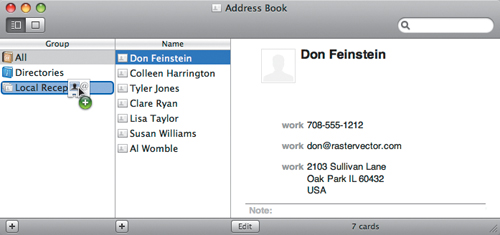
Open Address Book.
You may open it from your Dock or from your Applications folder.
Under the Group heading, click the Add (+) button to create a new group. Name the group Local Reception.

By using a group, you can organize several contacts.
Click All, then drag a contact from Address Book into the Local Reception group.
The contact is added to the group.
Drag six more contacts into the group.
Position the Address Book window so that you can see it as well as your Numbers spreadsheet.
Drag the Local Reception group in Address Book into the Guest List table in Numbers.

The contacts are added to the Guest List table.
Note
You can add a contact’s information to a table by dragging a contact or group from Address Book. Dragging a contact into an existing table will import only contact information that matches the table headers.
You can clean the table to properly display the contact information.
With the table selected, click column D.
Drag the right edge of column D to expand it so that the email addresses fit on a single line.
Delete any unused rows from the Guest List table.

Adjust the width of column G so that it matches the page header.

You can use the alignment guides to help judge the correct width.
Choose File > Save to save your work.
The data in the spreadsheet can be modified to reflect changes in the reception plans. Fortunately, in Numbers you can quickly add and remove data using intuitive controls that let you adapt your spreadsheet to your needs. In this exercise, you’ll make several changes to your spreadsheet that illustrate how to control tables.
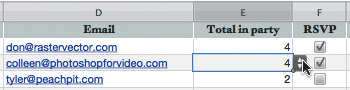
For the Guest List table, click in cell E2 and type 4.
This signifies that the first guest will have four people total in his party.
Enter data for the remaining guests according to the following figure:
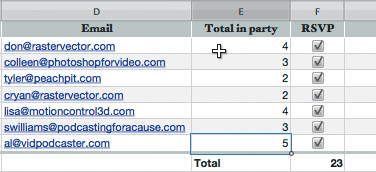
The Guest List currently totals 23 guests.
Click the Budget table to switch to it.
Numbers allows you to use multiple tables in a sheet for added flexibility. You can modify this table to adjust for event costs
Place your pointer over row 3, Band, until the menu arrow appears. From the cell reference pop-up menu, choose Delete Row.
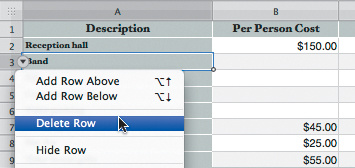
Using the same method, delete row 4, “Ceremony location.”
Remove the yellow comment by clicking the X in the upper right corner.

Click the Task List table to switch to it.
Remove the task “Book ceremony location” using the cell reference pop-up menu as you did earlier in this exercise.
Let’s enlarge the table to include more tasks.
In the lower right corner of the table, drag the Column and Row handle to resize the table to 11 rows and 4 columns.

Add information to the table as shown in the following figure:

Click column D (Notes); then, from the pop-up menu, choose Delete Column.
Choose File > Save to save your work.
As you build a spreadsheet, it will quickly fill with data that you’ll want to organize and present for maximum clarity. Numbers offers predictable data sorting in tables to help you organize lists. Using sorting, you can arrange values in some or all of the cells in a column. You can reorder the information in all rows by sorting a column in ascending or descending order.
Click the Task List table to make it active.
Click column B to select it.
This column contains the date of each task. Sorting by date is a logical way to arrange items in a to-do list.
Click the pop-up menu for column B and choose Sort Ascending.

The tasks are rearranged by date in ascending order.
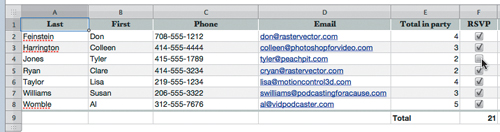
Click the Guest List table to make it active.
Click column A to select it.
Sorting by last name is the most common way to organize a name list.
Click the pop-up menu for column A and choose Sort Ascending.
The guests are arranged by last name in ascending order.

Save your work by choosing File > Save.
If a spreadsheet has a lot of repeated data or requires the entry of a large volume of similar data, Numbers ’09 offers an array of checkboxes, steppers, and sliders to accelerate that data entry. Additionally, you can enter data and explore the results interactively by adjusting values. As you adjust cell controls, the formulas and charts update automatically.
Click the Guest List to select it.
By default, the Event Planner template uses checkboxes to calculate the total number of guests.
Deselect the box in the RSVP column for one guest.
The total number of guests is changed. The Budget and Budget Overview chart are also adjusted dynamically.
Click cell E2 to select the first “Total in party” data cell.
By formatting cells to use stepper controls, you can increase or decrease numbers in a cell by specific increments.
Shift-click cell E8 to select cells E2 through E8.
Open the Cells inspector.
From the Cell Format pop-up menu, choose Stepper.
You now must assign the allowable stepper values for the cells. You want to limit a party to no more than eight members.
Set the Minimum value to 1 and the Maximum value to 8.
Note
The Minimum and Maximum fields indicate the lowest and highest allowable cell values. You can specify an increment (such as 5) to alter the value by a specific amount with each click (5, 10, 15, 20, and so on).

By formatting the “Total in party” cells to use a stepper, you can ensure that only whole numbers with the right formatting are entered.
Click cell E3 to select it.
Up and down arrows appear next to the cell so that you can change its value.
Click the up arrow to add one more guest to the party.
You’ve determined you are over budget for the reception. Let’s try to trim off a few dollars. You can adjust the budget values to see the impact of modifying individual budget elements.
Click the Budget table to make it active.
Click cell B2; then Command-click cells B5, B6, and B7 to select them.
From the Cell Format pop-up menu, choose Slider.
Set the Minimum value to 0, the Maximum value to 300, and the Increment value to 5.
These values allow you to adjust the amount spent on each guest to a value between $0 and $300 in $5 increments.

Click cell B5 to select the amount budgeted for each meal.
A slider appears next to the cell that enables you to change its value.
Change the Catering Per Person Cost to $60.

You’ll notice that the Budget table and Budget Overview chart both update.
Choose File > Save to save your work.
Now let’s make the spreadsheet look a little nicer so you can print it out and distribute it to others in the family who are helping to organize the wedding. A quick way to format the appearance of a table is to use styles. In Numbers ’09, table styles can define the font, font size, style, and color for all table elements. A table style can format the background of the table as well as the stroke, color, and border of table cells.
Double-click the Guest List title to select it.
When a table title is selected, you can modify its font and style.
In the format bar, click the Bold button to change the style of the text.
In the format bar, change the size of the text to 18 points.

Note
When you change a table’s style, it is called an override. When you assign a different style to a table, you can keep or remove any overrides. To replace a table’s style and remove any overrides, click the arrow to the right of the new style and then choose Clear and Apply Style. To replace a table’s style but keep the overrides, just click the name of the new style in the Styles pane.
The text for the Guest List table is modified but now does not match the text in the other tables in the spreadsheet.
Click the triangle next to the Event Planner style and choose Redefine Style from Table.

The headers on all of the tables update to match the new style.
Choose File > Save to save your work.
You can compare your work to the document 14_Event_Planner_Final.numbers provided in the Lesson_14 folder.
Now that your spreadsheet is done, let’s share it with a few other people involved in the wedding by publishing it to the Internet. You can use iWeb (part of the iLife ’09 application suite) to create a website that includes your document. You also can publish a Numbers document directly to your iWeb blog or podcast.
Choose Share > Send to iWeb > PDF, or choose Share > Send to iWeb > Numbers Document.
Note
You should use PDF if you want to share the file with a broader audience. However, PDF files cannot be easily modified. If you want to share a modifiable document with other Numbers ’09 users, choose Numbers Document.
iWeb opens. In the left column, you can choose a theme for your website.

Click Layered Paper and choose either a Blog or Podcast template for posting the file. While both templates will work, the Blog format is best for single posts.
Click Choose to create the page.
The PDF or Numbers document becomes an attachment that your website visitors can download.
Replace all placeholder text in the Blog entry with information about the event or file.