Chapter 14. Querying and Editing XML
The previous chapter covered creating, reading, and saving XML documents. The next steps are to learn how to query and edit them. This chapter deals with XML documents similar to the ones shown in the previous chapter. You will learn how to navigate through these documents to find individual nodes or series of nodes. You can start your query at any point in a document. You can begin at the top node and drill down into the hierarchy, or you can start on a leaf node and climb back up toward the root node. Wherever you are in a document, you can start your search there and either look at the sibling nodes nearest you, or navigate up to a root node or down to a leaf node. Detailing the range of options open to you is one of the primary goals of this chapter.
You will also learn how to edit, append, and delete XML nodes. These skills usually depend on your ability to search through a document, so I cover them only after completing a survey of common techniques of querying and navigating a document. After all, you usually need to find a particular node before you can edit it, delete it, or insert data next to it.
More on XDocument, XElement, and XAttribute
Before we begin, I want to step back for a moment and discuss the structure of the hierarchy of classes in which the XDocument, XElement, and XAttribute classes reside. This may seem an academic exercise, but you will see that there is a practical reason for understanding the shape of these objects.
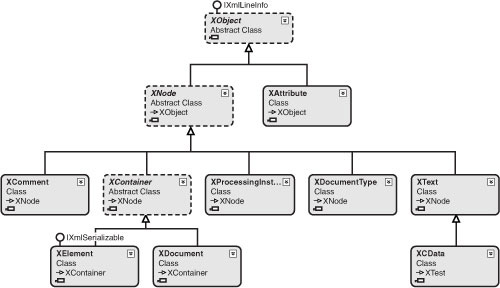
Figure 14.1 shows the hierarchy for both the XDocument and XElement classes. Notice in particular that both classes descend from a class called XContainer, which in turn descends from a class called XNode. Other descendents of the XNode class include XComment and XCData.
Figure 14.1. Both XDocument and XElement descend from XContainer, which in turn descends from XNode.

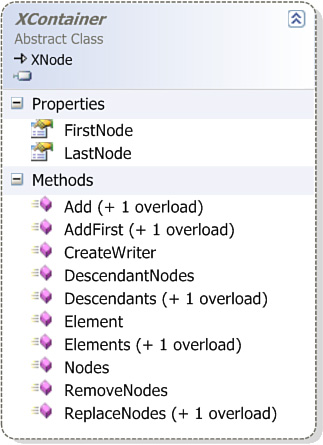
Figures 14.2 and 14.3 reveal that the abstract classes XNode and XContainer contain the declarations for many of the most important methods accessed by consumers of the XElement and XDocument classes. Having at least a passing familiarity with what these classes offer will stand you in good stead when you are working with LINQ to XML.
Figure 14.2. Besides XElement and XDocument, other important classes that descend from XNode include XComment, XText, and XCData.
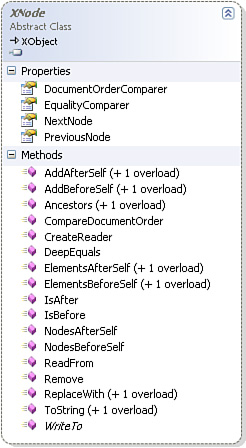
Figure 14.3. The XContainer class defines some of the most important methods shared by XDocument and XElement.
As shown in Figure 14.4, although XDocument is clearly smaller than XElement, both classes inherit quite a bit of power from XContainer and XNode. Therefore, they are more equal in capability than a simple glance at their declarations might suggest.
Figure 14.4. XDocument compared to XElement.

Figures 14.2, 14.3, and 14.4 show the methods and properties found in XNode, XContainer, XElement, and XDocument. I’m showing you these classes not because I want you to memorize which methods are in which classes, or because you need to overly concern yourself with the actual class in which a method is declared. Instead, I want to be sure you understand that XDocument and XElement derive much of their power from XNode and XContainer.
Here are the methods in XContainer that you will use most often when querying data:
public IEnumerable<XNode> DescendantNodes();
public IEnumerable<XElement> Descendants();
public IEnumerable<XElement> Descendants(XName name);
public XElement Element(XName name);
public IEnumerable<XElement> Elements();
public IEnumerable<XElement> Elements(XName name);
public IEnumerable<XNode> Nodes();
Notice that all of them, except Element, return an IEnumerable<T>. As a result, they are all fully LINQ-enabled.
The XNode class has a similar set of methods:
public IEnumerable<XElement> Ancestors();
public IEnumerable<XElement> Ancestors(XName name);
public IEnumerable<XElement> ElementsAfterSelf();
public IEnumerable<XElement> ElementsAfterSelf(XName name);
public IEnumerable<XElement> ElementsBeforeSelf();
public IEnumerable<XElement> ElementsBeforeSelf(XName name);
public bool IsAfter(XNode node);
public bool IsBefore(XNode node);
public IEnumerable<XNode> NodesAfterSelf();
public IEnumerable<XNode> NodesBeforeSelf();
When you query data, the only member declared in XDocument that you will use frequently is Root. The XElement class is a bit richer, because it contains the Attribute and Attributes properties, as well as DescendantNodesAndSelf, DescendantsAndSelf, and AncestorsAndSelf:
public IEnumerable<XElement> AncestorsAndSelf();
public IEnumerable<XElement> AncestorsAndSelf(XName name);
public XAttribute Attribute(XName name);
public IEnumerable<XAttribute> Attributes();
public IEnumerable<XAttribute> Attributes(XName name);
public IEnumerable<XNode> DescendantNodesAndSelf();
public IEnumerable<XElement> DescendantsAndSelf();
public IEnumerable<XElement> DescendantsAndSelf(XName name);
Finally, a class called Extensions is declared in the System.Xml.Linq namespace. A set of extensions methods are declared in that class, all but one of which return IEnumerable<T>:
IEnumerable<XElement> Ancestors<T>(...);
IEnumerable<XElement> AncestorsAndSelf(...);
IEnumerable<XAttribute> Attributes(...);
IEnumerable<XNode> DescendantNodes<T>(...);
IEnumerable<XNode> DescendantNodesAndSelf(...);
IEnumerable<XElement> Descendants<T>(...);
IEnumerable<XElement> DescendantsAndSelf(...);
IEnumerable<XElement> Elements<T>(...);
IEnumerable<T> InDocumentOrder<T>(...);
IEnumerable<XNode> Nodes<T>(...)
public static void Remove(this IEnumerable<XAttribute> source);
I should perhaps add that XObject, the base class for these other classes, contains two methods that LINQ to XML developers will find frequent reason to use:
public XElement Parent { get; }
public abstract XmlNodeType NodeType { get; }
Also included in the XObject class is the ability to annotate a node. I discuss this relatively minor feature near the end of the next chapter.
Now that you understand a little of how XElement and XDocument get their power, it is time to begin writing LINQ to XML queries. I’ll begin that process in the next subsection and continue until near the end of the chapter. At that point I’ll switch gears and talk about editing XML files with LINQ to XML.
Querying with Element and Elements
The Element and Elements properties are two of the workhorses of LINQ to XML. They are the simplest means of gaining access to the nodes of an XML tree.
To write LINQ to XML queries, you need an XML document that is complex enough to offer a moderate challenge. To get us started, I’ve created a document called FirstFourPlanets.xml, which is shown in Listing 14.1 and which you can find on disk. Take a moment to familiarize yourself with this document. This file and files similar to it are referenced often throughout this chapter and the next. You might even want to consider using a bookmark to help you return to this listing while you are reading.
Listing 14.1. FirstFourPlanets.xml
<Planets>
<Planet>
<Name>Mercury</Name>
</Planet>
<Planet>
<Name>Venus</Name>
</Planet>
<Planet>
<Name>Earth</Name>
<Moons>
<Moon>
<Name>Moon</Name>
<OrbitalPeriod UnitsOfMeasure="days">27.321582</OrbitalPeriod>
</Moon>
</Moons>
</Planet>
<Planet>
<Name>Mars</Name>
<Moons>
<Moon>
<Name>Phobos</Name>
<OrbitalPeriod UnitsOfMeasure="days">0.318</OrbitalPeriod>
</Moon>
<Moon>
<Name>Deimos</Name>
<OrbitalPeriod UnitsOfMeasure="days">1.26244</OrbitalPeriod>
</Moon>
</Moons>
</Planet>
</Planets>
The root element of this listing is called Planets. It contains four elements called Planet. In turn, these elements have two nested elements called Name and OrbitalPeriod and an optional element called Moons, which has nested elements called Moon. Each Moon has two nested elements called Name and OrbitalPeriod. Each OrbitalPeriod has an attribute called UnitsOfMeasure. This document is just complex enough to provide an interesting challenge for those who want to query it.
Listing 14.2 (from the sample program called CreatePlanets) shows you how to write a simple two-line query that retrieves the names of the planets, creating the output shown in Listing 14.3.
Ensuring That Your Program Can Find an XML File
In this section of the book, you will frequently need to access XML files from your project. Visual Studio makes this easy. Simply copy the XML file to the directory where your project file is located. Add the XML file to your project. In the Properties window, set the property Copy to Output Directory to the value Copy if Newer. This ensures that the XML file is in the same directory as the project executable and, hence, can be loaded directly into the project without your having to consider the path to the file. For a more in-depth explanation of how this works, see the section in Appendix A titled “Including Data Files in Your Project.”
Listing 14.2. Code That Writes out the Names of the Planets Found in FirstFourPlanets.xml
var xml = XDocument.Load("FirstFourPlanets.xml");
var query = from p in xml.Root.Elements("Planet")
select p.Element("Name").Value;
foreach (var x in query)
{
Console.WriteLine(x);
}
Listing 14.3. The Output When You Run the Code Shown in Listing 14.2 Against the XML Shown in Listing 14.1
Mercury
Venus
Earth
Mars
The first line of code in Listing 14.2 loads the XML we want to query. We then start a simple LINQ query that begins like this:
from p in xml.Root.Elements("Planet")
The reference to the Root node allows us to address the top-level element in the XML file. Because the rest of the file is nested inside the Planets element, the Root node addresses the entire file minus the declaration. The following code is semantically identical:
from p in xml.Element("Planets").Elements("Planet")
Now add a select statement:
from p in xml.Root.Elements("Planet")
select p;
This code returns the entire XML file except the outer Planets node. You need to foreach over the results to see them:
foreach (var x in query)
{
Console.WriteLine(x);
}
This displays the following output:
<Planet>
<Name>Mercury</Name>
<Moons />
</Planet>
<Planet>
<Name>Venus</Name>
<Moons />
</Planet>
<Planet>
<Name>Earth</Name>
<Moons>
<Moon>
<Name>Moon</Name>
<OrbitalPeriod UnitsOfMeasure="days">27.321582</OrbitalPeriod>
</Moon>
</Moons>
</Planet>
<Planet>
<Name>Mars</Name>
<Moons>
<Moon>
<Name>Phobos</Name>
<OrbitalPeriod UnitsOfMeasure="days">0.318</OrbitalPeriod>
</Moon>
<Moon>
<Name>Deimos</Name>
<OrbitalPeriod UnitsOfMeasure="days">1.26244</OrbitalPeriod>
</Moon>
</Moons>
</Planet>
It is important to understand that this code does not simply dump one large chunk of XML to the screen. Instead, our query returns four elements, one for each Planet element in the document. This differs from the xml.Element("Planets") query, which returns only one very large item, because the file has only one Planets node.
To see exactly how this works, let’s modify that foreach loop just slightly by asking it to “take” the first two results from the query:
foreach (var x in query.Take(2))
{
Console.WriteLine(x);
}
This produces the following output:
<Planet>
<Name>Mercury</Name>
<Moons />
</Planet>
<Planet>
<Name>Venus</Name>
<Moons />
</Planet>
This is one way of demonstrating that we are returning four elements, and not just one big element.
Now take a look at the select clause in Listing 14.2. It projects a return set that contains the Value of the Name element:
select p.Element("Name").Value;
Our from clause returns a set of four planets. Each planet in our file contains two elements called Name and Moons. Our new projection simply asks for the Value of the Name node. In the case of the second planet, that value would be the string "Venus".
Consider what would happen if we wrote the following code:
var query = from p in xml.Root.Elements("Planet")
select p.Element("Name");
Our output would look like this:
<Name>Mercury</Name>
<Name>Venus</Name>
<Name>Earth</Name>
<Name>Mars</Name>
The point is that the code returns the entire element.
If you cast an element as a string using an explicit conversion operator, you get its value:
var query = from p in xml.Root.Elements("Planet")
select (string)p.Element("Name");
This query projects the element’s Value, producing output like that shown in Listing 14.3. We’ll return to this subject in the section “Working with Missing Nodes.”
XML Descendants
If you have to dig more than two levels deep into your XML file, using Elements to compose a query can become cumbersome. For instance, this code is perhaps a bit too verbose:
xml.Element("Planets").Elements("Planet").Elements("Moons").Elements("Moon")
Fortunately, there are many cases when you will not need to use this kind of syntax. LINQ to XML provides a shortcut that allows you to dig down directly to the node you want:
var query = from x in xml.Descendants("Moon")
select x.Element("Name");
Let’s step back for a moment and see if we can understand how Descendants works. One version of the Descendants method takes no parameters. I found it useful to take a moment to study this overload. Consider the following code:
var query = from c in xml.Descendants()
select c;
Console.WriteLine("Descendant Count: " + query.Count());
int count = 1;
foreach (var item in query)
{
Console.WriteLine("{0} Descendant {1} {2}", ">>",
count++.ToString(), "<<");
Console.WriteLine(item);
}
In the sample program that accompanies this book called Descendants, I ran this query against the following short XML file:
<?xml version="1.0" encoding="utf-8" ?>
<Planet>
<Name>Mars</Name>
<Moons>
<Moon>Phobos</Moon>
<Moon>Deimos</Moon>
</Moons>
</Planet>
The program produces the output shown in Listing 14.4. Note that the code “annotates” the results with some simple descriptive statements designating the descendant count.
Listing 14.4. An Annotated Look at the Results of a Simple Query That Uses a Call to Descendants
Descendant Count: 5
Descendant 1:
<Planet>
<Name>Mars</Name>
<Moons>
<Moon>Phobos</Moon>
<Moon>Deimos</Moon>
</Moons>
</Planet>
Descendant 2:
<Name>Mars</Name>
Descendant 3:
<Moons>
<Moon>Phobos</Moon>
<Moon>Deimos</Moon>
</Moons>
Descendant 4:
<Moon>Phobos</Moon>
Descendant 5:
<Moon>Deimos</Moon>
As you can see, the first descendant is the entire document. The next one is the Name element with the value Mars, and then the element Moons, and finally each individual Moon. This is a very logical descent through the nodes of the document. Whenever you become confused about how LINQ to XML views the structure of your document, it may be worth writing code like this to see exactly how LINQ thinks about the descendants in your document.
If you pass in a parameter to Descendants, you can single out one of the nodes shown in Listing 14.4. Consider this code:
var query = from c in xml.Descendants("Name")
select c;
It retrieves the following data:
Descendant Count: 1
>> Descendent 1 <<
<Name>Mars</Name>
As you can see, this code skips directly to the Name node and ignores the Planet node that precedes it.
You will find LINQ to XML much more fun to use if you if you take the time now to fully understand the difference between calling Descendants() and calling Descendants("Name"). The first call retrieves all the elements that descend from the caller. The second node picks out the descendant elements that have the specified name.
Consider what would happen if you ran the following code against the same document:
var query = from c in xml.Descendants("Moon")
select c;
It would produce the following output:
Descendant Count: 2
>> Descendant 1 <<
<Moon>Phobos</Moon>
>> Descendant 2 <<
<Moon>Deimos</Moon>
As you can see, the output from this query consists of the two nodes named Moon. The call to Descendants simply skips all the previous nodes and focuses only on the name we passed in as a parameter. If you pass in a parameter to Descendants, it does not drill down into the hierarchy as the parameterless version does. Instead, it grabs only the siblings of the node you specify.
Composition and XML Queries
It probably has occurred to you that calls to Descendants might not work as hoped in documents that contain nodes that have the same name but at different levels. For instance, consider what happens when we run the following query against the FirstFourPlanets.xml file:
var nameQuery = from x in xml.Descendants("Name")
select x;
foreach (var x in nameQuery)
{
Console.WriteLine(x);
}
This code grabs Name nodes from multiple levels. In other words, it finds both the names of planets and the names of moons.
<Name>Mercury</Name>
<Name>Venus</Name>
<Name>Earth</Name>
<Name>Moon</Name>
<Name>Mars</Name>
<Name>Phobos</Name>
<Name>Deimos</Name>
This is fine if you want to find all the Name nodes in the document. But if you are looking for only the names of moons, it would be the wrong answer. As you will see in the next chapter, you can solve this problem by using XML namespaces. Alternatively, you could revert to the type of code you saw earlier in this chapter, which is slightly more verbose than a call to Descendants(), but also more precise:
var moonName = from x in xml.Descendants("Moon")
select x.Element("Name");
This query locates the unique node that is nearest to the Name element you seek and then uses it as a point of reference.
Solutions like this work fine with relatively simple documents, but with complex documents it could become painful to try to isolate a particular node. If you are working with a complex document, you might want to use LINQ composability to help simplify your query. As you recall, composability allows you to break queries into composable parts, thereby limiting the complexity of any one query. Because LINQ queries are deferred, this does not result in a significant performance penalty.
The code shown in Listing 14.5 is run against the FirstFourPlanets.xml file. It separates the Mars node from the rest of the XML in our file.
Listing 14.5. A Short Query Showing How to Access a Single Node in an XML Tree
var query = from x in xml.Descendants("Planet")
where x.Element("Name").Value == "Mars"
select x;
foreach (var x in query)
{
Console.WriteLine(x);
}
The output from this query expression looks like this:
<Planet Name="Mars">
<Name>Mars</Name>
<Moons>
<Moon>
<Name>Phobos</Name>
<OrbitalPeriod UnitsOfMeasure="days">0.318</OrbitalPeriod>
</Moon>
<Moon>
<Name>Deimos</Name>
<OrbitalPeriod UnitsOfMeasure="days">1.26244</OrbitalPeriod>
</Moon>
</Moons>
</Planet>
We can now write a second query based on the results of the query shown in Listing 14.5:
var query1 = from x in query.Descendants("Moon")
select x;
The output from this query is as follows:
<Moon>
<Name>Phobos</Name>
<OrbitalPeriod UnitsOfMeasure="days">0.318</OrbitalPeriod>
</Moon>
<Moon>
<Name>Deimos</Name>
<OrbitalPeriod UnitsOfMeasure="days">1.26244</OrbitalPeriod>
</Moon>
This particular example is perhaps a bit contrived. Nevertheless, many developers may find it easier to break a query into two parts like this rather than writing one long query. Feel free to use this kind of composition whenever possible if you think it will help you write code that is simpler to write, simpler to test, and simpler to understand. The compositional aspect of LINQ is one of its great features. Use it when you think it will be helpful.
DescendantNodes, XText, and CData
The DescendantNodes method returns a collection of not just the elements, but of all the nodes descending from the source collection. Contrast it with the Descendants method, which retrieves only the Elements.
Here is an example from the CreatePlanets sample program of embedding a query in a foreach statement:
foreach (var x in query.Descendants("Moon").DescendantNodes())
{
Console.WriteLine(x);
}
This query uses both the Descendants methods and the DescendantNodes method to produce the output shown in Listing 14.6.
Listing 14.6. The Output from a Call to DescendantNodes Includes Not Only Elements, but Also Text Nodes
<Name>Moon</Name>
Moon
<OrbitalPeriod UnitsOfMeasure="days">27.321582</OrbitalPeriod>
27.321582
<Name>Phobos</Name>
Phobos
<OrbitalPeriod UnitsOfMeasure="days">0.318</OrbitalPeriod>
0.318
<Name>Deimos</Name>
Deimos
<OrbitalPeriod UnitsOfMeasure="days">1.26244</OrbitalPeriod>
1.26244
If this query asked only for the Descendants("Moon"), it would return three nested nodes, one for each of the moons in the FirstFourPlanets.xml file:
<Moon>
<Name>Moon</Name>
<OrbitalPeriod UnitsOfMeasure="days">27.321582</OrbitalPeriod>
</Moon>
<Moon>
<Name>Phobos</Name>
<OrbitalPeriod UnitsOfMeasure="days">0.318</OrbitalPeriod>
</Moon>
<Moon>
<Name>Deimos</Name>
<OrbitalPeriod UnitsOfMeasure="days">1.26244</OrbitalPeriod>
</Moon>
DescendantNodes breaks the descendants of the top-level nodes in this query into their constituent parts. Look, for instance, at this descendant:
<Moon>
<Name>Moon</Name>
<OrbitalPeriod UnitsOfMeasure="days">27.321582</OrbitalPeriod>
</Moon>
It is broken down by DescendantNodes into these three constituent parts:
<Name>Moon</Name>
Moon
<OrbitalPeriod UnitsOfMeasure="days">27.321582</OrbitalPeriod>
27.321582
As mentioned earlier, attributes such as UnitsOfMeasure are not regarded as nodes.
DescendantNodesAndSelf
If you called DescendantNodesAndSelf, as shown in Listing 14.7, you would find one extra node in the results of your query. Compare the code in Listing 14.8 with that in Listing 14.6. Notice that DescendantNodesAndSelf returns not only the descendants of the Moon node, but also the Moon node itself. In Listing 14.8, I have put in bold the code that is retrieved by DescendantNodesAndSelf but not by DescendantNodes.
Listing 14.7. A Call to DescendantNodesAndSelf
var dsnodes = from x in
planets.Descendants("Moon").DescendantNodesAndSelf()
select x;
foreach (var x in dsnodes)
{
Console.WriteLine(x);
}
Listing 14.8. The Results of the Simple Query Shown in Listing 14.7
<Moon>
<Name>Moon</Name>
<OrbitalPeriod UnitsOfMeasure="days">27.321582</OrbitalPeriod>
</Moon>
<Name>Moon</Name>
Moon
<OrbitalPeriod UnitsOfMeasure="days">27.321582</OrbitalPeriod>
27.321582
<Moon>
<Name>Phobos</Name>
<OrbitalPeriod UnitsOfMeasure="days">0.318</OrbitalPeriod>
</Moon>
<Name>Phobos</Name>
Phobos
<OrbitalPeriod UnitsOfMeasure="days">0.318</OrbitalPeriod>
0.318
<Moon>
<Name>Deimos</Name>
<OrbitalPeriod UnitsOfMeasure="days">1.26244</OrbitalPeriod>
</Moon>
<Name>Deimos</Name>
Deimos
<OrbitalPeriod UnitsOfMeasure="days">1.26244</OrbitalPeriod>
1.26244
Searching for Text Nodes
One quick way to find a unique Value in an XML tree is to combine DescendantNodes with a call to the standard LINQ operator OfType:
var phobos = from XText x in xml.DescendantNodes().OfType<XText>()
where x.Value == "Phobos"
select x;
Console.WriteLine(phobos.First());
This simple query writes the word Phobos. The call to OfType ensures that the query retrieves only nodes of type XText—that is, content nodes that contain a simple text value. Consider this element:
<Name>Venus</Name>
The content for this XML element is the text node Venus. LINQ to XML regards text like the word Venus as being of type XText.
Write code like this to ensure that your query retrieves a single value:
var phobos = (from XText x in planets.DescendantNodes().OfType<XText>()
where x.Value == "Phobos"
select x).Single().Value;
As you learned in Chapter 6, “Query Operators,” the LINQ query operator Single raises an exception if your query returns more than one result. Thus, a developer is alerted if the document contains two instances of a string that he assumed appeared only once.
CData
We have been working with very “well-behaved” text nodes. However, sometimes you need to work with text fields that do not conform so nicely to the expected syntax for an XML file. Consider, for instance, what would happen if you inserted a text node that itself contained markup as text in an XML element:
<Alt>Use "<PlanetName>Earth</PlanetName>"?</Alt>
Code like this would upset any XML parser and cause it to return unexpected results. To fix the problem, you could write something like this:
<Alt>Use "<PlanetName>Earth</PlanetName>"?</Alt>
Here standard XML character entity references such as < and > are used in place of characters such as < and >. Few people would consider this an optimal solution.
The CData section, where CData stands for “character data,” is designed to help alleviate the pain. Consider the code shown in Listings 14.9 and 14.10. (See the CDataQuery sample program that accompanies this book for the complete Listing 14.9.)
Listing 14.9. An Example of How to Parse XML That Contains CData
XDocument xml = XDocument.Load("WithCData.xml");
var query = from p in xml.Descendants("Alt")
select p;
foreach (var item in query)
{
Console.WriteLine("The entire node");
Console.WriteLine(item);
}
var alt = from p in xml.Descendants("Alt")
select p.Value;
foreach (var item in alt)
{
ShowTitle("Just the title");
Console.WriteLine(item);
}
Listing 14.10. A Simple XML File Containing CData
<?xml version="1.0" encoding="utf-8" ?>
<Planets>
<Planet>
<Name>Earth</Name>
<Alt><![CDATA[Use "<PlanetName>Earth</PlanetName>"?]]></Alt>
</Planet>
</Planets>
The Alt element shown in Listing 14.10 uses a CData section to embed text that contains XML markup. Although admittedly it’s a bit awkward to read, this is nonetheless much simpler than directly inserting character entity references into XML.
Consider the query shown in Listing 14.9. This code loads the XML file from Listing 14.10 and produces the following output:
=================
The entire node
=================
<Alt><![CDATA[Use "<PlanetName>Earth</PlanetName>"?]]></Alt>
=================
Just the value
=================
Use "<PlanetName>Earth</PlanetName>"?
As you can see, LINQ to XML interprets the Value of the Alt node as if it were the plain text without the machinery of the CDATA syntax.
Here is one way to search for a node that contains CData:
var query1 = from p in xml.DescendantNodes().OfType<XCData>()
where p.ToString().Contains("Earth")
select p;
This query would retrieve our CData node from the document in Listing 14.10. As always in LINQ, there are many different ways to achieve the same end, but this is a reasonable approach.
Parents and Ancestors
After you have found a node, you can navigate backward from it to a Parent node. In this code fragment, the program navigates to a text node and then finds the parent of its parent:
var parent = from XText x in planets.DescendantNodes().OfType<XText>()
where x.Value == "Phobos"
select x.Parent.Parent;
Console.WriteLine(parent.First());
This code writes the following:
<Moon>
<Name>Phobos</Name>
<OrbitalPeriod UnitsOfMeasure="days">0.318</OrbitalPeriod>
</Moon>
Even though we specified a node of type XText in our search, this query returns an XElement because the projection returns the Parent of Parent, and Parents return XElements:
public XElement Parent { get; }
The Ancestors method is the mirror image of the Descendants method. Instead of walking down the graph of the XML file, it walks backward through it toward the root:
var ancestors = from XText x in planets.DescendantNodes().OfType<XText>()
where x.Value == "Phobos"
select x.Ancestors();
count = 1;
foreach (var item in ancestors)
{
foreach (var i in item)
{
Console.WriteLine("<< Ancestor: {0} >>", count++);
Console.WriteLine(i);
}
}
This code walks backward through the FirstFourPlanets.xml document:
<< Ancestor: 0 >>
<Name>Phobos</Name>
<< Ancestor: 1 >>
<Moon>
<Name>Phobos</Name>
<OrbitalPeriod UnitsOfMeasure="days">0.318</OrbitalPeriod>
</Moon>
<< Ancestor: 2 >>
<Moons>
<Moon>
<Name>Phobos</Name>
<OrbitalPeriod UnitsOfMeasure="days">0.318</OrbitalPeriod>
</Moon>
<Moon>
<Name>Deimos</Name>
<OrbitalPeriod UnitsOfMeasure="days">1.26244</OrbitalPeriod>
</Moon>
</Moons>
Etc, up to the root...
To save space, I cut off this listing about halfway through. The next node in the series would be Planet. The final element in the series would be the entire document, starting at the Root node. Like the Descendants method, you can pass in a string with an element name as a parameter to the Ancestors method. You then are taken directly to the particular set of elements associated with that name.
It’s hard to overemphasize the importance of understanding how Descendants and Ancestors work. The more readily you can visualize what nodes would be returned by a call to these methods, the more quickly you will become comfortable with navigating through a document with LINQ to XML.
Elements After or Before Self
It can be confusing to call ElementsBeforeSelf or ElementsAfterSelf right after calling Ancestors or Descendants. You can tend to think that these methods drill up or down into the XML hierarchy like Descendants and Ancestors, when in fact they reference the next item after the caller at the current level in the XML graph. They return sibling nodes, not parent or child nodes.
Consider the following XML node:
<Planet>
<Name>Earth</Name>
<Moons>
<Moon>
<Name>Moon</Name>
<OrbitalPeriod>27.321582d</OrbitalPeriod>
</Moon>
</Moons>
</Planet>
The Ancestor of the Moons node is Planet, and its Descendants are Moon, Name, and OrbitalPeriod. The ElementsBeforeSelf in this file is Name. There are no ElementsAfterSelf.
To illustrate how these methods work, open the ReadXml sample that accompanies this book. Here is the ElementsBeforeSelf method from that program:
var query = from p in xml.Descendants("Moons")
select new
{
eas = p.ElementsAfterSelf(),
ebs = p.ElementsBeforeSelf()
};
foreach (var item in query)
{
// After self
foreach (var i in item.eas)
{
Console.WriteLine("Before...{0}...{1}", i.Name, i.Value);
}
// Before self
foreach (var i in item.ebs)
{
Console.WriteLine("Before...{0}...{1}", i.Name, i.Value);
}
}
When run against the FirstFourPlanets.xml file, this code yields these results:
Before...Name...Earth
Before...Name...Mars
As you can see, the code finds the Name node that appears before itself on the same level in the XML hierarchy, but it finds nothing after itself. In either case, it is searching for sibling nodes, not parents or children.
Here are similar lines of code run against the same file:
var query = from p in xml.Descendants("Planet")
select new { val = p.Element("Name").Value,
eas = p.Element("Name").ElementsAfterSelf() };
foreach (var item in query)
{
Console.WriteLine(item.val);
foreach (var i in item.eas)
{
Console.WriteLine("...{0}", i.Name);
}
}
It produces this code:
Mercury
Venus
Earth
...Moons
Mars
...Moons
This code searches for and finds the two planets in the file that have moons and then gets the elements after the Name element. Each planet has only one such element, and it is called Moons. In other words, this sample does the opposite of what we saw in the previous sample.
Working with Missing Nodes
LINQ to XML developers frequently encounter the “problem of the missing node.” Consider this simple XML document from the MissingElements sample that accompanies this book:
<?xml version="1.0" encoding="utf-8" ?>
<Planets>
<Planet Id="1">
<Name>Mercury</Name>
</Planet>
<Planet Id="2">
<Name>Venus</Name>
</Planet>
<Planet>
<Name>Earth</Name>
</Planet>
<Planet Id="4">
<Name>Mars</Name>
</Planet>
</Planets>
All but one of the Planet elements in this document has an Attribute called Id. Following the lead of its dominant species, the planet Earth is the one that breaks with precedent.
If you run the following code against this document and then try to foreach over the results, you get a NullReferenceException:
var venusMoons = from x in xml.Descendants("Planet")
where x.Attribute("Id").Value == "2"
select x;
The problem, of course, is that there is no Attribute called Id for the planet Earth, and when LINQ tries to find the Value of the Id attribute for Earth, a null reference exception is thrown.
To avoid this problem, you can write the following code, or some variation of it:
var venusMoons = from x in planets.Descendants("Planet")
let id = x.Attribute("Id") ?? new XAttribute("Id", "-1")
where id.Value == "2"
select x;
Here the ?? (null coalescing) operator is used to test if an Attribute called Id exists:
let id = x.Attribute("Id") ?? new XAttribute("Id", "-1")
If it does not, a new Attribute called Id with a value of -1 is created. This new attribute ensures that we don’t get a NullReferenceException. I’ve passed in -1 as the Value of this attribute to ensure that this node does not accidentally pass our filter.
In some cases the null coalescing operator won’t meet a developer’s needs. In those situations, you may use a regular ternary operator (if statement):
var venusMoons = from x in planets.Descendants("Planet")
let id = (x.Attribute("Id") == null) ?
"-1" : x.Attribute("Id").Value
where id == "2"
select x;
This is less elegant, but it works in certain circumstances where the null coalescing operator will not work.
Another very useful technique is to use explicit conversion operators to access the value of an attribute:
var venusMoons = from x in planets.Descendants("Planet")
let id = (string)x.Attribute("Id")
where id == "2"
select x;
Code like this is quite terse and very easy to read. It relies on the existence of a series of more than 20 very esoteric conversion operators that happen to exist in the XAttribute and XElement classes. If you cast the XAttribute class to a string, it returns the Value of the attribute if it is available; otherwise, it returns the empty string. This means you don’t get a null reference exception.
This is absolutely not the right place to explore explicit and implicit conversion operators. However, you might want to open one of your LINQ to XML source files and hover the cursor over a valid instance of the word XElement. Press F12 to go to the metadata definition of the XElement class. You will see the declarations for the explicit conversion operators at the top of the listing. Here are two of them:
public static explicit operator int?(XAttribute attribute);
public static explicit operator int(XAttribute attribute);
For more information, search the online C# help for the topic “Using Conversion Operators.”
If none of these solutions fits your tastes, you can simply use an external method to resolve any potential null reference exceptions in your code:
private static void UseExternalMethod()
{
XDocument planets = XDocument.Load("FirstFourModified.xml");
var venusMoons = from x in planets.Descendants("Planet")
let id = ExternalResolution(x)
where id == "2"
select x;
foreach (var item in venusMoons)
{
Console.WriteLine(item);
}
}
private static string ExternalResolution(XElement x)
{
if (x.Attribute("Id") == null)
{
return "IdEarth";
}
else
{
return (string)x.Attribute("Id");
}
}
Here we create a method that checks if the node we want to examine is null. If it is, the code returns IdEarth; otherwise, it returns the Id of the attribute. This is not particularly terse, and perhaps not really in the spirit of LINQ, but it is easy to read.
The examples I’ve shown you here are fairly easy to understand. In the next chapter, I will revisit the subject of missing nodes and show how you can solve more complex problems with this same technology.
Working with Line Numbers
Sometimes it is helpful to know the line number of a node in a file. Reporting the line number of a node you have found can be a very useful feature, particularly if you want to report an error. It can also be convenient to search for a node by line number. However, that can, of course, be a very risky endeavor, because documents can be modified accidentally, and their line numbers changed without notice.
If you look at either the first or last figure in this chapter, you will see that a class called XObject sits at the top of the LINQ to XML class hierarchy. This class supports an interface called IXmlLineInfo:
public interface IXmlLineInfo
{
int LineNumber { get; }
int LinePosition { get; }
bool HasLineInfo();
}
An instance of this interface is used to store the line number information when you call XDocument.Load with LoadOptions.SetLineInfo:
XDocument xml = XDocument.Load(fileName, LoadOptions.SetLineInfo);
If you load an XML file into memory using this technique, line numbers are associated with the nodes in your document.
Here is code that uses the IXmlLineInfo interface to report the line number of a node you have found through a standard LINQ to XML search:
XText phobos = (from x in xml.DescendantNodes().OfType<XText>()
where x.Value == "Phobos"
select x).Single();
var lineInfo = (IXmlLineInfo)phobos;
Console.WriteLine("{0} appears on line {1}",
phobos, lineInfo.LineNumber);
This code is taken from the XmlLineNumber program that accompanies this book.
The query shown here searches through our document for the word “Phobos.” It uses the query operator Single to ensure that the query returns only a single node, which in this case is of type XText. The program then casts the result as IXmlLineInfo and reports the line number to the user:
Phobos appears on line 21
Let’s now turn things around and see how to search through an XML and look for a node by line number. If you look at the FirstFourPlanets.xml file, you will see that line 18 looks like this:
<Name>Mars</Name>
Here is code from the XmlLineNumber sample showing how to search for that node by line number:
XDocument xml = XDocument.Load(fileName, LoadOptions.SetLineInfo);
var line = from x in xml.Descendants()
let lineInfo = (IXmlLineInfo)x
where lineInfo.LineNumber == 21
select x;
foreach (var item in line)
{
Console.WriteLine(item);
}
Note that the first line uses LoadOptions.SetLineInfo to ensure that line information is recorded when the document is loaded into memory.
The LINQ query shown here uses Descendants to iterate over the elements in the FirstFourPlanets.xml file. The where filter in the query checks to see if any of those elements has its line number set to 21. It happens that the 15th element returned by the call to Descendants fits that search criteria, so that node, and that node alone, is found when we foreach over the results.
Notice the cast to convert the XElement nodes returned by the call to Descendants:
let lineInfo = (IXmlLineInfo)x
This cast is necessary because the actual fields of the IXmlLineInfo interface are not exposed as Public by XElement. As soon as we know the line number of an element, we can use a where clause to filter the result set, returning only the node that appears on line 21.
Again, I want to stress that reporting the line number of a node seems like a reasonable thing to do, but searching for an element by line number usually is not a good idea. In any case, you now know enough to begin working with line numbers in a LINQ to XML program.
Modifying XML
To modify the nodes of an XML tree, you need to work with only a small set of easy-to-use calls. The program called ModifyNodes that accompanies this book illustrates how to proceed.
The ModifyNodes program uses the document called FirstFour-Planets.xml, which lists the first four planets and their moons, as shown in Listing 14.11. Alternatively, you can use the file called NewPlanets.xml, which lists 8 planets and their 66 moons, plus the dwarf planet Pluto and its moons Charon, Nix, and Hydra.
In this section of the chapter, I will modify the same document multiple times. The results of each query are cumulative. For instance, in the section on removing nodes, the code lops off all the moons in the document. The next section, on editing, assumes that the moons have been removed from the document, and it shows the results of editing the modified document.
Removing Nodes
The code shown in Listing 14.11 strips all the planetary moons by calling Remove. The Element and Elements methods navigate to the relevant nodes. As soon as we have arrived at our destination, a call to Remove excises the moons. We then navigate to the next set of satellites and again excise them with a call to Remove. You can see the results of this operation in Listing 14.12.
Listing 14.11. Using Remove to Delete Nodes from an XML Document
XDocument xml = XDocument.Load("FirstFourPlanets.xml");
planets.Element("Planets")
.Elements("Planet")
.Elements("Moons")
.Remove();
Listing 14.12. The Results of the Method Shown in Listing 14.11
<Planets>
<Planet>
<Name>Mercury</Name>
</Planet>
<Planet>
<Name>Venus</Name>
</Planet>
<Planet>
<Name>Earth</Name>
</Planet>
<Planet>
<Name>Mars</Name>
</Planet>
</Planets>
The code shown in Listing 14.11 uses LINQ method syntax. Alternatively, you could write this code:
XDocument planets = XDocument.Load("FirstFourPlanets.xml");
var nodes = from m in planets
.Element("Planets")
.Elements("Planet")
.Elements("Moons")
select m;
nodes.Remove();
Here the effect is exactly the same, but the code uses a traditional LINQ query expression, and the program calls Remove on the results returned from the query. Remember that query expressions are converted into method syntax at compile time, so the runtime performance of both techniques is close to identical. In most cases, you should use the syntax that you find easiest to read.
Editing Nodes
Here is how to edit the value of the first planet node:
planets.Element("Planets")
.Element("Planet")
.Element("Name")
.Value = "Mercury is near the sun";
Note that this code picks out the first planet in the document by using Element("Name") rather than Elements("Name"). The latter technique would return a list of all the names of the planets, which is not what we want in this case. If we make this edit after removing the moons, the document looks like this:
<Planets>
<Planet>
<Name>Mercury is near the sun</Name>
</Planet>
<Planet>
<Name>Venus</Name>
</Planet>
<Planet>
<Name>Earth</Name>
</Planet>
<Planet>
<Name>Mars</Name>
</Planet>
</Planets>
This code uses a where clause to pick out one node by name and edit it:
Console.WriteLine("Modify Planet by Name");
var q = (from p in planets.Element("Planets").Elements("Planet")
where p.Element("Name").Value == "Venus"
select p).Single();
q.Element("Name").SetValue("Venus is love!");
Console.WriteLine(planets);
The code uses Single() to specify that we want to get the only item from the XML file that meets our criteria. If more than one element is returned, the call to Single ensures that an InvalidOperation exception is raised. The exception would state that the “Sequence contains more than one element.”
After this action, the document would look like this:
<Planets>
<Planet>
<Name>Mercury is near the sun</Name>
</Planet>
<Planet>
<Name>Venus is love</Name>
</Planet>
<Planet>
<Name>Earth</Name>
</Planet>
<Planet>
<Name>Mars</Name>
</Planet>
</Planets>
Inserting Nodes
There are simple methods for inserting nodes in or adding nodes to an existing XML file. You read about these methods in the section “Building a Document One Node at a Time” in the preceding chapter, but they take on a different flavor in this context.
In the samples shown in this section, the code first searches for a location in the document where you want to add the node. When it is safely at its destination, the code proceeds to insert the new node.
Adding Attributes
Here is how you add an attribute to a node:
XElement sun = planets.Element("Planets");
sun.Add(new XAttribute("MassOfSun", "332,946 Earths"));
After this edit, the XML for the Planets element looks like this:
<Planets MassOfSun="332,946 Earths">
Here is how you add an attribute to the Mars node:
var query = (from x in planets.Elements("Planets").Elements("Planet")
where x.Element("Name").Value == "Mars"
select x).Single();
query.Add(new XAttribute("Mass", "0.107 Earths"));
After you execute this code, the Mars node looks like this:
<Planet Mass="0.107 Earths">
<Name>Mars</Name>
</Planet>
Here is how you edit that attribute:
var attr = (from x in planets.Elements("Planets").Elements("Planet")
where x.Element("Name").Value == "Mars"
select x.Attribute("Mass")).Single();
attr.Value = "6.4185?1023 kg";
After you execute this code, the Mars node looks like this:
<Planet Mass="6.4185x10²³ kg">
<Name>Mars</Name>
</Planet>
Adding Elements
Here is a how to add an element to our existing list of planets:
planets.Root.Add(new XElement("DwarfPlanet",
new XElement("Name", "Eris")));
Note that we are adding a nested set of XElement nodes, one called DwarfPlanet and the other called Name. Here is what the XML looks like when we are done:
<Planets MassOfSun="332,946 Earths">
<Planet>
<Name>Mercury is near the sun</Name>
</Planet>
<Planet>
<Name>Venus is love</Name>
</Planet>
<Planet>
<Name>Earth</Name>
</Planet>
<Planet Mass="6.4185x10²³ kg">
<Name>Mars</Name>
</Planet>
<DwarfPlanet>
<Name>Eris</Name>
</DwarfPlanet>
</Planets>
In this section, you have learned about the three basic operations you can perform when modifying a document: delete, modify, and insert. You have seen that the code for performing these actions is usually very simple. Using these methods, however, does require that you first know how to search for the node upon which you want to operate.
Summary
In this chapter, you have learned how to query an XML document. The text focused on several key methods and properties, including Element, Elements, Descendants, Parents, and Ancestors. You also read about removing, editing, and inserting nodes in an XML document.
Figure 14.5 shows the complete hierarchy of the classes that make up the core of LINQ to XML. A few other classes in this namespace are not part of this hierarchy, such as XNamespace and XDeclaration. But most of the key LINQ to XML classes are shown in this diagram. Take a moment to study it as a means of reviewing the subjects covered in this and the previous chapter, and also to see some of the topics to be covered in the next chapter.
Figure 14.5. This object hierarchy provides an overview of many of the key classes explored in this chapter and the preceding one.
By this stage you know many of the most important features of LINQ to XML. The next chapter covers slightly more advanced material on XML namespaces, transforms, and schemas. You will see examples of how to move XML data into and out of a relational database.