Chapter 9. Modifying Objects with LINQ to SQL
Querying is the focus of all LINQ components, as the name Language Integrated Query suggests. However, applications that use relational data as objects need to go beyond querying by making changes to the retrieved objects and saving them back to the database. LINQ to SQL complements the LINQ query pattern with a simple API to modify and save objects.
Relational databases use SQL commands to insert, update, and delete rows. The LINQ pattern currently does not cover such commands because they are very specific to the relational domain. Furthermore, for most applications, it is more natural and efficient to work with objects and in-memory collections to modify objects until all the changes are done. Then they can be submitted to the database for insert, update, and delete operations. Hence, LINQ to SQL follows this approach by letting users modify their objects as they wish and then executing SQL commands for all the changes in one batch. This approach preserves the normal way of handling objects in the program and allows the developer to decide exactly when the changes are made persistent in the database.
This chapter starts with the foundational concept of creating new entity instances in the database and modifying or deleting existing instances from the database. We will then look at related concepts of concurrent changes, transactions, and support for moving entities between tiers to make changes. We will also look at how LINQ to SQL integrates with presentation technologies to display and modify data in Windows and web applications.
Entity Lifecycle
As mentioned in the preceding chapter, objects decorated with mapping information about the primary key are the only modifiable objects and are called entities. Typically, entities are retrieved through the use of one or more queries and then are manipulated until the application is ready to send back the changes to the server. This process may repeat a number of times until the application no longer needs the entities. At that point the entities are reclaimed by the runtime just like normal CLR objects. The data, however, remains in the database in persistent form. Even after the runtime representation is gone, the same data can still be retrieved. In this sense an entity’s true lifetime exists beyond any single runtime manifestation.
The focus of this chapter is the entity lifecycle, in which a cycle refers to the time span of a single manifestation of an entity object within a particular runtime context. The cycle starts when the DataContext becomes aware of a new instance, and it ends when the object or DataContext is no longer needed. For both the runtime and persistent manifestations, let’s start by looking at how entities are created for insertion and then are deleted.
Inserting and Deleting Entities
Consider the following code fragment that retrieves a Customer and adds a newly created order to its Orders collection. When the order is added to the collection, no change occurs in the database. In fact, the connection to the database is not even used at that point. Later, when SubmitChanges() is called, LINQ to SQL discovers the newly added order and generates the appropriate SQL INSERT command to create an Order in the database. Be sure to run the code in this chapter only against a copy of the Northwind database so that you keep the original copy intact. The following examples assume that the designer in Visual Studio or SqlMetal has been used to generate entity classes used against a copy of Northwind.
NorthwindDataContext db = new NorthwindDataContext(connectionString);
db.Log = Console.Out;
// Retrieve single customer with given ID - AROUT
Customer cust = (from c in db.Customers
where c.CustomerID == "AROUT"
select c).Single();
Order ord = new Order();
// Set properties for the new order
...
// Add order to the customer's Orders collection
cust.Orders.Add(ord);
db.SubmitChanges();
// Display the database generated id
Console.WriteLine(ord.OrderID);
A new Order could also be created using a slightly different approach, as shown in the next code fragment. The key differences in this code fragment are the lack of a query and a DataContext.InsertOnSubmit() call.
NorthwindDataContext db = new NorthwindDataContext(connectionString);
Order ord = new Order();
ord.CustomerID = "AROUT";
// Set other properties for the new order
...
// Add order to Table<Order> for eventual insertion
db.Orders.InsertOnSubmit(ord);
db.SubmitChanges();
In the first example, LINQ to SQL discovers a new order because it can be reached from the Customer object that was being tracked. The second example has no query, so there is no tracked object to start looking for new objects. The InsertOnSubmit()call introduces the new Order to the DataContext so that it can be inserted when SubmitChanges() is called. The first example shows the convenience of an inferred insert. The second example shows that when a new entity is not reachable from a known entity, it still can be introduced for insertion.
The example of inserting an Order is also interesting because it shows another requirement for inserting a new Order—retrieving a database-generated ID. The Order.OrderID column in the Northwind database is an autoincremented identity key. The mapping created using the designer or SqlMetal indicates that the value is database-generated by setting the IsDbGenerated property of the Column attribute to true. You can view this property in the property grid (called “Auto Generated Value”) by right-clicking the class member on the designer surface and selecting Properties. Or you can look at the generated code under the dbml file node in the Solution Explorer in Visual Studio. In response to the IsDbGenerated setting, LINQ to SQL automatically retrieves the value after executing a successful INSERT command. As described in the preceding chapter, the text of the generated SQL commands sent to the database can be conveniently captured using DataContext’s log, as shown in the following code snippet:
INSERT INTO [dbo].[Orders]([CustomerID], [EmployeeID], [OrderDate],
[RequiredDate], [ShippedDate], [ShipVia], [Freight], [ShipName],
[ShipAddress], [ShipCity], [ShipRegion], [ShipPostalCode],
[ShipCountry])
VALUES (@p0, @p1, @p2, @p3, @p4, @p5, @p6, @p7, @p8, @p9, @p10,
@p11, @p12)
SELECT CONVERT(Int,SCOPE_IDENTITY()) AS [value]
-- @p0: Input NChar (Size = 5; Prec = 0; Scale = 0) [AROUT]
...
An entity can be deleted by calling DeleteOnSubmit(), as shown in the next example. For simplicity, let’s delete the order that was created in the previous example by setting the retrievedID variable to the OrderID value displayed by the last code fragment in place of the ellipsis (...) in the code.
// Set the value to newly inserted OrderID
int retrievedID = ...;
// Retrieve single order with given ID
Order ord = (from o in db.Orders
where o.OrderID == retrievedID
select o).Single();
// Mark the order for deletion
db.Orders.DeleteOnSubmit(ord);
db.SubmitChanges();
If the order was removed from the corresponding Customer’s Orders collection by calling cust.Orders.Remove(), that would have been considered a case of “severing the association” between the Customer and the order entities; it would not be a case of deletion. The result would be an update to the Order setting the foreign key value to null to reflect the severance of association. Thus, unlike in the case of insertion, LINQ to SQL does not infer that a DELETE command should be generated for removal from a relationship collection. A DELETE command requires a DeleteOnSubmit()call to avoid accidental deletion. This is a safer choice.
Updating Entities
After entities are retrieved from the database, you are free to manipulate them as you like. They are your objects; use them as you will. As you do this, LINQ to SQL tracks changes so that it can persist them into the database when SubmitChanges() is called.
LINQ to SQL starts tracking your entities as soon as they are materialized, even before giving them to you as returned results of a query. Indeed, the identity management service discussed in Chapter 8, “Reading Objects with LINQ to SQL,” has already kicked in as well. Change tracking costs very little in additional overhead until you actually start making changes. It allows LINQ to SQL to generate UPDATE statements when you call SubmitChanges(). Unlike in the case of deletion, which requires DeleteOnSubmit(), no additional API needs to be called before SubmitChanges(). The following code shows a simple example in which the ContactName property is changed for a Customer:
var cust = (from c in db.Customers
where c.CustomerID == "AROUT"
select c).Single();
// Change a property of retrieved customer
cust.ContactName = "Horatio Hornblower";
// Persist the change
db.SubmitChanges();
The automatic detection of a change is made possible by LINQ to SQL’s ability to keep a copy of the original entity for comparison when SubmitChanges() is called. A new interface INotifyPropertyChanging was added to make this efficient by allowing a copy to be made just before an entity is changed through a property setter. The code generated by the designer or SqlMetal for entities implements this interface and notifies the LINQ to SQL runtime about an imminent change. The runtime makes a copy of the entity before the first property change. Entities that are queried but not modified do not need to have their original versions copied for comparison and update statement generation.
The original values also allow LINQ to SQL to generate a minimal update statement. Only the columns that are modified are set to new values. Unchanged column values are not set. The SQL generated for the previous C# code setting Customer.ContactName sets only the corresponding column with parameter p10, as follows:
UPDATE [dbo].[Customers]
SET [ContactName] = @p10
WHERE ([CustomerID] = @p0)
...
As in the case of insertions, some column values may be set in the database. A common example is a timestamp column. The value of the timestamp is set for an updated row in the database. Another example is a trigger-updated column. In such cases, using the IsDbGenerated and AutoSync properties of the Column mapping attribute, you can tell LINQ to SQL to skip updating the column and instead retrieve the value after successful update.
Automatically Maintained Relationships
Relationships pose an interesting challenge. They involve two entities. Hence, a change in the relationship affects two entities. In the database, this is simplified through normalized data models and foreign keys. In the case of the database relationship between Customers and Orders, the Orders table contains a foreign key recording the relationship, and the Customers table keeps no direct record of the relationship. In the corresponding object model, both the Customer.Orders collection and the Order.Customer references pointing back to Customer entities need to be in sync. If the Customer.Orders collection contains an Order, the corresponding Order.Customer better point back to the same Customer entity.
Maintaining such a bidirectional relationship would be quite a chore if you had to take care of it every time there was any change. Fortunately, LINQ to SQL automates this process through a combination of the generated code and the EntitySet–EntityRef classes. Customer.Orders is of type EntitySet<Order>, and Order.Customer is of type EntityRef<Customer>. Consider the following code, which moves an order from one Customer to another. Here, we use the terser but semantically identical lambda function syntax to retrieve single customers:
Customer cust1 = db.Customers.Single(c => c.CustomerID == id1);
Customer cust2 = db.Customers.Single(c => c.CustomerID == id2);
// Pick an order
Order o = cust1.Orders[0];
// Remove from first, add to the second
cust1.Orders.Remove(o);
cust2.Orders.Add(o);
// Prints 'true'
Console.WriteLine(o.Customer == cust2);
The same objective can be accomplished just as well through the following assignment instead of the Remove(), Add() sequence used in the preceding example:
o.Customer = cust2;
If you assign a null to a relationship reference, you are severing the relationship. This is distinct from deleting the target of the relationship. In the following code, the order is no longer associated with any Customer entity. The order’s original target Customer is not deleted. Likewise, if you remove an order from the Customer.Orders collection, the effect is symmetric: the relationship is severed, but the order is not deleted. In each case, LINQ to SQL attempts to set the foreign key column Order.CustomerId to null in the database when SubmitChanges() is called. Such an operation may succeed if the foreign key column is nullable; otherwise, it will fail.
Customer cust1 = db.Customers.Single(c => c.CustomerID == id1);
// Pick an order
Order o = cust1.Orders[0];
// Set reference to null. db.DeleteOnSubmit() not called
o.Customer = null;
// Prints 'true'
Console.WriteLine(cust1.Orders.Contains(o));
// Updates Order
db.SubmitChanges();
Regardless of which direction you choose for severing a relationship—a Customer.Orders.Remove() call or assignment to Order.Customer—the net effect is an update to the entity containing a member mapped to the relationship’s foreign key—in this case, Order. The key member for maintaining relationship is in the entity containing the foreign key, often called the child entity. Hence, LINQ to SQL requires the object reference from child to parent. The reference or collection of references in the other direction—from the parent entity to the child entity—is optional. In the Customer–Orders relationship, Order.Customer must be present and mapped, while the Customer.Orders member may be skipped.
References and collections of references are how object models handle relationships. But the underlying foreign key value (such as Order.CustomerId) is often valuable for showing the relationship in the presentation tier and for serializing the entities to another tier. Hence, it is available for use as a mapped member when you use the designer or SqlMetal. However, the foreign key value needs to remain consistent with the references. The generated LINQ to SQL code ensures that after it is initialized, an in-memory foreign key value is not accidentally directly changed. It is kept in sync with the in-memory references by the generated code.
Submitting Changes
The previous sections covered basic insert, delete, and update operations, as well as relationship management, as individual operations. However, a key advantage of accessing relational data as objects is that you can retrieve a bunch of objects, make changes to the object graph as needed, and then make all the changes persistent in one shot. LINQ to SQL uses this model by persisting all the pending changes in response to SubmitChanges(). This one-shot approach allows changes to be done or aborted atomically so that the database remains in a consistent state. It also provides a logical checkpoint for a set of changes and minimizes the overhead.
When you call SubmitChanges(), the set of tracked entities is examined. All entities with pending changes are ordered into a sequence based on dependencies between them. Objects whose changes depend on other objects are sequenced after their dependencies. Foreign key constraints and uniqueness constraints in the database play a big part in determining the correct ordering of changes. Then, just before any actual changes are transmitted, a transaction is started to encapsulate the series of individual commands unless one is already in scope. Finally, one by one the changes to the objects are translated into SQL commands and are sent to the server.
Any errors detected by the database cause the submission process to abort, and an exception is raised. All changes to the database are rolled back as if none of the submissions ever took place. The DataContext still has a full recording of all changes, so it is possible to attempt to rectify the problem and resubmit the changes by calling SubmitChanges() again. The following code shows the conceptual handling of exceptions. The following sections look at the processing of the specific exception that user code should check for and a richer set of transaction options.
NorthwindDataContext db = new NorthwindDataContext(connectionString);
// make changes to in-memory objects here
try {
db.SubmitChanges();
}
catch (ChangeConflictException e) {
// make some adjustments
...
// retry
db.SubmitChanges();
}
When the transaction around the submission completes successfully, the DataContext recognizes all the changes to the objects by simply forgetting the change-tracking information. However, failure of the transaction to complete successfully does not lead to a rollback of the local change tracking state. As just shown, you need to make the necessary changes to the entities based on the exception and then resubmit the changes. For example, if an update fails because a value is out of range, specified by a check constraint in the database, you need to change to value to fit within the range and then call SubmitChanges() again. Alternatively, if you decide not to retry the submission, you can discard the DataContext instance and restart with a new one. There is no rollback for the in-memory state held by a DataContext instance.
After successful completion of SubmitChanges(), you may use the DataContext for further queries and updates. Each successful SubmitChanges() call concludes a unit of work and effectively starts the next unit of work with no pending changes left. The following example shows a sequence of two units of work. Note that the Customer entity retrieved during the first unit of work remains available for the second unit of work and does not automatically get refreshed when a new unit of work begins.
// First unit of work
Customer cust =
db.Customers.Where(c => c.CustomerID == "AROUT").Single();
// Defer load orders and modify some orders
...
db.SubmitChanges();
// Second unit of work begins
// Make more changes
...
db.SubmitChanges();
Simultaneous Changes
So far we have discussed changes as if only one instance of one application is manipulating data in a database. But a key purpose of a database is to allow sharing of data across multiple applications and users. Hence, we need to look at what happens when multiple applications modify data simultaneously and how we can ensure that the data remains consistent in such an environment. Ensuring consistency when simultaneous or concurrent changes are possible is called concurrency control. LINQ to SQL provides some key tools for implementing concurrency control.
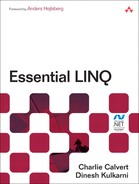
Consider the example of a simplified Order entity with an OrderId, ShippedDate, and ShipAddress being modified by an interactive order management application and a fulfillment application. Further assume that the two applications retrieve the same order and modify their copies, as shown in Figure 9.1. The fulfillment application assumes that the ShipAddress it has read at instant t1 is valid. It proceeds with shipping the order and sets the ShippedDate at time t4. The order management application in turn reads the same Order at t2 and makes a change to ShipAddress in the database at time t3 based on the knowledge that the order has not yet been shipped.
Figure 9.1. Concurrent changes to an entity.
Clearly, the data would be inconsistent if both the applications were allowed to make the changes and assume that their operations are successful. We would have an order that was shipped to an address that was different from the new address set by the user of the order management system. That is a conflict between two updates. So we need a way to either prevent such a conflict or detect it and take corrective actions.
A way to prevent such a conflict is to require the applications to acquire a lock on the order before making any changes. Then, only the application that can get a lock would have exclusive access to the order for making a change. This approach is an example of pessimistic concurrency control, because we are pessimistic about a conflict and always take preventive steps.
The pessimistic approach is problematic. A lock would always limit access to an order, regardless of whether other applications were looking to access the same order. In an interactive application where a user can go to lunch while keeping an order form open, such a lock could be held for a long time, and that could be unacceptable for other applications. Furthermore, it could potentially force the database server to manage a large number of locks for relatively uncommon conflicts. Hence, we need to look for a better alternative.
Optimistic Concurrency
An alternative is to take an optimistic approach: Proceed with changes as if there won’t be any conflict, and then detect a conflict and take corrective actions so that consistency is ensured. In effect, instead of asking for permission to update in the form of a lock, we go ahead and update anyway and then apologize and make amends if a conflict is detected.
The optimistic concurrency approach is very suitable for data shared across applications in which the application can potentially spend a significant amount of time manipulating the data. Both applications involving user interaction and those involving significant processing without user input are good candidates for optimistic concurrency. Because such applications are the norm, LINQ to SQL relies on optimistic concurrency as the primary approach for concurrency control. Optimistic concurrency has two aspects: detection of conflicts and resolution of conflicts. LINQ to SQL provides support for both aspects.
Conflict Detection
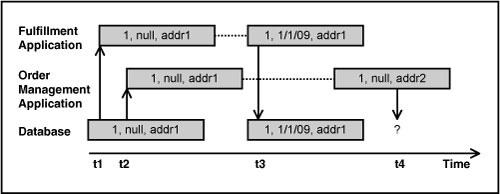
Let’s revisit the example shown in Figure 9.1. The order management application assumed that the ShippedDate was null when it was not. To avoid the conflict, it needed to detect that the value of ShippedDate had changed since it was read. In short, it could have used the original value of null and compared it against the value in the database before applying the current value for ShipAddress. In fact, you can imagine doing the comparison with the original values automatically in the data access layer. This is how the original values are used by LINQ to SQL on behalf of the application. Figure 9.2 shows how the order example can be changed to make use of the original values.
Figure 9.2. The original value check for conflict detection.
The following code fragments show the C# code performing the update and the corresponding generated SQL. In the absence of a conflict, the WHERE clause in the generated SQL simply confirms that there has been no change to the original values, and the update succeeds. In the case of the conflict described before, the check for the original value of ShippedDate fails and, as a result, the update fails.
ord.ShipAddress = "123 Main St., Paradise";
db.SubmitChanges();
UPDATE [dbo].[Orders]
SET [ShipAddress] = @p2
WHERE ([OrderID] = @p0)
AND ([ShippedDate] IS NULL)
AND ([ShipAddress] = @p1)
The optimistic concurrency check in the previous SQL statement covered all the mapped properties of the Order entity. Common variations include a subset of the properties that acts as a proxy for the entire entity. For example, you may exclude large values such as images or notes in certain cases, because they do not affect the business logic like ShippedDate did in the previous case. One interesting special case is where a special timestamp column (or similar DateTime column) is updated for every update to the row. Where available in the database schema, such a column provides a great conflict-detection proxy for the entire row.
LINQ to SQL designer and SqlMetal automatically detect timestamp columns and use them for the optimistic concurrency check. In the absence of such a column, all mapped columns are used for the optimistic concurrency check. This provides a safe default. However, you can override these defaults by changing the UpdateCheck property of the Column attribute for the properties you want to exclude from the check.
In the previous example, we looked at a single entity update. In many applications, multiple entities are modified, and the changes are submitted together with one SubmitChanges() call. In such a case, it is more efficient to gather information about all the conflicts that can be detected in one shot instead of dealing with one conflict at a time and discovering successive ones with additional calls to SubmitChanges(). The following code illustrates how to collect all conflicts for a set of changes submitted together. The outer loop in the catch block iterates over entities in conflict, and the inner loop iterates over the entity members in conflict.
using System.Reflection;
// Modify Customer entities
try
{
db.SubmitChanges(ConflictMode.ContinueOnConflict);
}
catch (ChangeConflictException e)
{
// Take corrective actions for all detected conflicts
foreach (ObjectChangeConflict occ in db.ChangeConflicts)
{
Customer customerInConflict = (Customer)occ.Object;
foreach (MemberChangeConflict mcc in occ.MemberConflicts)
{
object currVal = mcc.CurrentValue;
object origVal = mcc.OriginalValue;
object databaseVal = mcc.DatabaseValue;
MemberInfo mi = mcc.Member;
// Change customerInConflict's members as appropriate
}
}
}
// Retry
db.SubmitChanges(ConflictMode.FailOnFirstConflict);
This code example also illustrates the two different failure-handling options: ContinueOnConflict and FailOnFirstConflict. The first attempt collects all the conflicts and reports them in a single exception. The second attempt is failed on the first conflict that is encountered while executing a sequence of insert, update, and delete commands. In the absence of an explicit request to continue, the default behavior of SubmitChanges() is to fail on first conflict.
Conflict Resolution
When a conflict is detected, the SubmitChanges() operation fails, and LINQ to SQL throws a ChangeConflictException. The following code shows one way to deal with such an exception. It generalizes the previously shown approach of using retries. In most cases, a very small number of retries are sufficient or appropriate before a user has to intervene or the processing has to start over again by retrieving the data again.
while (retries < maxRetries)
{
try
{
db.SubmitChanges(ConflictMode.ContinueOnConflict);
break;
}
catch (ChangeConflictException e)
{
// Adjust properties of objects with conflicts
retries++;
}
}
LINQ to SQL provides tools for reporting errors and adjusting objects with conflicting changes. In some applications, user input may be the best choice for deciding what adjustments, if any, should be made. In others, policy-based resolution may be programmatically applied for automatic handling of conflicts.
Three steps are involved in handling conflicts: catching ChangeConflictException, resolving each reported conflict using the built-in resolution mechanism or through additional programmatic work, and calling SubmitChanges() again. Three resolution policy options often are referred to by simplified names: client wins, database wins, and merge. Alternatively and more informally, the first two also are called stomp on the database and stomp on my updates. The RefreshMode enumeration has three corresponding values. To illustrate the difference, let’s consider a slightly modified version of the entity class that contains three nonkey values—ShippedDate, ShipAddress, and ShipVia. Figure 9.3 shows the effect of each of the options for an Order object that was concurrently updated, causing a conflict between the original and database values.
Figure 9.3. Conflict resolution options.

• Client wins, or the KeepCurrentValues option: The original values are reset to the database values so that when SubmitChanges() is called again, the “new” original values are the same as those that caused the conflict. Hence, no conflict occurs during the second SubmitChanges() call, and the current, in-memory values overwrite the concurrent update. Hence, this option circumvents optimistic concurrency by pushing through the updates anyway, despite the optimistic concurrency check specified in the mapping. So this is most appropriate after some check about the values or a user override. This is the default value used by the Resolve() method when the option is not explicitly specified.
• Database wins, or the OverwriteCurrentValues option: The current values in the DataContext are overwritten and effectively lost. This allows changes to other entities that were not in conflict to succeed with the next SubmitChanges() call. The conflicting update is simply omitted.
• Merge, or the KeepChanges option: The concurrent changes are merged such that the values of properties updated in the current version in the DataContext are retained. As a result, if conflicting changes are made to a property, the client values win over the database values. Note that in the particular example in Figure 9.3, this option does not make much sense based on the semantics of the three properties.
The Resolve() method also supports an additional Boolean parameter to ignore conflicts in case of delete operations.
Conflict resolution requires two key decisions: selecting the resolution option, and deciding on the number of retries before abandoning the current set of changes and starting over. Each resolution option involves overwriting someone’s change or potentially merging inconsistent changes. Hence, it is worth seeking human input from a user if the application has a user interface. Otherwise, automatic conflict resolution based on predetermined choices may be the only option. The number of retries typically is decided in advance and is defined in the program. Optimistic concurrency is intended for cases in which conflicting concurrent changes are rare. Hence, a small number of retries, often just one, is appropriate and sufficient. In practice, repeated conflicts in succession may indicate that optimistic concurrency is an unsuitable option. Perhaps a more pessimistic approach using transactions is appropriate.
Refreshing Entities
Simultaneous changes also can affect entities that have been retrieved but not modified. Modified entities can be refreshed when a conflict is detected by using the Resolve() method. For unmodified entities, an explicit Refresh() call is required to retrieve the latest values. Refresh capability is particularly handy when a unit of work runs for a long time. An example is when the results are bound to a user interface and the user comes back after a lunch break. Another example is when certain entities need to be selectively refreshed for a second unit of work. The following code is a modified version of a previous code sample with a Refresh() call added. Note that Refresh() changes only the scalar values and does not affect relationship properties such as Order.Order_Details.
// First unit of work
Customer cust =
db.Customers.Where(c => c.CustomerID == "AROUT").Single();
// Defer load orders and modify some orders
...
db.SubmitChanges();
// Second unit of work begins
// Select a specific order with a LINQ to Objects query
// Refresh the order before making changes
Order ord = cust.Orders.Where(...).Single();
db.Refresh(RefreshMode.OverwriteCurrentValues, ord);
// Change the order
...
db.SubmitChanges();
LINQ to SQL computes the set of changes before generating SQL commands to make the changes persistent. You can ask for the set of changes using the GetChangeSet() method. This gives you a way to inspect the changes and possibly do some validations before deciding to call SubmitChanges(). It also provides a handy tool for debugging your applications without affecting the rows in the database. The changes are returned as three read-only collections containing entities to be inserted, updated, and deleted, respectively. ChangeSet also has a convenient ToString() implementation that lists the number of inserts, updates, and deletes. Alternatively, you can use the ObjectDumper class from the Visual Studio sample project mentioned in the preceding chapter to see the results. The following listing shows a usage pattern:
Customer cust = new Customer();
cust.CustomerID = "AAAA";
// Set other properties
Order ord = db.Orders.Where(o => o.OrderID == 10355).Single();
Order_Detail od = ord.Order_Details[0];
// New customer (insert), changed order, deleted detail
ord.Customer = cust;
db.Order_Details.DeleteOnSubmit(od);
// Get change set without submitting anything to database
ChangeSet cs = db.GetChangeSet();
// The following prints "{Inserts: 1, Deletes: 1, Updates: 1}"
Console.WriteLine(cs);
// See contents of Inserts, Deletes, Updates collections
// ObjectDumper sample must be built into a DLL and added
ObjectDumper.Write(cs,1);
// Submit to database after additional processing
db.SubmitChanges();
In summary, LINQ to SQL provides a rich set of tools to handle simultaneous changes. You can specify what properties should be used to detect conflicts, choose to end on first conflict, or get information about all conflicts and resolve conflicts with simple built-in options. You can also refresh the state for unmodified objects. These tools cover concurrent changes between the time that objects are read and the time that the changes are submitted. But an equally important issue is to ensure that all the changes are done atomically as one unit of work or are not done at all. This is accomplished using transactions, which are covered next.
Transactions and Connection Management
LINQ to SQL lets you retrieve a graph of objects for modification. All changes to the graph can then be submitted as a single unit of work with a SubmitChanges() call. A unit of work may include multiple updates, inserts, and deletes. Each operation on an entity is handled as a single database command. So the set of changes requires a set of commands. This raises some obvious questions:
• What happens when one of the commands fails—say, due to a change conflict or some other failure?
• What happens if someone else makes changes between two commands in a set of changes?
LINQ to SQL addresses these issues by executing the set of SQL commands as a single transaction. Here is the conceptual multistep process for a SubmitChanges() call:
1. Compute the change set for the entities in the DataContext. The result is a list of entities to be updated, a list of entities to be inserted, and a list of entities to be deleted.
2. Order the changes based on foreign key dependencies. For example, an Order must be inserted before an OrderDetail can be inserted, because the latter requires the key value of the former.
3. Open a connection to the database, and start a transaction or use the ambient transaction.
4. Execute INSERT, UPDATE, and DELETE SQL commands, with appropriate checks for conflict detection.
5. Run queries for database-generated values.
6. If all commands execute successfully, commit the transaction to make the changes persistent in the database. Otherwise, roll back the transaction and throw exception to inform the caller that SubmitChanges() failed.
The transaction around all the SQL commands addresses these questions. It ensures that either all the changes are persisted or all of them are ignored, leaving the database in the same state as before the beginning of the transaction. Second, depending on the transaction’s isolation level, the database server prevents conflicting changes between the commands.
LINQ to SQL starts a transaction by default to minimize the chance of an error. You do not have to remember to start a transaction for every SubmitChanges() call. However, you still have control over the transaction boundary if you so desire. You have two additional options at your disposal for more advanced scenarios. In most common cases, you do not need the following options; you can just rely on the implicit transaction started by a SubmitChanges() call.
Use a TransactionScope to perform additional operations in the context of the transaction. LINQ to SQL detects an ambient transaction and uses it for SubmitChanges(). The transaction is committed or aborted based on the usual TransactionScope model. Failures other than SubmitChanges() also get to veto the transaction’s completion.
Create a DbTransaction yourself, and use it to execute other commands as necessary. Then tell LINQ to SQL to use it by setting the DataContext.Transaction property. You still get to start and commit or roll back the transaction as you want.
Use of TransactionScope is convenient when you want to perform additional operations. A common scenario for such a broader scope is to include queries and SubmitChanges() in one transaction, as shown in the following code. This provides a pessimistic concurrency control option, where you want to avoid conflicts rather than detecting and resolving them. Another usage scenario is to enable access to multiple transactional sources using a promotable or distributed transaction.
using System.Transactions; // Add reference to System.Transactions.dll
using (TransactionScope ts = new TransactionScope())
{
NorthwindDataContext db = new NorthwindDataContext();
List<Order> orders =
db.Orders.Where(o => o.Customer.CustomerID == "ALFKI").ToList();
// Modify order entities here
db.SubmitChanges();
ts.Complete();
}
Use of DbTransaction allows interoperability with code using ADO.NET relational APIs, as shown in the following code. It lets you mix direct SQL commands and LINQ to SQL operations, and it also allows you to change the isolation level on the transaction if you want.
using System.Data.SqlClient;
DbTransaction myTxn = db.Connection.BeginTransaction();
// Execute some SqlCommands with the transaction
db.Transaction = myTxn;
try
{
db.SubmitChanges();
}
catch(ChangeConflictException e)
{
// handle conflicts and roll back transaction
}
// Do additional work with the transaction
myTxn.Commit();
Optimistic concurrency checks and transactions provide complementary support. The former allows disconnected operation. No resources are held on the database server while working with entities retrieved in memory, and yet conflicting changes are detected. The latter ensures that either all changes are persisted successfully, or nothing is persisted in case of a failure.
The two mechanisms also illustrate how connections are managed by LINQ to SQL. When a user issues a query, LINQ to SQL issues a command and creates a DataReader. As soon as the results are consumed, the connection goes back to the connection pool for use by other users of the connection (unless you explicitly change the connection pooling setting on the connection). This pattern repeats for all LINQ to SQL queries. Meanwhile, the retrieved objects can be used for potentially long-running computations involving user input (including coffee breaks) or for complex processing. When all the changes are done and SubmitChanges() is called, LINQ to SQL again opens a connection to the database and uses it to execute INSERT, UPDATE, and DELETE SQL commands in a transaction. LINQ to SQL then returns the connection to the connection pool. This minimizes connection usage while providing flexibility of operating in disconnected mode and yet making changes to the retrieved objects. Thus, precious database resources such as connections are managed carefully to provide a more scalable solution.
Attaching Multitier Entities
In two-tier applications, a single DataContext instance handles queries and updates to results of queries. However, for applications that have additional tiers, it is often necessary to use separate DataContext instances for query and update. For example, in the case of an ASP.NET application, query and update are executed as separate requests to the web server where most of the code is supposed to operate in a stateless fashion. The requests may even go to different machines in a server farm. Hence, it is not possible to use the same DataContext instance across multiple requests. In such cases, a DataContext instance needs to be able to update objects that it has not retrieved. The Attach() method allows the DataContext to deal with entities coming from another tier. An Attach() call tells the DataContext to start tracking the entity as if it were retrieved with a query but without actually requiring a database query. Just like the InsertOnSubmit() method, this capability is exposed by Table<T> for each given entity type T. The following example shows a typical usage:
NorthwindDataContext db1 = new NorthwindDataContext();
Customer c1 = db1.Customers.Single(c => c.CustomerID == "AROUT");
// Customer entity changed on another tier - e.g. through a browser
// Back on the mid-tier, a new context needs to be used
NorthwindDataContext db2 = new NorthwindDataContext();
// Create a new entity for applying changes
Customer c2 = new Customer();
c2.CustomerID = originalID;
// Set other properties needed for optimistic concurrency check
c2.CompanyName = originalCompanyName;
...
// Tell DataContext to track this object for an update
db2.Customers.Attach(c2);
// Now apply the changes
c2.ContactName = "Horatio Hornblower";
// DataContext has original/current values to update the customer
db2.SubmitChanges();
In the absence of Attach(), during SubmitChanges() processing, an entity that was not retrieved in a query is considered to be a new entity for insertion into the database. Attach() tells the DataContext that the entity is not new but merely serialized from another tier.
Attach() needs to preserve the optimistic concurrency capability by ensuring that current and original values are available. As a result, three different overloads deal with the current and original values:
• Original values used for conflict detection: Attach(originalCustomer) should be used to attach the original values. The instance can then be modified by playing back the changes serialized from another tier before calling SubmitChanges().
• Original and current copies available: Attach(currentCustomer, originalCustomer) does it in one shot. This requires two instances with original and current values, respectively.
• Timestamp or no optimistic concurrency members:Attach(currentProduct, true) lets you attach the current value without requiring the original values. No playback is needed before SubmitChanges() is called. The current version of Product is attached with updated members but the original timestamp. The original timestamp takes care of the optimistic concurrency check. If the mapping is set up to skip the optimistic concurrency check, the current version is all that is needed for an update when SubmitChanges() is called.
In many multitier applications, the entire entity often is not sent across tiers for simplicity, interoperability, or privacy. For example, a supplier may define a data contract for a web service that differs from the Order entity used on the middle tier. Likewise, a web page may show only a subset of the members of an Employee entity. Hence, the multitier support also accommodates such cases. Only the members belonging to one or more of the following categories need to be transported between tiers and set before calling Attach():
• Members that are part of the entity’s identity
• Members that have been changed
• Members that participate in the optimistic concurrency check
LINQ to SQL uses minimal updates. It checks which columns are changed from the original to the current version and creates a SQL UPDATE command to set just the corresponding columns. So when you create an entity instance on the mid-tier for attaching, anything that is not changed and not required for the optimistic concurrency check can be skipped. The remaining members can have default values in both the original and current versions. For example, if an Order uses a timestamp and only the ShipAddress has been changed, you need to set only three properties when you new up an Order entity—OrderID, ShipAddress, and the timestamp property.
When attaching objects in original state, the entity graph is recursively explored for each attached entity until a known entity is reached. By default, no further action is taken for attached entities. For example, if you attach an Order in original state, all related Order_Detail entities are also attached. You are free to make changes to Order_Details to effect an update, or you can even take action to have them inserted or deleted.
However, entities for insertion and deletion do not require the Attach() method. The methods used for two-tier applications—Table.InsertOnSubmit() and Table.DeleteOnSubmit()—need to be used for inserting and deleting multitier entities. As in the case of two-tier usage, a user is responsible for handling the foreign key constraints in the multitier case as well. A customer with orders cannot just be deleted without handling its orders if a foreign key constraint in the database is preventing the deletion of a customer with orders.
Attach() is designed for multitier entities obtained through deserialization from another tier or a web service. It is not intended for moving objects from one live DataContext instance to another. When an entity is already in the scope of a live DataContext, it may be “tethered” to the DataContext instance to enable deferred loading. If you try to Attach() such an entity to another DataContext instance, you get an exception. In short, you should call Attach() only if you have an entity that is detached. There is no specific API to detach an entity from a DataContext. When you serialize the entity, it is effectively detached when it is re-created through deserialization.
Thus, Attach() provides a core operation that brings a deserialized entity into the world of entities retrieved from the database. After it is attached, the entity then can be used for update, delete, or refresh operations exactly like the entities retrieved from the database. With the foundation of these operations, let’s now look at how to build a presentation tier for entities retrieved using LINQ to SQL.
Data Binding
Many applications have a presentation tier that uses the data retrieved by a Data Access Layer (DAL) technology such as LINQ to SQL. In the presentation tier, the data is bound to user interface (UI) controls—either with one-way data binding for a read-only display of data or two-way data binding for updatable data. Two-way data binding ensures that the control and the object bound to it remain in sync as the values in either of them are changed. You can use the objects retrieved and saved by LINQ to SQL for two-way data binding either with smart client technologies such as Windows Forms and Windows Presentation Foundation (WPF) or with web technology such as ASP.NET Web Forms.
Smart Client Data Binding
The entities retrieved using LINQ to SQL are normal CLR objects that can be used for data binding just like any other CLR object. The role of LINQ to SQL in supporting data binding comes into focus for the results of a query. In general, the results of a LINQ to SQL query are of type IEnumerable<T>. Hence, they can be displayed easily, like any other IEnumerable<T>. For two-way data binding, LINQ to SQL implicitly implements the necessary interface so that you can bind the results of a typical query to a DataGrid. The following sequence of steps gets a simple form that binds to Orders and Order_Details:
1. Create a new Windows Forms Application called NorthwindForms, and add a new item for LINQ to SQL classes named Northwind.dbml. Use the design surface to build an object model by dragging and dropping two tables from the Northwind database—Orders and Order Details. After you have the model, the first step for data binding is to create a new data source using the Data menu in Visual Studio, as shown in Figure 9.4.
Figure 9.4. The Add New Data Source menu option.

2. The Add New Data Source menu option brings up the Data Source Configuration Wizard, as shown in Figure 9.5. Because LINQ to SQL returns normal CLR objects, choose Object as the Data Source Type.
Figure 9.5. Choosing a data source type.

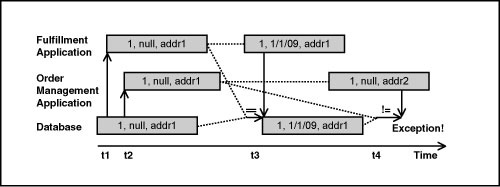
3. Click Next to bring up a list of available objects, including Order and Order_Detail, as shown in Figure 9.6.
Figure 9.6. Choosing the object you want to bind to.
4. Select Order and click Finish to put Order in the Data Sources window, as shown in Figure 9.7. You can get to the Data Sources window by selecting Data, Show Data Source in Visual Studio.
Figure 9.7. The Data Sources window populated by the wizard.

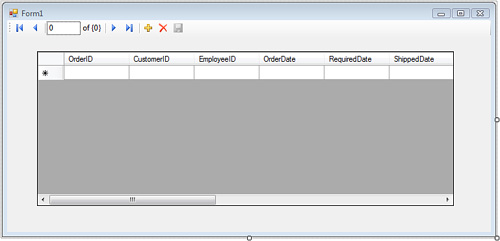
5. Drag and drop Order from the Data Sources window onto the form to get the grid shown in Figure 9.8.
Figure 9.8. Design view of the order form.
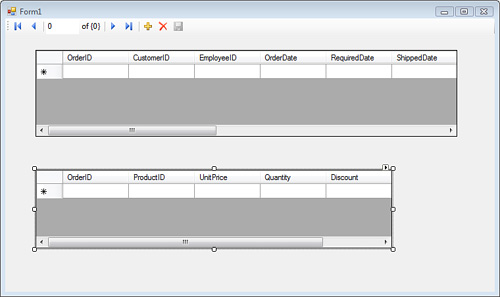
6. Notice that Order_Details is available as a data source under Order. This is possible because LINQ to SQL recognizes the foreign key-based relationship and automatically creates a collection of Order_Details that is available as a data source. To see a master-details view showing Orders and their Order_Details, drag Order_Details from the Data Sources window onto the form. The result is shown in Figure 9.9.
Figure 9.9. Design view of the master-details form.
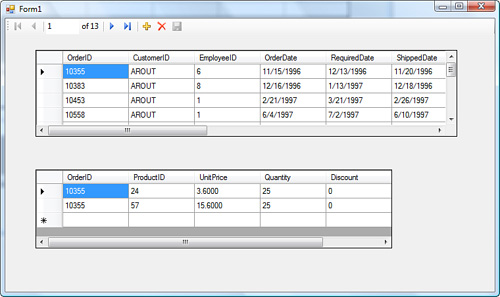
Now it is time to instantiate a DataContext instance and specify the query whose results we want to bind. In general, it is not a good idea to bind the entire contents of a database table to a form, because the amount of data may be too large for a user of the form to consume. Here, we will get the orders for one customer with ID "AROUT". The following listing shows the result of adding code to instantiate a DataContext and specifying the query for orders:
public partial class Form1 : Form
{
private NorthwindDataContext db = new NorthwindDataContext();
public Form1()
{
InitializeComponent();
orderBindingSource.DataSource = from o in db.Orders
where o.CustomerID == "AROUT"
select o;
}
}
A sample application displaying orders is now ready to run. Figure 9.10 shows the data retrieved when the application is run.
Figure 9.10. Results in the master-details form.
ASP.NET Data Binding
The experience for basic data binding of query results is very similar in ASP.NET. Create a new ASP.NET web application and add the existing model previously created in the Windows Forms applications sample. Use the Toolbox in Visual Studio to drag and drop a GridView control and add the title “Order Details” to Default.aspx as follows:
<h3>Order Details</h3>
<asp:GridView ID="GridView1" runat="server">
</asp:GridView>
Save Default.aspx and add the following code to the Page_Load() method in Default.aspx.cs:
protected void Page_Load(object sender, EventArgs e)
{
NorthwindDataContext db = new NorthwindDataContext();
GridView1.DataSource = from od in db.Order_Details
where od.OrderID == 10356
select od;
GridView1.DataBind();
}
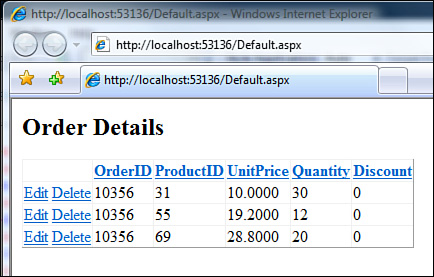
With just three lines of code, we have a simple sample application that is ready to run. Running it produces the output shown in Figure 9.11.
Figure 9.11. Order details in a web page.

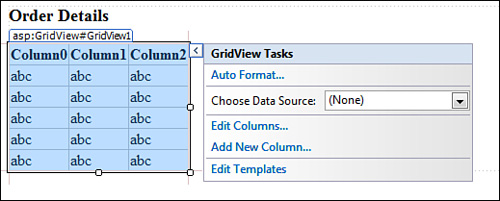
This sample shows how to display results easily. However, more functionality is needed to edit the results. In the ASP.NET stateless server model, when a change is posted back, the original DataContext instance that retrieved the data bound results is no longer around. As discussed in the section “Attaching Multitier Entities,” a new DataContext instance serves the second request to make a change. You could programmatically do the work for update, insert, or delete using the APIs discussed in earlier sections. But LinqDataSource simplifies everything with a declarative way to handle changes on postback. LinqDataSource implements the DataSourceControl pattern defined in ASP.NET 2.0. It knows how to take a mini-string language for filtering, sorting, and paging and turn it into LINQ queries. It also knows how to round-trip the original values and Attach() to a new DataContext instance to make updates. Let’s look at a quick way to enhance the previous sample to use LinqDataSource. First, remove the C# code added in the previous sample. Instead, we will use a wizard to set up a LinqDataSource, as shown in Figure 9.12.
Figure 9.12. Launching the Data Source Configuration Wizard.
1. Select the <New data source...> option for the Choose Data Source property. The selection starts the Data Source Configuration Wizard. Select LINQ as the source, and provide a name for the LinqDataSource–Order_Details, as shown in Figure 9.13.
Figure 9.13. Launching the LinqDataSource Configuration Wizard.

2. Click OK to see the LINQ to SQL DataContext types available in the project and the Table<T> instances in them, as shown in Figure 9.14.
Figure 9.14. Selecting data in the LinqDataSource Configuration Wizard.

3. Click the Where button to specify a filter for the LINQ query, as shown in Figure 9.15. This dialog is suitable for relatively simple predicates in the LINQ where clause. For more complex cases, you could simply edit the LinqDataSource element in the aspx file.
Figure 9.15. Specifying a filter for the LINQ query.

4. Click OK to go back to the Configure Data Selection dialog (see Figure 9.14). You can similarly set up sorting by clicking the OrderBy button. Clicking the Advanced button brings up the key dialog shown in Figure 9.16. It is essential for ensuring that the query results are set up for modification.
Figure 9.16. Setting up LinqDataSource for insert, update, and delete operations.

5. The final design view step is to configure the GridView to provide links for editing and deleting, as shown in Figure 9.17.
Figure 9.17. Setting up GridView for additional operations.

This completes the basic LinqDataSource sample. Run the application to get results, as shown in Figure 9.18. Now the entities can be edited or deleted as well.
Figure 9.18. Results displayed by the LinqDataSource sample application.
Overall, LinqDataSource takes care of a number of complex tasks and provides a simple design-time data-binding capability. At runtime, it takes care of creating a DataContext, forming LINQ queries from string properties, and returning the results for consumption by a control such as GridView. After the user has made a change, it also handles the postback by creating a new DataContext instance, calling Attach() for entities to be updated, and handling inserts and deletes as well. By taking care of a number of “plumbing” details, it provides simple building blocks for creating a presentation tier in a web application.
Thus, LINQ to SQL provides a broad array of options for bridging the objects retrieved from the database and your desired presentation tier technology. It supports the presentation tier actions affecting the entity lifecycle, from creation through retrieval, update, and deletion, for both smart client and web applications.
Creating a Database
LINQ to SQL is designed to allow you to think in terms of your objects. That is true whether you are retrieving data from the database or binding the results to a presentation tier control. In fact, the same principle even extends to creating a database. Because entity classes have attributes describing the structure of the relational database tables and columns, you can use this information to create new instances of your database.
You can call the CreateDatabase() method on the DataContext to construct a new database instance with a structure defined by your classes. This allows you to build an application that automatically installs itself on a customer system. It also allows you to build a client application that needs a local database to save its offline state. For these scenarios, CreateDatabase() is ideal.
However, the data attributes may not encode everything about an existing database’s structure. The contents of additional indexes, user-defined functions, stored procedures, triggers, and check constraints are not represented by the attributes. The CreateDatabase() function creates a replica of the database using only the information it knows. It is not designed to be a substitute for full-fledged schema design or DDL creation for a complex production database with tuning needs. Yet, for a variety of databases, this is sufficient and very expedient from a productivity standpoint.
Here is an example of how you can create a new database named MyDVDs.mdf:
[Table(Name="DVDTable")]
public class DVD
{
[Column(IsPrimaryKey = true)]
public string Title;
[Column]
public string Rating;
}
public class MyDVDs : DataContext
{
public Table<DVD> DVDs;
public MyDVDs(string connection) : base(connection) {}
}
The object model can be used to create a database using the SQL Server Express 2005 database as follows:
MyDVDs db = new MyDVDs("c:\mydvds.mdf");
db.CreateDatabase();
A complementary API allows you to check an existing database and drop it before creating a new one. Here is a modified version of the database creation code that first checks for an existing version of the database using DatabaseExists() and then drops it using DeleteDatabase():
MyDVDs db = new MyDVDs("c:\mydvds.mdf");
if (db.DatabaseExists()) {
Console.WriteLine("Deleting old database...");
db.DeleteDatabase();
}
db.CreateDatabase();
After the call to CreateDatabase(), the new database exists and can accept queries and commands such as SubmitChanges() to add objects to the MDF file.
It is also possible to use CreateDatabase() with normal SQL Server, using either an MDF file or just a catalog name. You need to use the appropriate connection string, which you can find from the connection properties in Server Explorer in Visual Studio. The information in the connection string is used to define the database that will exist, not necessarily one that already exists. LINQ to SQL finds the relevant bits of information and uses them to determine what database to create and on what server. Of course, you need the appropriate rights granted to you on the database server to do so.
Summary
LINQ to SQL implements the LINQ query pattern to retrieve entities from the database. Applications require additional support for the retrieved entities beyond the LINQ query pattern. LINQ to SQL supports modification of entities through create, update, and delete operations. It also provides rich capabilities for handling concurrent changes through optimistic concurrency checks, conflict resolution, and transactions. In addition to the database operation, entities from other tiers can be processed using attach functionality.
LINQ to SQL also provides rich features for building a presentation tier quickly. Retrieved entities are ready for data binding in both the Windows smart client and ASP.NET web forms presentation tiers.
In addition to data access and presentation, LINQ to SQL covers simple deployment through a runtime capability for creating a database from the object model. Together these features make it easier to write database applications in an object model-centric fashion.