Lesson 15. Converting SD to HD
Lessons > lesson15 > 16R_SD
Media
Media > One_Six_Right
Time
This lesson takes approximately 30 minutes to complete.
Goals
Understand the basics of HD encoding
Convert an SD project to an HD project
Convert an SD menu to an HD menu
Swap an SD asset with an HD asset in tracks
Now that you’ve authored and built various DVDs, it’s time to explore project conversions. In this lesson, you’ll learn how to convert footage shot in standard definition (SD) to high definition (HD). This knowledge is be helpful when, for example, you start a project in SD and later want to create an HD version for distribution. Fortunately, DVD Studio Pro very easily lets you convert your SD work into HD, with a little help from Compressor.
Be aware that SD to HD project conversion is a one-way street. It’s very easy to go from SD to HD, but you cannot convert HD to SD. Therefore, if you’re planning on creating both SD and HD projects, you should create the SD project first, then convert the project to HD.
In the following exercises, you’ll start with a simple SD project that contains a single menu with a single linked track. You will first encode your HD content with Compressor, then convert the DVD Studio Pro project to HD and, finally, replace the original SD asset with an HD asset.
HD to SD Downconversions
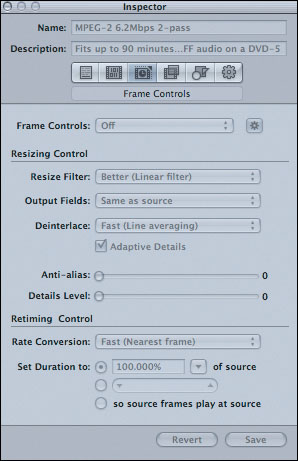
Before working with HD DVD projects, let’s first explore how to create SD assets out of HD material for use in SD projects in DVD Studio Pro. Compressor uses optical flow technology via frame controls to conform the HD frame size to an SD frame size. The resulting quality is superior to other encoding options within Final Cut Studio.
The media you’ll use for the exercises in this lesson is a 30-second clip from Brian J. Terwilliger’s feature-length documentary One Six Right (www.onesixright.com). The footage was shot on HDCAM and has been transcoded to full raster Apple ProRes.
Use the following steps to downconvert an HD QuickTime movie into SD assets for use in DVD Studio Pro (via Compressor):
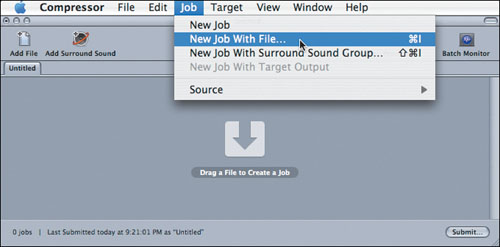
- Launch Compressor and choose Job > New Job with File. Navigate to the Media > One_Six_Right folder and select One_Six_Right.mov. Click Open.
- Select the job and choose Target > New Target with Setting. In the drop-down window, navigate to the DVD: Best Quality 90 Minutes folder and click Add.
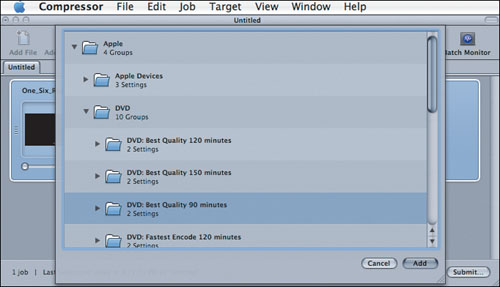
Two targets are added: an MPEG2 for video and a Dolby Digital Professional for audio.
Note
Selecting SD presets when starting with HD source media may seem counterintuitive, but remember that when choosing presets in Compressor you are making decisions based on the desired output media, not the input media format.
- Make any desired adjustments to the destination or output filename (see Lesson 9 for suggestions on naming these files).
Frame Controls will be harnessed when downconverting HD to SD streams. By default, the settings are set to Automatic and therefore all of the options are dimmed.
Tip
The Apple Pro Training Series: Compressor 3 Quick-Reference Guide (Peachpit Press) details both the Frame Controls settings and Advanced Format Conversions such as HD to SD.
You can make manual adjustments by deselecting the Automatic button and then adjusting the settings.
- When you’re ready to encode, click Submit.
During encoding, Compressor will transform the frame size from HD to SD and encode the video into MPEG-2 and the audio into AC3. You can use these assets just like any other SD assets in SD projects.
Encoding HD Assets
In this exercise, you’ll apply an Apple preset to encode the HD footage into HD assets for use in an HD DVD project in DVD Studio Pro.
- Open Compressor, if necessary, and choose Job > New Job with File. Navigate to the One_Six_Right folder and select One_Six_Right.mov. Click Open.
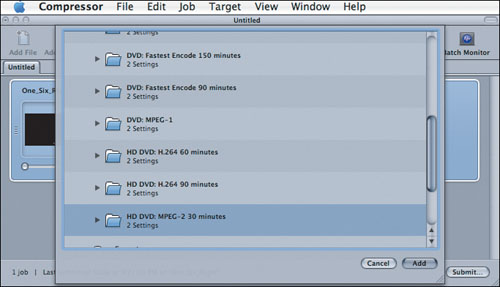
- Select the job and choose Target > New Target with Setting. In the drop-down window, navigate to the HD DVD: MPEG-2 30 Minutes folder and click Add.
Compressor automatically assigns two presets to the file: a Dolby Digital Professional AC-3 preset and an MPEG-2 preset. (For more information on Dolby Digital files, see “About AC-3 Files” in Appendix A.)
More Info
HD MPEG-2 encoding allows for higher data rates (up to 29.4 Mbps) and operates with a set GOP structure and size. For more information on MPEG-2 encoding, refer to Appendix A, “Advanced Encoding.”
- Make any desired adjustments to the destination or output filename. When you’re ready to encode, click Submit.
During encoding Compressor will create MPEG-2 and AC-3 assets that you will use in the next exercise.
Converting SD Projects to HD Projects
In this exercise, you’ll convert a completed SD project to HD within DVD Studio Pro.

- Open the 16R_SD DVD Studio Pro project file.
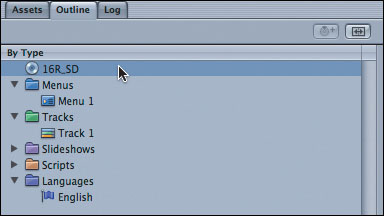
- Click the Outline tab and select 16R_SD from the list.
The disc settings will load into the Inspector.
- In the Inspector window, click the General tab to view the DVD Standard options.
- For the DVD Standard option, select HD DVD.
- In the warning dialog, click OK.
- Choose File > Save As and name the file 16R_HD. Save the file to the My_Projects folder.
By changing the name of the file, you will retain the SD project and create a new project for the HD DVD.
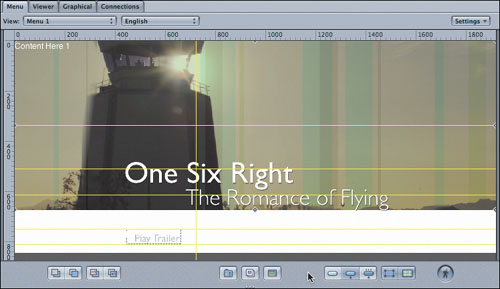
- From the Apple tab of the Templates window, drag the Corporate Cover HD template onto the SD menu in the Canvas and hold down the mouse button. When the Drop palette appears, drop the template onto Apply to Menu.
DVD Studio Pro retains your current custom text, buttons, and any media you’ve placed in drop zones and converts that content to the new theme.
- Import the movie that was encoded using the HD DVD settings in Compressor by clicking the Assets tab and the Import button. Navigate to One_Six_Right_HD.m2v and, in the Open dialog, click Import.
- In Track 1, Command-click both assets to select them, and then press Delete.
- In the Assets tab, Command-click the One_Six_Right_HD.m2v and the One_Six_Right.ac3 assets and drag them into the empty Track 1.
The SD media is replaced with the HD media, but the button linking from the menu to the track is retained.
- Choose File > Save to commit all of your changes to the new project file.


More Info
For more information about Compressor and its use, see Brian Gary’s Apple Pro Training Series: Compressor 3 Quick-Reference Guide (Peachpit Press).
Lesson Review
1. Is it possible to convert HD projects to SD projects?
2. What is the benefit of using Compressor to downconvert HD to SD media bound for DVD?
3. True or false: You can swap SD assets with HD assets in DVD Studio Pro without creating a new track.
Answers
1. No. The conversion process goes only one way. Once an SD project has been converted to HD, it cannot be converted back.
2. Compressor uses optical flow technology to convert the frame size from HD to SD.
3. True. You can, and you should, because doing so will save any button links created during authoring.