
Blocking and Shot Listing, Part Two
Now that you’ve imagined how the actors will move in the scene (blocking), it’s time to imagine how you will shoot the scene (shot listing). Come to the set with your plan and enlist the services of the DP. If it’s an exterior location (where the light is less controllable because no one has figured out yet how to manage the sun), the DP will definitely have an opinion about in which direction he would like to shoot first. If it’s a night exterior or an interior set, the DP will give you more options.
Your DP will generally prefer to light the widest shot first and condense the scope of the lighting as you go on. So in your shot list, go from wide to tight. The DP will also want to light directionally, that is, to shoot everything in one direction, using the same group of lights, before you turn around to have the camera look in the opposite direction. If you have multiple scenes in the same area (like a courtroom), you may want to block shoot those scenes, that is, to shoot every scene with the witnesses on the stand before you turn around to shoot the attorneys. You begin your shot list by indicating where you want to put the camera to establish the scene; then you ask yourself, “What would be the next shot while lighting in this same direction?” After you have continued that process and listed all shots, finishing with your tightest/last shot in your first direction, you note on your shot list that you are going to turn around/reverse, and you begin again with the widest shot and work your way down to the tightest shot. When you have completed the shot list, double-check the work by indicating next to the dialog/description of the script page which shot you anticipate using—this methods helps make sure that you haven’t forgotten anything. It is important to note that your shot list is created in the order in which you plan to shoot it, not the order in which it will be edited. For example, you may be putting an insert shot or montage first (like in our first scene with the Soldier) when you cut it together, but you would shoot the widest shot first, (in that case, that is probably the dolly shot that leads the Soldier to the porch). So your shot list will be in shooting order, but when you doublecheck your work and put a shot number in your script next to each piece of dialog or stage direction, that will illustrate your editing order.
Once you have all your shots, you can edit it in multiple ways (more to come on this in Chapter 14). Your job as a director on the shooting day is to make sure that you have all the coverage you need. The best way to ensure that you do is to plan it out ahead of time (block and shot list) so you’re able to focus on understanding the subtext and providing all the shots required to illustrate the story.
Whether you shot list or storyboard, the point is to “see” the movie in your head before shooting a single shot.
You could also storyboard this scene, which would be a literal depiction of the blocking and the shots, shown in a succession of boxes (frames). This step can be done by skilled artists who listen to the director describe the scene and then translate it by drawing a picture of each shot onto storyboards. (Or if you can draw, you can do it for yourself.) Since Bethany can draw nothing but stick figures, a talented artist named Joe Mason drew the storyboard for the opening sequence of an episode of Castle she directed, which you can see in Figure 8-1. The storyboards essentially show in still frames what the finished product will look like. It’s a visual representation, rather than the logical/literal method of shot listing. You then shoot it so the shots resemble the storyboard as seen in Figure 8-2. If you choose storyboarding, there are several computer programs for this, including Google Sketchup and Adobe Photoshop. There is even a Hitchcock storyboarding application for the iPhone/iPad.
The reason Mary Lou and Bethany prefer shot lists is that they better illustrate how shots are reused during scenes. (Plus, as we know, Bethany can’t draw.) In the example from Chapter 7, you would cut back and forth between shots #f and #3, between the Wife and the Soldier, and as you wanted to go tighter, you would cut back and forth between shots #2 and #4. But storyboards might help you “see” the finished film better because with computer programs, you get a better three-dimensional sense of the set in which the actors are moving. Whether you shot list or storyboard, the point is to “see” the movie in your head before shooting a single shot.
Just as blocking and shot listing utilize two separate abilities of a director (feeling and logic), shots deliver two kinds of impressions: objective or subjective. Objective means the camera is merely recording the scene as an unseen and nonparticipatory observer. The audience should not be aware of what the camera is doing; that is, the camera movement is organic to the action and does not call attention to itself. Subjective camera is used when the lens of the camera is the eye of a character; that is, the camera is a character. This impression is prevalent in action or horror sequences and in cases in which the director wants the audience to feel as if they are “in” the scene with the actors. So when planning the shot list, the director should take into consideration the kind of feeling the script requires and know how to integrate the camera with the actors in front of it to provide either an objective or subjective point of view.

FIGURE 8-1 The first storyboard panel from an opening sequence of an episode of Castle that Bethany directed. (Castle copyrighted material is used with the permission of ABC Studios.)
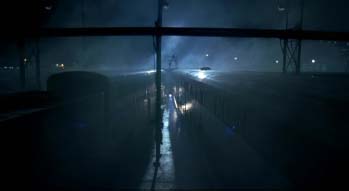
FIGURE 8-2 One frame from the opening sequence of an episode of Castle that Bethany directed. The scene had been previously storyboarded, as seen in Figure 8-1, and this frame matches the third element on the storyboard page. (Castle copyrighted material is used with the permission of ABC Studios.)
The most subjective type of shot is when the camera is photographing a character’s point of view. It is extremely personal and subjective. The audience members feel as if they are in the story—almost as if the camera is not only the character, but also the audience’s perspective. The next most subjective shot is when the actor looks directly into the lens, making each member of the audience feel as if the character is speaking personally to him. The shot starts to become more objective when characters talk to each other and the camera records that interaction, showing the audience the story but not making them feel inside of it. This sense of objectivity or subjectivity is achieved not only with the camera, but with the object of the actors’ focus—where they are looking during the scene. When two characters are talking to each other and there’s a sense of intimacy, you’ll want a tight eyeline, meaning that when Character A looks to Character B, she is looking very close to the camera lens. The wider the eyeline, the more objective the feel.
Let’s go back to one of our scenarios with the Soldier and his Wife, the one that ended on the 50/50 shot of them embracing. If you want to see what each of them is thinking after they embrace, you have the choice of where to place your camera to get these reactions. The closer the camera is to the Soldier or the Wife’s eyeline, the more subjective the shot will be and the more the audience will be placed inside the feelings of the character. The farther you move the camera from the eyeline, the more objective and observing the shot will be. In Figure 8-3, you can see the camera placement to demonstrate this concept.
To summarize, the farther away the camera is placed from the action, the more objective the feel. (The exception would be a close-up on a long lens, which—because it throws the background out of focus—can make the storytelling intimate, even though the camera is far away from the actor. More on that to come.) Conversely, the closer the camera is to being inside the character(s), the more subjective an impression it gives.

FIGURE 8-3 Camera placement for subjective and objective shots.
THE CAMERA AND OTHER EQUIPMENT
The director needs to know not only how the actors will move and what shots are planned, but also what equipment is used to achieve those shots. (We’ll go over this subject next, but understand that only a general knowledge is needed.) The director has an entire crew behind him that specializes in different areas of equipment, and they do not need to be told how to use that equipment. They need to be told only what shot the director is looking to achieve; they know how to best utilize their resources.
1. Camera: The device for recording pictures. These used to be primarily film cameras (35 mm or 16 mm) but now are generally digital, using a hard drive or memory cards as the recording element. For a better quality of recording, cameras are now often high-definition (HD).
2. Dolly: The platform or wagon on wheels to which the camera is attached.
3. Steadicam: A handheld product for moving the camera; the operator wears a harness and the camera is attached to a floating head. This approach is used for tracking shots that move with the actor, particularly over unsteady terrain.
The director has an entire crew behind him that specializes in different areas of equipment, and they do not need to be told how to use that equipment. They need to be told only what shot the director is looking to achieve; they know how to best utilize their resources.
4. Dolly track: Looks like a railroad track. It comes in sections and is laid by the grip department. (We talk about crewmembers and their jobs in Chapter 11.) The wheels of the dolly move on the track, enabling the camera to move in a straight line backward or forward without bumping the frame. It collapses together on an angle for easy storage and portability.
5. Dance floor: Used when the camera movement is not in a straight line. The grips lay a floor of plywood or plastic over the existing floor to create a smooth surface.
You can also choose to use the camera handheld, which tends to create a bit of a bumpy frame. The camera operator simply holds the camera and moves to create the best shot as the actors move, for a very subjective feel that is an increasingly popular method of shooting. Bethany and Mary Lou favor it only when the story truly warrants it, as it tends to call attention to the method of shooting. The audience becomes aware of the shot, rather than the story. It’s essential that the audience loses any thought that interferes with their immersion in the story; they should not think about how it was done. As director Mike Nichols said about his classic movie The Graduate, “We did a lot of fancy camera shit, but nobody has ever mentioned it in 40 years because if you have events that are compelling you’re completely unaware of what the camera is doing, which is the idea.”1
A shot is the sum of two things: (1) what is in the frame, the actors, the set, and every production design element, and (2) how those things are recorded by the camera. The camera isn’t simply a box with a recording element inside of it. It is a box with lenses on it that change the size and feel of the shot. So the director also needs to know what lenses can do and what perceptions they create. (Even though most shows today are shot digitally, the lenses used are adaptations of 35 mm film lenses, and are therefore referred to in those terms.)
Lenses are the curved glass circles set into a tube and attached to the front of the camera that bend and refract light and “see” the scene, just as the lenses in your eyes do for you. The difference is that if you are standing and looking at the front of the house as if you were the Soldier in our story, your vision dictates that you will see with roughly a 50 mm lens. You can’t zoom your eyes in to suddenly see an up-close version of the house. But a camera lens can. Wide lenses (9 mm–50 mm) are short and squat. They show a picture that opens up peripherally (on the sides) but can’t look deep (long). Long lenses (75 mm–250 mm) show the up-close version. So if you are shooting from the point of view of the Soldier standing on the sidewalk, 50 feet away from the front door, a wide lens will show you the whole house. A 75 mm lens (a long lens) would show you the full figure of the Wife as she opens the door. A 250 mm lens from the same camera position would photograph her close up.
Why would a director choose to shoot the Wife’s close-up with a long lens from far away, rather than moving the camera closer to her and shooting her with a wider lens? Both are valid choices, but lenses have properties that lend different feelings to their shots; they provide different-looking shots. A wide lens can hold focus for the foreground, middle ground, and background of a shot. In our Soldier’s house example, both the flowers in front of the porch (35 feet away from the camera) and the door (50 feet away from the camera) would be in focus. Wide lenses are used for establishing shots and masters whenever you want to see the “big picture.” Long lenses have a shallow depth of field. The longer the lens you use, the more shallow the focus. (This is an oversimplification in that depth of field is determined by f-stop, focusing distance, and format size. But the director need only say, “I’m looking for a close-up on a long lens,” and the DP will set up the shot. The director can then assess whether that shot is really what he’s looking for and continue the discussion with the DP, refining the shot until it corresponds to what the director sees in his mind’s eye.) So on a 250 mm lens, the Wife’s eyes might be in focus, but her nose will not be. But the feeling that a long lens gives is more filmic because the background is out of focus, bringing the viewer’s attention precisely to the point that is in focus. Figures 8-4 and 8-5 show the different feelings that two lenses can give you when the framing is identical.
A shot is the sum of two things: (1) what is in the frame, the actors, the set, and every production design element, and (2) how those things are recorded by the camera.
There are extremes at both ends of the lens continuum. At the wide end is the fish-eye lens, which distorts what is in front of it. It is often used when a character is looking through a peephole in a door. At the long end, you can use an extender, which doubles or quadruples the capability of the lens so that a 250 mm lens becomes a 500 mm lens. The best use for this type of lens is when you want to give the impression that the subject in front of the lens is being watched from a distance, as by a paparazzi.
There are two types of lenses: fixed (prime) and zoom. A fixed lens gives you only one focal length (25 mm, 35 mm, 50 mm, 100 mm, and so on). A zoom lens is a continuum of sizes. Most often used is a 5:1 (five to one), which provides any focal length between 20 mm and 100 mm. The other favorite lens is the 10:1, which runs from 25 mm to 250 mm. The advantage to a zoom lens is that you have every shot possibility at the first assistant camera’s fingertips. The disadvantage is that the lens is not quite as crisp as a fixed lens because of the optical compromises required by the necessity of light passing through three times as many glass elements, making it difficult for a zoom lens to match the optical quality of a prime lens. Therefore, your DP is more likely to used fixed lenses in a low-light situation such as a night exterior.

FIGURE 8-4 A close-up shot with a wide lens. Actress Katie Enright; photographer Matthew Collins.

FIGURE 8-5 A close-up shot with a long lens. Actress Katie Enright; photographer Matthew Collins.
Let’s say you’re shooting something like The Bourne Identity, in which your main character is hunting for another character in the environment of New York’s Grand Central Station. You want to show the audience where you are. So you’ll shoot an establishing shot, probably from a high angle, on a wide lens, which shows the space and the people in the space and gives the feeling of the crowds and urgency. You then might shoot both a master (full figure plus some of the environment) and a mini-master (the main character who is being hunted plus whomever he interacts with) so that the audience understands the action but still has a sense of the environment. Then you might shoot the close-ups in various sizes to show the hunted’s physicality and expression so that the audience can see how that character is feeling. If the director wants to show that the hunted one is being watched from a distance, he will use a long lens. If, instead, the director wants to depict immediacy and have the audience feel as if they are in the same space as the character, he will use wider lenses and be closer to the actor. You might even go handheld and get right up in the actor’s face. All of this would be intercut with the other character who is watching: the hunter. You would choose lenses, shot size, and shot movement in order to tell his side of the story.
MOVING THE SHOT
What is shot movement? We have already briefly mentioned push-ins and pull-outs, which means that the camera goes closer to the actor or withdraws from the actor. These are dolly shots because the camera is mounted on the dolly. These shots are storytelling devices in that they help give a feeling to the audience. A push-in says, “This is important, let’s get closer.” A pull-out says, “All’s well that end’s well.” (Or it could say, “This character is all alone in this space.”) Another kind of dolly shot is the lateral dolly, in which the camera moves sideways across the plane in front of the actor(s). This shot is used when characters are in one place for a long time, like sitting on a park bench side by side and you want to be graceful and lyrical in movement, not static. A type of lateral dolly is the counter, in which the camera moves in the opposite direction from a walking actor. All of these shots can be done on a dolly, Steadicam, handheld, or crane. There are various types of cranes available, ranging from the kind that was used in Gone With the Wind in 1939 to the technocrane of today, which has a hydraulic arm. You’ll see an example of one in Chapter 9.
Your crew can usually figure out a way to achieve any shot that you can imagine. And they want to do so because helping the director achieve her vision engages their own creativity and ingenuity.
There are ways to move the camera that don’t involve moving the dolly; that is, the camera stays in one place, but it “looks around.” The camera operator steers it, using control wheels. One wheel is for up-and-down movement or tilt. The other wheel controls side-to-side movement or pan.
Your crew can usually figure out a way to achieve any shot that you can imagine. And they want to do so, because helping the director achieve her vision engages their own creativity and ingenuity.
You can imagine how this works if you picture an actor walking into a room and the camera is placed in the middle of the room. The actor enters left-to-right and the camera pans with him as he walks. When he sits down, the camera would tilt down to continue to hold him in the shot. If you wanted an extremely low or high angle, you could take the camera off the dolly and attach it to a flat mounting device called a high-hat. The high-hat can sit on the floor, or it can be attached to the top of a ladder.
If the camera doesn’t move, but the lens does, that is a zoom: the physical act of rotating the lens so the frame of the picture squeezes in or pulls out. If it’s done quickly, that’s a snap-zoom, a storytelling device that tells the audience, “Quick! Pay attention! Look at this!” Generally, zooms are for effect: a way of saying, “I want you to be aware of what the camera is doing so that you will see what I want you to see.” A dolly move is less visible, and if done correctly, the audience will never be aware that in one shot, they have seen a two-shot become a close-up because they are so involved in watching the story. This move is a coordinated effort by the camera operator, the dolly grip (who physically manipulates the dolly), and the 1st camera assistant (focus puller). We talk more about this in Chapter 11.
After you have blocked the entire script, go back through it to check all your ins and outs (for both acts and scenes) and look at all your transitions, or how you get from one scene to the next. Unless it’s a specific story point, you don’t want to end a scene on a close-up of a character and then start the next scene in the same way or same shot. To determine the visual, look at the feeling of the scene. If it’s fast and funny, you might want to have a character make a sudden entrance or even actually pop into the frame. If there’s a story point you want to make, you might want to begin with that. For example, if a young woman just received some money, you could start on her (new and fancy) shoes as she enters. If the scene is somber, you would talk to your DP about the lighting, and perhaps plan a shot that showed the isolation of the character. And then check all the endings of the scenes to make sure that you have a compelling visual and have told the story and that the ending works with the beginning of the next scene.
During prep for a one-hour drama (which is usually seven days), there is much to be done. One of your most critical tasks is blocking the scenes and shot listing or storyboarding. The entire script should ideally be prepared in this way before beginning to shoot. But there is one more element to keep in mind: how much time do you have to shoot?
MAKING THE DAY
In an average 12-hour single-camera production day (7:00 a.m. to 8:00 p.m.), most television shows average about 25 setups (individual shots) per day. It takes that long because each scene must be rehearsed, blocked, and shot. There is also time allotted for things like hair and makeup touchups. Uncomplicated shots take a minimum of 30 minutes. Depending on the lighting, and what kind of shot it is, it could take far longer than that—up to 2 hours. (Feature films usually top out at 10 setups a day.)
In an average 12-hour single-camera production day (7:00 a.m. to 8:00 p.m.), most television shows average about 25 setups (individual shots) per day.
But then there are complicated shots, plus things can go wrong, which is statistically likely because of the sheer number of people involved. If there are 50 crewmembers, plus let’s say 5 actors, that’s 55 opportunities for obstacles, not to mention the equipment snafus. So let’s say that almost every TV production can accomplish 25 setups within the usual 12-hour day. If two cameras are used, obviously you could double the amount of setups. You are normally expected to shoot 4 to 7 scenes in a day.
What if, in your prep, you planned to shoot 12 setups in each scene? Well, 4 (scenes) times 12 (setups) is already 48 setups, which is generally not possible. If you have two cameras, you might make it. But what if you have 6 scenes, not 4? Logistically, you have to look at your day and know that only a certain amount of sausage will fit in the casing. You have to add up the shots you planned in all the scenes scheduled for the day and determine whether what you have planned is feasible. You also have to restrict the number of takes, or tries, of each shot. Three good takes require much less time than ten takes, especially if you know what you’re looking for in terms of performance or shot execution. If you have overloaded your day, then you have to make adjustments to your plans. If you stubbornly don’t adjust your shot planning and think, “I’ll just make it somehow,” you run the danger of having the producers pull the plug. That’s a pretty literal description: suddenly, it’s all over, and you may have to drop a scene and not finish your planned work.
So now you are over budget and you didn’t make the day (complete the scheduled work while staying on time and on budget). Not a good place for a responsible director to be in. So let’s go back: how could you have figured out what to do in order to tell the story in the time allotted? Perhaps you get less coverage, which refers to the number of shots it takes to do a good job of telling the story. You might choose to shoot a scene as a oner, with only one shot. This is generally effective if it’s a walk ’n’ talk, when two characters stroll in a straight line while talking. You could either have the camera at the end point on a long lens, or dolly alongside the actors, or you could do both at the same time if you have two cameras, and that would be a very effective and efficient way of covering the scene.
A director going for less coverage as a means to save time (and therefore, money) might play a moment of a scene in a two-shot (one shot, thirty minutes) rather than getting the two-shot plus two singles (three shots, ninety minutes). But less coverage is potentially dicey because you’ll want as much film as possible in the editing room—more choices could mean better storytelling. We say “could,” because there is also a case to be made for spare, decisive directing, like that of Clint Eastwood. It’s a little like that old game show Name That Tune, in which a contestant would say, “I can name that tune in four notes.” Well, a director like Eastwood might tell the story in only four shots, but they are magnificently perfect ones. And he might print only two circled takes of each shot (which means that only two completed shots are forwarded to the editor), but he is confident that the performance is the best it can be and that no more takes are needed. As actor Matt Damon said of Eastwood, “He’s so prepared and expects everyone else to be, and so there’s nothing wasted, ever. It’s a real lesson in how to run a super-efficient set.”2
The other method of condensing your shot list so that you can make the day is to block the scene more efficiently. The way to do that is to try to make sure all of the movement by the actors in a scene is on the same axis, which allows you to shoot in two directions instead of four. And that means less lighting and fewer setups. In other words, in a two-person scene, both actors may move north and south, but not east and west. Another way to say it is that the actors can come closer to the camera or go farther away from the camera, but cannot go side-to-side in front of the camera. There is nothing to be gained by shooting all four directions, because as we know, every time the DP and his crew have to light in a different direction, it takes more of the director’s precious time. But sometimes it is necessary, given the scripted action or if there are multiple characters, to shoot in all four directions. All we’re saying here is that if you can block it on the same axis, it will serve you well. Playing all the action on the same axis will not dumb down the energy of the scene because it will still register with the audience as movement. The audience is not counting how many directions or shots it takes to tell the story. The audience is just caught up in performance, going along with the story.
Bethany directed a scene in Brothers & Sisters that is a good model for the work process in prep, both on the director’s part and the 1st AD’s part. The script called for a happy occasion (a charity event) to turn bad when one of the main characters punched someone—the wrong someone. Figure 8-6 shows a script page from this scene. The undulating marks on the left side of the page are made by the script supervisor during production to indicate which lines of dialog were covered in which shot.

FIGURE 8-6 The marked script supervisor’s page 41 of the Brothers & Sisters script entitled “An Ideal Husband.” (Brothers & Sisters trademarks and copyrighted material have been used with the permission of ABC Studios.)

FIGURE 8-7 The script supervisor’s facing page 41 of the Brothers & Sisters script entitled “An Ideal Husband.” (Brothers & Sisters trademarks and copyrighted material have been used with the permission of ABC Studios.)
The script supervisor kept all the data about the coverage, including the slate, the shot description, how many takes, and so on as a facing page at the beginning of both scenes. Figure 8-7 shows these facing pages for this scene.
With the script and floor plan (see Figure 8-8) in hand, Bethany sketched a small version of the floor plan on her shot list page and gave each of her characters a starting point, then imagined where each of them would go during the scene.
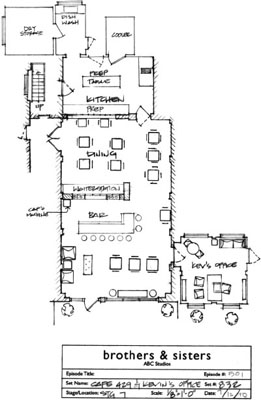
FIGURE 8-8 The floor plan for Café 429 and Kevin’s office of the Brothers & Sisters script entitled “An Ideal Husband.” (Brothers & Sisters trademarks and copyrighted material have been used with the permission of ABC Studios.)

FIGURE 8-9 Bethany’s shot list for scenes 25 and 26 of the Brothers & Sisters script entitled “An Ideal Husband.” (Brothers & Sisters trademarks and copyrighted material have been used with the permission of ABC Studios.)
She then began shot listing the scene. Figure 8-9 shows Bethany’s shot list. By the time she was finished, she had 12 shots planned, which was extremely economical because several shots evolved to become multiple-use coverage. Figure 8-10 shows the actors’ starting points and some camera placement for scenes 25 and 26. Figure 8-11 shows how the scene evolved.
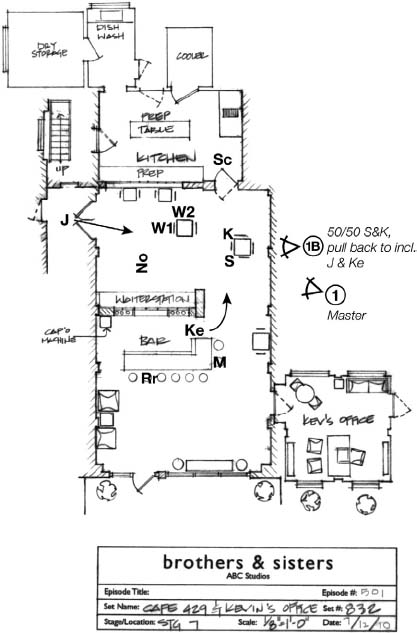
FIGURE 8-10 The starting points for all the principals in scene 25 of the Brothers & Sisters script entitled “An Ideal Husband.” (Brothers & Sisters trademarks and copyrighted material have been used with the permission of ABC Studios.)
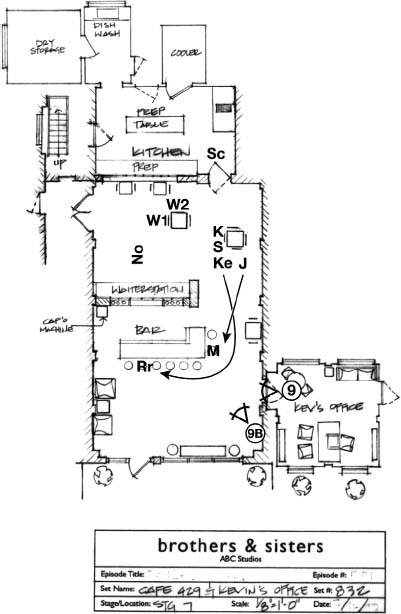
FIGURE 8-11 The movement of the characters in scene 26 of the Brothers & Sisters script entitled “An Ideal Husband.” (Brothers & Sisters trademarks and copyrighted material have been used with the permission of ABC Studios.)
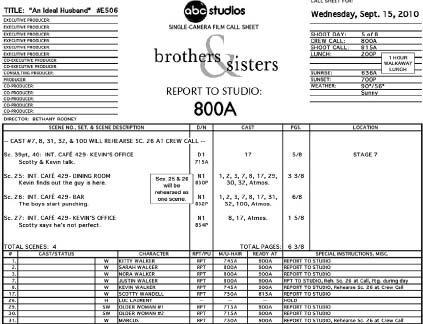
FIGURE 8-12 An excerpt from the 1st AD’s call sheet for scenes 25 and 26 of the Brothers & Sisters script entitled “An Ideal Husband.” (Brothers & Sisters trademarks and copyrighted material have been used with the permission of ABC Studios.)
Meanwhile, after the appropriate concept, department head, and production meetings, the 1st AD (Sally Sue Lander) initiated a shooting schedule and later the call sheet. Figure 8-12 shows part of the 1st AD’s call sheet. Figure 8-13 shows an excerpt of the 1st AD’s shooting schedule. So on the day, all of the elements were in place to shoot a terrific scene: and so it was!
Shot Listing
![]()
Using the scene you blocked in Chapter 7, shot list the scene, making sure (for purposes of practice) that you have planned at least six shots. List your shots by type (master, two shot, and so on) and in shooting (lighting) order, giving each shot a number. Finally, double-check your work by indicating on your script which shot (by its number) you anticipate using next to each line of dialog or stage direction to show editing order.

FIGURE 8-13 An excerpt from the 1st AD’s shooting schedule (page 2) for scenes 25 and 26 of the Brothers & Sisters script entitled “An Ideal Husband.” (Brothers & Sisters trademarks and copyrighted material have been used with the permission of ABC Studios.)
It requires a fair amount of effort to stay focused and creative while deciding how to block and shot list every scene in a script. Some people might refer to it as the drudgery of the job, compared to the excitement of being on set, saying “action” and “cut,” being the boss, and making movies. But by blocking and shot listing ahead of time, during your prep period, you free yourself to live in the moment on set and allow the magic to happen. If you haven’t done this work, you’ll be all knotted up in anxiety, wondering how to shoot a scene, unsure whether you’ve really told the story. It’s hard to be a leader when you’re not sure where you’re going.
Insider Info

How Do the Director and the DP Interact During Prep?
For me, the best part of prep is the set walk with the director. Some already have detailed shot lists; others bring nothing more than notetaking materials. Either way, it provides me with the most productive time during prep.
Because there is no crew present, we are free to explore the scenes and their blocking without 40 pairs of eyes waiting for our directions. We are free to mull over as many variations as we wish and not worry about the ever-present time considerations of a production crew. I find the resulting notes and diagrams crucial in coordinating all the departments during a shoot and prerigging sets correctly for the scene, making my lighting setups better and more efficient. Tones and themes also get discussed, and those conversations tend to percolate through my mind after the walkthrough, leading to further lighting and blocking ideas.
Another benefit of set walks—less tangible than notes—is establishing a rapport with the director. Both the director and I get to communicate and collaborate on what is eventually a shared enterprise. We are able to walk onto the working set and quickly lead the crew because of our shared understanding of what we are trying to accomplish.
John Smith
Director of Photography
Brothers & Sisters, Cold Case, CSI: NY
Vocabulary
axis
block shoot
camera
circled takes
counter
coverage
crisp
dance floor
digital
directionally
dolly
dolly shot
dolly track
double-check
drop a scene
extender
eyeline
fish-eye lens
fixed (prime) lens
handheld
high-definition (HD)
high-hat
lateral dolly shot
objective
oner
pan
pull the plug
reverse
snap-zoom
Steadicam
subjective
take
tilt
tracking shot
turn around
walk ‘n’ talk
zoom
1. Feld, Rob, “Shot to Remember, Trouble in Mind,” DGA Quarterly, Summer 2010, p. 22.)
2. Blair, Iain, “Matt Damon: ‘Good Will Blessings,’” Daily Variety, March 26, 2010.