
EDITING CONSIDERATIONS
The advent of nonlinear editing software has dramatically changed the way video is made. In fact, the emergence of lower-cost (yet powerful) editing tools is directly responsible for the rise of web video. Without a means to create video for the masses, there would be no podcasting or YouTube.
But finding the right nonlinear editing tool is a tricky game. You will encounter several choices on the market as well as hotly contested platform and manufacturer wars. In this chapter, we share with you tools that meet the needs for various types of web video producers, as well as identify specific tasks you need to accomplish during the editing stage.
What's the Big Deal?

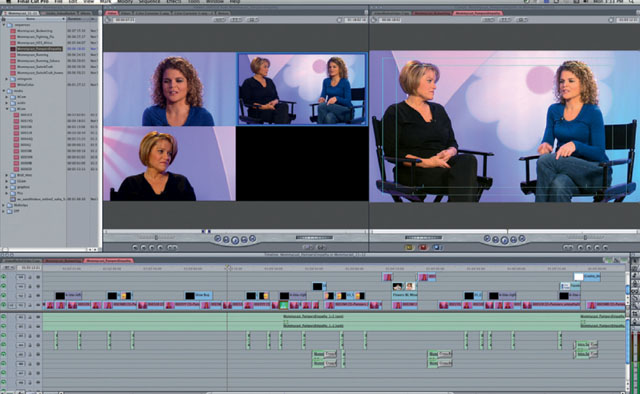
The emergence of nonlinear editing allows for nondestructive editing. This means the original source tapes or files are not modified during editing. Rather, the editing software records the decisions made by the editor in an edit decision list (or EDL). These files can often be interchanged between editing tools (even from different manufacturers). Newer systems are using XML-based project files, which can transfer much more data between software tools.
The Evolution of Nonlinear Editing
Nonlinear editing tools have been around for many years. The technology is defined by its ability to access any frame of video loaded onto the computer system, without needing to shuttle through tape. In using a nonlinear editor, it is possible to assemble video in a word-processing-like approach. This means that video can be built in segments, which can be easily reordered or modified at any point in time.
This is different than the traditional tape-based methods that involved meticulously assembling one shot after another by dubbing from one tape to another (with little to no ability for changes). It is now possible to both build a library of video assets and to experiment much more freely.
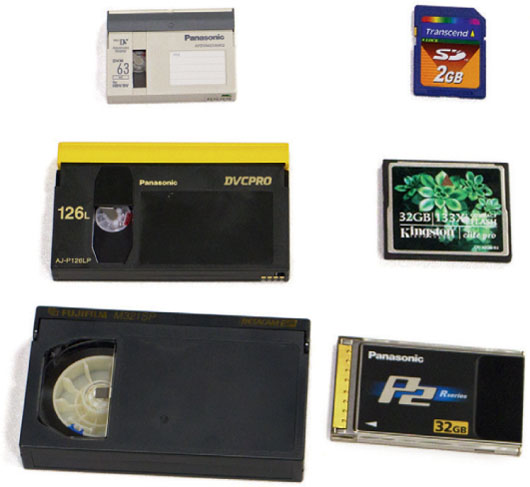
When you work with a nonlinear editing system, you must transfer material (such as video from the camera) to a computer hard drive. Some formats of videotape must be digitized, which is why some modern cameras offer tapeless acquisition of material that can just be copied. Once the material is imported, it can be edited and arranged using a variety of software tools made by several companies. Many of these software tools have a rich history and have seen a long period of evolution (see the sidebar).
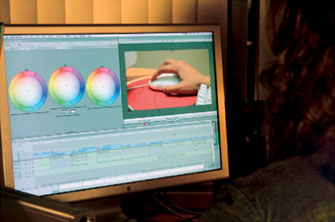
Many nonlinear editing tools offer powerful color correction tools for calibrating and improving images. Software scopes like these used to be a hardware-only option and would add thousands of dollars in cost to an editing system.
The emergence of DV technology and FireWire signaled a huge shift in the editing marketplace, leading to the release of high-quality tools targeted at significantly broader audiences. Tools like iMovie and Windows Movie Maker brought desktop editing to the homes and schools, while companies like Sony, Avid, Adobe, and Apple released multiple products for different segments of the professional and prosumer markets. Thanks to DV, video could really be edited on fairly standard computers. This revolution in FireWire filmmaking democratized the market. Without this revolution, there would be no web video movement.

A Short History of Nonlinear Editing
The first nonlinear editing system was the CMX 600, which was introduced in 1971 by CMX Systems. This system had a console with two black-and-white monitors as well as a light pen to control the system. The system helped establish the idea that the left monitor was where the editor made selections and previewed edits, whereas the right monitor showed the assembled program. Costing near $250,000 (and that price is not adjusted for inflation), the tool was very expensive and only six units were placed into use. But it was a start, and it led to more innovation.
Many others tried to develop nonlinear editing systems throughout the 1980s. These used computers that coordinated multiple laser discs or several tape recorders. One of the more successful units was the EditDroid system invented by Lucasfilm. Only 24 EditDroid systems were ever produced, and the company was eventually sold to Avid Technology in 1993.
Avid is often seen as the leading pioneer in nonlinear editing software and hardware. The company first showed its Avid/1 product in 1988 to a private audience at the National Association of Broadcasters Event. The product continued to evolve with new features. Originally, Avids were intended as an “offline” tool meant to serve as a creative editing solution; the actual edits would then be reassembled in a linear editing suite (called an online edit).
But as computers and storage technology improved, many industries started building programs on their Avids, then releasing them directly to broadcast. In 1993, a group of industry experts lead by a Digital Video R&D team at the Disney Channel found the key solution. Previously, computers had a limit of 50 GB of storage, but these engineers found a way to build a system that gave the Avid Media Composer access to over 7 terabytes of digital video data. The industry was reinvented again, with feature films now being edited nonlinearly.
These early days were interesting, with lots of innovation and technical challenges. The market saw competition from manufacturers like NewTek's Video Toaster and Media 100 editing systems. These both challenged Avid's dominance, mainly by attacking it on price. Other tools emerged such as Adobe Premiere, which offered both software only and a variety of third-party hardware options.
One late entry into the nonlinear editing space is Apple (which many see as a market leader). A group of engineers originally left Adobe to start a project called “Keygrip” for Macromedia. This project couldn't really get off the ground and was eventually purchased by Apple. It was seen as a way to compete with Adobe Premiere and a precautionary move since Avid had begun to move away from the Mac platform and push its Windows-based solutions. Final Cut Pro was unveiled in 1999—and originally was not taken seriously. Apple has continued to invest heavily in the product, however, making major strides in technology and value, leading the company to a dominant position in most market segments. A big part of Final Cut Pro's success was the advent of DV-based video formats, which use IEEE 1394 (or FireWire).
Nonlinear Editing Software
Lots of tools are used to edit video. Selecting the right one involves the balancing of several factors. If you are considering investing in a new NLE, be sure to evaluate these options. We have listed tools by top manufacturers, sorted alphabetically by manufacturer, then by cost. There are more tools on the market; these are just the most popular in the web video space.
- Adobe Systems (www.adobe.com)
 Adobe Premiere Elements (Microsoft Windows) Adobe Premiere Pro (Microsoft Windows, Mac OS X)
 - Apple, Inc. (www.apple.com)
iMovie (Mac OS X) Final Cut Express (Mac OS X) Final Cut Pro (Mac OS X)
- Avid Technology (www.avid.com)
Avid Liquid (Microsoft Windows) Avid Xpress Pro (Microsoft Windows, Mac OS X) Avid Media Composer (Microsoft Windows, Mac OS X)
- Media 100 (www.media100.com)
Media 100 HDe (Mac OS X) Media 100 SDe (Mac OS X)
- Microsoft (www.microsoft.com)
Windows Movie Maker (Microsoft Windows)
- Sony (www.sonycreativesoftware.com)
Vegas Movie Studio (Microsoft Windows) Vegas (Microsoft Windows)
Our Tools of Choice
We think it's important to be transparent here. Both authors have significant experience using nonlinear editing software. We both began using Avid editing systems. When we started RHED Pixel, we chose the Mac platform because of personal experience and our ability to maintain it. RHED Pixel was one of the first companies to adopt Final Cut Pro and use it for a variety of broadcast and nonbroadcast projects. We also use Adobe Premiere Pro (mainly for its excellent integration with Adobe After Effects and DSLR Video). We are open-minded and constantly look at new tools to compare their features and opportunities.
NLE Selection Criteria
Asking video pros to tell you which editing system they'd pick will often invoke passionate answers. Editors tend to have strong feelings about how they like to get their work done. When choosing for yourself, remember that there is no one-size-fits-all answer here. You'll need to balance out your needs and budget to choose the right tool. There are some selection criteria that you should be aware of. This advice is framed solely around use in web video, so keep this in mind when we make recommendations.
Cost
Nonlinear editing tools run the gamut in cost. For example, both iMovie and Windows Movie Maker are included with Apple and Microsoft's operating systems. So if you are looking for a tool at no additional cost, you likely have one. Both of these tools are effective, though many users eventually outgrow them as they develop their video editing skills.
At the next level, you'll find tools like Apple Final Cut Express for Mac and Adobe Premiere Elements or Sony Vegas Movie Studio. These tools start to increase the feature set for the editor and run between $79 and $299. These tools offer significantly more control over editing your video and fixing problems, but they do have a steeper learning curve.
But even the pro-level tools can be within reach of web video producers. Many choose to invest in options like Apple Final Cut Studio or Adobe Creative Suite Production Premium. These bundles offer significant savings and combine multiple video tools into one package. These package deals are useful as they combine video editing, motion graphics, sound editing, encoding, and publishing tools into one bundle.
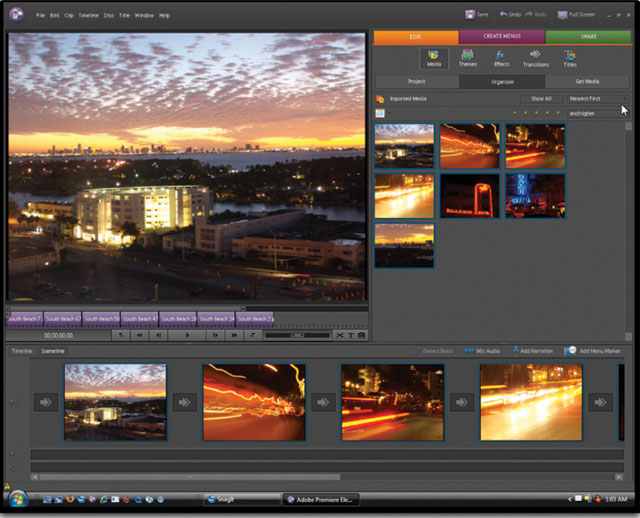
Premiere Elements is a flexible tool that works well for Windows users.
Be sure to fully explore the tools and their costs. It's also a good idea to visit a certified reseller or approach peers so you can try out the systems you are considering. You can also read video editorial reviews from magazines such as Layers Magazine, Creative COW Magazine, and DV Magazine where you can get independent opinions on editing software.
Ease of Use
Ease of use is subjective and depends on the individual user. We have heard from many that Apple, Adobe, and Sony lead the way with products that are powerful and easy to use. It is important to realize though that video editing is a complex task. Be prepared to pick up books, training DVDs, and even enroll in a class to learn video editing skills.
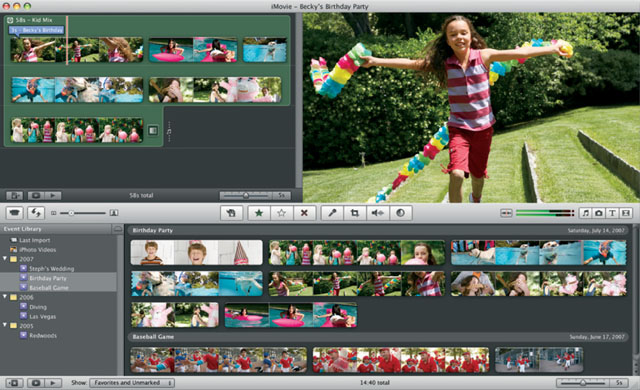
Apple iMovie offers an easy-to-use interface and is designed for newcomers to nonlinear editing.
The biggest mistakes we see are from the people who choose to go it alone and teach themselves. Sure, you probably could have learned to drive a car with no outside help, but it would get really expensive with all those crashes and fender benders. Same holds true with video editing—if you are going to invest in expensive equipment, invest time and money in learning to get the most out of that gear.
Looking for Training?
![]()
There are lots of companies on the market that produce training for video tools. Here are the ones that we personally use and believe in:
- Creative COW – www.creativecow.net
- Future Media Concepts – www.FMCtraining.com
- Focal Press – www.focalpress.com
- Peachpit Press – www.peachpit.com
- Kelby Training – www.kelbytraining.com
- Ripple Training – www.rippletraining.com
Editing Formats
Different camera manufacturers have closer ties to certain NLEs, so be sure to investigate if your type of camera or video deck will work with a particular NLE. It's important that you fully explore this important connection before investing money in technology. A good place to start is to look at the manufacturers’ web pages and see which equipment and video formats they list as supported.
Additionally, we prefer resolution independent NLEs. Tools such as Adobe Premiere Pro, Apple Final Cut Pro, and Sony Vegas allow you to bring in a variety of materials and mix them in one timeline. This is particularly useful if you need to frequently work with photos or screen captures.
For example, our Understanding Adobe Photoshop series takes video shot on a high-definition video camera with nonsquare pixels and intercuts it with screen captures that are digitally acquired. The screen captures are generally larger (often much more) as we can then pan around and show close-ups of the software interface (we simply scale down to show the whole user interface). We prefer this flexibility, as it increases our working options.
Slated Takes
![]()
We have already discussed using a slate to sync and mark takes when in the field. Be sure the editor knows to look for these (and that whoever is loading the footage doesn't chop them off). This way, people not involved in the shooting process can have an easier time editing the web video.
Multicamera Assistance
![]()
If you're looking to edit multiple camera angles together, be sure to check out the different tools from Singular Software (www.singularsoftware.com). We find them to be a huge timesaver.
Multicamera Editing Abilities
The ability to synchronize and edit multicamera video shoots is essential to web video. When executed properly, a multicamera shoot saves enormous time in the postproduction process. Once the angles are synchronized, it is easy to maintain continuity. Additionally, the material is easier to edit as you have multiple angles and can cut between them with a single keystroke. Multicamera options are available for most pro-level tools:
- Adobe Premiere Pro
- Apple Final Cut Pro
- Avid Xpress Pro and Media Composer
- Sony Vegas
Export Abilities
Just as important as what you can put into an NLE is what you can get out. Most nonlinear editing tools fully support multiple web-ready export formats. Some build support right into the application via the Export or Share menu, while others offer more options through standalone compression tools.
It's important that you test the abilities of the NLE to make an MPEG-4, H.264, or Flash video file for use in web video. Although many editing tools do an adequate job, you may still consider some of the dedicated compression tools that we will discuss in Chapter 8.
Are Your Hard Drives Fast Enough?
Do you plan on editing multicamera edits? What about HD footage? Then you need to get some fast hard drives. Here are a few simple tips:
- Use the fastest scratch disk available on your system.
- Never use the system boot drive; it is too cluttered to perform.
- Look at RAID-style hard drives. These have multiple drives striped together for better performance. This is essential for uncompressed and HD formats.
- If your system supports them, take a look at adding serial ATA drives in and stripe them together for performance.
Adobe Premiere Pro offers a great variety of export options including Flash, DVD, Blu-ray, Windows Media, and MPEG-4.
Customer Support
As we've said many times, editing video is not easy. Therefore, you'll want to examine how much support is available for a product. Look at the company's website for an active user forum. Does the company offer certified training classes? How many books or DVDs are published on the tool? Can you find a local user's group in your area for sharing ideas and support? Different manufacturers have different levels of loyalty. Apple and Sony tend to have the biggest “zealots” followed by broad support for Adobe tools and a large established training system for Avid.
A Camera Is Not a Deck or Card Reader
![]()
We see many people plug their cameras in to load material into their video editing systems. This is a very bad idea, as it significantly stresses the equipment. Shuttling and rewinding tape can quickly wear out a camera, as can plugging and unplugging cables. You are much better off buying a tape deck or card reader to feed your material. This way you can have shooting and editing going simultaneously and your camera investment should last significantly longer.
Technical Considerations During Editing
The editing stage is the place where all the pieces come together into the final story. In many ways, it all comes down to how the editor puts the pieces together. It is beyond the scope of this book to teach you how to edit. Rather, we'll identify the most common problem areas when it comes to editing video podcasts. These are the skills you must master (or find someone who has). Knowing what problems to watch for is the hardest thing. Here's what we've learned (often the hard way).
Determining Finishing Size
There is often debate as to how to set up your sequences for editing. Some suggest setting the sequences to match the finished web video size. Although this is a valid choice, we don't recommend this method. Working with nonstandard frame sizes usually results in significantly more editing and rendering. After all, it is easy enough to reformat the video when it is edited (more on this in the next chapter).
The best advice here is to set your video editing timeline to match your primary acquisition source of video. This means that if you shot DV NTSC, set your timeline to 720 × 480 nonsquare pixels. It is also a very good idea to stick with the sequence presets that ship with your editing software. Just be sure to match the right sequence settings to your footage. If you have to render everything in your timeline in order to play it, the sequence settings are wrong.
Determining Sequence Settings
It is important to set your NLE timeline up properly; otherwise the settings could lower the quality of your images. With a podcast or web video, determining the right sequence setting to use can be a bit tricky. This is because you'll often mix elements like video, archival material, photos, slides, and screen captures. The guiding factor is the format of your primary source material. You want your editing sequence to match your most dominant or important source.
This generally means that you want to set your sequence to match your on-camera footage. The good news is that most NLE software tools make this easy. You should find sequence presets for common cameras or video formats. It is generally best to set your sequence up to match your camera footage so you get the most real-time performance from the computer and can edit without having to first render.
After the initial edit is complete, you need to evaluate your image quality. If your sequence contains heavily compressed footage mixed with higher-quality sources like screen captures or photos that use less compression, you'll want to “up-rez” your sequence. Duplicate your edited sequence, then modify its compression type (or codec) to match your highest quality material (such as Apple ProRes, Avid 1:1, or Cineform HD). You'll likely need to render much of the sequence, but this file will make a much better source for web compression.

Apple's Final Cut Pro offers flexible sequence settings. These allow you to create customized sequences to match nonstandard footage.
Maintaining Optimal Color and Exposure
Many web video producers understand little about color correcting their video. This is because web video doesn't have the same rigorous issues of quality control as broadcast video. This doesn't mean that you should ignore the stricter rules of broadcast television:
- Web video codecs work best when the source material has its colors and exposure set properly.
- You might also need to deliver your video for playback on a television.
- Following the best practices of video is literally good practice and will make all of the videos you do look more professional.
You want to make sure that you have adjusted exposure properly. Try to avoid blowing the image out. If it's a choice between too light or too dark, favor a little bit dark. Make sure you have sufficient contrasts because a lack of contrast will cause problems when you compress.
Most modern video editing tools include reasonably good tools for color correction. The problem is that most NLEs contain bad tools as well. In general, look for tools that offer three-way color correctors or curves-based color tools. On the other hand, avoid the use of brightness or contrast filters, as they are the two worst filters for fixing video images. Color correction is a tricky task, so be sure to invest in some training to learn which tools work best for your NLE.
Using Color to Tell a Story
![]()
If you're looking for more on using color in your video productions, be sure to check out The Visual Story by Bruce Block or If It's Purple, Someone's Gonna Die by Patti Bellantoni.
Power Windows: Simple Vignettes

In the traditional color grading process, a vignette (or power window) is often added to the footage. Vignettes offer a simple way to draw a viewer's attention subtly to a person's face or some other object on screen. Most NLEs offer a vignette plug-in. You can also find a free vignette overlay file on the chapter's page at www.VidPodcaster.com.
Color Grading for Best Look
Color grading goes beyond mere color correction. It is the manipulation of color for artistic purposes. You'll often choose to manipulate the color in your podcast to help give it a visual identity. The manipulation of color is a powerful way to convey mood and style to your audience.
There are several third-party tools that are useful for manipulating color in your video. These plug-ins cost extra, but they offer powerful options that can simulate film as well as processing techniques used in cinema. Although you may not be able to do color grade on every show, download demos and try out some of the following tools:
- Magic Bullet Suite (www.redgiantsoftware.com)—Final Cut Pro, Premiere Pro
- Nattress Film Effects (wwww.nattress.com)—Final Cut Pro
- Celluloid Film Looks (www.vasst.com)—Sony Vegas
- Tiffen Dfx Software (www.tiffen.com)—Final Cut Pro, Premiere Pro, Avid
Check for Flash Frames
Before we export a show and publish it online, we give it a thorough scouring. One of the things to check includes looking for flash frames. A flash frame is usually a one- or two-frame edit that is unintentional. It may be a few frames from a scene change or a small gap where no video is present.
It sounds meticulous, but step through your show and review each edit point. You can often find a keyboard command to cycle around your edit points, playing a few seconds before and after. Trust us, avoid flash frames—they are amateurish.
Keep Getting Flash Frames?
Do you keep ending up with flash frames in your edits? The likely culprit is you! It is a bad idea to drag video to or around your timeline. It is an inaccurate way to edit and often results in “little” errors as a result of sloppy dragging. Instead you should use the precise trimming controls as well as set In and Out points for your initial edits.
Consider Transitions Carefully
You will want to carefully consider the use of wipes and transitions in your podcasts. Oftentimes transitions will “break up” because of the limitations of web video. A transition (especially a dissolve) is much too complex to compress effectively. This is because so many of the pixels are changing at the same time and usually quite rapidly.
Most web compression relies on MPEG-4 or Flash technology, which is based on saving space by only updating pixels that change. When you use a wipe, it causes a spike in the data needed to show the image clearly. Because web videos generally have caps on their data rates, this results in the picture breaking up. Many producers eliminate wipes altogether and instead rely on the most basic dissolves and fade-to-color transitions (or even the most basic transition of all—the cut).

Avid editing systems offer several transition styles to choose from.
Dealing with Interlaced Material
There's a good chance that the video in your timeline is interlaced (even if it is shot at 24P). Most video formats involve some interlacing. This is a “leftover” technology from the earliest days of television. Video interlacing causes half of one frame to load, followed by the second half. This material is often identified as the upper or lower field (or even and odd). Essentially, every other frame of video is refreshed each 1/60th of a second for NTSC video and 1/50th of a second for PAL.
Although this is useful for video that is intended for television sets (it can produce smoother motion), it looks terrible on progressive type displays. An interlaced video file is jagged on a portable media player or computer display. Therefore, you need to determine when to remove interlacing:
- Shoot progressive. If you know that you're only delivering to the web, try to get rid of fields and shoot your video progressive.
- De-interlace the timeline. If your NLE allows, set your video editing timeline to progressive. You'll generally need to remove fields using a plug-in or effect. Most NLEs include a de-interlacer or flicker filter. A better option, though, is to purchase a re-interlacer and advanced de-interlacer plug-ins. Filters can take a while to render, so weigh carefully adding the filters to your edit. We generally recommend filtering during the edit if you want greater control or plan to export several versions of the file.
- During compression. Many compression tools offer the ability to de-interlace via a filter as part of the encode process. This option is valid but only works well if all the material in the timeline is from consistent sources. If you have mixed many sources in the timeline (such as footage from different cameras), it is often better to de-interlace your footage within the timeline itself via a filter.
Dual Chain Errors
![]()
If you are using both FireWire hard drives and a camera or deck, you can have major technical problems. For most machines, the built-in FireWire ports all share the same system bus. This leads to major problems when you try to load video into the system and write it out to drives at the same time. The solution is to either capture to a second, high-speed internal drive or to hook up an additional FireWire card. This can often be added to an empty card slot in a tower or slipped into a cardbus slot on a laptop. These options will run you between $50 and $100 and will significantly cut down on technical issues like dropped frames and aborted capture errors.
Shot Selection
If you have a lot of experience editing video for other, more traditional, media, you'll need to retrain yourself a bit. Web video involves putting video out to devices that are not usually television sets. This means you need to choose your shots with the playback medium in mind.
The frame on the left shows how interlacing can affect image quality when viewed on a noninterlaced display (such as a computer or portable media player). the frame on the right was shot progressive with a Panasonic dVX-100B.
Your shot composition will tend to be tighter than you're probably used to. Instead of wide shots, you're more likely to use medium or medium close-up shots. This is because of the lower resolution and smaller size that most web video is published. The best thing for an experienced video creator to do is export and test the video early on. Get used to seeing your video on smaller screens and computer displays. Let this guide you as you select shots to use.
Fixing Interlacing During an Edit
![]()
Need to de-interlace your web video? Here are a few plug-ins worth checking out:
- Big Box of Tricks for Final Cut Pro (www.nattress.com)
- FieldsKit for After Effects, Premiere Pro, and Final Cut Pro (www.revisionfx.com)
- Instant HD for After Effects, Premiere Pro and Final Cut Pro (www.magicbullet.com).
Spelling Errors
We'll let you in on a cold, hard fact. If there are spelling errors in a show, it's always the editor's fault. It doesn't matter where the errors come from, whether it is the client or producer; it's still the editor's fault. Through the years we have built up a constant paranoia. There will be spelling mistakes, therefore scrub your graphics carefully and look for errors. Every time we forget our own advice, the phone rings or the email chimes; it's a client or viewer letting us know there's an error. Be paranoid, expect problems, and then be thorough in your final quality check.
Audio Mix
Your web video may end up with several tracks of audio. Many editors will try to “troubleshoot” their audio mix. The editor intently listens to the show, as if intensity alone could move the edit from a “fine” cut to a “final” cut. Intense focus is a good thing, but make things a little easier by narrowing your focus.

We generally find that the only way to spot problems is to narrow our focus. Problems will stand out in your audio track when you listen to the elements separately. Use these tips:
- Turn off your audio monitors to listen to tracks (or pairs) individually. This way you can isolate problems with the audio tracks.
- If you've added audio edits to your music, do things transition smoothly, or are you trying to hide your music edits? Learn to use your NLE's trimming tools to finesse audio edits.
- Are there any loud breaths, gasps, or “guttural” sounds in your narration or sound bites? Throat clearings and coughs can be cleaned up easily.
- Because many viewers of your podcast or web video will listen with headphones, you should too. This way you get an idea of what the viewer will experience.
Audio Normalization
Pay attention to your audio levels. With the rise of portable media players and smart phones, many web video consumers have headphones jacked into their ears. If your audio mix keeps varying, with very loud areas being followed by areas that are very quiet, you will annoy your audience.
Audio is a much bigger issue when you've got the sound pumped directly into your ears. So a sudden blast because the talent got really loud will cause someone to take the ear buds out and turn your show off. Fortunately, many NLEs or bundled audio editors offer normalization gain. This process attempts to automatically smooth out your audio levels. It won't totally “flatten” the mix, but it will move it all closer to the middle. Your highest highs will drop to a specified target (in dBs) and your lows will be raised closer to the center. This is an important step and worth doing.
Little Upcuts
No matter how good of an audio editor you are, the more edits in your vocal tracks, the more likely you are to have small pops in your sound track. We usually add several four- or six-frame audio dissolves to all audio edits on a narration track. These short dissolves go a long way to smooth things out in your vocal track.
After adding the dissolves, be sure to listen to your mix. You want to make sure that when you add that dissolve, you're not picking up extra audio (random words and double breaths) from the media in the clip's handles.
Run Time Strategies
We've rarely watched a web video that couldn't benefit from being shorter. Never forget your target run time. For most web video and podcasts, you are editing short-form entertainment or training. It is far better to keep it short and to the point. In our opinion, this is an easy way to meet the audience's needs and lower production costs.
You are financially better off if you can generate more episodes with less work. You'll do much better by thinking shorter and getting more individual episodes (making it easier for people to search for your content). This is actually what most audiences prefer—shorter videos, because they are consuming it as on-demand content.
Using Dynamic Noise Reduction?
Many NLE's offer the ability to use a dynamic noise reduction filter. This technology works by sampling the ambient noise in a shot when people aren't talking. This can then be used to filter out the noise from the scene. Although this works great, here's an important piece of advice. Fix any sound problems like this first, before you start to edit. It is much easier to filter and fix the entire interview or on-camera take than it is to go back and do it 15 times because you made several edits. This will save you significant time and effort.
Keep an Eye on the Finish Line
Here's a suggested workflow to improve the quality of your podcasts. These steps should be completed in order and are based on a professional video workflow. The checklist can, of course, be amended with project-specific tasks, but here is a general list that you can adapt for your needs. Thanks to Robbie Carman for the suggestion.
1. Watch the show.
2. Note problems with video and audio using markers.
3. Color-correct the show.
4. Mix the show's audio track.
5. Check graphics for consistency (i.e., fonts, colors, position, and spelling).
6. Watch and get approval for the show.
7. Output the show and create compressed files.
8. Archive and back up the show.
Be sure you monitor your editing and agree-upon target length. For example, you may determine that you want all episodes to run between four to six minutes, but the show inched closer to seven or eight minutes. In this case, you should split it in half for two parts. If the show clocked in at twelve minutes, you could deliver two six-minute episodes or three four-minute shows. The important logic here is that you pick a target run time then manage your editing so the segments time out.
One trick is to add a marker in your timeline to make it easier to see your target run time. Remember, most shows benefit from editing out the “bad” parts. A shorter show helps you distill your content to only the best content. Trim the fat and get to the good stuff quicker.
Backup Progress
Save your work. There, we've said it. Having an organized approach to backing up your work is essential. We generally take a multifaceted approach to our backups. Here are a few strong suggestions for implementation in your projects:
- Drive mirroring. If the content we are using is irreplaceable (for example, screen captures or tapeless acquisition with no tape backup), then we mirror our drive. This involves getting an identical sized or larger drive and copying all of the content from the edit drive. We can recount a few times too many where this basic backup has saved the day. Once the project is done and archived, you can erase and reuse your mirrored drive.
- Auto-save/Vault/Attic. Most NLEs offer some level of control of the program's ability to autosave. This means that you can target a set number of automated project backups to be recorded on a different directory from the system drive or media drive. We often specify a removable drive like a USB “thumb” drive for backup.
- Nightly backup. We recommend giving every editor or graphics person involved in the project his or her own portable hard drive. Additionally, give the mandate that project files should be backed up every night before leaving work. This is a very good idea and puts ownership into the team's hands.
- Use protected drives. There are many affordable drive solutions on the market that automatically protect against data loss. We use drives from Drobo in our facility; they have a failsafe mechanism to account for drive failure (remember, all drives eventually fail).
- Self-contained movies. When you export your movie files for compression, we recommend “self-contained” QuickTime or AVI files. Many users choose “reference” movies, which are dependant on project media and render files. A self-contained file can be easily used in the future if DVD compilation or recompression needs arise. Hard drives have gotten much cheaper, and the extra effort is great insurance for the future.
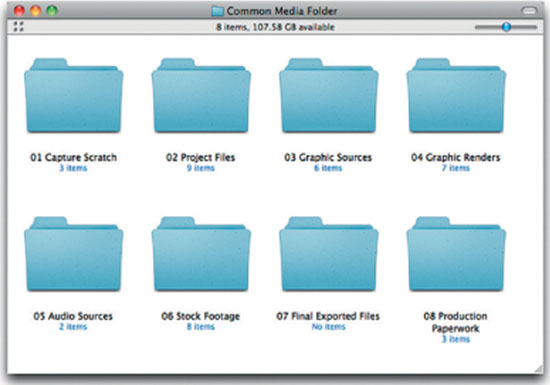
- Common Media Folder. We're often asked about our backup strategies. What do we save, where do we store things on our drives? Here's one methodology that works for us. We create a Common Media Folder for each project. Inside we put folders for all sorts of common media types, such as a sequences folder, a capture folder to hold loaded video, a graphics folder, and an audio folder. Within these folders things are further broken down into source projects, renders, and so on. You will want to create a folder structure that works for you. By using the same structure for each project, it becomes easy to find project assets, as well as make changes. Plus, this folder can be easily backed up to a mirrored drive or archived at the end of a project.
PROfile: LetsKnit2gether |
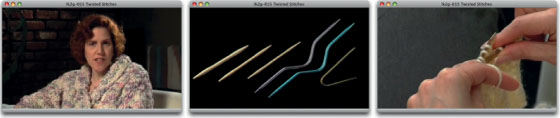
LetsKnit2gether is a five to ten minute video podcast about knitting produced by CAT and Eric Susch. The episodes cover topics like knitting socks, blocking, felting, cables, knitting with ribbon, and lace knitting. LetsKnit2gether (www.LetsKnit2gether.com) focuses on intermediate to advanced techniques and take special care to show the actual knitting up close with simple and clear instructions. Let's Knit2gether is frequently featured in the iTunes Store Top 10 in the Hobbies category.

The show also takes “field trips” to knitting events like the Sheep and Wool festivals in New York and Maryland. There they try to capture the spirit of knitting culture. A recent field trip took the show to Shea stadium to watch a Mets baseball game with eight hundred knitters.
CAT Susch, who has been knitting for more than 20 years and develops all the demonstrations, hosts the show. Husband Eric handles all of the production and editing. Eric leveraged his experience producing shows for the Discovery Channel to create his web video series. The show is shot entirely in HD, with an emphasis on high production values and enjoyable content.
“We shoot everything in HD and finish to broadcast specifications. We use two different cameras for the two types of shows we do. For the demo shows we shoot with a JVC GY-HD110U,” said Eric Susch. “For our ‘field trips’ we shoot with a Sony HC1 because it's small and non-threatening.”

While many people focus on cameras, Eric Susch recommended keeping an eye on lighting and sound.
“Good audio is the single most important thing. If your viewers can't understand what people are saying, they won't care how pretty your pictures are. Good audio is also an unconscious sign of a professional production,” said Eric Susch.
“Lighting is the second most important thing. We take a lot of care with the lighting for our demonstration shows. We shoot in our home and have several standard locations in different rooms so there is a bit of variety in the shows. I have very detailed lighting diagrams so that we can set up and break down quickly. We also shoot multiple shows at once so we can save time.”

A focus on saving time and money is just one the lessons learned.
“Shorter is usually better (when in doubt, cut it out!). Podcasting is not time-based like TV, where every show has to be an exact length to fit in a time slot. Don't fall into bad TV habits by adding fluff to fill time because you lack content. Let your content decide how long your show will be. This is one of the advantages of podcasting over TV and your viewers will appreciate the fact that you are treating their time as valuable.”
Eric Susch has embraced podcasting. He sees it as a valid alternative to traditional media outlets.
“A few years ago it was becoming clear that broadcast television was changing, and not for the better. Production budgets were getting smaller and smaller. The business is now about volume with every show getting more and more tabloid to get attention,” said Eric Susch. “I started looking for a new outlet. When podcasting began I said to myself, ‘How can we get into this and try it without spending any money on it?’ Let's Knit2gether started basically as a test to see what this new medium can do. CAT had all the knitting expertise (so the ‘content’ was free) and I had a lot of the equipment and production expertise. We could start a show and give this new medium the ultimate real world test. Our first year was extremely successful and our test has become something we want to continue and try to make money with.”

Eric is now focusing his professional career on LetsKnit2gether and developing podcasting and new media programs for others. He is learning a lot as he goes, but offered practical advice for those starting out.
“Keep it simple… video podcasting can be whatever you want and that leads to many exciting possibilities. It's impossible to travel down all those roads at the same time and you can quickly become overwhelmed. Figure out what you want your show to be and stick with it,” said Eric Susch. “Your success is not dependent on one or two episodes, it's based on the show as a whole. That leaves room for a misstep here and there. It's not a big disaster if you have a terrible show. Make any adjustments necessary and continue on.”
Gear List
- JVC GY-HD110U camera
- Sony HC1 camera
- Sachtler System tripod
- Sony 17” HD LCD Monitor
- Arri Softbank 1 kit that has two 650 fresnels, one 300 fresnel, and a 1K open face with a chimera and an egg crate
- A 30” silver/white FlexFill
- Pro Prompter
- Schoeps CMC 5 microphone
- Electrovoice 635AB Wireless Microphone
- BeachTek DXA-2S XLR audio adapter