
PREPARING TO RECORD
The music production process starts much before artists enter the recording space. The preparation that precedes sessions may ultimately dictate the potential for their success and it is vital for all involved to understand the importance of planning. With the confirmation of an upcoming project, producers and engineers should gather as much information as possible regarding the material to be recorded and the venues and tools that will be used for sessions.
RESEARCH
The initial familiarisation stage of pre-production should not only incorporate research on the work that the artists create (live shows, existing material, etc.) and the direction in which they want to take it, but also on their attitude towards and views on music and the industry. It is very important for the recording team to establish what the performers think their music sounds like as early as possible, as this should give an indication of what they expect to hear back from their recordings.
During planning, producers have the opportunity to discuss objectives and strategies with the performers, helping them ‘map out’ their desired session outcomes. This process may not be simple, as some individuals can find it difficult to discuss their influences and aspirations, e.g. inexperienced musicians may refuse to be compared to any pre-existing or contemporary acts and seem uncertain of what they want to achieve. Moreover, some artists might simply find the pre-production stage unnecessary and appear unwilling to co-operate. In such circumstances it is important for producers not to take such overly confident or detached attitude as final, as it could merely result from inexperience, lack of musical knowledge or insecurity. It is ultimately the job of the supporting team to ensure that artists feel comfortable in describing their vision, as this will help establish a frame of reference for production.
THE DEMO
The demo, i.e. an early, ‘rough’ recording of a composition, is a very powerful tool that should be used extensively during pre-production. Armed with it, producers and artists can examine the material that will be recorded and discuss possible ways to maximise its impact. In some circumstances, such recordings may also expose the weaknesses of performers, which can help the team focus the production on their strengths.
It is important to mention that the excessive referencing of ‘demos’ during the recording stage may be counter-productive and detrimental for sessions, as artists might get overly attached to their original performance (and its sound). In such cases, attempts to further improve a production may meet with constant opposition on the part of performers, who are anecdotally described as suffering from ‘demo fever’.
Ideally, ‘demos’ should only be used as a reference during the pre-production stage, when they should be analysed and played alongside the artist’s ‘influences’. This may help establish what should realistically be achievable during production.
THE COMPOSITIONS
Although the knowledge of music theory may not be seen as a prerequisite for popular music production, an understanding of the basics of composition and arranging may help producers earn the respect and the trust of the artists they work with, which in turn may help facilitate the communication process and encourage the exchange of ideas. Ideally, during the preproduction stage artists should commit to a final form and arrangement for their songs, as this information will be used to guide the team throughout the recording process.
Form
The form of songs is commonly described in terms of sections, i.e. compositions are commonly broken down into:
• Introduction
• Verses
• Choruses (at times preceded by sections referred to as ‘pre-chorus’)
• Bridge(s)
• Interlude(s)
• Instrumental(s)
• Outro.
Such sections may be further divided into bars or measures (possibly arranged into blocks, etc.), allowing for information regarding song position to be communicated quickly and efficiently.
The following examples illustrate how the form of songs may be mapped out in a very basic pop producer or recordist-oriented format:
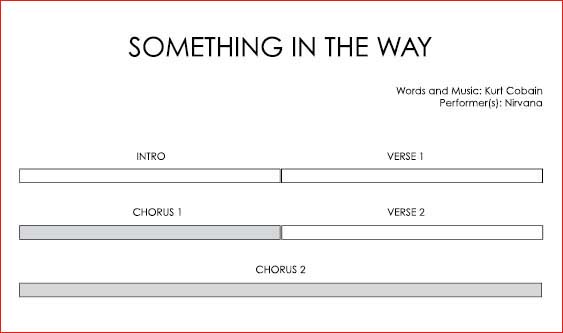
Simplified charts outlining song form, such as the previous examples, or ‘lyric sheets’ (see page 289) may be sufficient for recordists aiming to run standard pop / rock recording sessions with a minimum degree of control over performance. Such charts may be further developed to display bars, beats, etc. for more complex sessions that require a greater command on the part of the producer, e.g. those involving classically trained musicians (where full scores are commonly used). Please refer to Appendix 2 for examples of more elaborate producer-oriented charts.
Arrangement / Instrumentation
Considering that Western popular music is mostly based on simple diatonic melodies and harmonies, lyrical content and instrumentation arguably hold the key to a song’s impact. This does not imply that composers must always aim to write sophisticated lyrics and arrangements for their compositions, but that they should strive to find the most authentic ‘feel’ to deliver an engaging message distinctively.
Although it is important to note that lyrics play a vital part in the capturing of the listener’s ears and imagination, without differences in texture, musical works based on preexisting, predictable patterns would most likely be perceived as repetitive and tedious by the general public, i.e. without contrast in instrumentation and dynamics, less inspired compositions could lack the power to hold the audience’s attention for more than a few seconds. With this in mind, once the form of a song is established, the production team must examine all options regarding arrangement carefully.
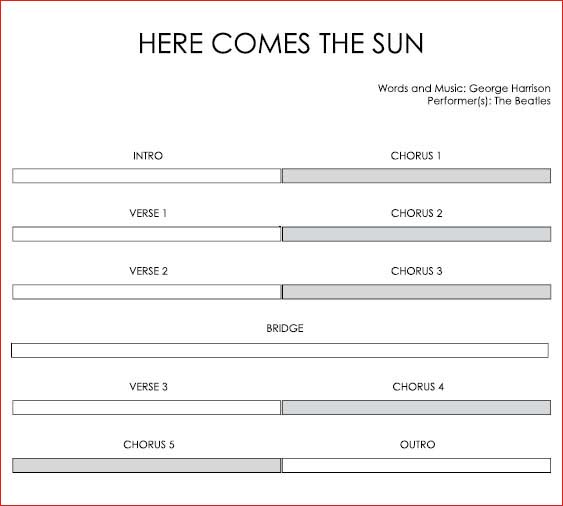
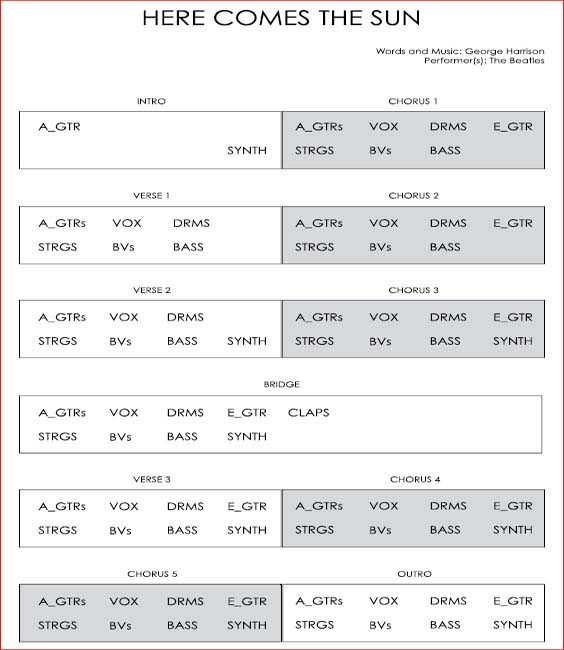
The examples that follow illustrate how the arrangement of songs may be mapped out in a simple, pop producer or recordist-oriented format. Such charts may serve as an important visual aid outlining contrast and, possibly, the dynamic curve of a composition and may be used to help measure the progress of the recording stage, allowing for a quick scan of what is required for the completion of a given production.

Arranging
Arranging is defined here as the act of selecting the instruments that will play at specific sections of a given recording. Some authors reserve this term for the reworking of an existing song for a different set of instruments than those for which it was originally composed.
Arrangement and Mixing
Since the introduction of multitrack recording, it has been possible for engineers to manipulate the arrangement of tracks during the mixdown stage of production, e.g. through mutes, solos, etc. It is not uncommon at present for performers to record brief static parts to be ‘looped’ over the entire length of songs, allowing producers to postpone important arrangement related decisions until the subsequent editing and mixing sessions. It is nonetheless important to remember that musicians will perform differently when they are made aware of their changing role within a given track, which may help bring to life an otherwise static musical composition, e.g. through the use of contrast / dynamics.
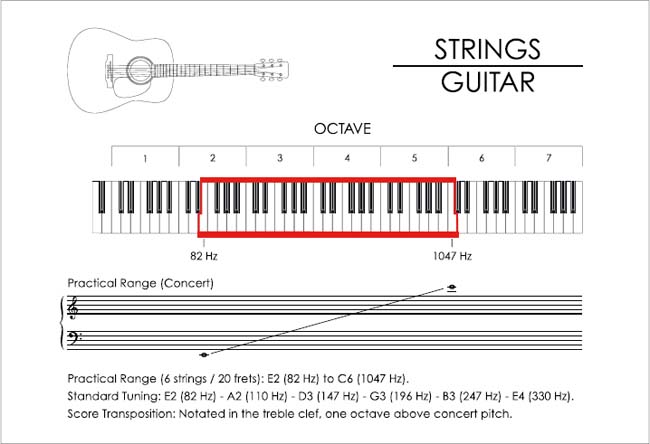
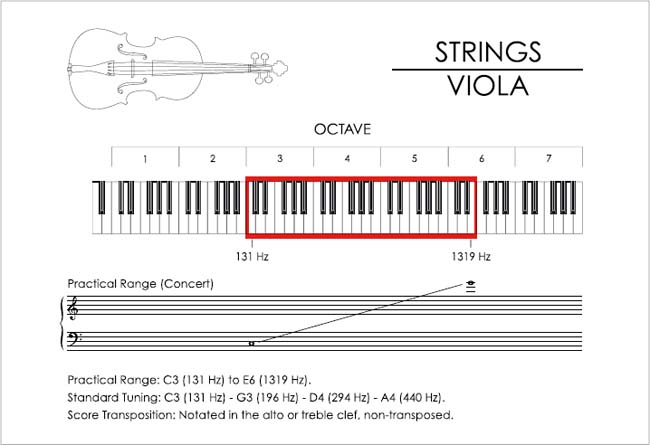
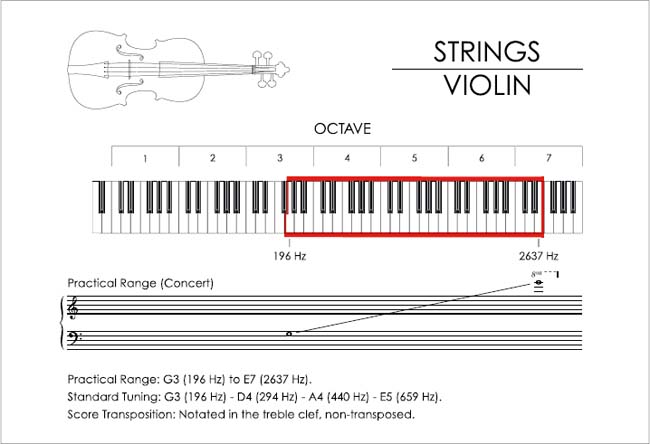
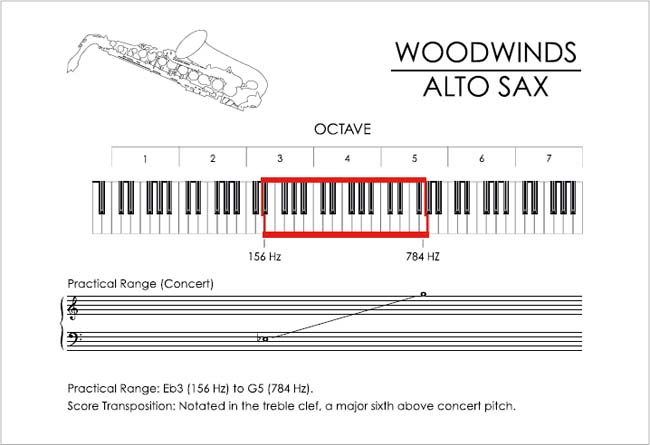
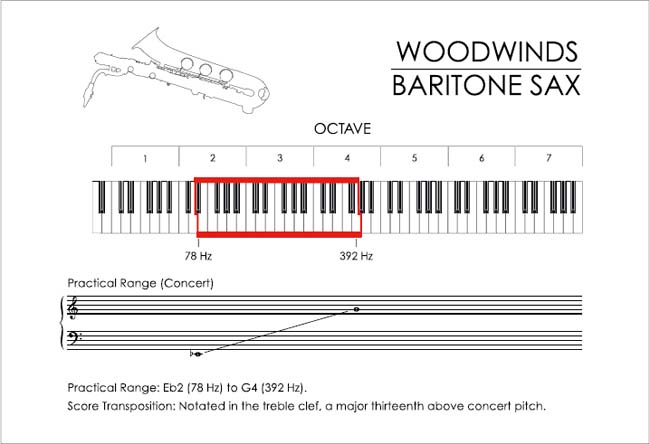
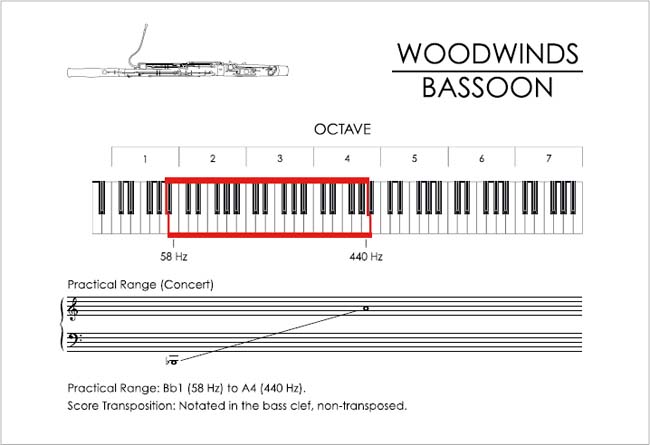
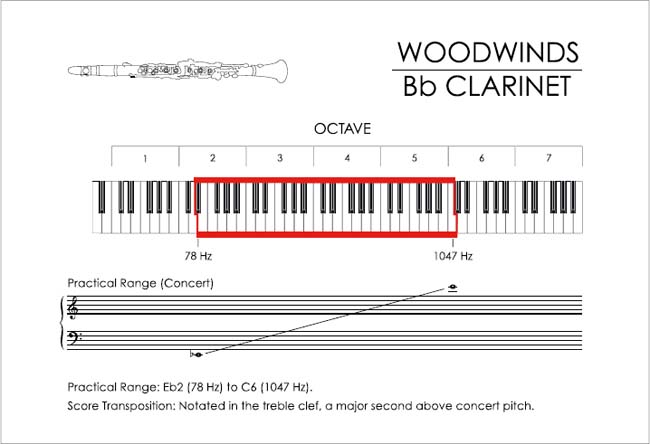
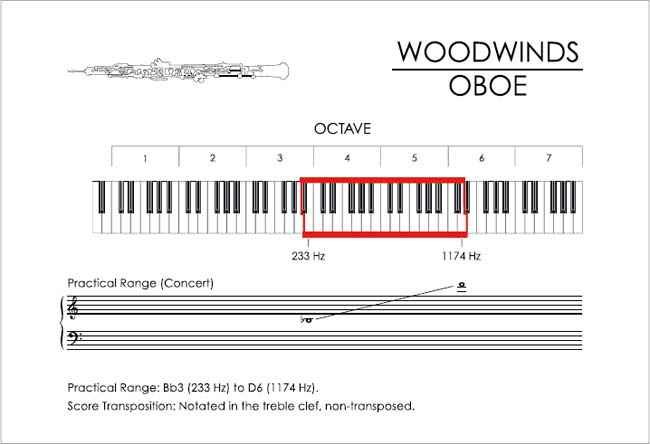
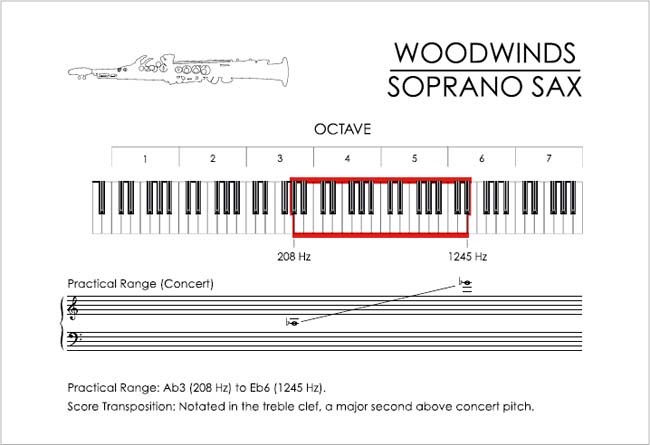
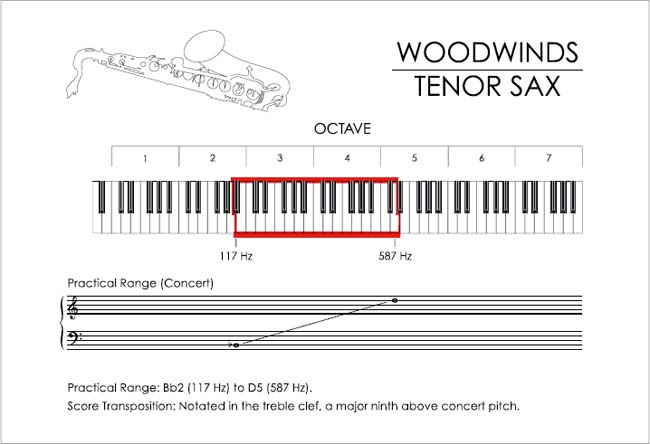
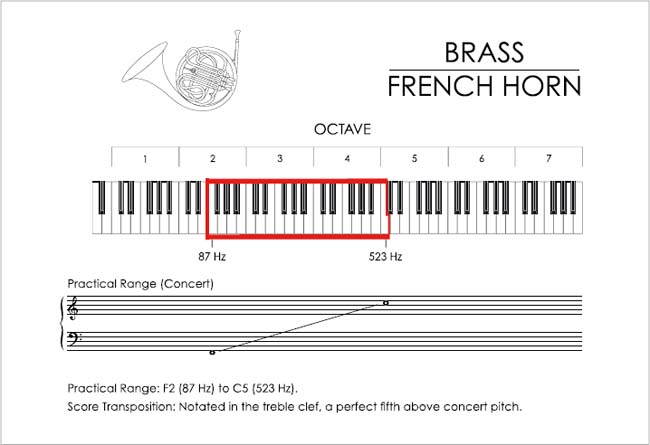
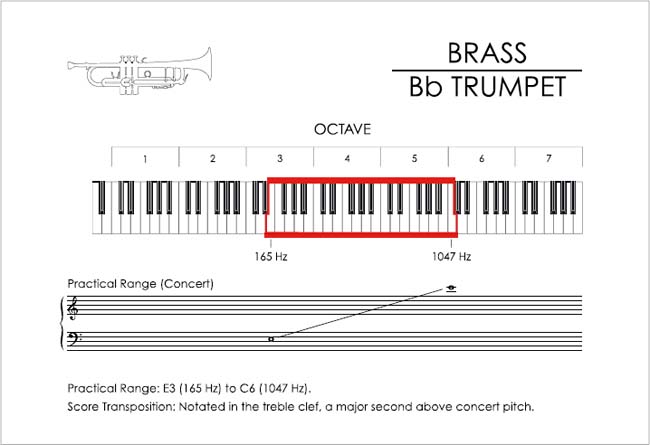
THE INSTRUMENTS
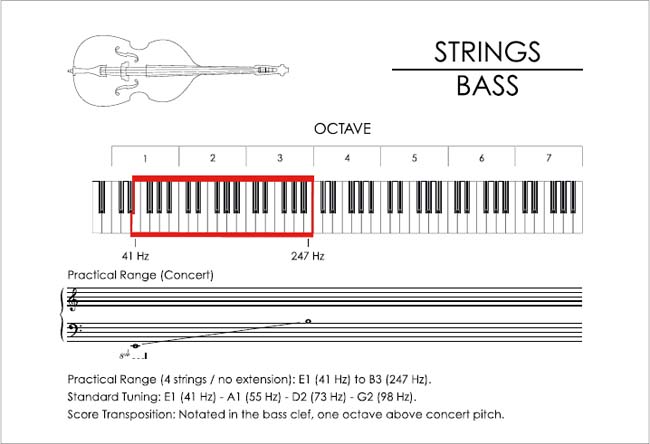
The knowledge of instrument characteristics, including part names (see Appendix 4), range, score attributes, etc. may lead to the crafting of efficient arrangements, facilitate communication in the studio and influence recording (and mixing) decisions, such as microphone choice, the use of processors such as compressors, pass filters, etc.
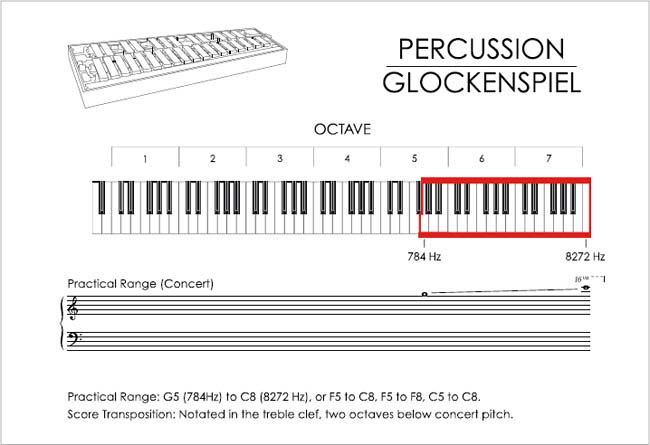
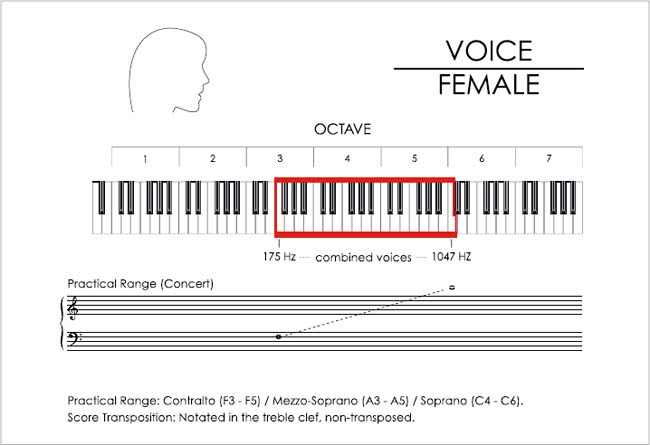
The following pages display information regarding some instruments that are commonly used in popular music production.


THE ‘RECCE’ / VISITING THE RECORDING VENUE
It is vital for the production team to visit the recording venue for their impending sessions in advance. This action, commonly referred to as the ‘recce’, can help save a lot of time and avoid embarrassment, as in some cases a venue may be deemed unsuitable for sessions on personal inspection, e.g. contrary to advertising it may not accommodate the number of musicians required comfortably, etc.
From excessive extraneous noise to the lack of infrastructure, several reasons may make a location inappropriate for music production. On this basis, engineers/producers must consider all possible issues that might affect the result of sessions and discuss these with the rest of the team, e.g. artists, A&R, etc. Some of the aforementioned issues include:
• Unsuitability of equipment
• Difficulty in access (transport)
• Noise level constraints
• Size limitations
• Restricted access to mains power
• Environmental conditions, e.g. ambient noise, air conditioning, etc.
• Health and safety issues
• Lack of services, e.g. catering, parking, Internet access, etc.
It is important to note that in some cases what initially appears to be a hindrance may not have a negative effect on production, e.g. nature-related extraneous sounds that may become the ‘sonic imprint’ of a record.
Size Considerations
Recordists must examine session details regarding personnel closely, as these frequently dictate specific requirements regarding venue layout, size, etc. As an example, sessions involving classical musicians may surprise engineers that normally work with pop music, as the performers might require a greater amount of ‘personal space’ than what might be expected (a minimum of approximately 2 to 3 square metres per musician).
Other key aspects that are affected by venue size include the isolation between sound sources, reverberation time, etc. and all of these factors must be investigated and considered during the ‘recce’.
EQUIPMENT REQUIREMENTS
The process of establishing the equipment requirements for a project should start with the final agreement over the arrangement of songs. At this stage, instrumentation related notes may be translated into technical audio signal information, outlining the tools required for production.
Signal Types
The following is an overview of the different signal types that recordists may work with during production:
Microphone Signals
• Origin: Voice; string, woodwind, brass and percussion instruments and backline amplification captured via microphones
• Nature of signal: Low-level balanced microphone signals
• Characteristics:
- Very low voltages (microvolts to millivolts)
- Low output impedance (commonly 600 ohms or less)
- Microphone preamplification required
Electric Instrument Signals
• Origin: Electric guitars/basses, electric pianos, etc.
• Nature of signal: Unbalanced instrument level signals
• Characteristics:
- Very low voltages (microvolts to millivolts)
- High output impedance
- Commonly recorded via direct injection (DI) or connected to backline amplification, which in turn is captured as an acoustic source, i.e. via microphones
Electronic Signals
• Origin: Synthesisers, sound modules, samplers, drum machines, sound cards, etc.
• Nature of signal: Balanced or unbalanced line level signals
• Characteristics:
- Higher voltages (commonly exceeding 1 volt)
- Low output impedance
- Such signals may be fed directly into the line input of recorders
Electronic Sources and MIDI Signals
Some electronic instruments generate MIDI signals. The latter differ from audio signals, as MIDI is a data protocol that uses voltages to convey binary messages. MIDI makes it possible for musicians to record electronic parts quickly, i.e. without worrying about timbre, while allowing for a great degree of flexibility during editing and mixing.
Although electronic performances invariably involve the conversion of a MIDI stream into audible signals (as musicians need to hear what they are playing), it is not mandatory for engineers to record the audio that corresponds to a MIDI-related performance. Still, MIDI data should ideally be captured with accompanying sound, i.e. if viable, electronic performances should be recorded as audio as well as MIDI tracks. This will allow for the selection of ‘patches’ (sounds) and extensive editing at later stages, while providing a form of production ‘insurance’ in cases where original tracking sounds are considered best and are not replicable.
The Audio Tool List
When all the audio signal related information is determined (based on instrumentation), the data must be compiled and checked against the list of audio tools that will be available during sessions. Whether working in professional, semi-pro or home studios, recordists should always assemble an inventory of the devices that they will have access to during production, as such a register should help the planning process and increase efficiency. The aforementioned list must ideally include:
• Instruments / Backline amplification
• Microphones
• DI boxes
• Console(s)
• Microphone preamplifiers
• Equalisers
• Dynamic range processors, e.g. compressors and gates
• Effects processors, e.g. reverb and delay units
• Multitrack recorders / DAWs
• Two-track recorders
• Monitoring system, e.g. amplifiers, loudspeakers, etc.
Equipment Rental
It is common for large recording projects to require the rental of equipment, e.g. instruments, amplifiers, microphones, etc. These should be sourced from a trusted supplier and added to the audio inventory list.
THE SESSION PLAN
The session plan should be the final product of the planning stage, summarising all relevant information regarding production requirements and scheduling. This document must ideally include:
• Date, time and nature of sessions, e.g. tracking, overdub or bouncing
• Venue
• Suggested song(s) to work on (with key and tempo)
• Personnel and instrumentation breakdown (including call times)
• Engineering notes, e.g. click-track, backing track, general musician placement, music and microphone stands, number of cue mixes, etc.
• General requirements, e.g. media, catering, ‘atmosphere’-related items, e.g. candles, rugs, etc.
It is important to note that under pressurised conditions, e.g. a busy production house or studio, the session plan may never be committed to paper, existing only in the producer’s mind (or diary). It is nevertheless important to remember that planning equates to control and even in extreme conditions individuals can benefit greatly from mapping out their strategies.
Session Schedule / Date Planning
The scheduling of recording dates is one of the most challenging steps of session planning, requiring producers to be extremely organised and sensible when making projections. Ideally, only after extensive forethought should a schedule entry be made and backup plans are indispensable if costly studio time is at stake.
The allocation of funds or the breakdown of the budget between the different stages of production is dependant on a number of variables, e.g. how prepared the performers appear to be, etc., and figures will change as projects develop. Producers should always work with the most current, updated version of the budget and must be prepared to react immediately to situations as they arise. It is important to remember that projects must be finalised within their given budget and in many cases slight overestimation of costs may be advisable, i.e. the production team should err on the side of caution, without being unrealistic in their planning.
While it may not be practical to setout fixed, ideal time-related guidelines for the scheduling of sessions, it is certainly possible to split the production process into stages, allowing for resources and time to be allocated proportionally.
The following is an example of how the recording phase may be split:
1. Basic Tracking
Loud rhythm instruments, e.g. drums, bass, electric guitar, electric keyboards, synthesisers, percussion (and possibly ‘scratch vocals’ for navigation and ‘feel’)
2. Overdubbing
• Quieter rhythm instruments, e.g. piano, acoustic guitar
• Lead vocals
• Backing vocals
• Instrumental solos
• Special sound effects, hand percussion
• Strings, horns, woodwinds, etc.
Upon careful examination of the steps necessary for the completion of a given project, it should be possible to estimate how the budget is to be distributed and one of the roles of the producer is to ensure that artists stick to the plan, while minimising the impact of finances on creativity.
Planning the Sound-Check
The inventory of audio tools allows for a sound-check signal path chart to be drafted. This preliminary plan of action should list suggested equipment chains for the different signals to be recorded, e.g. possible combinations of microphones and preamplifiers for acoustic sources. The selection of devices to be interconnected should be based on technical data and familiarity with the equipment, and it should provide the team with enough variety and/or backup options. The following is an example of a sound-check signal path chart for a singer-songwriter vocal and piano recording:
From the preceding example it is possible to gather that the producer wants to try recording the main vocals and the piano using three different models of microphones and preamplifiers. These should be tested in all possible combinations, unless at some point of the audition stage a given chain is deemed ideal and further testing appears unnecessary.
A sound-check plan can help streamline the initial stages of the recording process, especially if an assistant is able to setup all microphones and preamps for A/B comparison prior to the beginning of sessions. This should allow the production team to spend more time auditioning signals and to focus on the aesthetic evaluation of sounds.
As producers combine all the knowledge gathered throughout the preproduction stage and finalise the session plan, the team should be ready to start production and enter the recording environment. At this stage, a few reminders can be extremely helpful and save all involved time and money. The following are some important final instructions for the performers:
• Be well prepared and warm up before sessions (do not rely excessively on inspiration).
• Practise using headphones and with a click-track (if sessions will require their use).
• Try to be focused and minimise possible distractions (do not invite unnecessary people to sessions).
• Change strings, drum heads, etc. (‘break them in’), purchase spares and check instrument intonation, oil moving parts, etc.
• Check communication channels frequently, e.g. phones, email, etc.
Live Sound Technical Riders vs. Studio Session Plans
Recordists can benefit from analysing live concert technical riders, as such documents can help them create efficient and comprehensive session plans. Good technical riders commonly incorporate all relevant information regarding personnel, equipment, stage plans, etc., and as critical documents they must be assembled with extreme caution and attention to detail.