Chapter 13
Protect data through classification, encryption, and auditing
Security is incredibly important to private industry and the public sector. The number of leaks and hacks of sensitive information continues to increase, and data professionals are at the forefront of securing this information. Along with the technical features built into SQL Server, Azure SQL Database, and Azure SQL Managed Instance, organizations should embrace the guidelines in privacy laws worldwide for handling and managing customer information.
Continuing from Chapter 12, “Administer instance and database security and permissions,” which focuses on authorization, this chapter covers features in the Database Engine and the underlying operating system (OS) that help you to secure your server and the databases that reside on it.
It begins with privacy and how it guides the responsibilities of the data professional. Then it gets into the technical details of what it means to encrypt data and looks at the SQL Server and Azure SQL Database features that help you achieve and maintain a more secure environment. It also looks at securing the network, the OS, and the database itself, right down to the column and row level.
Throughout the chapter, you should be thinking about defense in depth—that is, combining different features and strategies to protect your data and minimize the fallout if your data is stolen.
Sample scripts in this chapter, and all scripts for this book, are all available for download at https://www.MicrosoftPressStore.com/SQLServer2022InsideOut/downloads.
Privacy in the modern era
A chapter about protecting your data estate is incomplete without a discussion of external policies and procedures to ensure that protection. This section is provided as a reminder to keep abreast of current local and international legislation, using one particular regulation as a reference.
Caution
This section does not constitute legal advice. Consult your own legal counsel for more information.
General Data Protection Regulation (GDPR)
On May 25, 2018, the General Data Protection Regulation (GDPR) came into effect in the European Union (EU). It provides for the protection of any personal data associated with data subjects (EU residents) located in the EU. Organizations across the world may be affected if they process personal data belonging to EU residents.
Whenever your organization deals with an EU resident’s personal data, you are responsible for ensuring it is managed according to that legislation. The good news is, this is a business problem, not a technical one. Your organization must develop policies and procedures to enforce the requirements of the GDPR; you as a data professional then create technical solutions to satisfy those procedures. These requirements include the following:
Pseudonymization
Right of access
Right to erasure
The following subsections list problem statements and proposed solutions to achieve these requirements as they might apply to data professionals. (Note that this is not an exhaustive list.)
Pseudonymization
Problem statement. Personal data must be transformed in a way that the resulting data cannot be attributed to a data subject without additional information.
Proposed solution. This can be implemented through encryption. We cover this in detail later in this chapter in the section “Introduction to security principles and protocols,” including various methods to ensure that sensitive data is not made available to privileged users and administrators.
Note
Anonymizing data is different from encrypting or masking data.
Right of access
Problem statement. A data subject may request access to their personal data.
Proposed solution. This can be achieved through standard Transact-SQL (T-SQL) queries, assuming you have taken measures to appropriately handle encryption of the data and authentication of the data subject. Chapter 2, “Introduction to database server components,” covers authentication and authorization.
Right to erasure
Problem statement. A data subject may request erasure of their personal data.
Proposed solution. To erase personal data, you must identify it. This can become arduous with more than a few databases. Organizations may not appreciate the numerous environments in which they store personal data, including scaled-out applications, data warehouses, data marts, data lakes, and email. Fortunately, you can catalog and tag sensitive data in SQL Server and Azure SQL Database.
Microsoft Purview overview
Microsoft has combined several security and compliance products and services under the name Microsoft Purview.
 You can read more about this change at https://azure.microsoft.com/blog/azure-purview-is-now-microsoft-purview/.
Microsoft Purview provides your organization with a unified overview of its governance and compliance portfolio, including its data estate. You can register, scan, map, and catalog your data estate, which includes sources such as SQL Server and Azure SQL, from within the Microsoft Purview governance portal. While your databases stay where they are, their metadata is copied into Microsoft Purview.
- For an in-depth look at how Microsoft Purview can help your organization, see https://learn.microsoft.com/microsoft-365/compliance/purview-compliance.
Microsoft Purview provides a set of deep categorization and classification tools for governing your data estate. This means that your SQL Server or Azure SQL environments might fall under a much broader management scope. Therefore, you must work with your data governance partners to register, classify, and manage data assets.
Caution
When dropping and re-creating a table, you may lose any data classifications associated with that table. This is a similar problem with setting granular permissions, so it is good practice to store and maintain your Data Definition Language (DDL) scripts in a source control system.
Introduction to security principles and protocols
Information security is about finding a balance between the value of your data and the cost of protecting it. Ultimately the business and technical decision makers in your organization make this call, but at least you have the technical tools available to undertake these measures to protect yourself. In other words, you should not leave security solely to the IT department.
SQL Server implements several security principles through cryptography and other means, which you can use to build up layers of security to protect your environment.
Computer cryptography is implemented through some intense mathematics that use very large prime numbers; we won’t delve deeply into specifics here. Instead, this section explains various security principles and goes into some detail about encryption. It also covers network protocols and how cryptography works. This will aid your understanding of how SQL Server and network security protect your data. Keep in mind that encryption is not the only way to protect data.
Secure your environment with defense in depth
Securing a SQL Server or Azure SQL environment requires several protections that work together to make it difficult for an attacker to get in, snoop around, steal or modify data, and then get out.
Defense in depth is about building layers of protection around your data and environment. These measures might not be completely effective on their own, but work well as part of an overall strategy because each layer helps weaken and isolate an attack long enough to allow you to respond.
Layers involved in defense in depth typically include the following:
Perimeter security. You should install perimeter security in the form of a firewall and other network defenses to protect against external network attacks. From a physical aspect, don’t let just anyone plug a laptop into an unattended network point, or allow them to connect to your corporate wireless network and have access to the production environment. Logical and physical segmentation involves keeping sensitive servers and applications on a separate part of the network, perhaps off-premises in a separate datacenter or in the Azure cloud. You then protect these connections—for example, by using a virtual private network (VPN).
Authentication and authorization. From within the network, you must implement authentication (who you are) and authorization (what you can do), preferably through Active Directory (AD), which is available on both Windows and Linux.
Policies. On the servers themselves, you should ensure that the file system is locked down with a policy that does at least the following:
Enforces permissions and modern protocols for files, folders, and network shares
- SMB 1.0 (also known as CIFS) is a deprecated file-sharing protocol that Microsoft recommends removing from your environment. For more information about disabling SMB 1.0, see https://techcommunity.microsoft.com/t5/Storage-at-Microsoft/Stop-using-SMB1/ba-p/425858. SMB 2.0 and higher are still supported.
Denies access to unauthorized users
Denies access to untrusted storage devices
Ensures service accounts do not have system administrator privileges
Encrypts the file system (optional but recommended)
Permissions. SQL Server permissions should be set correctly so that the service account does not have administrative privileges on the server, and database files, transaction logs, and backups cannot be accessed by unauthorized users.
Application security. On the application side, you can implement coding practices that protect against things like SQL injection attacks, and you can implement encryption in your database (and backup files).
- The SQL Vulnerability Assessment tool in SSMS can help identify possible security vulnerabilities. Read more about it at https://learn.microsoft.com/sql/relational-databases/security/sql-vulnerability-assessment.
The difference between hashing and encryption
In a security context, data that is converted in a repeatable manner to an unreadable, fixed-length format using a cryptographic algorithm and that cannot be converted back to its original form is said to be hashed. In contrast, data that is converted to an unreadable form that can be converted back to its original form using a cryptographic key is said to be encrypted.
Cryptographic algorithms can be defeated in certain ways, the most common being brute-force and dictionary attacks. Let’s take a quick look at each of these:
Brute-force attack. In a brute-force attack, the attacking code checks every possible combination of a password, passphrase, or encryption key against the hashing or encryption service until it finally arrives at the correct value. Depending on the type of algorithm and the length of the password, passphrase, or key, this can take anywhere from a few milliseconds to many years.
Dictionary attack. A dictionary attack takes a list of words from a dictionary (which can include common words, passwords, and phrases) and uses these against the hashing or encryption service. Dictionary attacks take advantage of the fact that we are bad at remembering passwords and tend to use common words. A dictionary attack is a lot faster to perform, so attackers typically attempt this first.
As computers become more powerful and parallelized, the length of time to run a brute-force attack continues to decrease. Countermeasures do exist to protect against some of these attacks, and some encryption systems cannot be defeated by a brute-force attack. These countermeasures are beyond the scope of this book, but it is safe to say that sufficiently complex algorithms and long encryption keys take several years to compromise.
- Security expert Bruce Schneier suggests that an algorithm with a 512-bit block and key size and 128 rounds (meaning the encryption algorithm is applied 128 times with a slightly different change in each pass) will be sufficiently complex for the foreseeable future. Schneier’s essay “Cryptography after the Aliens Land” is available at https://www.schneier.com/essays/archives/2018/09/cryptography_after_t.html.
Hashing
A cryptographic hash function (algorithm) takes variable-length data (usually a password) and applies a mathematical formula to convert it to a fixed size, or hash value.
This is the recommended method of securing passwords. When a password has been hashed correctly, it cannot be decrypted into its original form. When used with a random salt (a random string applied along with the hash function), the result is a password that is impossible to reconstruct—even if the same password is used by different people.
To validate a password, it must be hashed using the same hash function again, with the same salt, and compared against the stored hash value.
Because hash values have a fixed size (the length depends on the algorithm used), there is a chance that two sets of data (two different passwords) can result in the same hash value. This is called a hash collision, and it is more likely to occur with shorter hash value lengths. This is why longer hashes are better.
Note
Use passwords that are at least 15 characters in length and, preferably, more than 20 characters. You should also employ a password manager so you don’t have to memorize multiple passwords. Brute-force attacks take exponentially longer for each additional character you choose, so don’t be shy about using phrases or sentences (with spaces), either. Password length matters more than complexity.
Encryption
Data encryption is the process of converting human-readable data, or plain text, into an encrypted form by applying a cryptographic algorithm called a key (cipher) to the data. This process makes the encrypted data (ciphertext) unreadable without the appropriate key to unlock it. Encryption facilitates both the secure transmission and storage of data.
Over the years, many ciphers have been created and subsequently defeated (cracked). In many cases, this is because both central processing units (CPUs) and graphics processing units (GPUs) have become faster and more powerful, reducing the length of time it takes to perform brute-force and other attacks. In other cases, the implementation of the cryptographic function was flawed, and attacks on the implementation itself have been successful.
A primer on protocols and transmitting data
Accessing a database involves the transmission of data over a network interface, which must occur in a secure manner. A protocol is a set of instructions for transmitting that information over a specific network port. A port is one of 65,535 possible connections per protocol that can be made to a networked device. The most common protocol for SQL Server is Transmission Control Protocol (TCP). It is always associated with an IP address and a port number.
The Internet Protocol suite
To discuss security on a network, you must understand cryptographic protocols. To discuss the network itself, you must discuss the biggest network of them all: the Internet.
The Internet is a network of networks (it literally means “between networks”) that transmits data using a suite of protocols. These include TCP, which sits on top of another protocol, called Internet Protocol (IP). Together, they are called TCP/IP. TCP/IP is the most common network protocol stack in use today. Most of the services on the Internet, as well as local networks, rely on TCP/IP.
Note
The full IP suite comprises TCP, IP, Address Resolution Protocol (ARP), Internet Control Message Protocol (ICMP), UDP, and Internet Group Management Protocol (IGMP). All these are required to implement the full TCP/IP stack.
IP is a connectionless protocol, meaning each individual unit of transfer, also known as a network packet or datagram, contains a payload (the data itself) and a header that indicates where it came from and where it needs to go (the routing information).
IP network packets might be delivered out of order, with no delivery guarantee at all. This low overhead makes the protocol fast and allows packets to be sent to several recipients at once (multicast or broadcast). TCP, however, provides the necessary instructions for reliability, sequencing (the order of packets), and data integrity. If a packet is not received by the recipient, or a packet is received out of order, TCP can resubmit the data again using IP as its delivery mechanism.
Versions of IP in use today
Internet Protocol Version 4 (IPv4) has a 32-bit address space, which provides nearly 4.3 billion addresses (232, or approximately 4.3 × 10⁹). Unfortunately, when this version was first proposed in September 1981, very few people could have imagined the Internet would be as large and important as it is today. With billions of humans online, and billions of devices connected, the available IPv4 address space is all but depleted.
- You can read the IPV4 specification, known as Internet Engineering Task Force Request For Comments #791, at https://tools.ietf.org/html/rfc791.
Techniques like Network Address Translation (NAT), which uses private IP addresses behind a router with a single valid public IP address representing that entire network, have held off the depletion over the years, but time and address space have run out.
Internet Protocol Version 6 (IPv6) has an address space of 128 bits, which provides more than 340 undecillion (340 trillion trillion) addresses (2128, or approximately 3.4 × 1038). This number is so staggeringly huge that, even with networks and devices being added every minute, including the upward trend in the use of the Internet of Things (IoT), each of these devices can have its own unique address on the Internet without ever running out of addresses.
- You can read the IPV6 Specification, known as Internet Engineering Task Force Request For Comments #8200, at https://tools.ietf.org/html/rfc8200.
- For more information about Azure SQL Edge, visit https://azure.microsoft.com/products/azure-sql/edge/.
Deconstruct an IP address
An IP address is displayed in a human-readable notation but is binary under the hood:
IPv4. The address is broken into four subclasses of decimal numbers, each ranging from 0 to 255, and separated by a decimal point. For example, 52.178.167.109 is a valid IPv4 address.
IPv6. The address is broken into eight subclasses of hexadecimal numerals, each being four digits wide, and separated by a colon. If a subclass contains all zeros, it can be omitted. For example, 2001:d74f:e211:9840:0000:0000:0000:0000 is a valid IPv6 address that can be simplified to 2001:d74f:e211:9840:: with the zeros omitted (note the double-colon at the end to indicate the omission).
- You can read more about IPv6 address representation at http://www.ciscopress.com/articles/article.asp?p=2803866.
Note
Hexadecimal is a counting system that uses all the decimal numbers plus the first six letters of the Latin alphabet to represent the 16 values between 0 and 15 (10 = A, 11 = B, 12 = C, 13 = D, 14 = E, 15 = F). Using hex is a convenient way to describe binary values that would otherwise take up a lot of space to display.
Adoption of IPv6 across the Internet is taking decades, so a hybrid solution is currently in place, by which IPv4 and IPv6 traffic is shared across compatible devices. If that doesn’t sound like enough of a headache, let’s add routing into the mix.
Find your way around the Internet
Routing between networks on the Internet is performed by the Border Gateway Protocol (BGP), which sits on top of TCP/IP. BGP is necessary because there is no map of the Internet. Devices and entire networks appear and disappear all the time.
BGP routes billions of network packets through millions of routers based on a best-guess scenario. Packets are routed based on trust: routers provide information to one another about the networks they control, and BGP implicitly trusts that information.
BGP is therefore not secure, because it was designed solely to address the scalability of the Internet, which was (and still is) growing exponentially. It was a “quick fix” that became part of the fabric of the infrastructure long before security was a concern.
Efforts to secure BGP have been slow. It is therefore critical to assume that your own Internet traffic will be hijacked at some point. When this happens, proper cryptography can prevent third parties from reading your data.
A brief overview of the World Wide Web
The World Wide Web (the web) is a single component of the greater Internet, along with email and other services that are still very much in use today, such as File Transfer Protocol (FTP) and Voice over IP (VoIP).
The web uses the Hypertext Transfer Protocol (HTTP), which sits on top of TCP/IP. A web server provides mixed media content (text, graphics, video, and other media) in Hypertext Markup Language (HTML) format, which is transmitted using HTTP and then interpreted and rendered by a web browser. Modern web browsers include Microsoft Edge, Google Chrome, Mozilla Firefox, and Apple Safari.
Note
The modern web browser is hugely complex, doing a lot more than rendering HTML, but for the purposes of this discussion and in the interest of brevity, we gloss over those extras.
How does protocol encryption fit into this?
The explosive adoption of the web in the 1990s prompted public-facing organizations to start moving their sales online for electronic commerce (e-commerce) ventures, which created the need for secure transactions. Consumers wanted to use their credit cards safely and securely so they could shop and purchase goods online.
Remember that the Internet is built on IP, which is stateless and has routing information in the header of every single packet. This means anyone can place a hardware device (or software) in the packet stream, do something with the packet, and then pass it on (modified or not) to the destination without the sender or recipient having any knowledge of this interaction. Because this is a fundamental building block of a packet-switching network, it’s very difficult to secure properly.
As discussed, encryption transforms your data into an unreadable format. Now, if someone connected to the same network were to intercept encrypted packets, that person couldn’t see what you’re doing. The payload of each packet would appear garbled and unreadable unless this person had the key to decrypt it.
Netscape Communications created a secure version of HTTP in 1994 called HTTPS, which stands for HTTP Secure or HTTP over Secure Sockets Layer (SSL). Over the years, the moniker of HTTPS has remained, but as standards improved, it came to be known as HTTP over Transport Layer Security (TLS).
Understand symmetric and asymmetric encryption
When we talk about data moving over the network, that usually means TCP/IP is involved, and we must transmit that data securely, through encryption. You can encrypt data in two ways: symmetric and asymmetric. Each has its advantages and disadvantages.
Symmetric encryption (shared secret)
A secret key—usually a password, passphrase, or random string of characters—is used to encrypt data with a particular cryptographic algorithm. This secret key is shared between the sender and the recipient, and both parties can encrypt and decrypt all content using this secret key.
If the key is accidentally leaked to a third party, the encrypted data could be intercepted, decrypted, modified, and re-encrypted—again, without either the sender or recipient being aware of this. This type of attack is known as a man-in-the-middle attack.
Asymmetric encryption (public key)
Also known as public key encryption (PKE), asymmetric encryption generates a key-pair composed of a public key (used to encrypt data) and a private key (used to decrypt that data). The public key can be widely distributed.
The private key never needs to be shared. Therefore, this method is far more secure, because only you can use your private key to decrypt the data. Unfortunately, however, asymmetric encryption requires a lot more processing power, and both parties need their own key-pairs.
Digital certificates
Public keys require discoverability, which means that they must be made publicly available. If a sending party wants to sign a message for the receiving party, the burden is on the sender to locate the recipient’s public key to sign a message. For small-scale communications between two private entities, this might be done by sharing their public keys with each other.
For larger-scale communications with many senders and one recipient (such as a web or database server, for example), a certificate authority (CA) can provide the public key through a digital certificate, which the recipient (the website or database administrator) can install directly on the server. This certificate serves as an electronic signature for the recipient, which includes its public key. The CA is trusted by both the sender and the recipient, and the sender can verify that the recipient is indeed who it claims to be.
Digital certificates, also known as public key certificates, are defined by the X.509 standard. Many protocols use this standard, including TLS and its predecessor, SSL.
- You can read more about how digital certificates and TLS relate to SQL Server and Azure SQL Database later in this chapter. The X.509 standard is available at https://www.itu.int/rec/T-REC-X.509.
Protect the data platform
You use multiple layers of defense as you go down the stack of your data environment. Even if you use virtual machines (VMs) and containers in a cloud environment, the same principles apply.
Each layer protects the layer below it using a combination of encryption keys (asymmetric and symmetric), certificates, and other obfuscation techniques. SQL Server provides features that protect sensitive data from unauthorized users, even if they manage the data. Azure SQL services share a lot in common with SQL Server, and have unique protections, which we call out where applicable.
This section breaks down each layer into network, OS, the SQL Server instance, and finally the database itself, including columns and rows. Much of this hierarchy is encrypted by SQL Server, starting at the OS layer and working all the way down to individual cells in a table. Figure 13-1 shows this hierarchy.

Figure 13-1 The SQL Server encryption hierarchy.
Secure the network with TLS
Data is in motion from the moment it is read from, or written to, the buffer pool in SQL Server, Azure SQL Database, and Azure SQL Managed Instance. Data in motion is data that the Database Engine provides over a network interface. Protecting data in motion requires several considerations, from perimeter security to cryptographic protocols for the communication itself, and the authorization of the application or process accessing the data.
SQL Server 2022 protects data by default during transmission over a network connection, using Transport Layer Security (TLS). Any network protocols and APIs involved must support encrypting and decrypting the data as it moves in and out of the buffer pool.
Note
You may have a network storage device connected to the underlying OS and encrypted using TLS. However, SQL Server is not aware of this encryption. See Chapter 2 for more information.
As mentioned, TLS is a security layer on top of a transport layer, or cryptographic protocol. Most networks use the TCP/IP stack and TLS is designed to secure traffic on TCP/IP-based networks.
How TLS works
With TLS protection, before two parties can exchange information, they must mutually agree on which encryption key and cryptographic algorithm to use. This is called a key exchange or handshake. TLS works with both symmetric and asymmetric encryption, which means the encryption key could be a shared secret or a public key (usually with a certificate).
After the key exchange, the handshake is complete, and a secured communication channel allows traffic between the two parties to flow. This is how data in motion is protected from external attacks.
Note
Remember that longer keys mean better security. Public keys of 1,024 bits (128 bytes) are considered short these days, so some organizations now prefer 2,048-bit or even 4,096-bit public key certificates for TLS.
A brief history of TLS
Just as earlier cryptographic protocols have been defeated or considered weak enough that they will eventually be defeated, so too have SSL and TLS had their challenges:
The prohibition of SSL 2.0 is covered at https://tools.ietf.org/html/rfc6176.
Known attacks on TLS are available at https://tools.ietf.org/html/rfc7457.
TLS 1.2 was defined in 2008 and is the most widely available public version.
Note
TLS 1.3 is supported for SQL Server 2022 on Windows, but is not supported in all client libraries at the time of this writing. TLS 1.3 is not yet supported for SQL Server on Linux.
Like its predecessors, TLS 1.2 is vulnerable to certain attacks, but as long as you don’t use older encryption algorithms (for instance 3DES, RC4, and IDEA), it is good enough while we wait for TLS 1.3 to propagate. You should use TLS 1.2 or TLS 1.3 wherever possible. Once support is available in client libraries, however, you should switch to TLS 1.3. SQL Server ships with older versions of TLS, so you must disable 1.0 and 1.1 at the OS level to ensure you use at least TLS 1.2.
- You can see how to disable older versions of TLS in the Microsoft Knowledge Base article at https://support.microsoft.com/help/3135244.
- You can read more about how TDS and TLS interact at https://learn.microsoft.com/sql/relational-databases/security/networking/tds-8-and-tls-1-3.
Data protection from the OS
At the top of a server’s encryption hierarchy, protecting everything below it, is the OS. Windows Server provides an application programming interface (API) for system-level and user-level processes to take advantage of data protection (encryption) on the file system. SQL Server and other applications can use this data protection API to configure Windows to automatically encrypt data on the drive without having to encrypt data through other means. SQL Server uses the Data Protection API (DPAPI) for transparent data encryption (TDE).
- To read more about the PAL, visit the official SQL Server Blog at https://cloudblogs.microsoft.com/sqlserver/2016/12/16/sql-server-on-linux-how-introduction.
The encryption hierarchy in detail
As mentioned, each layer of the hierarchy protects the layer below it using a combination of keys (asymmetric and symmetric) and certificates. (Refer to Figure 13-1.) Individual layers in the hierarchy can be accessed by a password at the very least unless an extensible key management (EKM) module is being used. The EKM module is a standalone device that holds symmetric and asymmetric keys outside of SQL Server.
The database master key (DMK) is protected by the service master key (SMK), and both are symmetric keys. The SMK is created when you install SQL Server and is protected by the DPAPI.
If you want to use TDE on your database (see the “Configure TDE on a user database” section later in this chapter), it requires a symmetric key called the database encryption key (DEK), which is protected by an asymmetric key in the EKM module or by a certificate through the DMK. This layered approach helps to prevent your data from falling into the wrong hands.
Note
Although we do not recommend 3DES for TLS, you can still use 3DES lower in the SQL Server security hierarchy to secure DEKs because these are protected by the SMK, the DMK, and a certificate, or entirely by an HSM/EKM module like Azure Key Vault. (See the next section, “Use EKM modules with SQL Server,” for more information.)
There are two considerations when deciding how to secure a SQL Server environment, which you can implement independently:
Data at rest. In the case of TDE, data is encrypted as it is persisted to the storage layer from the buffer pool and decrypted as it is read into memory. You can also encrypt your storage layer independently from SQL Server, but this does not form part of the encryption hierarchy.
Data in motion. This refers to data being transmitted over a network connection. Any network protocols and APIs involved must support encrypting and decrypting the data as it moves in and out of the buffer pool.
As mentioned, data is in motion from the moment it is read from or written to the buffer pool. Between the buffer pool and the underlying storage, data is at rest.
Note
TDE encrypts database backup files along with the data and transaction log files. TDE is available with SQL Server Enterprise and Standard editions, and is enabled by default in Azure SQL.
- For more information about installing certificates in an availability group, including a step-by-step guide, see https://learn.microsoft.com/sql/database-engine/configure-windows/manage-certificates.
Use EKM modules with SQL Server
Organizations might choose to take advantage of a separate security appliance called a hardware security module (HSM) or extensible key management (EKM) device to generate, manage, and store encryption keys for the network infrastructure outside a SQL Server environment. The HSM/EKM device can be a hardware appliance, a USB device, a smart card, or even software, as long as it implements the Microsoft Cryptographic Application Programming Interface (MCAPI) provider. SQL Server can use these keys for internal use.
EKM is an advanced SQL Server setting and is disabled by default. To use the key or keys from an HSM/EKM device, you must enable EKM by using the sp_execute 'EKM provider enabled' 1; command. Then, the device must be registered as an EKM module for use by SQL Server. After the HSM/EKM device creates a key for use by SQL Server (for TDE, for instance), the device exports it securely into SQL Server via the MCAPI provider.
The module might support different types of authentication (Basic or Other), but only one of these types can be registered with SQL Server for that provider. If the module supports Basic authentication (a username and password combination), SQL Server uses a credential to provide transparent authentication to the module.
The extensible key management feature of SQL Server is only supported in Standard and Enterprise editions, and is not available for SQL Server on Linux.
- To read more about EKM in SQL Server, visit https://learn.microsoft.com/sql/relational-databases/security/encryption/extensible-key-management-ekm.
Cloud security with Azure Key Vault
You can use Azure Key Vault in addition to, or as a drop-in replacement for, a traditional HSM/EKM device. For this to work, your SQL Server instance (whether on-premises or on a VM in the cloud) requires Internet access to the Key Vault.
Key Vault is implemented as an EKM provider inside SQL Server, using the SQL Server Connector (a standalone Windows application) as a bridge between Key Vault and the SQL Server instance. To use Key Vault, you must create the vault and associate it with a valid Azure Active Directory (Azure AD).
Begin by registering the SQL Server service principal name in Azure AD. Then you install the SQL Server Connector and enable EKM in SQL Server.
- You can read more about service principal names and Kerberos in Chapter 2.
You must then create a login for SQL Server to use to access Key Vault, and map that login to a new credential that contains the Key Vault authentication information.
- A step-by-step guide for this process is available at https://learn.microsoft.com/sql/relational-databases/security/encryption/setup-steps-for-extensible-key-management-using-the-azure-key-vault.
Master keys in the encryption hierarchy
Since SQL Server 2012, both the SMK and DMK are symmetric keys encrypted using the Advanced Encryption Standard (AES) cryptographic algorithm. AES is faster and more secure than Triple Data Encryption Standard (3DES), which was used in SQL Server before 2012. Starting with SQL Server 2022, you can back up and restore your master key using Azure Blob Storage instead of the local file system, by using the URL argument and pointing it to an Azure Blob Storage location.
- For more information on using Azure Blob Storage to back up and restore your master key, see https://learn.microsoft.com/sql/t-sql/statements/backup-master-key-transact-sql.
Note
When you upgrade from an older version of SQL Server that was encrypted using 3DES, you must regenerate both the SMK and DMK to upgrade them to AES.
The SMK
In SQL Server, the SMK is at the top of the encryption hierarchy. It is automatically generated the first time the SQL Server instance starts, and it is encrypted by the DPAPI in combination with the local machine key (which itself is created when Windows Server is installed). The key is based on the Windows credentials of the SQL Server service account and the computer credentials. (On Linux, the local machine key is part of the PAL used by SQL Server.)
Note
You will get a new SMK if you change the service account that runs SQL Server, but it is considered “self-healing”—meaning you don’t have to do anything else once it has changed.
If you need to restore or regenerate an SMK, you first must decrypt the entire SQL Server encryption hierarchy, which is a resource-intensive operation. You should perform this activity only in a scheduled maintenance window. If the key has been compromised, however, you shouldn’t wait for the maintenance window.
Caution
It is essential that you back up the SMK to a file and then copy it securely to an off-premises location. Losing this key will result in total data loss if you need to recover a database or environment.
To back up the SMK, you can use the following T-SQL script, but be sure to choose a randomly generated password. The password will be required for restoring or regenerating the key at a later stage. Keep the password separate from the SMK backup file so they cannot be used together if your secure backup location is compromised. Ensure that the folder on the drive is adequately secured. You can also use an Azure Blob Storage URL instead of a local file path. After you back up the key, transfer and store it securely in an off-premises location.
BACKUP SERVICE MASTER KEY TO FILE = 'c:SecureLocationservice_master_key'
   ENCRYPTION BY PASSWORD = '<UseAReallyStrongPassword>';
GO
The DMK
The DMK is used to protect asymmetric keys and private keys for digital certificates stored in the database. A copy of the DMK is stored in the database for which it is used as well as in the master database. The copy is automatically updated by default if the DMK changes. This allows SQL Server to automatically decrypt information as required. A DMK is required for each user database that will use TDE. Refer to Figure 13-1 to see how the DMK is protected by the SMK.
Caution
Remember to back up the DMK to a file, as well, and copy it securely to an off-premises location.
It is considered a security best practice to periodically regenerate the DMK to protect the server from brute-force attacks. The idea is to ensure that it takes longer for a brute-force attack to break the key than the length of time for which the key is in use. For example, suppose you encrypt your database with a DMK in January and regenerate it in July, causing all keys for digital certificates to be re-encrypted with the new key. If anyone has begun a brute-force attack on data encrypted with the previous DMK, all results from that attack will be rendered useless by the new DMK.
You can back up the DMK using the following T-SQL script. The same rules apply as with backing up the SMK (choose a random password, store the file off-premises, and keep the password and backup file separately). You can also use an Azure Blob Storage URL instead of a local file path. This script assumes the master key exists.
USE WideWorldImporters;
GO
BACKUP MASTER KEY TO FILE = 'c:SecureLocationwwi_database_master_key'
    ENCRYPTION BY PASSWORD = '<UseAReallyStrongPassword>';
GO- You can read more about the SMK and DMK at https://learn.microsoft.com/sql/relational-databases/security/encryption/sql-server-and-database-encryption-keys-database-engine.
Encrypt data with TDE
Continuing with our defense-in-depth discussion, an additional way to protect your environment is to encrypt data at rest—namely the database files and, when TDE is enabled, all backups of that database.
Third-party providers, including storage vendors, provide excellent on-disk encryption for your direct-attached storage (DAS) or storage area network (SAN) as a file-system solution or at the physical storage layer. Provided your data and backups are localized to this solution, and no files are copied to machines that are not encrypted at the file-system level, this might be an acceptable solution for you.
Note
If files in this scenario are copied to another device, they may not be encrypted. Consult with your storage vendor to discuss options for broader protection.
If you have either the Enterprise or Standard edition of SQL Server, you can use TDE, which encrypts data, transaction log, and backup files at the file-system level by using a DEK. Should someone manage to acquire these files via a backup server or Azure Storage archive, or by gaining access to your production environment, that person will not be able to attach the files or restore the database without the DEK.
The DEK is a symmetric key (shared secret) that is secured by a certificate stored in the master database. If using HSM/EKM or Azure Key Vault, the DEK is protected by an asymmetric key in the EKM module, instead. The DEK is stored in the boot record of the protected database (page 0 of file 1) so that it is easily available during the recovery process.
Note
Because it is implemented within the Database Engine, TDE is invisible to any applications that access TDE-encrypted data. No application changes are required to take advantage of TDE for the database.
In the data file, TDE operates at the page level, because all data files are stored as 8-KB pages. Before being flushed from the buffer pool, the contents of the page are encrypted, the checksum is calculated, and then the page is written to the drive. When reading data, the 8-KB page is read from the drive, decrypted, and then the contents are placed into the buffer pool.
Note
Even though encryption might to some degree increase the physical size of the data it is protecting, the size and structure of data pages is not affected. Instead, the number of pages in the data file might increase.
For log files, the contents of the log cache are also encrypted before writing to and reading from the drive.
- To read more about checkpoint operations and active virtual log files (VLFs) in the transaction log, refer to Chapter 3, “Design and implement an on-premises database infrastructure.”
Backup files constitute the contents of the data file, plus enough transaction log records to ensure that the database restore is consistent (redo and undo records of active transactions when the backup is taken). Practically speaking, this means the contents of new backup files are encrypted by default after TDE is enabled.
Note
Files associated with the buffer pool extension are not encrypted if you use TDE. To encrypt buffer pool extension files, you should use a file-system encryption method such as BitLocker or EFS. To read more about BitLocker, visit https://learn.microsoft.com/windows/security/information-protection/bitlocker/bitlocker-overview.
Configure TDE on a user database
To use TDE on SQL Server, you must create a DMK if you don’t have one already. Verify that it is safely backed up and securely stored off-premises. If you have never backed up the DMK, the Database Engine will warn you after you use it that the DMK has not yet been backed up. If you don’t know where that backup is, back it up again. This is a crucial detail to using TDE (or any encryption technology).
Next, you create a digital certificate or use one that you have acquired from a CA. In the next example, the certificate is created on the server directly. Then, you create the DEK, which is signed by the certificate and encrypted using a cryptographic algorithm of your choice.
- To read more about managing database encryption keys in SQL Server, visit https://learn.microsoft.com/sql/relational-databases/security/encryption/sql-server-and-database-encryption-keys-database-engine.
Although you do have a choice of algorithm, we recommend AES over 3DES for performance and security reasons. Additionally, you can choose from three AES key sizes: 128, 192, or 256 bits. Remember that larger keys are more secure, but will add additional CPU overhead when encrypting data. If you plan to rotate your keys every few months, you can safely use 128-bit AES encryption because no brute-force attack (using current computing power) can compromise a 128-bit key in the months between key rotations.
After you create the DEK, you enable encryption on the database. The command completes immediately, but the process takes place in the background because each page in the database must be read into the buffer pool, encrypted, and persisted to the drive.
Verify whether TDE is enabled for a database
To determine which databases are encrypted with TDE, issue the following T-SQL query:
SELECT name, is_encrypted FROM sys.databases;If a user database is encrypted, the is_encrypted column value for that database is set to 1. tempdb will also show a value of 1 in this column.
Manage and monitor the TDE scan
Enabling TDE on a database requires each data page to be read into the buffer pool before being encrypted and written back out to the drive. If the database instance is under a heavy workload, you can pause the scan and resume it at a later stage.
To pause the scan on the WideWorldImporters sample database, issue the following T-SQL command:
ALTER DATABASE WideWorldImporters SET ENCRYPTION SUSPEND;To resume the scan on the same database, issue the following T-SQL command:
ALTER DATABASE WideWorldImporters SET ENCRYPTION RESUME;You can also check the progress of the TDE scan using the encryption_scan_state column in the sys.dm_database_encryption_keys DMV. To see when the state was last modified, refer to the encryption_scan_modify_date column in the same DMV.
Protect sensitive columns with Always Encrypted
Although TDE is useful for encrypting the entire database at the file-system level, it doesn’t prevent database administrators and other users from having access to sensitive information within the database.
The first rule of storing sensitive data is that you should avoid storing it altogether when possible. For example, credit-card information makes sense in a banking system, but not in a sales database, so it should not be stored in one.
Note
Many third-party systems can encrypt your data securely but are beyond the scope of this chapter. Keep in mind that there is a small but inherent risk in storing encryption keys with data, as SQL Server does. Your organization must balance that risk against the ease of managing and maintaining those keys.
If you must store sensitive data, Always Encrypted protects how data is viewed at the column level. It works with applications that use specific connection types (client drivers; see the next section) to interact with SQL Server. These client drivers are protected by a digital certificate so that only specific applications can view the protected data.
- To learn about column-level encryption, which uses a symmetric key, see https://learn.microsoft.com/sql/relational-databases/security/encryption/encrypt-a-column-of-data.
Always Encrypted was introduced in SQL Server 2016 and has been available on all editions since SQL Server 2016 with Service Pack 1. Since SQL Server 2019, Always Encrypted can also be combined with hardware-level secure enclaves to provide additional functionality. Secure enclaves leverage virtualization-based security (VBS) to isolate a region of memory inside the SQL Server process. SQL Server 2022 improves performance in the secure enclave with multi-threading and key caching.
To use Always Encrypted, the database employs two types of keys: column encryption keys and column master keys (discussed shortly).
The encryption used by Always Encrypted is one of two types.
Deterministic. This is the same as generating a hash value without a salt. The same encrypted value will always be generated for a given plain-text value. Without secure enclaves, this is useful for joins, indexes, searching, and grouping, but makes it possible for people to guess what the hash values represent.
Randomized. This is the same as generating a hash value with a salt. No two of the same plain-text values will generate the same encrypted value. Without secure enclaves, this does not permit joins, indexes, searching, and grouping for those encrypted columns. SQL Server 2022 supports nested loop, hash, and merge joins, as well as
GROUP BYandORDER BYclauses.
As you can see in Table 13-1, secure enclaves provide a much richer experience when protecting data with Always Encrypted.
Table 13-1 Functionality available with Always Encrypted encryption
Operation | Without enclave | With enclave | ||
|---|---|---|---|---|
| Randomized | Deterministic | Randomized | Deterministic |
In-place encryption | No | No | Yes | Yes |
Equality comparison | No | Yes (external) | Yes (internal) | Yes (external) |
Beyond equality | No | No | Yes | No |
LIKE predicate | No | No | Yes | No |
Joins | No | No | Yes | No |
GROUP BY clause | No | No | Yes | No |
ORDER BY clause | No | No | Yes | No |
Without secure enclaves, you can use randomized encryption for values that are not expected to participate in joins or searches, while deterministic encryption is useful for values like social security numbers and other government-issued values because it helps for searching and grouping. With secure enclaves, randomized encryption is useful for both scenarios.
- To read more about the virtualization-based security underlying secure enclaves, visit https://www.microsoft.com/security/blog/2018/06/05/virtualization-based-security-vbs-memory-enclaves-data-protection-through-isolation.
Because Always Encrypted is meant to prevent unauthorized persons from viewing data (including database administrators), you should generate the keys elsewhere and store them in a trusted key store (in the operating system’s key store for the database server and the application server, or an EKM module such as Azure Key Vault), away from the database server. To maintain the chain of trust, the person who generates the keys should not be the same person who administers the database server.
Client application providers that support Always Encrypted
The following providers currently support Always Encrypted:
Microsoft .NET Data Provider for SQL Server
Microsoft JDBC Driver 6.0 or higher
ODBC Driver 13.1 for SQL Server or higher
Microsoft Drivers 5.2 for PHP for SQL Server or higher
The connection between the Database Engine and application is made using a client-side encrypted connection. Each provider has its own appropriate method to control this setting:
.NET. Set
ColumnEncryptionSettingin the connection string toEnabledor configure theSqlConnectionStringBuilder.ColumnEncryptionSettingproperty asSqlConnectionColumnEncryptionSetting.Enabled.JDBC. Set
columnEncryptionSettingtoEnabledin the connection string or configure theSQLServerDataSource()object with thesetColumnEncryptionSetting("Enabled")property.ODBC. Set the
ColumnEncryptionconnection string keyword toEnabledand use theSQL_COPT_SS_COLUMN_ENCRYPTIONpre-connection attribute or set it using the Data Source Name (DSN) with theSQL_COLUMN_ENCRYPTION_ENABLEsetting.PHP. Set the
ColumnEncryptionconnection string keyword toEnabled. Note that PHP drivers use ODBC drivers for encryption.
Additionally, the application must have the VIEW ANY COLUMN MASTER KEY DEFINITION and VIEW ANY COLUMN ENCRYPTION KEY DEFINITION database permissions to view the column master key and column encryption key (see next section).
The column master key and column encryption key
The column master key (CMK) protects one or more column encryption keys (CEKs). The CEK is encrypted using AES encryption and is used to encrypt the actual column data. You can use the same CEK to encrypt multiple columns, or you can create a CEK for each column that needs to be encrypted.
- You can read more about ADR in Chapter 3.
Metadata about the keys (but not the keys themselves) is stored in the database’s system catalog views:
sys.column_master_keyssys.column_encryption_keys
This metadata includes the type of encryption and location of the keys, plus their encrypted values. Even if a database is compromised, the data in the protected columns cannot be read without access to the secure key store.
- To read more about considerations for key management, visit https://learn.microsoft.com/sql/relational-databases/security/encryption/overview-of-key-management-for-always-encrypted.
Use the Always Encrypted Wizard
The easiest way to configure Always Encrypted is to use the Always Encrypted Wizard in SSMS. As noted, you must have the following permissions before you begin:
VIEW ANY COLUMN MASTER KEY DEFINITIONVIEW ANY COLUMN ENCRYPTION KEY
If you plan to create new keys, you also need the following permissions:
ALTER ANY COLUMN MASTER KEYALTER ANY COLUMN ENCRYPTION KEY
In SSMS, in Object Explorer, right-click the name of the database that you want to configure, select Tasks, and choose Encrypt Columns. This opens the Always Encrypted wizard.
On the Column Selection page, choose the column you want to encrypt, and then select the encryption type (deterministic or randomized). If you want to decrypt a previously encrypted column, you can choose Plaintext.
On the Master Key Configuration page, you can create a new key using the local OS certificate store or using a centralized store like Azure Key Vault or an HSM/EKM device. If you already have a CMK in your database, you can use it instead. Also choose the master key source—either Current User or Local Machine.
Note
Memory-optimized and temporal tables are not supported by this wizard, but you can still encrypt them using Always Encrypted.
Limitations in Always Encrypted
Certain column types are not supported by Always Encrypted, including:
image,(n)text,xml,sql_variant,timestamporrowversiondata typesstringcolumns with non-BIN2 collations (reduced features are available with non-BIN2 collations, but for best results, use a BIN2 collation)FILESTREAMcolumnsColumns with
IDENTITYorROWGUIDCOLpropertiesColumns with default constraints or referenced by check constraints
- You can read the full list of limitations and find out more about Always Encrypted at https://learn.microsoft.com/sql/relational-databases/security/encryption/always-encrypted-database-engine.
Configure Always Encrypted with secure enclaves
Always Encrypted with secure enclaves requires a complex environment to guarantee the security it offers. This includes the following:
Host Guardian Service (HGS). Install HGS in a Windows Server 2022 failover cluster with three computers in its own AD forest. These computers must not be connected to an existing AD, and none of them can be used for the SQL Server installation. Microsoft suggests that this cluster be isolated from the rest of your network, and that different administrators manage this environment. The only access to HGS will be through HTTP (TCP port 80) and HTTPS (TCP port 443).
SQL Server 2022. Install SQL Server 2022 on Windows Server 2022, on its own physical hardware. VMs do not support the recommended Trusted Platform Module (TPM) enclave attestation, which is hardware-based.
- You can read more about TPM attestation at https://learn.microsoft.com/windows-server/identity/ad-ds/manage/component-updates/tpm-key-attestation.
Tools for client and development. Install the requisite tools on your client machine:
Microsoft .NET Data Provider for SQL Server 2.1.0 or later
SSMS (SSMS) 19.0 or later
SQL Server PowerShell module version 21.1 or later
Visual Studio 2017 or later
Developer pack (SDK) for .NET Standard 2.1 or later
Microsoft.SqlServer.Management.AlwaysEncrypted.EnclaveProvidersNuGet packageMicrosoft.SqlServer.Management.AlwaysEncrypted.AzureKeyVaultProviderNuGet package version 2.2.0 or later, if you plan to use Azure Key Vault for storing your column master keys
Configured enclave. From the client/development machine, you use SSMS to enable the enclave. Rich computations are disabled by default for performance reasons. If you want to use this feature, you must enable it after every SQL Server instance restart using Trace Flag 127. Make sure you test the performance impact on your environment before enabling this feature in production.
Enclave-enabled keys. This works in a similar way to regular Always Encrypted keys, except the CMKs provisioned through HGS are marked as enclave-enabled. You can use SSMS or PowerShell to provision these keys, and store them either in the Windows Certificate Store or Azure Key Vault.
Encrypted sensitive columns. You use the same methods to encrypt data as before.
- A step-by-step walkthrough of this process is available at https://learn.microsoft.com/sql/relational-databases/security/encryption/configure-always-encrypted-enclaves.
Row-level security
Protecting the network and database instance is good and proper. However, this does not protect assets within the environment from, say, curious people snooping on salaries in the human resources database. Or perhaps you have a customer database, and you want to restrict the data those customers can access.
Row-level security, which does not use encryption, operates at the database level to restrict access to a table through a security policy, based on group membership or execution context. Access to the rows in a table is protected by an inline table-valued function, which is invoked and enforced by the security policy. It is functionally equivalent to a WHERE clause.
The function checks whether the user is allowed to access a particular row, while the security policy attaches this function to the table. So, when you run a query against a table, the security policy applies the predicate function.
Row-level security supports two types of security policies, both of which you can apply simultaneously:
Filter predicates, which limit the data that can be seen
Block predicates, which limit the actions a user can take on data
Hence, a user might be able to see rows, but will not be able to insert, update, or delete rows that look like rows they can see. This concept is covered in more detail in the next section.
Caution
There is a risk of information leakage if an attacker writes a query with a specially crafted WHERE clause and, for example, a divide-by-zero error, to force an exception if the WHERE condition is true. This is known as a side-channel attack. It is wise to limit the ability of users to run ad hoc queries when using row-level security.
Filter predicates for read operations
You can silently filter rows that are available through read operations. The application then has no knowledge of the other data that is filtered out.
Filter predicates affect all read operations. This list is taken directly from the official documentation at https://learn.microsoft.com/sql/relational-databases/security/row-level-security:
SELECT. Cannot view rows that are filtered.
DELETE. Cannot delete rows that are filtered.
UPDATE. Cannot update rows that are filtered. It is possible to update rows that will be subsequently filtered. (The next section covers ways to prevent this.)
INSERT. No effect (inserting is not a read operation). Note, however, that a trigger could cause unexpected side effects in this case.
Block predicates for write operations
These predicates block access to write (or modification) operations that violate the predicate. Block predicates affect all write operations:
AFTER INSERT. Prevents the insertion of rows with values that violate the predicate. Also applies to bulk insert operations.
AFTER UPDATE. Prevents the updating of rows to values that violate the predicate. Does not run if no columns in the predicate were changed.
BEFORE UPDATE. Prevents the updating of rows that currently violate the predicate.
BEFORE DELETE. Blocks
DELETEoperations if the row violates the predicate.
Dynamic data masking
Data masking works on the principle of limiting exposure to data by obfuscation. It does not use encryption. Without requiring too many changes to the application or database, you can mask portions of columns to prevent lower-privilege users from seeing them, such as with full credit-card numbers and other sensitive information.
You define the mask in the column definition of the table using the MASKED WITH (FUNCTION = [type]) syntax. You can add masking after table creation using the ALTER COLUMN syntax.
Note
One of the limitations for dynamic data masking before SQL Server 2022 was the lack of granular security. In SQL Server 2019 and earlier, the UNMASK privilege was available only at the database level. In SQL Server 2022, UNMASK can be granted at the database, schema, table, and even the column level to a database principal, as well as conferred via ownership chaining.
Four types of masks are available:
Default. The column is masked according to the data type (not its default value). Strings use
XXXX(fewer if the length is less than four characters); numeric values use a zero value; dates use midnight on January 1, 1900; and binary uses a single byte binary equivalent of zero. If a string is too short to complete the entire mask, part of the prefix or suffix will not be exposed.Email. Only the first letter and the trailing domain suffix is not masked—for example,
[email protected].Random. This replaces a numeric data type with a random value within a range you specify.
Custom string. Only the first and last letters are not masked. There is a custom padding string in the middle, which you specify.
- You can read more about dynamic data masking, including samples of how to set it up, at https://learn.microsoft.com/sql/relational-databases/security/dynamic-data-masking.
Limitations with masking data
Dynamic data masking has some limitations. It does not work on Always Encrypted columns, nor on FILESTREAM or COLUMN_SET column types. Computed columns are also excluded, but if the computed column depends on a masked column, the computed column inherits that mask and returns masked data.
If a column has dependencies, you cannot perform dynamic data masking on it without removing the dependency first, adding the dynamic data mask, and then re-creating the dependency. Finally, a masked column cannot be a used as a FULLTEXT index key.
Caution
It is possible to expose masked data with carefully crafted queries. This can be done using a brute-force attack or using inferences based on the results. If you are using data masking, you should also remove the ability of the user to run ad hoc queries and ensure their permissions are sound. For more on permissions, see Chapter 12.
Protect Azure SQL Database with Microsoft Defender for SQL
All security features discussed thus far work equally on SQL Server, Azure SQL Database, and Azure SQL Managed Instance. These include TDE, Always Encrypted, row-level security, and dynamic data masking.
That’s great if you’re just comparing SQL Server to its Azure SQL siblings. But there are some features unique to Azure SQL under the Microsoft Defender for SQL offering that are worth looking at. We cover these in the subsections that follow. Keep in mind that because Azure features and products are always evolving, this is only a brief overview, and is subject to change.
Vulnerability assessment
You can enable vulnerability assessments on your Azure SQL Database and Azure SQL Managed Instance subscriptions for a monthly fee. This provides a basic monthly overview of your Azure SQL environment and includes steps to mitigate any vulnerabilities it finds.
- For more information about vulnerability assessments and how to subscribe to the service, visit https://learn.microsoft.com/azure/azure-sql/database/sql-vulnerability-assessment.
Azure SQL Advanced Threat Protection (ATP)
The risks of having a publicly accessible database in the cloud are numerous. To help protect against attacks, you can activate SQL Advanced Threat Protection (ATP), which runs 24 hours a day on each of your Azure SQL databases, for a monthly fee. This service notifies you by email whenever it detects atypical behavior.
Note
ATP includes protection for Azure SQL Database, Azure SQL Managed Instance, Azure Synapse Analytics, SQL Server on Azure VMs, and Azure Arc–enabled SQL Server instances.
Some interesting threats include SQL injection attacks, potential vulnerabilities, and unfamiliar database access patterns, including unfamiliar logins or access from unusual locations. Each notification includes possible causes and recommendations to deal with the event. ATP ties into the Azure SQL audit log (discussed later in this chapter); thus, you can review events in a single place and decide whether each one was expected or malicious.
Although this does not prevent malicious attacks (over and above your existing protections), you are given the necessary tools to mitigate and defend against future events. Given how prevalent attacks like SQL injection are, this feature is very useful in letting you know if that type of event has been detected. You can enable ATP using the Azure portal, PowerShell, or the Azure CLI.
- To read an overview on Azure SQL ATP, visit https://learn.microsoft.com/azure/azure-sql/database/threat-detection-overview.
Built-in firewall protection
Azure SQL is secure by default. All connections to your database environment pass through a firewall. No connections to the database are possible until you add a rule to the firewall to allow access.
To provide access to all databases on an Azure SQL Database server, you must add a server-level firewall rule through the Azure portal (or PowerShell or Azure CLI) with your IP address as a range. This does not apply to Azure SQL Managed Instance, because you access the instance through a private IP address inside the VNet.
- To read more about protecting your Azure SQL Database, see Chapter 17, “Provision Azure SQL Database.”
Ledger overview
The ledger feature, introduced in Azure SQL Database and now available in SQL Server 2022, provides an additional layer of auditing in your database. Ledger is based on the same underlying technology as temporal tables, along with an offsite cryptographic attestation feature, which gives you a transparent layer of tamper evidence for sensitive data without requiring changes to your applications.
Ledger does not prevent database tampering; rather, it provides evidence that tampering has occurred. You should use the ledger feature in combination with other security and auditing features as part of your defense-in-depth strategy.
Ledger generates a SHA-256 hash of modified rows for each transaction, and these hashes are combined with previous hashes to form a chain of dependent hashes known as a blockchain. A block of these hashes is called a database digest, which is a cryptographic hash that represents the state of the database at the time hash was computed. Database digests combine to form a database ledger.
Immutable storage
Although these hashes are stored internally, they must also be copied and stored outside the database in tamper-proof storage so you can compare the state of the database at a point in time with a known external hash value. The ledger feature pushes database digests to immutable storage when a block is closed, and these digests can be sent offsite to Azure Blob Storage or on-premises to an Azure confidential ledger or third-party immutable storage device. You choose the external storage when setting up the ledger feature.
A block is closed after 30 seconds, or when 100,000 transactions have occurred, whichever happens sooner. You can also manually trigger this event using the sys.sp_generate_database_ledger_digest stored procedure.
Ledger verification
To verify whether tampering has occurred, the external database digest can be compared against the hashes stored in the database. During the ledger verification process, all hashes are recalculated using the sys.sp_verify_database_ledger_from_digest_storage stored procedure. Depending on the size of the database and the number of transactions, this can take a significant amount of time.
If any data has been tampered with, these recomputed hashes will not match the database digests stored in the external database ledger. This proves that tampering has occurred. You can then use additional auditing methods to identify when and how the tampering occurred.
Ledger considerations and limitations
The external database ledger must be placed in secure, tamper-proof storage, with different permissions and access levels than your database administrators. An attacker with access to both the SQL Server instance and the external database ledger can bypass any system checks and render the protections useless.
Updateable ledger tables are fully compatible with system-generated temporal tables.
- You can read more about temporal tables in Chapter 7, “Understand table features,” in the section “Special table types.”
Note
You cannot use an existing history table when enabling the ledger feature on an updateable ledger table.
Data storage requirements
Ledger is based on the same underlying technology as temporal tables. Depending on the type of ledger table used, you might need to monitor your database storage usage closely. An append-only ledger table will not permit the deletion of rows, while an updateable ledger table must maintain a full history of database modifications. In both these types of ledger tables, the metadata columns require storage as well.
Once you enable the ledger feature for a table, you cannot disable it. For practical reasons, this means you can’t delete data from your database while the ledger feature is enabled. Enabling the ledger feature for an entire database is not recommended. You should restrict usage to sensitive data only.
You can define a custom history table when creating an updateable ledger table as long as it mirrors the schema of the ledger table. You can create the history table in its own schema, which means it can be stored in a separate filegroup. You can also enable data compression on this history table. Keep in mind, though, that not all data types compress well.
- For more information about the types of data compression, see Chapter 3.
Types of ledger tables
There are two types of ledger tables:
Append-only tables
Updateable ledger tables
A history table is also created for updateable ledger tables. You cannot modify the schema of a ledger table.
As with temporal tables, a ledger table needs two GENERATED ALWAYS columns to represent when data was created and the sequence in which it occurred. However, because the ledger feature operates at the transactional level, these columns store transaction information instead of dates and times. You can choose your own names for the GENERATED ALWAYS columns when creating a new ledger table or when altering an existing table to enable the ledger feature. For updateable ledger tables, there are two additional columns that store when a row version was deleted and the sequence in which it occurred.
Append-only ledger table
As the name implies, you cannot delete rows from append-only ledger tables. This type of table is useful for security event information and system logs. Because it only allows INSERT operations, an append-only ledger table doesn’t have a history table.
The system-generated names for the GENERATED ALWAYS columns are as follows, and are used for transaction information about when the row version was generated:
ledger_start_transaction_id (bigint)ledger_start_sequence_number (bigint)
Updateable ledger table
Updateable ledger tables work in much the same way as temporal tables, providing a history of changes to the table, and have the same schema as the ledger table. As noted in the “Data storage requirements” section, you can store the history in a different filegroup with its own storage if you choose to define the history table yourself.
The system-generated names for the GENERATED ALWAYS columns are as follows, and are used for transaction information about when the row version was generated or modified.
ledger_start_transaction_id (bigint)ledger_end_transaction_id (bigint)ledger_start_sequence_number (bigint)ledger_end_sequence_number (bigint)
Although similar in some respects, temporal tables and ledger tables provide different querying features, so you can create an updateable ledger table that is also a temporal table. Take care with your storage requirements if you choose this combination, however, because the history must be retained in two separate history tables.
- For more information about updateable ledger tables, see https://learn.microsoft.com/sql/relational-databases/security/ledger/ledger-updatable-ledger-tables.
The following CREATE TABLE script demonstrates the creation of an updateable ledger table with an anonymous (system-generated) history table. The use of LEDGER = ON is for illustration purposes because each table in a ledger table is updateable by default.
CREATE TABLE dbo.Products (
    ProductId INT NOT NULL PRIMARY KEY CLUSTERED
    , ProductName VARCHAR(50) NOT NULL
    , CategoryId INT NOT NULL
    , SalesPrice MONEY NOT NULL
)
    WITH (
    SYSTEM_VERSIONING = ON,
    LEDGER = ON
);
Ledger view
For every table on which you enable the ledger feature, the database creates a ledger view, which shows all the rows that were created and/or modified and the sequence in which these changes took place. You can customize the names of the columns in the ledger view if you want, but if you don’t, these are the system-generated names.
ledger_transaction_id (bigint). This column displays the ID of the transaction for the creation or modification of a row in the ledger table, and references the
ledger_start_transaction_idandledger_end_transaction_idvalues.ledger_sequence_number (bigint). This column displays the sequence number in which the creation and/or modification took place. This references the
ledger_start_sequence_numberandledger_end_sequence_numbervalues in the ledger table.ledger_operation_type (tinyint). This column displays
1for insert operations or2for delete operations. Modifying a row in the ledger table generates a delete operation followed by an insert operation.ledger_operation_type_desc (nvarchar(128)). This column displays a text value for the ledger_operation_type, which will either be
INSERTorDELETE.
The ledger_operation_type and ledger_operation_type_desc columns have limited use in append-only ledger tables, and are there for consistency with updateable ledger table views.
Find the names of system-generated ledger objects
If you don’t choose custom values for the names of the ledger history table and ledger view, you can use the following query to return the names of the system-generated objects:
SELECT ts.[name] + '.' + t.[name] AS [ledger_table]
    , hs.[name] + '.' + h.[name] AS [history_table]
    , vs.[name] + '.' + v.[name] AS [ledger_view]
FROM sys.tables AS t
INNER JOIN sys.tables AS h ON h.object_id = t.history_table_id
INNER JOIN sys.views v ON v.object_id = t.ledger_view_id
INNER JOIN sys.schemas ts ON ts.schema_id = t.schema_id
INNER JOIN sys.schemas hs ON hs.schema_id = h.schema_id
INNER JOIN sys.schemas vs ON vs.schema_id = v.schema_id;
GO
Audit with SQL Server and Azure SQL Database
Auditing is the act of tracking and recording events that occur in the Database Engine. Since SQL Server 2016 with Service Pack 1, the SQL Server Audit feature is available in all editions, as well as in Azure SQL Database.
- Chapter 17 covers configuring auditing in Azure SQL Database in depth.
SQL Server Audit
There is a lot going on in the Database Engine. SQL Server Audit uses Extended Events to give you the ability to track and record those actions at both the instance and database level.
Note
Although Extended Events carry minimal overhead, it is important that you carefully balance auditing against performance impact. Use targeted auditing by capturing only those events that are necessary to fulfill your audit requirements.
- You can read more about Extended Events in Chapter 8.
Audits are logged to event logs or audit files. An event is initiated and logged every time the audit action is encountered, but for performance reasons, the audit target is written to asynchronously. The permissions required for SQL Server auditing are complex and varied because of the different requirements for reading from and writing to the Windows event log, the file system, and SQL Server itself.
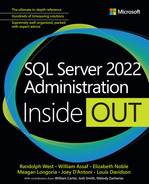
Requirements for creating an audit
To keep track of events (called actions), you must define a collection, or audit. The actions you want to track are collected according to an audit specification. Recording those actions is done by the target (destination). The following list explains these terms in more depth:
Audit. The SQL Server audit object is a collection of server or database actions (which might also be grouped together). Defining an audit creates it in the off state. After it is enabled, the destination receives the data from the audit.
Server audit specification. This audit object defines the actions to collect at the instance level or database level (for all databases on the instance). You can have multiple server audits per instance.
Database audit specification. You can monitor audit events and audit action groups. Only one database audit can be created per database per audit. Server-scoped objects must not be monitored in a database audit specification.
Target. You can send audit results to the Windows Security event log, the Windows Application event log, or an audit file on the file system. You must ensure there is always sufficient space for the target. If you are using the Windows Application event log, keep in mind that the permissions required to read the Windows Application event log are lower than those required to read the Windows Security event log.
An audit specification can be created only if an audit already exists.
- To read more about audit action groups and audit actions, visit https://learn.microsoft.com/sql/relational-databases/security/auditing/sql-server-audit-action-groups-and-actions.
Creating a server audit in SQL Server Management Studio (SSMS)
Verify that you are connected to the correct instance in SSMS. Then, in Object Explorer, expand the Security folder. Next, right-click the Audits folder and select New Audit on the shortcut menu that opens.
The Create Audit dialog box opens. (See Figure 13-2.) You can configure the settings to your requirements or leave the defaults as is. Just be sure to enter a valid file path if you select File in the Audit Destination list box. We also recommend that you choose an appropriate name to enter into the Audit Name box (the default name is based on the current date and time).

Figure 13-2 Creating an audit in SSMS.
Remember to enable the audit after it is created. It will appear in the Audit folder, which is inside the Security folder in Object Explorer. To do so, right-click the newly created audit and select Enable Audit on the shortcut menu.
Create a server audit using T-SQL
The server audit creation process can be quite complex, depending on the destination, file options, audit options, and predicates. As demonstrated in the preceding section, you can use SSMS to configure a new audit and create a script of the settings before selecting OK to produce a T-SQL script. You can also do this manually.
- To read more about creating a server audit in T-SQL, visit https://learn.microsoft.com/sql/t-sql/statements/create-server-audit-transact-sql.
To create a server audit in T-SQL, verify that you are connected to the appropriate instance. Then run the following code sample, changing the audit name and file path as needed. Note that this code also sets the audit state to ON; it is created in the OFF state by default. Also, this audit will not have any effect until an audit specification and target are also created.
USE master;
GO
-- Create the server audit.
CREATE SERVER AUDIT Sales_Security_Audit
     TO FILE (FILEPATH = 'C:SalesAudit');
GO
-- Enable the server audit.
ALTER SERVER AUDIT Sales_Security_Audit
    WITH (STATE = ON);
GO
Create a server audit specification in SSMS
In Object Explorer, expand the Security folder. Then, right-click the Server Audit Specification folder and select New Server Audit Specification on the shortcut menu.
In the Create Server Audit Specification dialog box (see Figure 13-3), in the Name box, type a name of your choosing for the audit specification. Then, in the Audit list box, select the previously created server audit. If you type a different value in the Audit box, a new audit will be created by that name. Now you can choose one or more audit actions or audit action groups. Remember to use the context menu to enable the server audit specification after you create it.
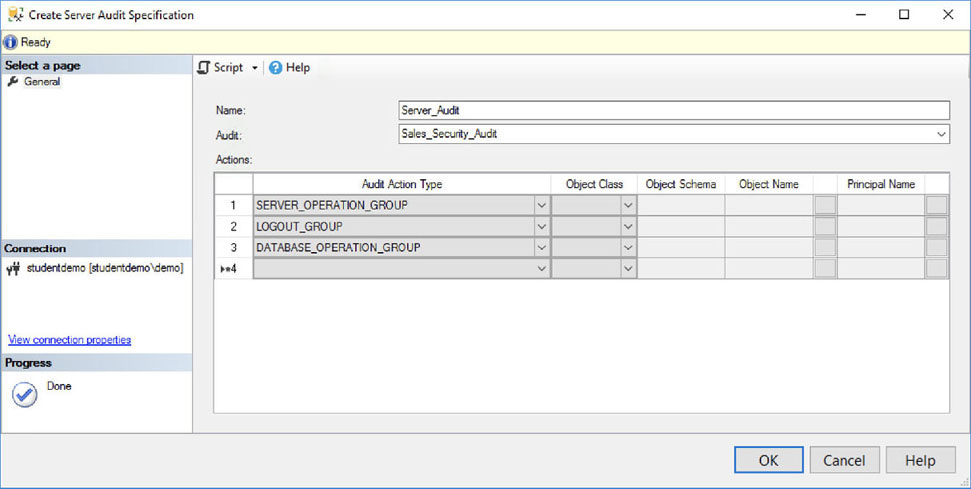
Figure 13-3 Creating a server audit specification in SSMS.
Remember to turn on the server audit specification after you create it by using the context menu.
- A full list of audit actions and audit action groups is available at https://learn.microsoft.com/sql/relational-databases/security/auditing/sql-server-audit-action-groups-and-actions.
Note
If you have selected an audit group action, you cannot select Object Class, Object Schema, Object Name, or Principal Name, because the group represents multiple actions.
Create a server audit specification using T-SQL
In much the same way you create the audit itself, you can create a script of the configuration from a dialog box in SSMS or you can do it manually, as shown in the following script. Note that the server audit specification refers to a previously created audit.
USE [master];
GO
-- Create the server audit specification.
CREATE SERVER AUDIT SPECIFICATION Server_Audit
FOR SERVER AUDIT Sales_Security_Audit
     ADD (SERVER_OPERATION_GROUP),
     ADD (LOGOUT_GROUP),
     ADD (DATABASE_OPERATION_GROUP)
WITH (STATE = ON);
GO
Creating a database audit specification with SSMS
As you would expect, the location of the database audit specification is under the database security context.
In Object Explorer, expand the database on which you want to perform auditing, and then expand the Security folder. Then right-click the Database Audit Specifications folder and select New Database Audit Specification in the shortcut menu. Remember again to use the context menu to turn it on. Figure 13-4 shows an example of capturing SELECT and INSERT operations on the Sales.CustomerTransactions table by the dbo user.

Figure 13-4 Creating a database audit specification in SSMS.
Creating a database audit specification with T-SQL
Again, verify that you are in the correct database context. Then create the database audit specification by referring to the server audit that was previously created. Next, specify which database actions you want to monitor, as demonstrated in the following code. The destination is already specified in the server audit, so as soon as this is enabled, the destination will begin logging the events as expected.
USE WideWorldImporters;
GO
-- Create the database audit specification.
CREATE DATABASE AUDIT SPECIFICATION Sales_Tables
    FOR SERVER AUDIT Sales_Security_Audit
    ADD (SELECT, INSERT ON Sales.CustomerTransactions BY dbo)
    WITH (STATE = ON);
GO
Viewing an audit log
You can view audit logs in SSMS or in the Security Log in the Windows Event Viewer. This section describes how to do it using SSMS.
Note
To view audit logs, you must have CONTROL SERVER permission.
In Object Explorer, expand the Security folder, and then expand the Audits folder. Then, right-click the audit log you want to view and select View Audit Logs on the shortcut menu.
Figure 13-5 shows two audit events that have been logged, with the Event Time showing the most recent events first. In the first event (second row), the audit itself has been changed (it was enabled). The second event is a SELECT statement that was run against the table specified in the database audit specification example presented earlier. Note that the Event Time is in UTC format. This is to avoid issues regarding time zones and daylight saving time.

Figure 13-5 File Viewer dialog box for viewing a SQL Server audit.
There are many columns in the audit that you cannot see in Figure 13-5. Notable among them are Server Principal ID (SPID), Session Server Principal Name (the logged-in user), and Statement (the command that was run). The point here is that you can capture a wealth of information.
Note
You can also view the audit log in an automated manner using the built-in T-SQL system function sys.fn_get_audit_file, though the data is not formatted the same way as it is through the File Viewer in SSMS. For more information, see https://learn.microsoft.com/sql/relational-databases/system-functions/sys-fn-get-audit-file-transact-sql.
Auditing with Azure SQL
With Azure SQL Database and Azure SQL Managed Instance auditing, you can track database activity and write it to an audit log in a storage container in your Azure Storage account. (You are charged for storage accordingly.) This helps you to remain compliant with auditing regulations as well as to see anomalies to gain greater insight into your Azure SQL environment, as discussed earlier in the section “Protect Azure SQL Database with Microsoft Defender for SQL.”
Auditing enables you to retain an audit trail, report on activity in each database, and analyze reports, which include trend analysis and security-related events. You can also define server-level and database-level policies. Server policies automatically cover new and existing databases.
If you enable server auditing, that policy applies to any databases on the server. Thus, if you also enable database auditing for a particular database, that database will be audited by both policies. You should avoid this unless retention periods are different or you want to audit for different event types.
- You can read more about Azure SQL Database auditing in Chapter 17.
Secure Azure infrastructure as a service
You secure SQL Server running on an Azure VM, which is an example of infrastructure as a service (IaaS), in much the same way you secure the on-premises product. Depending on the edition, you can use TDE, Always Encrypted, row-level security, and dynamic data masking. You can also enable Microsoft Defender for SQL for an additional fee.
- You can read more about designing an Azure database infrastructure in Chapter 16, “Design and implement hybrid and Azure database infrastructure.”
With Azure IaaS, setting up a VM in a resource group is secure by default. If you want to allow connections from outside your Azure VNet, you must not only allow the connection through the OS firewall (which is on by default in Windows Server), but you can also control connections through a network security group (NSG). In addition, you can control access through a network appliance such as a firewall or NAT device. This provides finer-grained control over the flow of network traffic in your VNet, which is needed to set up Azure ExpressRoute, for example.
Network security groups
A network security group (NSG) controls the flow of traffic in and out of the entirety (or part) of an Azure VNet subnet.
An NSG provides security for an entire subnet by default, which affects all the resources in that subnet (see Figure 13-6). If you require more control, you can associate the NSG with an individual network interface card (NIC), thus further restricting traffic.

Figure 13-6 A typical VNet, with each subnet secured by an NSG.
Note
When you create a VM using Azure Resource Manager, it comes with at least one virtual NIC, which you manage through an NSG. This is important, because individual NICs can belong to different NSGs, which provides finer control over the flow of network traffic on individual VMs.
As with typical firewalls, the NSG has rules for incoming and outgoing traffic. When a packet hits a port on the VNet or subnet, the NSG intercepts the packet and checks whether it matches one of the rules. If the packet does not qualify for processing, it is discarded (dropped).
Rules are classified according to source address (or range) and destination address (or range). Depending on the direction of traffic, the source address can refer to inside the network or outside, on the public Internet.
This becomes cumbersome with more complex networks, so to simplify administration and provide flexibility, you can use service tags to define rules by service name instead of IP address. You can also use default categories—namely VirtualNetwork (the IP range of all addresses in the network), AzureLoadBalancer (the Azure infrastructure load balancer), and Internet (the IP addresses outside the range of the Azure VNet).
- You can read more about Azure VNet security and get a full list of service tags at https://learn.microsoft.com/azure/virtual-network/security-overview.
User-defined routes and IP forwarding
As a convenience for Azure customers, all VMs in an Azure VNet can communicate with one another by default, irrespective of the subnet in which they reside. This also holds true for VNets connected to your on-premises network by a VPN and for Azure VMs communicating with the public Internet (including those running SQL Server).
In a traditional network, communication across subnets like this requires a gateway to control (route) the traffic. Azure provides these system routes for you automatically.
You might decide that this free-for-all communication is against your network policy and that all traffic from your VMs should first be channeled through a network appliance such as a firewall or NAT device. Virtual appliances are available in the Azure Marketplace at an additional cost, or you could configure a VM yourself to run as a firewall. A user-defined route with IP forwarding facilitates this. With a user-defined route, you create a subnet for the virtual appliance and force traffic from your existing subnets or VMs through the virtual appliance.
You must enable IP forwarding for the VM for that VM to receive traffic addressed to other destinations. This is an Azure setting, not a setting in the guest OS. (See https://learn.microsoft.com/azure/virtual-network/virtual-network-scenario-udr-gw-nva.) You might also need to enable IP forwarding in the VM itself in certain circumstances.
Caution
With user-defined routes, you cannot control how traffic enters the network from the public Internet. User-defined routes only control how traffic leaves a subnet. This means that your virtual appliance must be in its own subnet. If you want to control traffic flow from the public Internet as it enters a subnet, use an NSG.
Until you create a routing table (by user-defined route), subnets in your VNet rely on system routes. A user-defined route adds another entry in the routing table, so a technique called longest prefix match (LPM) kicks in to decide which is the better route to take by selecting the most specific route (the one with the longest prefix). As you saw in Figure 13-6, a /24 prefix is longer than a /16 prefix, and a route entry with a higher prefix takes precedence.
If two entries have the same LPM match, the order of precedence is as follows:
User-defined route
BGP route
System route
Remember BGP? It’s used for ExpressRoute. ExpressRoute is a VPN service by which you can connect your Azure VNet to your on-premises network, without going over the public Internet. You can specify BGP routes to direct traffic between your network and the Azure VNet.
Additional Azure networking security features
There are additional features worth discussing here to improve the management and security of an Azure VNet as it relates to SQL Server or Azure SQL Database.
VNet service endpoints
Service endpoints make it possible for you to restrict access to certain Azure services that were traditionally open to the public Internet so they are available only to your Azure VNet. (See Figure 13-7.)
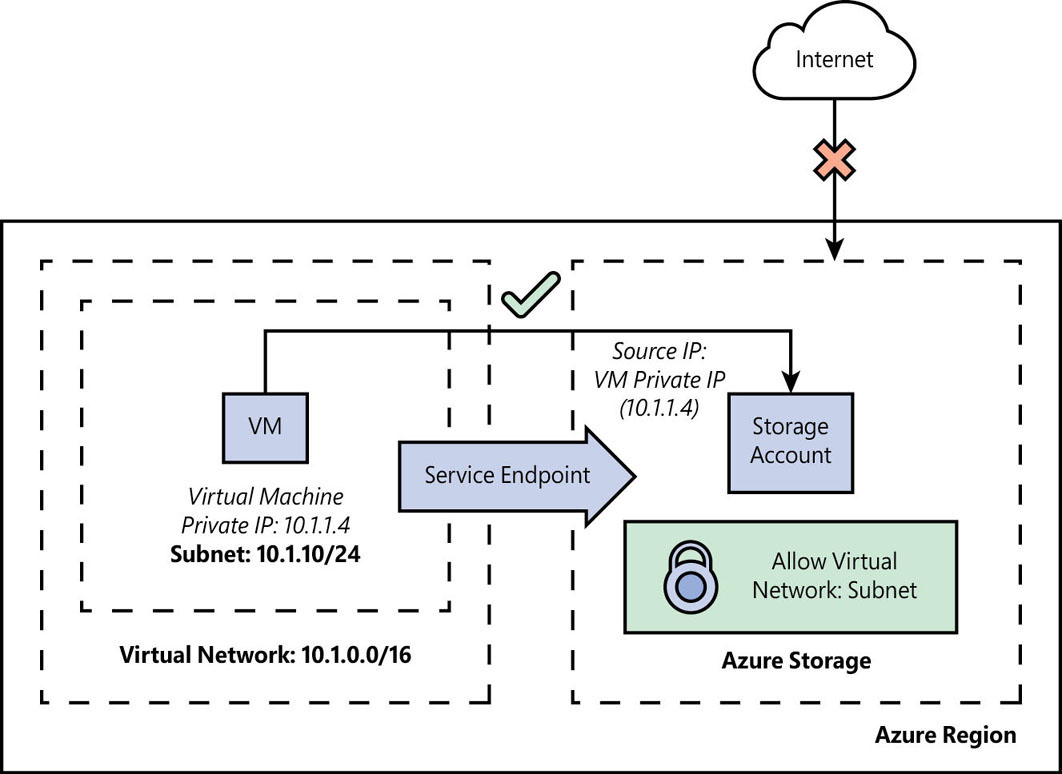
Figure 13-7 A service endpoint protecting an Azure Storage account.
Configurable through the Azure portal, PowerShell, or the Azure CLI, you can block public Internet access to your Azure Storage and Azure SQL Database resources. Additional service endpoints are available, and more will be introduced in the future.
- To read more about VNet service endpoints, visit https://learn.microsoft.com/azure/virtual-network/virtual-network-service-endpoints-overview.
Distributed-denial-of-service protection
Azure provides protection against distributed-denial-of-service (DDoS) attacks for VNets. This is helpful, given that attacks against publicly accessible resources are increasing in number and complexity.
The basic service included in your subscription provides real-time protection using the scale and capacity of the Azure infrastructure to mitigate attacks (see Figure 13-8). For an additional cost, you can take advantage of built-in machine learning algorithms to protect against targeted attacks, with added configuration, alerting, and telemetry.

Figure 13-8 Azure DDoS protection defending a VNet against attacks.
You can also use the Azure Application Gateway web application firewall to protect against more sophisticated attacks. Combined with Azure SQL Database auditing and NSGs, these features provide a comprehensive suite of protection from the latest threats.
- To read more about Azure DDoS protection, see https://azure.microsoft.com/services/ddos-protection.