
Chapter 1
Implement identities in Azure AD
Azure Active Directory (Azure AD) is a cloud-based identity provider. It provides single sign-on access to Microsoft 365 and Azure clouds, thousands of pre-integrated Software as a Service (SaaS) applications, line-of-business applications, and platform as a service (PaaS) solutions. It provides seamless access for people located on site and remotely so that they can stay productive from anywhere. With Azure AD, you can collaborate with customers and partners using Azure AD B2B and Azure AD B2C technologies. With the Zero Trust approach, Multi-Factor Authentication (MFA), and passwordless authentication, you can provide secure access to your organization’s applications and resources. Governance features help you ensure that employees and guests have the right level of access to the data when they need it.
In this chapter, we will cover initial configuration steps after you have created or inherited an Azure Active Directory (Azure AD) tenant: configuring roles for administrators, domain names, creating users and groups, managing hybrid configuration with on-premises Active Directory Domain Services (ADDS). We will also cover external identities—managing guest user access with Azure AD B2B.
Skills covered in this chapter:
Skill 1.1: Configure and manage an Azure AD tenant
With a new Azure AD tenant, you must take several steps for initial setup. In this section, we review the skills you need to manage role assignments—both tenant-wide and scoped to administrative units. Many organizations choose to configure custom domain names in their Azure AD tenant; in this section, we review reasons for this configuration and the steps for implementation.
Configure and manage Azure AD roles
Azure and Microsoft 365 have multiple Role-Based Access Control (RBAC) models, such as:
Azure AD roles (also known as Azure AD directory roles)
Azure resource roles
Exchange Online roles
Intune roles
Other product-specific role models
To pass the exam, you must understand which roles will or will not be covered by the Azure AD RBAC model.
Azure AD roles can have:
Azure AD specific permissions (such as Application Administrator or Authentication Administrator)
Permissions across the Microsoft 365 stack covering multiple products (such as Global Administrator or Global Reader)
High-level permissions for a specific product (such as Intune Administrator or Exchange Administrator)
Azure AD roles do not have:
Permissions for Azure resources hosted in Azure subscriptions (such as VMs, websites, etc.)
Granular permissions within the RBAC model of Microsoft 365 products such as Exchange, Intune, etc.
Azure AD roles can be:
Built-in roles.
The list of Azure AD roles is constantly expanding. You can find up-to-date information at https://docs.microsoft.com/en-us/azure/active-directory/roles/permissions-reference.
Find least privileged roles by task at https://docs.microsoft.com/en-us/azure/active-directory/roles/delegate-by-task.
Custom roles.
To assign a role, you need to create a Role assignment. A role assignment consists of the following elements:
A security principal—a user, group, or service principal that will receive permissions
Role information
Scope
Type of assignment
Scope defines which objects the security principal will have control over. Possible options are:
Directory (Azure AD tenant)
Administrative unit
Azure AD resource (Azure AD group, Enterprise application, application registration)
Type of assignment defines when permissions will be available. Possible options are:
Permanent eligible
Permanent active
Time-bound eligible
Time-bound active
With eligible assignment, the security principal can get permissions just-in-time, when they need them. With active assignment, the security principal has permissions 24/7.
Time-bound assignments are typically used when a user is assigned to some project with specified start and end dates. Otherwise, permanent assignments are used.
We recommend having all Azure AD role assignments as eligible assignments with exceptions only for emergency access accounts (also known as “break glass” accounts).
To create an Azure AD role assignment using the Azure portal:
Open Azure Active Directory > Roles and administrators and select the role. See Figure 1-1. You must select the actual role name (Application developer in this example), not the checkbox on the left.

FIGURE 1-1 Roles and administrators page.
The next steps depend on the licensing level of your tenant—i.e., whether or not your license includes Azure AD Privileged Identity Management. In this book, we will assume that you have all necessary licenses. If you don’t, you still can assign roles, but you won’t have just-in-time capabilities or Custom roles functionality.
Select Add assignments in the Privileged Identity Management interface. See Figure 1-2.
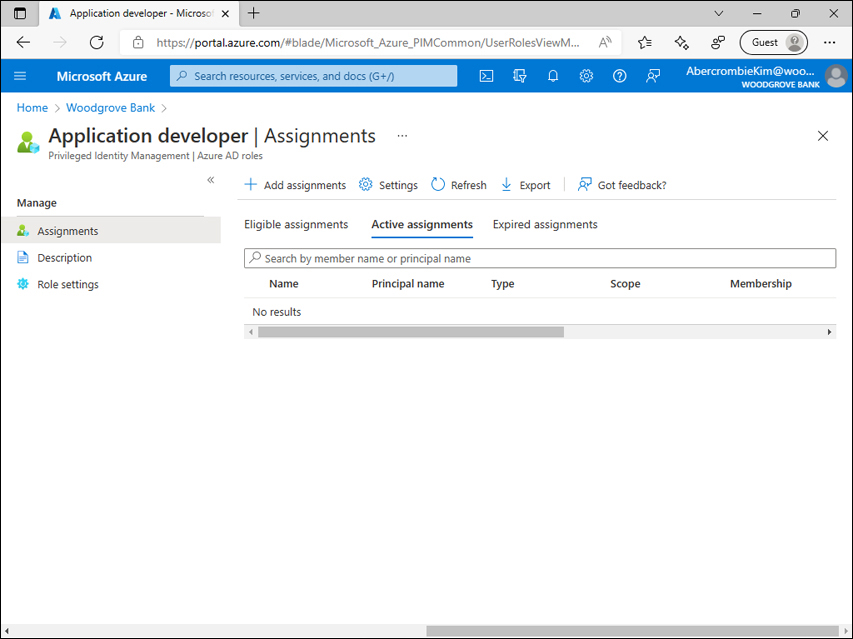
FIGURE 1-2 Assignments page for the Application developer role.
On the Membership tab of the Add assignments page, you specify security principals (members that should have roles assigned) and scope information. Available scope types depend on the role selected—for example, the User administrator role can be scoped to the administrative unit, since users can be included in an administrative unit, while the Application administrator role can be scoped to the Application or Service principal. Any role can be scoped to the Directory (tenant). Click Next. See Figure 1-3.

FIGURE 1-3 Add Assignments page for the Application developer role, Membership tab.
On the Setting tab of Add assignments page, specify the Assignment type (Eligible vs Active) and start/end dates if necessary. Select Assign. See Figure 1-4.

FIGURE 1-4 Add Assignments page for the Application developer role, Setting tab.
After an assignment is created, you can find it on the Assignments page on either the Eligible assignments or Active assignments tab. See Figure 1-5.
Use this page to remove the assignment or update assignment type if necessary.

FIGURE 1-5 Add Assignments page for the Application developer role.
In the example above, we used the built-in Azure AD role. You can create your own Azure AD custom roles if you want to specify permissions granularly.
Open Azure Active Directory > Roles and administrators and select New custom role. See Figure 1-6.

FIGURE 1-6 Roles and administrators page.
On the Basics tab of the New custom role page, specify the Name and Description and choose whether you want to start from scratch or clone a permissions list from an existing custom role. Click Next. See Figure 1-7.

FIGURE 1-7 New custom role page, Basics tab.
On the Permissions tab of the New custom role page, select which permissions the new role will have. Click Next. See Figure 1-8.

FIGURE 1-8 New custom role page, Permissions tab.
On the Review + create tab of the New custom role page, review the definition of a new Azure AD custom role, and select Create. See Figure 1-9.

FIGURE 1-9 New custom role page, Review + create tab.
After an Azure AD custom role is created, assignments for this role can be managed the same way you’d manage them for Azure AD built-in roles.
Configure delegation by using administrative units
An administrative unit is a container in an Azure AD tenant that can include other resources for the purpose of delegating permissions. At the time of writing, administrative units can contain only users and groups.
If you are familiar with Active Directory Domain Services (ADDS), you can compare an Azure AD administrative unit to an organizational unit in on-premises Active Directory Domain Services. Still, there are several differences between these technologies: in on-premises Active Directory Domain Services, organizational units were used both for Group Policies targeting and Role-Based Access Control. In Azure AD, administrative units are used for Role-Based Access Control only.
To list administrative units for the tenant, select Azure portal > Azure Active Directory > Administrative units. A new tenant doesn’t have any administrative units. See Figure 1-10.

FIGURE 1-10 Administrative units page for new tenant.
To create an administrative unit:
Select Azure portal > Azure Active Directory > Administrative units > Add.
Specify a Name and Description (optional).
Create an administrative unit by clicking Review + create or click Next: Assign roles to add a role assignment.
If you chose to Assign roles, you will see a list of roles that can be assigned to administrative units. As discussed earlier, at the time of writing, administrative units can contain only users and groups. Therefore, only roles applicable to users and groups are shown on this screen. See Figure 1-11.

FIGURE 1-11 Custom domain names page with a verified custom domain name listed.
Select roles you want to assign security principals to and add security principals as delegated administrators. Select Next: Review + create.
Review the properties of the administrative unit and select Create.
Use the Administrative unit page to:
Modify the Display name and Description of the administrative unit.
Add/remove objects to/from an administrative unit. At the time of writing, this applies to users and groups.
Assign roles to security principals that will manage objects from this administrative unit.
See Figure 1-12.
FIGURE 1-12 Administrative unit page.
Analyze Azure AD role permissions
Earlier in the “Configure and manage Azure AD roles” section, we discussed the management of role assignments and custom Azure AD roles.
In the SC-300 exam, you may be asked questions for which you need to identify permissions and roles necessary for a certain task. Documentation (https://docs.microsoft.com/en-us/azure/active-directory/roles/permissions-reference) includes information about Azure AD built-in roles and actions they can perform (permissions they have). Note that most Azure AD built-in roles have some actions listed that start with microsoft.directory/. These permissions allow the roles to create, update, or remove objects in Azure AD. Some roles also have permissions in other Azure and Microsoft 365 services and systems. At the moment of writing, these include:
microsoft.azure.advancedThreatProtection/ - Azure Advanced Threat Protection
microsoft.azure.devOps/ - Azure DevOps
microsoft.azure.informationProtection/ - Azure Information Protection
microsoft.azure.print/ - Microsoft Print
microsoft.azure.serviceHealth/ - Azure Service Health
microsoft.azure.supportTickets/ - Azure support tickets
microsoft.cloudPC/ - Windows 365
microsoft.commerce.billing/ - Microsoft 365 billing
microsoft.commerce.volumeLicenseServiceCenter/ - Volume Licensing Service Center
microsoft.dynamics365/ - Dynamics 365
microsoft.edge/ - Microsoft Edge
microsoft.insights/ - Microsoft Viva Insights
microsoft.intune/ - Microsoft Intune
microsoft.flow/ - Microsoft Power Automate
microsoft.office365.complianceManager/ - Microsoft Purview Compliance Manager
microsoft.office365.desktopAnalytics/ - Desktop Analytics
microsoft.office365.exchange/ - Exchange Online
microsoft.office365.knowledge/ - Microsoft 365 knowledge management
microsoft.office365.lockbox/ - Microsoft Purview Customer Lockbox
microsoft.office365.messageCenter/ - Message Center in Microsoft 365 admin center
microsoft.office365.network/ - network locations
microsoft.office365.usageReports/ - Office 365 usage reports
microsoft.office365.protectionCenter/ - Microsoft 365 Defender
microsoft.office365.search/ - Microsoft Search
microsoft.office365.securityComplianceCenter/ - Security & Compliance Center
microsoft.office365.serviceHealth/ - Service Health in Microsoft 365 admin center
microsoft.office365.skypeForBusiness/ - Skype for Business Online
microsoft.office365.sharePoint/ - SharePoint Online
microsoft.office365.supportTickets/ - Microsoft 365 service requests
microsoft.office365.usageReports/ - Office 365 usage reports
microsoft.office365.userCommunication/ - user communication, including “What’s New” messages
microsoft.office365.webPortal/ - Microsoft 365 admin center
microsoft.office365.yammer/ - Yammer
microsoft.powerApps/ - Power Apps
microsoft.powerApps.powerBI/ - Power BI
microsoft.teams/ - Teams
microsoft.virtualVisits/ - Virtual Visits app
microsoft.windows.defenderAdvancedThreatProtection/ - Microsoft Defender for Endpoint
microsoft.windows.updatesDeployments/ - Windows Update service
Some roles can have restrictions that prohibit them from managing certain objects in an Azure AD tenant. For example, Exchange Administrator can manage Microsoft 365 group membership because they have microsoft.directory/groups.unified/members/update permission. But this permission won’t apply to Role-Assignable Groups.
Configure and manage custom domains
Every user in Azure AD has a User Principal Name (UPN). This attribute uniquely identifies the user. The UPN consists of a UPN prefix (user account name) and UPN suffix (domain name) divided by the @ symbol. For example, [email protected] has a UPN prefix of alice and a UPN suffix of contoso.com.
A new Azure AD tenant has the initial domain name <companyname>.onmicrosoft.com. This means that your first user account(s) will have a UPN formatted as <useraccountname>@<companyname>.onmicrosoft.com.
After a custom domain name is added to the tenant, it is possible to have UPNs formatted as <useraccountname>@<customdomain>. For example, [email protected].
In addition to UPNs customization, custom domain names are also used to configure association with third-party identity providers, for Application Proxy configuration, and for groups in Exchange Online.
A key part of the custom domain name configuration process is verification: during verification, Microsoft ensures that you are the one who owns or manages the custom domain. Verification is completed through DNS records: you add requested DNS records to the public DNS servers, and Microsoft uses this as a confirmation that it is indeed your domain.
To list custom domain names for the tenant, select Azure portal > Azure Active Directory > Custom domain names. For the new tenant, only the initial domain name is listed. See Figure 1-13.

FIGURE 1-13 Custom domain names page for the new tenant.
To add a new custom domain name:
Select Add custom domain, provide the custom domain name that you have control over, and select Add domain. See Figure 1-14.

FIGURE 1-14 Add custom domain dialog.
On the next page, you will see DNS records. Microsoft asks you to add to the public DNS zone. See Figure 1-15.

FIGURE 1-15 Add custom domain dialog with DNS records for verification.
Either a TXT or MX record will work to verify a domain in Azure AD, but if you want to forward email for that domain you need an MX record.
You can add a DNS record and click Verify. Adding a DNS record might take significant time—you may need to contact the DNS administrator of your company, go through internal change management processes for DNS records, wait for replication, and so on. For now, you can select the
 button in the top-right corner. A custom domain name is already added in the tenant; it is just not yet verified. See Figure 1-16 for an example of an added but not yet verified custom domain name.
FIGURE 1-16 Custom domain names page with an unverified domain name listed.
After DNS records have been successfully added and verification has completed, successfully verified domain names will be shown in Azure AD as such. See Figure 1-17.

FIGURE 1-17 Custom domain names page with the verified custom domain name listed.
A custom domain name can be selected as primary. The primary domain is the default domain for new users. To make a domain name primary, select it and then select Make primary.
It is possible to add subdomains of existing custom domains. If a domain is already verified in the tenant and you add a subdomain, the subdomain will be verified automatically.
To delete a domain, select Delete on the domain’s page. It is recommended to remove all references to that domain in your tenant first: any users, email addresses, proxy addresses, app ID URIs that mention the custom domain you are going to delete. Alternatively, you can use the ForceDelete option—in which case the custom domain will be deleted even if there are objects referencing it, and references will be updated to the initial domain name, such as <companyname>.onmicrosoft.com. The following conditions should be met for the ForceDelete option:
There should be fewer than 1000 references to the custom domain name.
Any references where Exchange is the provisioning service must be updated or removed.
The domain name shouldn’t be purchased through Microsoft 365 domain subscription services.
You are not a partner administering on behalf of another organization.
No multi-tenant apps should have app ID URIs mentioning the domain subject for removal.
Configure tenant-wide settings
In this section, we will discuss tenant-wide settings shown from the tenant’s Properties page and User Settings page.
The tenant Properties page (see Figure 1-18) allows you to modify:
Tenant Name
Notification language
Technical contact information
Global privacy contact information
Privacy statement URL

FIGURE 1-18 Tenant Properties page.
During Azure AD tenant creation, you specify a Country/Region. Based on the country/region information, the Datacenter location is determined. You cannot change the country, region, or datacenter location after the tenant is created.
Users with Azure AD roles, including Global Administrators, don’t generally have permissions to manage Azure subscriptions associated with tenant or resources in Azure subscriptions. There still may be scenarios when a Global Administrator needs access to an Azure subscription—for example, to recover access if the original subscription owner has left the organization. The Access management for Azure resources toggle allows the Global Administrator to elevate access and obtain a User access administrator role in Azure subscriptions associated with the tenant. It is recommended to use this option to recover access when needed and to disable the option again after the operation is completed.
Use the Azure portal > Azure Active Directory > User Settings page to control tenant-wide settings such as:
Restricting users from registering applications in the tenant.
Restricting users’ access to the Azure AD administration portal (Azure Active Directory on Azure portal). This doesn’t restrict users from doing anything through the API/PowerShell, so it shouldn’t be considered a way to protect from a dedicated attacker.
Sharing LinkedIn account connections: data sharing between Microsoft and LinkedIn that allows users to have information and insights from LinkedIn available in some Microsoft apps and services.
Skill 1.2: Create, configure, and manage Azure AD identities
An Azure AD tenant typically includes user objects and group objects (among other object types). In this section, we cover management of user and group objects in an Azure AD tenant—directly, not through synchronization from an on-premises environment. In this section, we also cover Microsoft 365 licenses assignment. An Azure AD tenant can have devices registered in it—in this section, we also cover device registration options (Azure AD Registration, Azure AD Join, Hybrid Azure AD Join), related controls, and implementation steps.
Create, configure, and manage users
Most Azure AD tenants include user objects that represent the organization’s employees or associates. There are multiple ways that the user object can be created in Azure AD:
The user object can be created directly in Azure AD (via Azure portal, API, PowerShell, or Azure CLI).
The user object can be synchronized from on-premises Active Directory Domain Services with Azure AD Connect or Azure AD Connect cloud sync.
For the rest of this section, we will focus on user objects created directly in Azure AD. Synchronization from on-premises environment will be covered in Skill 1.4: “Implement and manage hybrid identity.”
To create a new user in the Azure portal:
Open Azure portal > Azure Active Directory > Users > New user. See Figure 1-19.

FIGURE 1-19 The custom domain names page with a verified custom domain name listed.
Keep Create user selected. See Figure 1-20. Specify a User name and name. Optionally, you can:
Set a First name.
Set a Last name.
Add the user to groups.
Assign roles to the user.
Block sign in.
Set Usage location. You must set Usage location if the user will have a Microsoft 365 license assigned directly.
Set Job info (Job title, Department, Company name, Manager).

FIGURE 1-20 New user creation dialog.
Select Create.
In the preceding example, we discuss creating a user with the Azure portal New user dialog. Other ways to create users include:
Upload a CSV file with user information to the Azure portal. Read more at: https://docs.microsoft.com/en-us/azure/active-directory/enterprise-users/users-bulk-add
Use Graph API calls: https://docs.microsoft.com/en-us/graph/api/resources/user?view=graph-rest-1.0
Use PowerShell: https://docs.microsoft.com/en-us/powershell/module/microsoft.graph.users/?view=graph-powershell-1.0
Use Microsoft School Data Sync: https://docs.microsoft.com/en-us/schooldatasync/overview-of-school-data-sync
Once the user object is created, you can use the user profile page shown in Figure 1-21 to:
Modify the user’s attributes, such as Name, User Principal Name, Job info, Contact information, and so on.
Manage Authentication methods available to users: email, phone number, Temporary Access Pass.
Manage Custom security attributes.
Assign roles to the user.
Assign applications to the user.
Add the user to administrative units.
Manage devices associated with the user.
Manage the user’s licenses.
View sign-in logs and audit logs information for a user.
Revoke a user’s sessions.
Delete a user.

FIGURE 1-21 User properties page.
Create, configure, and manage groups
Group objects in an Azure AD tenant can be used in many scenarios, such as:
Managing access to applications
Assigning Azure AD roles
Assigning Azure roles
Assigning roles and permissions across various Microsoft 365 products such as Intune, Exchange Online, Cloud App Security, and others
Managing group-based licensing
Targeting Conditional Access policies
Managing Authentication methods
Managing Self-Service Password Reset
As with user objects, there are multiple ways that group objects can be created in Azure AD:
Group objects can be created directly in Azure AD (via Azure portal, API, PowerShell, Azure CLI).
Group objects can be synchronized from on-premises Active Directory Domain Services with Azure AD Connect or Azure AD Connect cloud sync.
Groups synchronized from on-premises environments are managed in on-premises environments; you can’t modify them in Azure AD.
In Azure AD, you can create two types of groups:
Security groups
Microsoft 365 groups
Additionally, Microsoft 365 has concepts of Distribution groups and Mail-Enabled Security groups that are represented in Azure AD as read-only objects and are beyond the scope of this book.
Security groups are used for granting access to resources.
Microsoft 365 groups are used for collaboration between users, as well as between users and guests.
To create a group using the Azure portal:
Open Azure portal > Azure Active Directory > Groups. Select New group. See Figure 1-22.

FIGURE 1-22 All groups page for the new tenant.
Specify the properties of the group you are creating, as shown in Figure 1-23:
Group type—Security or Microsoft 365
Group name
Group email address (for Microsoft 365 groups only)
Group description (optional)
Azure AD roles can be assigned to the group—if the group will be role-assignable. This setting can’t be changed later.
Membership type—if the group should be dynamic. You will find more information about dynamic groups later in this section.
Owners (optional)
Members (optional, for non-dynamic groups only)
Dynamic query (for dynamic groups only)

FIGURE 1-23 New group dialog.
Select Create.
In the preceding examples, we managed a group through the Azure portal. Read more about managing groups with Graph API at: https://docs.microsoft.com/en-us/graph/api/resources/group?view=graph-rest-1.0
Group nesting is supported only between Security groups. The Microsoft 365 group can’t be added to any group, and no group can be added to the Microsoft 365 group.
Even though nesting is supported between security groups, not every feature within Azure AD recognizes nested membership. Read Azure AD service limits documentation for up-to-date information on scenarios supported and not supported for nested groups: https://docs.microsoft.com/en-us/azure/active-directory/enterprise-users/directory-service-limits-restrictions.
Both Security and Microsoft 365 groups can be dynamic groups. This feature allows you to configure complex attribute-based rules to populate group membership automatically. A dynamic group can include users or devices but not at the same time.
Here is an example of a dynamic group membership rule (expression):
user.department -eq “Finance”
Here, the group will include all users from the Finance department.
Dynamic groups support expression operators (such as Equals, Starts With, Match, etc.), logical operators (And, Or, etc.), strings, numbers, Boolean and array properties.
Azure AD Self-Service Group Management allows users to create and manage their groups. Self-Service Group Management is supported for security groups and Microsoft 365 groups but not mail-enabled security groups or distribution lists.
By default, users can create Security and Microsoft 365 groups using the Access panel page https://account.activedirectory.windowsazure.com/r#/groups, API calls, or PowerShell commands. See Figure 1-24 for an Access Panel user interface example. After the group is created, the creator becomes the first owner and first member of the group. Later, an owner or administrator can add additional owners and members to the group. For an owner to manage groups, they must use the Access Panel shown in Figure 1-24. For administrators to manage groups, they will need to use the Azure portal shown in Figure 1-22.

FIGURE 1-24 Access Panel, group management page.
Users can request membership in groups that may be granted automatically or under the owner’s discretion. This is controlled by the Join policy of the group. Groups have a Join policy with one of the following values:
This group is open to join for all users.
Only the owner of this group can add members.
This group requires owner approval.
The Join policy is managed by the group owner, as shown in Figure 1-25.

FIGURE 1-25 Access Panel, group properties.
The first two options are available for group owners in the tenant by default. The third option is available to group owners only if an administrator enables it by setting “Owners can manage group membership requests in the Access Panel” to “Yes.” See Figure 1-26.

FIGURE 1-26 Group management settings, default values.
To join a group:
As a requestor (a user who needs to join a group), open the Access Panel, Groups page: https://account.activedirectory.windowsazure.com/r#/groups.
Select Join group.
Select the group you want to join and select Join group. See Figure 1-27.

FIGURE 1-27 Access panel, Join groups dialog.
Provide business justification.
On the page Your request has been sent to the owner of the group select OK.
For the group owner to approve the request, they need to:
Open the Access Panel, Groups page: https://account.activedirectory.windowsazure.com/r#/groups.
Select the notification button
 and review the request. See Figure 1-28.
FIGURE 1-28 The Access panel, Groups page shows a group join notification for the group owner.
Select Approve or Deny.
Groups Expiration policy allows you to automatically remove Microsoft 365 groups that are no longer in use. When group expiration policy is enabled, all groups with user activity (such as document uploads, emails delivered) are renewed automatically, while for groups without user activity, owners should confirm if the group should be renewed and not deleted. Example settings for group expiration are shown in Figure 1-29.
Group Expiration policy is not applicable to Security groups.

FIGURE 1-29 Group Expiration settings.
Configure and manage device joins and registrations, including writeback
Devices are represented in Azure AD in the form of device objects. You don’t generally need your device to be represented in Azure AD to sign in, but in certain scenarios having device objects is a prerequisite or significantly improves the user experience. These scenarios include:
Sign in to the device with Azure AD credentials
Single Sign-On to Azure AD
Device-based Conditional Access policies
Mobile Device Management enrollment
There are three join types that can be used to register a device in Azure AD:
Azure AD Registration
Azure AD Join
Hybrid Azure AD Join
Azure AD Registration (previously known as Workplace Join) is for personal (BYOD—Bring Your Own Device) scenarios. It works for Windows 10 and above, iOS, Android, and macOS. During Azure AD Registration, the user adds their Azure AD account to the device, and the device will be represented in Azure AD. In some cases, Azure AD Registration can happen when the user installs a Microsoft app and signs in with their Azure AD account—for example, when the user installs Outlook on a personal device and signs in with their (corporate) Azure AD account. Azure AD Registration doesn’t affect how the user signs in to the device itself; they will continue to sign in the same way they did before Azure AD registration occurred.
Azure AD Join is for corporate devices with Windows 10 and above. A device is joined to an Azure AD tenant, and Azure AD users from that tenant can sign in to the device. Azure AD Joined devices are typically managed through Mobile Device Management (MDM) solutions, such as Intune. Azure AD Joined devices are not part of the on-premises Active Directory Domain Services domain. It is possible to get Single Sign-On from an Azure AD Joined device not only to Azure AD but also to on-premises resources. Azure AD Join works great for corporate computers, especially for remote workforce, if you are OK with managing devices with MDM solutions rather than Group Policy.
Hybrid Azure AD Join is for corporate devices running Windows 7 and above, Windows Server 2008 and above. Before Hybrid Azure AD Join process can be triggered, the device must be joined to the on-premises Active Directory Domain Services domain. After that, the device identity can be synchronized to Azure AD with Azure AD Connect and the device can complete the Hybrid Azure AD Join process. When a device is joined to Azure AD through the Hybrid Azure AD Join process, the device becomes represented in Azure AD tenant and the user gets Single Sign-On to Azure AD. Users will use on-premises Active Directory Domain Services mechanisms to sign in to a Hybrid Azure AD Joined device, which means line of sight to domain controllers will be required for certain scenarios, such as device password changes, user password changes, and TPM resets. Since the device is part of the on-premises Active Directory Domain Services domain, the device can be managed with Group Policy, but MDM is also an option.
For new implementations, we recommend deploying Azure AD Joined machines (not Hybrid Azure AD Joined), as they don’t require line of sight to domain controllers or have other dependencies on on-premises Active Directory Domain Services.
All three options mentioned above (Azure AD Registration, Azure AD Join, Hybrid Azure AD Join) will provide you Single Sign-On to Azure AD. For Windows 10 and newer, in all three implementations it will be achieved by using a Primary Refresh Token (PRT). Read more about PRT at https://docs.microsoft.com/en-us/azure/active-directory/devices/concept-primary-refresh-token.
An administrator can control device registration:
For Azure AD Registered devices: An administrator can select whether users can register devices on the Azure AD > Devices > Device settings page. Azure AD Registration must be enabled if enrollment with Intune or MDM for Office 365 is enabled. See Figure 1-30.
For Azure AD Joined devices: An administrator can select which users can join devices on the Azure AD > Devices > Device settings page. See Figure 1-30.
For Hybrid Azure AD Joined devices: Service Connection Point (SCP) entry is required for a device to complete the Hybrid Azure AD Join process. SCP can be located in on-premises Active Directory Domain Services domain or in the form of registry settings on the client machine. An administrator can remove SCP from the domain and add client-side registry settings on desired machines.

FIGURE 1-30 Device settings—default configuration.
As discussed above, the Hybrid Azure AD Join process includes synchronization of device identity from on-premises Active Directory Domain Services to Azure AD.
There are also scenarios when information about a device must be synchronized in another direction—from Azure AD to on-premises Active Directory Domain Services. This is called Device writeback. Device writeback is used when you need to:
Enable Windows Hello for Business with hybrid certificate trust deployment (for Hybrid Azure AD Joined machines only)
Enable Conditional Access based on devices on ADFS 2012 R2 and higher (for environments with Active Directory Federation Services—ADFS)
Device writeback must be configured in Azure AD Connect. See Figure 1-78 for the Optional features page of Azure AD Connect in Skill 1.4: “Implement and manage hybrid identity.”
When you enable device writeback in Azure AD Connect, it provides you with PowerShell script that performs the following operations in your on-premises environment:
Creates containers and objects for the device registration configuration under CN=Device Registration Configuration,CN=Services,CN=Configuration,[forest-dn]
Creates containers and objects for devices under CN=RegisteredDevices,[domain-dn]
Gives Azure AD Connect necessary permissions to manage devices in on-premises Active Directory Domain Services
Assign, modify, and report on licenses
Many Microsoft 365 services are available through licensing plans such as:
Azure Active Directory Premium P1/P2
Microsoft 365 E3/E5
Office 365 E1/E3/E5
Enterprise Mobility + Security E3/E5
Some of these plans include other plans: for example, Enterprise Mobility + Security E3 includes Azure Active Directory Premium P1, and Enterprise Mobility + Security E5 includes Azure Active Directory Premium P2, etc.
Before a user can have a Microsoft 365 service license assigned, they need to set the UsageLocation attribute to the value representing their country or region. Usage location is important because not all Microsoft services are available in all regions.
Cloud-only users can update their Usage location on the Azure portal > Azure Active Directory > Users > [Name] > Manage > Profile page.
For user accounts synchronized from on-premises Active Directory Domain Services, you can manage the msExchUsageLocation attribute on-premises (if you have on-premises Active Directory Domain Services schema extended for Microsoft Exchange) or use another attribute of your choice and synchronize it to UsageLocation by modifying synchronization rules.
UsageLocation must be set before a license can be assigned to a user individually. If you assign a license to a group and one or more of the group’s members doesn’t have the UsageLocation attribute set, the location of the Azure AD tenant will be inherited.
To view licenses available in your tenant, open Azure portal > Azure Active Directory > Licenses > All products. See Figure 1-31.

FIGURE 1-31 Manage licenses.
To assign a license:
Ensure that users you need to assign a license to have the Usage location attribute set to their country or region.
Select the checkbox near the license name and select Assign.
On the Users and groups tab of the Assign license page, select Add users and groups and add those who will be licensed. See Figure 1-32.
Select Next: Assignment Options.

FIGURE 1-32 Assign license page, Users and groups tab.
On the Assignment options tab of Assign license page, you can turn specific products On or Off for licenses that include multiple products. See Figure 1-33. Select Next: Review + Assign.

FIGURE 1-33 Assign license page, Assignment options tab.
Review the options and select Assign.
Skill 1.3: Implement and manage external identities
With Azure Active Directory, you can provide business partners and consumers seamless access to applications and resources. In this section we cover Azure AD B2B. We discuss authentication options available for guests—many guests can get single sign-on to resource tenants using their existing accounts such as Azure AD accounts, Microsoft accounts, Google federation, federated identity providers, etc. We discuss the process of inviting and re-inviting guests to your tenant. We cover collaboration settings applicable to guests. Also, we cover federation with identity providers.
Manage external collaboration settings in Azure AD
With Azure AD, you can provide business partners and consumers seamless access to applications and resources. Seamless authentication allows external users to “bring their own identity” and get access without the need to set up new credentials such as new passwords. Collaboration is protected with security features such as Conditional Access and Identity Protection.
Azure AD B2B allows you to invite business partners to your tenant and provide them access to applications and resources. In Azure AD B2B, the invited party is called a Guest and the tenant they access as a guest is called a Resource tenant. To differentiate from a Guest, a regular user account is called a Member in this context.
When you invite a guest, the only required field is an email address—everything else (name information, job title, personal message) is optional. After a guest is invited, they need to accept the invite by following the redemption link and providing consent to access your tenant. The redemption link is already included in the invitation email, or you can provide it to a guest through other means.
After a guest accepts an invite, the Identity issuer type will be identified based on the guest’s email address:
Azure AD users will get the Single Sign-On experience. In this case, the tenant user account location is called Home tenant.
A user with an email address matching the domain of a SAML/WS-Fed provider federated with a resource tenant will get the Single Sign-On experience. This option is used when resource tenant administrator needs to provide Single Sign-On to guests from a domain that is not Azure AD verified.
A user with the domain suffix of gmail.com or googlemail.com will get the Single Sign-On experience if the resource tenant admin configured Google federation.
A user with a personal Microsoft account will get the Single Sign-On experience.
If none of the options above are applicable to a guest based on their email address:
If a one-time passcode is enabled in the tenant—for example, a passcode is sent to the guest over email—the guest can use the one-time passcode from email to sign in.
If a one-time passcode is disabled in the tenant, the guest will be prompted to create an Azure AD self-service account or personal Microsoft account.
After a guest is invited, it is one more user account in the resource tenant. The difference with a regular user account will be that the regular user account has a User type of Member, while a guest has a User type of Guest. Like any other user account, Guest can have applications assigned to it, can have Azure AD roles or roles in other RBAC systems, can be a member of groups, and can have permissions for various resources, etc.
Use the Azure portal > Azure Active Directory > External Identities > External collaboration settings page to manage tenant-wide settings of the Azure AD B2B collaboration. See Figure 1-34 and Figure 1-35.
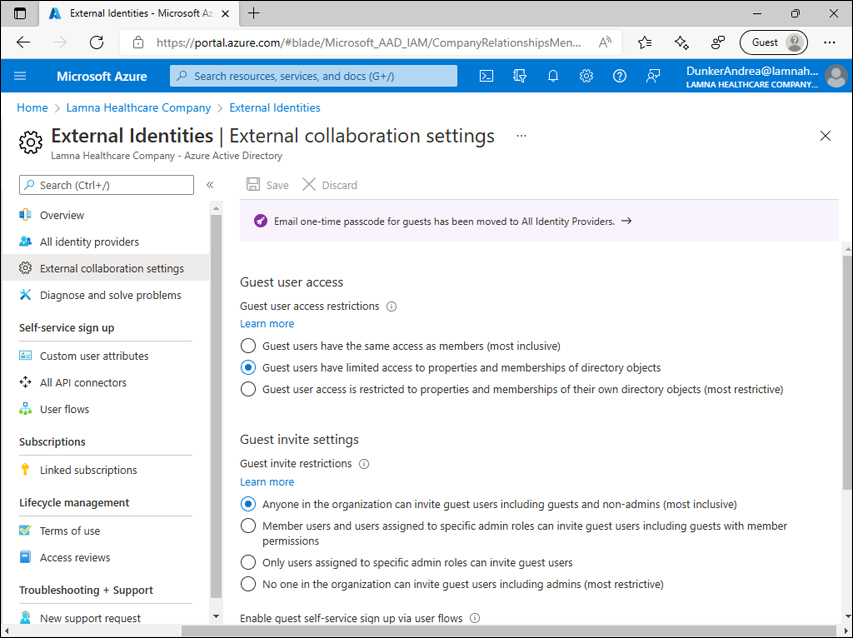
FIGURE 1-34 External collaboration settings.

FIGURE 1-35 External collaboration settings (continued).
By default, guest users have limited permissions in the resource tenant—less than a member of the tenant—but their permissions can still be considered too broad, depending on the business scenario. For example, by default, guests can read properties of groups in the tenant (including membership and ownership) and read certain properties of other users, including guests, in the tenant: display name, email, sign-in name, photo, etc. To limit information guest users can read in your tenant, you can change the Guest user access restrictions setting by setting it to Guest user access is restricted to properties and memberships of their own directory objects (most restrictive).
By default, any user can invite guests to the tenant. This means guests can invite new guests as well. By modifying the Guest invite restrictions setting you can control who can invite new guests:
Any existing user (member or guest)
Any member, and guests with specific administrative roles (Global Administrator, User Administrator, Guest Inviter)
Global Administrator, User Administrator, or Guest Inviter
No one can invite new guests
Azure AD External Identities self-service sign-up allows guests to use social identity providers (e.g., Azure AD, Microsoft Account, Email one-time passcode, Google, Facebook) to sign up to the application. Self-service sign-up works for applications built by resource tenant organizations and doesn’t work for Microsoft’s first-party applications. Self-service sign-ups must be enabled on the External collaboration setting. After it is enabled, you need to create user flows and API connectors.
As discussed earlier, the most important attribute of a guest in the invite process is their email address. By default, users that have permissions to invite guests can invite guests from any email domain. You can change that with the Collaboration restrictions setting—you can configure a list of domains that invites cannot be sent to or allow invites to be sent only to the specified domains.
Invite external users, individually or in bulk (collectively)
There are multiple ways that a user can be invited as an Azure AD B2B guest to the resource tenant:
Individually with Azure portal
As part of a bulk invite with Azure portal
Individually with PowerShell
As part of a bulk invite with PowerShell
Using Graph API
In addition to these methods, various applications may call Graph API to invite guests when they need to establish collaboration with external users. Examples are SharePoint Online, OneDrive for Business, or Teams: when you share a file with OneDrive or invite an external user to a Teams channel, this may lead to the creation of an Azure AD B2B guest account.
To invite an Azure AD B2B guest individually using the Azure portal:
Open Azure portal > Azure Active Directory > Users. See Figure 1-36.

FIGURE 1-36 All users page.
Select New guest user.
On the New user page, keep the Invite user option selected. See Figure 1-37.
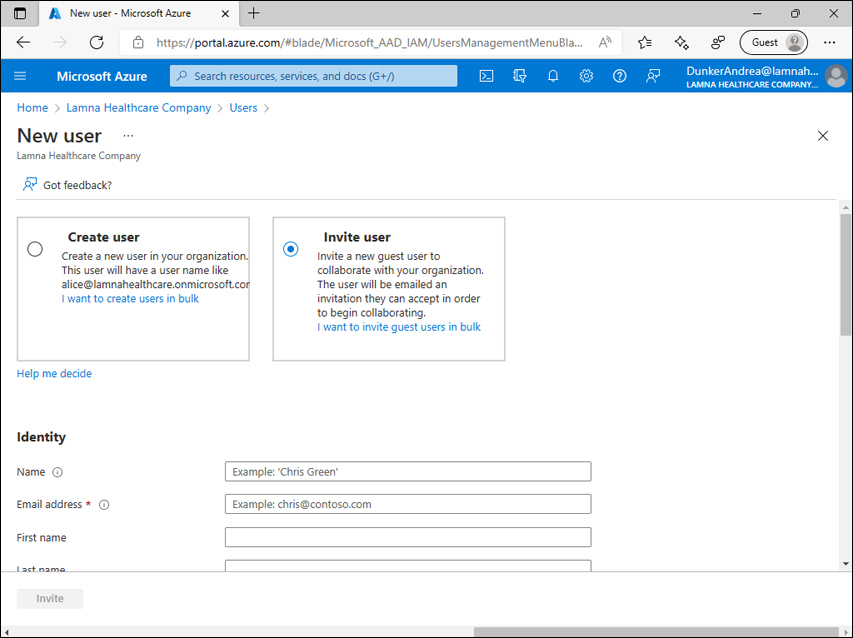
FIGURE 1-37 New user dialog.
Provide an Email address of the new guest.
Optionally, provide any of the following:
Name
First name
Last name
Personal message
Groups
Roles
Block sign in
Usage location
Job title
Department
Company name
Manager
Select Invite.
After the preceding steps are completed, the invited person will receive an email. See Figure 1-38.

FIGURE 1-38 Azure AD B2B guest invite email.
At this time (before the invite is accepted by a guest), the guest user object already exists in the resource tenant. The resource tenant administrator can add that user object to groups, assign permissions, add the user to roles, and perform other management tasks. But nobody can sign in with that user account yet because the invite hasn’t yet been accepted.
When the guest-to-be selects the Accept invitation link in the email, Azure AD identifies the Issuer type as described previously. If the guest-to-be is an Azure AD user, they are redirected to the consent page, where they can review the permissions that the resource tenant will have over their account if they accept an invite. See Figure 1-39.

FIGURE 1-39 Review permissions page.
After the guest selects Accept, they will be redirected to the My Apps portal, where they can see applications available to them in the resource tenant. The My Apps portal will open in the context of a guest account in the resource tenant. See Figure 1-40, where the user from the home tenant northwindelectriccars.onmicrosoft.com signed in to the resource tenant lamnahealthcare.onmicrosoft.com as a guest.

FIGURE 1-40 My apps page.
To bulk invite guests using the Azure portal:
Open the Azure portal > Azure Active Directory > Users page, as shown in Figure 1-36.
Select Bulk operations > Bulk invite. See Figure 1-41.

FIGURE 1-41 All users page, Bulk invite users dialog.
Download the csv file template.
Edit the csv file:
Provide the email addresses of invitees (guests).
Provide the redirection URL. The template provides the URL https://myapplications.microsoft.com. You can keep this one, and the guests’ invite redemption experience will be like the one described earlier in this section. But in many cases, in a bulk invite scenario, you may want to redirect guests to some application after they accept the invite.
Specify whether you want to send guests invites. The template includes a TRUE flag. You can keep this one, and the guests’ invite redemption experience will be like the one described earlier in this section. Optionally, you can provide end users a redemption URL through other means: publish it on a custom portal, include it as part of custom email communication you have to them, and so on.
Provide a customized invitation message.
Upload the csv file back to the Azure portal. You will see a File uploaded successfully message if there are no issues found with the file format.
Select Submit.
After processing is completed, select the File is ready! Click here to download link, as shown in Figure 1-42.

FIGURE 1-42 All users page, Bulk invite users dialog, after the CSV file has been uploaded and processed.
Download the CSV file from the portal: it will be mostly the same file you previously uploaded. A key difference is that it will now have a Status column where you can see whether the invite was sent successfully.
Manage external user accounts in Azure AD
In most scenarios, guest accounts in Azure AD can be used equivalently to member user accounts. You can assign applications to them, assign them Azure AD roles, assign permissions in various applications, include them in groups, etc. The guest account can be targeted in policies such as Conditional Access policies, and the guest account can be assigned a license in the resource tenant—all using the same mechanisms that member accounts are managed with.
A few principles are still unique to guest accounts and will be covered in this section.
If a guest user has not yet redeemed their invitation, in some cases you may need to resend the invitation email—for example, if the user mistakenly removed the original invite email.
To resend an invitation email:
Open Azure portal > Azure Active Directory > Users.
Open the properties of the guest account you need to resend the invitation email to.
In the Identity section, note that Invitation accepted is set to No. Select (manage). See Figure 1-43.

FIGURE 1-43 Profile of a guest user that hasn’t yet redeemed their invite.
Set Resend invite? To Yes. See Figure 1-44.

FIGURE 1-44 Profile of a guest user that hasn’t yet redeemed their invite, Manage invitations tab.
In the Are you sure you want to resend an invitation? dialog, select Yes.
Select Done.
As discussed earlier, Azure AD B2B allows users with a variety of credentials (Azure AD accounts, Microsoft accounts, Google accounts, accounts from federated SAML/WS-Fed identity provider) to get Single Sign-On to a resource tenant. There still may be a situation when an invited guest has an email address that doesn’t correspond to any of the account types above. In that case, depending on the resource tenant configuration, the guest can sign in with a one-time passcode delivered over email or be prompted to create a Microsoft account or Azure AD self-service account. We recommend the email one-time passcode option in these business scenarios; this will help you validate that the user has continuous access to the email address they were invited from before they access the resource tenant. With the Microsoft account/Azure AD self-service account option, the guest will create a password of their choice, and you may not be notified if they leave their organization, so there will be no technical way to ensure that user still works for their employer at a later time.
To enable an email one-time passcode:
Open Azure portal > Azure Active Directory > External identities > All identity providers. See Figure 1-45.

FIGURE 1-45 All identity providers page.
Select Email one-time passcode. See Figure 1-46.

FIGURE 1-46 Configure identity provider—Email one-time passcode for guests.
Select Enable email one-time passcode for guests effective now.
Select Save.
Configure identity providers, including SAML and WS-Fed
With Azure AD B2B, you can configure federation with social providers (Google, Facebook) or SAML/WS-Fed identity providers.
Google federation with Azure AD External identities allows Gmail users to get Single Sign-On to a resource tenant they are invited to. Read more about Google federation at https://docs.microsoft.com/en-us/azure/active-directory/external-identities/google-federation. Google federation isn’t applicable to Google Workspace domains—for Google Workspace domains, see the SAML/WS-Fed section below.
Facebook federation shares the same idea as Google federation: it allows Facebook users to sign in as Azure AD B2B guests to your tenant. Follow the article for details, here: https://docs.microsoft.com/en-us/azure/active-directory/external-identities/facebook-federation.
SAML/WS-Fed identity provider federation (previously known as Direct federation) is a Public Preview feature at the time of writing. This option is used when a resource tenant administrator needs to provide the Single Sign-On experience to guests from a domain that is not Azure AD verified.
To set up SAML/WS-Fed identity provider federation:
Determine if the guest company DNS administrator will need to update their DNS settings:
DNS changes are needed if the target domain does not match the identity provider’s passive domain URL.
DNS changes are not needed if the target domain matches the identity provider’s passive domain URL.
For example, when setting up federation with fabrikam.com:
If the identity provider’s authentication URL is https://fabrikam.com or https://sts.fabrikam.com/adfs, no DNS changes are necessary.
If the identity provider’s authentication URL is https://fabrikamhq.com or https://sts.fabrikamhq.com/adfs, DNS changes are necessary to confirm that the company that owns the fabrikam.com domain name uses the identity provider with the authentication URL in the fabrikamhq.com domain.
The following Identity Provider (IdP) domain names do not require DNS changes:
If DNS changes are necessary, add a DNS record:
<domainname> IN TXT DirectFedAuthUrl=<IdP authentication URL>
Taking the example from the previous step, a DNS record may look like this:
fabrikam.com IN TXT DirectFedAuthUrl=https://sts.fabrikamhq.com/adfs
If you choose to federate with SAML, ensure that the IdP includes the following attributes (as shown in Table 1-1 and Table 1-2) in the SAML 2.0 response:
TABLE 1-1 Required attributes for the SAML 2.0 response from the IdP
Attribute
value
AssertionConsumerService
Audience
urn:federation:MicrosoftOnline
Issuer
Issuer URI of the IdP
TABLE 1-2 Required claims for the SAML 2.0 token issued by the IdP
Attribute
value
NameID Format
urn:oasis:names:tc:SAML:2.0:nameid-format:persistent
Emailaddress
http://schemas.xmlsoap.org/ws/2005/05/identity/claims/emailaddress
If you choose to federate with WS-Fed, ensure that the IdP includes the following attributes (as shown in Table 1-3 and Table 1-4) in the WS-Fed message:
TABLE 1-3 Required attributes in the WS-Fed message from the IdP
Attribute
value
PassiveRequestorEndpoint
Audience
urn:federation:MicrosoftOnline
Issuer
Issuer URI of the IdP
TABLE 1-4 Required claims for WS-Fed token issued by the IdP
Attribute
value
ImmutableID
http://schemas.microsoft.com/LiveID/Federation/2008/05/ImmutableID
Emailaddress
http://schemas.xmlsoap.org/ws/2005/05/identity/claims/emailaddress
Go to Azure portal > Azure Active Directory > External Identities > All identity providers.
Select + new SAML/WS-Fed IdP.
Under Identity provider protocol, select SAML or WS-Fed.
Provide Domain name of federating IdP.
Upload a metadata file or provide the following information manually:
Issuer URI
Passive authentication endpoint
Certificate
Metadata URL (Optional. We recommend allowing Azure AD to renew the signing certificate automatically when it expires).
Select Save.
Skill 1.4: Implement and manage hybrid identity
Many organizations have on-premises environments that include on-premises Active Directory Domain Services. In this section, we cover tools that synchronize on-premises identities to Azure AD: Azure AD Connect and Azure AD Connect Cloud Sync. We cover authentication methods that are applicable to on-premises users: Password Hash Synchronization, Pass-Through Authentication, and Federation. We discuss the configuration of Azure AD Connect with each of these methods. We also discuss Azure AD Connect Health—a tool that can be used to monitor the health of on-premises components of your environment such as Azure AD Connect synchronization engine, Active Directory Domain Services (AD DS), and Active Directory Federation Services (AD FS).
Implement and manage Azure Active Directory Connect
Many enterprises have existing on-premises infrastructures before they start their cloud journey. On-premises infrastructure often has identity providers including Active Directory Domain Services. Microsoft offers a set of hybrid capabilities that allows customers to use on-premises identities in the cloud. Two products currently offered are Azure AD Connect and Azure AD Connect cloud sync.
Azure AD Connect is an on-premises application that provides the following capabilities:
Synchronization—based on on-premises users, groups, and devices information, this creates users, groups, and devices in Azure AD. For certain scenarios, writeback synchronization (creating/updating on-premises objects based on Azure AD object information) is also supported.
Authentication—Azure AD Connect configures authentication of on-premises users using one of the following options:
Password Hash Synchronization
Pass-Through Authentication
Federation
Health monitoring—Azure AD Connect Health provides monitoring for:
Azure AD Connect synchronization
Active Directory Domain Services
Active Directory Federation Services
Think about Azure AD Connect as a wizard that configures all the things mentioned above: Synchronization engine, Federation settings, Active Directory Domain Services monitoring, etc. And most of them are separate pieces of software—different agents, synchronization engines, and so on.
The Synchronization engine (also known as Azure AD Connect Sync) is a central part of Azure AD Connect. Authentication-related components may or may not be implemented, but the Synchronization engine is always deployed in any Azure AD Connect installation. In this part, we will focus on basic Azure AD Connect implementation and the Synchronization engine.
The Azure AD Connect Synchronization engine can be used for synchronization between on-premises Active Directory Domain Services or LDAP directory on one side and Azure AD on another side. But for the purposes of this book, we will focus on synchronization between Active Directory and Azure AD.
Single tenant topologies:
The simplest Azure AD Connect topology consists of one on-premises Active Directory Domain Services forest, one Azure AD tenant and one Azure AD Connect that synchronize information between them See Figure 1-47.

FIGURE 1-47 Azure AD Connect topology for one Active Directory forest and one Azure AD tenant.
Another possible situation is when you have multiple on-premises Active Directory Domain Services forests and need to synchronize information from each of them to a single Azure AD tenant. This is possible with one Azure AD Connect instance that should have network connectivity to domain controllers of all involved Active Directory domains. See Figure 1-48.

FIGURE 1-48 Azure AD Connect topology for multiple Active Directory forests and one Azure AD tenant.
Multiple tenant topologies:
In the common multi-tenant topology, one on-premises object (user, group, device) is synchronized to only one Azure AD tenant. This can be implemented using filtering mechanisms—for example, one organizational unit can be synchronized to one Azure AD tenant, and another organizational unit can be synchronized to another Azure AD tenant. See Figure 1-49. Filtering based on groups or custom rules will achieve the same result if one on-premises object is synchronized to only one Azure AD tenant.
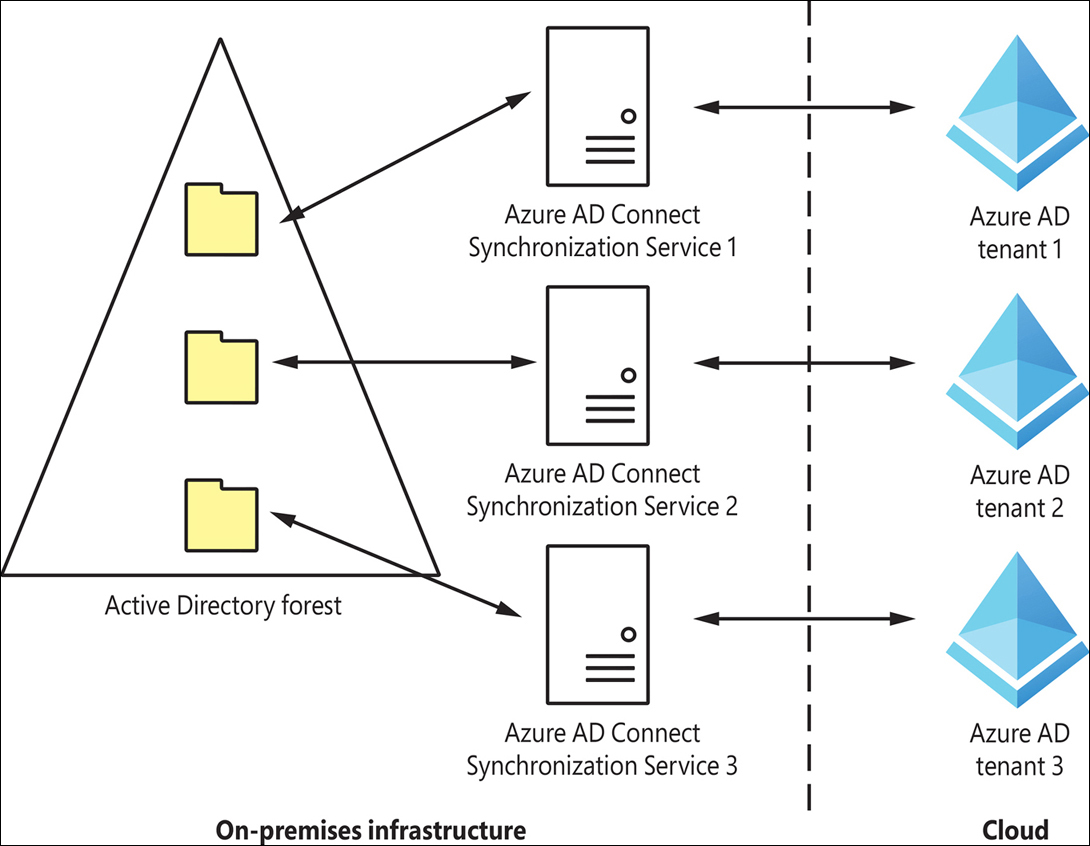
FIGURE 1-49 Azure AD Connect topology for one forest and multiple Azure AD tenants, where each object is synchronized to one tenant only.
In some situations, one on-premises object (user, device, group) needs to be synchronized to multiple Azure AD tenants. This topology is in Public Preview at the time of writing. In this configuration, synchronization from an on-premises environment can be configured to multiple Azure AD tenants, but only one Azure AD tenant can be configured to write back to the on-premises environment for the same object. See Figure 1-50.

FIGURE 1-50 Azure AD Connect topology for one forest and multiple Azure AD tenants, where an object is synchronized to multiple tenants.
Choosing the right authentication method in a hybrid environment:
A key decision that must be made is the authentication method for user accounts that will be synchronized from an on-premises environment. Three options to choose from are:
Password Hash Synchronization (PHS)
Pass-Through Authentication (PTA)
Federation
Each of these methods will be covered in detail in later sections.
We recommend using the Password Hash Synchronization authentication method unless you need to enforce user-level Active Directory security policies during sign-in or have a sign-in requirement not supported natively by Azure AD—such as Certificate-Based Authentication.
If PTA or Federation are chosen as the authentication method, we still recommend enabling Password Hash Synchronization in addition. That will allow you to switch to cloud authentication if something goes wrong with the on-premises Active Directory Domain Services environment or the federated identity provider and also will allow leaked credentials detection through Azure AD Identity Protection.
Prior to Azure AD Connect installation, it is recommended to use the IdFix tool to identify any potential issues with source data in on-premises Active Directory—such as duplicates or unsupported characters in attribute values. Follow the next steps to identify and resolve issues:
Download the IdFix tool from https://github.com/Microsoft/idfix.
Install the IdFix tool by launching an installation file and selecting Install.
Review the privacy statement.
Select Query to analyze Active Directory Domain Services domain data.
If you get a Schema Warning message, review it and select Yes.
Review identified issues as shown in Figure 1-51. An empty list indicates that there were no issues identified.

FIGURE 1-51 IdFix tool execution result.
Solve identified issues manually outside of the IdFix tool or select an applicable action in the right column and select Accept.
Azure AD Connect can be installed in one of two modes: Express settings or Custom settings. Choose Express settings if all of the following are true:
You need to synchronize identities from one on-premises Active Directory Domain Services forest.
Azure AD Connect server is a member of the same forest you will synchronize to Azure AD.
Your authentication method of choice is Password Hash Synchronization.
You are fine with synchronization of all attributes (eligible for synchronization) to Azure AD.
You don’t need to configure custom groups to manage Azure AD Connect Synchronization Engine.
To install Azure AD Connect:
Download Azure AD Connect from https://go.microsoft.com/fwlink/?LinkId=615771.
Run the installation file.
On the Welcome to Azure AD Connect screen, review the license terms and privacy notice and select Continue.
On the Express Settings page, select Customize or Use express settings. See Figure 1-52.
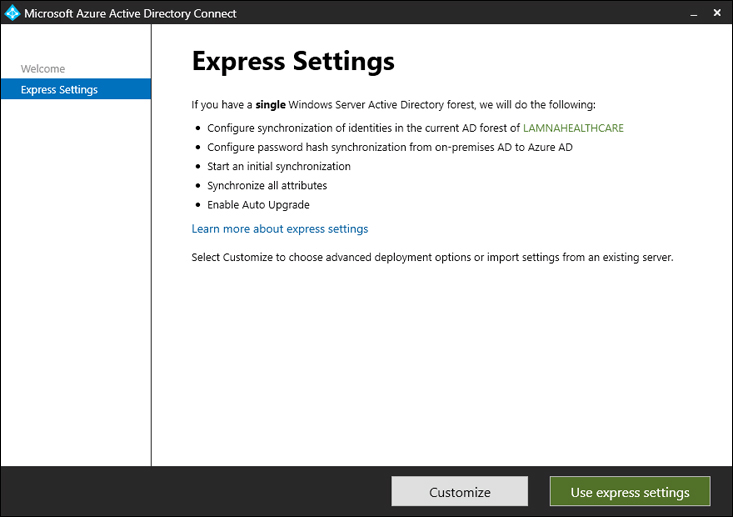
FIGURE 1-52 Azure AD Connect, Express Settings page.
For the rest of this exercise, we will assume that the Use express settings option was selected.
On the Connect to Azure AD page (shown in Figure 1-53), provide the credentials for the Azure AD Global Administrator or Hybrid Identity Administrator. You may also be asked to provide a second factor of authentication, depending on tenant settings.

FIGURE 1-53 Azure AD Connect, Connect to Azure AD page.
On the Connect to AD DS page (shown in Figure 1-54), provide the enterprise administrator credentials for the Active Directory forest. Similar to the previous step, the enterprise administrator’s credentials will be used to create the service account. There is no need to manually create a service account in Active Directory. It is safe to disable the enterprise administrator account used during installation at a later point—for example, if the administrator that made the Azure AD Connect configuration has left the company.
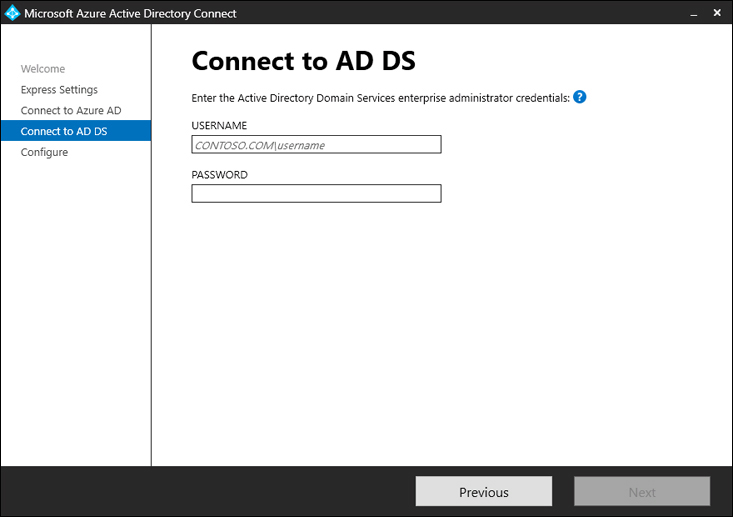
FIGURE 1-54 Azure AD Connect, Connect to AD DS page.
On the Azure AD sign-in configuration page, review the list of UPN suffixes configured in the Active Directory forest.
In the earlier section “Configure and manage custom domains,” we discussed User Principal Names (UPNs) of Azure AD users. Like Azure AD users, on-premises Active Directory Domain Services users also have UPNs. For the best user experience, it is recommended that UPNs in on-premises and Azure AD environments should match. Review the UPN suffixes to ensure that UPN suffixes used on-premises are verified in Azure AD.
On the Ready to configure page, review the settings and proposed changes and select Install. See Figure 1-55.

FIGURE 1-55 Azure AD Connect, Ready to configure page.
On the Configuration complete page, review the configuration summary and recommendations. Select Exit. See Figure 1-56.

FIGURE 1-56 Azure AD Connect, Configuration complete page.
After configuration is completed, open the Azure AD Connect wizard (using a desktop or start menu shortcut) to perform the following actions:
Review privacy settings: enable or disable application telemetry.
View or export Azure AD Connect configuration.
Customize synchronization options:
Configure Exchange Hybrid deployment.
Add/remove Active Directory forests for synchronization.
Implement domain/OU filtering.
Configure Azure AD app and attribute filtering.
Enable/disable Password Hash Synchronization.
Enable/disable password writeback.
Enable/disable group writeback.
Configure device writeback.
Configure directory extension attribute sync.
Configure Hybrid Azure AD Join.
Refresh schema to enable synchronization of new attributes.
Enable/disable staging mode.
Change user sign-in options.
Manage federation settings.
Launch AADConnect Troubleshooting tool (PowerShell-based).
Implement and manage Azure AD Connect cloud sync
Azure AD Connect cloud sync is a new synchronization service for hybrid environments. It can be used by itself or with Azure AD Connect. Similar to Azure AD Connect, it provides synchronization between on-premises Active Directory and Azure AD. A key difference compared to Azure AD Connect is that Azure AD Connect runs its synchronization engine on an on-premises server, while Azure AD Connect cloud sync utilizes lightweight agents on-premises and a synchronization engine in the cloud.
Azure AD Connect cloud sync provides the following benefits, compared to Azure AD Connect:
Simplified installation with lightweight provisioning agents.
Synchronization from a multi-forest disconnected Active Directory environment. As discussed earlier, to synchronize from multiple forests with Azure AD Connect, you must establish network connectivity between Azure AD Connect and each involved domain. With Azure AD Connect cloud sync, you can deploy multiple provisioning agents—each in its own forest—without direct network connectivity between them.
Multiple provisioning agents can be used to simplify high-availability deployments.
At the same time, Azure AD Connect cloud sync lacks the following functionality available in Azure AD Connect at the time of writing:
Synchronization from LDAP directories
Synchronization of device objects (required for Hybrid Azure AD Join)
Synchronization of directory extension attributes
Pass-Through Authentication support
Filtering based on attribute values
Advanced customization of attribute flows
Device writeback
Group writeback
Azure AD Domain Services support
Exchange Hybrid writeback
Cross-domain references
Also, Azure AD Connect currently supports groups with up to 250K members, while Azure AD Connect cloud sync supports groups with up to 50K members only.
Azure AD Connect and Azure AD Connect cloud sync may coexist for the same tenant. This is typically used in Merges & Acquisitions scenarios: a company may have Azure AD Connect deployed for the main forest, and the forest of the acquired company may be synchronized with Azure AD Connect cloud sync agents. This may be done without establishing network connectivity between forests, which may be a challenging task if IP addresses overlap.
To deploy Azure AD Connect cloud sync:
Prepare the domain-joined server, Windows Server 2016 or later.
Select Azure portal > Azure AD Connect > Manage Azure AD cloud sync > Review all agents. See Figure 1-57.

FIGURE 1-57 Azure portal, On-premises provisioning agents page.
Select Download on-premises agent.
Review the Terms of Service and select Accept terms & download.
Open the installation file.
Review the License terms and Privacy notice, and select I agree to the license terms and conditions.
Select Install.
On the Welcome to Azure AD Connect provisioning agent configuration wizard page, select Next. See Figure 1-58.

FIGURE 1-58 Azure AD Connect Provisioning Agent Configuration, Welcome page.
Sign in with Global Administrator or Hybrid Identity Administrator credentials.
On the Configure Service Account page (shown in Figure 1-59), provide Domain Admin credentials and select Next. The credentials will be used to create a group-managed service account (gMSA) in an on-premises Active Directory. It is safe to change the password or disable the Doman Admin account later if necessary—for example, if the Domain Admin leaves the organization.

FIGURE 1-59 Azure AD Connect Provisioning Agent Configuration, Configure Service Account page.
On the Connect Active Directory page (shown in Figure 1-60), you can add additional on-premises Active Directory domains to the synchronization. If Azure AD Connect cloud sync is being configured on the member server of the same domain that will be synchronized, select Next.

FIGURE 1-60 Azure AD Connect Provisioning Agent Configuration, Connect Active Directory page.
Review the proposed changes on the Agent configuration page and select Confirm. See Figure 1-61.

FIGURE 1-61 Azure AD Connect Provisioning Agent Configuration, Agent configuration page.
After receiving the Your agent installation and configuration is complete message, select Exit.
Open Azure portal > Azure Active Directory > Azure AD Connect > Manage Azure AD cloud sync > Review all agents.
Notice that you now have an on-premises agent listed. See Figure 1-62.
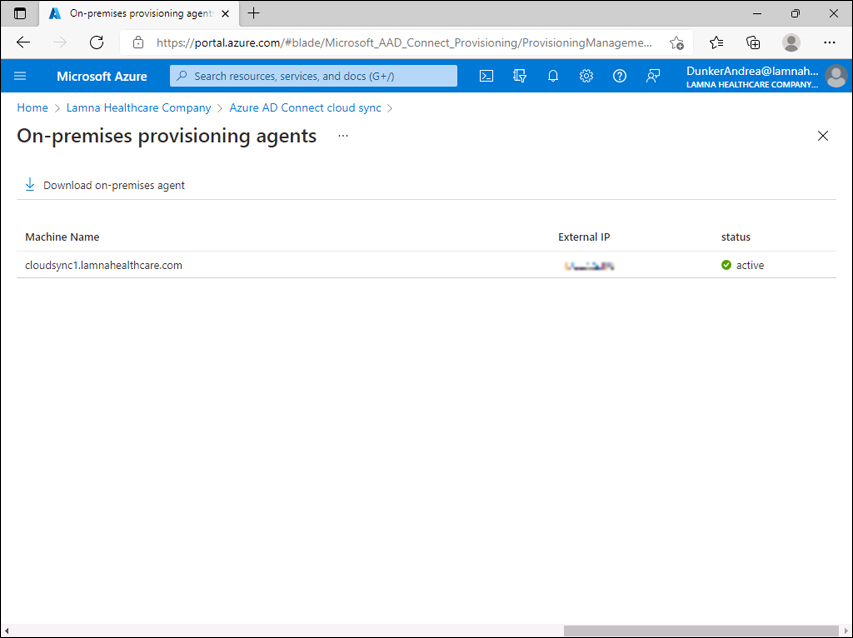
FIGURE 1-62 On-premises provisioning agents page.
Open Azure portal > Azure Active Directory > Azure AD Connect > Manage Azure AD cloud sync.
Select New configuration.
Ensure that the correct domain is selected and keep Enable password hash sync enabled as desired. Select Create. See Figure 1-63.

FIGURE 1-63 New cloud sync configuration page.
On the Edit cloud sync configuration page, adjust the following if necessary:
Scope—which users will be synchronized to Azure AD, based on OU or group
Attribute mapping
Notification email
Accidental deletion prevention
Accidental deletion threshold
See Figure 1-64 and Figure 1-65.

FIGURE 1-64 Edit cloud sync configuration page, part 1.

FIGURE 1-65 Edit cloud sync configuration page, part 2.
Select Enable, Save and Yes.
Open Azure portal > Azure Active Directory > Azure AD Connect > Manage Azure AD cloud sync and ensure that the configuration is now listed with the status Healthy.
To edit the settings of the configuration, select a domain name and adjust the settings accordingly.
Implement and manage Password Hash Synchronization (PHS)
Password Hash Synchronization serves two goals:
PHS is one of the three main authentication mechanisms in hybrid environments and allows users to sign in to Azure AD with the same password they use in on-premises Active Directory Domain Services. See Figure 1-66.
PHS allows Azure AD Identity Protection to check for leaked credentials and protect user accounts.
Even if your chosen authentication mechanism is Pass-Through Authentication (PTA) or Federation, we still recommend enabling Password Hash Synchronization for the purposes of detecting leaked credentials.

FIGURE 1-66 Password Hash Synchronization (PHS).
We recommend using Password Hash Synchronization as your authentication mechanism because it provides the following benefits:
Business continuity. Authentication to Azure AD doesn’t depend on the availability of an on-premises environment over the internet or on-premises components.
Simple deployment. Implementation doesn’t require any agents or federated identity providers to be deployed on-premises, which makes PHS the easiest authentication mechanism to implement.
At the same time, Password Hash Synchronization comes with the following limitations:
Since on-premises Active Directory doesn’t participate in the authentication process, recent changes to the account (such as the account being recently disabled) must be synchronized from the on-premises environment to Azure AD to take effect. This usually takes up to 30 minutes for Azure AD Connect and up to 2 minutes for Azure AD Connect cloud sync.
Information about a password being expired or account being locked out in an on-premises Active Directory is not synchronized to Azure AD. Therefore, it will not be considered during the Azure AD sign-in.
Information about logon hours configured in an on-premises Active Directory is not synchronized to Azure AD. Therefore, it will not be considered during the Azure AD sign-in.
Sign-in features not natively supported by Azure AD, such as smartcards or certificates, can’t be used.
To enable Password Hash Synchronization in an existing Azure AD Connect installation:
Open the Azure AD Connect wizard using the desktop or Start menu shortcut.
On the Welcome to Azure AD Connect page, select Configure. See Figure 1-67.

FIGURE 1-67 Welcome to Azure AD Connect page.
On the Additional tasks page, select Customize synchronization options. See Figure 1-68.

FIGURE 1-68 Additional tasks page.
On Connect to Azure AD page, provide the credentials of the Global Administrator or Hybrid Identity Administrator.
On the Connect your directories page, review the list of on-premises Active Directory domains that password hash synchronization will occur on and then select Next.
On the Domain and OU filtering page, review the OUs that will participate in synchronization and select Next.
On the Optional features page, select the Password hash synchronization checkbox and select Next. See Figure 1-69.

FIGURE 1-69 Optional features page.
On the Ready to configure page, select Configure.
On the Configuration complete page, select Exit.
To enable Password Hash Synchronization in an existing Azure AD Connect cloud sync installation:
Open Azure portal > Azure Active Directory > Azure AD Connect > Manage Azure AD cloud sync.
Select the configuration (the domain that is being synchronized).
Under 2, Manage attributes, select Sync password hashes, Enable.
Select Save.
Implement and manage Pass-Through Authentication (PTA)
Pass-Through Authentication (PTA) is one of the three authentication mechanisms available in the hybrid deployment of Azure AD (the other two mechanisms are Password Hash Synchronization and Federation, covered in other sections).
When PTA is deployed, the user provides a password on the Azure AD login page, and Azure AD validates the password with on-premises Active Directory with the help of the PTA agent deployed on-premises. See Figure 1-70.

FIGURE 1-70 Pass-Through Authentication (PTA).
A PTA agent can be enabled as part of the Azure AD Connect installation, on the same machine. In a production environment, for availability reasons, we recommend additionally installing two standalone PTA agents.
There is no need to publish any ports to the internet for the PTA agent to work. When the PTA agent service starts, it establishes a TCP session to Azure AD, which is an outbound connection. Previously established TCP session(s) will be used for pass-through authentication requests.
Pass-Through Authentication provides following benefits:
Simple deployment. Implementation doesn’t require complex network configuration, certificate management, or manually configured federation.
High availability. It is possible to deploy multiple PTA agents on-premises.
No synchronization-driven latency for existing accounts. Because each authentication request is validated with on-premises domain controllers, password changes or account status changes (enabled/disabled) are honored immediately. There is no need to wait for synchronization with Azure AD Connect.
Security. On-premises policies such as logon hours configured in on-premises Active Directory are honored.
At the same time, Pass-Through Authentication comes with the following limitations:
Sign-in features not natively supported by Azure AD, such as smartcards or certificates, can’t be used.
Sign-in to Azure AD Joined devices with expired passwords is not supported. If an on-premises password has expired, the user will need to sign in through a browser, get a password update, and then sign in to the Azure AD Joined device.
Pass-Through Authentication is only supported for Azure AD Connect installations (additional standalone agents may be installed as well, as discussed earlier) and isn’t supported for Azure AD Connect cloud sync installations.
You can select the Pass-Through Authentication option during Azure AD Connect installation or enable it in an existing Azure AD Connect deployment.
To enable Pass-Through Authentication in an existing Azure AD Connect installation:
Open the Azure AD Connect wizard using the desktop or Start menu shortcut.
On the Welcome to Azure AD Connect page, select Configure.
On the Additional tasks page, select Change user sign-in.
On the Connect to Azure AD page, provide credentials of the Global Administrator or Hybrid Identity Administrator.
On the User sign-in page, select Pass-through authentication. Keep Enable single sign-on selected for Seamless SSO (covered in the following section). Select Next. See Figure 1-71.

FIGURE 1-71 User sign-in page.
On the Enable single sign-on page, provide the credentials for the Domain Administrator account to enable Seamless SSO (covered in the following section) and select Next.
On the Ready to configure page, review the proposed changes and select Configure. See Figure 1-72.

FIGURE 1-72 Ready to configure page.
On the Configuration complete page, review the completed changes and select Exit. See Figure 1-73.

FIGURE 1-73 Configuration complete page.
Implement and manage Seamless Single Sign-On (Seamless SSO)
Password Hash Synchronization (PHS) or Pass-Through Authentication (PTA) allow a user to sign in to Azure AD with the same password they use in an on-premises Active Directory. But the mere implementation of PHS or PTA does not provide Single Sign-On from an on-premises environment. Single Sign-On can be accomplished in one of two ways:
Primary Refresh Token (PRT)
Seamless Single Sign-on (Seamless SSO)
Primary Refresh Token is available on Windows 10, Windows Server 2016, and later versions if the machine is Azure AD Registered, Azure AD Joined, or Hybrid Azure AD Joined.
Seamless SSO (also known as Desktop SSO or SSSO) is available on Windows 7 and later. The device must be domain joined.
We recommend using Primary Refresh Token when possible.
To enable Seamless SSO in an Azure AD Connect environment, select the checkbox Enable single sign-on in Azure AD Connect configuration. See Figure 1-71.
Implement and manage Federation, excluding manual ADFS deployment
Federation is one of three main authentication mechanisms that provide single sign-on in an Azure AD hybrid environment (the other two mechanisms are Password Hash Synchronization and Pass-Through Authentication, as described earlier). Azure AD can be federated with various identity providers. For the purposes of this book, we will use Active Directory Federation Services (ADFS) as an example identity provider installed on-premises that can be federated with Azure AD, for two reasons: first, ADFS is an identity provider created by Microsoft; second, the Azure AD Connect installation wizard can configure an ADFS environment for you.
You may already have an ADFS environment with a number of relying party trusts configured. In that case, Azure AD will become one more relying party trust in that existing ADFS environment. Configuring Azure AD federation in existing ADFS environment is out of scope of this book. Manual ADFS deployment is out of scope as well. We will only cover configuring new ADFS environment with Azure AD Connect installation wizard.
When Federation is configured, Azure AD redirects users to the federated identity provider for authentication. While in the case of Password Hash Synchronization or Pass-Through Authentication, the user submits a password to an Azure AD page (login.microsoftonline.com), with Federation, a user submits a password or another credential to the federated identity provider. Because of that, the federated identity provider page should be exposed to the internet to allow users to authenticate externally. With ADFS, Web Application Proxy should be published to allow external connections from the internet.
Before installation, you will need to prepare. The prerequisites include:
An Active Directory Domain Services environment.
A machine that will become an Azure AD Connect server.
A machine(s) that will become an ADFS server(s).
A machine(s) that will become a Web Application Proxy server(s) and have port 443 published to the internet.
A PFX file with certificate for your future federation service name—for example, sts.northwindeletriccars.com. We recommend that the certificate should be publicly trusted.
External clients should be able to resolve the federation service name—for example, sts.northwindelectriccars.com—to public IP address(es) of Web Application Server(s).
Internal clients and Web Application Server(s) should be able to resolve the federation service name—for example, sts.northwindelectriccars.com—to IP address(es) of ADFS server(s).
Ensure that remote management of the future Web Application Proxy servers from the future Azure AD Connect server is enabled:
On Azure AD Connect server, run Set-Item WSMan:localhostClientTrustedHosts –Value <DMZServerFQDN> -Force -Concatenate
On Web Application Proxy servers, run Enable-PSRemoting -force.
See Figure 1-74 for the topology diagram.

FIGURE 1-74 Federation.
To install Azure AD Connect and configure ADFS:
Download Azure AD Connect from https://go.microsoft.com/fwlink/?LinkId=615771.
Run the installation file.
On the Welcome to Azure AD Connect screen, review the license terms and privacy notice, and select Continue.
On the Express Settings page (shown in Figure 1-52), select Customize.
On the Install required components page, select Install. See Figure 1-75 for other customization options available at this step.

FIGURE 1-75 Install required components page.
On the User sign-in page, select Federation with AD FS. See Figure 1-76.

FIGURE 1-76 User sign-in page.
On the Connect to Azure AD page, provide the credentials of the Global Administrator or Hybrid Identity Administrator. You may also be asked to provide a second factor of authentication, depending on tenant settings.
These credentials will be used for configuration and creating another user account for synchronization purposes (service account). There is no need to manually create a service account in Azure AD. It is safe to disable the Global Administrator or Hybrid Identity Administrator account at a later point—for example, if an administrator that configured Azure AD Connect leaves the company.
On the Connect your directories page, select Add Directory to add the current directory to the synchronization. Provide the credentials of the enterprise administrator that will be used to configure the account for synchronization. Similar to the step above, it is safe to change the credentials or remove the enterprise administrator account later if needed. Select Next.
On the Azure AD sign-in configuration page, review the list of Active Directory UPN suffixes provided and the corresponding Azure AD domains. Select Next.
On the Domain and OU filtering page, include or exclude certain OUs from synchronization if required, and select Next.
Review the settings on the Uniquely identifying your users page. If you have only one Active Directory forest to synchronize from, and users from that forest are synchronized to only one Azure AD tenant, you can typically select Next. See Figure 1-77.

FIGURE 1-77 Uniquely identifying your users page.
On the Filter users and devices page, select the group of users and devices that should be synchronized. This option is supported only for pilot deployments. For production deployments, select Next.
On the Optional features page, review the options. We recommend enabling Password hash synchronization even if the selected authentication mechanism is Federation with ADFS. See Figure 1-78 for the available options.

FIGURE 1-78 Optional features page.
On the Domain Administrator credentials page, provide the Domain Administrator credentials for the domain where the ADFS server will be installed.
On the AD FS farm page (shown in Figure 1-79), provide the PFX file with the certificate described in the prerequisites section.

FIGURE 1-79 ADFS farm page.
On the AD FS Server page, add the names of future ADFS servers and select Next.
On the Web Application Proxy server page, add the names of future Web Application Proxy servers and select Next.
On the AD FS service account page, keep Create a group Managed Service Account selected, provide the credentials of the Enterprise Administrator, and select Next. See Figure 1-80.

FIGURE 1-80 AD FS service account page.
On the Azure AD domain page, select a custom domain name that will be converted from Managed to Federated state. Select Next. See Figure 1-81.

FIGURE 1-81 Azure AD domain page.
On the Ready to configure page, review the proposed changes and select Install. See Figure 1-82.

FIGURE 1-82 Ready to configure page.
On the Configuration complete page, select Next.
On the Verify federation connectivity page, select both checkboxes and select Verify. See Figure 1-83.

FIGURE 1-83 Verify federation connectivity page.
Ensure that verification was successful and select Exit.
Open Azure AD Connect using the desktop shortcut.
On the Welcome to Azure AD Connect page, select Configure.
On the Additional tasks page, select Manage federation.
On the Manage federation page, select Verify federated login.
On the Connect to Azure AD page, provide the credentials of the Global Administrator or Hybrid Identity Administrator.
Provide credentials of the synchronized user.
Ensure that you see the message Successfully logged into Microsoft Online using a security token from AD FS with the provided user credentials and select Exit.
Disable WS-Trust endpoints for the extranet usage by running the following commands on the primary ADFS server:
Set-AdfsEndpoint -TargetAddressPath /adfs/services/trust/2005/windowstransport
-Proxy $false
Set-AdfsEndpoint -TargetAddressPath /adfs/services/trust/13/windowstransport
-Proxy $false
Enable Extranet Lockout Protection to protect your users from brute force password attacks from the internet by running the following command on the primary ADFS server: Set-AdfsProperties -EnableExtranetLockout $true
Implement and manage Azure AD Connect Health
Azure AD Connect Health helps to monitor on-premises components of your hybrid environment:
Azure AD Connect Health Synchronization Engine
Active Directory Domain Services (ADDS)
Active Directory Federation Services (ADFS)
Azure AD Connect Health relies on agents that work on respective servers in an on-premises environment: Azure AD Connect servers, domain controllers, and ADFS servers. Azure AD Connect Health agents need outbound connectivity to Azure AD Connect Health service endpoints in the cloud. Installation procedures vary depending on the agent used—for the synchronization engine, domain controllers, or ADFS.
The Azure AD Connect Health agent for Synchronization Engine is installed automatically when you install Azure AD Connect. No manual installation steps are required.
To monitor the status of your Azure AD Connect Synchronization Engine, open Azure portal > Azure AD Connect Health > Sync services. You will see a list of Azure AD Connect servers with health agents installed. See Figure 1-84.

FIGURE 1-84 Azure Active Directory Connect Health, Sync services page.
Select a service name to view the run profile latency chart for the last 24 hours.
To view individual synchronization errors, open Azure portal > Azure AD Connect Health > Sync errors. See Figure 1-85.

FIGURE 1-85 Azure Active Directory Connect Health, Sync errors page.
The Azure AD Connect Health agent for ADFS should be installed manually. To install the Azure AD Connect Health agent on ADFS servers:
Download the Azure AD Connect Health agent for ADFS from https://go.microsoft.com/fwlink/?LinkID=518973.
Run the installation file.
On the first screen, review the Microsoft Azure Subscription Agreement and select Install. See Figure 1-86.

FIGURE 1-86 Azure AD Connect Health AD FS Agent Setup page.
On the Setup Successful page, select Configure Now. See Figure 1-87.
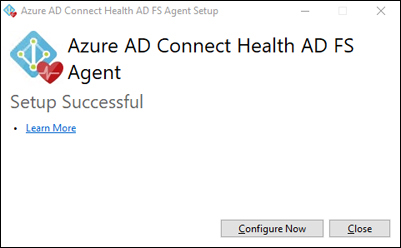
FIGURE 1-87 Azure AD Connect Health ADFS Agent Setup Successful page.
Sign in with a Global Administrator account.
Review the result of script execution. You may receive a warning that auditing isn’t enabled (this will be covered below).
(Optional) To get Usage Analytics collected by the Azure AD Connect Health AD FS Agent, enable auditing:
In the Local Security Policy, add the ADFS service account to the Security SettingsLocal PoliciesUser right assignmentGenerate security audit policy. The ADFS service account name is typically DOMAINaadcsvc$.
Run the following command in an elevated command prompt:
auditpol.exe /set /subcategory:{0CCE9222-69AE-11D9-BED3-505054503030} /failure:enable /success:enableRun the PowerShell command
Set-AdfsProperties -AuditLevel VerboseIf agent registration previously completed with warnings, restart agent registration by running the PowerShell command
Register-AzureADConnectHealthADFSAgent
Repeat steps 1-6 on Web Application Proxy servers. There is no need to enable auditing on them.
Once Azure AD Connect Health Agents for ADFS are installed and configured, they will start reporting health data. You can view their status at Azure portal > Azure AD Connect Health > AD FS services. See an example in Figure 1-88.

FIGURE 1-88 Azure Active Directory Connect Health | AD FS services page.
Use Azure AD Connect Health for ADFS to:
View Properties of your ADFS configuration. See Figure 1-89.
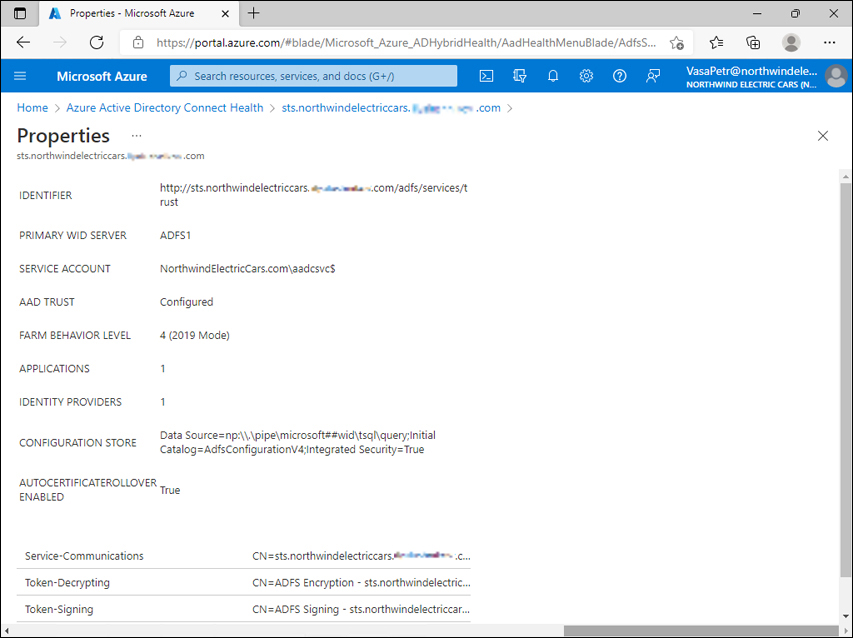
FIGURE 1-89 Azure Active Directory Connect Health for ADFS, Properties page.
View alerts such as Extranet Lockout Protection Disabled for ADFS or The Windows Transport endpoint is enabled. It is recommended that the endpoint be disabled from the extranet due to a known security vulnerability.
Configure notification settings.
Monitor the number of token requests per second on ADFS servers and Web Application Proxies. See Figure 1-90.

FIGURE 1-90 Azure Active Directory Connect Health for ADFS, Monitoring section.
Monitor bad password attempts.
A third component of Azure AD Connect Health (along with Azure AD Connect Health for Sync and Azure AD Connect Health for ADFS) is Azure AD Connect Health for ADDS.
Download Azure AD Connect Health Agent for ADDS from https://go.microsoft.com/fwlink/?LinkID=820540.
The installation procedure is like the one for Azure AD Connect Health Agent for ADFS.
To use Azure AD Connect Health for ADDS, open Azure portal > Azure AD Connect Health > AD DS services and select the forest name. See Figure 1-91.

FIGURE 1-91 Azure Active Directory Connect health for ADDS
Use Azure AD Connect Health for ADDS to:
View domain controllers, domains, and sites.
View replication status.
View alerts.
Configure notification settings.
Monitor LDAP Successful Binds/sec for each domain controller.
Monitor NTLS Authentications/sec for each domain controller.
Monitor Kerberos Authentications/sec for each domain controller.
Troubleshoot synchronization errors
As with many other solutions, troubleshooting of Azure AD Connect can be done on many levels—depending on the complexity of the problem, level of configuration customization, and skills of a troubleshooting person. For the purposes of this book, we will focus on troubleshooting using the Azure AD Connect wizard.
To troubleshoot synchronization using the Azure AD Connect wizard:
Ensure that the PowerShell execution policy is set to RemoteSigned or Unrestricted.
Open the Azure AD Connect wizard.
On the Welcome to Azure AD Connect page, select Configure.
On the Additional tasks page, select Troubleshoot and then select Next. See Figure 1-92.

FIGURE 1-92 Azure AD Connect, Additional tasks page.
On the Welcome to AADConnect Troubleshooting page, select Launch.
The PowerShell-based troubleshooting tool will be displayed with a list of options. See Figure 1-93.

FIGURE 1-93 AAD Connect Troubleshooting.
Enter ‘1’ - Troubleshoot Object Synchronization
Enter ‘2’ - Troubleshoot Password Hash Synchronization
Enter ‘3’ - Collect General Diagnostics
Enter ‘4’ - Configure AD DS Connector Account Permissions
Enter ‘5’ - Test Azure Active Directory Connectivity
Enter ‘6’ - Test Active Directory Connectivity
Enter ‘Q’ - Quit
Please make a selection:
Proceed with the desired troubleshooting option. For example, to continue with object synchronization, press 1 and hit Enter.
Object synchronization options are displayed in Figure 1-94.

FIGURE 1-94 AAD Connect Troubleshooting, Troubleshoot Object Synchronization step.
Enter ‘2’ - Diagnose Attribute Synchronization Issues
Enter ‘3’ - Diagnose Group Membership Synchronization Issues
Enter ‘4’ - How to change Exchange Online primary email address
Enter ‘5’ - How to hide mailbox from Exchange Online global address list
Enter ‘6’ - Compare object read permissions when running in context of AD Connector account vs Admin account
Enter ‘B’ - Go back to main troubleshooting menu
Enter ‘Q’ - Quit
Please make a selection:
Select the desired option. For example, if option 1 (Diagnose Object Synchronization Issues) is selected, you will be asked to provide the AD object Distinguished Name. Then, you will be asked to provide the Azure AD tenant Global Administrator or Hybrid Identity Administrator credentials.
Review the problems found, recommended actions, and the generated HTML report. See Figure 1-95.

FIGURE 1-95 AAD Connect Troubleshooting shows the result of object synchronization troubleshooting.
Chapter summary
Azure AD roles can have permissions in Azure AD, permissions for Microsoft 365 products, or permissions across a Microsoft 365 stack.
Azure AD roles can be built-in or custom.
Role assignment includes the security principal, role information, scope, and type of assignment.
The scope of assignment can be Directory, Administrative unit, or an Azure AD resource.
The type of assignment can be permanent eligible, permanent active, time-bound eligible, or time-bound active.
The UserPrincipalName (UPN) consists of a UPN prefix (user account name) and UPN suffix (domain name) divided by the @ symbol.
After adding a new custom domain name to the tenant, you need to verify it—i.e., prove that you own the domain name by configuring DNS records.
Registering a device in Azure AD is beneficial for single sign-on, signing in to the device with Azure AD credentials, device-based conditional access, and mobile device management enrollment scenarios.
Three device join types are available in Azure AD: Azure AD Registration, Azure AD Join, and Hybrid Azure AD Join.
Azure AD Registration is for Bring Your Own Device (BYOD) scenarios.
Azure AD Join and Hybrid Azure AD Join are for corporate Windows 10/11 devices.
A Hybrid Azure AD Joined device is a member of an on-premises AD domain, registered in Azure AD on top of that.
All three options (Azure AD Registration, Azure AD Join, and Hybrid Azure AD Join) provide single sign-on (SSO) to Azure AD.
Control the Hybrid Azure AD Join process for members of an on-premises domain by managing Service Connection Points (SCP).
Use Seamless SSO in situations where a Primary Refresh Token (PRT) is not available.
Place resources to administrative units for the purpose of delegating permissions.
Use the Access management for Azure resources toggle to grant Global Administrator control over subscriptions associated with a tenant.
Security groups are used for granting access to resources.
Microsoft 365 groups are used for collaboration between users, as well as between users and guests.
Group nesting is supported only between Security groups.
Use dynamic groups to configure attribute-based rules to populate group memberships.
Use Azure AD Self-Service Group Management to allow users to create and manage their groups.
Use Group expiration policy to automatically remove Microsoft 365 groups that are no longer in use.
Set the UsageLocation attribute for users before assigning Microsoft 365 licenses.
Use Azure AD B2B to invite business partners to your tenant and provide them access to applications and resources.
Limit guests’ permissions with the Guest user access restrictions setting.
Use Guest invite restrictions to limit who can invite guests. By default, any member or guest can invite new guests.
Use Azure AD Connect to synchronize objects between an on-premises environment and Azure AD, configure hybrid authentication, and monitor the health of the hybrid environment.
One Azure AD Connect server can synchronize with multiple on-premises AD forests but only one Azure AD tenant.
Use staging Azure AD Connect servers to test configuration and as a standby.
In a hybrid environment, authentication methods available include Password Hash Synchronization (PHS), Pass-Through Authentication (PTA), and Federation.
Use Password Hash Synchronization as a recommended hybrid authentication method.
Azure AD Connect cloud sync is a new synchronization service that utilizes lightweight agents on-premises and a synchronization engine in the cloud.
Use Azure AD Connect Health to monitor the Azure AD Connect synchronization engine, on-premises ADDS environment, and ADFS environment.
Thought experiment
In this thought experiment, you demonstrate your skills and knowledge of the topics covered in this chapter. You can find the answers in the section that follows.
You are an enterprise administrator for a company that starts its Microsoft 365 journey. You have three on-premises AD forests that have forest trusts between them. You need to configure synchronization of users, groups, and devices identities between the on-premises environment and an Azure AD tenant that you are about to create.
Today, all corporate Windows 10 devices are joined to an on-premises AD domain and managed through Group Policy Objects. You need to provide single sign-on from these devices to Azure AD, keeping them joined to an on-premises domain for the time being.
1. What device registration model you will choose for corporate Windows 10 devices?
2. What synchronization mechanism will you use to synchronize identities between the on-premises environment and Azure AD?
3. What authentication method will you configure for the hybrid environment? Assume that there are no additional requirements beyond those explicitly stated above.
Thought experiment answers
This section contains the solutions to the thought experiment. Each answer explains why the choice is correct.
1. Hybrid Azure AD Join. Hybrid Azure AD Joined devices are members of the on-premises domain and registered to the Azure AD tenant at the same time.
2. Azure AD Connect. Azure AD Connect cloud sync doesn’t support synchronization of device identities at the time of writing. On-premises forests having trusts between them is not a prerequisite for Azure AD Connect deployment, but it signals that there is network connectivity between forests, which is a prerequisite for Azure AD Connect deployment.
3. Password Hash Synchronization is the recommended authentication method because it doesn’t have dependency on the on-premises environment for every sign-in.