
Chapter 2
Implement an authentication and access management solution
Attacks on user accounts/passwords have increased significantly in recent years. Common brute force and password spray attacks are extremely effective against plain text passwords. Furthermore, leaked credentials are sold on the dark web, allowing anyone to instantly gain access to tens of thousands of user accounts and passwords. The root cause of these attacks is that passwords alone are ineffective in countering the level and sophistication of attacks against them. Azure AD offers robust multifactor authentication mechanisms that help safeguard access to critical organizational resources by adding another layer of security through the use of a secondary form of authentication. Azure AD also offers fine- and coarse-grain access management solutions, such as condition access, which enables organizations with varying security posture requirements to implement policies that meet their business requirements.
Skills covered in this chapter:
Skill 2.2: Plan, implement, and manage Azure AD user authentication
Skill 2.3: Plan, implement, and manage Azure AD conditional access
Skill 2.1: Plan, implement, and manage Azure Multifactor Authentication (MFA) and self-service password reset
To improve the security posture of an organization and to mitigate threats associated with passwords, it is highly recommended to incorporate a multifactor option to authenticate the user. Adding an additional factor to user authentication immediately improves account security because a hacker must compromise additional factors to compromise the account.
Azure provides a range of options for configuring multifactor authentication (MFA) which requires careful planning and administration.
Plan Azure MFA deployment, excluding MFA Server
Azure Multifactor Authentication (MFA) requires you to authenticate using two or more factors to establish identity successfully. These factors follow this pattern:
Something you know: this could be a password, a passphrase, or a security question.
Something you possess: this could be a token-generating device or a software-based application, such as a mobile app.
Something you are: this could be a biometric property of a person, such as a face scan, fingerprint, or retina scan.
Azure MFA offers several options for user authentication to enable two-step verification. The underlying theme of two-step verification is to protect the sign-in process by making it incrementally more difficult for a malicious actor to compromise the account while also ensuring that the sign-in process is not cumbersome. For example, during a sign-in process, some users might prefer to enter their password followed by receiving a push notification on their device, whereas others might prefer to make a phone call because they do not have access to a smart device. As you will see in the following sections, carefully evaluating various authentication options is critical for Azure MFA end user adoption.
Determining a rollout strategy for Azure MFA
You need to think strategically about the rollout of Azure MFA within an organization. Striking a right balance between deployment velocity and its scope is the key to a successful rollout. Following are key points to keep in mind:
Plan the deployment in small iterations by starting with a small subset of users who are receptive to change and whose daily tasks are least impacted by the rollout.
Provide users with clear guidance regarding the registration process along with the MFA methods available to them for authentication.
Continuously monitor for any issues reported by users, including steep learning curves, lack of preferred authentication methods, and technical challenges that may hamper the adoption.
Ensure that support staff are trained well in advance before the rollout.
Anticipate some resistance from a subset of users due to the change in their daily routine.
Licensing requirements for Azure MFA
Azure MFA licensing can be configured in a variety of ways. Understanding how licensing affects the availability of various MFA features to end users is an important part of planning. Table 2-1 provides a high-level breakdown of various Azure MFA features along with Azure AD and Microsoft 365 license requirements.
TABLE 2-1 Azure AD licenses and high-level MFA features
License Type | Description |
Azure Active Directory Free | Includes security default features that prompt users for MFA as needed and provides baseline security to user accounts. |
Azure Active Directory Premium P1 | Same as Azure Active Directory Free. Includes the Azure AD Conditional Access feature, which allows implementation of fine-grain organization policies for MFA. |
Azure Active Directory Premium P2 | Same as Azure Active Directory Premium P1. Includes support for risk-based conditional access policies. |
EMS E3, Microsoft 365 E3, and Microsoft 365 Premium | Includes Azure Active Directory Premium P1 features (as described above). |
EMS E5 and Microsoft 365 E5 | Includes Azure Active Directory Premium P2 features (as described above). |
Table 2-2 lists the commonly used Azure AD MFA and access management features, as well as the Azure AD licenses that support them.
TABLE 2-2 Azure AD licenses and specific MFA features
Feature | Azure AD Free | Azure AD P1 | Azure AD P2 |
Mobile app as a second factor | Yes | Yes | Yes |
Phone call as a second factor | No | Yes | Yes |
SMS as a second factor | No | Yes | Yes |
Custom greetings for phone calls | No | No | Yes |
Custom caller ID for phone calls | No | Yes | Yes |
Conditional Access | No | No | Yes |
Risk-based conditional access | No | No | Yes |
Configure and deploy self-service password reset
Self-service password reset (SSPR) is a feature in Azure AD that allows users to change their password without seeking help from support or an IT administrator. With SSPR, users can follow a series of prompts to reset their password to unlock their account if they forget their password. It also helps the organization in saving costs because support staff can focus on other urgent matters.
To enable service-service password to reset:
Sign in as a Global Administrator to the Azure portal at http://portal.azure.com.
Navigate to Azure Active Directory.
Select Password Reset from the left-side pane, as shown in Figure 2-1.

FIGURE 2-1 Password reset option in Azure AD.
On the Properties page, under the Self service password reset enabled option, select All, as shown in Figure 2-2. This will enable all users in the tenant to reset their password using SSPR. You can also choose a specific group by selecting the option Selected, which will only allow users in that group to reset their password.

FIGURE 2-2 Password reset properties.
Click Save.
Register an authentication method for self-service password reset
Follow the steps below to sign in as a user and register a phone number that will be used during SSPR.
Sign in as a user to the My Sign-Ins portal at: https://mysignins.microsoft.com.
On the Keep your account secure page, enter the phone number and click Next, as shown in Figure 2-3. A text code will be sent to the phone number provided.

FIGURE 2-3 Phone number validation via SMS message.
Enter the text code received on the phone number and click Next. Figure 2-4 shows a sample text code sent to the phone number registered in the previous step.

FIGURE 2-4 Phone number verification via 6-digit code.
You should see SMS verified. Your phone was registered successfully message, as shown in Figure 2-5. Click Next.
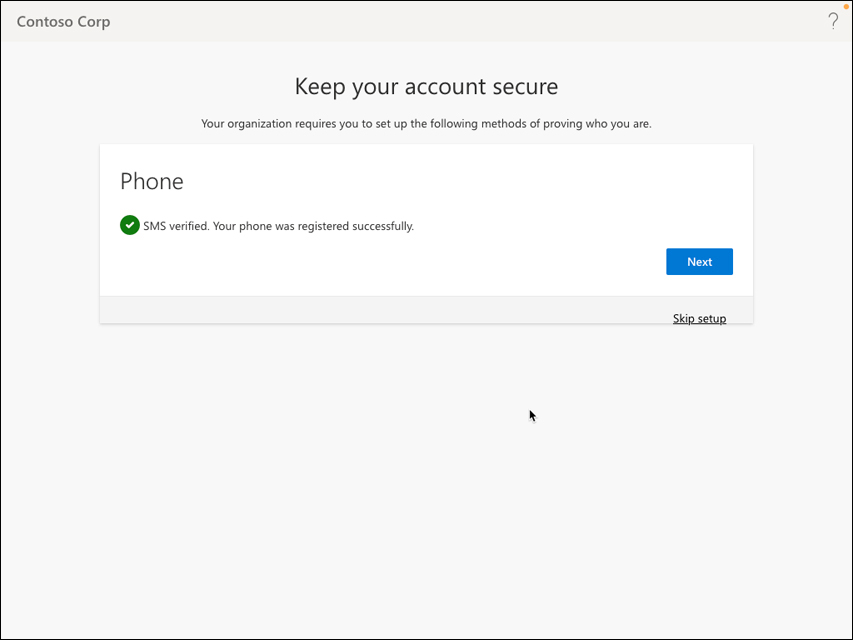
FIGURE 2-5 Phone number registration success.
Click Done to complete the phone number registration process for SSPR, as shown in Figure 2-6.

FIGURE 2-6 Security configuration information completion success message.
You can close the browser. You don’t need to finish the sign-in process at this time.
Reset password using Self Service Password Reset
Follow the steps below to reset the user’s password using Self Service Password Reset:
Navigate to the URL https://passwordreset.microsoftonline.com/ using an InPrivate or Incognito browser session.
Enter the user’s Email or Username and complete the CAPTCHA check, as shown in Figure 2-7, and then click Next.

FIGURE 2-7 Get back into your account using email or username.
Enter the phone number associated with the account, as shown in in Figure 2-8, and then press Text. A text message with a verification code will be sent to this phone number.

FIGURE 2-8 Enter a phone number.
Enter the verification code, as shown in in Figure 2-9, and then then press Next.

FIGURE 2-9 Phone number verification.
Enter the new password, as shown in in Figure 2-10, and then click Finish.

FIGURE 2-10 Enter new password.
The success message “Your password has been reset” will appear on the page, as shown in Figure 2-11. This confirms that the user account password has been reset successfully. You can now close the browser.
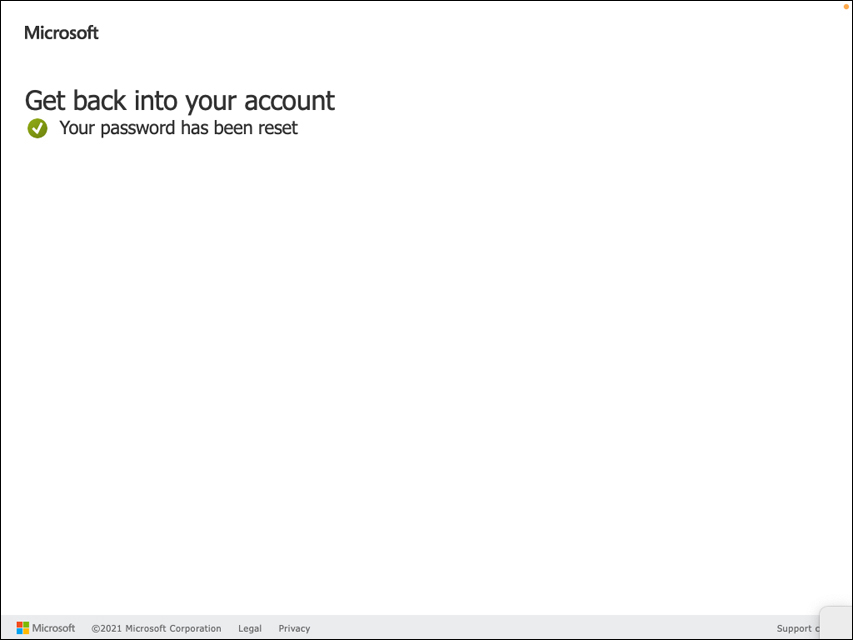
FIGURE 2-11 Password reset success.
Implement and manage Azure MFA settings
The steps below demonstrate how to set up and manage Azure MFA settings. Please note that you must have an active Azure subscription in order to complete the tasks in this skill and the others in this chapter. To sign up for a free trial subscription, visit https://azure.microsoft.com/en-us/offers/ms-azr-0044p/.
Sign in to the Azure portal, https://portal.azure.com, using a Global Administrator account.
Navigate to the Azure Active Directory dashboard by using the Azure Active Directory option available in the sidebar of the Azure portal.
Select the Security option located under the Manage section on the left side, as shown in Figure 2-12.

FIGURE 2-12 Azure AD home page with Security option.
Select the MFA option located under the Manage section on the Security page, as shown in Figure 2-13.

FIGURE 2-13 Azure AD Security page with MFA configuration options.
Select the Additional cloud-based MFA settings link located under Configure, as shown in Figure 2-14. This will open a new page with all available options for MFA.

FIGURE 2-14 Azure AD Multi-Factor Authentication (MFA).
By default, all available MFA verification options are selected, as shown in Figure 2-15. You can deselect one or more of these verification options as needed based on your MFA planning. It is recommended that users have at least more than one MFA method available to them in case the primary method is unavailable. Please review Table 2-3 for more details about each MFA setting available on this page.

FIGURE 2-15 Azure AD MFA service settings.
TABLE 2-3 Azure AD MFA service settings
Setting | Description |
App passwords |
|
Trusted IPs | Allow bypass of multifactor authentication prompts for users who sign in from a defined IP address range |
Verification Options | These are all the available verification options available for MFA:
|
Remember MFA on trusted device | When enabled, this option allows users to skip subsequent MFA verifications for a set number of days (up to 365 days) after successfully signing in using MFA on a trusted device. |
In addition to MFA service settings, Azure AD also provides miscellaneous configuration options for MFA, as summarized in Table 2-4.
TABLE 2-4 Azure AD MFA settings
Setting | Description |
Account lockout | Temporarily lock accounts using MFA service when there are many denied authentication attempts in a row. This applies only to users who enter a PIN to authenticate. The following settings are available:
|
Block/unblock users | Blocked users will not receive MFA requests. Users will remain blocked for 90 days from the time they are blocked. Blocked users can be manually unblocked by the administrator using the “Unblock” action. |
Fraud alert | The fraud alert allows users to report fraudulent MFA attempts because of a suspicious MFA prompt—for example, when an MFA prompt is from an unknown source. Users can use their phone or the Microsoft authenticator app to report the fraudulent MFA attempt. There are two configuration options available:
|
Notifications | Email notifications are sent to identity administrators when users report a fraud alert. |
OATH tokens | OATH time-based one-time password (TOTP) SHA-1 tokens that refresh codes every 30 or 60 seconds are supported. OATH tokens are uploaded in a comma-separated values (CSV) file format. See https://docs.microsoft.com/en-us/azure/active-directory/authentication/howto-mfa-mfasettings#oath-tokens. |
Phone call settings | Enables customization of the caller ID and voice greeting message that the user receives during an MFA attempt. When the caller ID is not customized, by default voice calls come from the phone number “+1 (855) 330-8653” within the United States. Make sure the user is aware of this number and that it is excluded from any spam filters. |
Manage MFA settings for users
Administrators can manage the following MFA settings for a specific user:
Phone number: Configure phone number used by the user to perform MFA via either SMS or a voice call.
Email address: Configure the email address of the user. The email can be used for self-service password reset (SSPR) but not for an MFA option.
Revoke existing MFA session: Remove any existing MFA sessions for the user and force MFA the next time the policy on the device requires it.
Force re-registration of MFA: Clears the user’s remembered MFA sessions and requires them to perform MFA the next time it’s required by the policy on the device.
Reset Password: Assigns a temporary password to a user account, which must be changed by the user during their next sign-in.
To configure phone authentication methods and the email address of a user:
Sign in as an administrator to the Azure portal at http://portal.azure.com.
Navigate to Azure Active Directory.
Select Users from the left pane, as shown in Figure 2-16.

FIGURE 2-16 Azure AD Users option.
On the Users page, select the user you’d like to configure the authentication method for MFA. You can use the search bar, as shown in Figure 2-17.

FIGURE 2-17 Azure AD All users.
Select Authentication methods from the left side, as shown in Figure 2-18.

FIGURE 2-18 Azure AD Authentication methods.
Fill in the following information:
Phone: This is the phone number used during the MFA authentication. Make sure there is a space between the region/country code and the phone number. For example, +1 1224567890.
Phone: This is the alternate phone number used during the MFA authentication in case the primary phone number is not available.
Email: The email address used during MFA authentication. An email address alone cannot be used for MFA.
Click the Save button located on the top row, as shown in Figure 2-19.

FIGURE 2-19 Azure AD Authentication contact info.
Extend Azure AD MFA to third-party and on-premises devices
To help you safeguard third-party and on-premises devices, Microsoft Intune can be used with Azure Active Directory (Azure AD) Conditional Access to mandate multifactor authentication (MFA) for device activation. MFA functions by requiring any two or more of the verification techniques listed below:
Something you are aware of (typically a password or PIN)
Something you possess (a reliable item that is difficult to copy, such as a phone)
Something that identifies you physically (biometrics, such as a fingerprint)
MFA is supported for iOS/iPadOS, macOS, Android, and Windows 8.1 or later devices. Please note that when end users enroll their device, they now must authenticate with a second form of identification, such as a PIN, a phone, or biometrics. More information about extending MFA on devices can be found at https://learn.microsoft.com/en-us/mem/intune/enrollment/multi-factor-authentication#configure-intune-to-require-multifactor-authentication-at-device-enrollment.
Monitor Azure AD MFA activity
The Azure Active Directory (Azure AD) sign-ins report can be used to review and understand Azure AD Multi-Factor Authentication events. This report provides the following insights:
Was the sign-in hampered by MFA?
How did the user finish MFA?
Which methods of authentication were used during a sign-in?
Why couldn’t the user complete MFA?
How many users were asked to provide MFA?
How many users failed the MFA challenge?
What are the most common MFA issues that end users face?
Step-by-step instructions on how to access the sign-ins report can be found at https://learn.microsoft.com/en-us/azure/active-directory/authentication/howto-mfa-reporting#view-the-azure-ad-sign-ins-report.
Skill 2.2: Plan, implement, and manage Azure AD user authentication
When a user signs in to a device, application, or service, one of the primary functions of an Azure AD is to authenticate credentials. However, in Azure AD, there are multiple options for user authentication that go beyond simply verifying a username and password and provide a range of security protections such as phishing resistance, biometrics, and so on.
Plan for authentication
Planning for authentication is an important part of determining which method provides the best combination of usability and security. Traditionally, username and password is the most popular authentication method used to verify user credentials. However, it is also the least secure method because it is easy to launch a brute force attack against the passwords. To improve security, it is highly recommended to replace the password or at least use an additional authentication method for sign-ins. Azure AD provides a range of passwordless MFA methods to the users.
Users can use Azure AD passwordless authentication methods such as FIDO2 security keys, Windows Hello for Business, and the Microsoft Authenticator app during sign-ins.
Table 2-5 provides a summary of various authentication methods that can be used for sign-ins. Please note that some of these methods can be used for both MFA and self-service password reset (SSPR). (SSPR is covered in a later section.)
TABLE 2-5 Azure AD authentication methods and usage.
Authentication method | Usage |
Password | Azure AD MFA and SSPR |
Microsoft Authenticator app | Azure AD MFA and SSPR Available to users using iOS and Android operating system. Users may register their mobile app at https://aka.ms/mfasetup. By using the Microsoft Authenticator app, users receive push notifications on their smartphone or tablet and then reject or approve the request. Users can also use the Microsoft Authentication app to generate an OATH verification code. During the sign-in process, this verification code can be used as a second form of authentication. |
Voice call | Azure AD MFA and SSPR Voice call is placed by the Azure automated voice system to the user’s phone number. The user receives the call and then must use a keypad to confirm or deny the authentication. |
Text messages | Azure AD MFA and SSPR A text message containing a time-bound verification code is sent by Azure MFA via SMS to the user’s mobile phone. The user must enter this verification code during the sign-in process within the specific time period to complete the verification process. |
FIDO2 Security Key | Azure AD MFA and SSPR Fast Identity Online (FIDO) is an open standard for passwordless authentication. The user first needs to register a FIDO2 security key and then select it at the time of sign-in for authentication purposes. FIDO2 security keys are available in the form of USB devices, Bluetooth, and NFC. |
Windows Hello for Business | Azure AD MFA and SSPR Windows Hello for Business (WHfB)is a fully integrated biometric authentication method based on facial recognition or fingerprint matching. Users need Windows 10 or a later version of the Windows operating system to use WHfB to sign in to Azure Active Directory. |
OATH software token | Azure AD MFA and SSPR Users can use the Microsoft Authenticator app or other similar authenticator apps that can generate software-based OATH tokens to sign in to Azure Active Directory. |
OATH hardware token | Azure AD MFA and SSPR OATH is an open standard to generate one-time password (OTP) verification codes. Azure Active Directory natively supports hardware-based OATH time-based one-time password SHA-1 tokens with 30 seconds or 60 seconds validity. Users can use hardware devices from their preferred vendors, which are compatible with OATH standards to generate OTPs and use them to sign in to Azure Active Directory. |
Implement and manage authentication methods
As part of the Azure AD sign-in experience, basic password-based authentication should be supplemented or replaced with a more secure authentication method such as FIDO.
Working with FIDO2
The Fast IDentity Online (FIDO) Alliance’s goal is to replace passwords with strong passwordless authentication that is both secure and usable. The latest version of the open specification for passwordless authentication, FIDO2, incorporates the W3C Web Authentication (WebAuthn) standard as well as the FIDO Client to Authenticator Protocol 2 (CTAP2). Users can sign in using an unphishable FIDO2 security key stored in a hardware device that can be accessed via commonly used protocols such as NFC (near-field communication), Bluetooth, and USB.
FIDO2 security keys can be used to sign in to Azure AD or hybrid Azure AD-joined devices to achieve single-sign-on to cloud and on-premises resources.
Enabling the FIDO2 security key method
To enable the FIDO2 security key method for Azure AD:
Sign in as an administrator to the Azure portal at http://portal.azure.com.
Navigate to Azure Active Directory.
Select Security from the left pane, as shown in Figure 2-20.

FIGURE 2-20 Azure AD home page with Security option.
Select Authentication methods from the left pane, as shown in Figure 2-21.

FIGURE 2-21 Azure AD Security settings with the Authentication methods option.
Select FIDO2 Security Key from the list of available methods, as shown in Figure 2-22.

FIGURE 2-22 Azure AD Authentication methods.
Under the Basics tab, choose the following options, as shown in Figure 2-23.
Enable: Yes
Target: All users

FIGURE 2-23 Azure AD FIDO2 Security Key settings.
Under the Configure tab, choose following options, as shown in Figure 2-24.
Allow self-service set up: Yes
Enforce attestation: No (Default)
Enforce key restrictions: No (Default)
Restrict specific keys: Block (Default)
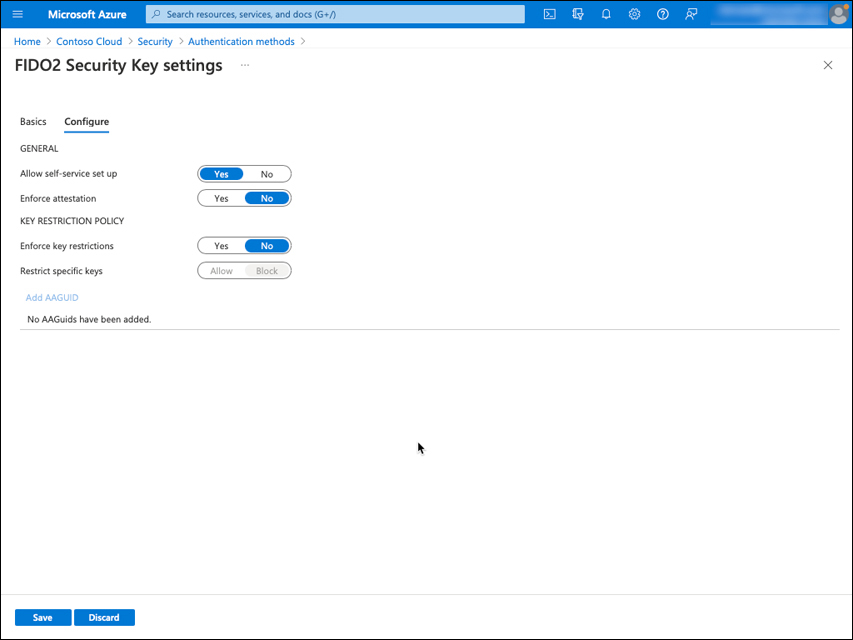
FIGURE 2-24 Azure AD FIDO2 Security Key configuration options.
Click Save.
Register a FIDO2 security key
The user must configure a FIDO2 security key using the steps below before it can be used for sign-in:
Navigate to the URL https://myprofile.microsoft.com/.
Sign in with the user account for which FIDO2 security key needs to be configured.
Select Security info, as shown in Figure 2-25. Make sure there is at least one Azure AD MFA method already registered; otherwise, you must first register for an MFA method before you can register a FIDO2 security key.

FIGURE 2-25 My Sign-Ins Security info.
Select Security key from the dropdown and click Add, as shown in Figure 2-26.

FIGURE 2-26 Adding a security key as an authentication method.
Choose the type of security key, USB device or NFC device, that you would like to use, as shown in Figure 2-27.

FIGURE 2-27 Security key type selection screen.
Complete the registration process by creating or using a PIN for the security key and then perform a biometric or touch for the gesture.
Provide a meaningful name for the key and select Next.
Finally, select Done to finish the process.
Sign in with passwordless credentials using a FIDO2 security key
The steps below demonstrate how to sign in with passwordless credentials using a FIDO2 security key.
Sign in to the Azure portal at https://portal.azure.com/ using the account for which a FIDO2 security key is already registered.
Complete the sign-in process by providing the security key. For example, Figure 2-28 shows the pop-up message presented by the browser asking a user who has previously registered the security key using a USB device to use it to finish the authentication process.

FIGURE 2-28 Sign-in process with security key.
After the successful passwordless authentication using the security key, the user will be taken to the Azure portal (https://portal.azure.com), as shown in Figure 2-29.
FIGURE 2-29 The Azure portal.
Implement and manage Windows Hello for Business
Windows Hello for Business allows users to use strong two-factor authentication to replace passwords on their Windows 10 or Windows 11 devices. Users are given a credential that is linked to their device and uses a biometric or PIN for authentication. Users can also use Windows Hello for Business to authenticate and sign in to Azure Active Directory, Active Directory, Microsoft Account, or any FIDO2-enabled service.
Keep the following key characteristics in mind when implementing Windows Hello for Business:
The credentials for Windows Hello are based on a certificate or an asymmetrical key pair. Windows Hello credentials can be bound to a device, and the token obtained with the credential can also be bound to the device.
During the registration process, the identity provider (such as Active Directory, Azure AD, or a Microsoft account) validates user identity and maps the Windows Hello public key to a user account.
Depending on the policy, keys can be generated in the hardware Trusted Platform Module (TPM), v1.2 or v2.0 for enterprises and v2.0 for consumers or through software. When using TPM, the private key never leaves the device. During the registration process, the authenticating server assigns a public key to the user account.
Two-factor authentication is used, which combines a key or certificate tied to a device with something the person knows (a PIN) or something physically associated with the person (biometrics).
For keys, both personal (Microsoft account) and corporate (Active Directory or Azure AD) accounts use the single container.
To help ensure user privacy, all keys are separated by identity providers’ domains.
The Windows Hello gesture is not shared with the server and does not roam between devices.
Templates for biometrics are kept locally on a device.
PINs are never saved or shared.
Table 2-6 lists various Windows Hello for Business features that help improve the overall security posture.
TABLE 2-6 Windows Hello for Business features
FEature | Description |
Dual Enrollment | This feature enables administrators to enroll both non-privileged and privileged credentials to perform elevated administrative functions on their device. Requirements:
|
Dynamic Lock | This feature allows users to enhance security of their Windows device by configuring it to lock automatically when a Bluetooth- paired device signal falls below the maximum Received Signal Strength Indicator (RSSI) value. Requirements:
|
Multifactor Unlock | These features allow Windows 10 and Windows 11 devices to be configured such that users require a combination of authentication factors and trusted signals to unlock their devices. https://docs.microsoft.com/en-us/windows/security/identity-protection/hello-for-business/feature-multifactor-unlock Requirements:
|
Remote Desktop | This feature allows a remote desktop connection to a server or another device using a certificate deployed to a Windows Hello for Business container. Requirements:
|
PIN Reset | This feature enables users to reset a forgotten PIN using the lock screen or from the sign-in options available in the Settings console. https://docs.microsoft.com/en-us/windows/security/identity-protection/hello-for-business/hello-feature-pin-reset Requirements:
|
Conditional Access | Azure Active Directory conditional access policies can be applied on devices using Windows Hello for Business. This enables organizations to apply an advanced set of conditions when a user tries to access a resource. Requirements:
|
When implementing Windows Hello for Business, you have many options to choose from. By providing multiple options, nearly every organization will be able to deploy Windows Hello for Business. The availability of numerous options makes the deployment appear complex; however, most organizations will realize they’ve already implemented most of the infrastructure required for the Windows Hello for Business deployment. It is critical to recognize that Windows Hello for Business is a distributed system that requires careful planning across multiple teams within an organization. Table 2-7 lists the most common Windows Hello for Business deployment types.
TABLE 2-7 Windows Hello for Business deployment types
Deployment type | Description |
Cloud only | The cloud-only deployment model is appropriate for organizations that only have cloud identities and do not need access to on-premises resources. These organizations typically connect their devices to the cloud and rely solely on cloud resources such as Exchange Online, SharePoint Online, Microsoft Teams, etc. Furthermore, because these users do not use on-premises resources, they do not require certificates for services such as VPN, as everything they require is hosted in Azure. |
Hybrid | The hybrid deployment model is intended for businesses that are using federation with Azure Active Directory or using Azure Active Directory connect using Azure Active Directory-hosted applications and want a single sign-in user experience for both on-premises and Azure Active Directory resources. |
On-premises | The on-premises deployment model is intended for organizations that do not have cloud identities or use Azure Active Directory-hosted applications. |
Implement and manage password protection and smart lockout
Azure AD Password Protection enables organizations to detect known weak passwords and block them from usage by the users. It also has capability to detect any variation of these weak passwords and block those from being used by the users. Azure AD Password Protection maintains a global banned passwords list, which is applied automatically to all users in the directory. In addition to the default global list of banned passwords, an organization can create their own custom list of banned passwords to meet their specific security requirements. Whenever a password is created or reset, it is checked against the banned password list, and only after it passes the check is the user allowed to use that password.
Azure AD Password Protection is available both for cloud-only users and for users who are synchronized from on-premises AD DS. The next section covers Azure AD Password Protection for cloud-only users, while a later section will cover deployment requirements and the configuration steps needed to enable Azure AD Password Protection for users synchronized from on-premises AD DS.
Licensing requirements
The licensing requirements for global and custom banned password lists are as follows:
Azure AD Password Protection with global banned password list: Cloud-only users require Azure AD Free, and users synchronized from on-premises AD DS require an Azure AD Premium P1 or P2 license to use this feature.
Azure AD Password Protection with custom banned password list: Both cloud-only users and users synchronized from on-premises AD DS require an Azure AD Premium P1 or P2 license to use this feature.
Configure custom banned password list
The steps below show how to configure a custom banned password list:
Sign in to the Azure portal, https://portal.azure.com, using a Global Administrator account.
Navigate to the Azure Active Directory dashboard by using the Azure Active Directory option available in the sidebar of the Azure portal.
Select the Security option located under the Manage section on the left side, as shown in Figure 2-30.

FIGURE 2-30 Azure AD home page with the Security option.
Select Authentication methods.
Select Password protection, as shown in Figure 2-31.

FIGURE 2-31 Password protection.
Set the Enforce custom list option to Yes, as shown in Figure 2-32.

FIGURE 2-32 Enforce custom list.
Specify custom passwords to ban using the multi-line text box available for the Custom banned password list. Make sure to enter one term per line, as shown in Figure 2-33.

FIGURE 2-33 Custom banned password list.
Consider the following restrictions while creating a custom banned password list:
A maximum of 1000 terms are allowed per list.
The minimum term length is 4 characters.
The maximum term length is 16 characters.
Terms are case-insensitive. For example, Northwind, NorthWind, northwind, northWIND, and norTHwinD are all considered identical terms.
The list considers common character substitutions, such as “o” and “0” or “a” and “@.”
Click Save. Keep all other settings at their default values. It may take up to several hours before the custom banned password list is fully applied.
Testing a custom banned password list
The steps below show how to test a custom banned password list:
Sign in to https://mysignins.microsoft.com/ using the user account. You will change the password for this account in the next step.
Select CHANGE PASSWORD, as shown in Figure 2-34.

FIGURE 2-34 My Account.
On the Change Password page, enter the current password in the Old password textbox and then enter a new password containing a term that’s on the custom banned password list that you defined earlier—for example, “Northwind100%.”
Click Submit. You will get an error message, as shown in Figure 2-35. This message indicates that the password you entered contains words or characters that are banned by the administrator.

FIGURE 2-35 Change password failure due to a custom banned password list.
Click Cancel to leave the page without changing the password. Alternatively, you can choose a new password that does not contain terms that are listed within the banned password list.
Finally, close the browser.
Planning for on-premises Azure AD Password Protection deployment
The Azure AD Password Protection feature allows using the same global and custom banned password lists that are stored in Azure AD for on-premises passwords. Technically, these checks are performed whenever a password is reset or changed using on-premises AD DS domain controllers.
Plan for deployment of Azure AD Password Protection on-premises by verifying the following core requirements:
Account with Active Directory domain administrator privileges in the forest root.
Universal C Runtime installation on all machines where Azure AD Password Protection components are installed. This also includes a domain controller.
Key Distribution Service (KDC) should be enabled on all domain controllers running Windows Server 2012 or later.
Network access to the following two endpoints from machines where the Azure AD Password Protected service is installed:
Azure AD Password Protection functionality: https://login.microsoftonline.com
Authentication Requests: https://enterpriseregistration.windows.net
At least one domain controller must be able to connect with one server running proxy service for Azure AD Password Protection. Specifically, the domain controller must be able to access RPC endpoint mapper port 135 and the RPC server port on the host running the proxy service.
Download Azure AD Password Protection for Windows Server Active Directory software installation files from the Microsoft Download Center: https://www.microsoft.com/en-us/download/details.aspx?id=57071.
AzureADPasswordProtectionProxySetup.exe
AzureADPasswordProtectionDCAgentSetup.msi
Install and configure Azure AD Password Protection on-premises
Table 2-8 summarizes the tasks that must be completed for successful installation and configuration of the Azure AD Protection proxy service in your environment. Please use the links provided for each task in Table 2-8 to follow detailed step-by-step instructions provided by Microsoft. These instructions are kept up to date by Microsoft, and it is highly recommended that you follow them as-is without customizations.
TABLE 2-8 Azure AD Password Protection installation and configuration task list
Task | Description |
Azure AD Password Protection proxy service installation | The Azure AD Password Protection proxy service is installed on a member server located within an on-premises AD DS environment. Its role is to communicate with Azure AD and maintain a copy of global and custom banned password lists. For step-by-step installation instructions, please read https://docs.microsoft.com/en-us/azure/active-directory/authentication/howto-password-ban-bad-on-premises-deploy#install-and-configure-the-proxy-service. |
Configure the proxy service to communicate through an HTTP proxy | Configure the HTTP proxy that the Azure AD Password Protection service will use to communicate with Azure AD. This step is optional. For step-by-step configuration instructions, please read https://docs.microsoft.com/en-us/azure/active-directory/authentication/howto-password-ban-bad-on-premises-deploy#configure-the-proxy-service-to-communicate-through-an-http-proxy. |
Configure the proxy service to listen on a specific port |
|
Table 2-9 summarizes the task that must be completed for successful installation and configuration of the Azure AD Protection DC service. Please use the link provided for the task in Table 2-9 to follow detailed step-by-step instructions provided by Microsoft. These instructions are kept up to date by Microsoft, and it is highly recommended that you follow them as-is without customizations.
TABLE 2-9 Azure AD Password Protection DC agent service installation and configuration tasks list
Task | Description |
Azure AD Password Protection DC agent service installation | The Azure AD Password Protection DC agent service installation can be automated using standard MSI procedures. For step-by-step configuration instructions, please read https://docs.microsoft.com/en-us/azure/active-directory/authentication/howto-password-ban-bad-on-premises-deploy#install-the-dc-agent-service. |
After the successful installation and configuration of the Azure AD Password Protection proxy and DC agent service, follow the steps below to enable Azure AD Password Protection for on-premises environments:
Sign in to the Azure portal, https://portal.azure.com, using a Global Administrator account.
Navigate to the Azure Active Directory dashboard by using the Azure Active Directory option available in the sidebar of the Azure portal.
Select the Security option located under the Manage section on the left side.
Select Authentication methods.
Select Password protection.
Set Enable password protection on Windows Server Active Directory to Yes, as shown in Figure 2-36. Leave the Mode set to Audit.

FIGURE 2-36 Password protection for Windows Server Active Directory.
Click Save.
Configure smart lockout thresholds
Azure AD smart lockout helps safeguard user accounts by locking out potential malicious actors who use brute force, password spray, or similar attack techniques to guess the passwords. Azure AD smart lockout works by locking the user account from sign-in attempts for one minute after several consecutive failed attempts. The lockout acts as a shield to protect the user account from being attacked from bots in an automated fashion. The exact number of failed attempts threshold resulting in the user account being locked depends on the type of Azure Cloud where the Azure AD tenant is located. For Azure Public Cloud and Azure China, the failed attempts lockout threshold is 10; for Azure US Government, the failed attempts lockout threshold is 3.
The default lockout values can be customized to match organizational needs. Please note that customizations to smart lockout values require an Azure AD Premium P1 or higher user license. The following steps show how to change the lockout threshold and duration:
Sign in to the Azure portal, https://portal.azure.com, using a Global Administrator account.
Navigate to the Azure Active Directory dashboard by using the Azure Active Directory option available in the sidebar of the Azure portal.
Select the Security option located under the Manage section on the left side.
Select Authentication methods.
Select Password protection.
Set the Lockout threshold and Lockout duration in seconds to values that match your needs.
For example, Figure 2-37 shows the Lockout threshold set to 5, which means the account will be locked after 5 failed sign-in attempts by the user, and Lockout duration in seconds is set to 90. Keep in mind that if the first sign-in attempt after the lockout also fails, then the account locks out again. If a user account keeps getting lockouts repeatedly, the lockout duration increases over time. The exact duration by which the lockout increases is not released publicly as a safety measure to avoid malicious actors from exploiting it.

FIGURE 2-37 Lockout threshold and Lockout duration in seconds.
Click Save.
Implement certificate-based authentication in Azure AD
For applications and browser sign-in, Azure Active Directory (Azure AD) certificate-based authentication (CBA) enables users to authenticate directly with X.509 certificates against their Azure AD account.
Following are some key advantages of using Azure AD CBA:
Improved user experience: Users who require certificate-based authentication can now directly authenticate against Azure AD without the need for federated AD FS.
Ease of deployment: Azure AD CBA is a free feature that does not require any paid editions of Azure AD to use, nor does it require complex on-premises deployments or network configuration, because users authenticate directly against Azure AD.
Security: On-premises passwords do not need to be stored in any form in the cloud, and CBA works in tandem with conditional access features and authentication strength capability to enforce MFA.
In CBA, the username binding policy aids in the validation of the user’s certificate. To determine the user, the Subject Alternate Name (SAN) PrincipalName in the certificate is mapped to the UserPrincipalName attribute of the user object by default. Table 2-10 shows the four supported binding methods. In general, mapping types are high-affinity if they are based on identifiers that cannot be reused (such as Subject Key Identifiers or SHA1 Public Key). These identifiers provide greater assurance that only one certificate can be used to authenticate the user.
TABLE 2-10 Azure AD CBA certificate bindings
Certificate mapping Field | Example values in certificateUserIds | User object attributes | Type |
PrincipalName |
|
|
|
RFC822Name |
|
|
|
X509SKI |
|
|
|
X509SHA1PublicKey |
|
|
|
When a user uses CBA to authenticate to Azure AD, the user’s sign-ins log will show the X.509 Certificate as the authentication method, as shown in Figure 2-38.

FIGURE 2-38 Azure AD user sign-in using X.509 certificate.
The following scenarios are supported by Azure AD CBA:
User sign-ins to web browser-based applications on all platforms.
User sign-ins to Office mobile apps, including Outlook, OneDrive, and so on.
User sign-ins on mobile native browsers.
Support for granular authentication rules for multifactor authentication by using the certificate issuer Subject and policy OIDs.
Configuring certificate-to-user account bindings by using any of the certificate fields:
Subject Alternate Name (SAN) PrincipalName and SAN RFC822Name
Subject Key Identifier (SKI) and SHA1PublicKey
Configuring certificate-to-user account bindings by using any of the user object attributes:
User Principal Name
onPremisesUserPrincipalName
CertificateUserIds
The following scenarios are not supported by Azure AD CBA:
Certificate Authority hints aren’t supported, so the list of certificates that appears for users in the certificate picket UI isn’t scoped.
Only one CRL Distribution Point (DP) for a trusted CA is supported.
The CDP can be only HTTP URLs. Azure AD CDA does not support Online Certificate Status Protocol (OCSP) or Lightweight Directory Access Protocol (LDAP) URLs.
Configuring other certificate-to-user account bindings, such as using the Subject, Subject + Issuer, or Issuer + Serial Number, are not available in this release.
More information on configuring Azure CBA can be found at https://learn.microsoft.com/en-us/azure/active-directory/authentication/how-to-certificate-based-authentication.
Configure Azure AD user authentication for Windows and Linux virtual machines on Azure
By integrating with Azure AD authentication, organizations can improve the security of Windows and Linux virtual machines (VMs) in Azure. Azure AD can be used as a primary authentication platform for:
Windows Server 2019 Datacenter edition and later
Windows 10 1809 and later
Windows 11
Linux virtual machines
More details on configuring Azure AD login for a Windows VM is available at https://learn.microsoft.com/en-us/azure/active-directory/devices/howto-vm-sign-in-azure-ad-windows#enable-azure-ad-login-for-a-windows-vm-in-azure.
More details on configuring Azure AD login for a Linux VM is available at https://learn.microsoft.com/en-us/azure/active-directory/devices/howto-vm-sign-in-azure-ad-linux#enable-azure-ad-login-for-a-linux-vm-in-azure.
Skill 2.3: Plan, implement, and manage Azure AD conditional access
Conditional access, at its core, offers organizations the ability to enable users to be productive anywhere and whenever they want while also protecting the organization’s resources. Organizations use Azure AD conditional access to apply the fine-grain access control policies required to secure resource access. Conditional Access collects signals from a variety of sources to make decisions and enforce organizational policies.
Plan conditional access policies
Azure AD conditional access policy in a nutshell is an “if-then” statement. It is a powerful tool for organizations to implement rich access control policies, since it allows implementing both fine-grain and coarse-grain access control. Following are a few examples of conditional access policies:
If the user belongs to HR Azure AD group and is requesting access to the HR application, then only grant access if the request is made from a device that is marked as compliant.
If the user belongs to the Global Administrator role, has a high sign-in risk, and is requesting access to the Azure portal, then only grant access after the user successfully completes both the MFA challenge and a password reset.
If the user belongs to a United States Sales Azure AD group, is making a request from a location outside of the United States (location based on IP Address), and is requesting access to a Microsoft 365 cloud application, then block the request.
If a request is made by any user in the Azure AD directory to access LegacyHRApp application, then block the request.
If a request is made by any user in the Azure AD directory to access cloud application using legacy authentication, then block the request.
If a request is made by any user in the Azure AD directory to access any cloud application, then only grant access if they have signed Terms of Use (ToU) successfully.
Azure AD includes a handy What If tool that allows you to simulate the behavior of conditional access policies without running them. This aids in the planning of conditional access policies by providing visibility into potential user impact. Figure 2-39 shows the What If tool with input parameters, and Figure 2-40 shows the result of the What If tool.

FIGURE 2-39 Azure AD What If tool parameters.

FIGURE 2-40 Azure AD What If tool results.
Licensing requirements
The Azure AD conditional access feature requires an Azure AD Premium P1 license or Microsoft 365 Business Premium license. Also, using risk-based signals like sign-in and user-risk requires the Identity Protection feature, which is available as part of the Azure AD Premium P2 license.
If the Azure AD premium licensing required for working with conditional access is not available, the message/banner shown in Figure 2-41 will be displayed. If a required license was held in the past but is no longer valid, the existing policies will be listed but cannot be modified.

FIGURE 2-41 Azure AD Conditional Access licensing message.
Furthermore, certain conditional access policy features, such as the risk-based conditions like user risk level and sign-in risk level, as shown in Figure 2-42, are only available when an Azure AD Premium 2 (P2) license is used because they require the Identity Protection feature.
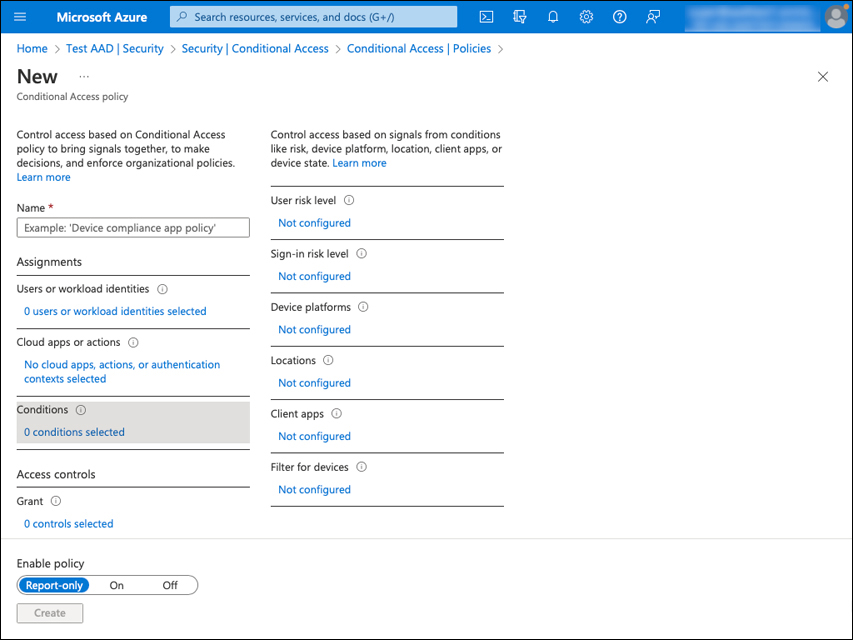
FIGURE 2-42 Azure AD P2 license is required for risk-based conditions.
Deployment planning for conditional access policies
Planning for Azure AD conditional access polices deployment is a critical step toward ensuring that users’ productivity is not negatively impacted while security posture is improved by the conditional access policies enforced. Table 2-11 shows various proven practices that should be taken into consideration while planning the conditional access deployment.
TABLE 2-11 Azure AD conditional access deployment considerations
Consideration | Description |
Use report-only mode | The report-only mode for conditional access policies enables you to view the results of real-time policy execution without enforcing the policy. This can be a very effective tool to evaluate the policies by reviewing the sign-in logs and gaining a better understanding of the impact of policies before enabling them in the production environment. |
Configure break-glass accounts | Misconfigured conditional access policies may result in administrator accounts getting locked out from accessing critical applications, causing negative impacts on business continuity. To mitigate this issue, always configure multiple break-glass accounts. These accounts are then excluded from conditional access policies, hence enabling them to continue accessing the critical applications. |
Avoid broad scope block-all policies | Conditional access policies can be implemented in both fine-grain and coarse-gain fashion. It is recommended to be as precise as possible when defining the conditional access policy to avoid accidentally impacting a broader range of users than expected. |
Simulate policy execution using What If tool | The What If tool helps you test the conditional access policies by simulating user sign-in under various scenarios based on a combination of attributes such as user, application, location, and device platform. The result shows which conditional access policies would apply based on sign-in characteristics. Run the What-If tool before the actual deployment to understand the impact of the conditional access policies. Read more about the What If tool at https://docs.microsoft.com/en-us/azure/active-directory/conditional-access/what-if-tool. |
Rollback policy | Azure AD allows three ways to roll back the conditional access policy:
|
Implement conditional access policy assignments
The assignments section of conditional access policy determines who, what, and where the conditional access policy applies to. Following are key components of conditional access policy assignments:
Users and Group: Allows for the targeting of specific groups of users. For more information about users and group-based assignments in conditional access, please refer to https://learn.microsoft.com/en-us/azure/active-directory/conditional-access/concept-conditional-access-users-groups.
Directory Roles: Allows administrators to specify which Azure AD directory roles should be used to determine assignment. Organizations, for example, may impose stricter policies on users with the Global Administrator role.
Guests or external users: This option provides a variety of choices for targeting conditional access policies to specific guests or external user types, as well as specific tenants containing those types of users.
Cloud apps, actions, and authentication context: Administrators can assign controls to particular applications, actions, or authentication contexts using conditional access policies. Administrators can select from a list of applications that includes built-in Microsoft applications as well as any Azure AD integrated applications, including gallery, non-gallery, and Application Proxy applications. Administrators can also define policy based on a user action rather than a cloud application, such as register security information or register or join devices, allowing conditional access to enforce controls around those actions. Finally, authentication context can be used by administrators to add an extra layer of security to applications. For more information about cloud apps, actions, and authentication context, please refer to https://learn.microsoft.com/en-us/azure/active-directory/conditional-access/concept-conditional-access-cloud-apps.
Conditions: An administrator can use signals from conditions such as risk, device platform, or location to improve policy decisions within a conditional access policy. More information about conditions are available at https://learn.microsoft.com/en-us/azure/active-directory/conditional-access/concept-conditional-access-conditions.
This section will show you how to use various conditional access policy assignments to enforce Terms of Service (ToU). Please note that you will need an Azure AD P2 license to complete the tasks in this section.
Enforce Terms of Use (ToU) using conditional access policy
Organizations can use Azure AD Terms of Use (ToU) policies to convey information to end users in a simple way. This allows users to read essential disclaimers for legal or compliance needs.
Follow the steps below to add a new Terms of Use, which you will use later in the conditional access policy:
Sign in to the Azure portal, https://portal.azure.com, using a Global Administrator account.
Navigate to the Azure Active Directory dashboard by using the Azure Active Directory option available in the sidebar of the Azure portal.
Select Identity Governance located under the Manage section, as shown in Figure 2-43.

FIGURE 2-43 Azure AD Identity Governance.
Select Terms of use from the left side pane, as shown in Figure 2-44.

FIGURE 2-44 Terms of Use (ToU).
Click New terms from the top pane.
On the New terms of use page, fill in the following information. It should look like Figure 2-45.
Name: Employee Terms of Use Agreement
Terms of use document: Select any PDF document and upload, it since it is only going to be used for testing purposes. You can use the Microsoft SLA for testing purposes, which is available for download at https://download.microsoft.com/download/2/C/8/2C8CAC17-FCE7-4F51-9556-4D77C7022DF5/MCA2017Agr_EMEA_EU-EFTA_ENG_Sep20172_CR.pdf.
Language: Select English (or the language of your choice) from the dropdown menu.
Display Name: ToU.
Require users to expand the terms of use: On (This will force users to read the entire document).
Require users to consent on every device: Off.
Expire consents: Off.
Duration before re-acceptance required (days): 60.
Enforce with conditional policy template: Create conditional access policy later.

FIGURE 2-45 New Terms of Use.
Follow the steps below to create a new conditional access policy and enforce the Terms of Use (ToU) before users can sign in to the Azure portal.
Sign in to the Azure portal, https://portal.azure.com, using a Global Administrator account.
Navigate to the Azure Active Directory dashboard by using the Azure Active Directory option available in the sidebar of the Azure portal.
Select Security from the left side pane.
Select Conditional Access from the left side pane, as shown in Figure 2-46.

FIGURE 2-46 Conditional Access.
Click + New policy and then select Create new policy as shown Figure 2-47.
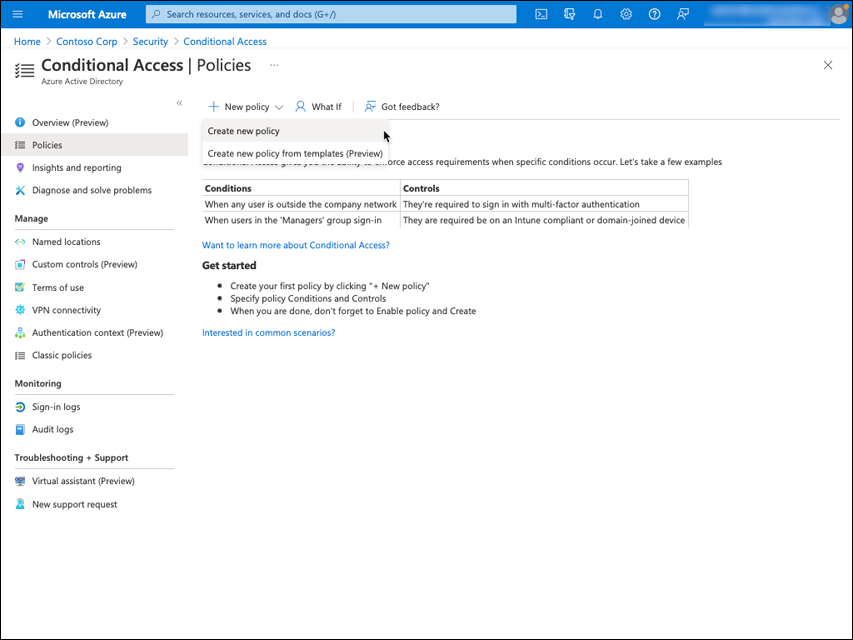
FIGURE 2-47 Create new policy.
On the New Conditional Access policy page, enter Enforce-ToU for the Name, as shown in Figure 2-48.

FIGURE 2-48 New Conditional Access policy.
Expand Users or workload identities and then set following information options. The result should look like Figure 2-49.
What does this policy apply to: Users and groups.
Include: All users.
Exclude: Select the Global administrator role from the Directory roles dropdown menu.

FIGURE 2-49 Users or workload identities.
Expand Cloud apps or actions and then set the following information options. The result should look like Figure 2-50.
Select what this policy applies to: Cloud apps.
Include: Click Select apps and then search for and choose My Apps.

FIGURE 2-50 Cloud apps or actions.
Expand Grant, set the following information options, and then click Select. The result should look like Figure 2-51.
Grant access: Employee Terms of Use Agreement.
For multiple controls: Require all the selected controls.

FIGURE 2-51 Grant options.
Set Enable policy to On.
Click Create.
Implement conditional access policy controls
The access control section of the conditional access policy determines how the conditional access policy is enforced. Following are key components of the conditional access policy access control:
Grant: The access control option can be used to allow or deny access to the resource. Learn more about Grant control at https://learn.microsoft.com/en-us/azure/active-directory/conditional-access/concept-conditional-access-grant.
Session: Administrators can use session controls to provide limited experiences within specific cloud applications. Learn more about session control at https://learn.microsoft.com/en-us/azure/active-directory/conditional-access/concept-conditional-access-session.
This section will show you how to implement conditional access policy access control to deny access to a resource based on the sign-in risk. Please note that you will need an Azure AD P2 license to complete the tasks in this section.
Enforce MFA using the sign-in risk signal with conditional access policy
Follow the steps below to create a conditional access policy that uses the sign-in risk signal to enforce MFA for granting access to a cloud application.
Sign in to the Azure portal, https://portal.azure.com, using a Global Administrator account.
Navigate to the Azure Active Directory dashboard by using the Azure Active Directory option available in the sidebar of the Azure portal.
Select Security from the left side pane.
Select Conditional Access from left side pane, as shown in Figure 2-46.
Click + New policy and then select Create new policy.
On the New conditional access page, enter CA-SignIn for the Name.
Expand Users or workload identities and then set the following information options. The result should look like Figure 2-49.
What does this policy apply to: Users and groups.
Include: All users.
Exclude: Select the Global administrator role from the Directory roles dropdown menu.
Expand Cloud apps or actions and then set the following information options.
Select what this policy applies to: Cloud apps.
Include: All Cloud Apps.
Expand Conditions, select Sign-In risk, and set the following information options:
Set Configure to Yes.
Select the sign-in risk level this policy will apply to:
High
Medium
Low
Press Done to save your choices.
Expand Grant, set the following information options, and then click Select.
Block access
For multiple controls: Keep the default option.
Set Enable policy to On.
Click Create.
Test and troubleshoot conditional access policies
In this section, you will learn how to test the previously created conditional access policies, as well as how to troubleshoot them.
Test conditional access policy to enforce Terms of Use (ToU)
The steps below show how to test a conditional access policy to enforce the Terms of Use (ToU) that you created earlier:
Sign in to the My Apps portal, https://myapps.microsoft.com/, with a user account that does not have a Global Administrator role assigned and has not read and accepted the Terms of Service (ToU).
Expand the Terms of Use (ToU), and then select Accept, as shown in Figure 2-52. You must review the entire terms of use document by scrolling through it before you can accept it.

FIGURE 2-52 Terms of Use (ToU).
The sign-in process will complete, and the browser will redirect to My Apps Portal.
You have successfully tested the conditional access policy that enforces the Terms of Use (ToU) before the user can access the resource.
Test Enforce MFA using the sign-in risk signal with the conditional access policy
The Tor Browser (https://www.torproject.org/) is required to complete the steps below in order to simulate sign-in risk and test the conditional policy. If your organization prohibits the use of the Tor browser, you may need to install it on a virtual machine.
Launch the Tor browser.
Sign in to the Azure portal, https://portal.azure.com, with a user account that does not have a Global Administrator role assigned.
Due to the high sign-in risk posed by the use of the anonymizer proxy Tor, user access will be blocked, and a message will display, as shown in Figure 2-53.

FIGURE 2-53 Sign-In blocked due to high risk.
Troubleshooting conditional access policy
When a conditional access policy is imposed, the user is given an explanation, as shown in Figure 2-53. This provides users with just enough information to understand why the policy is behaving as it does, but IT administrators may need more information to troubleshoot.
More information can be gathered to begin troubleshooting by expanding the More details option, as shown in Figure 2-54, which provides critical information useful for troubleshooting.

FIGURE 2-54 Troubleshooting details.
Administrators can further troubleshoot the issue by searching the Sign-In logs for Correlation ID, Timestamp, and other attributes available to them, as shown in Figure 2-54. To access the Sign-In logs and troubleshoot, follow these steps:
Sign in to the Azure portal, https://portal.azure.com, with a user account that has the Global Administrator role assigned to it or has the necessary permissions to view the Sign-In logs.
Navigate to the Azure Active Directory dashboard by using the Azure Active Directory option available in the sidebar of the Azure portal.
Select Sign-In logs located under the Monitoring section.
The Sign-In logs are displayed in chronological order, as shown in Figure 2-55. You can filter based on Correlation Id or other information.

FIGURE 2-55 Sign-In logs.
Select the Sign-In log entry with Failure and matching Correlation ID from the information collected earlier. As shown in Figure 2-56, the Failure reason, Additional details, and Sign-In error code provide useful information for troubleshooting.

FIGURE 2-56 Activity Details for Sign-ins.
You may now close the browser.
Implement session management
Organizations frequently need to restrict sessions when dealing with scenarios involving corporate resources accessed from unmanaged or shared devices, as well as access to sensitive business data from external networks. To constrain the authentication session, administrators can use conditional access to create policies that target session management scenarios within organizations. Table 2–12 lists session management controls that an administrator can use to implement through conditional access policy to constrain the experiences within specified cloud applications.
TABLE 2-12 Azure AD session controls options for conditional access
Option | Description |
Conditional access application control | The conditional access policy can be configured to use Conditional Access App Control to monitor and control user application access and sessions in real time based on access and session policies defined in Microsoft Defender for Cloud. More information on Conditional Access application control can be found at: https://docs.microsoft.com/en-us/defender-cloud-apps/proxy-deployment-aad. |
Sign-in frequency | Sign-in frequency specifies how long a user must wait before being asked to sign in again when attempting to access a resource. Administrators can set a time limit (hours or days) or require reauthentication every time. Please note that the sign-in frequency setting is only applicable to apps that have implemented the OAUTH2 or OIDC protocols. More information on sign-in frequency can be found at https://docs.microsoft.com/en-us/azure/active-directory/conditional-access/howto-conditional-access-session-lifetime#user-sign-in-frequency. |
Persistent browser session | Persistent browser session allows user to stay signed in after closing and reopening their browser. More information on Persistent browser session can be found at https://docs.microsoft.com/en-us/azure/active-directory/conditional-access/howto-conditional-access-session-lifetime#persistence-of-browsing-sessions. |
Customize continuous access evaluation | The customized continuous access evaluation configuration in the conditional access policy enables organizations to disable continuous access evaluation, which is enabled by default. More information on customizing continuous access evaluation can be found at https://docs.microsoft.com/en-us/azure/active-directory/conditional-access/concept-continuous-access-evaluation. |
Disable resilience defaults (Preview) | When the disable resilience defaults option is enabled, access to resources is disabled when existing sessions expire. More information on disable resilience defaults can be found at https://docs.microsoft.com/en-us/azure/active-directory/conditional-access/resilience-defaults. |
Implement device-enforcement restrictions
Conditional access policies can use the information returned from devices with Microsoft Intune installed to assess organization compliance requirements and grant or deny access to an organizational resource. For example, if access control is set to “Require device to be marked as compliant,” the conditional access policy will use that compliance status to determine whether to grant or deny access to email and other organizational resources.
The steps below demonstrate how to create a conditional access policy that requires users to use an approved client app or an app protection policy when accessing corporate cloud apps from a personal device running iOS or Android.
Sign in to the Azure portal, https://portal.azure.com, using a Global Administrator account.
Navigate to the Azure Active Directory dashboard by using the Azure Active Directory option available in the sidebar of the Azure portal.
Select Security from the left side pane.
Select Conditional Access from the left side pane, as shown in Figure 2-46.
Click + New policy and then select Create new policy.
On the New conditional access page, enter CA-DeviceCompliancePolicy for the Name.
Expand Users or workload identities and then set the following information options.
What does this policy apply to: Users and groups.
Include: All users.
Exclude: Select the Global administrator role from the Directory roles dropdown menu.
Expand Cloud apps or actions and then set the following information options.
Select what this policy applies to: Cloud apps
Include: All Cloud Apps
Expand Conditions, select Device platforms, and set the following information options:
Set Configure to Yes.
Select the device platforms:
iOS
Android
Press Done to save your choices.
Expand Grant, set the following information options, and then click Select.
Grant access and then select the checkboxes for Require approved client app and Require app protection policy.
For multiple controls: Require all the selected controls.
Set Enable policy to On.
Click Create.
Read more about device enforcement using conditional access at https://learn.microsoft.com/en-us/mem/intune/protect/conditional-access-intune-common-ways-use#device-based-conditional-access.
Implement continuous access evaluation
Continuous Access Evaluation (CAE) is an Azure AD feature that allows organizations to respond to policy violations or security issues in near real time. It allows the communication between the token issuer, which is Azure AD, and the relying party, which is the client application making the request for token issuance. This two-way conversation enables the relying party to detect changes in properties, such as network location, and notify the token issuer. It also allows the token issuer to notify the relying party to stop respecting tokens for a specific user due to account compromise, disablement, or other issues.
Continuous access evaluation automatically creates a conditional access policy when it is enabled. However, a conditional access policy can be customized to disable continuous access evaluation as needed. Read more about continuous access evaluation and conditional access at https://learn.microsoft.com/en-us/azure/active-directory/conditional-access/concept-conditional-access-session#customize-continuous-access-evaluation.
Create a conditional access policy from a template
Conditional access policy templates are intended to make it easier for administrators to implement new policies that adhere to Microsoft security recommendations. These templates are intended to provide maximum protection while adhering to commonly used policies across a wide range of customer types and locations.
Follow the steps below to create a conditional access policy from a template that will enforce multifactor authentication for admins.
Sign in to the Azure portal, https://portal.azure.com, using a Global Administrator account.
Navigate to the Azure Active Directory dashboard by using the Azure Active Directory option available in the sidebar of the Azure portal.
Select Security from the left side pane.
Select Conditional Access from the left side pane, as shown in Figure 2-46.
Click + New policy from template (preview).
Select Identities from template category and press the Next button.
Select Require multifactor authentication for admins and press the Next button.
Press the Create Policy button.
Skill 2.4: Manage Azure AD Identity Protection
Azure AD Identity Protection (AADIP) is the crown jewel in Microsoft’s Identity Security offering and can be fully leveraged with an Azure AD P2 license (or equivalent). Microsoft analyzes 6.5 trillion signals per day from internal and partner sources to identify and protect customers from threats. Identity Protection signals can be fed into tools like Conditional Access to make access decisions, or they can be fed back to a security information and event management (SIEM) tool for further investigation based on organization’s needs.
Implement and manage a user risk policy
Identity Protection can evaluate what it recognizes to be usual behavior for a user and use that knowledge to form risk calculations. Calculation of the likelihood that an identity has been compromised is known as user risk. Users can self-remediate if a risk is discovered by executing a self-service password reset and dismissing the user risk event to avoid causing unnecessary noise for administrators.
Licensing requirements
Microsoft offers two flavors of premium licensing: P1 and P2. Aside from any additional licensing for workload identities, the Identity Protection feature set is divided up across these license options, as shown in Figure 2-57.
Capapability | Details | Azure AD Free/Microsoft 365 Apps | Azure AD Premium P1 | Azure AD Premium P2 |
Risk policies | User risk policy (via Identity Protection) | No | No | Yes |
Risk policies | Sign-in risk policy (via Identity Protection or Conditional Access) | No | No | Yes |
Security reports | Overview | No | No | Yes |
Security reports | Risky users | Limited Information. Only users with medium and high risk are shown. No details drawer or risk history. | Limited Information. Only users with medium and high risk are shown. No details drawer or risk history. | Full access |
Security reports | Risky sign-ins | Limited Information. No risk detail or risk level is shown. | Limited Information. No risk detail or risk level is shown. | Full access |
Security reports | Risk detections | No | Limited Information. No details drawer. | Full access |
Notifications | Users at risk detected alerts | No | No | Yes |
Notifications | Weekly digest | No | No | Yes |
| MFA registration policy | No | No | Yes |
FIGURE 2-57 AADIP Licensing details.
As shown in Figure 2-57, P2 licensing contains all the bells and whistles, including:
The ability to remediate risk by end-users through risk remediation policies.
The ability to monitor risk and view details of the risk detected and remediated.
Stream into your existing framework, Security Information and Event Management (SIEM), for threat and incident response by using Microsoft’s extensible Graph APIs.
Throughout this skill, we will assume P2 licensing on the tenant to understand the full depth of concepts and capabilities.
Prerequisites
Configuring Identity Protection requires the administrator to assume one of the following roles depending on the action needed to be taken within the Identity Protection blade:
Global Administrator—giving them complete access to AADIP
Security Administrator—allowing them everything a global administrator (GA) can do except reset a user’s password
Security Operator—allowing access to Identity Protection reports and alerts
Security Reader—allowing access to Identity Protection reports and read-only access to alerts configuration
Configure user risk security policy
Azure AD Identity Protection offers native options to remediate risk within the Identity Protection blade. These are called Security Policies (also called IPC policies, where IPC stands for Identity Protection Center), and these are great for enabling end user risk remediation quickly and easily in your tenant.
To configure a user risk security policy:
Browse to portal.azure.com > sign-in > Azure Active Directory > Security > Conditional Access > New policy.
Choose a user/group to be included in the policy, as shown in Figure 2-58.
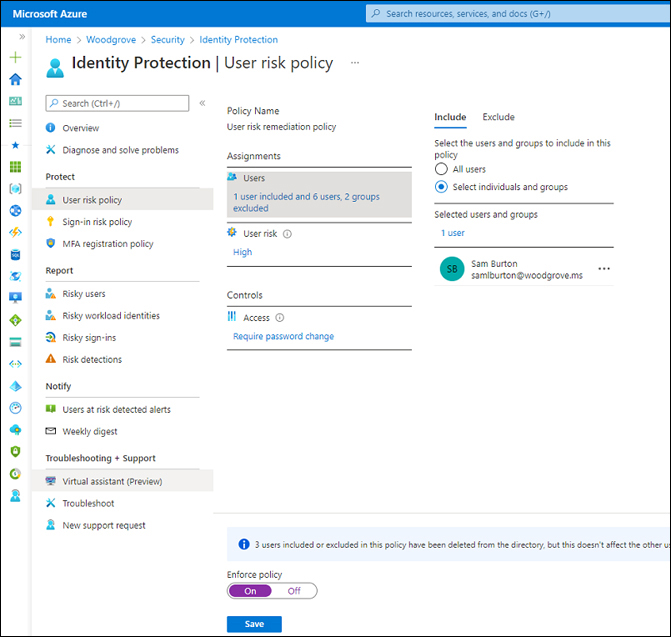
FIGURE 2-58 User risk security policy.
Select the risk levels that you’d like to trigger end-user risk remediation for. Microsoft recommends setting up the policy for High user risk to have a good balance between security and productivity. Setting up a policy for all levels of risk might trigger too many requests to change the password, leading to more predictable and less random passwords.
You can set the Grant Control to either Block or Allow access requiring MFA.
Remember to select Enforce policy before selecting Save.
As you can see, security policies don’t give us options to apply remediation with any sort of useful granular control. Therefore, risk remediation via Conditional Access was developed.
Configure risk-based conditional access user risk policy
The advantage of configuring risk-based conditional access policies is the granular control it offers in both Condition Control as well as Grant Control. You can also combine Session Controls with the Grant Controls. You may create multiple policies for each sign-in risk and/or user risk, for different risk levels and scoping different users, applications, locations, etc. If multiple sign-in risk policies conflict with each other, the most stringent action will be taken from among the two Condition Controls.
To configure a user risk remediation conditional access policy:
Browse to portal.azure.com > sign-in > Azure Active Directory > Security > Conditional Access > New policy.
Choose a user/group to be included in the policy.
For user risk remediation CA policies, it is recommended to choose All cloud apps as the applications you want access to be monitored for risk remediation.
Under Conditions, shift the Configure slider to Yes and choose User risk. Then choose the levels of risk to be targeted for end-user remediation. Microsoft recommends setting the policy for High user risk.
You can combine multiple condition controls (except sign-in risk) with the user risk condition control to lend granularity to your risk remediation scope.
You can get creative with your Grant Controls by combining them. For example, as shown in Figure 2-59, you can see how user risk can be remediated in combination with forcing another action on the user: The default grant control that must be chosen is Require Password Change. This is the only grant control that remediates risk on a user. Here, you will see a note that says that this grant action is allowed when policy is assigned to All cloud apps, which is why user risk policies are recommended to be applied to all cloud apps, above.

FIGURE 2-59 CA user risk policy.
Press Select.
Finally, Press Create.
Implement and manage sign-in risk policy
Sign-in risk is remediable provided it is real-time sign-in risk with MFA. All other sign-in risk detections are offline, accrued after the sign-in takes place and therefore contribute to user risk. A sign-in risk remediation policy therefore cannot, post-hoc, remediate risk accrued after the sign-in takes place. User risk CA policies therefore help with the mitigation of accrued offline sign-in risk.
Configure sign-in risk security policy
To create a sign-in risk security policy:
Browse to portal.azure.com > sign-in > Azure Active Directory > Security > Identity Protection.
Select Sign-in risk policy, as shown in Figure 2-60.
Choose a user/group to be included in the policy.
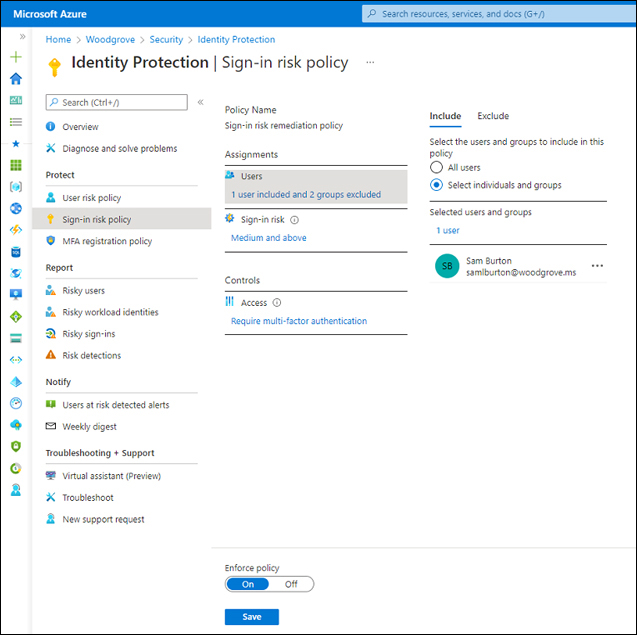
FIGURE 2-60 Sign-in risk security policy.
Select the risk levels that you’d like to trigger end-user risk remediation for. Microsoft recommends setting the policy for Medium and High sign-in risk to have a good balance between security and productivity. Setting up a policy for all levels of risk might trigger MFA fatigue or accidental approvals.
You can set the Grant Control to either Block or Allow access requiring MFA.
Remember to select Enforce policy before selecting Save.
Sign-in risk CA policy
To configure a sign-in risk conditional access policy:
Browse to portal.azure.com > sign-in > Azure Active Directory > Security > Conditional Access > New policy.
Choose a user/group to be included in the policy.
Choose the applications you want access to be monitored for risk remediation.
Under Conditions, shift the Configure slider to Yes and choose Sign-in risk. Then choose the levels of risk to be targeted for end-user remediation. Microsoft recommends setting up the policy for Medium and High sign-in risk.
Set the Grant access to Require multi-factor authentication.
Finally, select Create.
Note the following regarding choosing custom controls as a grant control with risk-based conditional access. Although this can be chosen as a grant control action, this does not remediate risk on the sign-in. If a sign-in risk based conditional access policy is configured with custom controls as a grant option, the end-user will be prompted for the relevant custom control when attempting a risky sign-in, and if the control challenge, multifactor authentication (MFA), is satisfied, the end user will be granted access but the risk on the sign-in will not have been mitigated. The reason is because custom controls as designed today don’t apply an MFA claim on the issued refresh token. All it does is provide a binary signal of Satisfied/Not Satisfied to the conditional access engine. Since there is no MFA claim issued on the refresh token, Identity Protection does not recognize it as a valid remediation action. Also, a third-party IdP (Identity Provider) federated with Azure AD will issue an MFA claim (if the third-party IdP is configured to do MFA) on the token it issues to Azure AD. Therefore, in such a case, Identity Protection respects the completed MFA and remediates risk provided that conditional access policy is set with grant control and requires MFA where MFA is completed through the federated IdP.
AADIP and B2B
The Azure AD ecosystem classifies B2B users into many types:
An Azure AD B2B user is defined as an identity using their organizational credentials in one Azure AD tenant to access resources in another Azure AD tenant.
There are B2B users using Microsoft (MSA) personal accounts like Hotmail, Outlook, etc.
There may also be B2B users hosted in non-Azure AD/vendor tenants.
There is the scenario where B2B users are homed in non-Microsoft personal accounts from popular vendors like Gmail, Yahoo!, etc.
And finally, there are accounts hosted on third-party on-premises identity systems.
There are a couple of principles to note when considering protection of B2B users using risk remediation policies:
Identity Protection is officially supported for Azure AD B2B users only.
Sign-in risk for an Azure AD B2B user is considered a property native to the resource tenant that the B2B user is attempting to access.
User risk for an Azure AD B2B user is considered a property of the user, and hence native to the home tenant that the B2B user belongs to.
This brings about curious behaviors that one must keep in mind when deploying risk remediation policies for Azure AD B2B guest users:
If an Azure AD B2B guest user develops sign-in risk while accessing a resource not in the home tenant, they will be prompted for MFA in the resource tenant and will be able to remediate risk through authentication methods registered either in the home tenant or in the resource tenant.
The risky sign-in is visible in the home tenant as well as the guest tenant.
Implement and manage MFA registration policy
Using MFA reduces the adversarial attack surface on identities. Microsoft’s MFA registration policy makes it simple for you to enroll your users in MFA. You can also gradually introduce it to your users by grouping them and configuring the group in the MFA registration policy. Scoped users will have a 14-day registration period that begins when they sign in interactively the next time. Users can continue to postpone registration for 14 days. The user must complete MFA registration at the end of the 14-day period before they can complete their sign-in process.
Configuration steps
Configuration can be a bit confusing, since Azure Active Directory has a separate MFA blade under Security. But the MFA registration policy is actually available for configuration in the Identity Protection blade.
Browse to portal.azure.com > sign-in > Azure Active Directory > Security > Identity Protection > MFA registration policy.
Choose the users and groups to be scoped for MFA registration. You can also set exclusions by user or group.
You have one compulsory control checkbox: Require Azure AD MFA registration.
Slide the Enforce policy slider to On.
Select Save.
Deployment considerations
Some deployment considerations to note:
The MFA registration policy is a P2 offering.
This feature is different from what is offered under portal.azure.com > sign-in > Azure Active Directory > Authentication Methods > Registration Campaign, popularly known as the “Nudge” feature. The registration campaign “nudges” a user without a deadline to onboard to a stronger authentication method, like the Authenticator app. This is therefore a feature complementary to the MFA registration policy.
The registration campaign offering is a P1 offering.
Monitor, investigate, and remediate elevated risky users
The true value of Identity Protection is gleaned from the thorough understanding of how risk is presented against users, sign-ins, and workload identities in a tenant. These are available through UX tools like the Risk Reports, via API, and also through streaming data options to your SIEM (Security Information and Event Management) tool of choice.
Understanding risk reports
Identity Protection offers three reports for three entity-level triage views of risk seen on the tenant:
Risky Users report
Risky Sign-ins report
Risky Detections report
Each of these reports can be viewed in the Azure portal by browsing to Azure Active Directory > Security > Identity Protection. The report allows for data export via CSV/JSON format. General functions like searching/sorting by any column is available as standard. By default, the risk reports are filtered (to optimize page load times). Be sure to remove all filters depending on the needs of your investigation.
Risky Users report
The Risky Users report is a table of all the risky users in your tenant. By default, it is filtered for all active users that are risky. Look at the various options the report offers for triaging risky users, as shown in Figure 2-61.

FIGURE 2-61 The Risky Users report.
Risk State: This depicts the current risk state of the user. It can take the following values:
At Risk (determined to be still risky)
Confirm Compromised (a special type of “at risk” state to denote that the administrator determined the user risky)
Remediated (determined to be no longer at risk, remedied by end user secure password change)
Dismissed (a special type of “no longer at risk” state, where the user is determined by the admin to be not risky)
Risk Level: This depicts the risk level calculation by AADIP at the time when the risk was last updated. This can take the values High, Medium, Low, or None.
Risk Detail: This offers more information about the transition of Risk States from the first Risk Level determined. It can take the following values:
User performed secure password change/reset
Admin confirmed compromised
Admin dismissed all risk for user
Admin generated temporary password for user
Risk last updated: This is a key value to check when trying to understand why a user is risky. You might look into a user’s associated sign-ins or risk detections to understand the contributions of risk to that user. In case you find nothing in either, then this field becomes useful, for if the date/timestamp is greater than 90 days from its log-rotation, that is the reason for not seeing any risk detections associated with the risky user.
Risk processing state: This is useful when admin actions (such as Confirm Compromised/Dismissal) are taken.
In the User Details pane, as shown in Figure 2-62, additional triage and investigation options are offered:
User’s risky sign-ins: Takes you to a filtered view of the Risky Sign-ins report.
User’s risk detections: Takes you to a filtered view of the Risk Detection report.
Reset password: Allows the admin to reset the user’s password to a temporary string (a useful option for help desk staff, especially when a Block risky user policy is configured).
Confirm user compromised/Dismiss user risk: Options to manually control the risk state of a user.
Block user: Disables access for the user.
Investigate with Azure ATP: This is a useful option for users that have accrued risk from detections that are non-native detections. Today, it takes you to the Microsoft Defender for Cloud portal, but as new detections from other products in the Microsoft Suite are surfaced/integrated, that link will change to a redirection to the Microsoft 365 Defender portal, where you can investigate the scenario in depth.

FIGURE 2-62 Risky Users Details.
Risky Sign-ins report
The Risky Sign-ins report, as shown in Figure 2-63, is a table of all the risky sign-ins occurring in your tenant. By default, it is filtered for all unremedied sign-ins.
Pay attention to the following:
Configure Trusted IPs: In triaging risky sign-ins, one may often find risk attributed to legitimate sign-ins from known IP addresses. In such a case, this option can be used to configure all the trusted IPs for the environment. Identity Protection ignores risk calculations for sign-ins sourced from trusted IPs.
Risk level (real-time): Reports the real-time risk calculated against the sign-in.
Risk level (aggregate): Reports the cumulative risk (real-time and offline) incurred against the sign-in.
Confirm sign-in compromised/Confirm sign-in safe: Like the options for risky users, these admin actions also elevate/nullify the risk score associated to the sign-in.
Neither “Confirm compromise” nor “Confirm safe” actions “familiarize” features for a sign-in or user today. So if you have a block policy and a user is blocked because of Identity Protection calling out risk due to unfamiliarity in the conditions around the sign-in, simply confirming the sign-in to be safe will not resolve the issue for the user. In all likelihood, if they log in from the same location again, they might be called out for risky behavior again. Microsoft always recommends setting grant controls such as “Require MFA” or “secure password change” for sign-in and user risk policies, respectively.

FIGURE 2-63 Risky sign-ins.
You can select an entry from the report to bring up the Risky Sign-in Details pane, as shown in Figure 2-64, which contains more information, including:
Sign-in time: Records the timestamp of the sign-in.
Time detected: Records the timestamp when Identity Protection first deemed the sign-in risky.
Detection last updated: Records the timestamp when the last end-user, AI, or admin action was taken on the sign-in.
When looking at the activity of a user at risk—be it their account risk or session (sign-in) risk—it is important to look at the entirety of their activity. Identity Protection does not just protect user activity during interactive sign-ins but also monitors and evaluates risk for non-interactive sign-ins as well. These sign-in types can be sorted through a filter available in the Risky Sign-ins report. Thus, while you might find a user to be risky with no associated sign-ins, it is possible that their silent non-interactive sign-ins are contributing to aggregate/account risk. Non-interactive user sign-ins are those performed on a user’s behalf by a client application or a background service. These sign-ins, unlike interactive user sign-ins, do not require the user to provide an authentication factor. Instead, a token or code is used by the device or client app to authenticate or access a resource on behalf of the user.

FIGURE 2-64 Risky Sign-ins Details.
Risk Detections report
The Risk Detections report, as shown in Figure 2-65, is a table of all the risky detections in your tenant. Risk detections form the basis of all risk incurred on users and sign-ins in the tenant. One or more risk detections may be associated to a particular sign-in or user. By default, it is filtered for all active detections.

FIGURE 2-65 Risky detections.
When thinking about risk reporting for B2B users, there are a couple of things to note:
If an Azure AD B2B guest user develops or possesses risk and attempts to access a resource in the non-home tenant, and if the user is covered by a user risk policy and is subsequently blocked (per the above!), this phenomenon is not visible in the resource tenant risky user reports.
Administrators cannot dismiss risk for Azure AD B2B guest users in the resource tenant.
Identity Protection has recently improved the signal-to-noise ratio (SNR) for low-risk risky sign-ins. The detection systems now run both in real-time and offline (post authentication) to understand whether sign-ins and users are compromised. The offline machine learning model scores sign-ins with different features and algorithms to determine whether a sign-in was compromised. The output of this offline model is the aggregate sign-in risk level, which represents the most recent evaluation of whether that sign-in was compromised.
Risk remediation considerations
Remediation involves reversing the contribution of risk to the entity’s risk score. Remediation can be performed on a sign-in or a user. When a risky sign-in is remediated, all contribution to the sign-in risk score, by the associated risk detections to that sign-in, is reversed. When a risky user is remediated, all contribution to the user risk score, by the associated risk detections to that user, contributing either directly or indirectly (via aggregate risk), is reversed.
When a user, workload, or a user’s sign-in is deemed to be at risk, it needs to be alleviated to ensure that a certain level of security is maintained in your tenant. Risk indicates the possibility of compromise. To mitigate that risk, an administrator may either manually remediate user/sign-in risk or choose to utilize end-user remediation options by configuring a risk remediation conditional access policy. Risks on workload identities don’t support remediation methods today, and the only action allowed upon detecting risk is “Block.”
The advantage of using end-user remediation via policies is that the remediation signal is fed back into Identity Protection to improve the precision of the risk determination in your tenant. This results in:
Helping achieve balance between security and productivity
Reduced time-to-response (TTR) toward risk detected, since this responsibility is passed on to the end-user
Reduces help desk/Identity admin overhead by reducing the volume of risk data to be triaged manually
There are two types of risk remediation methods supported today:
Sign-in risk remediation via MFA
User risk remediation via a secure password change
Identity Protection offers two independent methods to remediate risk via policy:
Identity Protection Security Policies
Risk-based Conditional Access Policies
Identity Protection notifications
AADIP sends two types of automated notification emails to help you manage user risk and risk detections:
Users at risk detected email—To enable immediate investigation of users at risk
Weekly digest email—Offering a summary of new risky users and real-time risky sign-ins detected over the last calendar week
To configure the Users at Risk email in the Azure portal, browse to Azure Active Directory > Security > Identity Protection > Users at risk detected alerts.
To configure the weekly digest email for recipients in your tenant, in the Azure portal, browse to Azure Active Directory > Security > Identity Protection > Weekly digest.
There are two corner case scenarios related to notifications:
The corner case scenarios with User at Risk email notifications: To prevent a barrage of emails, only one email is sent over risk detected in a 5-second period. Also, if risk is detected for an older sign-in (offline risk) and an email has already been sent for a more recent sign-in, then email notifications are throttled for the older sign-in. Finally, if end-user remediation via policies is deployed, it is quite possible that a user remediates their risk state before you address the email notification sent to alert their risk state.
The corner case scenarios with Weekly Digest email notifications: Users in the Global Administrator, Security Administrator, or Security Reader roles are automatically enrolled to receive the weekly digest emails. An attempt is made to send it to the first 20 members in each role. Only users who hold one of the above roles at the time the email is sent can receive the email. Those eligible for the role but who are not elevated into it at the time the email is sent won’t receive the email.
SIEM Integrations
An essential part to managing identity security at scale is the ability to spool authentication and threat events to a SIEM to aid incident response, threat hunting, and troubleshooting. AADIP generates the following kinds of logs:
User Risk Events (User risk detections)
Risk information in sign-ins
Risky users
Audit data
Risky Service Principals
Service Principal Risk Events
Exporting risk data
Using this method, organizations can choose to store Identity Protection-related risk data for longer periods than the default retention period in Azure AD. To do so, on the Azure portal, simply browse to Azure Active Directory > Diagnostic settings > Edit setting, as shown in Figure 2-66, and select between archiving data to a storage account, streaming it to an event hub, or making it available to Log Analytics or a partner solution.

FIGURE 2-66 Diagnostic settings.
Microsoft’s own version of cold storage would be to stream data into a storage account. However, if you want to make the data available for use within the Microsoft ecosystem, you could choose to stream it to Event Hub. Event Hub supports first- and third-party (non-Microsoft) connectors that allow integration of third-party SIEMs to pull the data off Event Hub. You could also make the data available in Log Analytics to write threat-hunting queries on a sample set of data on-the-fly. Finally, Microsoft supports direct integration with some partner vendor solutions such as Apache Kafka, Datadog, ElasticDB, and Logz.io.
Implement security for workload identities
Just as with risk-based policies for user principals, Microsoft now offers risk detections and remediation options for workload identities as well! For licensing considerations for workload identities, always refer to the licensing requirements detailed at https://docs.microsoft.com/en-us/azure/active-directory/identity-protection/overview-identity-protection#license-requirements. Currently, an active P2 license in the tenant can help secure workload identities with Identity Protection. However, when this feature is more generally available, additional licensing may be required.
A workload identity can be any application, service principal, or managed identity that attempts access to resources without human intervention. Workload identities need to be separated from user identities because their native characteristics differ from user identities. For example, a workload identity cannot perform multifactor authentication based on biometric proofs. Their credentials require security provisions whose requirements are very different from the security provisions of user credential methods. Something you know—a password or the storage of a memorized secret—is typically not the responsibility of an identity provider, but this is not so for workload identities. They are typically also privileged with permissions that are not normally or liberally assigned to user identities requiring greater monitoring and review.
Configure risk-based Conditional Access policy for workload identities
Today, Conditional Access for workload identities offers only “Block” as a grant control. Therefore, Conditional Access offers mitigation of risk rather than remediation (at the time of writing this book), but it is expected that there will be automatic remediation options in the future. To create a Workload Identity risk policy in Conditional Access:
Browse to portal.azure.com > sign-in > Azure Active Directory > Security > Conditional Access > New policy.
Choose a workload identity to be included in the policy. Here, although Microsoft regresses to an older term (viz., service principal), this is only because, as part of public preview, only single-tenant service principals are in scope—i.e., third-party SaaS applications and multi-tenanted applications that you may have published, as well as Managed Identities, are out of scope for now!
Under Cloud apps or actions, choose All cloud apps.
Under Conditions, for Service principal risk (preview), shift the Configure slider to Yes and choose Service principal risk. Then choose the levels of risk to be targeted for end-user remediation. Here, you can also combine this with a location condition limiting access for the scoped service principals. Service principals usually have fixed/finite IPs; therefore, the Location condition is a convenient option to narrow down access.
As mentioned above, only the Block grant condition is supported today. But watch for remediation options in the future! See Figure 2-67.

FIGURE 2-67 CA workload identity risk policy.
Monitor, investigate, and remediate workload identity risk
The options available for security administrators to monitor, investigate, and remediate risk on user identities is now also extended to workload identities. Risk data is available via:
The Risky Workload Identities blade
Graph APIs
Azure Monitor
There are some important differences to these options from those offered for User Identities.
As mentioned earlier, Workload Identity risk policies in Conditional Access today offer only mitigation of risk. However, Microsoft strongly recommends that further action be taken upon detecting risk on Workload Identities, including:
Inventory credentials on the identities called out at risk.
Delete credentials when the identity is suspected to be compromised.
Add new credentials, preferably X.509 certificates.
When using workload identities with Azure KeyVault (AKV), remediate any AKV secrets that the workload identity has access to, by rotating them.
Microsoft has published a detailed guide for Security Operations teams to help them in their monitoring and incident response effort around securing Applications: https://docs.microsoft.com/en-us/azure/active-directory/fundamentals/security-operations-applications. There is also an Azure AD Toolkit, a PowerShell module, that offers easy CLI options for performing some of the above recommended operations: https://github.com/microsoft/AzureADToolkit.
Another major difference to note is that, for user identities, there are two types of risk reported:
User Account Risk
Sign-in Session Risk
All risk detections for user identities fall under the above two risk classifications. For Workload Identities today, all risk detections offered contribute to workload identity account risk only—i.e., there are no risk detections for workload identities contributing to risk determined at the workload identity sign-in or session level (as of this book’s writing, which is not to say this will remain so in the future!). For details on the different types of workload identity risk detections, refer to https://docs.microsoft.com/en-us/azure/active-directory/identity-protection/concept-workload-identity-risk#workload-identity-risk-detections. Therefore, it follows that while there are two risk reports, as shown in Figure 2-68 and Figure 2-69, respectively, offered for User Identities, for Workload Identities today, administrators can monitor, investigate, and remediate risk via the Risky Workload Identities report.

FIGURE 2-68 Workload Identity Risk report.

FIGURE 2-69 Workload Identity Risk detections report tab.
Skill 2.5: Implement access management for Azure resources
Using Azure roles to assign and manage access to resources is an important part of the Administrator’s job. It is always recommended to follow the principle of least privilege, which states that only the absolute minimum permissions should be granted to users and groups. Azure provides both built-in roles and the ability to create custom roles as needed to ensure that organizations can create roles that meet their needs. Also, management of secrets, credentials, certificates, and keys is a challenge in any cloud-based system. This is where managed identities come in and relieve developers of the burden of managing credentials.
Assign Azure roles
The primary mechanism you use to control access to Azure resources is Azure role-based access control (Azure RBAC). Role assignment can be done at the following levels:
Users
Groups
Service Principal
Managed Identity
The Azure portal, Azure PowerShell, Azure CLI, Azure SDKs, or REST APIs can all be used to assign roles. The Access control (IAM) page in Azure, as shown in Figure 2-70, can be used to assign Azure roles. In each subscription, you can have up to 2000 role assignments. Role assignments at the subscription level, resource groups, and resource scopes are all subject to this restriction. Each management group can have up to 500 role assignments. Read more about role-based access assignment at https://learn.microsoft.com/en-us/azure/role-based-access-control/overview.

FIGURE 2-70 Azure role assignments.
Configure custom Azure roles
Similarly to built-in roles, custom roles can be assigned to users, groups, or other resources in Azure. When building a custom role, administrators can adhere to the concept of least privilege so that it includes only the permissions necessary for the new role and nothing else. Custom roles can be shared between subscriptions and are kept in the directory. The Azure AD directory may contain as many as 5000 custom roles. The Azure portal, Azure PowerShell, Azure CLI, or REST API can all be used to create custom roles.
To create a new custom role using the Azure portal, follow these steps:
Sign in to the Azure portal, https://portal.azure.com, a using Global Administrator account.
Navigate to the Azure Active Directory dashboard by using the Azure Active Directory option available in the sidebar of the Azure portal.
Select Roles and administration from the left side pane.
Fill in the Basics as needed and then press Next.
Select the permissions that match your requirements and press Next. Figure 2-71 shows the permissions assignment page along with a search bar to find the permission by name or description.
Finally, review the details and press Review + create to finish creating the new custom role.

FIGURE 2-71 Create a custom role.
Read more about configuring custom roles at https://learn.microsoft.com/en-us/azure/role-based-access-control/custom-roles#steps-to-create-a-custom-role.
Create and configure managed identities
The management of secrets, credentials, certificates, and keys is a common challenge when developing a cloud solution. These secure elements are used to ensure that communication between services is secure. Developers no longer need to manage these credentials thanks to managed identities.
While developers can safely store secrets in Azure Key Vault, services require access to Azure Key Vault. Managed identities provide applications with an automatically managed identity in Azure Active Directory to use when connecting to resources. The managed identity supports Azure AD authentication. Applications can obtain Azure AD tokens using managed identities without having to manage any credentials.
There are two types of managed identities:
System assigned: The system-assigned managed identity is created in Azure AD and is linked to the service instance’s lifecycle. When you delete the resource, Azure automatically deletes the identity. Only that Azure resource can use this identity to request tokens from Azure AD by design. Figure 2-72 shows an example of system-assigned managed identity role assignment for the Azure virtual machine instance.

FIGURE 2-72 System-assigned managed identity assignment to an Azure resource (VM).
User assigned: This type of managed identity is managed independently of the resources that make use of it. It can be assigned to one or more Azure service instances. Figure 2-73 shows an example of user-assigned managed identity assignment to an Azure virtual machine instance.

FIGURE 2-73 User-assigned managed identity assignment to an Azure resource (VM).
Please keep in mind that each Azure service that supports managed identities has its own timeline. More information about Azure services and support for managed identities can be found at https://learn.microsoft.com/en-us/azure/active-directory/managed-identities-azure-resources/managed-identities-status.
Use managed identities to access Azure resources
After you’ve assigned a managed identity to an Azure resource, you can grant the managed identity access to other resources. When working with managed identities, keep the following points in mind:
In Azure, you create a managed identity by selecting either system-assigned managed identity or user-assigned managed identity. The complete list of Azure services that support managed identities can be found at https://learn.microsoft.com/en-us/azure/active-directory/managed-identities-azure-resources/services-support-managed-identities.
Assign the managed identity to the source Azure resource, such as an Azure Virtual Machine, when dealing with a user-assigned managed identity.
Ensure that the managed identity is authorized to access the target service. For example, Figure 2-74 shows how an Azure virtual machine’s system-assigned managed identity can be granted access to the Azure Monitor logs analytics workspace. In this case, the source resource is an Azure virtual machine, and the target resource is a logs analytics workspace.

FIGURE 2-74 Managed identities assignment.
Analyze Azure role permissions
All users in Azure AD are given a set of default permissions. The type of user, their role assignments, and their ownership of individual objects all contribute to defining user access.
The set of default user permissions differs depending on whether the user is a native user of the tenant or was brought over as a guest user from another directory as part of a business-to-business (B2B) collaboration.
The following are the default permissions assigned to member and guest users.
Member users can register applications, manage their own profile photo and mobile phone number, change their password, and invite B2B visitors.
Guest users have limited directory access. They can edit their own profile, change their password, and view information about other users, groups, and apps. They cannot, however, read all directory information.
Configure Azure Key Vault RBAC and policies
Access to Azure Key Vault can be granted using either role-based access control (RBAC) or Key Vault access policies. Access policies provide more granular control but can be more challenging to manage.
A Key Vault access policy specifies whether a user, application, or group can access Key Vault secrets, keys, and certificates. Access policies can be assigned via the Azure portal (as shown in Figure 2-75), the Azure CLI, or Azure PowerShell. Please note that Key Vault can store up to 1024 access policy entries, each of which grants a unique set of permissions to a specific security principal. Due to this limitation, it is recommended to assign access policies to groups of users rather than individual users whenever possible. Using groups makes managing permissions within an organization much easier.
Please see the links below for step-by-step instructions on configuring Azure Key Vault RBAC and access policies.
Azure portal: https://learn.microsoft.com/en-us/azure/key-vault/general/assign-access-policy?tabs=azure-portal
Azure CLI: https://learn.microsoft.com/en-us/azure/key-vault/general/assign-access-policy?tabs=azure-cli
Azure PowerShell: https://learn.microsoft.com/en-us/azure/key-vault/general/assign-access-policy?tabs=azure-powershell

FIGURE 2-75 Create a Key Vault access policy.
Azure Key Vault also supports Azure RBAC for managing key, secret, and certificate permissions. RBAC enables you to manage all permissions across all Key Vaults from a single location. Permissions can be assigned to management groups, subscriptions, resource groups, or individual resources using the RBAC model. RBAC must be enabled for the Key Vault, as shown in Figure 2-76, and then the Access control (IAM) option can be used to view and assign roles as needed, as shown in Figure 2-77.

FIGURE 2-76 Enable Azure role-based access control in Key Vault.

FIGURE 2-77 Access control (IAM) in Key Vault for viewing and assigning roles.
Keep in mind that configuring Azure RBAC permissions for Key Vault nullifies all existing access policy permissions. This may cause outages if equivalent Azure roles are not assigned.
For more information on configuring access to Key Vault keys, certificates, and secrets with an Azure role-based access control, visit https://learn.microsoft.com/en-us/azure/key-vault/general/rbac-guide.
Chapter summary
Azure AD Multifactor Authentication (MFA) allows organizations to add an additional factor to user authentication, which increases account security readily because a hacker must compromise additional factors to get access to the account.
Azure AD provides a range of passwordless MFA authentication methods to users.
Users can use Azure AD passwordless authentication methods such as FIDO2 security keys, Windows Hello for Business, and the Microsoft Authenticator app during sign-ins.
Self-service password reset (SSPR) is a feature in Azure AD that allows users to change their password without seeking help from support or an IT administrator.
Azure AD smart lockout helps safeguard user accounts by locking out potential malicious actors who use brute-force, password spray, or similar attack techniques to guess the password.
Azure AD tenant restrictions enable organizations with strict information access and compliance requirements to control the access to any SaaS application that uses modern authentication protocol and relies on Azure AD tenant for single-sign-on (SSO).
Azure AD Conditional Access enables organizations to apply the fine-grain access control policies required to secure resource access.
Azure AD Conditional Access collects signals from a variety of sources to make decisions and enforce organizational policies.
Azure AD Terms of Use (ToU) policies make it easy for end users to see important legal or compliance disclaimers.
Azure AD Identity Protection (AADIP) can evaluate what it recognizes to be usual behavior for a user and use that knowledge to form risk calculations.
Calculation of the likelihood that an identity has been compromised is known as user risk.
Azure AD Identity Protection (AADIP) provides three risk related reports: the Risky Users report, Risky Sign-ins report, and Risky Detections report.
Azure role-based access control (RBAC) is the primary mechanism to control access to Azure resources.
Managed identities provide an automatically managed identity in Azure AD for applications to use when connecting to other Azure resources.
Thought experiment
In this thought experiment, demonstrate your skills and knowledge of the topics covered in this chapter. You can find answers to this thought experiment in the next section.
You work for Contoso, Inc., a large industrial company, as an Azure AD administrator.
Staff of Contoso, Inc. utilize passwords as their primary authentication mechanism, with no additional factor, and their credentials were recently exposed, raising serious security concerns. Staff also have a habit of selecting poor passwords with no verification for password quality. Also, Contoso, Inc. currently lacks capabilities to detect leaked credentials or anomalous user behavior.
The IT department recently upgraded all staff machines to the Windows 11 operating system, which was a costly process, and the company wanted to ensure that users received the best possible combination of security and usability.
Finally, Contoso, Inc.’s Compliance department requires that Azure AD logs be retained in Azure storage for retention purposes.
With this information in mind, answer the following questions:
1. How can Contoso, Inc.’s security posture be improved to ensure that even if user credentials are leaked, their security prevents hackers from accessing the user account?
2. What measures need to be taken to ensure that staff passwords do not contain words considered unsuitable for passwords?
3. What feature will allow Contoso, Inc. users to use biometrics for authentication on Windows 11?
4. Which Azure AD setting allows configuring of Azure AD logs to be sent to Azure Storage service?
Thought experiment answers
This section contains solutions to the thought experiment. Each answer explains why the answer choice is correct.
1. Azure Multifactor Authentication (Azure MFA). Azure MFA should be used to improve the security posture of an organization and to mitigate threats associated with passwords. Adding an additional factor to user authentication immediately improves account security because a hacker must compromise additional factors to compromise the account.
2. Azure AD Password Protection. Azure AD Password Protection maintains a global banned passwords list, which is applied automatically to all users in the directory. In addition to the default global list of banned passwords, organizations can create their own custom list of banned passwords to meet their specific security requirements.
3. Windows Hello for Business (WHfB). It allows users to use strong two-factor authentication to replace passwords on their Windows 11 devices. Users are given a credential that is linked to their device and that uses biometrics for authentication.
4. Azure AD Diagnostic settings. It enables the sending of Azure AD logs to the Azure Storage service.