
6. Use Social Media Safely

Social media services, such as Facebook, Instagram (shown here), and Twitter, offer a fun and convenient way to interact with your friends, family, and online acquaintances from your computer or mobile device. The trick is to make sure only the people you want to see your information can access it.
This chapter focuses on how to safely use social media and lock down your information and postings so only the people you want to access this content can. Topics include:
![]() Security and privacy concerns related to social media
Security and privacy concerns related to social media
![]() How to control the privacy and security settings related to your accounts
How to control the privacy and security settings related to your accounts
![]() Ways to enjoy using social media, without sharing too much information
Ways to enjoy using social media, without sharing too much information
![]() Why turning off geotagging and phototagging offers added security
Why turning off geotagging and phototagging offers added security
Billions of people all over the world are active on social media. It’s become a fun and convenient way for people to communicate and connect. Along with all the potential benefits of being active on social media, it has some potential security concerns. This chapter aims to help you maintain your privacy and still enjoy the benefits of social media.
Your Information on Social Media Is Typically Public
Whether it’s on Facebook, Instagram, LinkedIn, Twitter, or one of the other services, when you become active on social media, you’re strongly encouraged to freely share information about yourself, including photos. What you need to understand is that by default, these services are designed to be public forums, so any information you publish is available to all other users of that service, as well as the service itself and its advertisers and business partners.
On some services, if you want to make some or all your information private, you can, but it’s not the default setting. Unless you set up a free account, and then manually change your accounts settings, whatever you choose to share will ultimately become public—including photos that you might want only your friends or family members to see.
You might have audiences that you might want to reach, and others that you don’t, based on the level of privacy you’re hoping to achieve.
These social media audiences include:
Your family members (immediate and distant relatives).
Your current friends in the real world (people you know in real life) who you want to communicate with online. This might include current coworkers, neighbors, or other people you interact with in your everyday life outside of the Internet.
Your online friends. This includes people you’ve “met” online and may communicate with, but you’ve never actually met in person.
People from your past who you reconnect with online. This might include former neighbors, classmates, coworkers, or old friends you had previously lost touch with.
People who share a common interest and are part of the same online special-interest group as you. On Facebook, for example, special-interest groups are called Facebook Groups. Special-interest pages that are operated by a business, organization, or public figure are called Facebook Pages. As a Facebook user, you’re able to join and participate in Facebook Groups or on Facebook Pages for free.
The general public, which includes any other user of social media. Any information that’s published for the public to see can also be accessed by advertisers and the social networking service’s business partners, so your personal information and online activities can be used to target advertising to you.
Facebook Pages and Facebook Groups
Facebook is the host to thousands of independent Facebook Pages, which are run by private individuals, public figures, businesses, organizations, charities, and special interest groups. Facebook Pages are free to join. They let you meet and interact with people who are like-minded or share similar interests in your community or around the world.
Facebook Groups, which focus on specific subject matters, exist for just about every topic imaginable. Whatever your interests—if you want to exchange knowledge, thoughts, opinions, or other content with people about a specific topic—you can do this 24/7 by joining and becoming active on one or more Facebook Pages and Facebook Groups.
If your social media account is set up to be public, people from all these audience groups potentially have access to see everything you publish. Thus, the first thing you want to do after you establish any social media account is determine who you want to reach, and then lock down your account to prevent everyone else from gaining access to the content you publish. This is not a difficult process, but when it’s possible, it’s something you need to do manually for each social media service.
Becoming Active on Social Media
Becoming active on social media lets you share all sorts of information with other people. These services are free to join and use, available 24/7, and have very few restrictions about what you can and can’t publish or discuss online. One reason social media services have become so popular is that you can be active on a service such as Facebook, Instagram, Twitter, or LinkedIn from any Internet-connected computer or mobile device, from virtually anywhere.
Socializing (and More) on Facebook
Facebook is not only the world’s largest and most popular social media service, but also the most robust in terms of its functionality. Some of the popular things Facebook’s more than two billion active users do on the service include:
Publishing content about themselves and their lives on their personal timeline, which is a newsfeed that’s displayed in chronological order. Some people use this forum to share articles or news stories they’ve found online
Communicating with individual people (or small groups) via private, email-like messages or instant messages
Publishing and sharing individual photos or video clips, or creating online photo albums that can be personalized and shared with specific audiences
Playing multi-player online games against online friends or strangers
Participating in specific Facebook Pages and/or Facebook Groups
Participating for free in Internet-based voice calls or video calls with other Facebook users
Buying and selling used items through Facebook Marketplace, which is an online flea market
Watching video programming published on Facebook Watch, which is a video streaming service that’s similar to YouTube
Promoting or sharing details about real-world events that you’re hosting or participating in.
Because all these services are free, Facebook earns money by selling online advertising to advertisers that want to reach a targeted audience. For Facebook and similar services to charge a premium for targeted advertising opportunities, it uses information that the service gathers about you, and then automatically keeps track of your online activities.
Discerning Fake News from Real News
After the 2016 U.S. presidential election, Facebook was criticized and investigated for distributing “fake” news stories and posts that were published by its paid advertisers and designed to mislead readers. This concept of “fake news” has become rampant on the Internet and on all forms of social media.
Fake news comes in many forms. This content is typically published online, but formatted and worded to appear like a credible, accurate, and timely news story—even if it was created (or shared) by an individual or group looking to convey biased and potentially inaccurate information.
The problem with fake news is that it often looks like real news when it’s published on social media. Social media users can read and share fake news stories, which quickly expands the audience for this false information.
When you’re reading a news story on any social media platform, pay attention to who originally published it. Is it a reputable news organization, or an individual or group you never heard of? For example, the Boston Globe and the Boston Herald are two major daily newspapers published in Boston. However, the Boston Tribune does not actually exist. Someone trying to promote a fake news story will often create a fake news organization that sounds real.
To view an extensive list of fake news websites and sources of fake news articles that often appear on social media, visit https://en.wikipedia.org/wiki/List_of_fake_news_websites.
Consider the News Source, Not the Sender
If one of your online friends reposts a news article or video-based news clip, don’t trust that content just because you trust the person who posted it. Instead, pay attention to the original creator or publisher. Especially if the content does not come from a source you know to be credible, don’t believe everything you see or read on the Internet!
For tips on how to identify a fake news story, check out this article published by Harvard University: www.summer.harvard.edu/inside-summer/4-tips-spotting-fake-news-story.
Avoid Including Information Related to Passwords Within Your Profile
Many people use information related to their maiden name, pet’s name, birthday, anniversary date, spouse’s name, or child’s name for their various online account-related passwords. If you do this, do not include this information within your public social media profiles, or you’ll be providing cybercriminals with information that could allow them to hack into your online accounts.
When creating passwords, mix and match upper- and lowercase letters with numbers, and do not use a word or date that someone could easily figure out.
Addressing Privacy Concerns on Facebook
Facebook provides its users with an open forum to share and discuss almost anything. Although the service’s terms and conditions aim to prevent the abuse of other people or the distribution of information or content that could be harmful to others, relatively few limitations exist about what can and can’t be shared on social media. The distribution of pornography or directions for how to build a bomb, for example, are not allowed.
There’s a difference between online friends (people who you’ve never met in person) and real-world friends who you interact with online. Through social media, people often make friends and interact with others online. In some cases, you may build a strong personal bond over weeks, months, or even years of communication.
The problem is that anyone can create an account that says anything. In other words, people can impersonate other people or make up an entire identity for themselves. This is called catfishing, and unfortunately it is a somewhat common practice.
An online scam or online fraud often begins when a cybercriminal creates an online persona that’s designed to appeal to someone in a targeted audience. The cybercriminals build online friendships with their potential targets, and over weeks or months, try to develop a trust or bond with their targets. Information from a user’s profile will be used to create commonalities and shared interests. After a strong online friendship is established, the cybercriminal will tell you he or a family member is experiencing some type of emergency and ask for financial assistance. The story will be believable and convincing, albeit a lie.
Because the practice of catfishing has become somewhat common, it’s more important than ever that social media users differentiate their real-world friends from their online friends, and not share too much highly personal information with online friends or give money to people they haven’t met in person.
Cybercriminals who use catfishing often become active on Facebook Pages or Groups that cater to targeted special interests, where people are looking to build friendships with others based on a mutual interest or shared belief system. Until you’re able to confirm an online friend’s identity, always be mindful of what information you’re sharing and why you’re sharing it, and refrain from sharing any information that could assist a cybercriminal interested in perpetuating identity theft, fraud, or an online crime.
Anything you publish on a Facebook Page or within a Facebook Group, for example, becomes public for all members of that page or group to see. Plus, any other member of that Facebook Page or Facebook Group can access your Facebook profile and see what information you’ve shared.
If you understand catfishing is a potential threat, and use caution when interacting with online friends, you can easily and safely take full advantage of the positive aspects of social media.
Facebook and other social media services are all about making “online friends,” having people “follow” your account, and you following other peoples’ accounts. If you’re using Facebook as a tool to communicate just with your family and real-world friends, do not accept unusual friend requests from strangers—particularly from people who have no direct connection to you whatsoever, who share no common interests, and who are from another state or country.
Be leery of a total stranger who contacts you on social media in an attempt to strike up a random conversation or who offers you an investment or business opportunity.
Getting Started Using and Staying Secure on Facebook
Setting up a free account on any social media service is easy, but as you have already read, it’s your responsibility to share only information about yourself that you’re comfortable making public. The more information out there, the more a con artist can steal it. Once you decide on how much information you want published, you can adjust the security and privacy settings related to your account.
Information in Your Profile Is Typically Public
Unless you adjust the privacy settings for Facebook or other social media services you use, the information you add to your profile is typically public. Personal details, such as your address and birthdate, for example, is information that a cybercriminal can access and potentially use to help them steal your identity.
One of the pieces of information you must share with Facebook (and other social media services) to create an account is your email address. If you have an email address that contains your full name or employer’s name (such as [yourname]@[your company name].com), instead of linking that email address to your social media account, consider creating a free email address from a service like Google Gmail or Yahoo! Mail that does not include any identifiable characteristics. Refer to Chapter 3, “Protect Your Security When Working with Emails,” to learn how to create a free email account.
Set Up a Free Facebook Account
The following steps are for creating a new Facebook account using your favorite web browser on your computer. After you download the official Facebook app on your smartphone or tablet, you can also create a new account from that device, and the same features and options will be available to you.
![]() Launch your web browser and in the Search/Website Address field, type in www.facebook.com. (Edge running on a Windows PC is shown here.)
Launch your web browser and in the Search/Website Address field, type in www.facebook.com. (Edge running on a Windows PC is shown here.)
![]() Below the Sign Up heading, type in your First Name, Last Name, Mobile Phone Number, or Email Address, and create an account password. Also provide your Birthdate and Gender, and then click Sign Up.
Below the Sign Up heading, type in your First Name, Last Name, Mobile Phone Number, or Email Address, and create an account password. Also provide your Birthdate and Gender, and then click Sign Up.

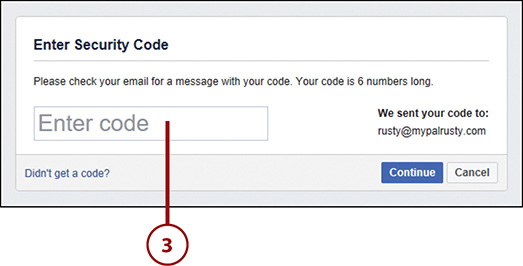
![]() To confirm your identity, Facebook will send a six-digit code to the email address or mobile phone number you provided. After you receive the code, type it into the Enter Security Code window.
To confirm your identity, Facebook will send a six-digit code to the email address or mobile phone number you provided. After you receive the code, type it into the Enter Security Code window.
![]() Choose whether you want to receive Facebook Notifications. If you opt to turn on this feature, be sure to customize this feature, so you’re only sent notifications related to things you’re interested in. For example, you can be notified anytime you receive a response to a post, receive a message from another user, or someone tags you within a photo.
Choose whether you want to receive Facebook Notifications. If you opt to turn on this feature, be sure to customize this feature, so you’re only sent notifications related to things you’re interested in. For example, you can be notified anytime you receive a response to a post, receive a message from another user, or someone tags you within a photo.

![]() When prompted, link your mobile phone number with your account. This is optional, but it provides an easier way to reset your account password if you forget it. When you’re customizing your Facebook profile, you can decide whether you want your email address and phone number(s) displayed for all to see. In the Mobile Phone Number field, type in your mobile phone number, and then click the Add Number button, or click the Not Now button to proceed without sharing your phone number.
When prompted, link your mobile phone number with your account. This is optional, but it provides an easier way to reset your account password if you forget it. When you’re customizing your Facebook profile, you can decide whether you want your email address and phone number(s) displayed for all to see. In the Mobile Phone Number field, type in your mobile phone number, and then click the Add Number button, or click the Not Now button to proceed without sharing your phone number.

![]() Click Next.
Click Next.

![]() You’re now ready to personalize your account and add friends. From the Find Your Friends screen, provide details about an existing email account so that Facebook can find and help you become online friends with some of your real-world friends who are also active on Facebook. If you want to skip this step, click Next, and confirm your decision by clicking Skip Step.
You’re now ready to personalize your account and add friends. From the Find Your Friends screen, provide details about an existing email account so that Facebook can find and help you become online friends with some of your real-world friends who are also active on Facebook. If you want to skip this step, click Next, and confirm your decision by clicking Skip Step.

![]() You’re now ready to personalize your Facebook Profile and then adjust the security and privacy settings for your account (not shown). How to do this is described in the next several sections.
You’re now ready to personalize your Facebook Profile and then adjust the security and privacy settings for your account (not shown). How to do this is described in the next several sections.
Create Your Public Facebook Profile
After your core Facebook account is set up, one of the first things you’ll be prompted to do is to create your profile and to add a profile photo of yourself. Follow these steps to proceed:
![]() Click your name that’s displayed near the upper center of the web browser window to access your online profile (which at this point is blank).
Click your name that’s displayed near the upper center of the web browser window to access your online profile (which at this point is blank).

![]() Near the top of the blank profile, click the camera-shaped icon directly below your full name to change the banner artwork for your profile. You can leave this blank, or include a photo.
Near the top of the blank profile, click the camera-shaped icon directly below your full name to change the banner artwork for your profile. You can leave this blank, or include a photo.
![]() Click the camera icon in the Profile Photo frame to add or change your profile photo. Some people use their own photo. Others use a photo of their pet, whereas others leave their profile photo blank. If you’re using Facebook from a computer’s web browser, the photo you want to use needs to be saved on your computer. Choose the Upload Photo option to select the image you want to use and upload it to your Facebook account online.
Click the camera icon in the Profile Photo frame to add or change your profile photo. Some people use their own photo. Others use a photo of their pet, whereas others leave their profile photo blank. If you’re using Facebook from a computer’s web browser, the photo you want to use needs to be saved on your computer. Choose the Upload Photo option to select the image you want to use and upload it to your Facebook account online.
![]() Click Edit Profile. The Edit Profile window divides your online profile into multiple categories, such as Edit Bio, Edit Featured Photos, Customize Your Intro, Work Current City, Hometown, Relationship, and About Info. Click any of these options to add or edit content within that section of your Facebook profile.
Click Edit Profile. The Edit Profile window divides your online profile into multiple categories, such as Edit Bio, Edit Featured Photos, Customize Your Intro, Work Current City, Hometown, Relationship, and About Info. Click any of these options to add or edit content within that section of your Facebook profile.

![]() Below the Edit Bio heading, type whatever information you want to share about yourself, in your own words. Click Save to continue.
Below the Edit Bio heading, type whatever information you want to share about yourself, in your own words. Click Save to continue.
![]() If you want to add “featured photos” to your profile, click any of the frames below the Edit Featured Photos option to import images you want to showcase on your profile. Photos can be imported from the Photos app running on your PC or Mac, or from the Photos or Gallery app running on your smartphone or tablet.
If you want to add “featured photos” to your profile, click any of the frames below the Edit Featured Photos option to import images you want to showcase on your profile. Photos can be imported from the Photos app running on your PC or Mac, or from the Photos or Gallery app running on your smartphone or tablet.

![]() Scroll down and click the Edit Your About Info option to start adding more information to your profile (keeping in mind that this is optional).
Scroll down and click the Edit Your About Info option to start adding more information to your profile (keeping in mind that this is optional).

![]() On the left side of the About screen, click one menu option at a time, starting with Overview, and fill in the related fields or add the requested information on the right side of the screen. When you add information, you can choose who can see the information, or edit sharing later.
On the left side of the About screen, click one menu option at a time, starting with Overview, and fill in the related fields or add the requested information on the right side of the screen. When you add information, you can choose who can see the information, or edit sharing later.
![]() Click the Add Your Hometown and/or the Add a Relationship option to be prompted for details about yourself that pertain to these areas of your life.
Click the Add Your Hometown and/or the Add a Relationship option to be prompted for details about yourself that pertain to these areas of your life.
![]() To jump directly to any of the submenus when creating or editing your profile, click one of the menu options displayed on the left side of the window. These include Overview, Work and Education, Places You’ve Lived, Contact and Basic Info, Family and Relationships, Details About You, and Life Events. When you later adjust the Privacy Settings related to your Facebook account, you’re able to determine who can see content included within your profile. In general, however, assume that all content added to your profile will be public.
To jump directly to any of the submenus when creating or editing your profile, click one of the menu options displayed on the left side of the window. These include Overview, Work and Education, Places You’ve Lived, Contact and Basic Info, Family and Relationships, Details About You, and Life Events. When you later adjust the Privacy Settings related to your Facebook account, you’re able to determine who can see content included within your profile. In general, however, assume that all content added to your profile will be public.

![]() When you click the Contact and Basic Info option on the left side of the window, you’ll be prompted to add all sorts of information about how people can contact you. The information you add to these sections is displayed as part of your public profile. This includes your mobile phone number, address, your personal/work website address, links to your other social media accounts, and your date of birth (you can choose to skip displaying your birthday altogether, or choose to display the month, day, and year, or just the month and day).
When you click the Contact and Basic Info option on the left side of the window, you’ll be prompted to add all sorts of information about how people can contact you. The information you add to these sections is displayed as part of your public profile. This includes your mobile phone number, address, your personal/work website address, links to your other social media accounts, and your date of birth (you can choose to skip displaying your birthday altogether, or choose to display the month, day, and year, or just the month and day).

![]() Keep scrolling to see options for adding information to your profile pertaining to things such as your relationship status, religious views, political views, favorite sports and sports teams, favorite music, favorite movies, favorite TV shows, favorite books, and Facebook Pages you want to become active on. Again, add as much or as little information in each section as you’re comfortable with.
Keep scrolling to see options for adding information to your profile pertaining to things such as your relationship status, religious views, political views, favorite sports and sports teams, favorite music, favorite movies, favorite TV shows, favorite books, and Facebook Pages you want to become active on. Again, add as much or as little information in each section as you’re comfortable with.

![]() Go through each option in each About submenu to include the information about yourself that you want to promote or display in your Facebook Profile, keeping in mind that everything you include will potentially be public and searchable. (Not shown.)
Go through each option in each About submenu to include the information about yourself that you want to promote or display in your Facebook Profile, keeping in mind that everything you include will potentially be public and searchable. (Not shown.)
You can update your Facebook profile anytime. To add, delete, or change information in your profile, return to the Profile screen by clicking your name that appears near the upper center of the browser window, and click the Edit Profile button.
Think Twice Before Sharing a Profile Photo
When choosing which photo of yourself to use as your profile picture with your social media account, some online security experts recommend you avoid using a headshot where you’re looking directly into the camera—in other words, a photo that’s similar to the type of photo found within your passport or on your driver’s license. A cybercriminal could potentially use this type of profile photo to create fake identification should they attempt to steal your identity.
Adjust Your Account’s Privacy and Security Settings
As soon as you set up a Facebook account, either before or after you personalize your profile, you want to adjust the Privacy and Security settings for your account.
Invest the Time to Adjust the Settings
Initially, it might take you 30 to 60 minutes to review each of the Privacy and Security-related settings. This needs to be done only once. However, you can return to any of the Privacy or Security-related menus at any time to readjust or fine-tune your selected settings.
Here’s how to adjust the Privacy and Security-related settings on Facebook:
![]() Log in to your Facebook account, and click the menu icon (a downward-pointing arrow on the upper right). (Not shown.)
Log in to your Facebook account, and click the menu icon (a downward-pointing arrow on the upper right). (Not shown.)
![]() Click the Settings option.
Click the Settings option.

![]() On the far-left side of the General Account Settings screen, click the Privacy option. The Privacy Settings and Tools menu appears.
On the far-left side of the General Account Settings screen, click the Privacy option. The Privacy Settings and Tools menu appears.

![]() Starting with the Your Activity options, click one menu option at a time and adjust each setting to a level you’re comfortable with. (Not shown.)
Starting with the Your Activity options, click one menu option at a time and adjust each setting to a level you’re comfortable with. (Not shown.)
![]() The options for who can view specific content for your account typically include Public (anyone can see it), Friends (only your online friends can see it), Friends Except (all online friends, except for specific people who you specify can’t see it), Friends of Friends (people who are your online friends or their online friends can see it), Specific Friends (only people you specify can see it), or Only Me (only you can see it).
The options for who can view specific content for your account typically include Public (anyone can see it), Friends (only your online friends can see it), Friends Except (all online friends, except for specific people who you specify can’t see it), Friends of Friends (people who are your online friends or their online friends can see it), Specific Friends (only people you specify can see it), or Only Me (only you can see it).

![]() Under the How People Find and Contact You heading, click one option at a time, and then choose which audience of people will be able to view and contact you through Facebook. If you want only your online friends and family to be able to find and contact you on Facebook, select the Friends option (instead of the Everyone or Public option).
Under the How People Find and Contact You heading, click one option at a time, and then choose which audience of people will be able to view and contact you through Facebook. If you want only your online friends and family to be able to find and contact you on Facebook, select the Friends option (instead of the Everyone or Public option).

![]() After adjusting the Privacy Settings and Tools menu options, click one of the other menu options in the left margin, such as Timeline and Tagging, and adjust each submenu option. Do this for all the menu options, including General, Security and Login, Your Facebook Information, Privacy, Timeline and Tagging, Location, Blocking, Language, Notifications, Mobile, Public Posts, Apps and Websites, Instant Games, Business Integrations, Ads, Payments, and Videos.
After adjusting the Privacy Settings and Tools menu options, click one of the other menu options in the left margin, such as Timeline and Tagging, and adjust each submenu option. Do this for all the menu options, including General, Security and Login, Your Facebook Information, Privacy, Timeline and Tagging, Location, Blocking, Language, Notifications, Mobile, Public Posts, Apps and Websites, Instant Games, Business Integrations, Ads, Payments, and Videos.

![]() If you need help, click the question mark–shaped Quick Help icon (near the top right of the browser window) to access an interactive Help feature that will explain what each setting option does and how to use it. To make sure you have the privacy-related settings adjusted to a level you’re comfortable with, click the Privacy Checkup option under the Quick Help icon, and then follow the onscreen prompts.
If you need help, click the question mark–shaped Quick Help icon (near the top right of the browser window) to access an interactive Help feature that will explain what each setting option does and how to use it. To make sure you have the privacy-related settings adjusted to a level you’re comfortable with, click the Privacy Checkup option under the Quick Help icon, and then follow the onscreen prompts.

Customize Face Recognition
Using advanced face recognition technology, Facebook can now analyze every digital photo that’s uploaded and published on the service, and automatically identify and tag who appears within each image. This means that if you or someone else publishes a photo of you on Facebook, and you have an active Facebook account, your name could automatically be linked with and displayed with that image.
To customize the Face Recognition setting, follow these steps:
![]() Log in to your Facebook account and access the General Account Settings menu.
Log in to your Facebook account and access the General Account Settings menu.
![]() When using the web browser on most computers, a Face Recognition option is displayed on the Settings menu on the left side of the screen. Click it.
When using the web browser on most computers, a Face Recognition option is displayed on the Settings menu on the left side of the screen. Click it.

![]() From the Face Recognition Settings menu, click the Edit option.
From the Face Recognition Settings menu, click the Edit option.

![]() The default option for the Face Recognition setting is Yes. This means that Facebook will automatically identify you in photos you or other people upload, and tag you within them. To change this option (which is recommended to retain some additional privacy), click the Yes pull-down menu and select the No option.
The default option for the Face Recognition setting is Yes. This means that Facebook will automatically identify you in photos you or other people upload, and tag you within them. To change this option (which is recommended to retain some additional privacy), click the Yes pull-down menu and select the No option.

![]() Click the Close option to save your changes.
Click the Close option to save your changes.

You can now access other Facebook Settings menu options by clicking them, or click the Home option to return to Facebook’s Home screen.
Adjust Facebook’s Advertising-Related Settings
Facebook is a free service, so you’re required to view ads as part of your online experience. Facebook ads take on several forms, and all are specifically targeted to you, based on information in your Facebook Profile, your activities on Facebook, and your online activities in general.
When you choose to adjust the advertising-related settings for your Facebook account, you need to do it only once. However, whenever Facebook changes its ad-related policies, you may need to revisit these menus and tweak your personalized options.
Consider Using Privacy Mode When Web Surfing
In addition to adjusting the ad-related settings for your Facebook account, you can reduce the tracking that’s being done to target ads to you by turning on the private browsing feature of your web browser, and/or by using an ad blocker with your web browser, and by turning on the web browser feature that requests that the websites you visit do not track you. These features can be used anytime you’re surfing the web, including when using social media services like Facebook, which track your activities in order display highly targeted advertising.
Keep in mind that Facebook shares user information with Internet search engines, online advertising networks, and its individual online advertisers.
Some Newsfeed Posts Are Actually Ads
In addition to what will appear as obvious ads on social media, some ads also take on the form of newsfeed posts. They’ll be mixed in with posts from your online friends and organizations/groups you purposely follow. Differentiating ads from legitimate posts is often difficult; look for a small icon that says “Ad” or “Sponsored” that appear somewhere in the post to identify an ad. Even a person with perfect eyesight might need a magnifying glass to see this icon.
To manually adjust the advertising-related settings for Facebook, follow these steps:
![]() Sign in to Facebook on your computer as you normally would. (Not shown.)
Sign in to Facebook on your computer as you normally would. (Not shown.)
![]() Click the menu icon (the downward-pointing arrow on the upper right).
Click the menu icon (the downward-pointing arrow on the upper right).
![]() Click the Settings option.
Click the Settings option.

![]() From the General Account Settings menu, click the Ads menu option.
From the General Account Settings menu, click the Ads menu option.

![]() The Your Ad Preferences screen has six color-coded sections. Starting with the Your Interests section, click one section heading at a time. When you first start using Facebook, some of these menu categories won’t offer anything to add or remove, but as you become more active using Facebook and the service collects information about your activity, you’ll see topics and options listed as part of each category.
The Your Ad Preferences screen has six color-coded sections. Starting with the Your Interests section, click one section heading at a time. When you first start using Facebook, some of these menu categories won’t offer anything to add or remove, but as you become more active using Facebook and the service collects information about your activity, you’ll see topics and options listed as part of each category.

![]() Click the Your Information category, and then click to turn on or off the virtual switch for each option, based on what information you want Facebook to use to target ads to you. Assume that unless you turn off the Relationship Status, Employer, Job Title, and Education option, Facebook will use any information from your Facebook Profile to target ads to you.
Click the Your Information category, and then click to turn on or off the virtual switch for each option, based on what information you want Facebook to use to target ads to you. Assume that unless you turn off the Relationship Status, Employer, Job Title, and Education option, Facebook will use any information from your Facebook Profile to target ads to you.

![]() Click the Ad Settings category and then click each option one at a time. The menu expands for each option, showing a dropdown menu with the choices, Allow or Not Allowed, for each. To limit the information that’s gathered and used about your online activities, select the Not Allowed option for the Ads Based on Data from Partners, as well as the Ads Based on Your Activity on Facebook, and Ads That Include Your Social Actions options.
Click the Ad Settings category and then click each option one at a time. The menu expands for each option, showing a dropdown menu with the choices, Allow or Not Allowed, for each. To limit the information that’s gathered and used about your online activities, select the Not Allowed option for the Ads Based on Data from Partners, as well as the Ads Based on Your Activity on Facebook, and Ads That Include Your Social Actions options.

![]() If there are specific ad topics for which you do not want to see ads, such as Alcohol, Parenting, or Pets, click the Hide Ad Topics category, select a topic, and then choose to hide those ads for six months, one year, or permanently.
If there are specific ad topics for which you do not want to see ads, such as Alcohol, Parenting, or Pets, click the Hide Ad Topics category, select a topic, and then choose to hide those ads for six months, one year, or permanently.

![]() To learn more about how Facebook uses your information and sells it to advertisers, click the How Facebook Ads Work category at the bottom of the Your Ad Preferences screen, and go through each step of the Facebook ad-related tutorial. (Not shown.)
To learn more about how Facebook uses your information and sells it to advertisers, click the How Facebook Ads Work category at the bottom of the Your Ad Preferences screen, and go through each step of the Facebook ad-related tutorial. (Not shown.)
![]() As you participate in the Facebook ad-related tutorial, click the Manage Your Ad Preferences option to adjust settings for the advertising topic that’s being discussed. (Not shown.)
As you participate in the Facebook ad-related tutorial, click the Manage Your Ad Preferences option to adjust settings for the advertising topic that’s being discussed. (Not shown.)
Adding Friends to Your Facebook Account
When you choose to “Friend” someone on Facebook, whether it’s a family member, real-life friend, or someone online you meet, that person will be granted greater access to the content you post online and your profile. At the same time, you’ll be granted access to the information and profile content posted by your Facebook friends.
Using tools offered by Facebook, you can sort your Facebook friends into categories, and then choose who will get to view specific postings or online photo galleries you publish, based on the category you place someone into. For example, as you’ll learn in Chapter 7, “Protect Your Privacy When Publishing and Sharing Photos Online,” you can choose to make photos only accessible to family members, real-life friends you interact with on Facebook, or to other audiences, including the general public.
Some people enjoy having hundreds or thousands of Facebook friends, and seek out as many friends as they can. Others are a lot more selective, and choose to become Facebook friends only with relatives and people they know in the real world. Who you accept or reject as a Facebook friend is entirely up to you, and you can “unfriend” anyone at any time.
Manage Your Facebook Friends
To manage your Facebook friends, follow these steps:
![]() Log in to Facebook on your computer using your favorite web browser.
Log in to Facebook on your computer using your favorite web browser.
![]() Access your Facebook Profile by clicking your name near the upper center of the browser window.
Access your Facebook Profile by clicking your name near the upper center of the browser window.

![]() Click the Friends tab.
Click the Friends tab.

![]() Click the Manage button (the pencil icon) to the far right of the Friends heading, and then click Edit Privacy.
Click the Manage button (the pencil icon) to the far right of the Friends heading, and then click Edit Privacy.

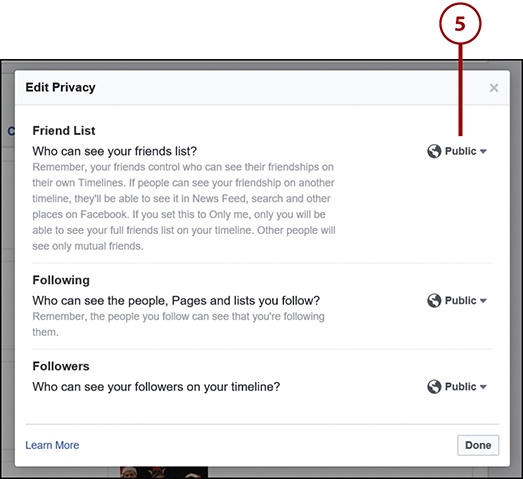
![]() From the Edit Privacy pop-up window that appears, adjust each of the three Edit Privacy options displayed in the pop-up window, and then click Done. The three options are: Who Can See Your Friends List, Who Can See the People, Pages, and Lists You Follow, and Who Can See Your Followers On Your Timeline.
From the Edit Privacy pop-up window that appears, adjust each of the three Edit Privacy options displayed in the pop-up window, and then click Done. The three options are: Who Can See Your Friends List, Who Can See the People, Pages, and Lists You Follow, and Who Can See Your Followers On Your Timeline.
![]() Hover your cursor over the Friends button to the right of each friend listing to access a menu that lets you categorize that online friend into a subgroup, or “unfriend” that person.
Hover your cursor over the Friends button to the right of each friend listing to access a menu that lets you categorize that online friend into a subgroup, or “unfriend” that person.

Delete Your Facebook Account
If you no longer want to participate on Facebook, you can delete your account. All content on your account, including photo galleries and information from your timeline, will be deleted. Facebook probably has backups, so nothing is actually gone forever, but a user can never access a deleted account or its contents after 30 days.
If you want to keep the content online, but stop using the account (temporarily), choose to “deactivate” as opposed to “delete” your account.
To delete your Facebook account, follow these steps:
![]() Sign in to Facebook on your computer as you normally would. (Not shown.)
Sign in to Facebook on your computer as you normally would. (Not shown.)
![]() Click the downward-pointing arrow menu icon.
Click the downward-pointing arrow menu icon.
![]() Click the Settings option.
Click the Settings option.

![]() Click the Your Facebook Information option.
Click the Your Facebook Information option.
![]() Click the Delete Your Account and Information option.
Click the Delete Your Account and Information option.

![]() Click the Delete Account option.
Click the Delete Account option.

![]() When prompted, type in your Facebook password, and click Continue.
When prompted, type in your Facebook password, and click Continue.

![]() Click the Delete Account option. Remember, all your content will be deleted and lost after 30 days. (Not shown.)
Click the Delete Account option. Remember, all your content will be deleted and lost after 30 days. (Not shown.)
Staying Safe on Twitter and Instagram
Twitter and Instagram are two extremely popular social media services. They focus on sharing a small amount of information with each post and are geared to be public forums (although private communication is possible using a Direct Messaging feature).
On Twitter, each message someone posts can be up to 280 characters long and include a photo, video clip, website link, the poster’s location, the time and date, and hashtags.
What Are Hashtags?
Hashtags start with the “#” symbol and are followed by a searchable keyword that helps other Twitter or Instagram followers who do not follow an account to find and read the poster’s messages. For example, someone posting content and/or sharing photos about a trip to Paris might include hashtags such as #travel, #paris, #eiffeltower, #louvre, and #vacation. As a Twitter or Instagram user, if you want to find posts or online discussions about a specific topic, you can search for hashtags you’re interested in using the service’s Search tool.
You can also search these services for individual users, based on their unique username. A username on Twitter or Instagram begins with the “@” symbol and is unique to that user. Although some people use their entire name as their username (such as @JasonRich7), others use something that does not reveal their identity (such as @MyPalRusty or @JasonFromBoston).
When you set up your Twitter or Instagram account, you’re asked to create a unique username, which is how you’re identified on that service. Unlike Facebook that requests that you create an extensive profile, a Twitter or Instagram profile is very short (about one sentence long) and can optionally contain a profile photo.
A post on Twitter is called a “tweet.” On Instagram, a message is called a “post.” Because most people use these services from their smartphone or tablet, each tweet or post can be accompanied by the poster’s location, as well as the time and date. The poster can also tag people who appear in the photo(s) being posted.
Turn Off Features You Don’t Want
For each post on Instagram or Twitter, if you don’t want to share your location or tag people in photos, turn off these features. You can control what information is published. Keep in mind that these sites are designed to be public forums, so anyone can potentially find and read your posts.
After setting up a free Twitter account (www.twitter.com) or Instagram account (www.instagram.com) and creating a profile, one of the first things you should do is adjust the settings related to your account.
Adjusting Twitter and Instagram Privacy and Security Settings
Instagram and Twitter were designed to be used from mobile devices. The official Twitter and Instagram mobile apps are available from the Apple App Store for iPhone and iPad or Google Play Store for Android.
Customize Twitter’s Settings
The focus of Twitter is to share a short, text-based message that can be accompanied by photos, a video clip, and other information. In this example, the official Twitter app is being used on an iPhone. You only need to do these settings-related adjustments once, but you can make changes at any time.
To customize the settings for your Twitter account, follow these steps:
![]() Tap the Twitter icon to launch the Twitter app on your smartphone or tablet, and then sign in to your account. (Not shown.)
Tap the Twitter icon to launch the Twitter app on your smartphone or tablet, and then sign in to your account. (Not shown.)
![]() Tap your profile photo in the upper-left corner of the screen. (Not shown.)
Tap your profile photo in the upper-left corner of the screen. (Not shown.)
![]() From the menu, tap the Settings and Privacy option.
From the menu, tap the Settings and Privacy option.

![]() In the Settings and Privacy menu that appears, tap one option at a time, starting with Account, to access a submenu that offers a handful of customizable options.
In the Settings and Privacy menu that appears, tap one option at a time, starting with Account, to access a submenu that offers a handful of customizable options.

![]() Tap the Account option, and then tap the Security option to turn on two-factor authentication (which Twitter calls Login Verification) and provide your account with extra security against hackers.
Tap the Account option, and then tap the Security option to turn on two-factor authentication (which Twitter calls Login Verification) and provide your account with extra security against hackers.

![]() Tap the Password Reset Protect virtual switch to turn on this feature to prevent someone from being able to change your account password and take control of your account without verifying your email address and phone number.
Tap the Password Reset Protect virtual switch to turn on this feature to prevent someone from being able to change your account password and take control of your account without verifying your email address and phone number.

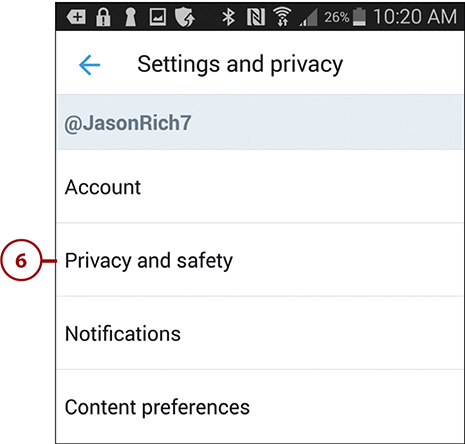
![]() From the Settings and Privacy menu, tap the Privacy and Safety option to adjust a variety of menu options that pertain to managing the account and the information you’ll share with each tweet you send.
From the Settings and Privacy menu, tap the Privacy and Safety option to adjust a variety of menu options that pertain to managing the account and the information you’ll share with each tweet you send.

![]() Tap the Photo Tagging option to access its switch and tagging options.
Tap the Photo Tagging option to access its switch and tagging options.

![]() Tap the Photo Tagging switch to turn off this feature. If you want to prevent people from tagging you (using your Twitter username), tap to remove the check mark from the Anyone Can Tag You option. The feature is on by default, meaning that anyone can tag you in their photos.
Tap the Photo Tagging switch to turn off this feature. If you want to prevent people from tagging you (using your Twitter username), tap to remove the check mark from the Anyone Can Tag You option. The feature is on by default, meaning that anyone can tag you in their photos.

![]() To prevent your account from receiving messages from strangers, tap to turn off the Receive Messages from Anyone option. When it’s off, only fellow Twitter users who you follow and who follow you will be able to send you a direct message.
To prevent your account from receiving messages from strangers, tap to turn off the Receive Messages from Anyone option. When it’s off, only fellow Twitter users who you follow and who follow you will be able to send you a direct message.

![]() Scroll down to the Safety heading. To prevent your exact location from being tracked, turn off the Precise Location option. Your location information is used to track your activities and to display local content, ads, and recommendations that relate to your location.
Scroll down to the Safety heading. To prevent your exact location from being tracked, turn off the Precise Location option. Your location information is used to track your activities and to display local content, ads, and recommendations that relate to your location.
![]() Tap the Personalization and Data option and adjust the submenu settings to prevent other types of data related to your Twitter activity from being collected, tracked, and used by Twitter and its advertisers or business partners.
Tap the Personalization and Data option and adjust the submenu settings to prevent other types of data related to your Twitter activity from being collected, tracked, and used by Twitter and its advertisers or business partners.

![]() Tap each of the options listed on the Settings and Privacy menu to customize your Twitter experience, based on the level of privacy and security you desire. Then, as you compose and send individual tweets, turn on/off the geotagging feature, and decide whether you want to tag people in your photos on a case-by-case basis. (Not shown.)
Tap each of the options listed on the Settings and Privacy menu to customize your Twitter experience, based on the level of privacy and security you desire. Then, as you compose and send individual tweets, turn on/off the geotagging feature, and decide whether you want to tag people in your photos on a case-by-case basis. (Not shown.)
How to Delete Your Twitter Account
To deactivate and delete your Twitter account, from the Settings and Privacy menu, tap the Account option and then tap the Deactivate Your Account option. Follow the on-screen prompts to continue.
Customize Instagram’s Settings
When you use Instagram, the focus is on sharing one photo or video clip (or a small group of photos) at a time, which can be accompanied by a text-based caption, along with other information.
After activating your free account, be sure to adjust the security- and privacy-related settings. For this example, the official Instagram app is shown here running on an iPhone.
To customize the privacy and security settings for your Instagram account, follow these steps:
![]() Tap the Instagram icon to launch the official Instagram app and sign in to your account. (Not shown.)
Tap the Instagram icon to launch the official Instagram app and sign in to your account. (Not shown.)
![]() Tap the User Profile icon in the lower-right corner of the screen. Your own profile appears.
Tap the User Profile icon in the lower-right corner of the screen. Your own profile appears.
![]() Tap the menu icon (the three horizontal lines) in the upper-right corner of the screen.
Tap the menu icon (the three horizontal lines) in the upper-right corner of the screen.

![]() Tap the gear-shaped Settings menu icon.
Tap the gear-shaped Settings menu icon.

![]() Scroll down to the Privacy and Security heading.
Scroll down to the Privacy and Security heading.
![]() Tap each menu option. From the submenu screen, adjust each option as you deem appropriate, based on the level of privacy and security you want for your account.
Tap each menu option. From the submenu screen, adjust each option as you deem appropriate, based on the level of privacy and security you want for your account.
![]() To turn on two-factor authentication to help protect your account from hackers, tap the Two-Factor Authentication menu option, and then follow the prompts to activate this feature.
To turn on two-factor authentication to help protect your account from hackers, tap the Two-Factor Authentication menu option, and then follow the prompts to activate this feature.

![]() For more information about what each of the more than a dozen privacy and security options can do and how they work, tap the Privacy and Security Help option, and then from the menu, choose topics to read about that you’re interested in.
For more information about what each of the more than a dozen privacy and security options can do and how they work, tap the Privacy and Security Help option, and then from the menu, choose topics to read about that you’re interested in.

Understanding What You’re Posting and Who Will See It
When you create and publish a tweet on Twitter or a post on Instagram, it can theoretically be seen by anyone who stumbles across it, who looks up your account, or who looks up a specific hashtag that’s included in your content.
Both Twitter and Instagram allow you to publish content to your feed, which remains there permanently (or until you delete it). You’re also able to publish content to your “story,” which allows users to view that content for 24 hours before it is deleted. Content can also be published and sent as a direct message, which means only you and the recipient can view it. Plus, there’s the ability to broadcast live, which means you can stream content live using the camera and microphone built into your mobile device for potentially anyone to watch.
When sharing content on these services, make sure you understand who can potentially see it, with the understanding that anything you post that you want to be viewed only by specific people can ultimately be made public if the recipient simply taps the “retweet” or “share” command to republish the content publicly.
Using LinkedIn and Other Social Media Services Securely
Unlike Facebook, Instagram, and Twitter—which can be used to socialize, as well as for business purposes—LinkedIn is a popular social media service designed as a business and employment-related networking tool.
LinkedIn (www.linkedin.com) lets users communicate with other subscribers, relay industry-related news (and gossip), share their expertise, get business-related questions answered, and seek out new customers and clients. It can also be used as a job search tool. The service has more than 562 million active users from around the world.
When you create a free LinkedIn account and set up your user profile, all the information added to your profile would typically appear in your resume, such as your education and work experience, and what specialty skills, licenses, or accreditations you’ve earned.
Because so many people from across the globe now rely on social media as a primary networking, communications, and entertainment tool, all sorts of specialty social media services have launched on the Internet. Some are targeted to people with specific interests, whereas others cater to handling only specific tasks, whether it’s online gaming, sharing travel-related content (including consumer reviews), online dating, or sharing photographs.
When you choose to become active on any social media platform, make sure you understand who can view whatever content you post and how to manually adjust the security- and privacy-related settings pertaining to your account. Also, when creating a username, to increase your privacy, refrain from using your full name, especially if you’ll be interacting with total strangers.
Because LinkedIn is designed for professional networking, you’re required to provide and display your full name, which will be verified, before your account becomes fully active. This, however, is an exception among social media sites. Most social media services allow you to create a unique username that does not need to include your full name.
Thinking Before You Post
Before posting anything on social media, ask yourself:
What would happen if this content were made public?
What would my relatives, friends, coworkers, or current or potential employers, think of this content?
Could this content jeopardize my job or reputation in the community?
Does the content I am about to publish compromise my privacy or security, or the privacy of anyone I am discussing or showcasing in photos or video clips?
Will someone potentially find my content offensive or threatening?
Have I adjusted the settings related to the service that prevent certain information, such as my exact location, from being included in the post?
This is another one of those online situations where you can take steps to avoid compromising your security, privacy, or safety. Even if you’re angry or upset when composing or creating content to be published on a public forum, think twice about the repercussions before publishing that content online.
After something is published online, even if you delete your original post almost immediately, that content could have been seen by others, copied, backed up, shared, and transmitted around the Internet. It can never fully be removed or deleted.
Social Media Is All About Sharing Thoughts and Opinions
All the social media platforms give users a vast and very public platform to voice their opinions, share their thoughts, convey their knowledge, offer their reviews, or post information about anything, without having to worry too much about being censored. If you have something to say about a product, service, or experience, you can share it on social media.
Understanding the Pros and Cons of Geotagging
When you create and publish a post on social media, particularly if you’re using a smartphone or tablet that has GPS capabilities built in, your exact location can automatically be added to the post. This feature is useful if you’re traveling and want people to be able to follow along on your adventure as you share photos taken at various tourist attractions and post them in almost real time on social media.
However, if you’re creating and publishing posts from your home, work, or while traveling, chances are you don’t want your exact location to be published online. After all, you don’t want strangers to see your post and where it was created, and then show up at your location. Also, by announcing where you are within your public posts, you’re telling people that you’re not home and that your home is potentially vacant.
When your location is included as part of a post, or published in conjunction with a photo, this is called geotagging. If you use Facebook’s Check-In feature to create your post, it also retrieves and publishes your exact location, unless you turn off this functionality.
Turn Off Geotagging from Your iPhone/iPad
If you want to prevent your location from being shared whenever you’re using any social media service, follow these steps:
![]() From the iPhone or iPad’s Home screen, tap the Settings icon.
From the iPhone or iPad’s Home screen, tap the Settings icon.

![]() Scroll down and tap the Privacy option.
Scroll down and tap the Privacy option.
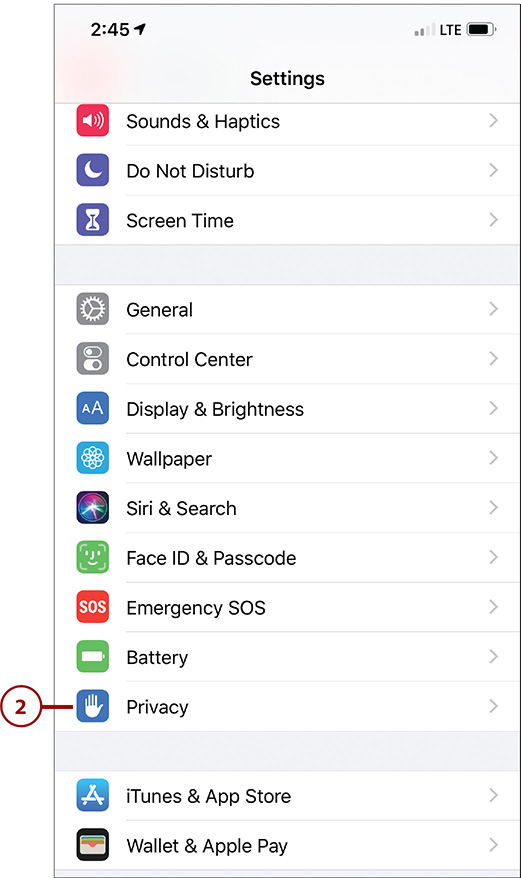
![]() From the Privacy submenu, tap the Location Services option.
From the Privacy submenu, tap the Location Services option.

![]() To prevent your iPhone or iPad from ever accessing, using, or potentially sharing your location, regardless of which app is being used, tap the Location Services switch to turn off the feature.
To prevent your iPhone or iPad from ever accessing, using, or potentially sharing your location, regardless of which app is being used, tap the Location Services switch to turn off the feature.
![]() Because many apps you’ll be using on your iPhone or iPad rely on knowing your current location (including the maps and weather apps, for example), instead of turning off the master Location Services switch, scroll down in the Location Services menu, and tap each social media app you have installed. For example, tap the Facebook listing.
Because many apps you’ll be using on your iPhone or iPad rely on knowing your current location (including the maps and weather apps, for example), instead of turning off the master Location Services switch, scroll down in the Location Services menu, and tap each social media app you have installed. For example, tap the Facebook listing.
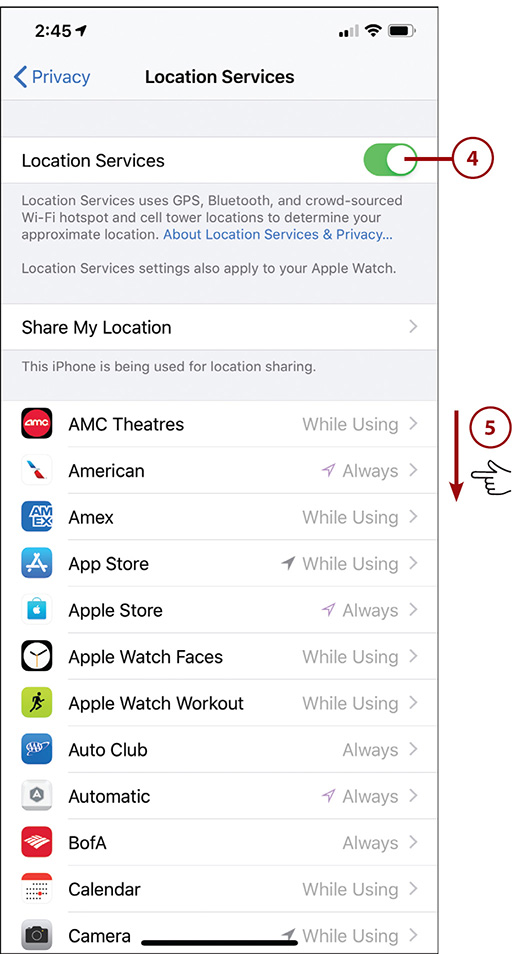
![]() From the Facebook submenu, select whether Location Services (the GPS functionality built in to your mobile device) can be used Never, While Using the App, or Always. If you want to prevent Facebook from tracking, publishing, or sharing your location, set this feature to Never.
From the Facebook submenu, select whether Location Services (the GPS functionality built in to your mobile device) can be used Never, While Using the App, or Always. If you want to prevent Facebook from tracking, publishing, or sharing your location, set this feature to Never.

![]() Return to the previous Location Services menu and tap the listing for each additional social media app you have installed, which might include Instagram, Twitter, or LinkedIn. From the Allow Location Access menu option, choose from among the Never, While Using the App, or Always options.
Return to the previous Location Services menu and tap the listing for each additional social media app you have installed, which might include Instagram, Twitter, or LinkedIn. From the Allow Location Access menu option, choose from among the Never, While Using the App, or Always options.

Turn Off Geotagging from Your Android-Based Mobile Device
If you want to prevent your location from being shared whenever you’re using any social media service, follow these steps:
![]() From the Android mobile device’s Home screen, launch Settings. (Not shown.)
From the Android mobile device’s Home screen, launch Settings. (Not shown.)
![]() Under the Network Connections heading, tap the Location option.
Under the Network Connections heading, tap the Location option.

![]() To turn off the master Location feature so neither the mobile device nor any apps running on it can access your location, tap the Location option to turn it off.
To turn off the master Location feature so neither the mobile device nor any apps running on it can access your location, tap the Location option to turn it off.
![]() Tap a specific app listing and then scroll down to the Permissions heading to see what features and functions, including Location-related functionality, the app uses.
Tap a specific app listing and then scroll down to the Permissions heading to see what features and functions, including Location-related functionality, the app uses.

![]() To prevent your location from being shared or tracked on an app-by-app basis, launch a social media app (such as Twitter). In this case, tap your profile photo to access the Settings menu for that app.
To prevent your location from being shared or tracked on an app-by-app basis, launch a social media app (such as Twitter). In this case, tap your profile photo to access the Settings menu for that app.

![]() Select the Privacy and Safety option (or equivalent) related to the app.
Select the Privacy and Safety option (or equivalent) related to the app.
![]() Tap the Location option.
Tap the Location option.

![]() To disable this feature and prevent the app (in this case Twitter) from identifying and tracking your location, tap to remove the check mark from the Precise Location option.
To disable this feature and prevent the app (in this case Twitter) from identifying and tracking your location, tap to remove the check mark from the Precise Location option.

Turn Off Geotagging on a Case-by-Case Basis
As you’re creating a post, tweet, or message on any social media service, tap the Location icon that’s included with the composition tools, and manually turn on or off this setting before publishing the post. If you choose to share the location, you can fine-tune the location to make it slightly less precise, based on the level of privacy you’re looking for.
For example, if you’re publishing content from your home, instead of including your full address with the post, you can share your location as just your city and state.


Weighing the Pros and Cons of Tagging Yourself and Others in Photos
The next chapter focuses on safely publishing photos, creating online galleries of your photos, and then sharing them with others. One of the most popular uses of almost all the social media services is to publish and share photos.
In addition to adding a searchable text caption to a photo, the date and time, and the exact location where the photo was taken, social media users can tag the people who appear in each photo. When you link the names of the people who appear in your photos, those people’s names become searchable, so other social media and online web surfers will be able to find and view photos with specific people in them, simply by searching for the person’s name.
Based on your comfort level of sharing the names of the people in your photos when you publish them online, you may opt to avoid tagging people in photos. This is particularly important if you want to avoid sharing the names and possibly the location of your kids or grandchildren who appear in your photos.
When you’re about to post a photo online when using social media, and are prompted to tag people who appear in the photo, consider skipping this step and not linking those peoples’ names to the image if you want to help preserve their privacy.
Fellow Facebook users who are linked in photos on Facebook receive a notification that they’ve been tagged in a photo and can manually untag themselves—but this is after the photo has already been published online. This is also the case with most other social media services. However, if you believe the people featured in your photo would not want to be tagged, don’t tag them to begin with. If you’re not sure, ask them before tagging them in your photos, especially if you plan to make the photos available to more than a small group of online friends to view.
How to Tag People in Photos
Chapter 7 explains how you can tag people in photos you publish.
For more information about how tagging works on Facebook, visit www.facebook.com/help/124970597582337.
For information about tagging people in photos on Instagram, visit https://help.instagram.com/627963287377328.
For information about tagging in Twitter, visit https://help.twitter.com/en/using-twitter/tweeting-gifs-and-pictures#tag-settings.