
16. Getting Fit with S Health

This chapter covers how to use the preinstalled S Health app on your Galaxy S7 or S7 edge to track your health and fitness activities. Topics discussed in this chapter include:
![]() Synchronizing your health data and changing settings
Synchronizing your health data and changing settings
![]() Working with activity trackers
Working with activity trackers
![]() Connecting with related third-party apps and accessories
Connecting with related third-party apps and accessories
![]() Setting activity goals and running programs
Setting activity goals and running programs
As you’ll probably have your Galaxy S7 or S7 edge with you as you go places, the preinstalled S Health app makes it easy to use the device to track your current health. If you don’t like what you see and decide to improve your health with physical activity, you can tell S Health what activity (or activities) you want to track using your Galaxy S7.
You can also set health goals for S Health to track over a period of time. The S Health app contains a number of built-in goals and programs you can set up to create a fitness plan that’s right for you. Then, over time, you can see the effects of your fitness plan on your overall health from within the app.
Working with S Health
By default, S Health tracks the number of steps you take and your running times and trends. You can add or remove trackers to track as many as 16 different health details, including how you walk, your caffeine intake, and your blood pressure.
Start S Health
Before you can use S Health, you have to start the app; accept the app terms, conditions, and privacy policy; and learn about the S Health dashboard.
1. Tap Apps on the Home screen.

2. Tap Samsung.

3. Tap S Health.

4. Tap Start.

5. Tap the I Agree checkboxes on the Terms, Conditions, and Privacy Policy screen. After you tap each checkbox, the checkbox turns green and includes a white checkmark. Note that this screen opens only when you run the app for the first time. If you don’t see this screen, proceed to step 7.
6. Tap Next.

7. Tap Setup.

8. Slide the Auto Sync slider button from left (Off) to right (On).
9. After you turn on Auto Sync, S Health synchronizes your health data with your Samsung account so you have your health data available on other devices or if you have to reset your Galaxy S7.
10. By default, you sync your S Health data with your Samsung account only using your Wi-Fi connection. If you want to sync using your carrier’s data network, slide the Sync Via Wi-Fi Only slider button from right (On) to left (Off).
11. Return to the S Health home screen by tapping the Back icon.

12. Tap More in the Flexible Dashboard Layout tile to view more information.
13. Swipe up and down in the screen to learn how to customize the S Health home screen, which S Health calls the Dashboard.
14. Return to the Dashboard by tapping the Back icon.
15. Tap Close to close the Flexible Dashboard Layout information tile.


Add and Remove Trackers
1. In the S Health screen, tap More.

2. Tap Manage Items in the menu.

3. In the Trackers tab, the only three trackers turned on by default are the Steps, Walking, and Running trackers.
4. Turn the tracker off by sliding the slider button from right (On) to left (Off).
5. Swipe up and down in the list to view all the trackers you can add.

6. Add a tracker by sliding the slider button from left (Off) to right (On). This example adds the Sleep tracker that you’ll learn to use later in this chapter.
7. When you finish adding and/or removing trackers, tap the Back icon.

Sync Your Health Data and Change Settings
After you set up your S Health account, you may see a notification from the app in the Status bar. The notification icon looks like the S Health icon you saw in the Apps screen. When you open the Quick Settings and Notification screen, you see a reminder to synchronize your health data with your Samsung account.
If you have a Samsung account, you can synchronize your health data when you view and/or change other account settings. This example presumes that you set up a Samsung account before you launched the S Health app.
1. Tap More in the menu bar.

2. Tap Settings.

3. Tap Account to turn on synchronization with your Samsung account.
4. Tap Password to set a password you must type every time you start the S Health app.
5. Tap Unit to change the units of measure for height, weight, distance, temperature, and blood glucose levels.
6. Tap Notification to turn notification of S Health events on or off, and also set the notifications to report.
7. Tap Detect Workouts to turn detection of your workouts on and off. S Health automatically detects and records your workout such as duration, distance, and burned calories after you start walking or running for 10 minutes. You can also map your workout location and see the map, such as a section of the city where you walk, after your workout ends.
8. Tap Data Permissions to allow the S Health app to share specific data with third-party apps. You find out more about third-party apps you can use with S Health later in this chapter.
9. Tap Reset Data to erase all S Health data you have accumulated since the time you either started tracking or the last time you erased your data. You need to enter your Samsung account password to erase your data.

What Happens When I Reset Data?
When you erase all data, you do so both on the Galaxy S7 and in your Samsung account. After the S Health app finishes erasing your data, the app closes and you need to open it again. After you open the app, you’ll see the Terms, Conditions, and Privacy screen that you learned about earlier in this chapter.
10. Swipe up in the screen to see the last two setting options within the Information section.
11. Tap Help for quick information about using S Health.
12. Tap About S Health to view information about the S Health app and check for app updates.
13. Return to the S Health screen by tapping the Back icon.

Using Activity Trackers
After you set up your activity trackers, you can begin using one or more trackers to monitor your physical activities. This example uses the Steps and Sleep trackers because those are two common physical activities.
Set Daily Step Goals and Track Your Steps
When you track your daily steps, you can see how many steps you’ve taken over a 24-hour period. What’s more, you can see how the number of steps you’ve taken in a day compares with the number of steps you’ve taken in recent days as well as your daily activity goal.
1. Tap the Add button in the Be More Active tile.

2. Begin tracking your activity by tapping Start.

3. Tap the Be More Active tile.

4. Tap Info to get more information about how to be more active.

5. Swipe upward in the list to view a summary of your daily activity, number of calories burned, the distance you’ve traveled all day, and the longest period of active minutes.

6. Tap the Trends tab to view your recorded activities for the current day and for each day over the previous week to see how the number of steps each day compares with other days and with your daily goals during the weeklong period.

7. Tap the Rewards tab to view any rewards that S Health gives you for meeting goals. If you have no rewards, you see “No rewards” on the screen.
8. Tap More to open a menu with more options.

9. Tap View Goal Details to view information about your fitness goal.
10. Swipe left and right within the timeline to change the number of minutes per day you want to be active. The default number of minutes is 60.
11. Tap Info to get recommendations for the number of minutes you should be active each week.
12. Tap Cancel Goal to cancel your goal of being more active and return to the S Health screen.
13. Tap the Back icon to return to the Be More Active screen.
14. In the Be More Active screen, tap the Back icon to return to the S Health screen.


15. Tap the Steps tile to view how many steps you’ve taken.

16. Tap Info to get tips about how many steps you need to take for good fitness.
17. View the number of steps you’ve taken today and compare them with the targeted number of steps.
18. View the number of steps you’ve taken over the last 24-hour period in the chart.
19. Tap Mobile Phone to select another device, such as a Samsung Gear smartwatch, that you want to use as the device that counts your steps.

20. Swipe up on the screen to view more Steps data.
21. View the current distance you’ve traveled, how many calories you’ve burned, and how many steps you’ve taken at a healthy pace (100 steps per minute for 10 minutes).
22. Tap the Trends tab to view your recorded steps over the period of one week and see how the number of steps each day compares with other days and with your daily goals during the weeklong period.
23. Tap the Rewards tab to view any rewards that S Health gives you for meeting your step goals. If you have no rewards, you see “No rewards” on the screen.
24. Tap More to open a menu with more options.

25. Tap Set Target to set your daily target for number of steps in a day.
26. Tap Source Data to View to select another device, such as a Samsung Gear smartwatch, that you want to use as the device that counts your steps.
27. Tap Pause Counting Steps to have S Health stop counting the number of steps until you tell it to resume by tapping More as you did in step 24 and then tapping Start Counting Steps.
28. Close the menu by tapping the Back touch button (not shown).
29. Return to the S Health screen by tapping the Back icon.

Track Your Sleep
Earlier in this chapter, you learned how to add the Sleep tracker to your Dashboard. Getting a good night’s sleep is important for everyone, and if you’re concerned about your sleep patterns, you can tell S Health when you go to sleep and when you wake up. After a period of time, you’ll be able to see your sleep pattern and determine if you need to make changes to your sleep schedule.
1. In the S Health screen, swipe down the screen until you see the Sleep tile.
2. Tap the Sleep tile.

3. View sleep data for the previous or following day by tapping the left and right arrows on either side of the date. If the date is the current date, then the right arrow is disabled.
4. Tap the date button to change the date within the Set Date window that appears at the bottom of the screen (not shown).
5. Record your sleep times by tapping the Record Manually button.

6. Tap, hold, and drag the Sleep button around the perimeter of the clock until you reach the time of day you went to sleep. As you move the icon, the time you went to sleep appears in the middle of the clock and changes in 10-minute increments as you move the icon so you can set your bedtime more accurately.
What Do the Number Marks Around the Clock Mean?
The 0 mark on the clock signifies midnight of the current day. If the Sleep button appears before midnight, then S Health presumes you went to bed at your selected time during the previous day. The 6 mark means 6 a.m., the 12 mark means 12 p.m., and the 18 mark means 6 p.m.
7. Tap, hold, and drag the Wake Up button around the perimeter of the clock until you reach the time of day you woke up. As you move the icon, the time you woke up appears in the center of the clock. The default wake-up time is the current time, which is 4:34 a.m. in this example.

8. After you set the sleep and wake-up times, the sleep date(s) and times appear in the center of the clock.
9. The total amount of time you slept appears below the clock.
10. Rate your sleep quality by tapping the appropriate star. For example, if you had a pretty good sleep and you want to give that sleep four stars, tap the fourth star from the left and the first four stars appear in gold and only the last star (the one on the right) remains gray.
11. Tap Save to save your bedtime and wake-up data.
12. Tap Cancel to return to the Sleep screen without setting your bedtime and/or wake-up time.

13. Tap Trends to view sleep data over the past few days.
14. Swipe left and right in the Days chart to view sleep data for each day during the past month.
15. Tap Days to change the chart monitoring period between Days, Weeks, and Months.
16. Return to the S Health screen by tapping the Back icon.

Viewing Partner Apps and Settings
Samsung has partnered with a variety of hardware and app accessories that work with S Health to enhance your monitoring experience and give you even more tools to stay active and healthy.
1. In the S Health screen, swipe up in the screen until you see the partner tiles.
2. Tap one of the partner tiles to learn more about the partnership offer in your preferred web browser app.
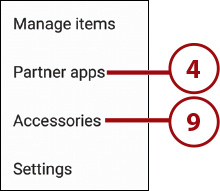
3. Tap More.

4. Tap Partner Apps in the menu.
5. Swipe up and down the screen to view all the partner app tiles.
6. Each partner app tile contains the name of the app, the company that produced the app, and a brief description.
7. You can get more information about the app and download it within the Google Play Store by tapping the download icon.
8. Return to the S Health screen by tapping the Back icon.
9. Tap More as you did in step 3 and then tap Accessories in the menu.

10. Swipe up and down the screen to view fitness hardware accessories from Samsung and partner companies.
11. Tap View More to view more accessories in the Samsung Accessories or Partner Accessories category.
12. Tap the accessory in the list to open the device screen and view the device. Within the device screen you can also get more information from the company website and also register your device on the Galaxy S7.
What Must I Do to Register My Fitness Device?
Before you register your fitness device, you need to turn your device on so your Galaxy S7 can find your device using a wireless technology such as Bluetooth. The Galaxy Apps or the Google Play app may also open so you can install an app on your Galaxy S7 that is necessary to operate the fitness device.
13. If you’re in the device screen, return to the Accessories screen by tapping the Back touch button (not shown).
14. Return to the S Health screen by tapping the Back icon.

Setting Goals and Creating Running Programs
The S Health app has several preset goals, and each goal takes you step by step through setting daily goals such as how many calories to eat in a day. If you’re a runner, there are also several programs that you can initiate in S Health to prepare you to run up to 10 kilometers (10K), or 6.2 miles.
1. Tap More in the menu bar and then tap Manage Items as shown in steps 1 and 2 of the “Add and Remove Trackers” task earlier in this chapter.
2. Tap the Goals tab.
3. Select a goal from Be More Active, Eat Healthier, or Feel More Rested. If you’re already working toward a goal, the In Progress text appears underneath the goal name.

4. The screen you see next depends on the goal you selected. You can follow the step-by-step instructions on the screen to set up your goal, or you can return to the Manage Items screen by tapping the Back touch button (not shown).
5. Tap the Programs tab.
6. Select the type of run you’re looking for. If you’re just getting started, tap Baby Steps to 5K.
7. The next screen you see depends on the program you selected. You can follow the step-by-step instructions for creating a workout program over a period of weeks, or you can return to the Manage Items screen by tapping the Back touch button (not shown).
8. If you decide you don’t want to set a goal or program, tap the Back icon to return to the S Health screen.
