
3. Audio, Video, and Movies

In this chapter, you discover your Android phone’s audio and video capabilities, including how your Android phone plays video and music and how you can synchronize audio and video from your desktop computer or Google Play Music. Topics include the following:
→ Using Google Play Music for music
→ Using the Photos app for pictures and video
→ Renting movies with Google Play Movies
→ Working with YouTube
Your Android phone has strong multimedia capabilities. The large screen enables you to turn your Android phone sideways to enjoy a video in its original 16:9 ratio. You can also use your Android phone to search YouTube, watch videos, and even upload videos to YouTube right from your phone. Android fully embraces the cloud, which enables you to store your music collection on Google’s servers so that you can access it anywhere.
Using Google Play Music
Your Android phone ships with a Google Play Music app, which enables you to listen to music stored on your phone as well as from your collection in the Google Play Music cloud. Using Google Play, you can also find and buy more music.
1. Tap the Play Store icon on the Home screen.

2. Tap to see only what’s offered in the Music category.

3. Tap to sort music by genre.
4. Tap to see top-selling albums.
5. Tap to see new releases.
6. Scroll right to see top-selling songs.
7. Tap to search for music.
8. Scroll down to see more music.

Purchase Music
After you find a song or album you’re interested in, follow these steps to purchase it. Remember that when you purchase music, it does not download to your phone; instead, it’s automatically added to your Google Cloud.
Free Music
Sometimes songs are offered for free. If a song is offered for free, you see the word FREE instead of a price for the song. Even though the song is free, you still need to follow the steps outlined in this section; however, the price is reflected as 0.
Adding a Payment Method
Before you purchase music, you need to make sure that you have a way to pay for it. To do that, you need to add a payment method to your Google Wallet account. Using your desktop computer, browse to http://wallet.google.com and log in. Click Payment Methods, and if you do not already have a valid payment method, click Add a Payment Method. Enter valid debit or credit card information.
1. Tap the price to the right of the song title. If you want to purchase the entire album, tap the price for the album (not shown).

2. Tap Buy.

3. Tap Listen to hear your song after the purchase is complete. The song opens in the Play Music app and streams from your Google Cloud account over the air.

Add Your Existing Music to Google Play Music
You can upload as many as 50,000 songs from Apple iTunes, Microsoft Windows Media Player, or music stored in folders on your computer for free to your Google Play Music Cloud account by using the Google Music Manager app on your desktop computer. If you haven’t already installed Google Music Manager, follow the steps in the “Install Google Music Manager” section in the Prologue of this book.
1. Click (right-click for Windows) the Google Music Manager icon. (This icon is in the Mac menu bar at the top of the screen or in the Windows taskbar at the bottom of the screen.)

2. Choose Preferences. (Use the Options command for Windows.)

3. Click to upload new songs you’ve added since you last used Google Music Manager to upload music.
4. Click to upload the remainder of songs that have not yet uploaded to Google Play Music.
5. Click to upload songs in certain playlists. This works only for iTunes or for Windows Media Player.
6. Choose the playlists to upload.
7. Click Upload after you have made your selections.
8. Click to allow Google Music Manager to automatically upload newly added songs.

How Does Automatic Upload Work?
If you choose to have your music uploaded automatically in step 8, Google Music Manager continually monitors Apple iTunes, Microsoft Windows Media Player, or your Music folders to see when you add music. If it finds new music, Google Music Manager automatically uploads it. (After you install Google Music Manager, the software is always running on your computer.)
What if I Don’t Have iTunes or Windows Media Player?
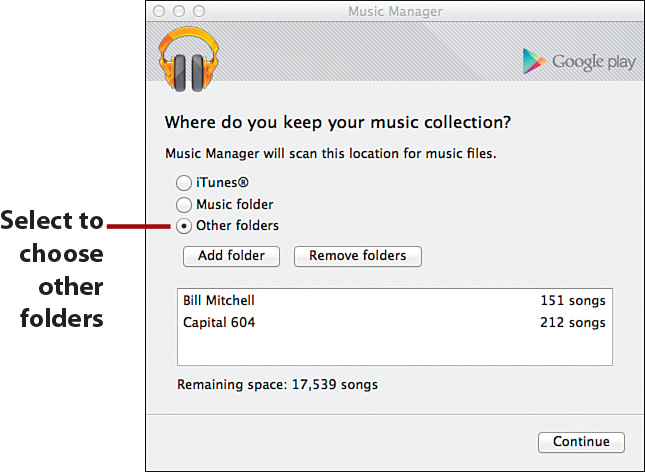
If you don’t have or don’t use Apple iTunes or Microsoft Windows Media Player to store and play your music, Google Music Manager can upload music from folders on your computer. Click the Advanced tab, click Change, and select either Music Folder (to use the folder on your computer called Music) or Other Folders (so you can choose folders where you store your music). Click Add Folder to add a new folder to the list.
Can I Download Music to My Computer?
You can download your entire music collection from Google Play Music to your computer, or just download music you have purchased on your Android phone by clicking the Download tab in Google Music Manager Preferences.

Use the Google Play Music App
Now that you have purchased some music and/or synchronized it from your computer, it’s time to take a look at the Google Play Music app on your Android phone.
1. Tap the Play Music icon on the Home screen.

2. Scroll down to explore the Listen Now screen.
3. Tap to search for music. This includes music loaded on your phone, stored in the Google Cloud, available in All Access (if you subscribe to it), and playing on online radio stations.
4. Swipe in from the left side of the screen to see a menu.

What Is Listen Now?
Listen Now is the first screen you are presented with when you launch the Google Play Music app. This view is dynamically created based on what music you have uploaded, purchased, and listened to. It contains your music, music accessible via All Access, and radio stations. All Access is a subscription service that enables you to access a vast collection of music. As you scroll around the Listen Now screens, you are not visually cued as to what music is on All Access, and what music you have uploaded or purchased; everything is just seamlessly put together. For a free 30-day trial of All Access, use your computer to visit http://play.google.com/about/music/allaccess/#/.
5. Tap to return to the Listen Now screen.
6. Tap to see only music in your music library. This is the music you have purchased and uploaded.
7. Tap to see playlists that you have created and playlists that have been automatically created for you.
8. Tap to browse and create Instant Mixes (previously called Radio Stations) that will play your music. Read more about Instant Mixes later in this chapter.
Instant Mix Naming Confusion
Google seems unsure of what it should call Instant Mixes. In previous versions of Android this was called “Radio Stations.” Then it was renamed to “Instant Mixes.” On some Android phones, instead of Instant Mixes, this is now called “Radio.”
9. Tap to explore music that is available to play and purchase.
10. Tap to switch between showing only music that is already downloaded to your phone or showing music no matter where it resides, including in your Google Cloud account.
11. Tap to change the Google Play Music app settings.

Work with My Library
My Library shows all music you have uploaded from your computer or purchased in the Google Play Store. After tapping My Library, as shown in step 6 of the “Use the Music App” task, continue with the following steps.
Swiping Between Views
As you follow the steps in this task, instead of tapping the view titles, such as Albums and Artists, you can swipe left and right to move between these views.
1. Tap Genres to filter the view by genre. Tap an album name to reveal songs on that album, and then tap a song to play it.
2. Tap Artists to filter the view by artist. Tap an artist’s name to reveal songs by that artist, and then tap a song to play it.
3. Tap Albums to filter the view by album title. Tap an album name to reveal songs on that album, and then tap a song to play it.
4. Tap Songs to filter the view by song title. This shows all songs by all artists. Tap a song to play it.
5. Tap to search for music in your collection.

If you are currently playing music, the bottom of the Google Play Music app shows the information about the song and allows you to pause the song. Tap the song to see more actions, including jumping backward and forward through a playlist.

Work with Playlists
Playlists can be created automatically for you, such as playlists of songs you have given a thumbs up to or music you last added to your library, but you can also manually create playlists. After tapping Playlists as shown in step 7 of the “Use the Music App” task, continue with the following steps.
1. Tap to search for music by song or artist. This does not let you search for a playlist.
2. Tap the Menu icon at the bottom of a playlist to see a list of actions.
3. Tap to shuffle the songs in the playlist.
4. Tap to play the next song in the playlist.
5. Tap to add the playlist and all its songs to the queue of music currently playing.

6. Tap to download the playlist (and all the songs in the playlist) to your phone rather than storing it only in the Google Cloud. This enables you to play the songs even when your phone cannot connect to a Wi-Fi or cellular network.

Creating or Adding to a Playlist
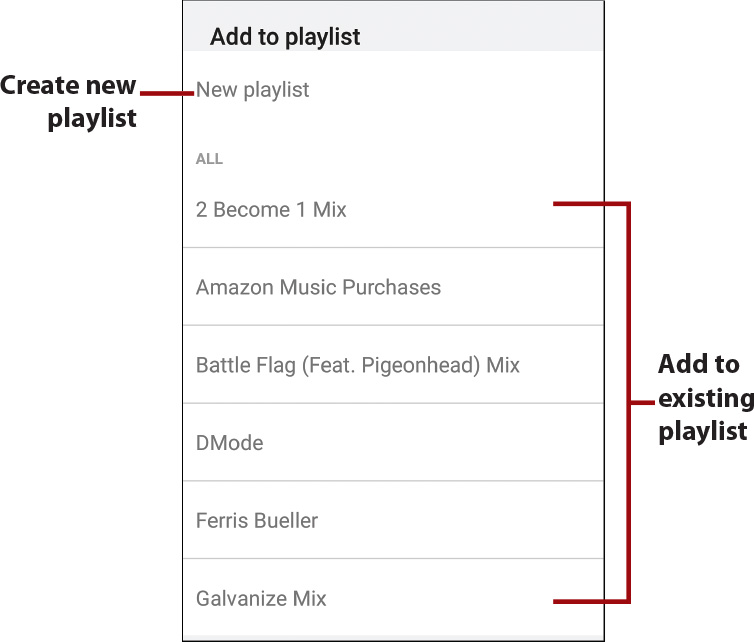
You can create a playlist from any song or add a song to any playlist. Tap the Menu icon to the right of the song and then tap Add to Playlist. When the list of playlists appears, either tap an existing playlist or tap New Playlist and provide a playlist name.

Edit or Delete Playlists
1. Tap the playlist you want to edit or delete.
2. Swipe a song left or right off the screen to remove it from the playlist.
3. Reposition a song in the playlist by dragging it up and down using the song anchor.

4. Tap the Menu icon to see more actions.
5. Tap to delete the playlist.

Work with Instant Mixes
Instant Mixes (previously called Radio Stations) are like channels that play music based on artist, genre, or some other shared criterion.
1. Swipe in from the left of the screen and tap Instant Mixes.

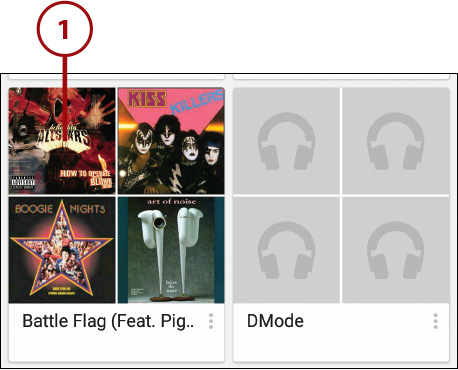
2. Tap a mix’s thumbnail to start playing that Instant Mix.
3. Tap to see mixes that you have created.
4. Tap to see a list of mixes that are generated based on music you have purchased and listened to in the past.
5. Tap to add your own new Instant Mix.

Create Your Own Instant Mixes
You can create your own Instant Mixes based on an artist, song title, or genre. After you create a mix, it plays music from the artist or song you selected, but it also plays other similar songs. Use the following steps after tapping the plus symbol, as described in step 5 in the previous section.
1. Type the name of a song, artist, album, or music genre.
2. Tap a mix that matches your search. This example uses the sound track for the movie Ferris Bueller’s Day Off. The mix should start playing immediately.

3. Tap the Music Queue icon to view and edit the list of songs queued up to play.

4. Swipe a song left or right off the screen to remove it from the mix.
5. Reposition a song in the queue by dragging it up or down by the song anchor.

Control Playback
While your music is playing, you have some control over how a song plays and the selection of music that is queued to be played.
1. Tap to jump to the previous song in the album, playlist, or mix.
2. Tap to jump to the next song in the album, playlist, or mix.
3. Tap to pause the song. The button turns into the Play button when a song is paused. Tap again to resume playing a paused song.
4. Tap to indicate that you like the song. The Google Play Music app adds the song to the Thumbs Up playlist.
5. Tap to indicate that you do not like the song.

6. Tap to enable or disable song shuffling. When Shuffle is enabled, songs in the current playlist or album are randomly played. The Shuffle icon is not available when you are playing an Instant Mix.
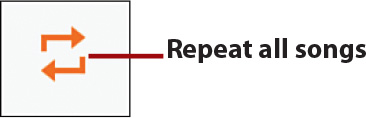
7. Tap to enable repeating. Tap once to repeat all songs; tap again to repeat the current song only; tap again to disable repeating. The Repeating icon is not available when you play an Instant Mix.
8. Drag right and left to skip forward and backward through the song.

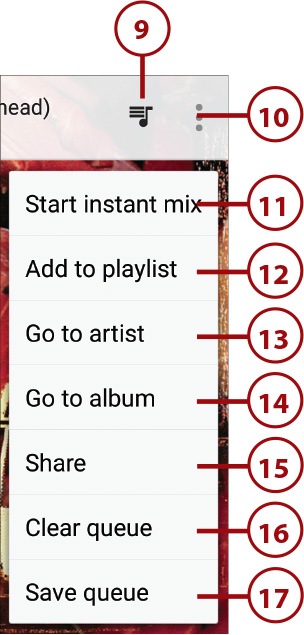
9. Tap to see and manage the list of songs in the album, playlist, or Instant Mix.

10. Tap the Menu icon to see more options.
11. Tap to make a new Instant Mix based on the song.

12. Tap to create a playlist and add the current song to it or add the song to an existing playlist.
13. Tap to show all songs by the artist.
14. Tap to show the album this song is on, and all songs you have purchased from the album.
15. Tap to share the link to the song on Google+.
16. Tap to clear the queue of songs you made earlier and stop playing the current song. If you didn’t make a queue, the current song stops playing.
17. Tap to save the Now Playing queue if you made any changes.
What Does Start Instant Mix Do?
If you are playing a song and choose the Start Instant Mix option, the Google Play Music app creates a new Instant Mix and adds songs to it that are similar to the one that’s currently playing. The name of the mix becomes the name of the current song.
What Is the Queue?
The queue is mentioned in step 16, but what is the queue? Essentially, the queue is the Now Playing queue, a dynamic playlist that you can add songs to so that they are queued up to play one after the other. To add music to the queue, tap the Menu icon to the right of a song, playlist, or album and choose Add to Queue. This puts the song at the bottom of the current Now Playing queue. To have that song play as the next song in the queue, choose Play Next.
Work and Listen to Music
You don’t have to keep the Google Play Music app open while you play music; you can switch back to the Home screen and run any other app while you still have the ability to control the music. The following steps work from the Home screen, while any app is running, or from the Lock screen.
1. While on any screen, pull down the Notification panel. If you are on the Lock screen, you can skip this step because notifications are always visible in the middle of the screen.
2. Tap to pause the song.
3. Tap the song title to open the Google Play Music app for more control.

4. Tap to jump to the next song in the list, album, or playlist.
5. Tap to jump to the previous song in the list, album, or playlist.
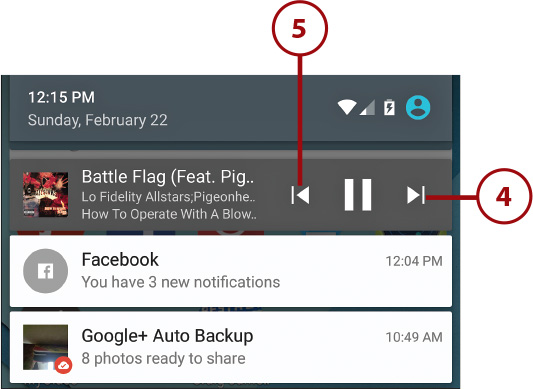
6. Use two fingers and swipe down on the music control to expand it.

Listen to Music with No Wireless Coverage
As established earlier in the chapter, if you utilize Google Play Music to store your music in the Google Cloud, when you play that music on your Android phone, it is actually streaming over the Wi-Fi or cellular data network. If you know that you are going to be in an area without coverage but still want to listen to your music, follow these steps.
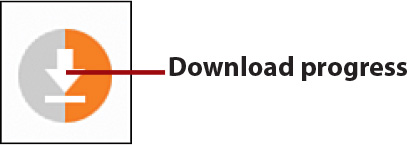
1. Tap the Download icon while viewing an album, song, or playlist.
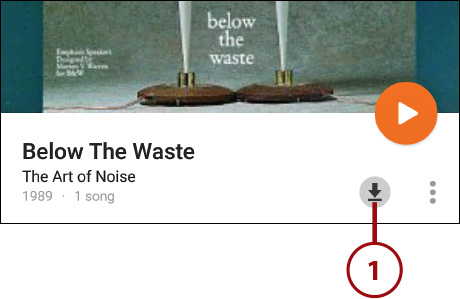
2. The Download icon indicates the progress of the download. The amount of orange on the icon shows the progress of the download. The down arrow changes to a check mark when the download has completed.

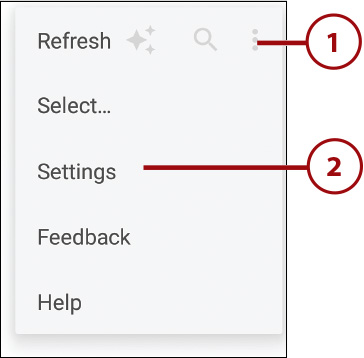
2. Tap Settings.

3. Tap to change the Google account being used for Google Play Music. You can also add a new Google account to be used with the Play Music app.
4. Tap to manually refresh the list of music shown on your Android phone.
5. Tap to subscribe to Google’s All Access plan that gives you access to Google’s 30-million-song collection. Tap to cancel your monthly All Access subscription, if you have one.
6. Tap to manage the devices you use to access your music. Google allows up to ten devices.
7. Tap to manage the audio equalizer settings.
8. Tap to enable or disable blocking explicit songs when listening to Instant Mixes.
9. Scroll down for more settings.

Trial All Access?
On some Android phones, step 5 may offer you a trial of Google’s All Access plan. After the trial period, you can choose to cancel or continue using the plan.
10. Tap to enable or disable caching of streamed music. When this is enabled, music you listen to is temporarily stored on your Android phone, so if you play one of the songs again, it plays it straight from memory.
11. Tap to enable or disable automatically caching music when you have your phone charging and connected to a Wi-Fi network. This setting refers to music you have chosen to store locally on your phone.
12. Tap to clear the local music cache. This removes all music you have previously chosen to be stored locally.
13. Check the box to only download music while connected to Wi-Fi, and not while connected to the cellular data network.
14. Tap to see the download queue. When you choose to make music available offline, that music is queued for download. You can see the download progress here.
15. Check the box to download music to your Android Wear smartwatch. See more about using Android Wear and playing music from your watch in Chapter 15, “Using Your Android Phone with an Android Wear Smartwatch.”
16. Scroll down for more settings.

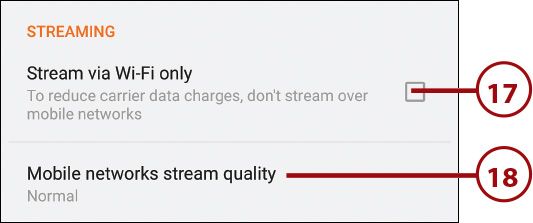
17. Check the box to only stream music while connected to Wi-Fi, and not while connected to the cellular data network.
18. Tap to change the audio quality when streaming music over cellular data networks. Your choices are Low, Normal, and High. The higher the audio quality, the more data needs to stream.
19. Tap to save your changes and return to the Play Music app’s main screen.

Adjust the Equalizer
The Google Play Music app has a graphic equalizer that enables you to select preset audio configurations or set your own. As is shown in step 7 in the previous task, tap Equalizer in the Settings screen and use the following steps to use or adjust the equalizer.
1. Tap to turn the Equalizer on/off.
2. Tap to select from a list of preset equalizer settings such as Dance, Hip Hop, and many more.
3. Drag the frequency response sliders to enhance or de-emphasize certain frequencies.
4. Drag the slider to adjust the Bass Boost. The Bass Boost setting is only available when you are using headphones.
5. Drag the slider to adjust the Surround Sound effect, which helps the music sound like it’s surrounding the listener.

Recording Videos with the Camera Application
The Camera application enables you to take pictures and record video. This chapter covers the video-recording feature of the Camera app. Chapter 14, “Taking and Managing Pictures,” covers information on using the Camera app to take pictures (including Panorama and Photo Spheres).
Record Video
1. Tap to launch the Camera app.
2. Swipe in from the left of the screen to see the Camera options.
3. Tap the Video icon to select the video camera mode.

4. Tap to start recording video. Tap the icon again to stop recording.

Change Video Settings
Before you record a video, you can change some settings that can alter how the video is recorded or configure it to record Time Lapse video.
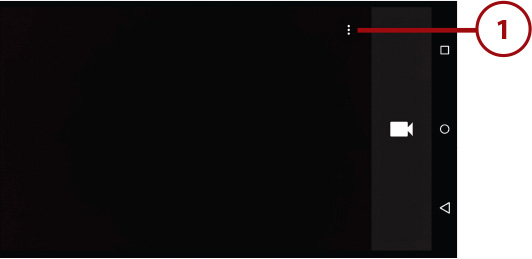
1. Tap the Menu icon.
2. Tap to turn the grid pattern on or off. The grid pattern is seen only in the view finder view to help you line objects up in the shot; it does not appear on your final video.
3. Tap to switch between the front-facing and rear-facing cameras (if your phone has both cameras).
4. Tap to use the rear LED flash as a light while recording video.
5. Tap anywhere on the screen to close the settings.

6. Swipe in from the left of the screen.
7. Tap the Settings icon.

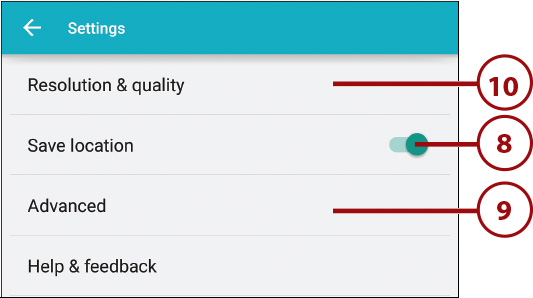
8. Tap to enable or disable storing your current geographic location with the video that you record.
9. Tap Advanced to enable or disable manual exposure. This feature only works when using the still camera mode, not video recording.
10. Tap to change the format of video recorded by the rear-facing or front-facing cameras.
11. Tap to select the format of the video for the rear-facing camera. You can choose Ultra High Definition (UHD, also known as 4K), 1080p High Definition, 720p High Definition, or 480p Standard Definition. The exact choices available are dependent upon the rear camera’s capabilities on your phone.
12. Tap to select the format of the video for the front-facing camera. You can choose 1080p High Definition, 720p High Definition, 480p Standard Definition, or a low-quality CIF format, which is 325×288 pixels. The exact choices available are dependent upon the front camera’s capabilities on your phone.
13. Tap to return to the main camera Settings screen.

Play Videos
If you have personal videos you have recorded or people have sent you, use the following steps to find them and play them.
1. Tap the Photos icon to launch the Photos app.

2. Swipe in from the left of the screen to see the list of photos and videos in different locations.
3. Tap Videos to filter the Photos app view to only show videos.

4. Tap a video to open it.

5. Tap to edit the video. This feature did not work at the time this book was written.
6. Tap to delete the video.
7. Tap to share the video on YouTube; on social media including Facebook, Instagram, or Google+; via Beam; via Bluetooth; or via email.
8. Tap to start playing the video.

9. Tap the screen while the video is playing to reveal the video controls.
10. Tap to pause or unpause the video.
11. Drag the slider to quickly skip forward and backward.
12. Tap to skip back five seconds.
13. Tap to skip forward five seconds.
14. Rotate your Android phone sideways to allow the video to fill the screen.

Share Videos
You can share videos with people from the Photos app. The list of methods of sharing is dependent on the applications you have installed on your Android phone. Many sharing methods require that you already have an account on the service you want to share on, including YouTube, Google+, Instagram, Facebook, and Path.
1. Touch and hold the video you want to share. You see a check mark on the video indicating that it is selected. Tap additional videos you want to share if you want to share more than one.

2. Tap the Share icon to see all the ways you can share the video(s). The list of choices is dependent on the apps you have installed.

3. Tap to send the video via Bluetooth. This allows you to send the video to another device (of any kind) using Bluetooth.
4. Tap to share the video on YouTube. This allows you to upload the video to your YouTube account.
5. Tap to share the video on Google+ to certain people, your circles, or share it publicly so everyone can see it.
6. Tap to share the video with specific people you know on Google+.
7. Tap to share the video with specific Google+ Circles.
8. Tap to share the video publicly on Google+.
9. Tap to email this video using Gmail.
10. Tap to upload the video to your Google Drive account.
11. Tap to share the video on the Path social network.
12. Tap to share with another person using Android Beam.
13. Tap to share the video on the Facebook social network.

Many phones do not accept incoming Bluetooth files, but devices like computers do. Even on computers, the recipient must configure her Bluetooth configuration to accept incoming files.
Uploading or Sharing Multiple Videos
You can share or upload multiple videos at the same time, instead of one by one. After you touch and hold a video, tap more videos to add them to your list. When you select more than one video to share, however, the option to share on Facebook is disabled because you can only upload videos to Facebook one at a time. After you reduce your list of videos to share to only one video, the Facebook sharing option returns.
Delete Videos
1. Touch and hold the video you want to delete. Tap additional videos or photos if you’d like to delete more than one file at a time.
2. Tap the Trash icon to delete the video(s).

Undeleting a Video
After you delete a video, you have six seconds to change your mind and undo the delete. Within six seconds, tap the Undo button to restore your deleted video(s).

2. Tap Settings.
3. Tap to change your Google account Auto Backup settings. Auto Backup automatically makes backup copies of your photos and videos to your Google+ account. They remain private and cannot be seen by others.

4. Tap to turn Auto Backup on or off.
5. Tap to change the Google account used for Auto Backup, if you have more than one account.
6. Tap to change the size of the photos that are uploaded. You can choose Standard or Full. Full size is the untouched full resolution photo, whereas Standard is a greatly reduced quality photo meant for quick sharing.
7. Tap to purchase more storage if your free storage is starting to fill up.
8. Scroll down for more settings.

9. Tap to select whether to back up photos only when on a Wi-Fi network, or over cellular data and Wi-Fi networks.
10. Tap to select whether to back up videos only when on a Wi-Fi network, or over cellular data and Wi-Fi networks. If you change the setting in step 9 to Wi-Fi only, this setting is grayed out.
11. Tap to indicate whether it’s okay to back up photos and videos while you are roaming on cellular data outside your home area.
12. Tap to select whether you want to back up your photos and videos only when your phone is charging.
13. Tap to back up all photos and videos immediately.
14. Tap to save your changes and return to the main Photos settings screen.

15. Tap to change your Google account settings for Photos.

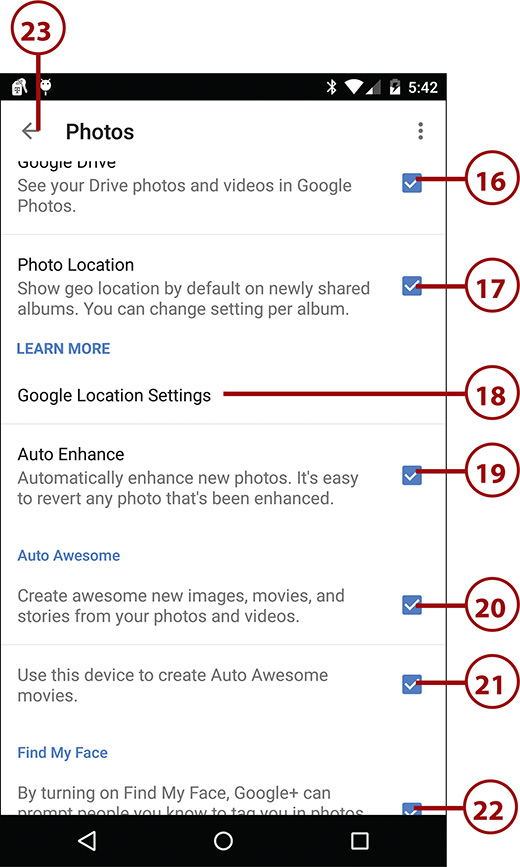
16. Tap to choose whether the Photos app should show any photos and videos that you have stored in your Google Drive.
17. Tap to choose whether you want the Photos app to show the geographic location of where newly uploaded photos and videos were taken. The accuracy of that geographic location is set in the next step.
18. Tap to change how accurately your geographic location is reported when you take photos or videos.
19. Tap to choose whether you want your photos and videos automatically enhanced when they are backed up to Google. If enabled, Google automatically modifies your photos to make them look better.
20. Tap to choose whether Google can automatically create Auto Awesome images, movies, and stories using your photos and videos that are backed up. The Auto Awesome images, movies, and stories are only viewable by you unless you choose to share them with others.
21. Tap to choose whether you want to use this phone to create Auto Awesome images, movies, and stories, instead of relying on the Google servers.
22. Tap to choose whether you want Google to prompt your friends to tag you in photos it can see that you are in.
23. Tap to save your changes and return to the main Photos settings screen.
Changing How Your Phone Determines Your Location
When you tap Google Location Settings, you can choose High Accuracy, which uses GPS, mobile networks, and nearby Wi-Fi networks to determine your location; Battery Saving, which uses only nearby Wi-Fi networks and mobile networks to determine your location; or Device Only, which uses only the GPS chip in your phone to determine your location.
My Phone Has the Gallery App
Android phones used to ship with the Gallery app. This app handled all photos and video on the phone, but has been replaced by the Photos app. Although Google has moved away from the Gallery app (in fact, you cannot find it in the Google Play Store anymore), some phone vendors who heavily modify Android (such as Samsung) still ship their phones with a modified version of the Gallery app. They do this because they have integrated certain vendor-specific features into the Gallery app. The Gallery app has many of the same functions as the Photos app, so the steps you see for the Photos app work for the Gallery app as well.
Managing Movies and TV Shows
Google Play enables you to rent and purchase movies. (Most movies are available only as rentals.) You can also buy TV shows—even whole season passes of TV shows.
Buy and Rent Movies
As with music, when you buy or rent movies, they remain in the Google Cloud and stream to your phone when you want to watch them.
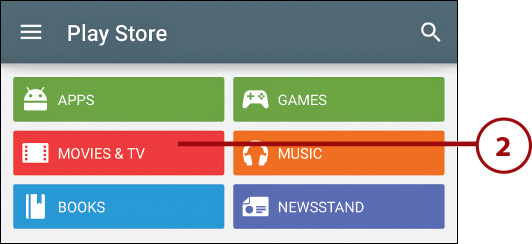
1. Tap to launch Google Play.


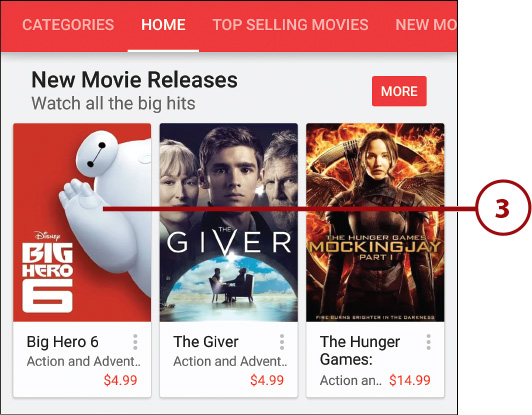
3. Scroll through the movie options, or use the Search icon to look for a specific title. Tap a movie title when you find one you want to watch.
4. Tap to watch a trailer of the movie.
5. Scroll down to see information about the movie, including other viewers’ reviews and ratings. You can also add your review and rating. If you see a red tomato icon, this means that the Rotten Tomatoes score is included in the reviews.
6. Tap to add the movie to your Wishlist.
7. Tap to buy the movie in either Standard Definition (SD) or High Definition (HD).
8. Tap to rent the movie in either Standard Definition (SD) or High Definition (HD).

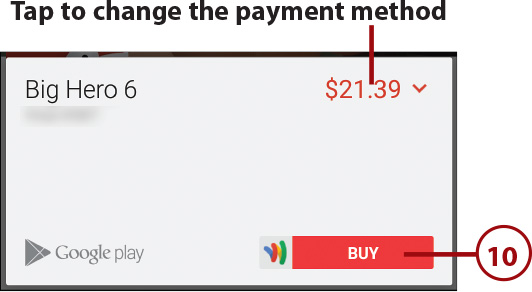
9. Choose whether you want to buy or rent the High Definition (HD) or Standard Definition (SD) version of the movie. In this example, we are buying the movie.

10. Tap to accept and buy or rent the movie. This example is about buying the movie.
Adding a Payment Method
Before you purchase or rent movies, you need to make sure that you have a way to pay for it. To do that, you need to add a payment method to your Google Wallet account. Using your desktop computer, browse to http://wallet.google.com and log in. Click Payment Methods, and if you do not already have a valid payment method, click Add a Payment Method. Enter valid debit or credit card information. Some cellular providers allow you to add your Google purchases to your bill.
11. Tap to first download the movie to your phone so that you can watch it when you are not in Wi-Fi or cellular data coverage. If you purchased an HD version of the movie, you are asked whether you want to download the SD or HD version. (The HD version is a larger file.)
12. Tap to start watching the movie. This streams the movie to your phone from the Google Cloud.

If you choose to download the movie you rented or purchased because you know you want to watch it when you will be out of Wi-Fi or cellular data coverage (on a plane, for example), you can see the progress of the movie download right on the screen. Wait until it shows Downloaded before you move out of Wi-Fi or cellular data coverage. You can also pull down the Notification panel to see the progress of your download. To cancel the movie download, tap the Push Pin icon.

Buy TV Shows
As with music and movies, when you buy TV shows, they remain in the Google Cloud and stream to your phone when you want to watch them.
1. Tap to launch Google Play.

2. Tap Movies & TV.
3. After browsing the available TV shows or searching for a specific show, tap a show title.

4. Tap to expand the synopsis.
5. Tap a star to rate the TV show yourself.
6. Tap to change the season if the TV show has multiple seasons.
7. Tap to buy the entire season. When you buy a season that is not yet complete, as new episodes air on TV you automatically have access to them on your phone.
8. Tap to buy just one episode. The rest of the example is for a single-episode purchase.

9. Tap to buy the Standard Definition (SD) version of the TV show season or episode. SD is lower quality.
10. Tap to buy the High Definition (HD) version of the TV show season or episode. HD is the best quality.

11. Tap Buy to complete your purchase.

Adding a Payment Method
Before you purchase TV shows, you need to make sure that you have a way to pay for it. To do that, you need to add a payment method to your Google Wallet account—if you haven’t already done so. Using your desktop computer, browse to http://wallet.google.com and log in. Click Payment Methods, and if you do not already have a valid payment method, click Add a Payment Method. Enter valid debit or credit card information.
Use the Play Movies & TV App
When you watch movies and TV shows, they are actually playing inside an app called Play Movies & TV. You can launch this app when you want to watch movies and TV shows you have previously purchased or rented.
1. Tap to launch Play Movies & TV. You should see the Watch Now screen.

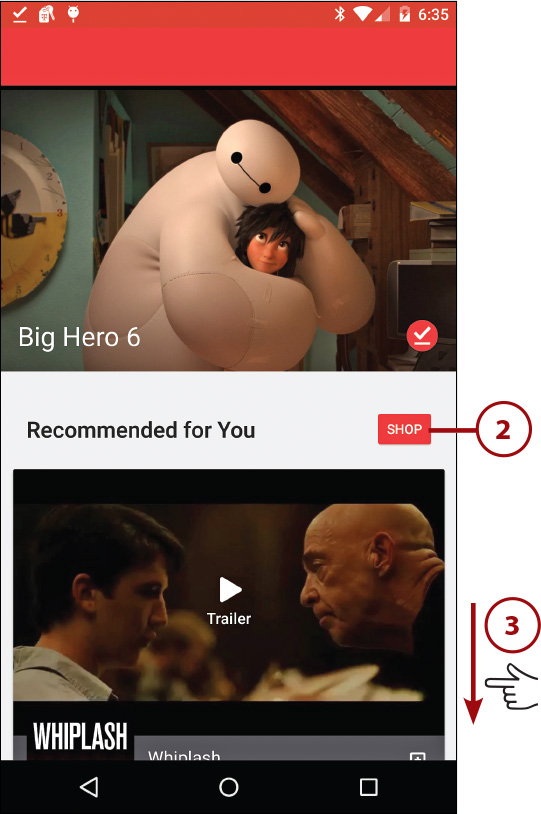
2. Tap to find more movies or TV shows in the Google Play Store.
3. Scroll down to see movies and TV shows Google recommends for you based on what you have previously searched for, rented, or purchased.
4. Swipe in from the left of the screen to reveal the menu.
5. Tap My Library to see only movies you have purchased or rented no matter whether they are physically located on your phone or still in the cloud.
6. Tap to see movies and TV shows that you have added to your Wishlist.
7. Tap to shop for more movies or TV shows in the Google Play Store.
8. Tap to change the settings for the Play Movies & TV app. See the next section for an explanation of the settings.

Change Play Movies & TV Settings
1. Check the box to choose whether you want to see information about actors and songs featured at the current position in the movie or TV show you have paused.
2. Tap to choose to play back the original language from the movie or TV show, or try to force the playback of English audio when it’s available.
3. Tap to enable or change the way Captions (Closed Captioning) looks systemwide (in this app and all other apps).
4. Check the box to show a warning when you are about to stream content over the cellular data network.
5. Check the box to restrict the quality of the media you are streaming to lower-quality Standard Definition (SD) when streaming over a cellular data network.
6. Scroll down for more settings.

7. Tap to manage downloaded movies and TV shows. You can delete them to free up space and view any downloads already in progress.
8. Tap to choose whether to download media over only Wi-Fi or over both Wi-Fi and cellular networks.

9. Tap Quality to choose whether to default to downloading High Definition (HD) content or Standard Definition (SD) content.
10. Tap to choose whether you want to hear 5.1 Surround Sound if the content you are playing supports it.
11. Tap to play a short demo of how 5.1 Surround Sound works.
12. Tap to save your changes and return to the Movies & TV main screen.

Copy Videos from Your Computer
You can copy videos from your computer to your Android phone via the USB cable. You start by creating a folder on your phone to store the videos and then you drag them from your computer to the new folder.
Copy from a Windows Computer
1. Connect your phone to your PC using the supplied USB cable. Your phone shows up as an option in Windows Explorer.
2. Click the phone. This example uses a Google Nexus 7.


3. Click Internal Storage to expand the list of folders on your phone.
4. Right-click in the right pane.
5. Select New Folder.
6. Type a name for your new folder. The sample folder is My Videos.


7. Click the newly created folder in the left pane.
8. Drag a movie from another folder on your PC to the new folder.
Copy from an Apple Mac OS X Computer
To copy files from your Mac to your phone, you must install Android File Transfer. You should have done this already, but if not, please follow the instructions in the Prologue earlier in this book.
1. Connect your phone to your Mac using the supplied USB cable. Android File Transfer automatically launches.
2. Click File.
3. Select New Folder.

4. Type a name for your new folder The sample folder is My Videos.
5. Drag a movie from another folder on your Mac to the new folder.


Watching Videos with YouTube
Your Android phone comes with a YouTube app that enables you to find and watch videos, rate them, add them to your favorites, and share links to YouTube videos. The YouTube application even enables you to upload new videos.

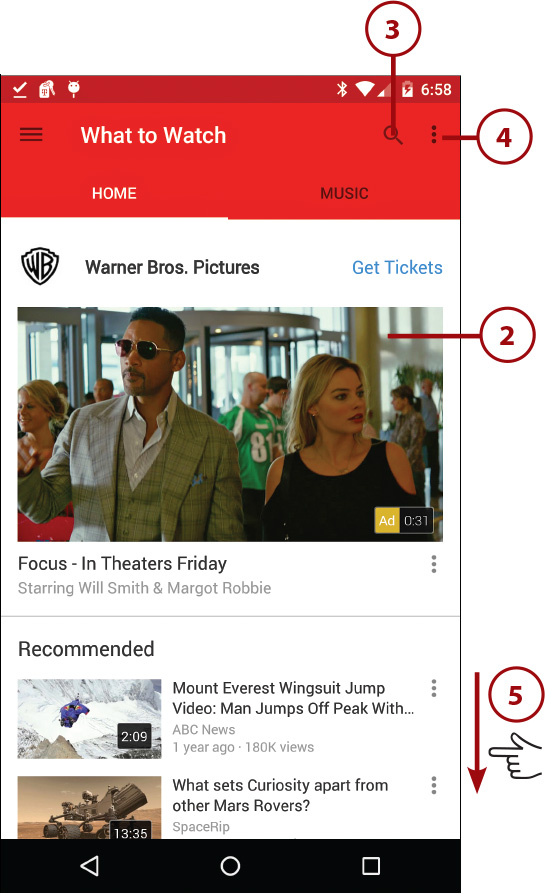
2. Tap a video to open it.
3. Tap to search for a video on YouTube.
4. Tap to change the YouTube app settings.
5. Scroll down to see all videos in your What to Watch feed.
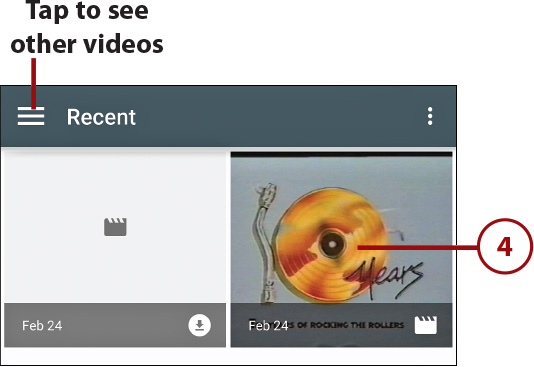
2. Tap My Subscriptions to see a mixture of videos from YouTube channels you subscribe to.
3. Tap to see videos you have uploaded to YouTube.
4. Tap to see your YouTube history, including videos you have previously watched.
5. Tap to see a list of videos you have chosen to watch later. You find out how to set videos to be watched later in the next section.
6. Tap to see movies and TV shows you have previously purchased in the Google Play Store. You can play that content in YouTube.
7. Tap one of your YouTube playlists to see videos that have been added to it.
8. Scroll down for more options.

9. Tap one of the channels you subscribe to in order to see videos in it.
10. Tap to browse YouTube channels.
11. Tap one of the Best of YouTube categories to see videos in that category.

Play a Video
While playing a YouTube video, you can rate the video, read video comments, and share the video with someone.
1. Tap on the playing video to see options.
2. Tap to share a link to this video. You can share it on Facebook, Twitter, Google+, or by more traditional ways, such as email and text message.
3. Tap to add this video to your favorites, save the video to an existing or new YouTube playlist, or add the video to your Watch Later queue.
4. Tap to give this video a thumbs up. Thumbs up tells the video’s creator that you liked the video.
5. Tap to give this video a thumbs down. Thumbs down tells the video’s creator that you disliked the video.
6. Scroll down to read and post comments for this video. You can also see suggested videos. YouTube suggests videos that are related to the one you are watching based on content and keywords.
7. Tap to choose whether you want to show the Closed Captions (CC), play the Standard Definition (SD) or High Definition (HD) version of the video, or flag the video as inappropriate.

8. Tap to pause the video.
9. Tap to subscribe to the YouTube Channel where this video is found.

Viewing Videos Full Screen
To view a video at a larger size, simply rotate your Android phone, and the video will be played in Landscape mode.
Swiping Videos Away
While playing a video in a window (not full screen), if you swipe it down, it moves to the bottom right of the screen as a thumbnail. Swipe the thumbnail of the video up to make it large, or swipe it left to dismiss it.
Upload a Video
You can upload one of your personal videos to YouTube. When uploaded, you can share the video with others.
1. Swipe in from the left of the screen to reveal the menu.
2. Tap Uploads. You see videos that you have previously uploaded to YouTube.


4. Select a video to upload from videos you have stored in the Photos app.

Modifying Properties of Uploaded Videos
You can edit the YouTube properties of videos that you have previously uploaded. While in the Uploads screen, tap the Menu icon to the right of a video, then tap Edit.
5. Tap to enter a title for your video.
6. Tap to enter a description for your video.
7. Tap to choose whether the video is private, public, or unlisted.
8. Tap to add any tags or keywords so that your video shows up in the results when people search using the tags you enter.
9. Tap to upload your video.

You Can Trim Some Videos Before Uploading
If you have recorded the video you are planning to upload to YouTube, you can trim the video. Blue trim handles on a video indicate that it is editable. Drag the trim sliders left and right to trim your video. To trim with more precision, touch and hold the sliders and then drag them.

Change YouTube Settings
You can clear your YouTube search history, set the video caption font size, or choose the SafeSearch Filter using the YouTube application’s Settings screen.
1. Tap the Menu icon.
2. Tap Settings.

3. Tap General to choose whether to prioritize videos from a specific country, specify whether you want videos with restricted content to be hidden when you search, whether to send Google anonymous data about your YouTube usage, and whether you want to receive notifications about YouTube content.
4. Tap to manage connected TVs.
5. Tap to clear your YouTube search and watch history, or to temporarily pause your device from keeping track of your search history.
6. Tap to choose how Captions (Closed Captioning) look in the YouTube app.


