
P. Getting to Know Your Android Phone

In this chapter, you become familiar with the external features of a typical Android phone and the basics of getting started with the Android operating system. Topics include the following:
→ Your Android phone’s external features
→ Fundamentals of Android 5.0 (Lollipop)
You can start to get to know more about your Android phone by examining the external features, device features, and how Google’s latest operating system—Android 5.0 (Lollipop)—works.
One important thing to remember about any Android phone bearing the Nexus name is that it is a pure Android phone with no wireless carrier or vendor modifications. This book refers to this unchanged version of Android, but where appropriate some vendor-specific information is included, too.
Your Android Phone’s External Features
Becoming familiar with the external features of your Android phone is a good place to start because you will be using them often.
Front
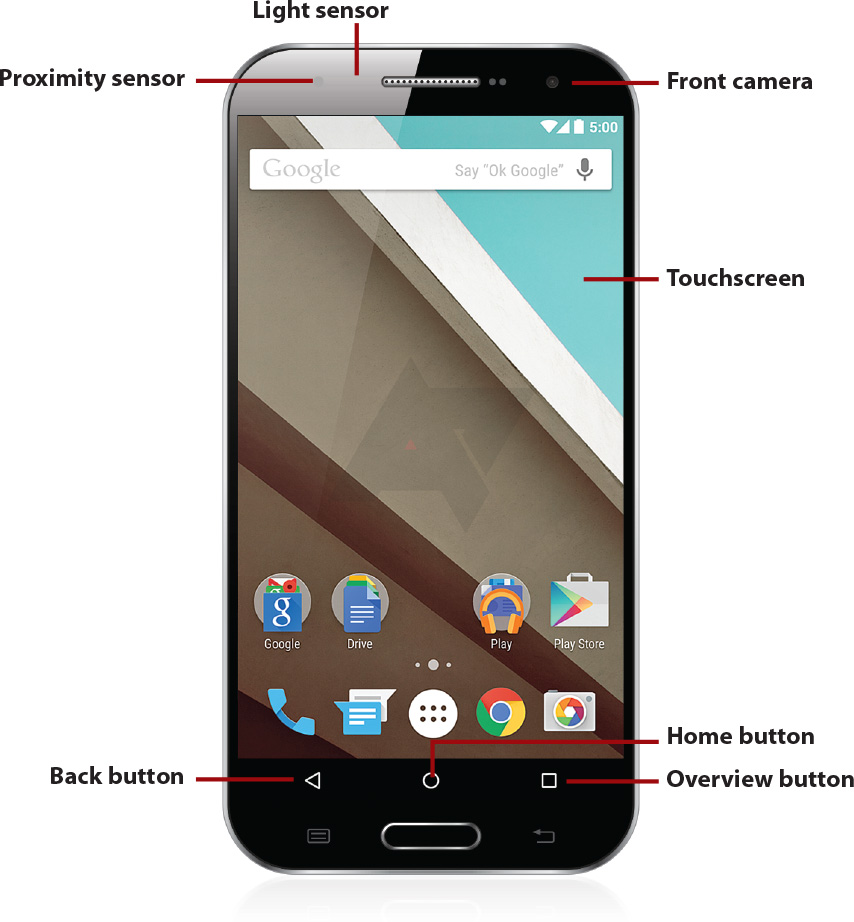
Proximity sensor Detects when you place your phone against your head to talk, which causes it to turn off the screen so that your ear doesn’t inadvertently activate things on the screen.
Light sensor Normally placed near the front camera, it adjusts the brightness of the screen based on the brightness of the ambient light.
Front camera Front-facing camera that you can use for video chat, taking self-portraits, and even unlocking your Android phone using your face.
Touchscreen The Android phone has a screen that incorporates 10-finger capacitive touch. The exact physical dimensions, technology used, and resolution of the screen differ depending on which vendor makes and sells the phone.
Back button Tap to go back one screen when using an application or menu. This virtual button is actually on the screen; however some vendors place a touch-sensitive Back button below the screen.
Overview button Previously called the Recent Apps button, tap it to see a list of recently used apps and switch between them. This virtual button is actually on the screen. Some vendors, such as Samsung, HTC, and others, modify Android so that this virtual button is removed. These vendors normally require that you touch and hold the Home button to see recent apps or they have a dedicated Recent Apps/Overview button under the screen.
Home button Tap to go to the Home screen. The application that you are using continues to run in the background. This virtual button is actually on the screen; however, some vendors, such as Samsung, HTC, and others, place an actual physical Home button below the screen.
Menu button Some vendors, such as Samsung, HTC, and others, keep the Menu button even though it is a hold-over from a much older version of Android. Tap the Menu button to see a context-aware menu of options based on the screen or app you are using.
Google creates Android, and in older versions of Android, many devices that ran Android used physical buttons and even featured trackballs for navigation. More recent versions of Android have moved the physical buttons onto the screen as virtual buttons. Android also no longer has a Menu button (virtual or not), opting for a Menu icon in each app. However some vendors, such as Samsung, HTC, and others, have chosen to implement buttons using their own design. Samsung has chosen to keep the physical Home button on all its devices. Samsung (as well as some other vendors) also has kept the Back and Overview/Recent Apps buttons below the screen. Depending on the model of phone you own, you may have an Overview/Recent Apps button or a Menu button. These are some variations you might see.

Back
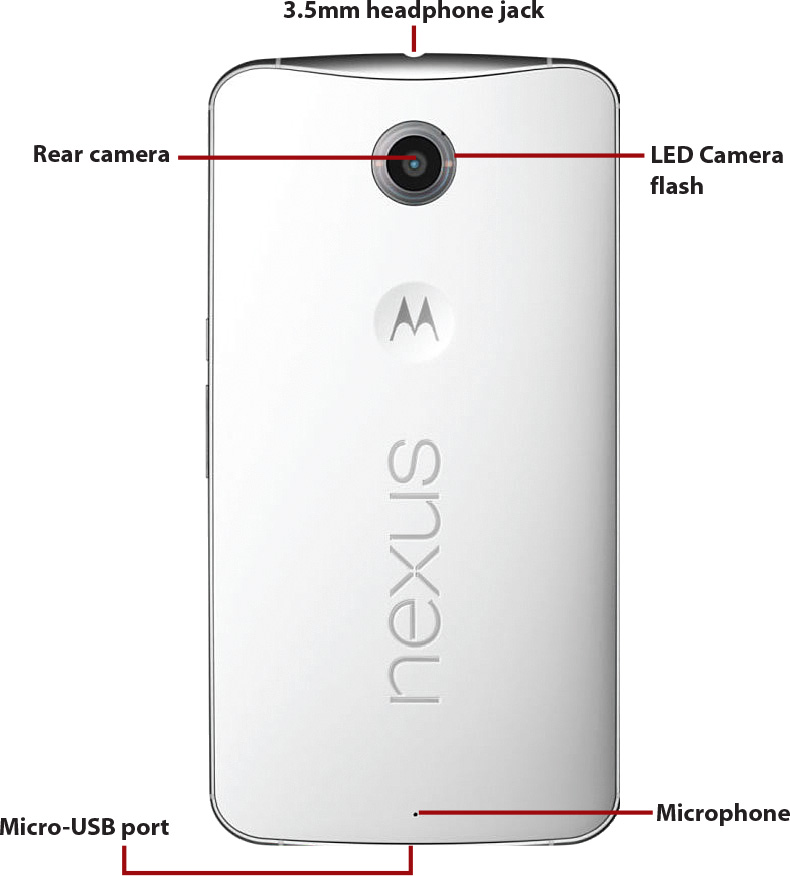
Microphone Used for video and audio calls (using apps such as Skype or Google Talk) and recording video. The actual placement of this microphone differs between manufacturers. This microphone is also used for noise cancelling while you are on a phone call.
3.5 mm headphone jack Used with third-party headsets so that you can enjoy music and talk on the phone. The actual placement of the headphone jack differs based on the manufacturer of the phone.
Micro-USB port Used to synchronize your Android phone to your desktop computer and charge it. The placement of the Micro-USB port differs based on the manufacturer of the phone. Some manufacturers are starting to include a Micro-USB 3 port, which is slightly longer. Your Android phone’s Micro-USB port may include technology that allows you to plug your phone directly into your TV to play content on it.
LED camera flash Illuminates the area when you’re taking photos or recording video. In this example the LED flash is contained in the ring around the camera; however, the vast majority of Android phones have an LED flash either alongside or under the camera.
Rear camera Rear-facing camera. The exact lens type, sensor resolution, and aperture differ based on who makes and sells the phone.
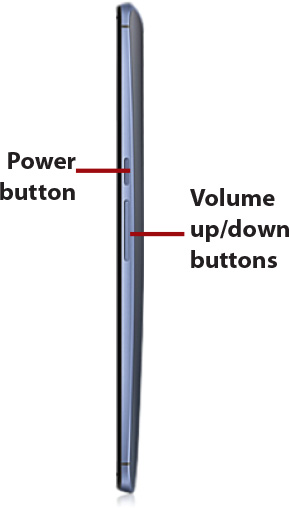
Power button Press once to wake your Android phone. Press and hold for 1 second to reveal a menu of choices. Depending on the manufacturer of the phone, the choices enable you to put your Android phone into silent mode, airplane mode, or power it off completely. The location of the Power button differs based on the phone manufacturer.
Volume up/down buttons Control the audio volume on calls and while playing audio and video. The location of the volume buttons differs based on the phone manufacturer.
Other Sensors and Radios
Your Android phone includes a Wi-Fi (WLAN) radio for connecting to your home or office networks or to Wi-Fi hotspots in airports, coffee shops, and even on planes. It also has a Bluetooth radio for connecting Bluetooth accessories such as headsets. Most Android phones include a Near Field Communications (NFC) radio for mobile payments and swapping information between other Android devices. On the sensor front, your Android phone probably has an accelerometer for detecting movement, a compass for directional awareness, a gyroscope for assisting with movement detection and gaming, a Global Positioning System (GPS) for detecting where you are on the planet, and, in some cases, a Hall Sensor for detecting a magnetic field. Finally, your Android phone will include radios for connecting to cellular voice and data networks. These could include GSM, GPRS, CDMA, WCDMA, and LTE.
First-Time Setup
Before setting up your new Android phone, it is advisable that you have a Google account. This is because your Android phone running Android is tightly integrated into Google and enables you to store your content in the Google Cloud, including any books and music you buy or movies you rent. If you do not already have a Google account, head to https://accounts.google.com on your desktop computer and sign up for one.
You Need Connectivity
You need to connect to a Wi-Fi network, or make sure that your Android phone can connect to the cellular data network, when using the following steps to set it up. It is recommended that you connect to a Wi-Fi network due to the amount of data that may be used after the phone finishes its setup and starts updating apps.
1. Press the Power button until you see the animation start playing.
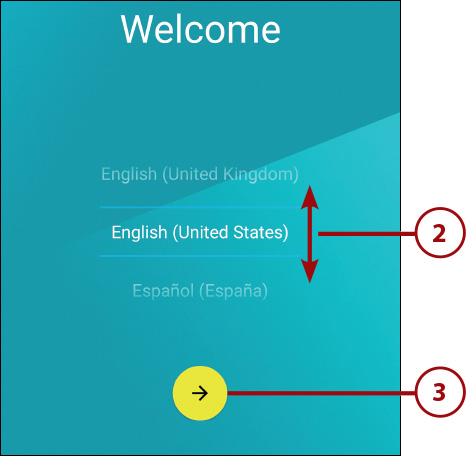
2. Swipe up or down to change your location if needed.
3. Tap to start the setup process.
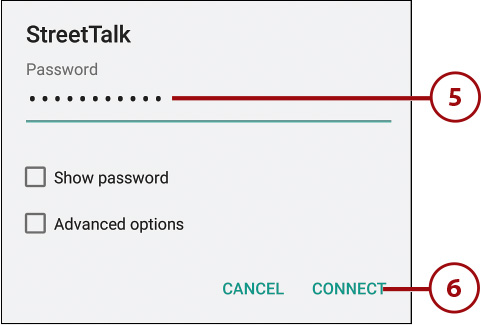
4. Select a Wi-Fi network to connect to. If you are not in range of a Wi-Fi network, or would rather use your cellular data, tap Skip, and continue with step 7.

5. Type in the Wi-Fi network password (if a password is required).
6. Tap Connect.
7. If you have another Android device (phone or smartphone) running Android 5.0 (Lollipop) and you want to transfer the data from it to your new phone, follow the instructions on this screen, or tap Skip to continue.

8. Enter your Gmail email address if you already have a Gmail account and tap Next.

9. Enter your Google account password.
10. Tap Next.

11. Tap to choose one of your other Android devices to restore data from, or choose Set Up as New Device to continue setting this phone up as a new Android phone.
12. Tap Next to continue.

13. Check this box if you want to back up your phone’s data so that it can be restored to a new Android phone or smartphone in the future.
14. Check this box if you are okay with Google collecting information about your geographic location at any time. Although Google keeps this information safe, if you are concerned about privacy rights, you should uncheck this box.
15. Check this box if you are okay with your phone scanning for Wi-Fi networks even if you have the Wi-Fi radio turned off. This helps improve location accuracy.
16. Check this box if you are okay letting Google collect diagnostic information about your phone and the apps running on it.
17. Tap Next to continue.

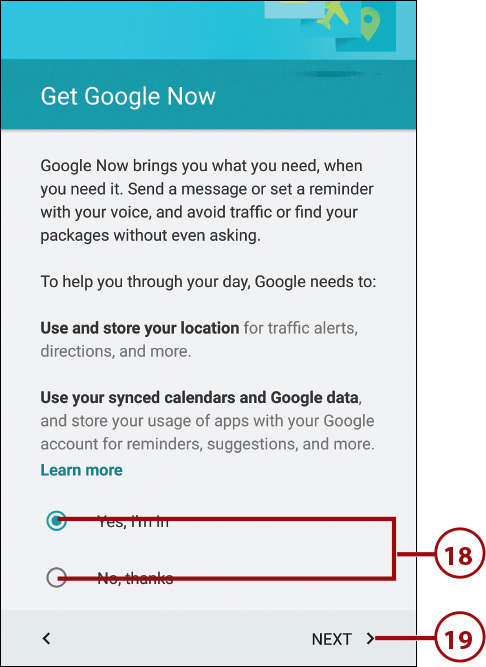
18. Choose whether you want to let Google use and store your location, and have access to your calendar and data so that it can allow you to use Google Now. Learn more about Google Now in Chapter 7.
19. Tap Next to complete your phone setup.
Extra Setup Steps for Some Phones
Many vendors that make Android phones modify them so that they include special services and features unique to their brand of phone—for example, separate app stores, special cloud services that provide backup and restore services, and other unique brand-only features. Normally, these features require that you have an account with the vendor itself in addition to having your Google account. Some phone vendors include extra apps such as Dropbox and use those services to back up your phone or store the pictures you take with the camera. During the phone setup, you might be asked to enter your vendor-specific account details (or create a new account) or participate in extra services such as Dropbox.
Fundamentals of Android 5.0 (Lollipop)
Your Android phone is run by an operating system called Android. This book covers the latest version of Android, called Android 5.0 (also called Android Lollipop). Some manufacturers of Android phones modify Android to provide a unique experience. For example Samsung’s modifications are called TouchWiz, and HTC’s modifications are called Sense UI. Where appropriate, this book covers these differences.
The Lock Screen
If you haven’t used your Android phone for a while, the screen goes blank to conserve battery power. Here is how to interact with the Lock screen.
1. Press the Power button to wake up your Android phone. Some phones have a physical Home button (as discussed earlier), and in these instances, pressing the physical Home button also wakes up your phone.
2. Swipe up anywhere on the screen to unlock your phone.

Some Android phones include a feature called Ambient Display. If you tap the screen twice or pick up your phone, you see a dimmed version of the Lock screen showing your notifications. Tapping the screen while the Ambient Display is visible wakes up your phone fully, but if you just leave it or put it back down, the Ambient Display screen disappears. New notifications also briefly appear on-screen as they arrive.

Lock Screen Differences
Some manufacturers modify Android to create their own experience, and one of the tweaks is how the Lock screen works. For example, on Samsung phones, you can swipe randomly in any direction to unlock the phone, and to launch the Phone or Camera apps, you drag the respective icons upward. HTC is another example. On its phones’ Lock screens, you see a row of icons plus the Lock icon. To unlock the HTC phone, you drag the Lock icon upward. To launch apps, drag the App icon upward.
Talk to Your Phone While It’s Sleeping
As long as it is plugged into power, you can speak to your phone and give it commands, even while it is sleeping. Just say “OK Google” to make your phone wake up and listen for commands. You can search your phone or the Internet, or give commands to send an email, add reminders, and many other things. To enable this feature, go to Settings, Language & Input, Voice Input, tap the cog icon to the right of Enhanced Google Services, tap “OK Google” Detection, and make sure that all three switches are in the on position.

Work with Notifications on the Lock Screen
With Android 5.0 (Lollipop) you can work with notifications right on the Lock screen. Tapping a notification takes you straight to the app that created it. Read more about notifications later in this section.
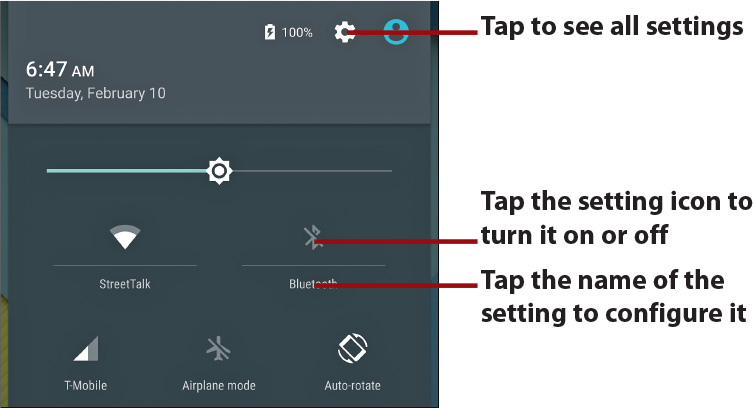
Work with Android Settings on the Lock Screen
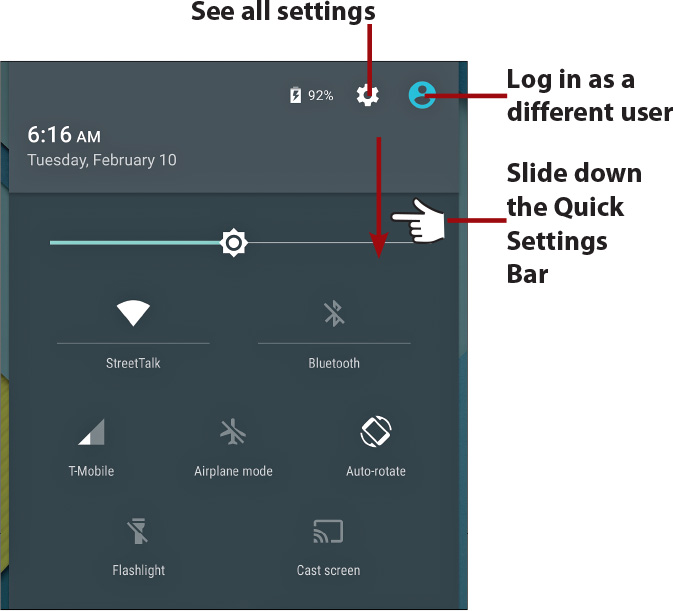
With Android 5.0 (Lollipop) you can work with settings (such as Airplane Mode, turning Wi-Fi on or off, and so on) right on the Lock screen. To work with settings, pull down the Quick Settings Bar by swiping down from the top of the screen with two fingers to view and change commonly used settings. Tap the Settings icon to see a full list of settings. Tap the User icon to log in as a different phone user, a guest phone user, or create a new phone user. Read more about phone users later in this chapter in the “Setting Up Multiple Users on Your Phone” section.
Answering a Call from the Lock Screen
If your phone is locked when a call comes in, you have three choices: Drag the phone icon right to answer the call, drag it left to reject the call, or drag it up to reject the call and send a preset text message (SMS) to the caller.

The Home Screen
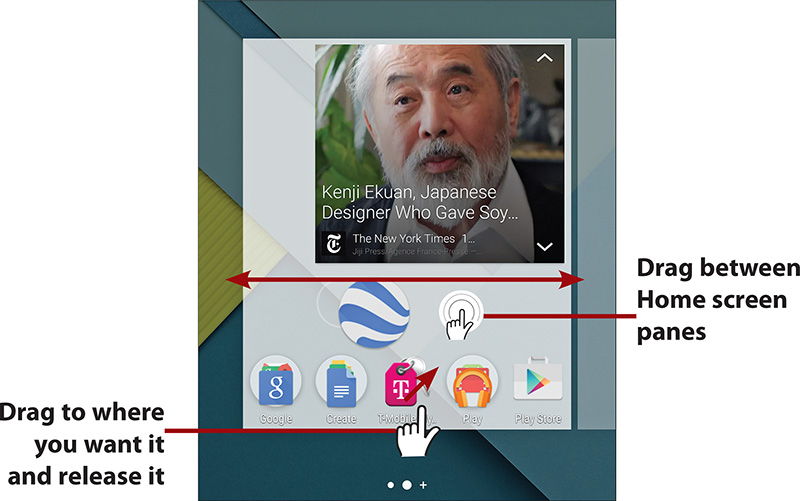
After you unlock your Android phone, you are presented with the middle Home screen pane. Your Android phone typically has five Home screen panes. The Home screen panes contain application shortcuts, a Launcher icon, a Notification panel, shortcuts, a Favorites Tray, and widgets.

Notification panel The Notification panel shows information about Bluetooth, Wi-Fi, and cellular coverage, as well as the battery level and time. The Notification panel also serves as a place in which apps can alert or notify you using notification icons.
Notification icons Notification icons appear in the Notification panel when an app needs to alert or notify you of something. For example, the phone app can show the new email icon indicating that you have new unread emails.
Widgets Widgets are mini apps that run right on the Home screen panes. They are specially designed to provide functionality and real-time information. An example of a widget is one that shows the current weather or provides search capability. You can move and resize widgets.
App shortcut Tapping an app shortcut launches the associated app.
App folders App folders are groups of apps that you can use to organize and declutter your screen.
Favorites Tray The Favorites Tray is visible on all Home screen panes. You can drag apps to the Favorites Tray so that they are available no matter which Home screen pane you are looking at. You can rearrange and move apps in the Favorites Tray.
Launcher icon Tap to show application icons for all applications that you have installed on your Android phone. The exact appearance and placement of the Launcher icon may differ on your phone, but it is usually an icon made up of a grid of dots or squares and may appear in the middle of the Favorites Tray or to the right.


The System Bar
Your Android phone running Android 5.0 (Lollipop) has no physical buttons. Instead it has an area of the screen set aside for virtual buttons. This area is called the System bar. The System bar includes the Back, Home, and Recent Apps virtual buttons.
My Phone Doesn’t Have a System Bar
Although Google’s Android operating system is designed to use virtual buttons in the System bar, some phone vendors have chosen to use physical and touch-sensitive buttons below the screen. Because the buttons are below the screen, there is no need to have a System bar. Refer to the “Button Placement” margin note earlier in this chapter for more information.
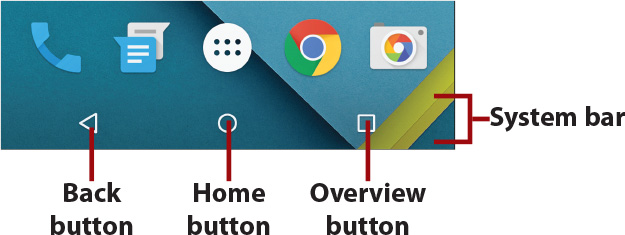
System bar Reserved area of the screen where virtual buttons are displayed.
Back button Tap to go back one screen in an app or back one step while navigating Android.
Home button Tap to exit what you are doing and return to the Home screen. Your app continues to run in the background.
Overview button Previously called the Recent Apps button, tap to see your recently used apps, switch between them, and close them.
The Leftmost Home Screen Pane
While on the Home screen view, if you keep swiping right until you see the leftmost Home screen pane, you are likely to find an app running there—typically Google Now (which is covered in Chapter 7, “Google Now and Navigation”). However, on some Android phones, instead of Google Now you might find an app called Flipboard (Samsung phones) or an app called Highlights (HTC phones).
Using Your Touchscreen
You mostly interact with your Android phone by touching the screen—what’s known as making gestures on the screen. You can tap, touch and hold, swipe, pinch, unpinch, and double-tap.
Tap To start an application, tap its icon. Tap a menu item to select it. Tap the letters of the onscreen keyboard to type.

Touch and hold Touch and hold to interact with an object. For example, if you touch and hold a blank area of the Home screen, a menu pops up. If you touch and hold an icon, you can reposition it with your finger.

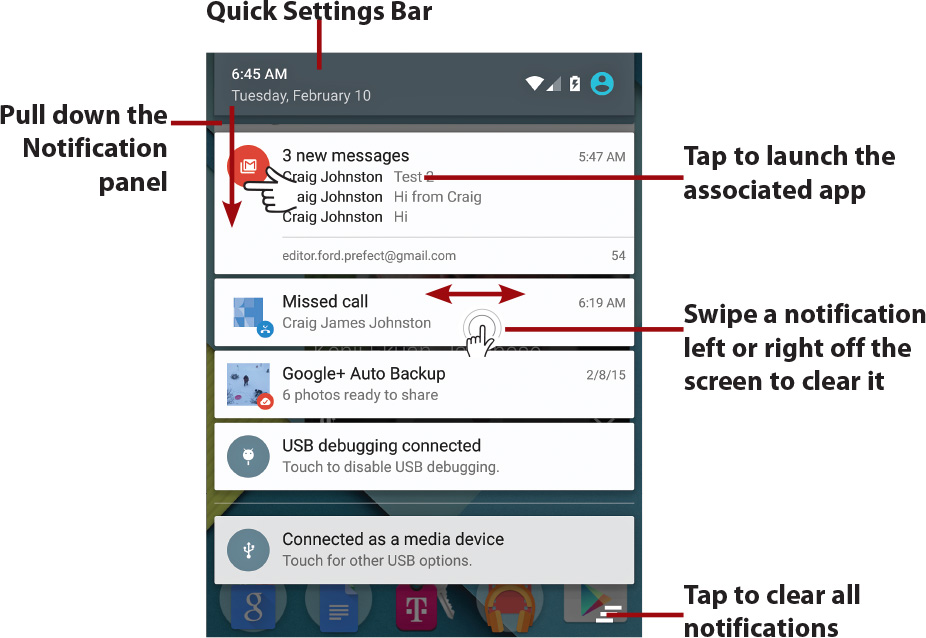
Drag Dragging always starts with a touch and hold. For example, if you touch and hold the Notification panel, you can drag it down to read all the notification messages.

Swipe or slide Swipe or slide the screen to scroll quickly. To swipe or slide, move your finger across the screen quickly. Be careful not to touch and hold before you swipe or you will reposition something. You can also swipe to clear notifications or close apps when viewing the recent apps.

Double-tap Double-tapping is like double-clicking a mouse on a desktop computer. Tap the screen twice in quick succession. For example, you can double-tap a web page to zoom in to part of that page.
Pinch To zoom in and out of images and pages, place your thumb and forefinger on the screen. Pinch them together to zoom out or spread them apart (unpinch) to zoom in. Applications such as Browser, Photos, and Maps support pinching.

Rotate the screen If you rotate your Android phone from an upright position to being on its left or right side, the screen switches from portrait view to landscape view. Most applications honor the screen orientation. The Home screens and Launcher do not.
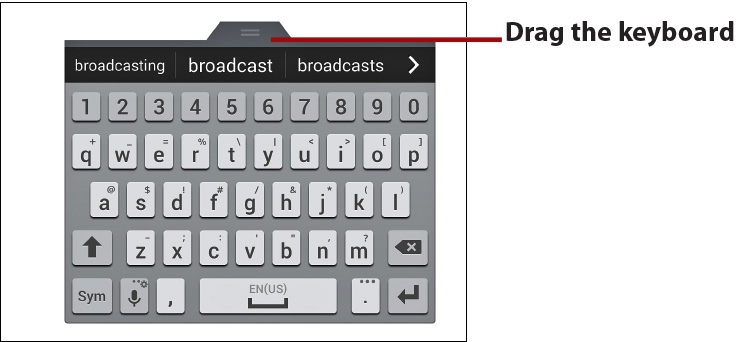
Using Your Keyboard
Your Android phone has a virtual (onscreen) keyboard for those times when you need to enter text. You might be a little wary of a keyboard that has no physical keys, but you will be pleasantly surprised at how well it works.
Most apps automatically show the keyboard when you need to enter text. If the keyboard does not appear, tap the area where you want to type and the keyboard slides up ready for use.

Keyboard Quick Tips
If you are typing an email address or a website address, the keyboard shows a button labeled .COM. If you tap it, you type .COM, but if you touch and hold it, you can choose between .EDU, .GOV, .ORG, and .NET. If you touch and hold the Return key, the cursor jumps to the next field. This is useful if you fill out forms on a website or move between fields in an app. If you touch and hold the comma key, you can change the language and keyboard settings. Some manufacturers of Android phones have moved the settings key to an adjacent key, sometimes combining it with the microphone key. The microphone key, used for dictation, that is normally on the top-right of the keyboard is moved to the bottom row of keys by some manufacturers.
Using the virtual keyboard as you type, your Android phone makes word suggestions. Think of this as similar to the spell checker you would see in a word processor. Your Android phone uses a dictionary of words to guess what you are typing. If the word you were going to type is highlighted, tap the space or period to select it. If you can see the word in the list but it is not highlighted, tap the word to select it.

Add Your Word
If you type a word that you know is correct, you can add it to your personal dictionary so that the next time you type it, your Android phone won’t try to correct it. To do this, after you type the word, but before you tap space, you’ll notice that your word is underlined. Tap the underlined word and your word appears in the middle of the suggested words area. Tap the word to add it to your personal dictionary. Tap it once more to complete the action.


To make the next letter you type a capital letter, tap the Shift key. To make all letters capitals (or CAPS), double-tap the Shift key to engage CAPS Lock. Tap Shift again to disengage CAPS Lock.
To type numbers or symbols, tap the Symbols key.
When on the Numbers and Symbols screen, tap the Symbols key to see extra symbols. Tap the ABC key to return to the regular keyboard.

To enter an accented character, touch and hold any vowel or the C, N, or S keys. A small window opens enabling you to select an accented or alternative character. Slide your finger over the accented character you want to use, and lift your finger to type it.

To reveal other alternative characters, tap and hold any other letter, number, or symbol.
Want a Larger Keyboard?
Turn your Android phone sideways to switch to a landscape keyboard. The landscape keyboard has larger keys and is easier to type on.

Dictation: Speak Instead of Typing
Your Android phone can turn your voice into text. It uses Google’s speech recognition service, which means that you must have a connection to the cellular network or a Wi-Fi network to use it.
1. Tap the microphone key. Some manufacturers of Android phones have moved the microphone key to the bottom row on the keyboard.

2. Wait until you see Speak Now, and then start saying what you want to be typed. You can speak the punctuation by saying “comma,” “question mark,” “exclamation mark,” or “exclamation point.”
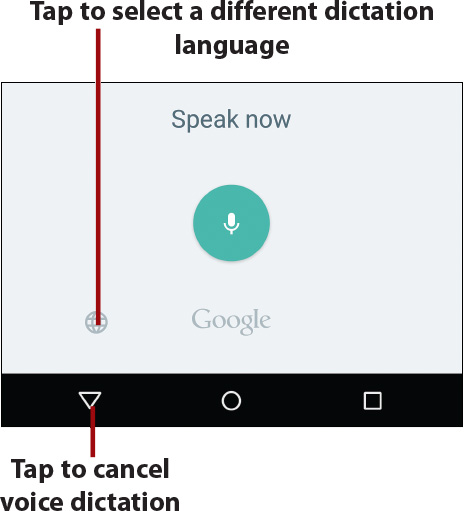
3. Stop speaking to finish dictation.
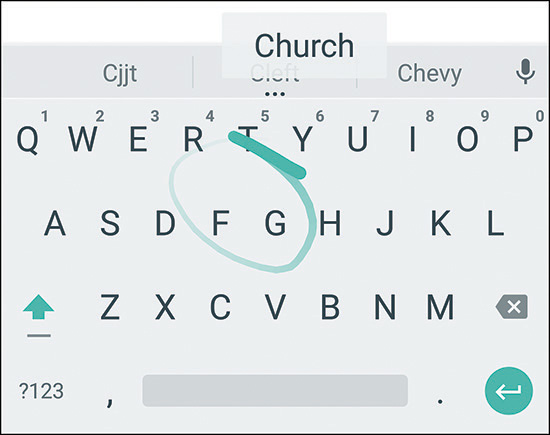
Swipe to Type
Instead of typing on the keyboard in the traditional way by touching each letter individually, you can swipe over the letters in one continuous movement. This is called Gesture Typing. It is enabled by default; to use it, just start swiping your finger over the letters of the word you want to type. As you swipe your finger, you see a trail following your finger. Lift your finger after each word. To add a space, swipe over the space bar or just start the next word and let the keyboard add the space for you. To type a double letter (as in the word “pool”), loop around that letter on the keyboard.
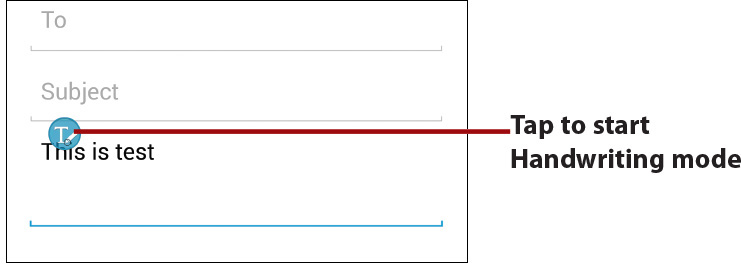
Samsung Writing Instead of Typing
Some larger Android phones, such as the Samsung Galaxy Note 4, come with a stylus. Samsung calls their stylus the S Pen. Instead of typing on the keyboard, you can use handwriting recognition to write. To enable Handwriting mode, pull out the S Pen from its holder and tap the Back key to dismiss the Air Command window. Then hover the S Pen over the screen in the text area until you see the handwriting icon. Tap the icon with your S Pen. Any text you have typed appears to be in handwriting. Now write in your own handwriting on the screen and it is turned into text. Tap Done to return to typing.

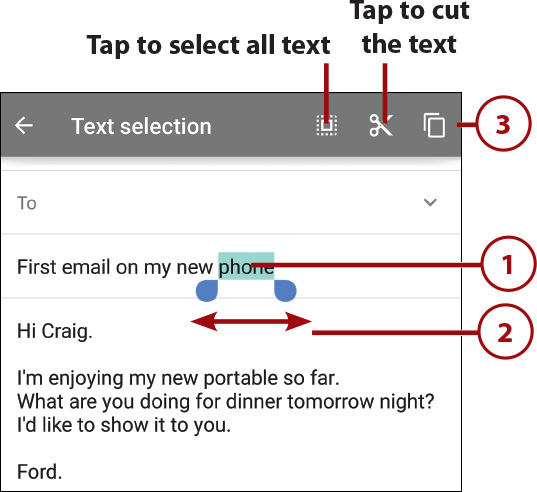
Edit Text
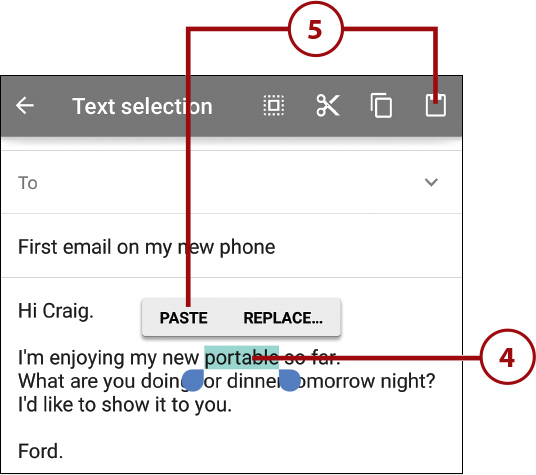
After you enter text, you can edit it by cutting, copying, or pasting the text. Here is how to select and copy text and then paste over a word with the copied text.
1. While you are typing, tap and hold a word you want to copy. The word highlights in blue, and you see end markers on either side of the word.
2. Slide the blue end markers until you have selected all the text you want to copy. In this example, just one word has been highlighted.
3. Tap to copy the text. You can also cut the text. This example demonstrates copying text.
4. Touch and hold the word you want to paste over.
5. Tap the word Paste or tap the paste icon.
Simpler Copy/Paste
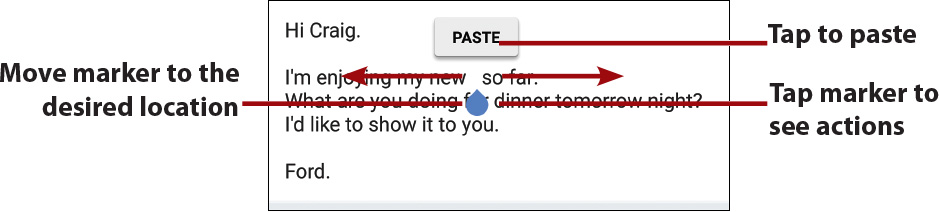
You might want to just copy some text and paste it somewhere else, instead of pasting it over a word. To do this, after you have copied the text, tap once in the text area, and move the single blue marker to where you want to paste the text. Tap the blue marker again, and tap Paste.
Menus
Your Android phone has two types of menus: app menus and context menus. Let’s go over what each one does.
Most applications have a Menu icon, which enables you to make changes or take actions within that application. The Menu icon should always appear in the top-right corner of an app; however, it can sometimes appear in the System bar next to the Recent Apps button or elsewhere in the app. Remember that some phones have a physical Menu button below the screen and might not have the onscreen Menu icon.

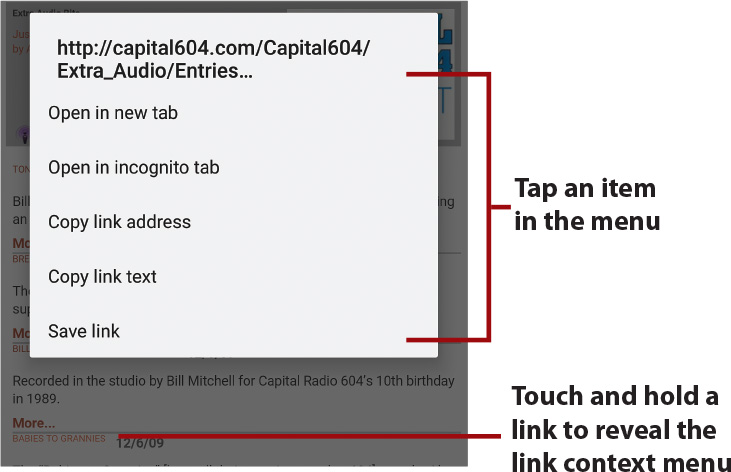
A context menu applies to an item on the screen. If you touch and hold something on the screen (in this example, a link on a web page), a context menu appears. The items on the context menu are based on the type of object you tapped.
Switch Between Apps
Your Android phone has an icon called the Overview icon. This icon is always on the System bar at the bottom of your screen. You can use this icon to switch between apps, close apps, and force them to quit if they have stopped responding. The Overview screen also allows you to switch between different Chrome web browser tabs and close them.
1. Tap the Overview icon.
Where Is My Overview Button?
The Overview icon/button may be a physical button on your phone positioned below the screen. Phones without the Overview button normally require that you double-tap the Home button to see the Overview screen. Sometimes the Overview button is called the Recent Apps button.
2. Scroll up and down the list of recent apps and Chrome browser tabs.
3. Swipe an app or Chrome browser tab left or right off the screen to close it.
4. Touch and hold an app’s icon to reveal the app’s information screen. If you touch and hold the icon of a Chrome browser tab, you see the Chrome app info.

5. Tap to force an app to close if it has stopped responding.

Run Multiple Apps on the Screen at the Same Time (Samsung Only)
Some larger Samsung phones have a feature called Multi Window that allows certain apps to run on the same screen at the same time. They can either run in a split-screen configuration, in multiple separate small windows, or a combination of both.
Make Sure Multi Window Is Enabled
Before you start this section, make sure that Multi Window is enabled in the Quick Settings.

Two Apps Together on a Split-Screen
This section describes how to run two apps at the same time in a split-screen configuration.
1. Touch and hold the Back button to see apps that support Multi Window.

2. Drag an app onto the screen and release it. Since this is the first app you are choosing, it fills the screen.

Some Apps Want To Be Popups
When you drag an app onto the screen in step 2, the app might want to be a pop-up app. Pop-up apps start by running in a small separate window on the screen instead of either filling the top or bottom of the screen. Unfortunately it is not clear which apps always want to start in pop-up mode, and which always start in split-screen mode. The next section covers pop-up apps.

Multi-Page Apps
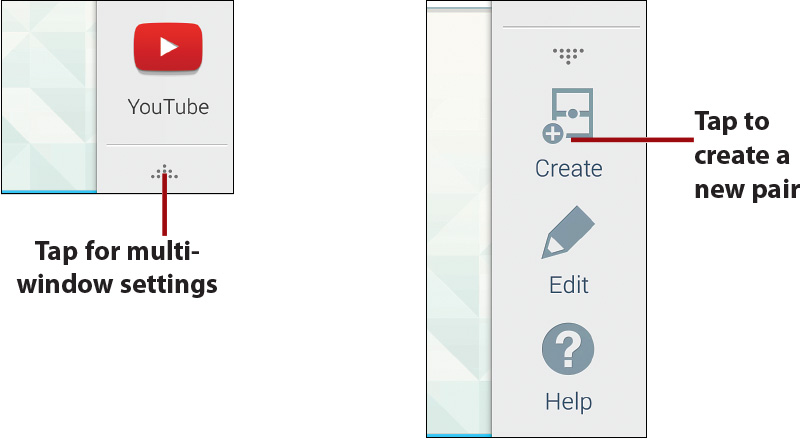
Some of the app icons have a small left arrow next to them. This indicates that the app is already running and has multiple pages open. An example of this is a web browser like Chrome. You may have many different websites open each in their own tabs. If you tap the little arrow, you can choose which open pages you want to drag onto the multi-window screen.
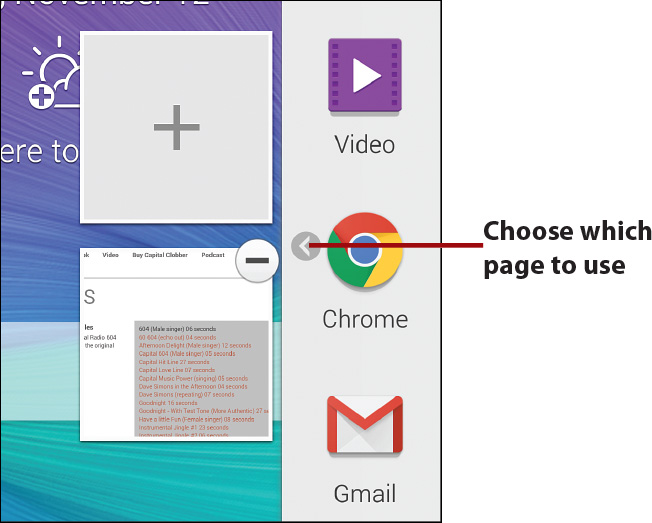
3. Drag another app to either the top or bottom half of the screen and release it. If the multi-window pane on the right of the screen disappears before you complete step 3, touch and hold the Back button to see the pane again.

4. Drag the circle up or down to give more or less room to each app.
5. Tap the circle to reveal extra Multi Window features.

6. Tap to swap the position of the apps on the screen.
7. Tap to enable dragging content between windows (like text or images).
8. Tap to minimize the selected app to a small draggable circle on the screen
9. Tap to maximize the selected app to full screen.
10. Tap to close the app in the selected window.


More Than One App in Each Window
When you use Multi Window, the screen is split into two windows—one at the top and one at the bottom. You can drag an app to either the top or bottom window. You can actually drag more than one app into each window. Follow steps 1 through 3 from the “Two Apps Together on a Split Screen” task, and simply drag the new app on top of the one that’s already there. The only downside to this is that you can only work with the last app that was dragged to the window. Even though the previous apps are there and running, you cannot switch to them. Your only course of action is to close the app on top and continue working on the previous app in the same window.
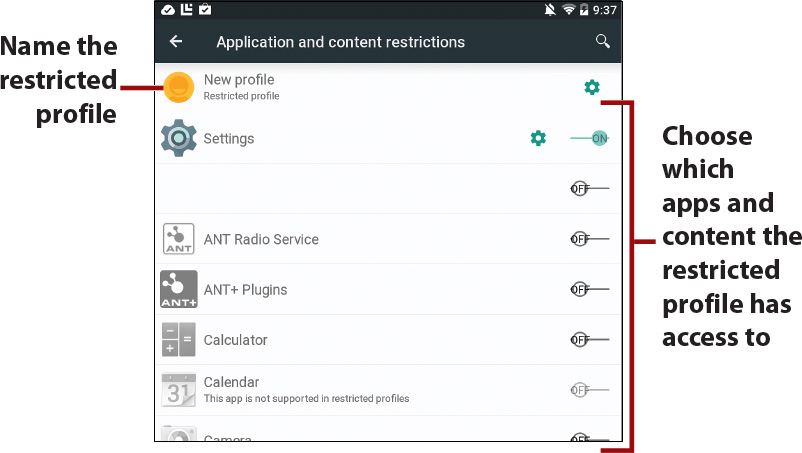
Setting Up Multiple Users on Your Phone
Your Android phone may have the capability to support multiple users. This enables you to share your phone among co-workers, family members, or friends, with each person having his own unique login, apps, photos, videos, and settings. Your phone can support up to eight users. Some phone vendors do not support this option.
Add a New Phone User
A phone user can have their own apps, photos, videos, wallpapers, and do anything on the phone with the exception of removing other users and factory resetting the phone. To add other users, the original owner of the phone must be logged in and needs to use the following steps. The user being added should also be present at the time the new user profile is created.
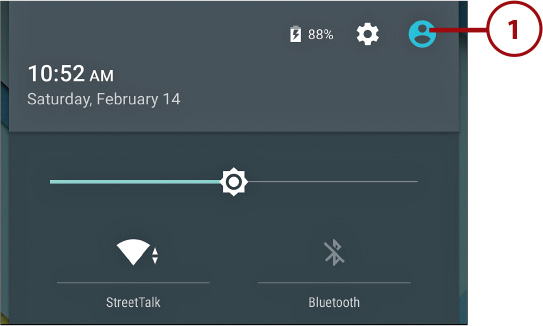
1. Pull down the Quick Settings Bar, and tap the User icon.
2. Tap Add User.

3. Tap OK. Your phone switches to the Lock screen, which is ready for you to start the new user process.

4. Swipe the Lock icon upward to unlock your phone.
5. Hand the phone to the person who will be setting up her account. She can now follow the steps in the “First-Time Setup” section earlier in this chapter.
How to Switch Between Phone Users
To switch between phone users, pull down the Quick Settings Bar on the Lock screen, Home screen, or while running any app, and tap the User icon. Tap the user you want to switch to.

Add a Phone Guest User
A phone guest user can use the phone like a regular user, however their information is not permanently saved. There can only be one guest account, and it can either be reused by the same guest or wiped for a new guest.
1. Pull down the Quick Settings Bar, and tap the User icon.
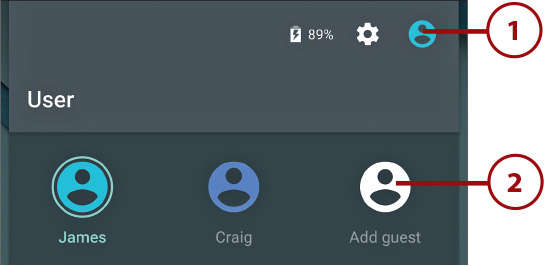
2. Tap Add Guest.
3. Hand the phone to the guest. No setup is required.
Continue as a Guest or Start Over
If you previously added a guest user and allowed someone to use it, the guest account remains untouched until your guest wants to use it again. If the same person wants to continue where he left off, when he switches to the guest user he is asked to either start over or continue. If he taps continue, the guest session continues where it left off. However if you are allowing a new person to use the guest user, she must tap Start Over to wipe the previous guest session and start fresh.

Installing Synchronization Software
Because your Android phone is tightly integrated with Google and its services, all media that you purchase on your phone is stored in the Google Cloud and accessible anywhere and anytime. However, you might have a lot of music on your computer that you need to copy to your Google cloud, so you need to install the Google Music Manager software or the Android File Transfer app for your Mac to copy any file back and forth.
Install Android File Transfer (Apple Mac OS X)
You need only the Android File Transfer app when using an Android phone on an Apple Mac running OS X, and only if you think you want to drag files to and from your phone using Finder.
1. From your Mac, browse to http://www.android.com/filetransfer/ and download the Android File Transfer app.

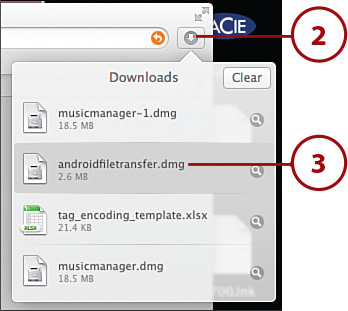
2. Click the downloads icon to reveal your downloaded files.
3. Double-click the androidfiletransfer.dmg file in your Safari Downloads.
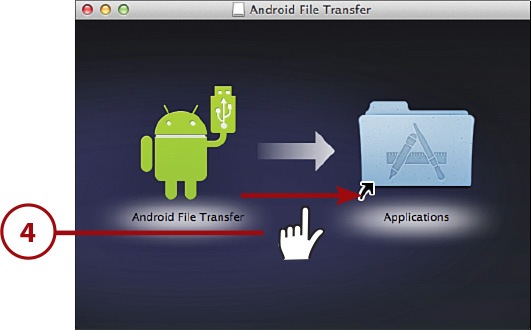
4. Drag the green Android to the Applications shortcut to install the app.
Install Google Music Manager (Apple Mac)
Don’t install Google Music Manager unless you plan to upload files from your computer to the Google Music cloud.
1. Visit https://play.google.com/music/listen#manager_pl from your desktop web browser, and log in to your Google account if prompted.
2. Click to download Music Manager.

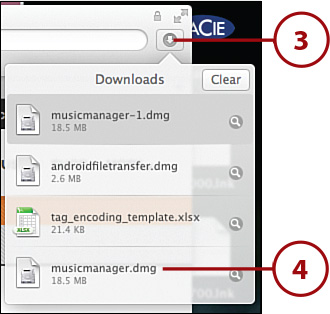
3. Click the downloads icon to reveal your downloaded files.
4. Double-click the musicmanager.dmg file in your Safari Downloads.
5. Drag the Music Manager icon to the Applications shortcut to install the app.

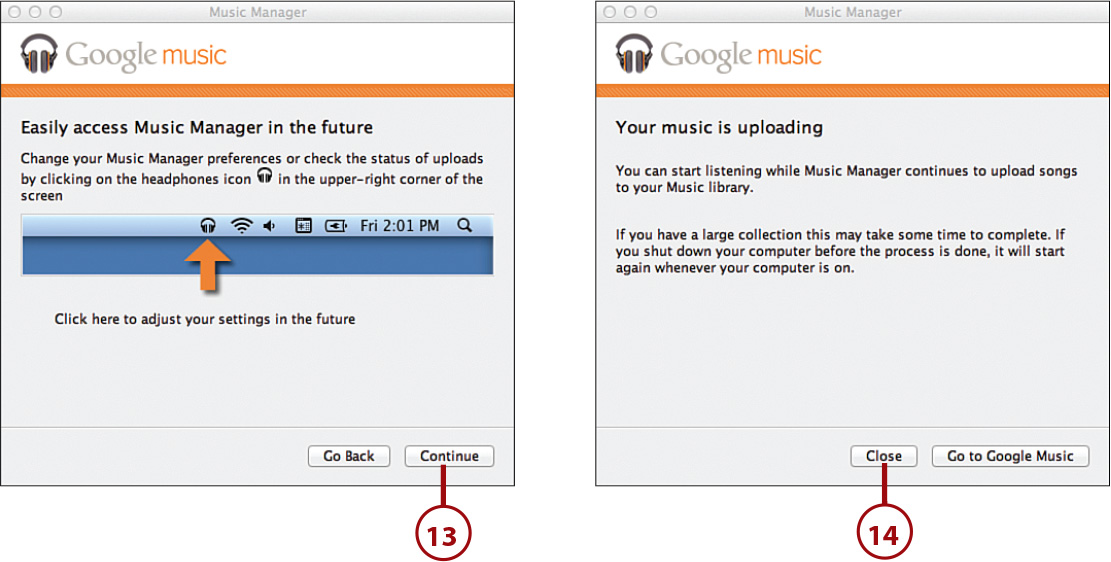
6. Double-click the Music Manager icon in the Applications folder.

7. Skip to the “Configure Music Manager” section later in the chapter to complete the installation.
Install Google Music Manager (Windows)
Don’t install Google Music Manager unless you plan to upload files from your computer to the Google Music cloud.
1. Visit https://music.google.com/music/listen#manager_pl from your desktop web browser, and log in to your Google account if prompted.
2. Click to download Music Manager.

3. Double-click the musicmanagerinstaller app in your Downloads folder and then follow the steps in the next section.

2. Enter your Google (Gmail) email address.

3. Enter your Google (Gmail) password.
4. Click Continue.

5. Choose where you keep your music.
6. Click Continue.

7. Choose whether to upload all your music or just some of your playlists. Remember that you can upload only 50,000 songs for free. Skip to step 12 if you choose to upload all music.
8. Check if you want to also upload podcasts.
9. Click Continue.

10. Select one or more playlists of music.
11. Click Continue.

12. Choose whether you want to automatically upload any new music that is added to your computer.

13. Click Continue and your files start uploading.
14. Click Close.
>>>Go Further: Other Sync Software
Freeing Up Memory
If you have installed a Secure Digital card (SD card) then you have the ability to move media and parts of some apps to the SD card to free up memory on your Android phone.
Move Apps
Not all apps support being moved to the SD card (external memory), and even apps that do support this feature only move part of themselves to the SD card.
1. Touch and hold an app you want to move to the SD card

2. Drag the app to the App Info icon.

3. Tap Move to SD card.
