
1. Phone, SMS, and MMS

In this chapter, you find out how to make and take phone calls and send instant messages on your Android phone. Topics include the following:
→ Making phone calls
→ Making conference calls
→ Sending and receiving text messages
→ Sending and receiving multimedia messages
As a cellular phone, your Android phone includes powerful features that enable you to make phone calls swiftly and easily. Using your Android phone, you can also send both text messages and multimedia messages with the Messenger app.
Using the Phone App
With the Phone app, you can quickly make and receive calls across the cellular network. When you need to talk to more than one other person, you can turn your current call into a conference call.
Make a Call
The Phone app contains three tabs that enable you to make calls in various ways and to track the calls you receive.
1. On the Home screen, tap Phone.

2. Tap to search for contacts and places nearby to call. This only works if you have enabled this feature. See how to enable it in the section “Configure the Phone App,” step 21, later in this chapter.
3. Tap to use your voice to search for contacts and places nearby to call.
4. Tap the most recent call to dial the number. The most recent call may be the last incoming call, the last outgoing call, or the last missed call.
5. Tap to see all recent incoming and outgoing calls.
6. Tap to see all of your contacts.
7. Tap the Keypad icon to manually type the numbers to call.
8. Tap the Speed Dial tab, and tap the icon for someone you have setup as a speed dial.

Dial by Typing Search Terms
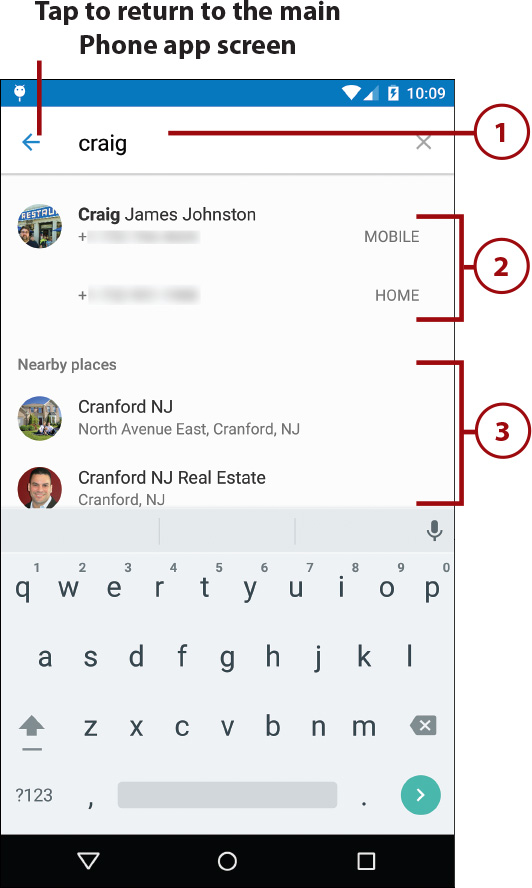
Find a contact or nearby place to call by typing a contact name or place name.
1. Type the name of the person you want to call, or the name of the nearby place you want to call. Contacts are pulled from your phone’s Contacts app, whereas the nearby places are gathered in real time based on where you are.
2. Tap the contact you want to call. If the contact has more than one phone number, such as mobile and home numbers, tap the particular number you want to call.
3. Tap one of the discovered nearby places to call the main number.
Dial by Speaking Search Terms
Find a contact or nearby place to call by speaking a contact name or place name.
1. When the green Microphone icon appears, speak the name of the person or the name of the nearby place you want to call. Contacts are pulled from your phone’s Contacts app, whereas the nearby places are gathered in real time based on where you are.

2. Tap the contact you want to call. If the contact has more than one phone number, such as mobile and home numbers, tap the particular number you want to call.
3. Tap one of the discovered nearby places to call the main number.

Dial by Using the Recents Tab
All incoming, outgoing, and missed calls are shown on the Recents tab. You can call a listed number, see the call details, and report an incorrect number to Google.
1. Tap a recent call to see the options.
2. Tap to call the contact or business back.
3. Tap to see details of your recent calls to and from this number. While viewing the call details, you can delete the specific recent call entry and even edit the phone number before you call it back.
4. Tap to report to Google that the number for a business is incorrect.

Dial by Using the Keypad
If you need to call a number that isn’t in Contacts, you can dial a number using the keypad.
1. Type the phone number to call using the keypad and tap the green Phone icon to place the call.
2. Tap to backspace if you make a mistake.
3. As you type a number, the Phone app displays any contacts with numbers that match what you are typing. If you see the contact you want to call, tap it to call.
4. Tap to place the call when you’ve finished typing the number or you’ve selected a contact name.


Dial from a Contact Entry
If you have a contact entry for the person you want to dial, you can start from that contact entry.
1. Tap the Contacts tab in the Phone app.
2. Tap the contact to display the contact’s details.

3. Tap the number you want to call.

Starting a Call from the Contacts App
Instead of launching the Phone app and then tapping the Contacts tab to go to the Contacts app, you can start a call directly from the Contacts app. Tap Contacts on the Home screen or the Apps screen to launch the Contacts app, tap the contact to display his or her details, and then tap one of the contact’s numbers to call the person.


Receive a Call
When someone phones your Android phone, you can accept the call, reject it, or reject it and send a text message.
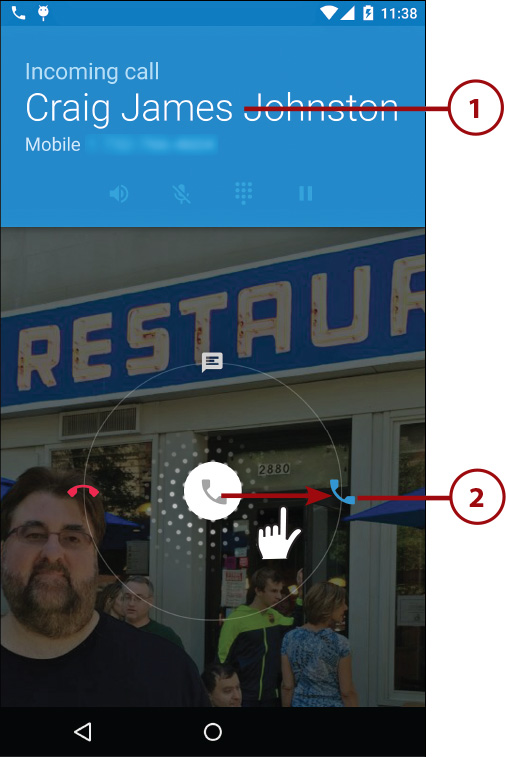
Accept a Call
1. When the phone rings, look at the contact name (if it is available) or the phone number (if it is not) and decide whether to take the call.
2. Drag the gray Phone icon to the blue Phone icon to accept the call.
3. Tap to switch to the speakerphone, a Bluetooth headset (or your car’s built-in Bluetooth), or your phone’s earpiece.
4. Tap to mute the call. Tap again to turn off muting.
5. Tap to show the keypad if you need to type extra numbers after the call is connected.
6. Tap to put the call on hold.
7. Tap to create a conference call by adding a new caller. See more about conference calling later in the chapter in the “Make a Conference Call” task.
8. Tap to end the call.


Reject a Call
If you do not want to accept the call, you can reject it so that it goes to your voicemail.
1. When the phone rings, look at the contact name (if it is available) or the phone number (if it is not) and decide whether to take the call.
2. Drag the gray Phone icon to the red Phone icon to reject the call. The call goes to voicemail, and your Android phone displays the screen you were using before the call came in.

Reject a Call and Send a Quick Response
Instead of simply declining a call and sending it to your voicemail, you can send a Quick Response to the caller. Your Android phone provides a selection of canned Quick Response messages for general needs. You can also create your own messages or type custom messages for particular calls.
1. When the phone rings, look at the contact name (if it is available) or the phone number (if it is not) and decide whether to take the call.
2. Drag the gray Phone icon to the text message icon to reject the call and send a Quick Response message to the caller.
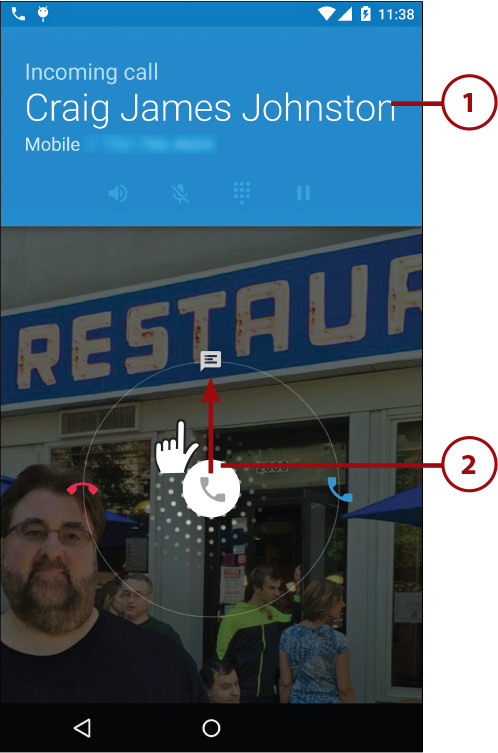
3. Tap one of the canned message suggestions to send that message.

Editing the Quick Responses
To edit your Quick Responses, open the Phone app and tap the Menu icon. On the menu, tap Settings. On the Settings screen, tap General Settings and then tap Quick Responses. Tap one of the Quick Responses to edit it.
Handle a Missed Call
If you miss a phone call, you can quickly locate it in the Phone app’s logs so that you can return it, but you can also take actions on missed calls from the Lock screen or any other screen.
1. Tap twice on the missed call notification on the Lock screen. If you use a Lock screen password or other method of locking your phone, you are required to use that method to unlock your phone before you can continue.

2. Tap the missed call in the call History screen.

3. Tap Call Back to return the call.

Make a Conference Call
You can quickly turn your current call into a conference call by adding more participants.
1. Tap the Add Call icon while you have a call in progress.

2. Dial the call in the most convenient way.
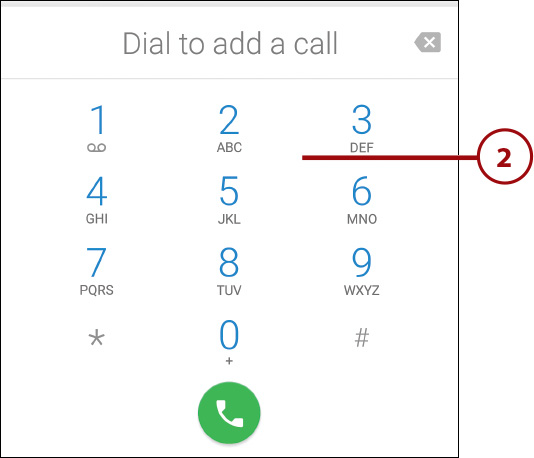
3. Tap to swap between the original call and the one you just added, if you need to.
4. Tap the Merge icon to merge the calls and complete the conference call setup.

5. Repeat steps 1–4 to add additional callers. The exact number of callers you can have on a conference call is governed by your wireless carrier.
Managing the Conference Call

1. Tap the Menu icon and tap Settings.

2. Tap General Settings.

3. Tap to change the sort order when displaying the Contacts tab. You can sort by first name or last name.
4. Tap to change how names in the Contacts tab are formatted. You can format them with the first name first, or the last name first.
5. Tap to change the ringtone that plays when you receive an incoming call.
6. Check the box to hear the dialpad tones. Uncheck to silence them.
7. Check the box to also vibrate your phone when you have an incoming call.
8. Tap to manage your Quick Responses.
9. Tap to save your changes and return to the previous screen.


11. Tap to manage any Voice over IP (VoIP) accounts you want to use for calls, instead of the regular cellular voice network.
12. Tap to choose which voicemail service to use (if you have more than one option). If you use Google Voice, it is common to use the Google Voice voicemail system as opposed to the one provided by your wireless carrier.
13. Tap to manage Fixed Dialing Numbers (FDN).
14. Tap to manage which TTY mode you want to use or to turn TTY off. TTY stands for Teletype and it allows hearing-impaired people to connect a Teletype machine to the phone to type instead of speaking.
15. Check the box to make your phone compatible with hearing aids.
16. Tap to manage your call forwarding settings. You can choose to forward all calls to a specific number or to forward calls to specific numbers based on the situation. This screen is mostly used to change what voicemail system unanswered calls are forwarded to.
17. Tap to manage your Caller ID settings and whether you want to use Call Waiting.
18. Tap to save your settings and return to the previous screen.

19. Tap Advanced Settings.

20. Tap to enable a feature that allows Google to show names for people and businesses who call you, but whose contact information is not stored in your phone.
21. Tap to enable a feature that allows Google to show nearby places in the Phone app when you search.
22. Tap to save your settings and return to the previous screen.

Call Setting Differences with Verizon Phones
If you use a Verizon Android phone (or an Android phone on another CDMA provider), you may see slightly different settings on the Call Settings screen. If you see a setting called DTMF Tones, this setting allows you to change the length of the DTMF tone played. DTMF (Dual Tone Multi Frequency) Tones are played on a phone call when you tap the phone dialpad keys. You can choose to use short tones or long tones, which means that when your phone plays the DTMF tone, it either plays it the regular length, or it plays it for longer. If you see Assisted Dialing, tapping this allows you to set your home country so that when you travel, your phone will make sure it is dialing the numbers correctly, even when you travel internationally. If you see Voice Privacy, tap to choose whether you want your calls encrypted or not.
What Is VoLTE?
Some Android phones support VoLTE. First, LTE (or Long-Term Evolution) is the fourth generation of cellular data technology (not to be confused with the slightly faster version of 3G technology that has been incorrectly called 4G for years). VoLTE stands for Voice over LTE. Effectively, your voice call is sent as regular data over the LTE data channel as opposed to over the cellular voice channel. Voice quality is much better due to the higher rate at which the data is transmitted and received, and if the person you are calling also uses VoLTE, you can speak at the same time. Most wireless carriers treat VoLTE as regular voice minutes and don’t count it against your data plan. However, you should verify the situation with your local wireless carrier; otherwise, your data plan might take an unexpected hit.
Fixed Dialing Number (FDN) is a feature that allows you to set up a fixed list of phone numbers that can be dialed from your phone. To use FDN, you first create a numeric PIN, then choose the numbers that can be dialed. This feature can be useful if you are lending your phone to someone and want to limit the dialing privileges, or you can use it on one of your children’s phones to limit their dialing abilities.
What Is Wi-Fi Calling?
Some phones support Wi-Fi calling. The technical name for Wi-Fi calling is Universal Media Access (UMA). This technology is provided by some carriers around the world and enables your Android phone to roam between the cellular network and Wi-Fi networks. Typically when you are connected to a Wi-Fi network, any calls you make are free and of higher audio quality because of the faster speeds. As you move out of Wi-Fi coverage, your phone hands the call off to the cellular network—and vice versa—allowing your call to continue without interruption. If you want to read more about UMA or Wi-Fi calling, read this online article: http://crackberry.com/saving-call-charges-recession-your-blackberry. The article is on a BlackBerry blog, but the descriptions of the technology still apply.
Using SMS and MMS
Short Message Service (SMS), also known as text messaging, has been around for a long time. Multimedia Message Service (MMS) is a newer form of text messaging that can contain pictures, audio, and video as well as text. Your Android phone can send and receive both SMS and MMS messages.
Get to Know the Messenger App
The Messenger app is what you use to send and receive text messages. This app has all the features you need to compose, send, receive, and manage messages.
1. Tap the Messenger icon.

2. Tap to compose a new text message.
3. Tap the picture of someone who has sent you a message to show the contact information that allows you to contact the person using email, phone, and other methods.
4. Tap a message thread to open it. A message thread may have one or more messages in it.
5. Tap the Menu icon to see more options.

6. Tap to view archived messages. These are messages that you have previously deleted.
7. Tap to open the Settings screen. See the next section for more on Settings.

Manage Settings for the Messenger App
You use the settings of the Messenger app to manage how the app handles your SMS and MMS messages. Before you actually start working with SMS and MMS, let’s take a look at the settings.
1. Tap the Menu icon and tap Settings.

2. Tap to change the default messaging app from Messenger to Google Hangouts. If you use Google Hangouts a lot for text and video chatting, you may decide to also use it for text and multimedia messages. Read more about using Google Hangouts in the “Using Google Hangouts for SMS and MMS” sidebar at the end of this chapter.
3. Choose to play a sound when you send messages.
4. Choose whether you want to be notified of incoming SMS and MMS messages.
5. Tap to choose the ringtone that plays when you are notified of a new message.
6. Choose whether your phone must vibrate when you receive a new message.
7. Tap to see Advanced settings.

8. Tap to choose how your phone handles group text messages when you choose to send a message to a group of people. You can either have your phone send the same text message to each person individually, or send one MMS message to all people.
9. Tap to edit your phone’s phone number.
10. Choose whether you want your phone to automatically retrieve MMS messages.
11. Choose whether you want your phone to automatically retrieve MMS messages while you are roaming outside your carrier’s home area.
12. Choose whether you want a delivery report when sending SMS messages.
13. Tap to manage which emergency alerts you want to receive. These alerts are sent out by your government or law enforcement (for example, AMBER alerts).
14. Tap to save your changes and return to the previous screen.

Don’t Auto-Retrieve MMS While Roaming
Disable the automatic retrieval of multimedia messages when you travel to other countries because automatically retrieving these messages when you’re roaming can result in a big bill from your provider. International carriers love to charge large amounts of money for people traveling to their countries and using their networks. The only time it is a good idea to leave this enabled is if your carrier offers an international SMS or MMS bundle, where you pay a flat rate up front before leaving. When you have the auto-retrieve feature disabled, you see a Download icon next to a multimedia message. You have to tap it to manually download the message.
What’s the Difference Between a Delivery Report and a Read Report?
A delivery report indicates that the message has reached the destination device. Some Android phones allow you to also request a read report. A read report indicates that the message has been opened for viewing.
Compose a Message
When you compose a new message, you do not need to make a conscious decision whether it is an SMS message or an MMS message. As soon as you add a subject line or attach a file to your message, your Android phone automatically treats the message as an MMS message.
1. Tap the Compose icon to compose a new message.

2. Type the recipient’s phone number, or if the person is in your contacts, type the name. If a match is found, tap the mobile number.

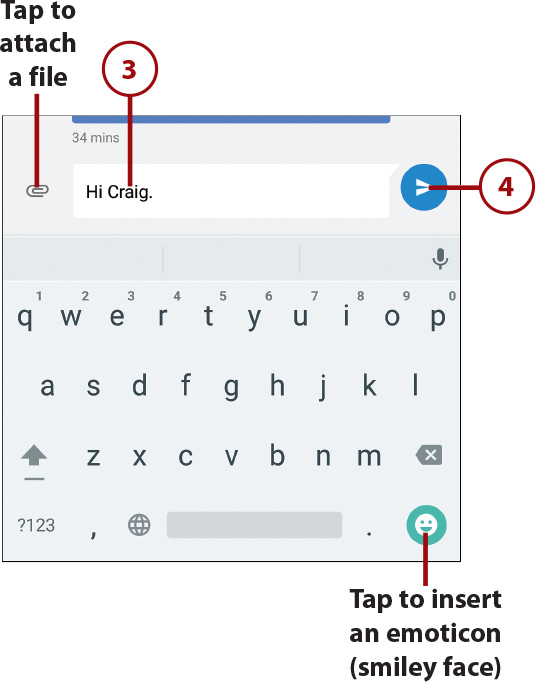
3. Tap and start typing your message.
4. Tap to send your message.
Schedule a Message To Be Sent at a Later Time
On some Android phones, you can decide that you want a text message to be sent automatically at a later time. To do this, before sending the message, tap the Menu icon and choose Schedule Message. Choose the date and time you want your message to be sent and tap Done. Then tap the Send button, and your message is sent at the time you scheduled.

Attach a File to a Message
If you want to send a picture, audio file, or video with your text message, all you need to do is attach the file. Be aware that attaching a file turns your SMS text message into an MMS multimedia message and may be subject to additional charges.
1. Tap the Paperclip icon to attach a file.

2. Tap to attach a picture or video already stored in your Gallery or Photos app.
3. Tap to record and attach a voice note.
4. Tap to take a picture or record a short (50-second) video using your phone’s camera.

5. Tap to send your MMS.

Receive a Message
When you receive a new SMS or MMS message, you can read it, view its attachments, and even save those attachments to your Android phone.
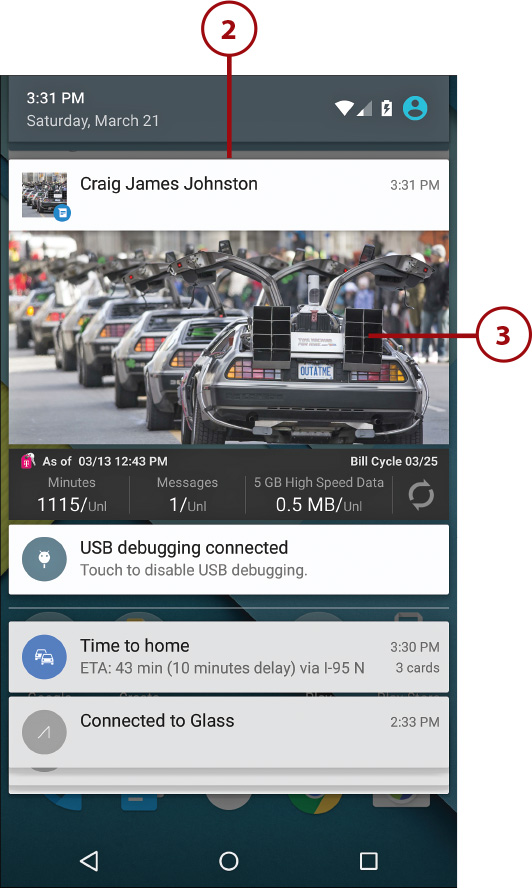
1. When a new SMS or MMS message arrives, your Android phone plays a ringtone and displays a notification in the status bar.
2. Pull down the Notification panel to see newly arrived messages.
3. Tap a message alert to display the message and reply to it.
4. Tap an attachment to open it for viewing.
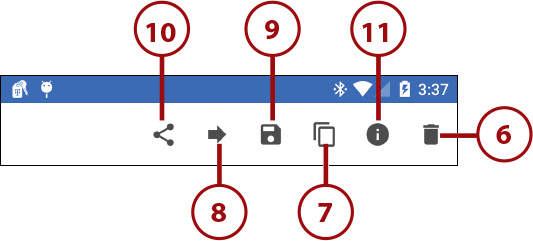
5. Touch and hold a message to display the Message Options dialog.

6. Tap to delete the message. This deletes just the message and not the entire thread.
7. Tap to copy the message text so you can paste it elsewhere.
8. Tap to forward the message and attachment to someone else.
9. Tap to save the attachment to your Android phone.
10. Tap to share the message via social media or other methods.
11. Tap to view the message details, such as its size and the date and time it was sent.
Usable Content
If a text message contains links to websites, phone numbers, or email addresses, tapping those links makes the Android phone take the appropriate action. For example, when you tap a phone number, your Android phone calls the number; when you tap a web link, the Android phone opens the page in Chrome or your other default browser.
