Implementing a TCP Socket Client
At the most basic level, implementing a TCP socket client involves creating a Socket object that connects to the server and then writing data to the server and handling the data that comes back. In addition, you should build the socket so that it can also handle errors, the buffer being full, and timeouts. This section discusses the steps involved in implementing a socket client using the Socket object. Listing 8.1 provides the full code for the following discussion.
The first step is to create the socket client by calling net.connect(), as shown below. Pass in the port and host that you want to connect to as well and implement a callback function to handle the connect event:
net.connect({port: 8107, host:'localhost'}, function() {
//handle connection
});
Then inside the callback, you set up the connection behavior. For example, you might want to add a timeout or set the encoding as shown below:
this.setTimeout(500);
this.setEncoding('utf8'),
You also need to add handlers for the data, end, error, timeout, and close events that you want to handle. For example, to handle the data event so that you can read data coming back from the server, you might add the following handler once the connection has been established:
this.on('data', function(data) {
console.log("Read from server: " + data.toString());
//process the data
this.end();
});
To write data to the server, you implement a write() command. If you are writing a lot of data to the server and the write fails, you might also want to implement a drain event handler to begin writing again when the buffer is empty. The following shows an example of implementing a drain handler because of a write failure. Notice that a closure is used to preserve the values of the socket and data variables once the function has ended:
function writeData(socket, data){
var success = !socket.write(data);
if (!success){
(function(socket, data){
socket.once('drain', function(){
writeData(socket, data);
});
})(socket, data);
}
}
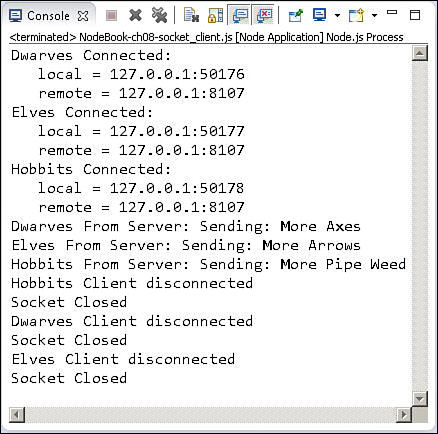
Listing 8.1 shows the full implementation of a basic TCP socket client. The client just sends a bit of data to the server and receives a bit of data back; however, the example could easily be expanded to support more complex data handling across the socket. Notice that there are three separate sockets opened to the server, and they are communicating at the same time. Figure 8.1 shows the output from the code in Listing 8.1. Notice that each client that is created gets a different random port number.
Listing 8.1 socket_client.js: Implementing basic TCP socket clients
01 var net = require('net'),
02 function getConnection(connName){
03 var client = net.connect({port: 8107, host:'localhost'}, function() {
04 console.log(connName + ' Connected: '),
05 console.log(' local = %s:%s', this.localAddress, this.localPort);
06 console.log(' remote = %s:%s', this.remoteAddress, this.remotePort);
07 this.setTimeout(500);
08 this.setEncoding('utf8'),
09 this.on('data', function(data) {
10 console.log(connName + " From Server: " + data.toString());
11 this.end();
12 });
13 this.on('end', function() {
14 console.log(connName + ' Client disconnected'),
15 });
16 this.on('error', function(err) {
17 console.log('Socket Error: ', JSON.stringify(err));
18 });
19 this.on('timeout', function() {
20 console.log('Socket Timed Out'),
21 });
22 this.on('close', function() {
23 console.log('Socket Closed'),
24 });
25 });
26 return client;
27 }
28 function writeData(socket, data){
29 var success = !socket.write(data);
30 if (!success){
31 (function(socket, data){
32 socket.once('drain', function(){
33 writeData(socket, data);
34 });
35 })(socket, data);
36 }
37 }
38 var Dwarves = getConnection("Dwarves");
39 var Elves = getConnection("Elves");
40 var Hobbits = getConnection("Hobbits");
41 writeData(Dwarves, "More Axes");
42 writeData(Elves, "More Arrows");
43 writeData(Hobbits, "More Pipe Weed");