
Chapter 7. Many Devices, One Application
Android devices have hundreds of different hardware configurations, from advanced TVs to very basic phones. Writing an application that runs perfectly across the whole spectrum can seem like a daunting task. Android, fortunately, provides many tools to handle the ecosystem on which it runs. In this chapter, I’ll show you how to leverage Android’s layout folder hierarchy system, configure your manifest to ensure that your application is available only to phones that can run it correctly, and handle older versions of the Android SDK. Android’s diversity can be a challenge, but I’ll show you how to use the available tools to make it a manageable one. This chapter also covers the secrets of the res/ folder; weeding out devices with the manifest; and accommodating older phones with reflection.
Uncovering the Secrets of the res/ Folder
Earlier, I gave you a basic mapping of what goes where in the res/ folder. In this section, I’ll show you its more advanced functions. As always, you can either code this yourself or follow along from the sample code posted at Peachpit.com/androiddevelopanddesign.
Layout Folders
Layout resource folders will be the first technique at your disposal, and it also happens to be one of the most effective. Android will pick layout files from a folder that matches the hardware configuration closest to the one it’s running on. Using this technique, you can define multiple screen layouts for any number of different hardware configurations. Let’s start with something simple: landscape mode.
Let’s say you have a simple screen with two buttons. Here’s the XML that produced the two buttons.
<!--Text view for question and relative layout params omitted-->
<RelativeLayout
android:id="@+id/button_holder"
android:layout_centerInParent="true"
android:layout_width="match_parent"
android:layout_height="wrap_content"
android:padding="20dp">
<Button
android:id="@+id/yes_button"
android:layout_width="match_parent"
android:layout_height="wrap_content"
android:gravity="center"
android:padding="15dp"
android:text="@string/yes_button_text" />
<Button
android:id="@+id/no_button"
android:layout_width="match_parent"
android:layout_height="wrap_content"
android:layout_below="@id/yes_button"
android:gravity="center"
android:padding="15dp"
android:text="@string/no_button_text" />
</RelativeLayout>
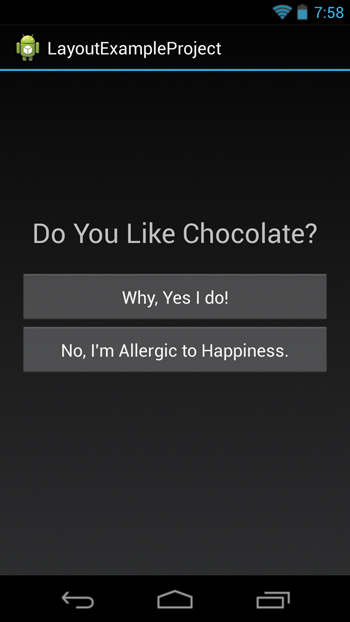
What you see in this code listing shouldn’t be anything new, given your experience with the RelativeLayout in previous chapters. I’ve declared two buttons, pinning the Yes button to the top and aligning the No button below it. When shown in portrait mode, these buttons look simple but pretty good (Figure 7.1). While this will win me a design award only if the judges are partially blind, it’s a fairly good-looking, simple, and functional screen. But take a look at what happens when I switch it to landscape mode (Figure 7.2).
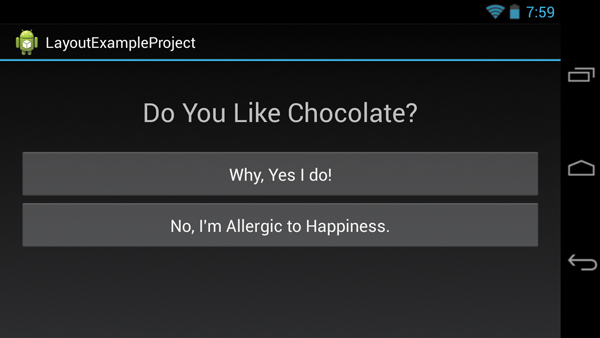
This is, for lack of a better term, ugly. The buttons are far too wide in proportion to both their text and the “Do You Like Chocolate?” question above them. This is exactly the sort of problem that Android’s layout folders make easy to solve.
To the fix this graphical mess, I want the buttons to be side by side in landscape mode while still being stacked in portrait mode. There are two approaches to fixing this problem: a slightly heavy-handed method involving setting up a second screen layout for landscape, or using a scalpel to excise and fix only the parts that are broken. Both solutions have their place. And both solutions require a new folder.
The landscape folder
Android allows you to specify different layout folders for various hardware screen configurations. Since both solutions require a layout-land folder, let’s create it now. Inside your resources folder (res/), create a new folder named layout-land. Since resource folders are ordered alphabetically, this folder should show directly below the layout folder.
Using different folders
The first example solves the problem by adding an entirely separate layout file to your layout-land folder that will take the place of the default layout located in the layout folder.
Now we come to the magic part.
Create a new layout file inside the layout-land resource folder, and name it the same as the layout file you wish to replace in the layout folder. For example, in our project, both of these files are named activity_main.xml. With this extra layout file in the layout-land folder, Android will use the appropriate layout automatically when the device is in landscape mode, no code required!
Using <include> for small changes
The <include> tag is a fantastic way to pull out small portions of your screen that you’d like to tweak and lay out separately. This is the scalpel method. You cut out only the portions you want to render differently, you split them into folder-separated layouts, and you’re finished. Which, in this case, is a perfect way to excise the buttons and have them render differently depending on the screen orientation. Here’s how to do exactly that.
1. Create a new button_layout.xml file in res/layout-land/.
This is the file into which we’ll put the landscape-specific layout.
2. Add a LinearLayout and two Buttons in the new button_layout.xml file, and place them next to each other in the new horizontal linear layout. Here’s the final contents of my /layout-land/button_layout.xml.
<?xml version="1.0" encoding="utf-8"?>
<LinearLayout xmlns:android="http://schemas.android.com/apk/res/android"
android:id="@+id/button_holder"
android:layout_width="match_parent"
android:layout_height="wrap_content"
android:layout_centerInParent="true"
android:padding="20dp"
android:orientation="horizontal">
<Button
android:id="@+id/yes_button"
android:layout_width="match_parent"
android:layout_height="wrap_content"
android:layout_weight="1"
android:layout_marginRight="5dp"
android:gravity="center"
android:padding="15dp"
android:text="@string/yes_button_text" />
<Button
android:id="@+id/no_button"
android:layout_width="match_parent"
android:layout_height="wrap_content"
android:layout_weight="1"
android:layout_marginLeft="5dp"
android:gravity="center"
android:padding="15dp"
android:text="@string/no_button_text" />
</LinearLayout>
As you can see, I’ve created a horizontal layout with two buttons to be used in landscape mode.
Don’t forget about the portrait layout. If we’re going to include a layout, it’s got to exist for both the landscape configuration and the default configuration.
3. Create a new button_layout.xml file in /res/layout/ (or you could add it as /res/layout-port/button_layout.xml). I’ve just copied the original buttons’ code and pasted it into a new RelativeLayout:
<?xml version="1.0" encoding="utf-8"?>
<RelativeLayout
xmlns:android="http://schemas.android.com/apk/res/android"
android:layout_marginBottom="60dp"
android:layout_width="fill_parent"
android:layout_height="100dp"
android:layout_alignParentBottom="true">
<Button
android:padding="15dp"
android:gravity="center"
android:id="@+id/yes_button"
android:layout_marginLeft="30dp"
android:layout_marginRight="30dp"
android:layout_width="fill_parent"
android:layout_height="wrap_content"
android:layout_above="@+id/no_button"
android:text="@string/yes_button_text"/>
<Button
android:padding="15dp"
android:gravity="center"
android:id="@+id/no_button"
android:layout_marginLeft="30dp"
android:layout_marginRight="30dp"
android:layout_width="fill_parent"
android:layout_height="wrap_content"
android:text="@string/no_button_text"
android:layout_alignParentBottom="true"/>
</RelativeLayout>
At this point, you’ve created two layouts: one for portrait and one for landscape.
4. You can now modify your original XML with an include so it looks like this:
<?xml version="1.0" encoding="utf-8"?>
<RelativeLayout xmlns:android="http://schemas.android.com/apk/res/android"
android:layout_width="match_parent"
android:layout_height="match_parent">
<TextView
android:layout_width="match_parent"
android:layout_height="wrap_content"
android:layout_above="@+id/button_holder"
android:gravity="center"
android:text="@string/question_text"
android:textSize="15dp" />
<include layout="@layout/button_layout" />
</RelativeLayout>
With the <include ... /> tag in place (instead of a single button definition), Android will grab the button_layout.xml file that corresponds to the screen configuration. If it can’t find one, it will default back to what’s in /res/layout.
Now, with this new code, the landscape mode looks much better (Figure 7.3).

Are there things that could be improved? Sure! Now, however, you know how to specify that parts of your user interface should change as the screen’s hardware configuration changes.
What Can You Do Beyond Landscape?
Lots. You can add suffixes to layout folders to account for just about everything. Here are a few I use on a regular basis:
![]()
layout-small, layout-normal, layout-large, layout-xlarge
The size modifier accounts for the physical size of the screen. Devices that would use the small layout folder are typically very old or very strange pieces of hardware, at least until Android-powered watches become popular. Most modern phones fit the layout-normal category, while many tablets are considered xlarge. Google keeps a great breakdown of all the various screen configurations at http://developer.android.com/resources/dashboard/screens.html.
![]()
layout-ldpi, layout-mdpi, layout-hdpi, layout-xhdpi, layout-sw600dp
The dpi, or dots per inch, of the device is a measurement of screen density. Screens with high densities (240 dpi) would pull from the layout folder layout-hdpi. Devices whose smallest width (sw) is 600dp or greater would pull from the layout-sw600dp folder, which is the generally accepted qualifier for 7-inch tablets such as the Nexus 7.
![]()
layout-large-hdpi-land
You can also mix and match the suffixes. This suffix would be used for phones that have large screens and high resolution and that are in landscape mode. Get creative, but remember that just because you can get very specific about screen configurations, it doesn’t mean you should.
The Full Screen Define
Just as you can place separate layout files to be referenced in <include> for different hardware configurations, so can you define a completely different screen in the layout-land folder for the system to use in landscape mode. This might seem like the best course of action at first, but it is less than ideal for several reasons.
![]() It involves a lot of typing.
It involves a lot of typing.
Instead of defining two small parts that change based on the screen configuration, you have to make and test more than one entire screen layout.
![]() Making changes can be painful.
Making changes can be painful.
With many hardware configurations comes a plethora of different screens. Were you to fully lay out a screen for every configuration, you’d have a nightmare on your hands when your designer wants to remove or add a button. You would have to add it separately to each XML file for every single screen configuration.
Those two things aside, sometimes you really do need a completely separate layout for a different hardware or screen configuration. Try to modify small parts when you can, but don’t be afraid to crack your knuckles and make a totally new screen layout when it’s necessary.
To make a new layout of the “chocolate” example, you can simply make a second two_buttons.xml file in /res/layout-land and configure the screen in any way you like. Then the call to setContentView in the onCreate method of your activity will, like include, find the right resource for the right screen configuration.
How can this possibly work?
That’s a great question that I’m glad you asked only at the end of the section. Because it separates layout files from activities, Android can have any number of different layouts for the myriad of possible screen configurations. You simply specify the layout name, and Android goes off in search of the correct XML file to show the user. To keep this process running smoothly, keep the following things in mind:
![]() The layouts must share the same name.
The layouts must share the same name.
Android can only find the layout XML by name. As long as the layout files have the exact same filename, it will locate the version in your landscape (or any other) folder.
![]() Make sure that the IDs for your individual views are consistent.
Make sure that the IDs for your individual views are consistent.
Remember that your activity calls findViewById in order to manipulate and interact with onscreen objects. The activity shouldn’t care where a view is to register a click listener, set an image, or pull data from an EditText.
![]() Try not to move views around in your activity’s Java code.
Try not to move views around in your activity’s Java code.
Your activity shouldn’t try to change the position of things onscreen. While in portrait mode, the button might be at point (330, 120); it will be somewhere totally different in landscape mode. In this situation, adding more screen layouts will require also adding the corresponding movement code to your activity, and this can become time consuming.
Be careful
Debugging layout issues across many linked layout files can be exhausting (I’ve done it), so keep your layouts as stretchy and dynamic as you possibly can. If your designs are done well, they should be able to handle many screen resolutions automatically with good use of linear and relative layouts. Fall back on includes and multiple layout folders only when dynamic layouts can’t do the job. There will be times, however, when one layout doesn’t do all screens justice. When this happens, make your breakouts as small and efficient as possible. Don’t hesitate to use this amazing layout tool, but be careful not to use it too much.
Limiting Access to Your App to Devices That Work
Your Android application may, in a lot of cases, require some very specific hardware in order to work correctly. I imagine that users who, for example, download a camera app to a device that doesn’t have a camera will have a very poor experience.
The <uses> Tag
Android gives you an avenue to tell the marketplace which devices it should allow to download and purchase your application. This is done with the <uses> tag in your AndroidManifest.xml file.
If, for example, your app requires the device to have a camera, you should add the following line to your manifest:
<uses-feature android:name="android.hardware.camera"
android:required="true"/>
This line tells Android that the application should not be installed on a device without a camera, because it’s required for correct operation. You can, on the flip side, declare that your app use a particular piece of hardware but degrade appropriately if it’s not there. An image-editing app might want the camera, but if the camera’s not there it may still function by modifying images saved from the web in the device’s built-in gallery. You tell the system this by declaring the hardware as used but setting the requirement to false:
<uses-feature android:name="android.hardware.camera"
android:required="false"/>
There are a host of hardware features you can set. It’s probably best to check the documentation for the full list (http://developer.android.com/guide/topics/manifest/uses-feature-element.html).
SDK Version Number
You can also declare which versions of the SDK your application supports. You do this by declaring <uses-sdk> in your manifest. In fact, if you created your project using your IDE or command-line tools, you already have a basic declaration:
<uses-sdk android:minSdkVersion="10" />
You can add minimum and maximum supported SDKs if there are classes or objects you rely on that aren’t available on older devices. You can, however, block out older and newer versions of the SDK with a declaration that looks like this:
<uses-sdk
android:maxSdkVersion="14"
android:minSdkVersion="9" />
This will tell Google Play to list the associated application for devices that are SDK 9: Android 2.3 (code name Gingerbread) and above. It will also block devices greater than SDK 14: Android 4.0 (code name Ice Cream Sandwich) from running your software. Further, if you try to load the app through a web link, the downloader will block the install on the grounds that the application isn’t supported.
It’s worth mentioning that this sort of heavy-handed blocking should really be a last-ditch effort. If you can make your application work well with both the latest and oldest devices, you should. With this declaration, you can limit who is allowed to install your app.
Handling Code in Older Android Versions
I can’t tell you how many times I’ve found the perfect Android SDK class to solve some annoying problem, only to find out that its use is limited to the latest version of the SDK. There is one trick you can use when faced with code that will compile only on later versions of Android: reflection.
While reflection is in no way unique to Android (it’s built into Java), it is something you can use to protect older phones from newfangled classes and methods.
SharedPreferences and Apply
Long ago, in a galaxy that’s actually quite close, Google figured out that writing to disk on the main thread is a bad thing for performance. During this discovery, they found that the SharedPreferences (something that’s typically used to save user settings and preferences) do actually write to disk when you save them through their commit method. You’ll see what I’m talking about in the following method, which saves a username to the preferences:
public void setUsername(String username){
SharedPreferences prefs =
PreferenceManager.getDefaultSharedPreferences(this);
Editor ed = prefs.edit();
ed.putString("username", username);
ed.commit();
}
This works just fine, but as it turns out, commit writes to the disk, and calling this on the main thread is a no-no (for reasons we’ve discussed at length). In SDK version 9, however, Google introduced the apply method to the SharedPreferences Editor class. Again, this is great, but there’s a catch: Any device that tries to use a class containing the apply method will throw a validation exception and crash. So how, you might be wondering, do you use apply on Android SDK 9 (2.3.3) and higher without breaking any 2.2 (or earlier) devices?
![]()
Build.VERSION.SDK_INT is an integer representing the value of the SDK that the devices is currently running.
![]()
Build.VERSION_CODE.GINGERBREAD is an integer constant provided to you by the system. All versions of Android are represented in the VERSION_CODE constants, up to the SDK target that you are compiling with. You could replace this constant with the number 9, but it would not be as readable in your code base.
Version Check Your Troubles Away
The solution for this problem, and indeed all problems with later declared SDK methods, is to access them conditionally by checking the API version at runtime. Runtime checking is a great way to handle these kinds of situations.
Ideally, I’d like to call apply if it’s available (SDK 9 and higher) but fall back to commit if apply is going to cause problems. Here’s the new version of setUsername to do exactly that:
public void setUserName(String username){
SharedPreferences prefs =
PreferenceManager.getDefaultSharedPreferences(this);
Editor ed = prefs.edit();
ed.putString("username", username);
if(Build.VERSION.SDK_INT >= Build.VERSION_CODES.GINGERBREAD){
ed.apply();
}else{
ed.commit();
}
}
While this method starts the same as the previous one—getting the Editor and using it to save the string—it diverges when it comes time to save that username.
Build.VERSION.SDK_INT will always refer to the current build number of the device that the application is running on. If the device is running 2.3, it will return 9; if the device is running 4.2.2, it will return 17; and so on. This number will correspond with the constants in Build.VERSION_CODES, which is a convenient way to check the compatibility of the OS with the code you are trying to run.
In this code, we are checking whether the OS version is at least Gingerbread. If it is, we are going to use the apply method; otherwise, we are going to use the commit method. This technique has a variety of use cases, such as only using the new ActionBar APIs that were added in API 11 and API 14.
Always Keep an Eye on API Levels
In the Android documentation, each class and method has a small gray label reading “Since: API Level #” on the right-hand side. If that number is higher than the system you’d like to support, you may need to re-evaluate using that class or method.
Reflection allows you to have the best of both worlds. You can use these latest methods on newer devices that support them, while gracefully degrading on devices that don’t.
Keep in mind, however, that reflection is slow and potentially error prone, so use it sparingly and with care. If you’re going to be frequently using a class or method that has two different implementations (Contacts, for example), consider using a Factory pattern to load different classes instead. That is, write two Adapter classes for each version of the class (one for the old, one for the new), and use your Factory to return whichever one is supported. You can always find out which SDK your device is running by checking android.os.Build.Version.SDK.
Wrapping Up
In this chapter, you learned how to handle diversity in screen resolution, density, and configuration. You did this through advanced use of the layout folders, the <include> tag, and Android’s XML layout system. Then you learned how to tell Android which device features you require by putting declarations in the manifest. Last, you learned about using OS version checking to take advantage of advanced methods when they’re available and to avoid them when they’re not.
Given all these tools, you should be ready to bring your killer mobile application into play on the tremendous number of devices—from refrigerators to phones to televisions—available to you on the Android platform.
In any case, monotony is boring. Different devices allow for innovation, greater user choice, and funny-looking screen protectors. Now that you’re equipped to handle it, you’ll be scaling resources and rocking the landscape mode with ease.