
Chapter 1. Getting Started with Android
The first and arguably most pivotal step to building an Android application is installing an integrated development environment (IDE). If you’ve already built an Android application and are comfortable with the IDE you chose—Eclipse (ADT Bundle) or Android Studio—congratulations are in order! You can skip this chapter and move on to the fundamentals. For those of you who haven’t, you’ll get through this before you can say “Open Handset Alliance” three times quickly.
In this chapter, you’ll move quickly through the platform configuration. You’ll
• Learn about your IDE options
• Download and configure Eclipse (ADT Bundle) or Android Studio
• Update the Android software development kit (SDK) to the latest version
• Create and configure a shiny new Android emulator
• Start a new Android project
• Run your Android project on your shiny new Android emulator Excited yet?
Exploring Android Development Environments
So you have to make a decision, beyond the decision to read this book! The decision is between Eclipse (ADT Bundle) and Android Studio. You’re free to change your mind at any point during the book, and if you’re really ambitious, you might even choose both. It’s important to understand a few key differences between these IDEs before deciding.
Eclipse (ADT Bundle)
Android’s home and birthplace. Formerly, Android users needed to download a standalone version of Eclipse and configure the Android software development kit (we’ll just call it SDK from here on out) separately. Google has alleviated all this hassle by packaging the SDK with Eclipse and branding it as ADT Bundle. Eclipse has been Android’s primary development environment since its preview release in 2008. Since then, just about every Android app that you know and love (or hate) has been built in Eclipse. It has wonderful strengths, its setup gets easier with every iteration, and there are years of amazing source code, project troubleshooting, and development guides all over the Internet that are exclusively linked to it.
Pros:
![]() Up and running in less than 5 minutes.
Up and running in less than 5 minutes.
![]() Most open-source projects from 2008 to 2013 are designed to be imported into Eclipse.
Most open-source projects from 2008 to 2013 are designed to be imported into Eclipse.
![]() Every problem you could ever have with Android and Eclipse has been asked on the Internet 100 times over.
Every problem you could ever have with Android and Eclipse has been asked on the Internet 100 times over.
Android Studio
Android Studio was announced at Google I/O 2013. It is based on a popular Java IDE named Intellij and is being designed as a complete replacement for Eclipse for developers wanting other options.
Pros:
![]() Powerful code inspection, capable of understanding how Android resources and source files interact
Powerful code inspection, capable of understanding how Android resources and source files interact
![]() Deep integration with Android’s new build system, Gradle (more on this later)
Deep integration with Android’s new build system, Gradle (more on this later)
![]() Slated to become the standard Android development tool as adoption grows
Slated to become the standard Android development tool as adoption grows
![]() (Bonus!) Dark-themed IDE built in
(Bonus!) Dark-themed IDE built in
If you are an experienced Java developer and you are familiar with Intellij, then Android Studio might be for you. However, it is a way less traveled, and you will find yourself with questions that you will have to persevere to figure out. If you have a lot of experience with Eclipse, or no experience at all, then I recommend Eclipse.
Getting Everything Installed
Since Eclipse shares many of the same options as Android Studio, it isn’t completely necessary to address them in separate chapters. For sections that are pertinent only to one or the other, look for Eclipse or Android Studio in the title. I promise it’s safe to skip over those parts that aren’t relevant to your decision.
At this point, there’s nothing left to do but get started! If a title doesn’t look like it applies to your operating system, skip ahead until you find one that does. Bear with me; you’ll be working on your first application in no time.
![]() Note
Note
For the duration of this book, I assume you’re using Eclipse or Android Studio for most of your development. But I include command-line methods as well as screenshots for all important commands and tasks in case you’re rocking the terminal with Vim or Emacs.
Installing Eclipse (ADT Bundle) for OS X, Linux, Windows
First things first: Whenever I say “Eclipse” in this book, I am referring to ADT Bundle. This is because ADT Bundle is just Eclipse with some extra stuff. With that out of the way, let’s get started.
Fire up your favorite Internet browser, and head on over to http://developer.android.com/sdk/index.html. From there, follow the instructions for downloading the appropriate application for your system.
Installing Eclipse is as simple as decompressing the file you’ve downloaded and putting the application somewhere you’ll remember. Although you can unpack this file anywhere, I recommend placing it in /Users/yourUserName/Documents/adt-bundle-<distribution-information>/.
Eclipse doesn’t install onto your machine like a normal program. The application you see in the unzipped folder is the actual application. Make sure you don’t remove Eclipse from that folder; otherwise, Eclipse won’t know where to find the Android SDK.
Command-line enthusiasts
If you’re using OS X or Linux and you’re a command-line person, then I recommend you put two directories on your path, as follows:
1. Navigate to /User/userName/.profile.
2. Assuming that you installed the SDK in the location I recommended, add the following code to your profile:
export PATH=${PATH}:/Users/<userName>/Documents/adt-bundle/sdk/tools export PATH=${PATH}:/Users/<userName>/Documents/adt-bundle/sdk/platform-tools
Now, when you open a new terminal, typing which android will return the path where you installed the Android SDK. Keep this command in mind—you’ll return to it in a minute.
Installing Android Studio
Go to http://developer.android.com/sdk/installing/studio.html and download the appropriate file for your system. Browser operating system detection is pretty great nowadays, and just by clicking Download you should retrieve the proper application.
OS X
Once you have downloaded the .dmg file for Android Studio from http://developer.android.com/sdk/installing/studio.html, double-click it to open it, and drop the application into your Applications folder.
Linux
This should be pretty straightforward. Once you have downloaded the .tar file from http://developer.android.com/sdk/installing/studio.html, double-click it to unpack it, and place it in an appropriate location for your distribution.
Windows
On Windows, you are installing an executable instead of just unzipping a folder. After launching the executable that you downloaded from http://developer.android.com/sdk/installing/studio.html, follow the setup wizard for choosing an installation location—that’s it!
Issues
There are always a few known issues, and Google does a great job of documenting them. Refer to http://tools.android.com/knownissues and look for information related to the issue you’re having. Most common issues are based on the system not knowing where the Java Development (JDK) is installed on your system. Android Studio works with JDK 7, but don’t download it unless you’re sure you need it. And if you’ve done any development before, you probably already have it.
Command-line enthusiasts
If using OS X or Linux, the command line is invaluable to your Android development process. If ever a time arises that Android Studio is not playing nicely (lookin’ at you, Eclipse!), it’s generally safe to assume that the command line won’t let you down.
1. Navigate to /User/yourUserName/.profile.
2. Assuming that you installed the SDK in the Applications folder, add the following code to your profile:
export PATH=${PATH}:/Applications/Android Studio.app/sdk/tools
export PATH=${PATH}:/Applications/Android Studio.app/sdk/platform-tools
Now, when you open a new terminal, typing which android –help will reveal all the tools available to you for managing your SDK and virtual devices.
Updating the Android SDK
With your IDE now installed, you’re just a few steps away from running your own Android application. You need to update the SDK so that you have options for the emulators you want to use and so that you have source code and resources available for references. By default, your downloaded IDE will have the latest version of the Android SDK packaged with it, but since not all users will always receive the latest and greatest updates, you should download some older SDKs to make sure that all your users are supported.
The first step is to open the SDK Manager.
1. In Eclipse, open the ADT Bundle folder you downloaded, and within the eclipse folder, double-click to open Eclipse.
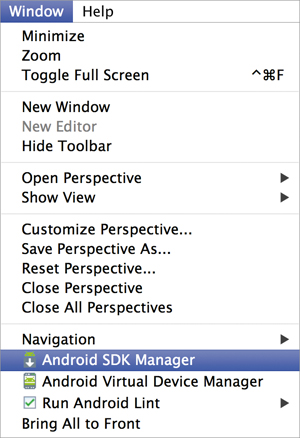
Once it’s open, select Window > Android SDK Manager, as in Figure 1.1.
or
In Android Studio, from the application toolbar, choose Tools > Android > SDK Manager (Figure 1.2).

This launches the tool responsible for managing your Android SDK, which includes everything from source files and build tools to Google’s add-on libraries, such as in-app billing and application compatibility.
 Tip
Tip
If you have configured your path properly, you can also access the SDK manager by typing android sdk into the command line (see “Getting Everything Installed”).
For many applications, it’s not enough to support only the latest version. Unless you know right away which SDK versions you want to support, I recommend selecting the same ones you see selected in Figure 1.3:
![]() Android 2.3.3 (Gingerbread)
Android 2.3.3 (Gingerbread)
![]() Android 4.0 / 4.0.3 (Ice Cream Sandwich / ICS)
Android 4.0 / 4.0.3 (Ice Cream Sandwich / ICS)
![]() Android 4.1.x /4.2.x / 4.3.x (Jelly Bean)
Android 4.1.x /4.2.x / 4.3.x (Jelly Bean)
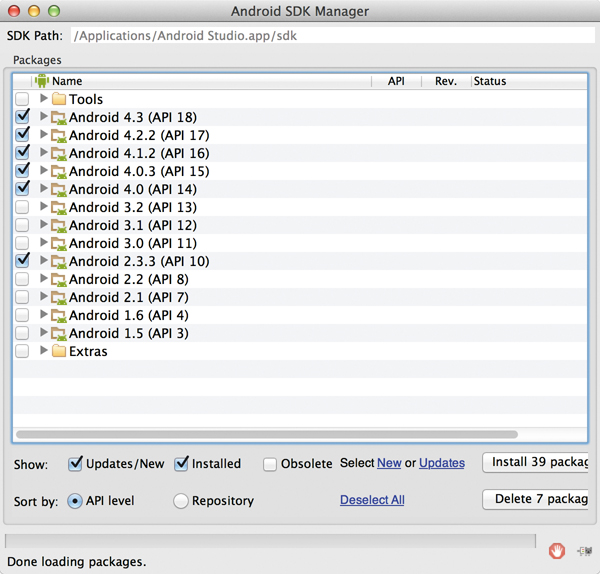
By downloading these versions, you should have immediate access to the virtual devices and source files you need to build almost any modern application.
2. In the Android SDK Manager dialog, click Install x Packages, agree to Google’s terms (read at your own risk), and away you go. This can be a bit tricky because you have to accept each group of licenses individually, so make sure you verify that you’ve accepted them all.
The Android SDK Manager should download and install the selected platforms for you. This is a large download, so I recommend you do this on a fast and reliable Internet connection.
Keep in mind that the platform you’re downloading corresponds to a particular version of the Android operating system running on devices. Older phones may not support all the SDK calls that the latest phones might. As you learn about various SDK calls, you’ll learn strategies for dealing with older devices.
Configuring Devices
With your IDE up and running and your Android SDK up to date, you need to create a device to test your applications on. One of the greatest features of Android development is that you are developing on real devices (or real device emulators). You can have the satisfaction of whipping out your phone and saying “Check out this app I made!” Your friends may not be impressed with your “Hello World” app, but who needs them anyway.
Virtual Device Emulator
The virtual device emulator is an application that runs on your computer and completely emulates a real Android device. While this emulation can be a bit slow and the speeds can choke up at times, it is a reliable means of development, and it lets you test on any version of Android without spending a dime. Here’s how to create as many virtual devices as your heart desires.
1. With Eclipse running, choose Window > Android Virtual Device Manager.
or
With Android Studio running, choose Tools > Android > AVD Manager.
or
If you’re a command-line junkie, run android avd in the shell. (I’m going to assume you were able to add it to your path.)
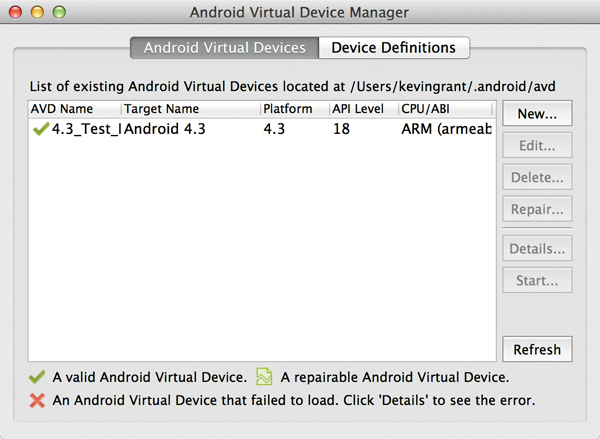
The Android Virtual Device Manager displays (Figure 1.4).

2. Click the Android Virtual Devices tab, and click New to open the Create New Android Virtual Device (AVD) dialog.
Use Figure 1.5 as a guide to configure your new device.
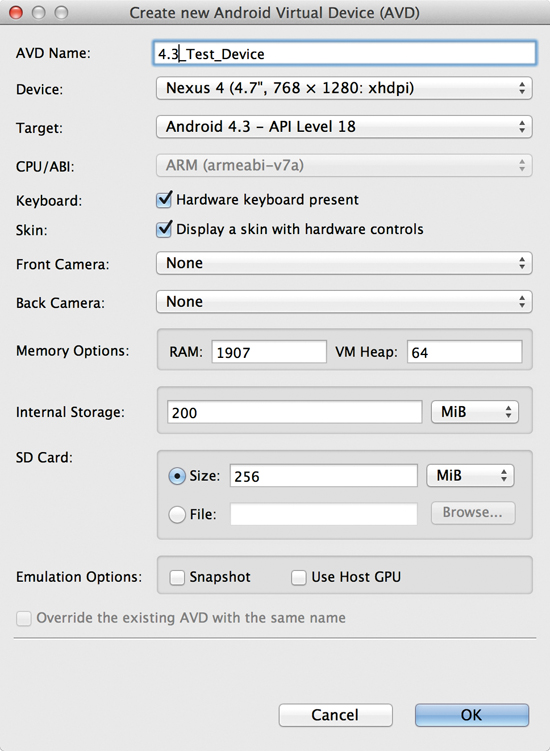
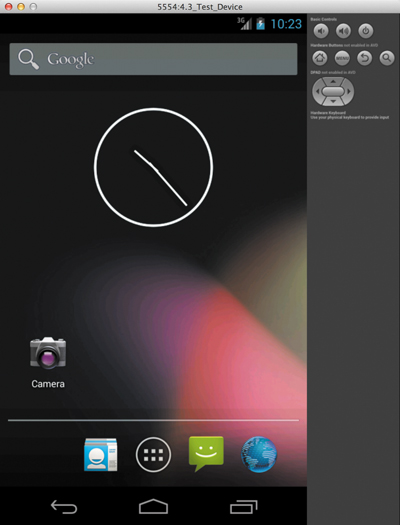
3. In the AVD Name field, enter a descriptive name, such as “4.3_Test_Device” (allowed characters: numerals, upper- and lowercase letters, period, underscore, and hyphen).
4. Select Nexus 4 from the Device menu.
5. Select Android 4.3 – API Level 18 from the Target menu.
6. In the SD Card field, select the Size radio button and enter 256.
7. Leave the Snapshot and Use Host GPU options unselected for now; we will address those in a moment.
8. Click OK and do a little dance next to your desk—or don’t, it’s up to you (Figure 1.6).
9. Select your new emulator, and click the Start button to get it running. Feel free to adjust the launch options available to you, but the default ones will be fine for 95 percent of your purposes. Click Launch from the launch options, and the laborious process of spinning up a new instance of the virtual device begins (Figure 1.7).
Tip
Once you start an instance of the emulator, you don’t ever have to start it up again. Reinstalling the application does not (as it does with many other systems) require you to spawn a new instance of the emulator.
So what about those two options that we left unselected, the Snapshot and Use Host GPU options?
![]() Snapshot saves a snapshot of the device’s current state when you close it, making subsequent startups much faster. When this works, it’s great! But often you might find that the device was left in a corrupted state and needs to be restarted. When starting the device, look in the launch options window. You’ll see two check boxes: Use Launch from Last Snapshot, and Save This Session to a Snapshot. I leave them both selected.
Snapshot saves a snapshot of the device’s current state when you close it, making subsequent startups much faster. When this works, it’s great! But often you might find that the device was left in a corrupted state and needs to be restarted. When starting the device, look in the launch options window. You’ll see two check boxes: Use Launch from Last Snapshot, and Save This Session to a Snapshot. I leave them both selected.
![]() Use Host GPU does what it says—it tries to use the machine’s hardware acceleration if and when possible. Refer to http://developer.android.com/tools/devices/emulator.html for more information if you think you need some more horsepower.
Use Host GPU does what it says—it tries to use the machine’s hardware acceleration if and when possible. Refer to http://developer.android.com/tools/devices/emulator.html for more information if you think you need some more horsepower.
I encourage you to play around with these options. As always, your mileage may vary, but they are important tools to have in your toolset.
Working with a Physical Device
When I have an actual Android device, in almost all cases I’ll do development on it over the emulator. One of the wonderful things about Android is how utterly simple it is to connect and work with nearly any Android phone. Here’s what you’ll need to do if you want to start working with your own device.
1. Find the USB cable that came with your phone, and plug it into your computer.
2. For Android 2.x or 3.x, on your home screen, open your application drawer and look for the Settings app. From within the Settings app, choose Applications > Development. Select the USB Debugging check box.
While you are in the application settings, also select the Unknown Sources check box.
or
For Android 4.0.x and above, on your home screen, open your application drawer and look for the Settings app. From within the Settings app, select Developer Options and toggle the Developer Options switch in the upper-right corner to On. Select the USB Debugging check box (Figure 1.8).

Then go to Settings > Security and select the Unknown Sources check box (Figure 1.9).

Enabling unknown sources lets you install applications that are not from Google Play onto your phone. It might be wise to disable this while you’re not developing, to prevent any possibility of accidentally installing a non–Google Play application.
![]() Note
Note
Starting in Android 4.2, the developer options on phones have been hidden by default. This is because there are many powerful options that can utterly destroy an application’s performance, and most average users should not try to tinker with them. To find developer options on 4.2 and above, go to Settings > About Phone (or About Tablet). Look for the list item Build Number, and press it repeatedly until you start seeing toasts indicating you are only a few steps away from being a developer. When you see the message “You are now a developer,” you can enable the developer options on the primary settings screen.
If you’re on a Windows machine, you may need to install the general USB drivers. You can find them at http://developer.android.com/sdk/win-usb.html.
If you’ve finished everything correctly, you should see a little bug icon in the notification bar on your device. Your phone will work in exactly the same way an emulator would.
Congratulations! If you’ve followed every step thus far, you have your very own emulator or connected device, your Android SDK is correctly installed, and you’re ready to rock and roll. Take a minute to play around with your new emulator before moving on to the next section, which is about creating applications.
Tip
The emulator is a full Linux virtual machine and can be a little heavy on the system resources (especially while Eclipse is running), so make sure your development machine has plenty of RAM.
Creating a New Android Project
Creating a new project in Android has never been easier. Google has provided some very powerful tools that let you bootstrap a basic application in no time. We are going to use the basic project creation wizard to create our first application and learn how all these folders and source files interact with each other. Can’t wait to get started? Me neither, so let’s go!
1. In Eclipse, choose File > New > Android Application Project (Figure 1.10). If you don’t see Android Application Project, select Other and search in the Android subfolder there.

or
In Android Studio, choose File > New Project.
2. Click Next, and Android’s friendly project creation wizard starts. The project creation wizards for each IDE are styled differently, but they offer the same workflow and options (Figures 1.11 and 1.12).


Let’s go over what each field means to your project as you complete them. We’re going to review the screenshots for Android Studio, but for the most part, the wizards are identical. If you don’t see an option that’s being described, it’s most likely coming up on the next screen.
3. In the Application Name field, enter the full name of your application.
This is what will show in the app drawer after you have installed your app.
4. Enter a project/module name. This name is how your IDE keeps track of your project. This name will never show up in your application or on the device, so it’s OK to pick unique and descriptive names here.
5. Enter a package name. This is where all your Java source code is housed. It’s common practice to have your package name mimic the name of its corresponding web service.
For example, if you’re making an application for purplepony.com, then you should probably name your package com.purplepony.
6. From the Target SDK menu, select the latest version of Android.
Newer versions of Android always support applications built through older SDKs. They accomplish this with what’s called compatibility mode. For now, try to target the most advanced version you can.
7. Leave the Compile With and Theme menus at their default values. As it suggests, this tells the compiler that you want to compile with the latest version of Android, and that you want to use the Light Holo theme with a dark action bar. We’ll get more into themes later. Click Next.
![]() Note
Note
Eclipse users: I’m not going to cover how to use the custom icon creator; it’s self-explanatory. If you deselect it, a generic icon will be given to you. If you leave it selected, you will get to play around with some options on the next screen.
8. Leave the Create Activity check box selected, and leave the Mark This Project as a Library check box unselected.
Library projects are powerful ways to share Android code between multiple projects. It’s an advanced topic, so we’re not going to get into it just yet.
9. Click Next through the remaining screens, and click Finish on the last screen. You are off to the races!
Now that you have a project, let’s get it running.
Creating a Project from the Command Line for Eclipse
1. Enter android list targets on the command line, and press Enter. This will list the available targets on your system:
id: 1 or "android-17"
Name: Android 4.2.2
Type: Platform
API level: 17
Revision: 2
Skins: HVGA, QVGA, WQVGA400, WQVGA432, WSVGA, WVGA800 (default), WVGA854, WXGA720, WXGA800, WXGA800-7in
ABIs : armeabi-v7a
2. Enter the following commands, supplying the values for the highlighted items using the bullet list below as a guide:
android create project -n MyFantasticSimpleProject -t 1 -p
myProjectDirectory -k com.peachpit.fantasticProjctPackage -a
NewActivity
cd myProjectDirectory
ant debug install
![]()
-n The name of your project
![]()
-t The build target for the project (corresponds to targets listed in first command)
![]()
-p The path to your project
![]()
-k The project’s package name
![]()
-a The main activity
Running Your New Project
Running your application is a satisfying experience. One of the great parts of the Android IDE is how it simplifies the build and execution process of your applications. As long as you can verify that your device is talking to the IDE properly (which we are about to cover), everything just sort of “works” and it’s truly magical.
Eclipse
1. If your emulator isn’t running, fire it up; if you’re using a physical device, plug it into your computer’s USB port.
2. To verify that Eclipse recognizes your emulator or device, you need to open the DDMS (Dalvik Debug Monitor Service) perspective: Choose Window > Open Perspective > Other, select DDMS from the list that appears, and click OK (Figure 1.13).

3. Verify that Eclipse recognizes your device by looking in the Devices tab of DDMS. If your device is connected, you will see it listed there by name, as well as all the processes that are currently running on it (Figure 1.14). If you don’t see your device there, restart your emulator (or unplug your device) and try again. If you still don’t see it, check out the end of this chapter for troubleshooting details.

Figure 1.14 If your device is recognized, it will appear in the devices list of your DDMS perspective.
4. Return to the Java perspective by clicking the Java tab, which is located next to the DDMS tab in the upper-right corner.
5. From the Run menu, choose either “Run last launched” or Run. Eclipse may ask you to confirm that the app is indeed an Android project.
Android will compile, package, install, and run the application on your emulator or device. You’ve now officially created an Android application.
Android Studio
1. At the bottom of the Android Studio window, click the Android tab (Figure 1.15). If your device has connected properly, you should see it here. If you don’t see your device here, close your emulator or unplug your device. Wait a few seconds, and then turn it back on or plug it back in. If you still don’t see it, check out the end of this chapter for troubleshooting details.

Figure 1.15 Connected devices in Android Studio show up in the Android DDMS tab, located in the lower-left corner of the application window.
2. From the application window, choose Run > Run Your Application. A dialog will appear, asking which device you would like to run it on. Choose either your emulator or your device, and click OK. If all goes as planned, you should see your old friend “Hello world!” (Figure 1.16 on the next page).

Although it doesn’t do much, you’ve successfully created and run your first Android application. As Confucius said, a journey of a thousand miles begins with a single step.
Tip
You can see all the Android device monitoring tools, including DDMS, by running monitor from the command line.
Troubleshooting the Emulator
As a general rule, if things aren’t working the way you expect them to, restart Eclipse. This isn’t limited to Eclipse, of course; Android Studio will also need to be restarted from time to time. If ever you feel like something should “just work” and you’ve double-checked all your code, try restarting. I can’t tell you how many times this has remedied a bug I’d thought I created. If restarting isn’t doing it for you, here’s a handy trick to try out.
If you’re sure your emulator is running, but it refuses to display in the list of devices, you may need to restart the Android Debug Bridge (ADB). Doing this requires getting into the terminal a little bit.
1. If you haven’t set up your command line path (bet you wish you did now), open a terminal window and change directories to the platform-tools folder inside your Android SDK folder.
cd ~/Documents/adt_bundle/platform-tools.
2. Run adb kill-server and count to 15.
3. Run adb start-server.
When you run the start command, you should see the following lines:
* daemon not running. starting it now on port 5037 *
* daemon started successfully *
4. Switch back to the DDMS perspective in Eclipse, or type monitor.
You should see the virtual device listed in the devices window. If you don’t, start from the beginning and restart the emulator, ADB, and your IDE until you do.
5. Switch back to the Java perspective and choose Run > Run.
6. When you’re asked what kind of project it is, select Android.
The dialog may ask which device you’d like to run your project on. Eclipse may also want to know which device you’d like to run your project on. Select emulator or device, depending on which option you’re working with.
7. If you’re using a physical device, now is the time to plug it in, or if using an emulator, this is your chance to start a new one. Otherwise, select one of the available devices and click OK.
Wrapping Up
This chapter covered downloading, installing, configuring, creating, and running Android applications. You now have the basic tools that you’ll need to continue with this book. Feel free, if you’re struggling with the topics in later chapters, to refer back to this chapter as needed.