
11. Combining Graphics with Text
In this chapter, you learn the various ways to combine graphics with text, including placing anchored objects, applying text wraps, and inserting type on a path.
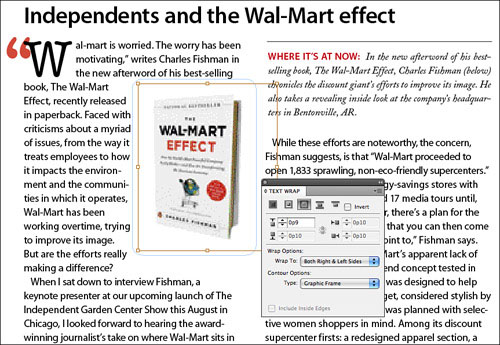
Graphic images and text are two very different page elements that complement each other well in a layout, but in some instances the two merge to become one. For example, you might want to inset a graphic in a body of text and flow the story around it, creating what is known as a text wrap. You also might want to anchor a graphic to the baseline of a paragraph to ensure its positioning in the layout as you edit the surrounding text. You can even create text on a path that can serve as graphic elements in your layout.
Applying Text Wraps
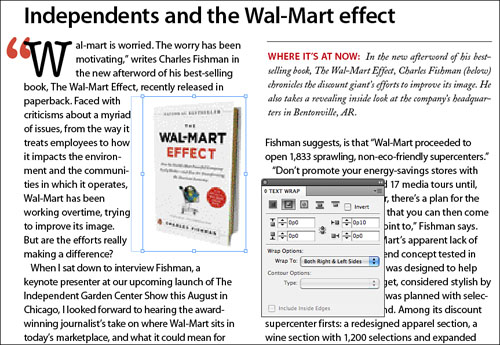
You can push any neighboring text away from an object (such as a shape or placed graphic) by applying a text wrap to it. To do so, select the object and click one of the buttons located at the top of the Text Wrap panel (see Figure 11.1) or in the Control panel. Options include No Text Wrap, Wrap Around Bounding Box, Wrap Around Object Shape, Jump Object, and Jump to Next Column.
Figure 11.1. Click one of the Text Wrap buttons to apply a wrap to the selected object(s).

![]() LET ME TRY IT
LET ME TRY IT
Applying a Text Wrap
Unlike the Wrap Around Bounding Box option, Wrap Around Object Shape only allows you to apply one offset value around the entire object.
- Access the Selection tool from the Tools panel and select the object to which you would like to apply a text wrap.
- Choose Window, Text Wrap to display the Text Wrap panel.
- To control how far the surrounding text is pushed away from each side of the graphic, click the Wrap Around Bounding Box button at the top of the Text Wrap panel, and enter an offset distance amount in any of the top, bottom, left, and right offset fields of the panel (see Figure 11.2).
Figure 11.2. Wrap Around Bounding Box enables you to apply a different text wrap value to the top, bottom, left, and right sides of a frame
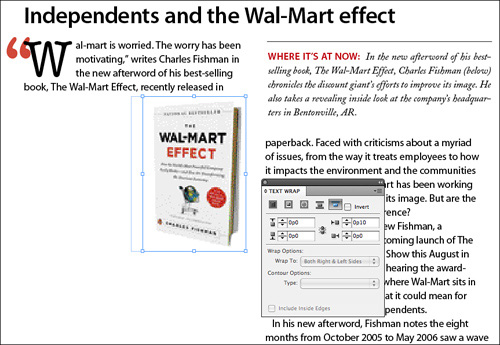
- To apply a single offset value around the entire object click the Wrap Around Object Shape button at the top of the Text Wrap panel. When applying the Wrap Around Object Shape option, InDesign does not allow you access to the other offset fields in the panel. Enter a single offset distance amount in the Top Offset field (see Figure 11.3).
Figure 11.3. Wrap Around Object Shape applies one offset value around the entire object.
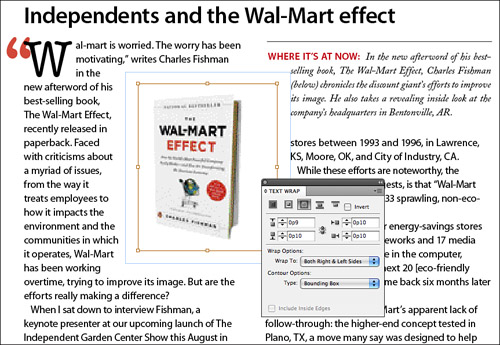
- To apply a wrap that “jumps” the text over the graphic, click the Jump Object button at the top of the Text Wrap panel. Doing so positions text above and below the graphic but not to the left or right. Enter an offset distance amount in any of the top, bottom, left, and right offset fields of the panel (see Figure 11.4).
Figure 11.4. Jump Object applies a wrap that “jumps” the text over an object, resulting in text above and below the offset but not to the left or right.

- To apply a wrap that “jumps” text to the next column, click the Jump to Next Column button at the top of the Text Wrap panel. Doing so stops the text at the top of the offset. Enter an offset distance amount in any of the top, bottom, left, and right offset fields of the panel (see Figure 11.5).
Figure 11.5. Jump To Next Column applies a wrap that “jumps” text to the next column, stopping the text at the top of the offset.
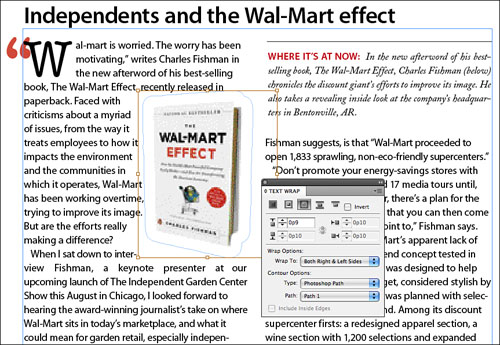
When applying the Wrap Around Object Shape option to a frame containing a placed image, InDesign activates the Contour Options portion of the Text Wrap panel. To view these options, choose Show Options from the panel menu.
The Contour Options Type drop-down list enables you to choose a contour type (such as a clipping path) to base the text wrap on. Options include Bounding Box, Detect Edges, Alpha Channel, Photoshop Path, Graphic Frame, Same as Clipping, and User-Modified Path (for more on working with clipping paths and channels, see Chapter 10, “Working with Graphic Links”).
![]() LET ME TRY IT
LET ME TRY IT
Applying Text Wrap Contour Options
- Access the Selection tool from the Tools panel and select an object that has the Wrap Around Object Shape option applied.
- Choose Window, Text Wrap to display the Text Wrap panel.
- To apply the text wrap to the outer edge of the placed graphic, including all areas that are cropped by the graphic frame, choose Bounding Box from the Type drop-down list (see Figure 11.6).
Figure 11.6. Bounding Box applies a text wrap to the outer edge of the placed graphic. This includes all areas that are cropped by a graphic frame.
- To apply the text wrap based on edges calculated by existing white areas in a placed graphic, choose Detect Edges from the Type drop-down list (see Figure 11.7).
Figure 11.7. Detect Edges applies a text wrap based on edges calculated by existing white areas in a placed graphic.

- To apply the text wrap based on the contour of an embedded alpha channel or Photoshop path, choose Alpha Channel or Photoshop Path from the Type drop-down list (see Figure 11.8). If the placed graphic contains more than one channel or path, select which one you’d like to apply the text wrap to from the Path drop-down list.
Figure 11.8. Alpha Channel and Photoshop Path applies a text wrap to the contour of an embedded alpha channel or Photoshop path.

- To apply one offset value to all sides of the graphic frame container, choose Graphic Frame from the Type drop-down list (see Figure 11.9).
Figure 11.9. Graphic Frame applies one offset value to all sides of the frame container.
- To apply the text wrap based on a clipping path created in InDesign, choose Same As Clipping from the Type drop-down list (see Figure 11.10).
Figure 11.10. Same As Clipping enables you to apply a text wrap based on a clipping path that is created in InDesign

- If your layout calls for it, you can change the way the surrounding text appears by selecting and repositioning points on the boundary path with the Direct Selection tool. You can also add, delete, or convert points using the various Pen tools. Whenever you edit a text wrap path, InDesign automatically displays User-Modified Path in the Type drop-down list (see Figure 11.11).
Figure 11.11. InDesign automatically displays User-Modified Path in the Type list when you edit a text wrap by selecting and repositioning points on the boundary path with the Direct Selection tool.

Tell Me More: Media 11.1—Ignoring Text Wraps
![]()
Access this video file through your registered Web edition at my.safaribooksonline.com/9780132174541/media.
Converting Text to Outlines
InDesign enables you to select text characters and convert them into editable paths. After you convert the text, you can no longer edit the characters with the Type tool; however, you can edit the character paths using the InDesign drawing tools, such as the Pen, Pencil, Eraser, and Scissors (see “Modifying Paths and Frames” in Chapter 5, “Working with Frames and Shapes”).
To convert all the text characters in a selected frame into editable paths, select the text frame with either selection tool and choose Type, Create Outlines. InDesign instantly converts all the characters in the frame and groups them. Characters such as P and A are automatically converted into compound paths. To convert individual selected characters in a text frame into editable paths, highlight them with the Type tool and choose Type, Create Outlines. When you do, InDesign converts the selected characters into paths and treats them as nested inline objects.
Just like with any other custom shape, you can edit a character outline by selecting and repositioning points on the path with the Direct Selection tool (see Figure 11.12). You can also add, delete, or convert points using the various Pen tools; add points using the Pencil tool; erase points using the Erase tool; cut points and line segments using the Scissors tool; and smooth points using the Smooth tool. You can also transform outline characters using the Scale, Shear, Rotate, Free Transform, and selection tools (see Modifying Paths and Frames in Chapter 5).
Figure 11.12. InDesign enables you to edit character outlines using the various drawing tools.

Inserting Inline or Anchored Objects
With InDesign, you can paste an object into a line of text and create what is known as an inline object. In addition, InDesign’s Anchored Objects feature enables you to take this one step further and position the object outside the column. By inserting an inline or anchored object, you can secure the object’s positioning in the layout as you edit or move the text.
![]() LET ME TRY IT
LET ME TRY IT
Inserting Inline Objects
Inline objects are anchored to the baseline along with all of the text characters. Follow these steps to create an inline object:
- Select an object with the Selection tool (such as a graphic frame, text frame, or path) and copy or cut it to the Clipboard (Edit, Cut or Edit, Copy).
- Press T to switch to the Type tool, and insert the cursor in a line of text where you’d like the object to appear.
- Choose Edit, Paste to anchor the object on the line of text (see Figure 11.13).
Figure 11.13. Shown here are three small graphic objects, each pasted on a line of text.

To create an anchored object, apply the Object, Anchored Object, Insert command. By doing so, you can gain access to many additional options, such as the capability to place an anchored object above or beside a text column.
![]() LET ME TRY IT
LET ME TRY IT
Inserting Anchored Objects
To insert an anchored object, apply the following steps:
- Access the Type tool from the Tools panel and place the cursor inside a text frame.
- Choose Object, Anchored Object, Insert.
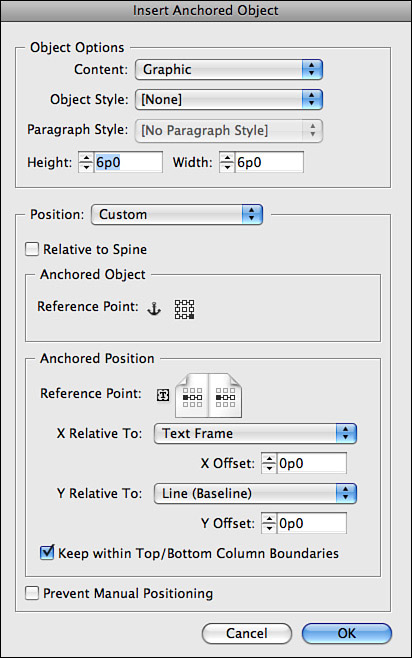
- When the Insert Anchored Object dialog box appears, choose the preferred settings and click OK (see Figure 11.14).
Figure 11.14. The Insert Anchored Object dialog box enables you to specify where you’d like to position the object in relation to the baseline.
- Use the Selection tool to select the anchored frame and place some contents into it using the Place or Paste Into commands, or use the Type tool to add text to it.
After you insert an anchored object into a body of text, you can select it with either selection tool and manually reposition or resize the frame and/or its contents (graphic or text). To lock the anchored object into place, select it and choose Object, Anchored Object, Options. In the Anchored Object Options dialog box that appears, click the Prevent Manual Positioning option.
Show Me: Media 11.2—Inserting Anchored Objects
![]()
Access this video file through your registered Web edition at my.safaribooksonline.com/9780132174541/media.
Working with Type on a Path
InDesign’s Type on a Path tool enables you to create text objects that also serve as graphic elements in your layouts. You can use the tool to place editable text along the contour of any open or closed path. Like all other editable text, you can select type on a path with the Type tool, format it, apply styles to it, and edit it with the Story Editor.
Creating and Editing Type on a Path
To create type on a path, press Shift+T to access the Type on a Path tool, and position the cursor over any open or closed path. When the cursor changes to display a plus sign, click once to position it on the path using the document default paragraph alignment option. Alternatively, you can define the area of the path that you’d like to add text to by clicking and dragging with the tool (see Figure 11.15).
Figure 11.15. Click and drag along the path to define the area you would like to add text to.

After you insert the cursor, you can add text to the path by typing. As you type, the added text follows the contour of the path. You can also paste text onto the path from the Clipboard or import it using the File, Place command. Any text that does not fit is stored as overset text.
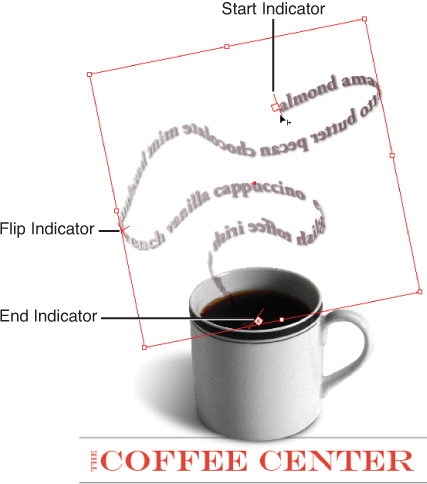
To change the position of the type, select the Start Indicator or End Indicator with the Selection tool, and then hold the mouse button down and drag it along the path (see Figure 11.16). When you’re ready, release the mouse button to apply the change. To flip the type, select the Flip Indicator located in the center of the text, hold the mouse button down, and drag it above or below the path. Release the mouse button to apply the change.
Figure 11.16. Click and drag the Start or End Indicator to reposition the type on the path; click and drag the Flip Indicator to flip the text.
Choosing Type on a Path Options
InDesign also includes several options for working with type on a path. To access these options, choose Type, Type on a Path, Options. In the Type on a Path Options dialog box that appears, you can choose specific effects to apply to selected type on the path. The settings in the dialog box also enable you to change character alignment and spacing, flip the type, or delete it.
![]() LET ME TRY IT
LET ME TRY IT
Choose Type on a Path Options
To apply a type effect to a selected text path object, follow these steps:
- Access the Type on a Path dialog box by double-clicking the Type on a Path tool icon in the Tools panel.
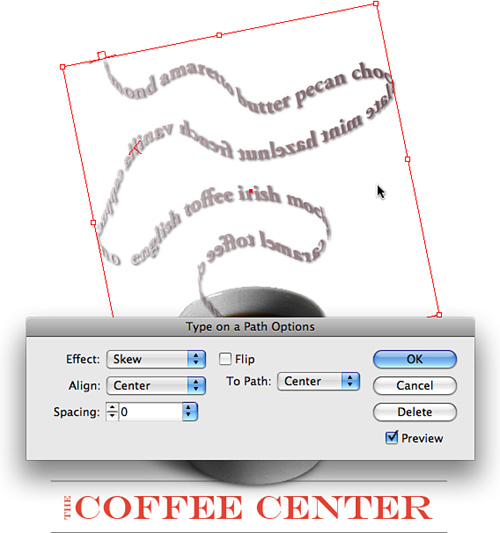
- Choose an effect from the Effect drop-down list. Options include Rainbow, Skew, 3D Ribbon, Stair Step, and Gravity. Enable the Preview option to see the effect applied in the document (see Figure 11.17).
Figure 11.17. Choose an effect to apply to the type on a path from the Effect drop-down list. Shown here is the Skew effect.
- The Align drop-down list enables you to choose a method for aligning the type to the path. Choose from the following options:
• Ascender aligns the top of the capital letters to the path.
• Descender aligns the bottoms of the characters to the path.
• Center aligns the text to the path at the vertical center point of the capital letters.
• Baseline aligns the baseline of the characters to the path.
- To choose a method for aligning the type to the stroke of the path, choose an option from the To Path drop-down list. Options include Top, Bottom, and Center.
- To specify the amount of character spacing to apply to type that is positioned around the curves of the path, enter a point value in the Spacing field. You can also choose a point value by clicking the up and down arrows to the left of the field, or by selecting a preset value from the drop-down list provided.
- To flip the type, enable the Flip option located in the center of the Type on a Path dialog box.
- You can delete type on a path by clicking the Delete button in the Type on a Path dialog box or by choosing Type, Type on a Path, Delete Type from Path.
Show Me: Media 11.3—Choosing Type on a Path Options
![]()
Access this video file through your registered Web edition at my.safaribooksonline.com/9780132174541/media.
Generating Captions for Photos
InDesign enables you to generate a photo caption based on metadata info that is embedded in the placed photo. You can generate a “live” caption that updates as the metadata is edited or as the caption is repositioned over a different photo. You can also generate a “static” caption that remains unchanged regardless of any metadata edits that you apply or where you position the caption in the layout.
![]() LET ME TRY IT
LET ME TRY IT
Generating Captions
Follow these steps to generate a caption:
- Access the Caption Setup dialog box by choosing Object, Captions, Caption Setup, or choose Captions, Caption Setup from the Links panel menu.
- Choose the metadata info that you would like to display in the caption from the Metadata drop-down list (see Figure 11.18). If you’d like to include additional text before or after the metadata info, enter it in the Text Before or Text After fields. To include additional metadata info, click the add button (+); to remove metadata info, click the subtract button (-).
Figure 11.18. You can choose caption setup options from the Caption Setup dialog box.

- In the Position and Style section of the Caption Setup dialog box, choose how you would like to align the caption to the photo by selecting an option from the Alignment drop-down list. Options include Below Image, Above Image, Left of Image, and Right of Image. To include extra space between the caption and photo, enter a value in the Offset field.
- To apply an existing paragraph style to the caption text, choose a style from the Paragraph Style drop-down list.
- You can also choose which layer you’d like to place the caption on by selecting it from the Layer drop-down list.
- Enable the Group Caption with Image option to allow live captions to display the caption text even when the caption frame is not touching the companion photo.
- When you finish choosing caption setup options, click OK to close the Caption Setup dialog box.
- To generate a live caption, choose Object, Captions, Generate Live Caption. To generate a static caption, choose Object, Captions, Generate Static Caption (see Figure 11.19).
Figure 11.19. InDesign displays the caption using the specified setup options.

You can also generate a static caption when placing a photo using the File, Place command. To do so, enable the Create Static Captions option located at the bottom of the Place dialog box (see Figure 11.20). When you click Open, InDesign closes the Place dialog box and displays the loaded place cursor. After you place the photo, InDesign reloads the cursor with the static caption. Click and drag to create a frame for the caption text. When you release the mouse button, InDesign places the text inside the frame.
Figure 11.20. Enable the Create Static Captions option in the Place dialog box.
