6. Working with Objects
In this chapter you learn how to transform, group, arrange, lock, duplicate, align, and distribute objects. You also learn how to use layers and save objects into a library.
As a designer, you’ll most likely spend quite a bit of time moving objects around the page before coming up with a design you’re satisfied with. Learning the various ways you can work with page objects in InDesign can save you time in the long run.
Transforming Objects
InDesign provides several ways to transform objects. You can move, scale, rotate, or shear objects using various tools and commands.
Moving Objects
To move an object, you must first select it with the Selection tool (by clicking anywhere on it) or select it with the Direct Selection tool (by clicking its center point). You can then use any one of the following methods to reposition it on the page:
• Drag the selected object to a new location.
• Enter new X and Y coordinates in either the Transform panel (see Figure 6.1) or Control panel.
Figure 6.1. To move a selected object to a precise position on the page, enter specific X and Y coordinates in the Control panel or Transform panel.

• Access the Move dialog box (Object, Transform, Move). Enter values in the Horizontal, Vertical, Distance, and Angle fields and click OK (see Figure 6.2).
Figure 6.2. Enable the Preview option in the Move dialog box to see the object transformation before it is applied.

• Nudge the object using the arrow keys.
Resizing Objects
To resize an object, you must first select it with the Selection tool, and then perform any one of the following actions:
• Drag one of the object’s frame nodes with the Selection tool. Frame nodes are the white squares located on the object’s outside area. Each object has eight nodes. As you drag, press the Shift key to keep the object in proportion. To scale an object’s contents at the same time, press Cmd (Mac) or Ctrl (Win) as you drag.
• To resize a container without its contents, enter new width and height values in either the Transform panel or Control panel. To resize a container and its contents simultaneously, enter new X and Y scale percentages in either the Transform panel (see Figure 6.3) or the Control panel. When you do so, InDesign resizes the selected object from the reference point chosen in the Control panel or Transform panel.
Figure 6.3. To scale a selected object to a precise scale percentage, enter specific width and height scale percentages in the Control panel or Transform panel.

• Press S to access the Scale tool, then click and drag to resize the container and its contents (see Figure 6.4). Press the Shift key to constrain overall object proportions or limit the scale to one axis.
Figure 6.4. When scaling with the Scale tool, InDesign resizes the selected object from the reference point that is chosen in the Control panel or Transform panel. You can also change the reference point by repositioning the crosshair target that appears in the center of the object.

• Choose Object, Transform, Scale to access the Scale dialog box. Enter values for Uniform or Non-Uniform scaling and click OK. Uniform values will scale the object in proportion. Non-uniform will not scale the object in proportion, giving it a distorted look.
• To resize the container without its contents, uncheck the Scale Content option in the Scale dialog box before clicking OK.
• Press E to access the Free Transform tool and click and drag to resize the container and its contents. Press and hold the Shift key to keep the object in proportion as you resize it. Press Cmd or Ctrl (Win) to scale the container without its contents. Press Option (Mac) or Alt (Win) to scale the object from its center.
• The Free Transform tool lets you transform any object with just a single tool. With the Free Transform tool selected, you can combine any of your transformations.
• The other tools (rotate, scale, and the like) allow you to apply only a single transform function one at a time.
• Use either of the keyboard shortcuts for incremental resizing. The keyboard shortcuts for increasing or decreasing the size of a selected object by 1% are as follows:
• Mac: Cmd-> (increase) or Cmd-< (decrease)
• Win: Ctrl+> (increase) or Ctrl+< (decrease)
• The keyboard shortcuts for increasing or decreasing the size of a selected object by 5% are as follows:
• Mac: Option-Cmd-> (increase) or Option-Cmd-< (decrease)
• Win: Alt+Ctrl+>(increase) or Alt+Ctrl+< (decrease).
Show Me: Media 6.1—Resizing Objects
![]()
Access this video file through your registered Web edition at my.safaribooksonline.com/9780132174541/media.
Rotating Objects
You can use several methods to rotate objects in InDesign. For each method described here, InDesign rotates the selected object from the reference point chosen in the Control panel or Transform panel. The default reference point is the absolute center of the object; however, you can move the reference point by clicking and dragging the crosshair target that appears over the selected object, or by clicking a different square in the Reference Point icon (see Figure 6.5).
Figure 6.5. You can change the transformation reference point by clicking any of the Reference Point squares in the Control panel or Transform panel.
![]()
To rotate an object, perform any one of the following actions:
• Select the object you want to rotate by clicking its frame or shape edge with the Rotate tool; then click and drag. Press the Shift key as you drag to constrain rotation angles to 45° increments.
• Select the object you want to rotate with the Selection tool. Enter a value in the Rotation Angle field, which is located in the Transform panel or Control panel. You can also select a preset rotation angle value from the Rotation Angle drop-down list in either panel (see Figure 6.6).
Figure 6.6. The Rotation Angle drop-down list contains several preset rotation values.

• Access the Rotate dialog box by choosing Object, Transform, Rotate. Enter a value in the Angle field and click OK.
• Select the object you want to rotate by clicking its frame or shape edge with the Selection tool or Free Transform tool. Hover your mouse over one of the corner nodes. When the left/right arrow icon appears, click and drag. Press the Shift key as you drag to constrain rotation angles to 45° increments.
• Click the Rotate 90° Clockwise or Rotate 90° Counter-clockwise buttons in the Control panel. You can also choose both commands, along with a Rotate 180° command from the Transform panel menu.
Flipping Objects
You can use several methods to flip objects in InDesign. For each method described, InDesign flips the selected object from the reference point in the Control panel or Transform panel. The default reference point is the center of the object; however, you can move it by clicking a different square in the Reference Point icon.
To flip an object, perform any one of the following actions:
• Choose Flip Horizontal or Flip Vertical from the Transform panel menu.
• Enter a negative X or Y percentage value in the Scale X and Scale Y Percentage fields of the Transform panel or Control panel.
• Select one of the object’s frame nodes with the Selection tool and drag it past its opposite side.
• Press A to switch to the Direct Selection tool and drag one of the object’s line segments past its opposite side.
• Select the object you want to flip by clicking its frame or shape edge with the Free Transform tool. Drag one of the object’s frame nodes past its opposite side.
• Click the Flip Vertical or Flip Horizontal buttons in the Control panel (see Figure 6.7).
Figure 6.7. The Control panel contains a Flip Horizontal and a Flip Vertical button.
![]()
Shearing Objects
InDesign also provides several ways that you can shear objects. Shearing slants or skews text or an object on its horizontal or vertical axis. Shearing is good for creating perspective or slanting a text frame to give the text an “italic” look.
For each method described here, InDesign shears the selected object from the reference point chosen in the Control panel or Transform panel. The default reference point is the center of the object; however, you can move the reference point by clicking a different square in the Reference Point icon.
To shear an object, perform any one of the following actions:
• Select the object you want to shear by clicking its frame or shape edge with the Shear tool; then click and drag to shear the object. Press the Shift key as you drag to constrain along the horizontal or vertical axis.
• Using the Selection tool, select the object you want to shear. Then enter a value in the Shear X Angle field located in the Transform panel or Control panel. You can also select a preset value from the Shear X Angle drop-down list (see Figure 6.8).
Figure 6.8. The Shear X Angle drop-down list contains several preset shear values.

• Using the Selection tool, select the object you want to shear. Then access the Shear dialog box by choosing Object, Transform, Shear. Enter a value in the Shear Angle field and choose an axis (Horizontal or Vertical); then click OK.
• Select the object you want to shear by clicking its frame or shape edge with the Free Transform tool. As you begin to drag a side node, hold down Option-Cmd (Mac) or Ctrl+Alt (Windows). Press the Shift key as you drag to constrain it vertically or horizontally.
Show Me: Media 6.2—Rotating, Flipping, and Shearing Objects
![]()
Access this video file through your registered Web edition at my.safaribooksonline.com/9780132174541/media.
Stacking Objects
When placing objects on top of one another (called stacking), you may find it challenging to individually select the objects positioned in the lower layers of the stacking order and rearrange them—especially if you are using transparency and can see right through all the objects in the stack! An object may appear to be in front when it is actually in back.
This is not the same as using layers. Stacks exist within each layer, and if you haven’t created any additional layers, that single layer has one stack of objects in it.
To select through the stacking order, press Cmd (Mac) or Ctrl (Win) and click. The first click selects the topmost object and every click afterward selects the next object below. Keep clicking until you get to the object you’re trying to select.
Using Groups
By grouping objects together, you can apply object formatting, such as drop shadow and transparency effects.
Grouping and Ungrouping Objects
To group multiple objects in InDesign, select them with either selection tool and choose Object, Group or press Cmd-G (Mac) or Ctrl+G (Win). InDesign displays a dotted rectangle around the objects to indicate that they are now grouped (see Figure 6.9). You can then transform and apply object formatting to the entire group.
Figure 6.9. Multiple objects grouped together.

To ungroup the objects, select the group with the Selection tool and choose Object, Ungroup or press Shift-Cmd-G (Mac) or Shift+Ctrl+G (Win). InDesign removes the dotted rectangle.
Selecting Objects Within a Group
To select an object that is part of a group, click once with the Selection tool to select the group, then double-click the object (see Figure 6.10). You can also click directly on a grouped object with the Direct Selection tool. To move, rotate, scale, or shear the grouped object, you must select the object with the Selection tool (by double-clicking) or select the entire path with the Direct Selection tool. To select the entire path with the Direct Selection tool, you must Option+click (Mac) or Alt+click (Win) the object or click directly on the object’s center point. You will know that the entire path is selected when all points of the path appear solid rather than hollow.
Figure 6.10. To select a grouped object, double-click with the Selection tool (top), or Option-click or Alt+click with the Direct Selection tool (bottom).

Alternatively, after clicking a grouped object with the Direct Selection tool, you can press V to switch to the Selection tool. Doing so enables you to select the object within the group. You can then change your selection by clicking a different object within the group, or Shift+click to add other grouped objects to your selection. By making selections from within a group, you can move, transform, or apply formatting to the selected object(s) without having to ungroup them first.
You can select the contents of a grouped object by clicking directly on it with the Direct Selection tool. To place a graphic into a grouped object, you must first select it with either selection tool and then apply the File, Place command or drag the graphic into the selected frame from the Bridge application or the Mini Bridge panel.
Nesting Grouped Objects
The Paste Into command enables you to “nest” grouped objects inside a frame or shape. This feature is great for creating vector-based artwork, much like you would in Adobe Illustrator.
![]() LET ME TRY IT
LET ME TRY IT
Nesting a Grouped Object
- Select multiple items and choose Object, Group or press Cmd-G (Mac) or Ctrl+G (Win).
- Copy the group to the Clipboard and delete it from the page by choosing Edit, Cut or by pressing Cmd-X (Mac) or Ctrl+X (Win).
- Use the Selection tool to select the object you want to paste the group into and choose Edit, Paste Into.
- Option+click (Mac) or Alt+click (Win) the nested group with the Direct Selection tool and move, rotate, scale, or shear it within its new container. You can also select and transform individual objects within the nested group.
Arranging Objects
You can rearrange the order of stacked objects by selecting them and choosing one of the four commands located under the Object, Arrange submenu: Bring to Front, Bring Forward, Send Backward, and Send to Back.
Figure 6.11. Apply the Object, Arrange commands to reposition the stacking order of multiple objects.

Locking Objects
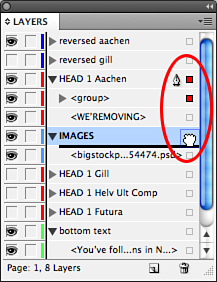
Locking an object prevents you from selecting it on the page. This makes it easier to select other stacked objects around it. To lock an object, select it with either selection tool and choose Object, Lock Position, or press Cmd-L (Mac) or Ctrl+L (Win). You can also lock an object by clicking in the lock toggle column, which is adjacent to the page item in the Layers panel (see Figure 6.12).
Figure 6.12. Applying the Object, Lock Position command automatically places the Lock icon next to the page item in the Layers panel.

To unlock a specific object, you must click the Lock icon in the Layers panel toggle column, or else choose Object, Unlock All on Spread to unlock all locked objects on the targeted spread.
Aligning Objects
You can position multiple selected objects in a document precisely by clicking the alignment buttons in the Align panel or the Control panel. To do so, select two or more objects and click one of the preset buttons (see Figure 6.13). Keep in mind that you cannot align text with this function.
Figure 6.13. The alignment buttons that are accessible via the Control panel.

Distributing Objects
In addition to the alignment buttons, a series of buttons enables you to precisely distribute multiple selected objects and their spacing, both vertically and horizontally. To distribute the objects or their spacing, select two or more objects and click one of the preset buttons located in the Align panel or the Control panel (see Figures 6.14 and 6.15).
Figure 6.14. The distribute buttons that are accessible via the Control panel.
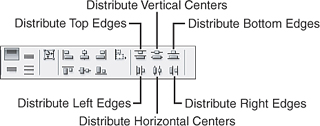
Figure 6.15. Shown here are several objects in their original position (left), and distributed by their horizontal centers using a Spacing amount of 6p (right).

Adjusting Space with the Gap Tool
The Gap tool enables you to control the amount of space between two or more objects (see Figure 6.16). You can also use it to resize several selected objects at once while maintaining the gap size between them.
Figure 6.16. To access the tool, click the Gap tool icon in the Tools panel, or press the letter U on your keyboard.
![]()
To adjust gap spacing, you must first position the cursor over the gap area that you want to adjust. When you do, InDesign highlights the gap area in transparent gray. Hold down Cmd (Mac) or Ctrl (Win) and click and drag to widen or narrow the gap.
To resize objects while maintaining the gap size between them, position the cursor over the gap area and then click and drag. Doing so resizes the items aligned to the gap. Hold down Shift to resize the nearest two objects to the cursor, rather than all objects aligned to the gap.
Show Me: Media 6.3—Using the Gap Tool
![]()
Access this video file through your registered Web edition at my.safaribooksonline.com/9780132174541/media.
Duplicating Objects
To duplicate an object, you must first select it with either selection tool, and then perform any one of the following actions:
• Hold down Option (Mac) or Alt (Win) and drag. It doesn’t get any easier than this!
• Copy the selected item to the Clipboard by choosing Edit, Copy or pressing Cmd-C (Mac) or Ctrl+C (Win). You can then paste the object by choosing Edit, Paste or by pressing Cmd-V (Mac) or Ctrl+V (Win). By default, InDesign places the object in the center of the page, unless you choose Edit, Paste in Place, which results in InDesign placing the copy directly in front of the original.
• Choose Edit, Duplicate to copy and paste a selected object all in one step. For placement, the Duplicate command uses the values set in the Step and Repeat dialog box.
• In the Layers panel, click the toggle arrow next to the layer that the object is currently on. Doing so reveals a list of all objects on that layer. Then select the object in the Layers panel and choose Duplicate Page Item from the Layers panel menu, or drag it over the Create New Layer button at the bottom of the panel.
• To copy and paste multiple copies of a selected object, choose Edit, Step and Repeat. When the Step and Repeat dialog box appears, enter settings for Repeat Count and Horizontal/Vertical Offset (see Figure 6.17). Click OK to copy and paste them.
Figure 6.17. In the Step and Repeat dialog box, enter how many times you’d like to repeat the object in the Repeat Count Field. Enter values in the Vertical and Horizontal Offset fields to determine the positioning of each repeated object. Click OK to copy and paste the copies.

• Enter a transformation value in the move, scale, shear, or rotation fields located in the Transform panel or Control panel and press Option-Return (Mac) or Alt+Enter (Win). This transforms a copy of the original.
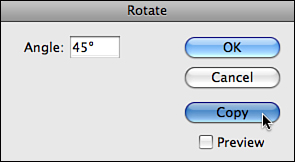
• You can also transform a copy of a selected object using the Move, Scale, Shear, or Rotate dialog boxes (see Figure 6.18). To do so, click the Copy button in the respective dialog box.
Figure 6.18. To transform a copy of the selected object, click the Copy button in the Move, Scale, Shear, or Rotate dialog box.
Point-Counterpoint: Media 6.4—Transforming a Copy of an Object
![]()
Access this video file through your registered Web edition at my.safaribooksonline.com/9780132174541/media.
Deleting Objects
You sometimes might find yourself surrounded by the remains of abandoned layout ideas in your document. When this happens, it’s time to win back control of your creative kingdom and start deleting unused objects.
To delete objects from your InDesign layouts, first use either selection tool to select the object(s) you want to delete; then do one of the following:
• Press Delete (Mac) or Delete/Backspace (Win).
• Choose Edit, Clear.
• Drag the selected object(s) to the Trash icon in the Dock (Mac OS X only).
• In the Layers panel, click the toggle arrow next to the layer that the object is currently on to reveal a list of all objects on that layer. Then select the page item in the Layers panel and choose Delete Page Item from the Layers panel menu, or click the Delete Selected Layers button (the trash can icon) at the bottom of the Layers panel. You can also select the page item in the Layers panel and drag it over the trash icon to delete it.
Saving Objects to a Library
Libraries are great for storing objects that you use repeatedly in your layouts. Common items such as logos, end marks, icons, formatted tables, and even stylized text samples are all perfect candidates for storing in a library. After you save the objects in a library, you can place them into your layouts by dragging them from the Library panel.
You can create separate libraries for separate projects. InDesign does not limit you to a single library.
To save objects into a library, you must first create one by choosing File, New, Library. Enter a name in the File Name field and then click the Save button. When you do, InDesign displays a new Library panel on your screen. Object Libraries are saved to your disk. To save objects into the library, drag them directly into the Library panel.
You can save shapes, frames, text items, and even placed graphics in a library. Placed graphics appear as links when you drag them into a document from a library, and editable text items require that the necessary fonts be loaded on your system (see Figure 6.19).
Figure 6.19. You can add as many objects as you like to a library by dragging them into the Library panel.

You can also add items to a library by selecting an object on the page and choosing Add Item from the Library panel menu or by clicking the New Library Item button at the bottom of the panel. To save all the objects on a targeted page as one library item, choose Add Items on Page from the panel menu. To save all of the objects on a targeted page as separate library items, choose Add Items on Page as Separate Objects.
If you want to change an item’s name, specify an object type, or add an item description, you can do so by entering the info in the Item Information dialog box (see Figure 6.20). You can access the dialog box by double-clicking the object in the Library panel list or by clicking the Library Item Information button at the bottom of the panel.
Figure 6.20. The Item Information dialog box enables you to enter information about a library item that you can later use as search criteria to help you locate it.

To search for objects in the library by name, creation date, object type, or description, click the Show Library Subset button located at the bottom of the Library panel. When the Show Subset dialog box appears, enter your search parameters and click OK (see Figure 6.19). Any found items automatically appear in the Library panel.
To close the library, click the Close Panel Window button (Mac) or the Close button (Win) or choose Close Library from the panel menu. You can reopen it later by choosing File, Open and browsing to the library’s stored location on your disk.
Figure 6.21. You can specify your library search parameters in the Show Subset dialog box. To do so, choose the preferred options from the Parameters drop-down lists. To add multiple search criteria, click the More Choices button.

Working with Layers
The great thing about working with layers in InDesign is that you can place multiple versions of a layout all in one document without adding any extra pages. The Layers panel enables you to assign objects to individual layers. By toggling layer visibility on or off, you can view your different design compositions and even create PDFs of them to send to your clients.
You can also use layers to create variations on a layout, such as a flyer that contains a special callout for a group of recipients but is otherwise identical to the main layout.
Creating and Naming a New Layer
Before you can start assigning objects to layers, you first need to add layers to the document using the controls available in the Layers panel. By default, every new document starts out with one layer. You can use either one of the following methods to create additional layers:
• Click the Create New Layer button located at the bottom of the Layers panel (see Figure 6.22). When the new layer appears at the top of the panel list, double-click it and enter a name in the Layer Options dialog box.
Figure 6.22. To add a layer, click the Create New Layer button.

• Choose New Layer from the Layers panel menu. When the New Layer dialog box appears, enter a name for the layer and click OK (see Figure 6.23). By default, the new layer always appears directly above the layer you currently have selected in the Layers panel list. However, if you’d like to create a new layer directly underneath the selected layer, press Cmd (Mac) or Ctrl (Win) and click the Create New Layer button. To create a new layer at the top of the Layers panel list, press Cmd-Shift (Mac) or Ctrl+Shift (Win) and click the Create New Layer button.
Figure 6.23. You can enter a name for the layer in the New Layer dialog box.

Placing Objects on Layers
Select the page item that you’d like to place on a different layer. After you make your selection, a small square appears in the far-right column of the Layers panel next to the layer where the item is currently positioned. Click the square icon and drag it to a different layer (see Figure 6.24). That’s all there is to it!
Figure 6.24. To place a selected object on a different layer, drag the square icon to a different layer in the Layers panel.
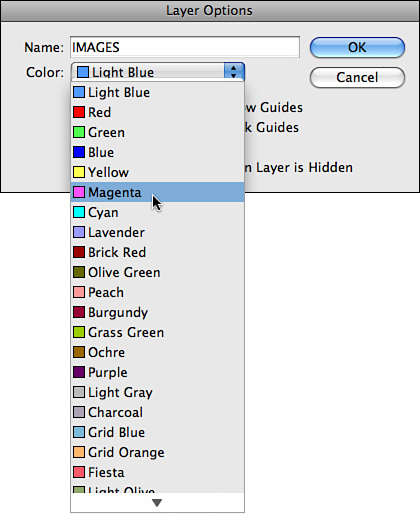
You can change the layer color if it conflicts with the fill and stroke colors applied to the objects on the layer. To do so, double-click the layer in the Layers panel. In the Layer Options dialog box that appears, choose a different color from the Color drop-down list and click OK (see Figure 6.25).
Figure 6.25. You can choose a different layer color from the Color drop-down list in the Layer Options dialog box.