20. Extending Photoshop
Introduction
Adobe Photoshop comes in two editions: Photoshop CS5 and Photoshop CS5 Extended. Photoshop CS5 is a subset of the Extended edition. Photoshop CS5 Extended edition has all the same features included in the standard edition. However, the Extended edition also contains additional features that are geared towards creating more sophisticated content.
If you need to count objects in an image for statistical purposes, you can use the Count tool. The Count tool allows you to manually click an image and track the number of times you do it. If you need to physically count the number of elements that appear in a photo, you can click the image to add numbers, so you don’t have to remember them. If you need to measure an area in an image and track the measurement data for statistical purposes, you can use the Measurement feature. The Measurement feature allows you to compute and track data points, such as width, height, area, and perimeter.
Photoshop Extended allows you to create a timeline-based animation. If you want to add video to a document, you can create a new video layer. You can create a video layer from a file, or create a blank one and add a video file to it later. After you insert a video layer, you can modify it using the Animation panel in Timeline view. You can change the start and stop points, trim frames, add a fade-in or fade-out, or add animation using keyframes.
In addition, Photoshop Extended provides vast improvements to the way you work with 3D files. You can create a 3D model by using the 3D panel or commands on the 3D menu. You can create a 3D model from a text layer, a selection, or a layer mask in a document to convert it to a 3D model or open an existing 3D file. Artists can paint directly on 3D objects without having to render them in another program.
Counting Objects in an Image
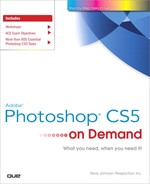
If you need to count objects in an image for statistical purposes, you can use the Count tool in Photoshop Extended. The Count tool allows you to manually click an image and track the number of times you do it. If you need to physically count the number of elements that appear in a photo, you can click the image to add numbers, so you don’t have to remember them. After you manually count by clicking, you can record the count in the Measurement Log. The count numbers are not saved with the document. If you have multiple selections in an image, Photoshop can automatically count them and record the results in the Measurement Log panel.
Count Objects in an Image Manually
![]() Open a document.
Open a document.
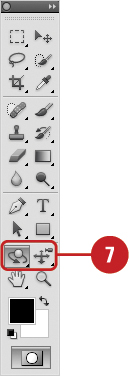
![]() Select the Count tool on the toolbox, now in the same section as the Eyedropper tool.
Select the Count tool on the toolbox, now in the same section as the Eyedropper tool.
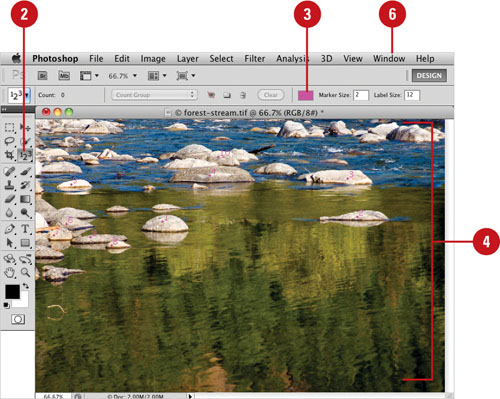
![]() To change the color, click the Color box on the Options bar, select a color, and then click OK.
To change the color, click the Color box on the Options bar, select a color, and then click OK.
![]() Click in the image to add numbers in sequential order.
Click in the image to add numbers in sequential order.
![]() To work with the numbers, do any of the following:
To work with the numbers, do any of the following:
• Move. Drag the existing number.
• Remove. Press Alt (Win) or Option (Mac) and click an existing number.
• Reset. Click Clear in the Options bar to reset the count to 0.
• Show or Hide. Click the View menu, point to Show, and then click Count.
![]() To view the measurement data, click the Window menu, and then click Measurement Log.
To view the measurement data, click the Window menu, and then click Measurement Log.
![]() To record the count to the Measurement Log, click Record Measurements in the Measurement Log panel.
To record the count to the Measurement Log, click Record Measurements in the Measurement Log panel.

Count Objects in an Image Automatically
![]() Open a document.
Open a document.
![]() Select the Magic Wand tool on the toolbox, or click the Select menu, and then click Color Range.
Select the Magic Wand tool on the toolbox, or click the Select menu, and then click Color Range.
• Magic Wand. You may need to adjust the Tolerance level to select the objects you want.
• Color Range. You may need to set Fuzziness and choose specific colors to select the objects you want.
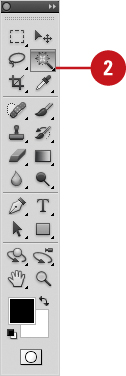
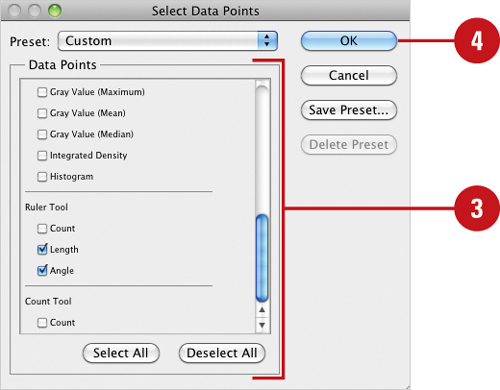
![]() Click the Analysis menu, point to Select Data Points, and then click Custom.
Click the Analysis menu, point to Select Data Points, and then click Custom.
![]() Click the Deselect All button, and then select the Count check box in the Selections area.
Click the Deselect All button, and then select the Count check box in the Selections area.
![]() Click OK.
Click OK.
![]() Click the Window menu, and then click Measurement Log to open the Measurement Log panel.
Click the Window menu, and then click Measurement Log to open the Measurement Log panel.
![]() Click Record Measurements in the Measurement Log panel.
Click Record Measurements in the Measurement Log panel.

Photoshop counts the selection areas and enters the number in the Custom column in the Measurement Log.
See Also
See “Working with Guides, Grid & Slices” on page 64 for information on changing the color of the count number.
Taking Measurements in an Image
If you need to measure an area in an image and track the measurement data for statistical purposes, you can use the Measurement feature in Photoshop Extended. You can measure any area defined with one of Photoshop’s selection tools, Ruler tool, or Count tool. The measurement feature allows you to compute and track data points, such as width, height, area, and perimeter. Photoshop tracks the measurement data in the Measurement Log panel, which you can customize to display the information you want. Before you start measuring, it’s important to set the measurement scale to specify what you want a specific number of pixels to represent in units, such as inches, millimeters, microns, or pixels. To make it easier to measure, you can place scale markers on an image to display the measurement scale.
Set Measurement Scale
![]() Click the Analysis menu, point to Set Measurement Scale, and then click Custom.
Click the Analysis menu, point to Set Measurement Scale, and then click Custom.
![]() Specify the pixel and logical length, and then specify the logical units.
Specify the pixel and logical length, and then specify the logical units.

![]() To save the measurement scale as a preset for later use, click Save Preset, type a name, and then click OK.
To save the measurement scale as a preset for later use, click Save Preset, type a name, and then click OK.
![]() Click OK.
Click OK.
Place a Scale Marker
![]() Click the Analysis menu, and then click Place Scale Marker.
Click the Analysis menu, and then click Place Scale Marker.
![]() Enter a number for the length of the scale marker in pixels.
Enter a number for the length of the scale marker in pixels.

![]() To show the logical length and units for the scale marker, select the Display Text check box and choose specific font and font size.
To show the logical length and units for the scale marker, select the Display Text check box and choose specific font and font size.
![]() Click the Bottom or Top option to specify where you want the text caption.
Click the Bottom or Top option to specify where you want the text caption.
![]() Click the Black or White option to set the scale marker and caption color.
Click the Black or White option to set the scale marker and caption color.
![]() Click OK.
Click OK.
Perform a Measurement
![]() Open a document.
Open a document.
![]() Click the Analysis menu, point to Select Data Points, and then click Custom.
Click the Analysis menu, point to Select Data Points, and then click Custom.
![]() Select the check boxes next to the data points you want to measure and track for the different tools.
Select the check boxes next to the data points you want to measure and track for the different tools.
![]() Click OK.
Click OK.
![]() Use any of the following methods to specify what you want to measure:
Use any of the following methods to specify what you want to measure:
• Selection. Create one or more selections.
• Ruler. Select the Ruler tool in the toolbox, and then drag the tool to measure what you want.
• Count. Select the Count tool in the toolbox, and then click to count items.
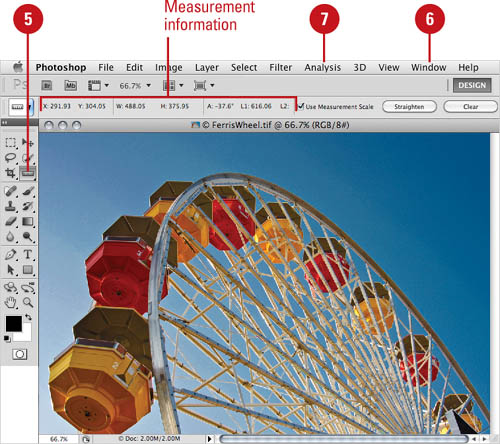
![]() Click the Window menu, and then click Measurement Log to open the Measurement Log panel.
Click the Window menu, and then click Measurement Log to open the Measurement Log panel.
![]() Click the Analysis menu, and then click Record Measurements to record the count to the Measurement Log.
Click the Analysis menu, and then click Record Measurements to record the count to the Measurement Log.
Did You Know?
You can delete a scale marker. In the Layers panel, select the Measure Scale Marker Layer group for the scale you want to delete, right-click the layer group, and then click Delete Group.
You can add or replace scale markers. Click the Analysis menu, click Place Scale Marker, click Remove or Keep, specify settings for the new marker, and then click OK.
Aligning and Combining Layers
Ever wanted to replace or delete parts of an image that have the same background or combine images that share overlapping content? In Photoshop, you can do it with the Auto-Align Layers and Auto-Blend Layers commands. The Auto-Align Layers command automatically aligns different layers that contain similar content. One layer is assigned to be the reference layer and all other layers are aligned to the reference layer in order to match everything up. You can manually set the reference layer, or let Photoshop automatically choose it for you. Sometimes when you align images, a visible stitching appears between them. You can use the Auto-Blend Layers command with RGB or grayscale images to create a smooth appearance between the aligned images. Auto-Blend Layers uses layer masks to remove content differences between the images.
Align Layers
![]() Open a document.
Open a document.
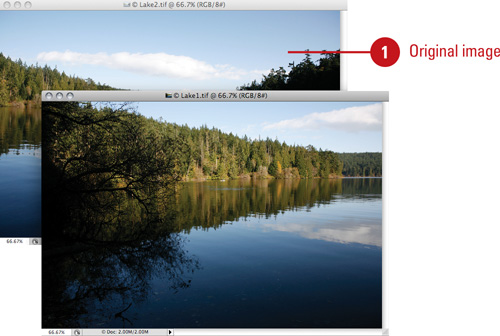
![]() Duplicate or place the images you want to align on different layers.
Duplicate or place the images you want to align on different layers.
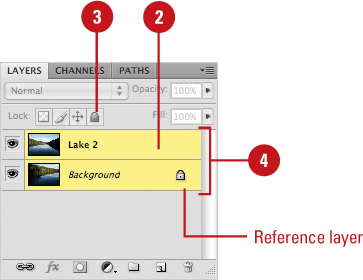
![]() To set a reference layer, select the layer you want, and then click the Lock button on the Layers panel.
To set a reference layer, select the layer you want, and then click the Lock button on the Layers panel.
• If you don’t have a locked layer, Photoshop will create one for you.
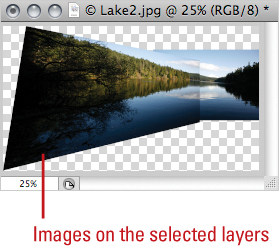
![]() Select the layers you want to align in the Layers panel.
Select the layers you want to align in the Layers panel.
![]() Click the Edit menu, and then click Auto-Align Layers.
Click the Edit menu, and then click Auto-Align Layers.
![]() Click one of the layout alignment options:
Click one of the layout alignment options:
• Auto. Analyzes the images and uses either the Perspective, Spherical, or Cylindrical layout.
• Perspective. Creates a stretched or skewed effect on the side images.
• Collage. Retains object shapes while aligning layers and matching overlapping content.
• Cylindrical. Reduces a bow-tie effect by displaying images as if they were on an unfolded cylinder.
• Spherical. Transforms images spherically using wide fields of view.
• Reposition. Aligns the layers and matches overlapping content.
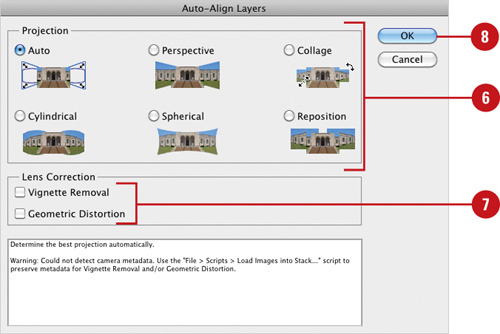
![]() Select Vignette Removal to remove unwanted lens vignette and Geometric Distortion to automatically correct for fisheye lenses.
Select Vignette Removal to remove unwanted lens vignette and Geometric Distortion to automatically correct for fisheye lenses.
![]() Click OK.
Click OK.
![]() To fine-tune the alignment or make tonal changes, click the Edit menu, and then click Free Transform.
To fine-tune the alignment or make tonal changes, click the Edit menu, and then click Free Transform.
Combine and Blend Layers
![]() Select the layers you want to combine in the Layers panel.
Select the layers you want to combine in the Layers panel.

![]() Click the Edit menu, and then click Auto-Blend Layers.
Click the Edit menu, and then click Auto-Blend Layers.
![]() Select the Panorama or Stack Images option.
Select the Panorama or Stack Images option.

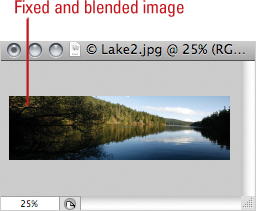
![]() Click OK.
Click OK.
Did You Know?
You can create an image stack (Extended). If you have images with a similar size, you can create an image stack. Create a document with each image as a separate layer. Select the all the layers, use the Auto-Align Layers command with the Auto option, convert the layers to Smart Objects, and then create an image stack. Click the Layer menu, point to Smart Objects, point to Stack Mode, and then select a stack mode from the submenu. To remove a stack, click None on the submenu. You can edit an image stack like any other Smart Object.
Opening Video Files and Image Sequences
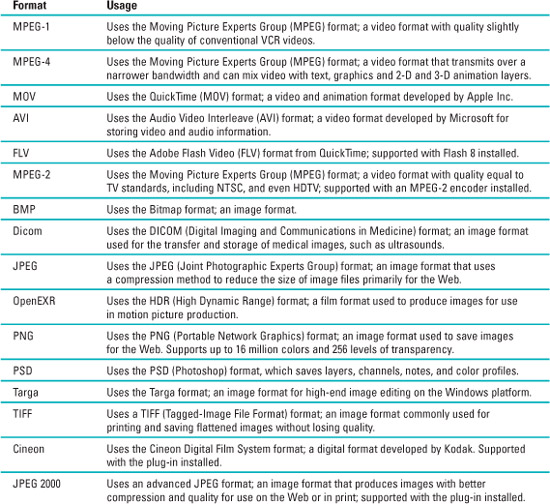
In Photoshop Extended, you can open video files and image sequences using the Open command from the File menu in the formats listed in the table below. Video layers can contain files with the following color modes and bits per channel (bpc):
• Grayscale. 8, 16, or 32 bpc
• RGB. 8, 16, or 32 bpc
• CMYK. 8 or 16 bpc
• Lab. 8 or 16 bpc
Video and Image Sequence Formats
Creating a Video Layer
If you want to add video to a document, you can create a new video layer in Photoshop Extended. You can create a video layer from a file, or create a blank one and add a video file to it later. If you want to open a video later, you can use the Open command from the File menu. Photoshop opens a variety of video files and image sequences. You can even play the video with sound by either clicking Alt (Win) or Option (Mac) when you hit the Play button, or toggle the sound icon on the bottom of the panel.
Create a Video Layer
![]() Open a document.
Open a document.
![]() Select the Animation panel.
Select the Animation panel.
• Click the Window menu, and then click Animation.
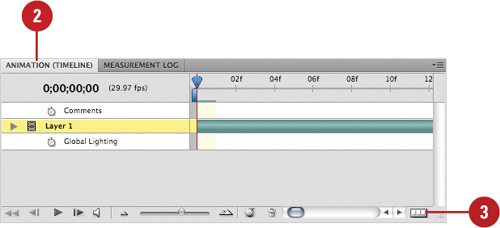
![]() To switch to Timeline view, click the Convert to Timeline Animation button.
To switch to Timeline view, click the Convert to Timeline Animation button.
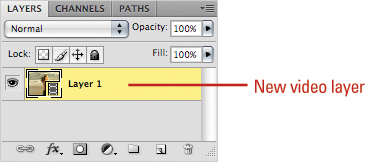
![]() Click the Layer menu, point to Video Layers, and then click the layer type you want:
Click the Layer menu, point to Video Layers, and then click the layer type you want:
• From File. Click New Video Layer from File, select a video or image sequence, and then click Open.
• Blank. Click New Blank Video Layer.
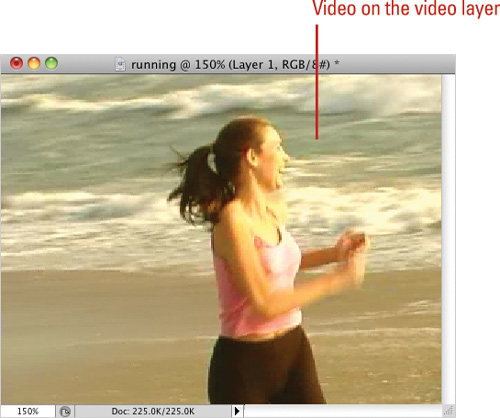
![]() If you want to open a video file and add it to a layer, click the File menu, click Open, select the video file you want to open, and then click Open.
If you want to open a video file and add it to a layer, click the File menu, click Open, select the video file you want to open, and then click Open.
Did You Know?
You can create a still frame from a video layer. If you want a still image from a video, you can rasterize the video layer, creating a flattened composite of the current frame. Select the video layer you want, move the playback head to the frame you want, click the Layer menu, point to Rasterize, and then click Video or Layer.
Modifying a Video Layer
After you insert a video layer, you can modify it in Photoshop Extended using the Animation panel in Timeline view. You can zoom in and out to display the Timeline the way you want, and then drag the playhead, also known as the current-time indicator, to the time or frame number in the video where you want to start your modifications. You can change the start and stop points (also known as In and Out points), trim frames, add a fade-in or fade-out, or add animation using keyframes. A keyframe defines the location of a property change to the video layer. When you set at least two keyframes that change properties, such as position, opacity, or style, you create animation.
Modify a Video Layer Duration
![]() Open a document with a video.
Open a document with a video.
![]() Select the Animation panel.
Select the Animation panel.
• Click the Window menu, and then click Animation.

![]() To switch to Timeline view, click the Convert to Timeline Animation button.
To switch to Timeline view, click the Convert to Timeline Animation button.
![]() Use any of the following methods to change the duration of the video:
Use any of the following methods to change the duration of the video:
• Start and End Work Area. Point to the ends of the work area bar, and then drag to change the position.
• In and Out Points. Point to the beginning or end of the layer duration bar (cursor changes to a double-arrow), and then drag to change the points.
• Move duration. Point to the duration bar, and then drag to move the duration to start and stop at a new position.
Did You Know?
You can delete a section of video. In the Animation panel in Timeline view, drag the ends of the work area bar to select the footage you want to delete, click the Animation Options button, and then click Lift Work Area.
Use Keyframes to Animate Layer Properties
![]() Open a document.
Open a document.
![]() Select the Animation panel.
Select the Animation panel.
• Click the Window menu, and then click Animation.
![]() To switch to Timeline view, click the Convert to Timeline Animation button.
To switch to Timeline view, click the Convert to Timeline Animation button.
![]() Click the down arrow for a video layer to display layer properties.
Click the down arrow for a video layer to display layer properties.
![]() Click the Time-Vary Stopwatch icon to enable shape animation for the layer property.
Click the Time-Vary Stopwatch icon to enable shape animation for the layer property.
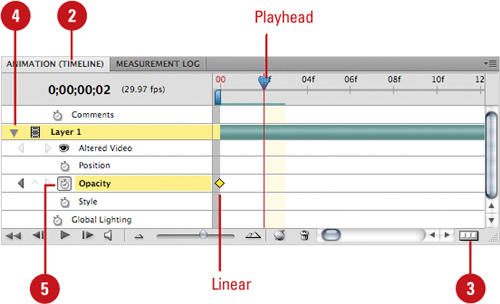
![]() Position the playhead where you want to set a keyframe, and then make the property changes you want, such as Opacity, in the Layers panel.
Position the playhead where you want to set a keyframe, and then make the property changes you want, such as Opacity, in the Layers panel.

![]() Use any of the following methods to change the keyframe:
Use any of the following methods to change the keyframe:
• Select. Click the keyframe icon.
• Move. Drag to change the position.
• Delete. Right-click the keyframe icon, and then click Delete Keyframes.
• Method. The diamond keyframe icon animates the property change evenly over time (known as a Linear Keyframe). If you want an instant property change, you can change the interpolation method to a Hold Keyframe, which appears as a square keyframe icon. Right-click a keyframe icon, and then click Hold Interpolation or Linear Interpolation.
Splitting a Video Layer
In addition to modifying a video layer, you can split it into two new video layers at the specific point you want in Photoshop Extended. You can zoom in and out to display the Timeline the way you want, and then drag the playhead to the time or frame number in the video where you want to split it. The video layer is duplicated and appears above the original in the Animation panel. The original layer contains the video from the start to the current time or frame, and the duplicate layer contains the video from current time or frame to the end.
Split a Video Layer
![]() Open a document with a video layer.
Open a document with a video layer.
![]() Select the Animation panel.
Select the Animation panel.
• Click the Window menu, and then click Animation.


![]() To switch to Timeline view, click the Convert to Timeline Animation button.
To switch to Timeline view, click the Convert to Timeline Animation button.
![]() Drag the playhead to the time or frame number where you want to split the video layer.
Drag the playhead to the time or frame number where you want to split the video layer.
![]() Click the Animation Options button, and then click Split Layers.
Click the Animation Options button, and then click Split Layers.
Did You Know?
You can preview video or timeline animation. You can preview a video or animation in the document window. Drag the playback head to the point where you want to play the video or animation. Click the Play button at the bottom of the Animation panel. You can also press the Spacebar to play or stop the playback. Photoshop caches it to memory for faster playback.
Cloning Video Layer Content
If you have video or animation frames that you want to retouch or duplicate, you can use the Clone Stamp and Healing Brush tool in Photoshop Extended. The Clone Stamp tool allows you to sample content from one area of a frame (known as the source) and paint it over another area of the same or a different frame (known as the target). The Healing Brush tool allows you to blend the sampled content from the source with the target to fix a problem. You can use the Clone Source panel to set several samples from one part of a video frame and clone or blend them in another video frame.
Clone Parts of a Video Layer
![]() Open a document with a video layer, and then select it in the Layers panel.
Open a document with a video layer, and then select it in the Layers panel.
![]() Select the Animation panel.
Select the Animation panel.
• Click the Window menu, and then click Animation.

![]() To switch to Timeline view, click the Convert to Timeline Animation button.
To switch to Timeline view, click the Convert to Timeline Animation button.
![]() Drag the playhead to the time or frame number that is the source of the sample you want.
Drag the playhead to the time or frame number that is the source of the sample you want.
![]() Select the Clone Stamp tool on the toolbox.
Select the Clone Stamp tool on the toolbox.


![]() To set a sample point, Alt (Win) or Option (Mac), and click where you want the sample.
To set a sample point, Alt (Win) or Option (Mac), and click where you want the sample.
![]() To set another sample point, select a Clone Stamp button on the Clone Source panel, adjust the playhead, and then repeat Step 6.
To set another sample point, select a Clone Stamp button on the Clone Source panel, adjust the playhead, and then repeat Step 6.
![]() Select the target video layer and move the playhead to the frame you want to paint.
Select the target video layer and move the playhead to the frame you want to paint.
![]() If you set multiple samples, click the source in the Clone Source panel.
If you set multiple samples, click the source in the Clone Source panel.
Timesaver
Use Shift+Alt (Win) or Shift+Option (Mac) to show the clone overlay temporarily.
![]() Drag the area you want to paint.
Drag the area you want to paint.
Setting 3D Preferences
Working with the 3D preferences (New!) gives you control over how the Photoshop 3D engine works with 3D objects. Working with 3D models can take its toll on your computer’s hardware, so you need to use software—either OpenGL or Adobe Ray Tracer (ART)—and/or hardware (a video card with memory, known as VRAM) to help process the rendering (display) of 3D models in Photoshop. In 3D Preferences, you set VRAM usage amounts and which rendering 3D engine to use, as well as other options for display elements and fine-tune the 3D model. If OpenGL (GL stands for Graphics Library) options are not available, you need to select the Enable OpenGL Drawing check box in Performance Preferences and/or upgrade your video hardware.
Enable OpenGL Drawing
![]() Click the Edit (Win) or Photoshop (Mac) menu, and then point to Preferences.
Click the Edit (Win) or Photoshop (Mac) menu, and then point to Preferences.
![]() Click Performance.
Click Performance.
If you have a video card installed with a GPU (Graphics Processing Unit), the name of your video card appears under Detected Video Card.

![]() Select the Enable OpenGL Drawing check box to use the enhanced speed and smoothness of graphic/3D rendering and navigation.
Select the Enable OpenGL Drawing check box to use the enhanced speed and smoothness of graphic/3D rendering and navigation.
![]() Click OK.
Click OK.
Set 3D Options
![]() Click the Edit (Win) or Photoshop (Mac) menu, and then point to Preferences.
Click the Edit (Win) or Photoshop (Mac) menu, and then point to Preferences.
![]() Click 3D (New!).
Click 3D (New!).

![]() Select options from the following:
Select options from the following:
• Available VRAM for 3D. Specify the amount of video memory (VRAM) you want Photoshop to use for 3D operations.
• Interactive Rendering. For interacting with 3D objects, select the OpenGL option to use hardware-acceleration (requires a video card), or the Ray Tracer option to use Adobe Ray Tracer (ART), and then select the related options.
• 3D Overlays. Specify colors for guides for highlighting 3D scene components.
• Ground Plane. Specify a plane side, grid spacing size, and color for the ground plane. The ground plane is a grid that reflects the position of the ground relative to the 3D model.
• Ray Tracer. Specify a quality amount for ray traced rendering.
• 3D File Loading. Specify the initial limit for active lights, and set the maximum number of diffuse textures to generate when they are absent.
![]() Click OK.
Click OK.
Creating 3D Models
Photoshop Extended provides vast improvements to the way you work with 3D files. There is a 3D menu with an assortment of commands and there are two slots on the toolbox dedicated to 3D, for a total of 10 easy-to-reach tools, as well as what’s on the 3D panel. Artists can paint directly on 3D objects without having to render them in another program. Photoshop includes support for three-dimensional files (U3D, 3DS, OBJ, KMZ, and DAE file formats) created by programs like Adobe Acrobat 3D Version 8, 3D Studio Max, Alias, Maya, and Google Earth. You can start from a text layer, a selection, or a layer mask in a document to convert it to a 3D model or open an existing 3D file. When you open a 3D file, Photoshop places the 3D model on a separate 3D layer. You can add multiple 3D layers to an image. If your Photoshop document contains one or more 2D layers (typical images), you can combine any one of them with a 3D layer, or convert a 3D layer to a 2D layer. You can create a 3D model by using the 3D panel (New!) or commands on the 3D menu.
Create a 3D Model from a 2D Image with the 3D Panel
![]() Open a 2D image.
Open a 2D image.
![]() Select the layer or object on the canvas you want to convert into a 3D model.
Select the layer or object on the canvas you want to convert into a 3D model.
![]() Select the 3D panel.
Select the 3D panel.
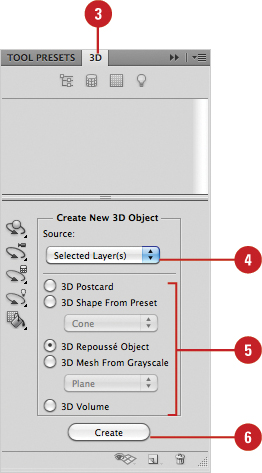
![]() Click the Source list arrow, and then select a source option: Selected Layer(s), Work Path, or Current Selection.
Click the Source list arrow, and then select a source option: Selected Layer(s), Work Path, or Current Selection.
![]() Select from the available options:
Select from the available options:
• 3D Postcard. Creates a plane with 3D properties.
• 3D Shape From Preset. Creates a 3D shape from a preset, such as cone, cube, donut, or hat.
• 3D Repoussé Object. Creates a 3D model using repoussé.
• 3D Mesh From Grayscale. Converts a grayscale image into a 3D model depth map using mesh options.
• 3D Volume. Creates a 3D volume model from a multi-frame file, such as a DICOM.
![]() Click the Create button.
Click the Create button.
Insert a 3D Model from a File
![]() Open a document.
Open a document.
![]() Click the 3D menu, and then click New Layer from 3D File.
Click the 3D menu, and then click New Layer from 3D File.
• You can also select File from the Source list arrow in the 3D panel, and then click Create.
![]() Navigate to the location where the 3D file is located, and then select the 3D file.
Navigate to the location where the 3D file is located, and then select the 3D file.
![]() Click Open.
Click Open.
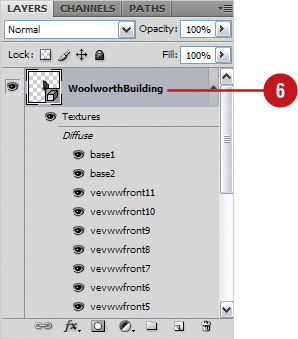
A new 3D layer appears in the document.
![]() To add a 3D layer to an image, drag the 3D layer from one layer in the Layers panel to another layer.
To add a 3D layer to an image, drag the 3D layer from one layer in the Layers panel to another layer.
![]() Select the 3D layer in the new location.
Select the 3D layer in the new location.
![]() Use the 3D tools on the toolbox or on the 3D panel to view, position, or scale the 3D model.
Use the 3D tools on the toolbox or on the 3D panel to view, position, or scale the 3D model.
• Change 3D position and scale. Use the following 3D tools: 3D Rotate Tool, 3D Roll Tool, 3D Pan Tool, 3D Slide Tool, or 3D Scale Tool.
• Change 3D view. Use the following 3D tools: 3D Orbit Tool, 3D Roll View Tool, 3D Pan View Tool, 3D Walk View Tool, and 3D Zoom Tool.

Did You Know?
You can convert a 3D layer to a 2D layer. Select the 3D layer in the Layers panel, click the 3D menu, and then click Rasterize.
Creating 3D Models Using Repoussé
Repoussé is an ancient metalworking technique for embossing artwork on the surface of metals, such as gold, silver, copper, tin, and bronze. In Photoshop, you can use Adobe Repoussé (New!) to convert 2D artwork, including rasterized text, into 3D models. With the Create New 3D Object section on the 3D panel, you can start from a text layer, a selection, or a layer mask to convert it to a 3D model. After you create the 3D model, you can use the Repousse dialog box to manipulate object properties, such as depth, scale, bend, shear, or twist. In addition, you can inflate the front or back of the object like a balloon as well as apply a custom bevel.
Create a 3D Model from a 2D Image with Repoussé
![]() Open a 2D image.
Open a 2D image.
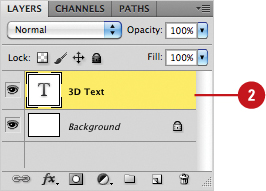
![]() Select the layer or object on the canvas you want to convert into a repoussé 3D object.
Select the layer or object on the canvas you want to convert into a repoussé 3D object.
![]() Select the 3D panel.
Select the 3D panel.

![]() Click the Source list arrow, and then select a source option: Selected Layer(s), Work Path, or Current Selection.
Click the Source list arrow, and then select a source option: Selected Layer(s), Work Path, or Current Selection.
![]() Click the 3D Repoussé Object option.
Click the 3D Repoussé Object option.
![]() Click the Create button.
Click the Create button.
Did You Know?
You can export a 3D layer to a 3D file. The supported 3D formats are Collada DAE, Wavefront/OBJ, U3D, and Google Earth. Select the 3D layer in the Layers panel, click the 3D menu, click Export 3D Layer, select a 3D file format, and then click OK.
You can save a 3D file. If you want to preserve 3D model position, lighting, render mode, and cross sections, save files with 3D layers in PSD, PSB, TIFF, or PDF using the Save As command on the File menu.
![]() Specify any of the following 3D options:
Specify any of the following 3D options:
• Presets. Choose from the available shape presets, and save your own presets.
• Materials. Select a material for the different areas of the 3D model.
• Extrude. Select individual attributes for the 3D object, including depth, scale, twist, and texture. You can also set shear and bend options to transform the 3D model.
• Inflate. Specify options to inflate the 3D model like a balloon.
• Bevel. Specify options to apply a bevel, including slides, height, width, and contour.
• Scene Settings. Specify scene settings for lights, view, rendering, and mesh quality.
• Internal Constrains. Use the buttons and other options to position, rotate, roll, pan, slide, and scale the 3D model or adjust a selection.
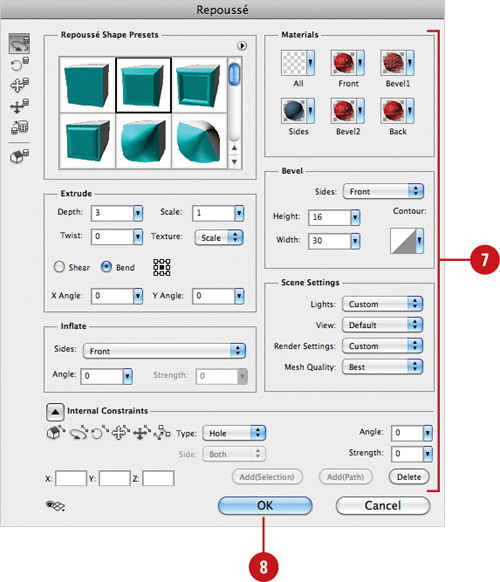
![]() Click OK.
Click OK.
![]() Use the 3D tools on the toolbox or on the 3D panel or use the Axis Widget to view, position, or scale the 3D model.
Use the 3D tools on the toolbox or on the 3D panel or use the Axis Widget to view, position, or scale the 3D model.
• Axis Widget. The three colored areas represent the three axes (x, y, z) of the object.

Did You Know?
You can edit repoussé settings. Select the 3D layer in the Layers panel, click the 3D menu, point to Repoussé, and then click Edit In Repoussé (New!).
Creating 3D Models Using Preset Shapes
Instead of starting from scratch, you can create a 3D model from a preset shape. The preset shapes include cone, cube, cube wrap, cylinder, donut, hat pyramid, ring, soda can, sphere, spherical panorama, and wine bottle. Some of the shapes use a single-mesh, such as the hat or sphere, while others use multiple-meshes, such as the soda can or wine bottle. You can also add your own custom shapes by creating a Collada DAE file, and placing it in the Presets/Meshes folder inside the Photoshop program folder. A 2D layer is converted to a 3D layer in the Layers panel. The original 2D layer appears as a Diffused texture map, and may be used on one or more surfaces in the 3D model.
Create and Modify a 3D Model from a Shape
![]() Open a document, and then select the 2D layer you want to use.
Open a document, and then select the 2D layer you want to use.

![]() Click the 3D menu, point to New 3D Shape from Layer, and then select a shape option.
Click the 3D menu, point to New 3D Shape from Layer, and then select a shape option.
![]() Select the 3D panel.
Select the 3D panel.
![]() Use the four area buttons (Scene, Mesh, Materials, and Lights) to display and change properties of your new 3D object.
Use the four area buttons (Scene, Mesh, Materials, and Lights) to display and change properties of your new 3D object.
![]() Select one of the navigation tools on the 3D panel, toolbox, or Options bar, such as 3D Rotate to move the image in a 3D space.
Select one of the navigation tools on the 3D panel, toolbox, or Options bar, such as 3D Rotate to move the image in a 3D space.

![]() Or, use the Axis Widget. The three colored areas represent the three axes (x, y, z) of the object.
Or, use the Axis Widget. The three colored areas represent the three axes (x, y, z) of the object.
• You can also highlight parts of the widget to isolate the movements or scaling of the object to specific axes.
![]() Use commands on the 3D menu or options on the 3D panel to modify the 3D model.
Use commands on the 3D menu or options on the 3D panel to modify the 3D model.
Changing Render Settings
Render settings determine how 3D models are drawn in Photoshop. You can use one of the presets with common settings, or customize your own settings and create your own presets. The default presets include bounding box, line illustration, paint mask, shaded illustration, and shaded or solid wireframe. You can change the preset render settings in the 3D panel, however the more specific options are available in the Render Settings dialog box.
Change Render Settings
![]() Open a document, and then select the 3D layer you want to change.
Open a document, and then select the 3D layer you want to change.
![]() Select the 3D panel.
Select the 3D panel.
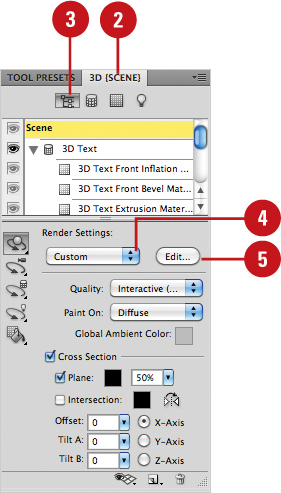
![]() Select the Scenes panel.
Select the Scenes panel.
![]() To use a render settings preset, click the Preset list arrow, and then select a preset.
To use a render settings preset, click the Preset list arrow, and then select a preset.
![]() Click Edit.
Click Edit.
![]() Select the check box next to any of the following, and then specify the settings you want:
Select the check box next to any of the following, and then specify the settings you want:
• Face Style. Specify options to determine how the model surfaces appear, including solid or texture.
• Edge Style. Specify options to determine how the wireframe lines appear.
• Vertex Style. Specify options to adjust the appearance of vertices in a wireframe.
• Volume Style. Specify options to adjust the appearance of 3D volume models.
• Stereo Type. Specify options to view images with red-blue glasses or printed to objects with lenticular lens.

![]() To save a custom preset, click the Save button, enter a name, and then click Save.
To save a custom preset, click the Save button, enter a name, and then click Save.
![]() Click OK.
Click OK.
Modifying 3D Models
After you have inserted a 3D file or created a new 3D layer from a 2D file, you can use Photoshop 3D tools to move or scale the 3D model, change the camera view, change the lighting (to daylight or interior light, for example), or change render modes (to solid or wireframe). If you have a texture layer, you can edit it using standard Photoshop tools and reapply the texture to the 3D model. 3D models contain several components, which can include meshes, materials, and lights. A mesh provides the underlying frame structure for the 3D model. Materials are applied to a mesh to create the appearance and lights apply intensity and shadows to the materials on the 3D model. Photoshop provides panels for each so you can make adjustments.
Modify a 3D Model
![]() Open a document with the 3D model you want to edit.
Open a document with the 3D model you want to edit.

![]() Select the 3D panel.
Select the 3D panel.

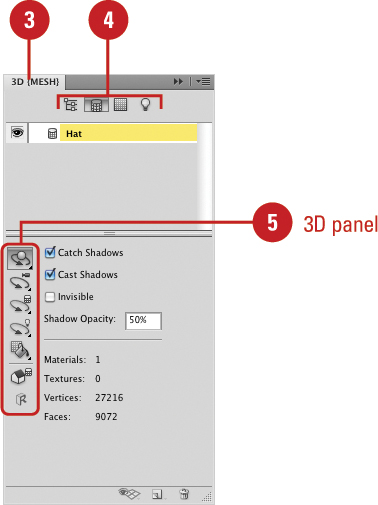
![]() Click any of the following buttons in the 3D panel to change a 3D model:
Click any of the following buttons in the 3D panel to change a 3D model:
• Scene. Choose from 17 render preset settings. Select properties to a display quality, a texture map for painting on a 3D model, or create and view cross sections of the 3D model by intersecting it with an invisible plane.
• Mesh. Shows the object mesh pieces, which you can edit.
• Catch Shadows. Select to display shadows on its surface.
• Catch Shadows. Select to cast shadows on other surfaces.
• Invisible. Select to hide the mesh, yet still display any shadows.
• Materials. Choose from 18 material presets (New!). Select properties to change material color (diffuse), opacity (transparency) reflections, glossiness, shininess, and bump strength.

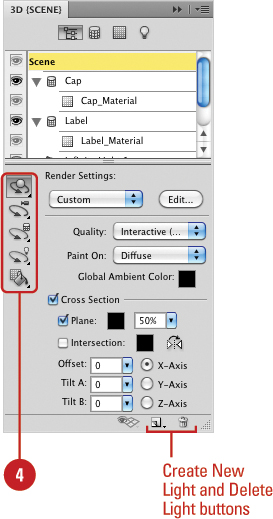
• Lights. Choose from 15 lighting preset settings (New!). Select properties to change the lighting type (Infinite, Spot, or Point), intensity, and color. You can also set an option to create shadows and specify a shadow softness percentage.
• You can also click the Create New Light button on the 3D panel to create and add different types of light sources, or click the Delete Light button to remove the selected light.
![]() To move and view the object in different ways, you can use the 3D tools from the toolbox, which are replicated on the Options bar:
To move and view the object in different ways, you can use the 3D tools from the toolbox, which are replicated on the Options bar:
• Move, rotate, or scale. Click a 3D tool on the 3D panel, on the toolbox or on the Options bar, and then drag to change the rotation, roll, pan, slide, or scale.
• Camera. Click a camera editing tool on the 3D panel, or on the toolbox, and then drag to change the orbit, roll, pan, walk, or zoom.
• Create and View 3D animations. Click the Window menu, point to Animation, and then click Timeline to animate your 3D objects and play the animations.
![]() Use commands on the 3D menu or options on the 3D panel to modify the 3D model.
Use commands on the 3D menu or options on the 3D panel to modify the 3D model.
Browsing 3D Content
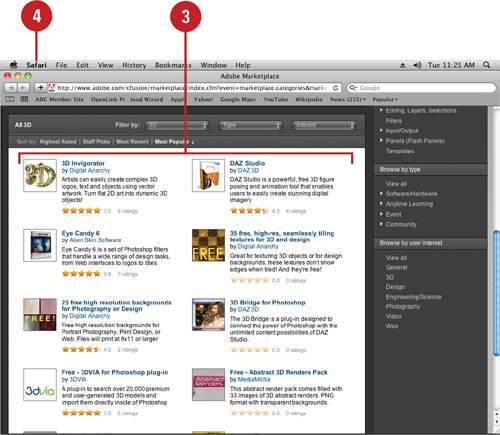
Not sure where to start when it comes to 3D content? Adobe can help with the Adobe Photoshop Marketplace Web site. It contains a library of updated 3D (New!) and other Photoshop related content from Adobe and other experts. The content includes textures, backgrounds, tutorials, plug-ins, and related software. With the Browse 3D Content command on the 3D menu, you can quickly access and browse 3D content provided by Adobe.
Browse 3D Content
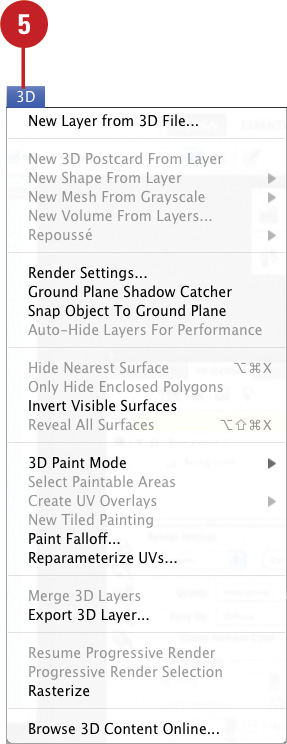
![]() Click the 3D menu, and then click Browse 3D Content.
Click the 3D menu, and then click Browse 3D Content.
Your browser opens, displaying the Adobe Photoshop Marketplace Web site, where you can browse 3D as well as other content.
![]() Use the Filter by options to display the content you want.
Use the Filter by options to display the content you want.

![]() Browse and download the content you want.
Browse and download the content you want.
• To display next or previous pages, click the navigation buttons on the bottom of the page.
![]() When you’re done, exit your browser.
When you’re done, exit your browser.