7. Working with Adjustment Layers, Filters, and Tools
Introduction
If you want to visually control an Adobe Photoshop document, then adjustment layers are the ultimate tool. The purpose of an adjustment layer is to show how a specific adjustment, such as Hue & Saturation, changes the appearance of the image. Since the adjustment is contained within a separate layer, the original image never changes. This gives you the ability to experiment with different settings. Since adjustment layers can be saved with the document, you can close the document, then return at a later time to make further adjustments.
Another advantage of adjustment layers is size. Adjustment layers do not increase the size of a Photoshop document. Most Photoshop layers are composed of pixels, so adding traditional layers to a document increases the size of the file. Since adjustment layers are simply a set of mathematical data, they do not increase the size of the file.
Photoshop has two ways to apply adjustments to an image. You could go to the Image menu, and choose Adjustments; however, when you apply an adjustment using this method, it’s permanent. The other way is to use an adjustment layer—the very definition of control over time. When working with adjustment layers, you can modify, merge, or even create a temporary composite image, all while your original image stays intact. With all of their advantages, you may never perform adjustments using the Image menu again.
In addition to letting you apply adjustments to an image without changing the original data, adjustment layers, because they are separate layers, give you the ability to apply standard layer controls, such as blending modes, opacity, and fill. Adjustment layers come with their own built-in masks, and allow you to control how and where the adjustment is applied to the image.
Creating an Adjustment Layer
Adjustment layers are applied within the Layers panel and use the Adjustment panel. By default, all layers beneath the adjustment layer are changed. In addition, adjustment layers will work on any type of Photoshop layer, including the Background. You can have as many adjustment layers as you need. For example, you might create a Levels adjustment layer to control the contrast of an image, and add a Curves adjustment layer to correct image color. When you create more than one adjustment layer, each adjustment is applied to the image based on its stacking order in the Layers panel.
Create an Adjustment Layer
![]() Select the Layers panel.
Select the Layers panel.

![]() Click the layer you want to adjust.
Click the layer you want to adjust.
![]() Click the Create New Fill or Adjustment Layer button, and then select from the available types of adjustment layers.
Click the Create New Fill or Adjustment Layer button, and then select from the available types of adjustment layers.
You can also open the Adjustments panel to set adjustment settings. You can choose from 15 icons representing most of the adjustment layer options. Below the icons are a listing of presets available for some adjustments. When you click one of the icons, controls for that type of adjustment appear on the panel.

![]() Adjust the controls for the specific adjustment in the Adjustment panel.
Adjust the controls for the specific adjustment in the Adjustment panel.
• To change the focus on the panel text boxes (New!), press Shift+Enter (Win) or Return (Mac), and then press Tab to switch between boxes.

![]() At the bottom of the Adjustments panel, you can use buttons that allow you to go back to the list of adjustment types, switch the panel from Expanded to Standard view, clip the adjustment to the layer below, make the layer visible or invisible, revert to the image state before adjustment was made, reset adjustment defaults, or delete the adjustment.
At the bottom of the Adjustments panel, you can use buttons that allow you to go back to the list of adjustment types, switch the panel from Expanded to Standard view, clip the adjustment to the layer below, make the layer visible or invisible, revert to the image state before adjustment was made, reset adjustment defaults, or delete the adjustment.
Modifying an Adjustment Layer
The beauty of adjustment layers is in the control they offer to the Photoshop user. When you use the Image menu, and click Adjustments, any changes made to the image are permanent as soon as you click OK. But that’s not true of adjustment layers. Adjustment layers keep the changes isolated in a separate layer, and this allows you to modify the adjustment minutes, or even days later. With this type of creative control at your fingertips, you can experiment with different settings until the image looks exactly the way you want.
Modify an Adjustment Layer
![]() Select the Layers panel.
Select the Layers panel.

![]() Double-click on the thumbnail of the adjustment layer you want to modify.
Double-click on the thumbnail of the adjustment layer you want to modify.
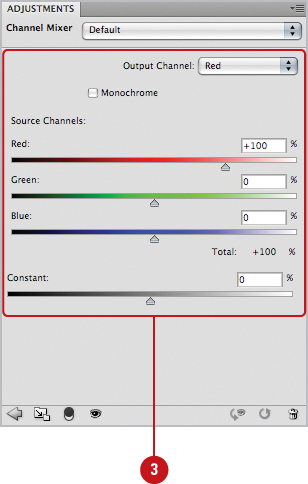
The options for that specific adjustment reopens in the Adjustments panel. If you didn’t already have the Adjustments panel open, clicking on the layer you want to modify will open it automatically. Options for each type of adjustment dialog box varies.
![]() Make the changes you want for the specific adjustment.
Make the changes you want for the specific adjustment.
![]() Click OK.
Click OK.
Did You Know?
You can move adjustment layers up and down in the layer stack. Since each adjustment layer interacts with other adjustment layers, changing the order of the layers creates a totally different image.
Merging Adjustment Layers
Photoshop lets you create as many adjustment layers as you need. For example, you might create a Levels adjustment layer to balance image contrast, a Curves adjustment layer to correct color, and a Photo Filter adjustment layer to create an overall warming effect to the image. Each adjustment layer works with the other adjustment layers to produce the final image. It’s not unusual to have three, four, or even five adjustment layers controlling a single image. At some point in the design, you might decide to save space by merging some or all of the adjustment layers. However, when you merge the adjustment layers, the adjustment effects are lost, as a result of how Photoshop deals with adjustment layers. Each adjustment layer controls one specific part of the adjustment, such as Curves or Levels. The layers themselves do not hold an image; they hold mathematical data on how to change an image. A single adjustment layer cannot hold more than one set of adjustments. That’s why you have multiple adjustment layers. Merging two or more adjustment layers together forces Photoshop to discard all of the adjustment data and the merged adjustment layers turn into one plain old transparent layer. To solve the problem, try merging the adjustment layers and the image layer into one single layer.
Merge Adjustments with Images
![]() Open a document containing an image layer, and two or more adjustment layers.
Open a document containing an image layer, and two or more adjustment layers.
![]() Select the Layers panel.
Select the Layers panel.

![]() Click the Layers Options button, and then select from the following merge options:
Click the Layers Options button, and then select from the following merge options:
• Merge Layers. Merges only the layers selected in the Layers panel into a single layer.
• Merge Visible. Merges only the layers that are visible, leaving the hidden layers untouched.
• Flatten Image. Merges all layers into a flattened background. If you have one or more layers hidden, Photoshop will open a warning dialog box and ask if you want to discard the hidden layers.
Creating a Temporary Composite Image
When you merge adjustment layers into the image, you wind up with a single layer that contains all of the adjustments. By merging the adjustment layers, you do lose control over the individual adjustment layers. It’s basically a trade-off of smaller file sizes and less layers to contend with, but also less control over the image. Let’s say you want the best of both worlds—a single layer that contains the image, all of the adjustments, and the original image with separate adjustment layers. It’s possible; all you have to do is create a composite layer.
Create a Temporary Composite Image
![]() Open a document that contains an image, and two or more visible adjustment layers.
Open a document that contains an image, and two or more visible adjustment layers.
![]() Select the Layers panel, create a new layer at the top of the layer stack, and then select it.
Select the Layers panel, create a new layer at the top of the layer stack, and then select it.

![]() Hold down the Alt (Win) or Option (Mac) key, click the Layers Options button, and then click Merge Visible.
Hold down the Alt (Win) or Option (Mac) key, click the Layers Options button, and then click Merge Visible.
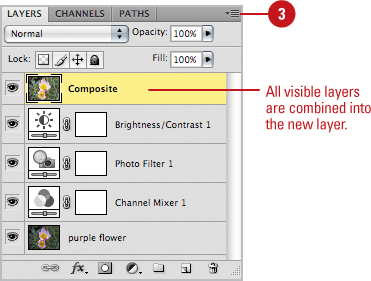
Photoshop combines all of the visible layers into a new layer, while leaving the original layers untouched.
Did You Know?
You can use the composite layer option on any multi-layered Photoshop document. Once you’ve created the composite layer, you can perform other adjustments without impacting the original image, or even drag and move the composite into another Photoshop document.
You can use the link option to control the composite image. Create a new layer, and then link the layers you want included in the composite. Follow the steps for creating a composite, except click Merge Linked.
Controlling Adjustment Layers with Clipping Groups
When you work with adjustment layers, the adjustments are applied to all the layers below the adjustment layer, including any additional adjustment layers. However, there are times when you only want the adjustment applied to a specific layer. For example, you’re working on a multi-layered document and you create a Curves Adjustment layer for the purpose of adjusting the color in the next layer down. Unfortunately, the Curves adjustment is applied to all the layers. The answer is simple; just create a clipping group to combine the adjustment layer with the one layer you want to be affected.
Control Adjustment Layers with the Clipping Group Option
![]() Select the Layers panel, and then click the layer you want to adjust.
Select the Layers panel, and then click the layer you want to adjust.

![]() Move your cursor down until the fingertip of the hand pointer touches the line separating the adjustment layer from the next layer down.
Move your cursor down until the fingertip of the hand pointer touches the line separating the adjustment layer from the next layer down.
![]() Hold down the Alt (Win) or Option (Mac) key.
Hold down the Alt (Win) or Option (Mac) key.
The cursor changes from a hand pointer to a double-circle button (the clipping group button).
![]() Click your mouse to group the two layers together.
Click your mouse to group the two layers together.
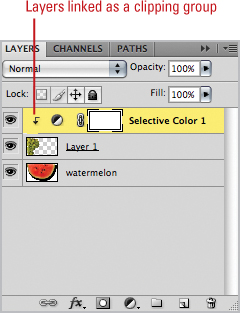
The thumbnail of the adjustment layer indents to indicate the two layers are grouped. The effect of the adjustment layer impacts the layer below and no others.
Did You Know?
You can group more than one layer together. Hold down the Alt (Win) or Option (Mac) key, and then click on the line separating the next layer to add a layer to the group. To remove a layer from the group, hold down the Alt (Win) or Option (Mac) key, and then click on the line separating two grouped items.
Deleting an Adjustment Layer
When you delete an adjustment layer you are simply deleting the adjustment, not the image. Adjustment layers do not contain pixels; they only manipulate the information contained within the image layer. Deleting an adjustment layer is as easy as deleting any other layer type. The effect is the same; the function of the layer is removed from the document. For example, if you delete a Curves adjustment layer, the effects are removed and the image returns to its original state. When you delete an adjustment layer, the change to the image created by the adjustment layer is removed, and the image returns to its original state.
Delete an Adjustment Layer
![]() Select the Layers panel.
Select the Layers panel.

![]() Click the adjustment layer you want to delete.
Click the adjustment layer you want to delete.
![]() Drag the adjustment layer onto the Delete Layer button.
Drag the adjustment layer onto the Delete Layer button.

Did You Know?
You can convert an adjustment layer into a regular layer. By default, adjustment layers come with a built-in mask. To remove the mask while preserving the adjustment layer, select the adjustment layer in the Layers panel, hold down the Alt (Win) or Option (Mac) key, and then click the Delete Layer button.
Using Blending Modes and Opacity with Layers
Adjustment layers perform two functions—they adjust the image and they give you control. Since an adjustment is held in a separate layer, you have the advantage of isolating the adjustment and keeping your original image information intact. Combine that with an adjustment layer’s ability to manipulate pixel information and you have a very powerful image-editing tool. Blending Modes change how two or more layers interact. For example, the Multiply blending mode instructs Photoshop to mix the pixels of two or more layers, thus creating an entirely new image from the mix. With that in mind, the five modes that produce the most stunning results are Multiply, Screen, Hard Mix, Difference, and Exclusion. The opacity of an adjustment layer controls the intensity of the selected adjustment. You can reduce the opacity of the Hue & Saturation adjustment to 50% and it would reduce its effect on the image. Since each adjustment layer has its own opacity settings, multiple adjustment layers can be fine-tuned to create a custom effect on the image.
Use Blending Modes with Adjustment Layers
![]() Select the Layers panel.
Select the Layers panel.
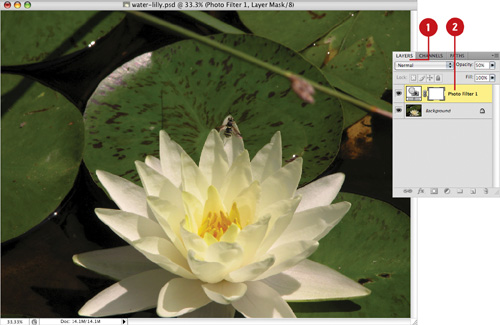
![]() Click the layer you want to adjust.
Click the layer you want to adjust.
![]() Click the Blending Mode list arrow, and then select from the available options.
Click the Blending Mode list arrow, and then select from the available options.

The results of the blend are visible in the document window.
Control Through Opacity
![]() Select the Layers panel.
Select the Layers panel.

![]() Select the layers you want to adjust.
Select the layers you want to adjust.
You can apply opacity to one or more (New!) selected layers in the Layers panel.
![]() Click the Opacity list arrow, and then drag the slider to lower the opacity of the layer.
Click the Opacity list arrow, and then drag the slider to lower the opacity of the layer.

The results of the change appear in the document window.
Timesaver
Click inside the Opacity box, and then use the Up and Down Arrow keys to increase or decrease the opacity 1 percentage point at a time. Hold the Shift key, and then use the Up and Down Arrow keys to increase or decrease the opacity 10 percentage points at a time. You can also select the percentage in the box and enter a value.
Using Masks with Adjustment Layers
When you create an adjustment layer, the effects of the adjustment are applied to the entire image. For example, if you use the Curves adjustment, the resulting changes are applied to the entire image. It’s true you can modify the adjustment with the use of layer blending modes and opacity settings but the effects are applied equally to the entire image. The problem is that many times you don’t want the adjustment applied to the entire image. For example, you may want to color-correct just a portion of the image, or lighten the shadows of an image without applying the same lightening adjustment to the highlights. Photoshop handles this problem with the use of masks. When you create an adjustment layer, Photoshop automatically creates a mask with the image. The mask controls how the adjustment is applied to the image, and you control the effect by painting in the mask with black, white, or a shade of gray. When you paint in the mask with black, it will totally mask the adjustment; painting with white fully applies the adjustment. If you paint with 50% gray, then the adjustment is applied to the image at 50% strength.
Paint on an Adjustment Mask
![]() Select the Layers panel.
Select the Layers panel.
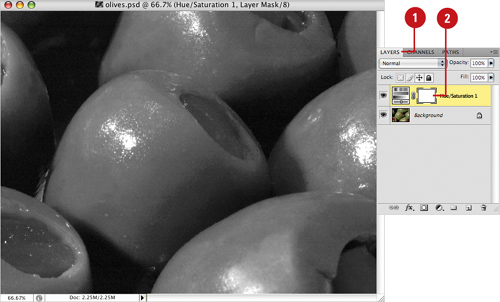
![]() Click the layer mask thumbnail in which you want to paint a mask.
Click the layer mask thumbnail in which you want to paint a mask.
![]() Select a Paintbrush tool.
Select a Paintbrush tool.
![]() Select a brush size on the Options bar.
Select a brush size on the Options bar.
![]() Select the Masks panel to display details about both pixel and vector masks and select from options to change the opacity (density) of the mask, as well as feather options. You can also access the Color Range command from here and invert the mask.
Select the Masks panel to display details about both pixel and vector masks and select from options to change the opacity (density) of the mask, as well as feather options. You can also access the Color Range command from here and invert the mask.

![]() Set the Foreground Color box on the toolbox to black as the paint color.
Set the Foreground Color box on the toolbox to black as the paint color.
![]() Paint the areas of the image that you want to mask. The adjustment layer must be selected. The areas painted black mask the adjustment, returning the image to normal.
Paint the areas of the image that you want to mask. The adjustment layer must be selected. The areas painted black mask the adjustment, returning the image to normal.
![]() To restore the masked areas, switch to white and drag across the image in the areas previously painted black.
To restore the masked areas, switch to white and drag across the image in the areas previously painted black.
Creating Masks with Selections
You can create an instant mask using traditional selection techniques. Before creating the adjustment layer, select the area of the image to which you want the adjustment applied. Use any of Photoshop’s selection tools for this purpose. When you create the adjustment layer, Photoshop converts the selection into a mask, and only the selected areas of the image are changed.
Create Masks with Selections
![]() Use any of Photoshop’s selection tools to create a selection around the area of the image to which you want the adjustment applied.
Use any of Photoshop’s selection tools to create a selection around the area of the image to which you want the adjustment applied.

![]() Select the Layers panel.
Select the Layers panel.
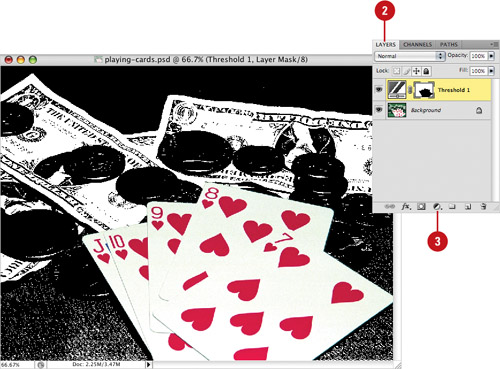
![]() Click the Create New Fill or Adjustment Layer button, and then select from the available adjustments or use the new Adjustments panel to choose one of the adjustment icons.
Click the Create New Fill or Adjustment Layer button, and then select from the available adjustments or use the new Adjustments panel to choose one of the adjustment icons.
Photoshop creates a mask based on your selection with the selected areas being adjusted and the non-selected areas masked.
Did You Know?
You can use any of Photoshop’s filters on an adjustment layer mask. For example, you could use the Gaussian Blur filter to soften the edge between adjustment and mask. Experiment with different filters for different creative effects.
Using the Add Noise Filter
The Add Noise filter applies random pixels to an image. When you want to simulate a film grain effect, you can apply the Add Noise filter. For example, you could use the Add Noise filter to make an image look like it was taken using high-speed film. In addition, the Add Noise filter can be used to reduce banding in feathered selections or graduated fills or even give a more realistic look to heavily retouched areas. Experiment with the Add Noise filter in combination with other filters, such as Motion Blur filters, to create eye-catching special effects.
Use the Add Noise Filter
![]() Select the Layers panel.
Select the Layers panel.
![]() Select the layer to which you want to apply the Add Noise filter.
Select the layer to which you want to apply the Add Noise filter.
![]() Click the Filter menu, point to Noise, and then click Add Noise.
Click the Filter menu, point to Noise, and then click Add Noise.
![]() Select from the following options:
Select from the following options:
• Amount. Drag the slider, or enter a value (0.10 to 400) to increase or decrease the amount of noise added to the image.
• Distribution. Click the Uniform option to create a more ordered appearance, or click the Gaussian option to create a more random noise pattern.
• Monochromatic. Select this check box to apply the filter to the tonal elements in the image without changing the colors.

Timesaver
The plus and minus signs, located directly under the image preview, let you increase or decrease the viewable area of the image.
![]() Click OK.
Click OK.
Using the Reduce Noise Filter
The Reduce Noise filter helps to remove the random noise that crops up in digital images. It’s called noise, but in reality it is a pattern of distracting color or grayscale information on top of the original image information. Noise can be generated by the Add Noise filter, but it typically comes from scanners and even digital cameras. Since there is a mathematical pattern to most noise, the Reduce Noise filter is designed to seek out and reduce the amount of noise in an image. The Reduce Noise filter works on individual layers, not the entire document. After applying the filter, you can use other restoration tools, such as the Healing Brush and Patch tool, to further clean up problem areas in your image.
Use the Reduce Noise Filter
![]() Click the Filter menu, point to Noise, and then click Reduce Noise.
Click the Filter menu, point to Noise, and then click Reduce Noise.
![]() Select the Preview check box to view the changes to the image.
Select the Preview check box to view the changes to the image.
![]() Select the Basic or Advanced option. Advanced allows you to adjust the noise on individual channels.
Select the Basic or Advanced option. Advanced allows you to adjust the noise on individual channels.
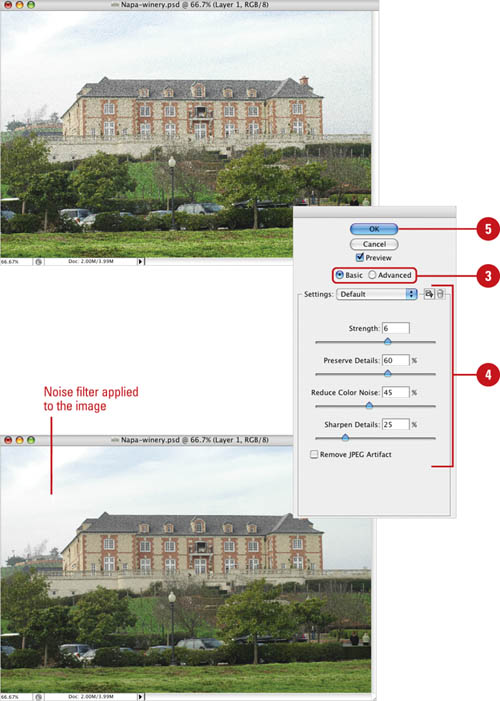
![]() Select from the following options:
Select from the following options:
• Settings. Click the setting arrow and select a user-defined preset.
• Strength. Drag the slider to determine how strong to apply the Reduce Noise filter.
• Preserve Details. Drag the slider to determine a balance between blurring the noise and preserving details.
• Reduce Color Noise. Drag the slider to convert noise composed of colors into shades of gray (this may desaturate other areas of the image).
• Sharpen Details. Drag the slider to determine where the details of the image exist, in terms of shifts in brightness.
• Remove JPEG Artifact. Check to help remove artifacts (typically noise within shadows) from severely compressed JPEG images.
![]() Click OK.
Click OK.
Keeping Proper Perspective with Vanishing Point
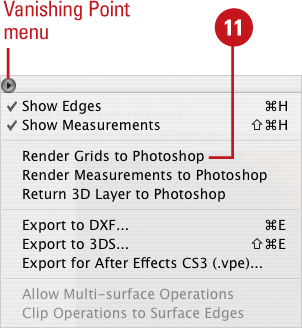
Vanishing Point gives you the ability to move and/or copy objects and still maintain the same visual perspective of the original. Let’s say that you shoot an image of a roadway disappearing into the distance, and along the road there’s a billboard. You want the billboard to appear as if it’s farther away, but to retain its proper perspective within the image. With Vanishing Point, you simply create a framework, or plane, that identifies the depth of the image, and then move the billboard (using the Move or Clone Stamp tools). Wherever you move the sign, it will appear within the proper perspective. If you have Photoshop Extended, you can adjust the angle of the plane for greater flexibility or take measurements. When you finish working in Vanishing Point, you can use the Vanishing Point menu to render grids to Photoshop. With Photoshop Extended, you can also export 3D information and measurements to DXF or 3DS formats.
Use the Vanishing Point Tool
![]() Open an image.
Open an image.

![]() Click the Filter menu, and then click Vanishing Point.
Click the Filter menu, and then click Vanishing Point.
![]() The following tools are available:
The following tools are available:
• Edit Plane. Adjusts the grid to match the perspective of the image.
• Create Plane. First tool to use; it creates the initial perspective grid plane.
• Marquee Tool. Makes selections in the grid and then changes their perspective as you move them to match the perspective of the grid.
• Stamp Tool. Lets you make copies of areas and then stamp them onto other areas using the perspective of the grid.
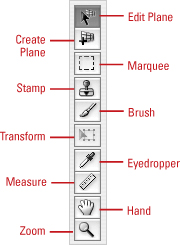
• Brush Tool. Lets you paint with color within the grid. If you click the Heal button and then click Luminance, Vanishing Point adapts the color to the shadows or textures of the areas being painted.
• Transform Tool. Lets you rotate, resize or flip a selection created with the Marquee tool.
• Eyedropper Tool. Click to select a specific color from the image.
• Measure Tool. Lets you draw a measurement line over an object in a perspective plane (Extended).
• Hand Tool. Click to move the image within the Vanishing Point window.
• Zoom Tool. Click to Zoom in, or Alt+click (Win) or Option+click (Mac) to zoom out.
![]() Select the Create Plane tool.
Select the Create Plane tool.

![]() Click on the image to create the first point of the grid, and then click three more times to create the box shape of the grid.
Click on the image to create the first point of the grid, and then click three more times to create the box shape of the grid.
• Angle. Lets you adjust the plane angle (Extended).
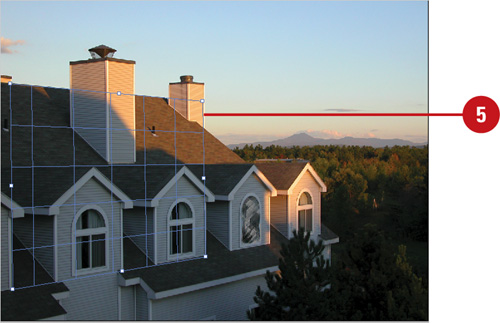
![]() Use the Edit Plane tool to change the perspective of the plane, and to extend the plane over the area you want fixed.
Use the Edit Plane tool to change the perspective of the plane, and to extend the plane over the area you want fixed.
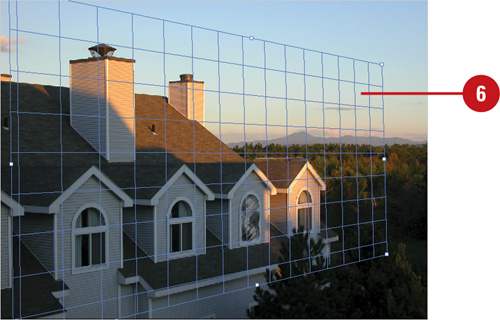
The grid should be blue; however, if the grid turns red or yellow, that means Vanishing Point believes you have a bad grid.
![]() Select the Zoom tool, and zoom in on the working areas of the image.
Select the Zoom tool, and zoom in on the working areas of the image.

![]() Select the Stamp tool.
Select the Stamp tool.

![]() Position the Stamp tool directly over the image area you want to use to fix the offending portions of the image, and then Alt+click (Win) or Option+click (Mac) to confirm the selection.
Position the Stamp tool directly over the image area you want to use to fix the offending portions of the image, and then Alt+click (Win) or Option+click (Mac) to confirm the selection.
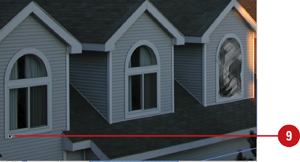
![]() Move to the area you want to fix and then click and drag with the Stamp tool, which replaces the original information; the perspective changes to match the grid.
Move to the area you want to fix and then click and drag with the Stamp tool, which replaces the original information; the perspective changes to match the grid.

![]() To show the grid in Photoshop, click the Vanishing Point menu, and then click Render Grids To Photoshop.
To show the grid in Photoshop, click the Vanishing Point menu, and then click Render Grids To Photoshop.
![]() Click OK.
Click OK.
Working with the Lens Correction Filter
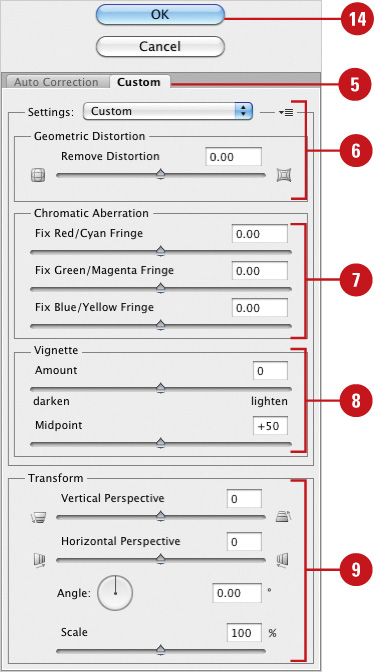
The Lens Correction filter fixes flaws that occur during the shooting of images, such as geometric distortion, vignetting, and chromatic aberration. Geometric distortion causes straight lines to bow out toward the edges of the image. Vignetting is a defect where edges of an image are darker than the center. Chromatic aberration appears as a fringe of color along the edges of objects caused by the lens focusing on different colors of light in different planes. You can select options to automatically correct image problems or apply a Lens Correction Profile (LCP) for a camera (New!). If a profile for your camera is not available, you can search online or use Adobe Lens Profile Creator (New!) (available at www.labs.adobe.com) to create one. If you know how you want to fix a problem, you can also manually adjust options to correct it (New!).
Use the Lens Correction Filter
![]() Open an image.
Open an image.
![]() Click the Filter menu, and then click Lens Correction.
Click the Filter menu, and then click Lens Correction.
![]() Select from the following tools:
Select from the following tools:
• Remove Distortion Tool. Drag in the grid left or right to remove geometric distortion.
• Straighten Tool. Drag in the grid to draw a new horizon line (image shifts to the horizon).
• Move Grid Tool. Drag to reposition the visible grid.
• Hand Tool. Drag to move the image within the view window.
• Zoom Tool. Click in the view window to zoom in, or Alt+click (Win) or Option+click (Mac) to zoom out.

![]() Select from the following options on the Auto Correction tab (New!):
Select from the following options on the Auto Correction tab (New!):
• Correction. Select to correct Geometric Distortion, Chromatic Aberration, or Vignette (New!).
• Edge. Select to fill in transparent areas of the image with the Black or White Color (New!), Edge Extension, or Transparent.
• Search Criteria and Lens Profile. Search for and select a lens profile to correct an image based on a camera and lens, or click Search Online (New!).

![]() Select from the following tools:
Select from the following tools:
• Settings. Choose from Lens Default, Previous Correction, Custom, or Default Correction.
• Remove Distortion. Drag the slider left or right to precisely remove pincushion or barrel distortion.
![]() Change the Chromatic Aberration options: drag left or right to remove Red/Cyan Fringe, Green/Magenta Fringe (New!), or Blue/Yellow Fringe from the image.
Change the Chromatic Aberration options: drag left or right to remove Red/Cyan Fringe, Green/Magenta Fringe (New!), or Blue/Yellow Fringe from the image.
![]() Select from the following Vignette options:
Select from the following Vignette options:
• Amount. Drag left or right to create a light or dark vignette around the image.
• Midpoint. Drag left or right to select the midpoint for the vignette.
![]() Select from the following Transform options:
Select from the following Transform options:
• Vertical Perspective. Drag left or right to change the image’s vertical perspective.
• Horizontal Perspective. Drag left or right to change the image’s horizontal perspective.
• Angle. Drag the angle option to rotate the image clockwise or counter clockwise.
• Scale. Drag left or right to change the scale (size) of the image.
![]() Select the Preview check box to view changes as they are made.
Select the Preview check box to view changes as they are made.
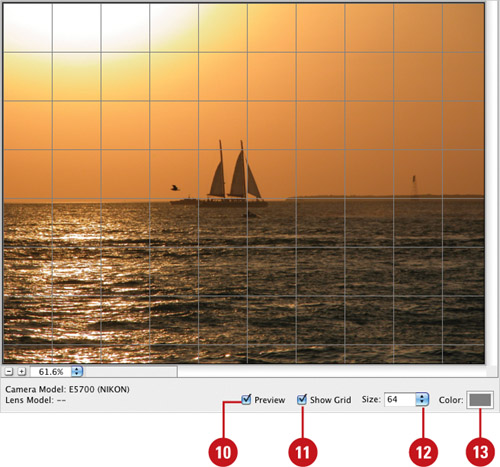
![]() Select the Show Grid check box to view or hide (default (New!)) the grid.
Select the Show Grid check box to view or hide (default (New!)) the grid.
![]() Click the Size list arrow to change the size of the grid boxes (default is 64 (New!)).
Click the Size list arrow to change the size of the grid boxes (default is 64 (New!)).
![]() Click the Color box to change the color of the grid.
Click the Color box to change the color of the grid.
![]() Click OK.
Click OK.
Using the Box, Surface, and Shape Blur Filters
Photoshop provides a variety of filters to blur the look of an image, including Box, Surface, and Shape. The Box Blur filter blurs an image based on the average color value of neighboring pixels. Its primary function is the creation of special effects. You can adjust the size of the area used to calculate the average value for a given pixel; a larger radius results in more blurring. The Surface Blur filter blurs an image while saving the visible edges; this filter is useful for creating special effects or removing that pesky noise or grain. The Radius option specifies the size of the area sampled for the blur. The Threshold option controls how much the tonal values of neighboring pixels must diverge from the center pixel value before being part of the blur. Pixels with tonal value differences less than the Threshold value are excluded from the blur. The Shape Blur filter uses a specified shape to create the blur. Choose a kernel from the list of custom shape presets, and use the radius slider to adjust its size. You can load different shape libraries by clicking the triangle and choosing from the list. Radius determines the size of the shape; the larger the shape, the greater the blur.
Use the Box Blur Filter
![]() Open an image.
Open an image.

![]() Click the Filter menu, point to Blur, and then click Box Blur.
Click the Filter menu, point to Blur, and then click Box Blur.
![]() Drag the Radius slider left or right to decrease or increase the amount of blur applied to the image.
Drag the Radius slider left or right to decrease or increase the amount of blur applied to the image.
![]() Click OK.
Click OK.

Use the Surface Blur Filter
![]() Open an image.
Open an image.
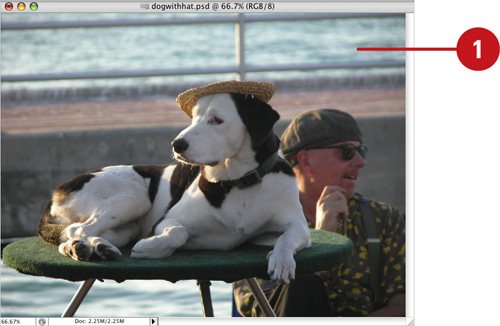
![]() Click the Filter menu, point to Blur, and then click Surface Blur.
Click the Filter menu, point to Blur, and then click Surface Blur.
![]() Drag the Radius slider left or right to decrease or increase the amount of blur applied to the image.
Drag the Radius slider left or right to decrease or increase the amount of blur applied to the image.
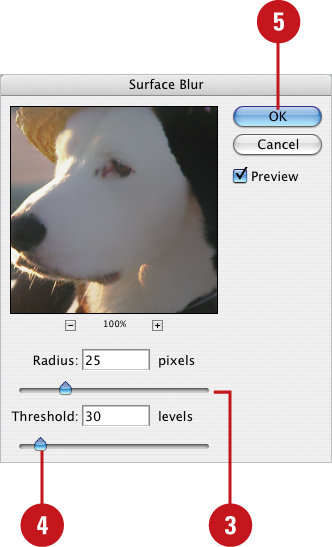
![]() Drag the Threshold slider left or right to decrease or increase the acceptance of the shift in brightness of the image information (the edges).
Drag the Threshold slider left or right to decrease or increase the acceptance of the shift in brightness of the image information (the edges).

![]() Click OK.
Click OK.
Use the Shape Blur Filter
![]() Open an image.
Open an image.
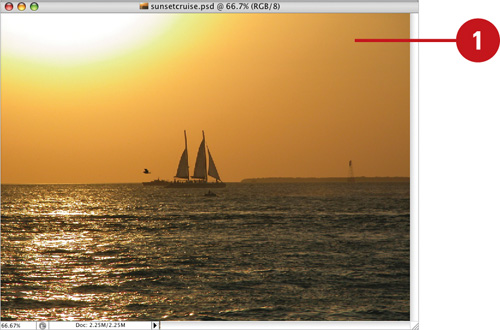
![]() Click the Filter menu, point to Blur, and then click Shape Blur.
Click the Filter menu, point to Blur, and then click Shape Blur.
![]() Select a shape (called a kernel) from the available options.
Select a shape (called a kernel) from the available options.
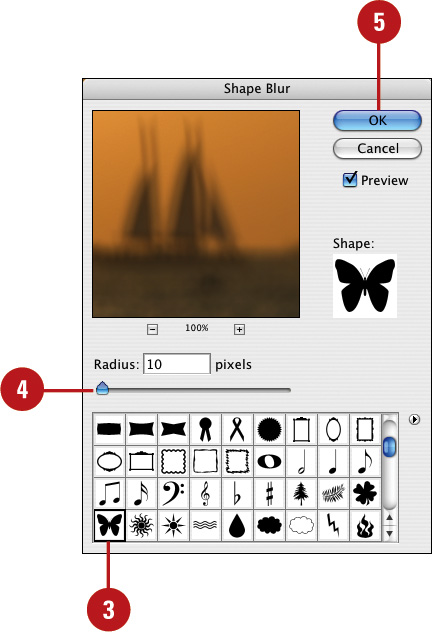
![]() Drag the Radius slider left or right to decrease or increase the amount of blur applied to the image.
Drag the Radius slider left or right to decrease or increase the amount of blur applied to the image.
![]() Click OK.
Click OK.

Using the Gaussian Blur and Despeckle Filters
You can also apply the Gaussian Blur filter that blurs an image or a selection by a controllable amount. While not strictly a restoration tool, the Gaussian Blur filter can be used to add a sense of depth to the image. For example, you could select and blur the background of an image while leaving the foreground in focus. The outcome of the filter is to create a hazy, out-of-focus effect on the image or selection. Another filter, the Despeckle filter, detects the edges in an image and blurs the entire image except those edges. Of course, there are no real edges in a Photoshop document—the Despeckle filter works along areas where there is a significant shift in the brightness of the pixels. Since a shift in brightness usually signifies an edge, the Despeckle filter performs a very accurate blurring of the image while preserving detail.
Use the Gaussian Blur Filter
![]() Select the portions of the image you want to blur or leave the image unselected to apply the filter to the entire image.
Select the portions of the image you want to blur or leave the image unselected to apply the filter to the entire image.
![]() Click the Filter menu, point to Blur, and then click Gaussian Blur.
Click the Filter menu, point to Blur, and then click Gaussian Blur.
![]() Select the Preview check box to view the results.
Select the Preview check box to view the results.
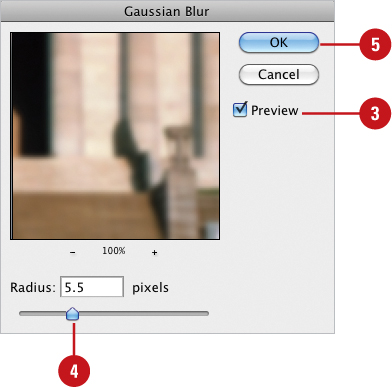
![]() Drag the Radius slider or enter a pixel value to increase or decrease the amount of Gaussian blur applied to the image.
Drag the Radius slider or enter a pixel value to increase or decrease the amount of Gaussian blur applied to the image.
![]() Click OK.
Click OK.
Use the Despeckle Filter
![]() Select the Layers panel.
Select the Layers panel.
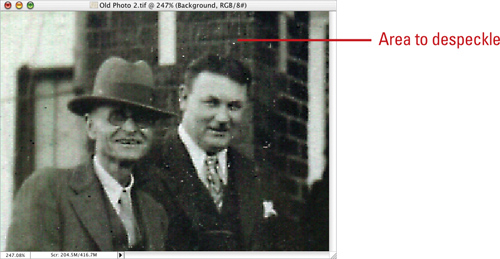
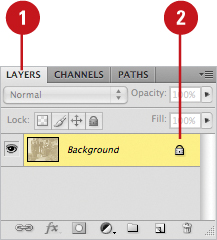
![]() Select the layer to which you want to apply the Despeckle filter.
Select the layer to which you want to apply the Despeckle filter.
![]() Click the Filter menu, point to Noise, and then click Despeckle.
Click the Filter menu, point to Noise, and then click Despeckle.
Photoshop applies the Despeckle filter to the image.
Using the Unsharp Mask Filter
The Unsharp Mask filter creates a visually sharper image by locating pixels that differ in value from surrounding pixels. When the filter is applied to the image, the bordering pixels specified by the threshold option get lighter and the darker pixels get darker. It’s important to understand that the Unsharp Mask does not actually sharpen the image; it only attempts to create the illusion of sharpness. Be careful; an over-application of this filter creates harsh images with ragged edges and shadows. Also, the effects of the Unsharp Mask filter appear more severe when viewed with the low resolution of a computer than when the document is output to a printer.
Use the Unsharp Mask Filter
![]() Select the Layers panel.
Select the Layers panel.
![]() Select the layer you want to sharpen.
Select the layer you want to sharpen.
![]() Click the Filter menu, point to Sharpen, and then click Unsharp Mask.
Click the Filter menu, point to Sharpen, and then click Unsharp Mask.
![]() Select from the following options:
Select from the following options:
• Preview. Select the option to view changes to the image directly in the active document window.
• Amount. Drag the slider or enter a value to determine how much to increase the contrast of pixels.
• Radius. Drag the slider or enter a value to determine the number of pixels surrounding the edge pixels that affect the sharpening.
• Threshold. Drag the slider or enter a value to determine how different the sharpened pixels must be from the surrounding area before they are considered edge pixels and sharpened by the filter.

![]() Click OK.
Click OK.

Using the Smart Sharpen Filter
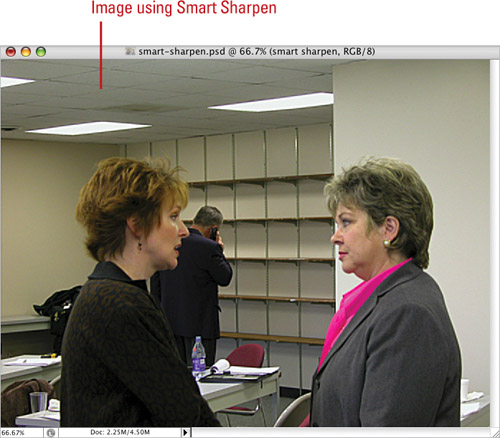
The Smart Sharpen filter attempts to sharpen the pixels of an out-of-focus image in much the same way as the Unsharp Mask filter. The major difference is the ability of Smart Sharpen to remove previously applied Gaussian, Lens, and Motion Blur filters. For example, you’ve applied the Lens Blur filter to an image, but later decide to reduce the effect. The problem is that Unsharp Mask will attempt to sharpen what it assumes to be an out-of-focus image. Unfortunately, an image taken with an out-of-focus lens, and a Lens blur are two different things, and that’s where the Smart Sharpen filter comes to the rescue.
Use the Smart Sharpen Filter
![]() Select the Layers panel.
Select the Layers panel.
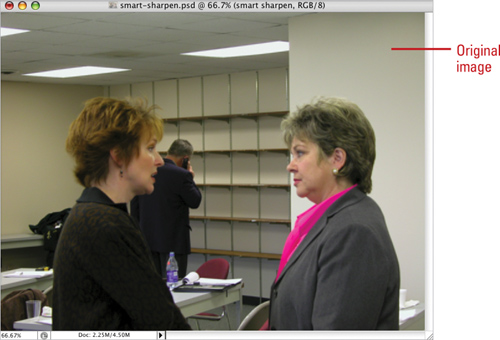
![]() Select the layer you want to sharpen.
Select the layer you want to sharpen.
![]() Click the Filter menu, point to Sharpen, and then click Smart Sharpen.
Click the Filter menu, point to Sharpen, and then click Smart Sharpen.
![]() Select the Preview check box to view the results.
Select the Preview check box to view the results.

![]() Select the Basic or Advanced option.
Select the Basic or Advanced option.
![]() Click the Settings list arrow, and then select from a list of user-defined settings.
Click the Settings list arrow, and then select from a list of user-defined settings.
![]() Select from the following Sharpen options:
Select from the following Sharpen options:
• Amount. Drag the slider to determine the amount of sharpness applied to the image.
• Radius. Drag the slider to determine the width of the sharpening effect.
• Remove. Click the list arrow and then select what type of blur effect you are removing from the image.
• Angle. Enter the angle of the Motion Blur filter to remove.
• More Accurate. Select for a more accurate (slower) sharpening effect.
![]() Select the Shadow panel and then select from the following Shadow options:
Select the Shadow panel and then select from the following Shadow options:
• Fade Amount. Drag the slider to determine the amount of shadow correction applied to the image.
• Tonal Width. Drag the slider to set the width of the tonal values in the image shadows.
• Radius. Drag the slider to choose the scale size for the shadows.
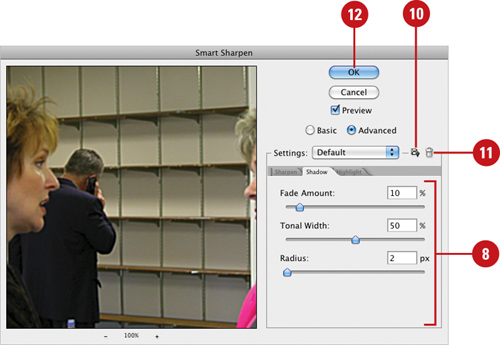
![]() Select the Highlight panel, and then select from the following Highlight options:
Select the Highlight panel, and then select from the following Highlight options:
• Fade Amount. Drag the slider to determine the amount of highlight correction applied to the image.
• Tonal Width. Drag the slider to set the width of the tonal values in the image highlights.
• Radius. Drag the slider to choose the scale size for the highlights.
![]() To save a copy of the current Smart Sharpen settings, click the Save button.
To save a copy of the current Smart Sharpen settings, click the Save button.
![]() To delete the active saved Smart Sharpen settings, click the Delete button.
To delete the active saved Smart Sharpen settings, click the Delete button.
![]() Click OK.
Click OK.
Using Sharpen, Blur, and Smudge Tools
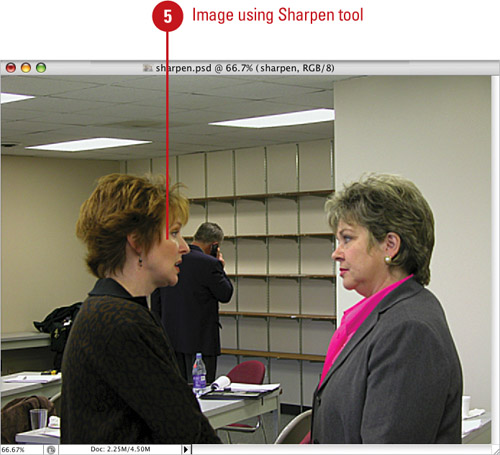
If you want to sharpen or blur parts of an image, you can use the Sharpen, Blur, or Smudge tools. These tools are grouped together on the toolbox. The Sharpen tool (New!) increases contrast along edges to increase sharpness; the more you use the tool, the greater the sharpening effect. The Blur tool softens hard edges or reduces detail; the more you use the tool, the greater the blur effect. The Smudge tool creates a finger drag through wet paint effect.
Use the Sharpen, Blur, or Smudge Tools
![]() Open a document.
Open a document.

![]() Select the Sharpen, Blur, or Smudge tool on the toolbox.
Select the Sharpen, Blur, or Smudge tool on the toolbox.
• Sharpen. Increases contrast.
• Blur. Softens hard edges or reduces detail.
• Smudge. Pushes a color in the drag direction to create a smudge effect.

![]() Select a brush tip.
Select a brush tip.
![]() Select brush options on the Options bar:
Select brush options on the Options bar:
• Mode. Specify a percentage value.
• Strength. Check this box to clip the overlay to the brush size.
• Sample All Layers. Select to modify pixels from all visible layers.
• Protect Detail (Sharpen tool). Select to minimize pixelization while maintaining details (New!).
• Finger Painting (Smudge tool). Select to use the background color as the smudge. Deselect to use the color under the pointer.
![]() Drag over the part of the image you want to change.
Drag over the part of the image you want to change.
Setting Up Multiple Clone Sources
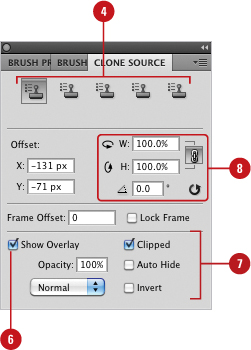
The Clone Source panel allows you to set up to five different sample sources for the Clone Stamp or Healing Brush tools in Photoshop. The Clone Source panel contains five clone buttons to which you can assign samples. Simply open the Clone Source panel, click a Clone Stamp button, and then select the sample you want. The Clone Source panel saves the samples until you close the document. To help you clone the source in a specific location, you can overlay your sample source and show the overlay on the screen. The overlay allows you to view your changes and helps you visualize where to paint. In addition, you can scale and rotate the sample source to clone the sample at a specific size and orientation as well as use the Flip buttons for reversing the clone source (New!). If you need to paint in a very specific location relative to the sampling point, you can use the x and y pixel offset.
Use the Clone Source Panel
![]() Open a document.
Open a document.
![]() Click the Clone Source button to display the Clone Source panel.
Click the Clone Source button to display the Clone Source panel.
![]() To determine if a Clone Stamp button is in use, point to it to display a Screen Tip.
To determine if a Clone Stamp button is in use, point to it to display a Screen Tip.
![]() Click a Clone Stamp not in use, or one you want to replace.
Click a Clone Stamp not in use, or one you want to replace.
![]() To set a sample point, Alt (Win) or Option (Mac), and click a point.
To set a sample point, Alt (Win) or Option (Mac), and click a point.
![]() To show the overlay, select the Show Overlay check box.
To show the overlay, select the Show Overlay check box.
![]() Select overlay options:
Select overlay options:
• Opacity. Specify a percentage.
• Clipped. Select to clip the overlay to the brush size.
• Auto Hide. Select to hide the overlay while you paint.
• Invert. Select to invert the overlay.
• Blend. Click the list arrow, and then select a blending mode.
![]() To scale or rotate the sample source, enter the values you want.
To scale or rotate the sample source, enter the values you want.
• Flip. Click to reverse (horizontal or vertical) the clone source (New!).
Using the Clone Stamp Tool
One of Photoshop’s most powerful features is its ability to retouch a photographic image. When you want to manipulate an image, you can apply the Clone Stamp tool. The Clone Stamp tool allows you to sample the image, and then apply that sample somewhere else on the same image, or on another open document. When you use the Clone Stamp tool, by selecting Aligned in the Options bar, you can reuse the most current sampling point no matter how many times you start and stop painting. When Aligned is deselected, you’ll reuse the same sampled pixels each time you paint. For example, you could use the Clone Stamp tool to repair damage to an image, remove a tree, or even remove or add someone from an image. If you want to take multiple samples, the Clone Source panel allows you to set up to five different sample sources for the Clone Stamp or the Healing Brush tools. Select Show Overlay and the Clipped option to see the clone source inside your brush cursor as you paint.
Use the Clone Stamp Tool
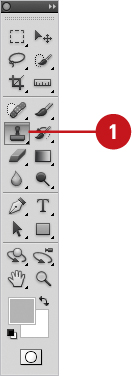
![]() Select the Clone Stamp tool on the toolbox.
Select the Clone Stamp tool on the toolbox.
![]() Select a brush tip, and then select brush options, such as blending mode, opacity, and flow, on the Options bar.
Select a brush tip, and then select brush options, such as blending mode, opacity, and flow, on the Options bar.


![]() Select the Aligned check box on the Options bar to sample pixels continuously without losing the current sampling point. Clear the check box to continue using pixels from the initial sampling point each time you stop and resume painting.
Select the Aligned check box on the Options bar to sample pixels continuously without losing the current sampling point. Clear the check box to continue using pixels from the initial sampling point each time you stop and resume painting.
![]() Click the Sample list arrow on the Options bar, and then select the layer option you want to use to obtain sample data: Current Layer, Current & Below, or All Layers.
Click the Sample list arrow on the Options bar, and then select the layer option you want to use to obtain sample data: Current Layer, Current & Below, or All Layers.
![]() Hold down the Alt (Win) or Option (Mac) key, and then click an area to sample the portion of the image you want to use for your sample.
Hold down the Alt (Win) or Option (Mac) key, and then click an area to sample the portion of the image you want to use for your sample.
![]() Drag over the area of the image you want to restore or modify.
Drag over the area of the image you want to restore or modify.
![]() To select more samples, click the Window menu, click Clone Source, click a clone button, and then repeat steps 5 & 6.
To select more samples, click the Window menu, click Clone Source, click a clone button, and then repeat steps 5 & 6.

Using the Dodge and Burn Tools
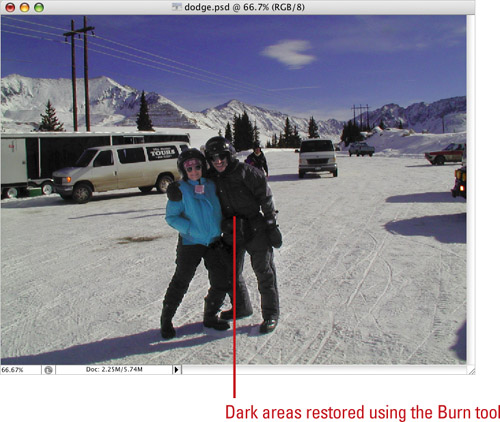
You can also use the Dodge and Burn tools to lighten or darken specific areas of an image. If you wanted to lighten the shadow areas of an image, you would use the Dodge tool, and conversely, if you wanted to darken the highlight areas of an image, you would select the Burn tool. While there are other ways to control the highlights and shadows of an image, such as a Levels adjustment, the Dodge and Burn tools are controlled by using a brush and painting in the image. That kind of control gives you the option to choose exactly what you want to modify.
Use the Dodge and Burn Tools
![]() Select the Dodge or Burn tool on the toolbox.
Select the Dodge or Burn tool on the toolbox.

![]() Select a brush tip, and then select brush options on the Options bar.
Select a brush tip, and then select brush options on the Options bar.

![]() Click the Range list arrow on the Options bar, and then click Midtones (middle range of grays), Shadows (dark areas), or Highlights (light areas).
Click the Range list arrow on the Options bar, and then click Midtones (middle range of grays), Shadows (dark areas), or Highlights (light areas).

![]() Specify the Exposure value for the stroke.
Specify the Exposure value for the stroke.
![]() To use the brush as an airbrush, click the Airbrush button. Alternately, select the Airbrush option in the Brushes panel.
To use the brush as an airbrush, click the Airbrush button. Alternately, select the Airbrush option in the Brushes panel.
![]() Select the Protect Tones check box to minimize clipping and reduce hue shifting within the image.
Select the Protect Tones check box to minimize clipping and reduce hue shifting within the image.
![]() Drag over the part of the image you want to lighten or darken.
Drag over the part of the image you want to lighten or darken.
Did You Know?
The Sponge tool does not lighten or darken an image. It saturates or desaturates color values as you drag over parts of the image. Since overexposed or underexposed images have a tendency to lose some tonal values and appear flat, you can use the Sponge tool (with Saturate) to return some of the color values back to the image.
Using the Healing Brush and Patch Tools
These tools have become my favorite tools for working with digital images and correcting problems. The Healing Brush tool allows you to correct small imperfections, making them disappear into the surrounding image. This tool works from a sample of the original image, and then matches the texture, lighting, transparency, and shading of the sampled pixels into the source pixels. If an image contains a lot of random noise, before working with the Healing Brush, try lowering the amount of noise with the Reduce Noise filter. After you’ve applied the Reduce Noise filter, you can use the Healing Brush to clean up the rest of the problem areas. The Patch tool takes a sample and matches the texture, lighting, transparency, and shading of the sample to the source, creating an almost seamless repair of the image. You can also use the Patch tool to clone isolated areas of an image. When you use healing operations in a separate layer, you gain control over the process; you can even use the opacity and blending mode settings to further control the healing process. Always use the Healing Brush in a separate layer...always.
Use the Healing Brush Tool
![]() Select the Healing Brush tool.
Select the Healing Brush tool.

![]() Select a soft round brush on the Options bar.
Select a soft round brush on the Options bar.


![]() Create a new layer above the layer you want to modify.
Create a new layer above the layer you want to modify.
![]() Click the Sample list arrow, and then select the layer option you want to use to obtain sample data: Current Layer, Current & Below, or All Layers.
Click the Sample list arrow, and then select the layer option you want to use to obtain sample data: Current Layer, Current & Below, or All Layers.
![]() Hold the Alt (Win) or Option (Mac) key, and then click on the area of the image for a sample.
Hold the Alt (Win) or Option (Mac) key, and then click on the area of the image for a sample.
This area should represent the texture (not color) of the areas you want to heal.
![]() Use small short strokes and carefully drag over the areas you want to change, then release your mouse and move to the next area.
Use small short strokes and carefully drag over the areas you want to change, then release your mouse and move to the next area.
The Healing brush works to match the sample to the source.
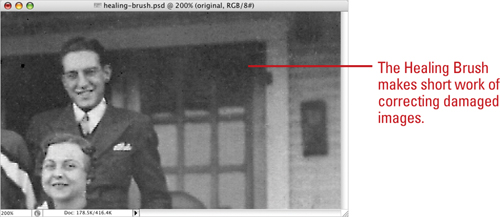
![]() If the texture of the area you are healing changes, repeat step 4, and sample a different area.
If the texture of the area you are healing changes, repeat step 4, and sample a different area.
Use the Patch Tool
![]() Select the Patch tool.
Select the Patch tool.

![]() Select the layer you want to modify.
Select the layer you want to modify.
![]() Using the Patch tool, select the damaged area of the image you want to repair (the Patch tool functions just like the Lasso selection tool).
Using the Patch tool, select the damaged area of the image you want to repair (the Patch tool functions just like the Lasso selection tool).

![]() Click the Source option on the Options bar.
Click the Source option on the Options bar.

![]() Move into the middle of the selection marquee, and drag the selection over the area you want to repair and release. As you drag, you will see a copy of the area you are moving over appear in the original selection.
Move into the middle of the selection marquee, and drag the selection over the area you want to repair and release. As you drag, you will see a copy of the area you are moving over appear in the original selection.
![]() Release your mouse when you see the best match.
Release your mouse when you see the best match.
The Patch tool corrects the damaged area of the image.
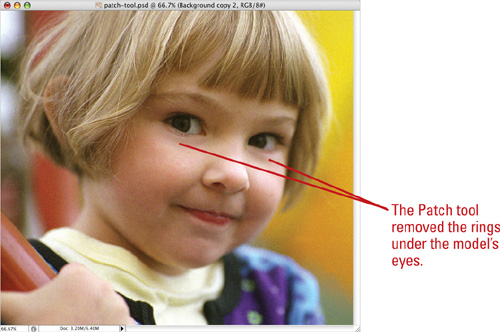
![]() Repeat steps 2 through 6 to patch any other damaged areas of the image.
Repeat steps 2 through 6 to patch any other damaged areas of the image.
Did You Know?
The Patch tool options on the Options bar provide power. On the Options bar, use the Source option with the Patch tool if you are selecting the damaged area and dragging it over the good area, and use the Destination option if you would rather select a good area to drag over the damaged area. The Transparent option preserves transparent areas during the patching process.
Working with the Spot Healing Brush
A powerful tool in Photoshop’s formidable arsenal of restoration and correction tools is the Spot Healing Brush. With a name similar to the Healing Brush, you might expect that the tools have similar features, and you would be correct. The main difference between the two tools is that the Spot Healing Brush does not require you to take a sample of the area to heal. The Spot Healing Brush tool takes the area sample as you work by sampling the surrounding pixels. The Spot Healing Brush, as its name implies, works best on small spots and imperfections. To heal larger areas, the standard Healing Brush, Patch tool, and even the good old Clone Stamp tool are your best bets.
Use the Spot Healing Brush
![]() Select the Spot Healing Brush tool.
Select the Spot Healing Brush tool.

![]() Select a soft round brush on the Options bar.
Select a soft round brush on the Options bar.


![]() Create a new layer above the layer you want to modify.
Create a new layer above the layer you want to modify.
![]() Select the Sample All Layers option.
Select the Sample All Layers option.
![]() Using small short strokes, carefully drag over the areas you want to change, then release your mouse and move to the next area.
Using small short strokes, carefully drag over the areas you want to change, then release your mouse and move to the next area.
The Spot Healing brush works to match the sample to the source.

Did You Know?
You can use the Clone Source panel to set different sampling points. The Clone Source panel allows you to set up to five different sampling source points for the Clone Stamp tools or Healing Brush tools. Click a clone source button in the Clone Source panel, and then click a sampling point. To open the Clone Source panel, click the Window menu, and then click Clone Source. You can also scale or rotate the clone source, or show an overlay of the clone source.
Working with the Red Eye Tool
The Red Eye tool not only gives the digital restorer an excellent tool for removing pesky red eye, it will also remove the green and white reflections in pet’s eyes. The biggest generator of red eye is the onboard flash on your camera. Actually, if they would simply rename a camera’s built-in flash, “red eye generator,” it might help amateur photographers pay more attention. However, until that day comes, designers will still have to deal with images that contain red eye. The Red Eye tool performs two operations: it desaturates the red values, and darkens the pupil.
Use the Red Eye Tool
![]() Select the Red Eye tool.
Select the Red Eye tool.

![]() Select from the following options on the Options bar:
Select from the following options on the Options bar:
• Pupil Size. Select the size of the pupil in relation to the amount of red eye.
• Darken Amount. Select how much you want to darken the pupil area of the eye.

![]() Click in the middle of the red portion of the eye, and release.
Click in the middle of the red portion of the eye, and release.
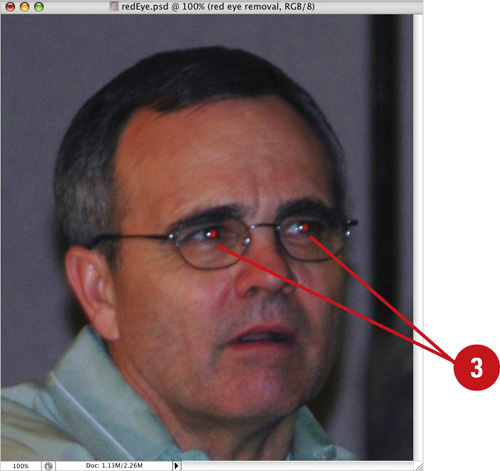
The red is removed, and the pupil is darkened.

Controlling Tonal Range
The Levels adjustment lets you adjust the tonal range of an image by giving you three sliders—one for shadows, midtones, and highlights. Dragging the sliders precisely adjusts the tonal ranges of an image. In addition, the Output sliders let you adjust the ink percentages used to print during output. By adjusting the output ink levels, you avoid the overly black images that sometimes plague images printed with high dot-gain papers.
Control Tonal Range
![]() Open a document in which you want to change the tonal range.
Open a document in which you want to change the tonal range.

![]() Select the Layers panel, and then select the layer to which you want to apply the Levels adjustment.
Select the Layers panel, and then select the layer to which you want to apply the Levels adjustment.
![]() Click the Create New Fill or Adjustment Layer button, and then click Levels or use the icon for Levels from the Adjustments panel.
Click the Create New Fill or Adjustment Layer button, and then click Levels or use the icon for Levels from the Adjustments panel.
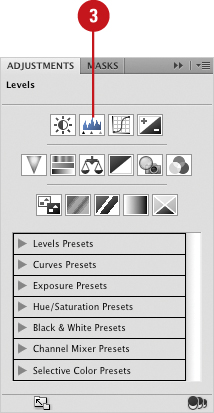
![]() To use common Levels settings, click the Levels list arrow, and then select a preset. If you select Auto, Photoshop will make a Levels adjustment for you.
To use common Levels settings, click the Levels list arrow, and then select a preset. If you select Auto, Photoshop will make a Levels adjustment for you.
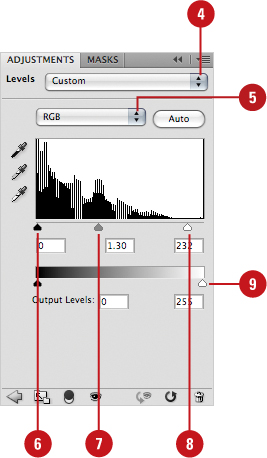
![]() Click the Channel list arrow to select whether to work on the entire image, or just one of the image’s default color channels (useful for color correction).
Click the Channel list arrow to select whether to work on the entire image, or just one of the image’s default color channels (useful for color correction).
![]() Drag the Shadow input slider to the right to adjust the balance of black in the image.
Drag the Shadow input slider to the right to adjust the balance of black in the image.
![]() Drag the Midtone input slider left or right to lighten or darken the midtones of the image.
Drag the Midtone input slider left or right to lighten or darken the midtones of the image.
![]() Drag the Highlight input slider to the left to adjust the balance of white in the image.
Drag the Highlight input slider to the left to adjust the balance of white in the image.
![]() Drag the Black and White Output Levels sliders left and right to adjust the percentage of ink used in printing the image.
Drag the Black and White Output Levels sliders left and right to adjust the percentage of ink used in printing the image.
![]() To load a previously saved Levels adjustment, click Load Levels Preset from the Levels options menu, and then select and load the file.
To load a previously saved Levels adjustment, click Load Levels Preset from the Levels options menu, and then select and load the file.
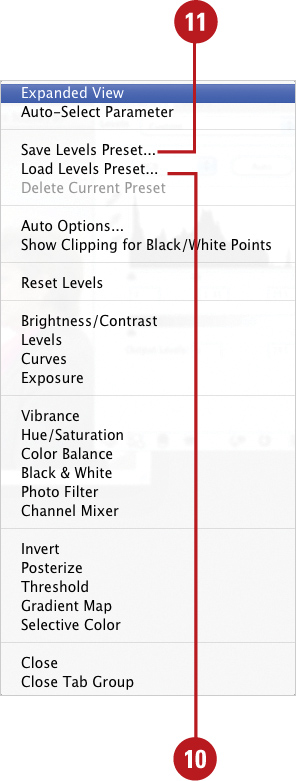
![]() Click Save Levels Preset from the Levels options menu to save the current Levels adjustment.
Click Save Levels Preset from the Levels options menu to save the current Levels adjustment.
![]() Use the eyedropper tools to select black, white, and midtone points directly within the active image.
Use the eyedropper tools to select black, white, and midtone points directly within the active image.

![]() Use the available buttons to fine-tune the adjustment and navigate through the Adjustments panel.
Use the available buttons to fine-tune the adjustment and navigate through the Adjustments panel.
• Left-pointing arrow moves you back to the list of available adjustment layer types.
• Folder icon with arrow toggles the panel from Expanded view to Standard view.
• The double circle icon creates a clipping group.
• The eye icon toggles visibility of the adjustment layer.
• The eye icon with an arrow allows you to see the previous state before the adjustment was made.
• The circular arrow returns the image to the default adjustments.
• The trash can icon deletes the adjustment layer.

Did You Know?
You can view the Levels Histogram anytime. Click the Window menu, and then click Histogram. Photoshop opens a Histogram panel that lets you view tonal changes to the image as you make them.
Working with the Histogram Panel
Photoshop’s Histogram panel gives you many options for viewing tonal and color information about the active image. The Histogram’s default display is the tonal range of the entire image. However, you can use any of Photoshop’s selection tools, select a portion of the active document, and display a histogram for just that portion of the image. You can also view a specific color channel or view all the channels at once. The tonal range and color values for an image are vitally important to generating great graphics, and the Histogram panel is a great resource for instant up-to-date information.
Work with the Histogram Panel
![]() Select the Histogram panel.
Select the Histogram panel.
• Click the Window menu, and then click Histogram.
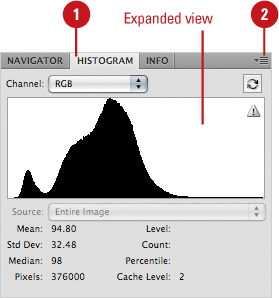
![]() Click the Histogram Options button, and then select from the following options:
Click the Histogram Options button, and then select from the following options:
• Uncached Refresh. Click to refresh the image cache (rescans the image).
• Compact View. Click to create a small, panel-size view of the Histogram panel.
• Expanded View. Click to create an expanded view of the Histogram panel. Includes options to view specific channels, luminosity settings or color.
• All Channels View. Click to view all the color channels.
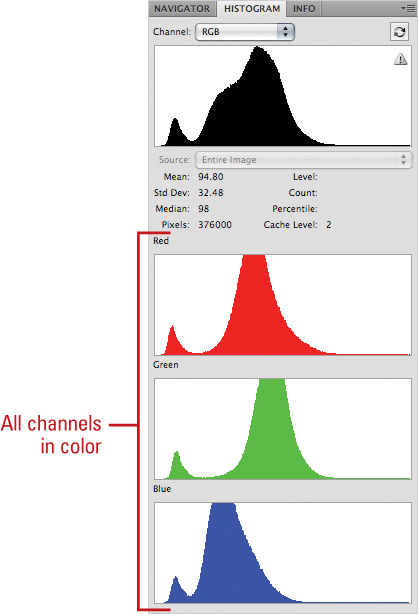
• Show Statistics. Click to show history statistics.
• Show Channels In Color. Click to show the channels using specific colors, such as red, green, and blue.
