12. Working with Layer Styles
Introduction
Layer styles are the very definition of creativity and control when using Photoshop. Using styles such as Bevel and Emboss or Drop Shadow, you can move from two-dimensional images into the world of three-dimensional. You can effortlessly change the look of a document with Gradient Overlay, Color Overlay, and Pattern Overlay, and you can do it all without ever changing the original image. That means you can apply a style to an image, and at any time in the creative process, change your mind. This level of control gives you the power you need to take your designs to the creative edge and beyond.
When you create a customized layer style, you can move that style to another layer, save the style in the Styles panel, or even move the style between two open documents. That kind of flexibility gives you consistency in your designs with a minimum of effort, and since layer styles do not change the original image, you can modify or remove the style at any time during the creative process. Not only do layer styles let you create special effects, but they give you the control you need over the image to experiment until you see exactly what you want.
Understanding Layer Styles
Layer styles are applied to the layers in the active document. When you add a style to a layer, the results of the style are only displayed in that layer. Each layer can have its own style, and you can apply more than one style to a single layer. Layer styles can be applied to any layer except the Background.
Two of Photoshop’s layer styles require both transparent and non-transparent layer elements (Drop Shadow and Outer Glow). For example, to apply a Drop Shadow to a layer, it would require a transparent area within the image to hold the shadow.
Adding a Layer Style
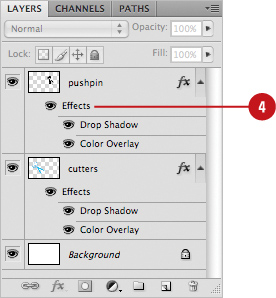
To add a layer style to the active layer, select the layer, and apply one or more of the styles by clicking the Add a Layer Style button. Once selected, the layer style appears as a sub-element of the active layer. Once applied, layer styles are easy to modify. Along with the default blending options, each of Photoshop’s layer styles has options to control exactly how the style appears in the active document. You can also set or reset default settings for each effect (New!). To modify a style, just reopen the Layer Style dialog box, and make your changes. In addition, each layer style has its own Show/Hide button. The Show/Hide button is a toggle that lets you temporarily hide the layer styles in the document.
Add a Layer Style
![]() Select the Layers panel.
Select the Layers panel.
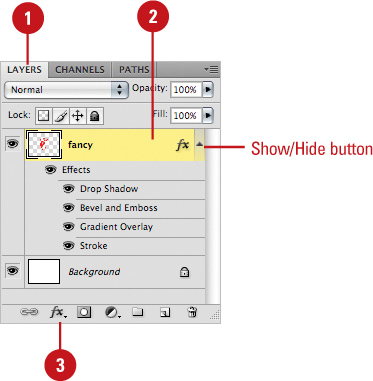
![]() Select a layer.
Select a layer.
![]() Click the Add Layer Style button, and then select from the available style options.
Click the Add Layer Style button, and then select from the available style options.
![]() Make changes to the layer style in the dialog box using the options; options vary depending on the layer style.
Make changes to the layer style in the dialog box using the options; options vary depending on the layer style.
![]() Click OK.
Click OK.
The selected layer style appears as a sub-element of the active layer.
Modify an Existing Layer Style
![]() Select the Layers panel.
Select the Layers panel.
![]() Double-click on the attached name of the layer style.
Double-click on the attached name of the layer style.
![]() Make changes to the layer style in the dialog box using the options; options vary depending on the layer style. Select Blending Options: Default to set general blending option for all styles.
Make changes to the layer style in the dialog box using the options; options vary depending on the layer style. Select Blending Options: Default to set general blending option for all styles.
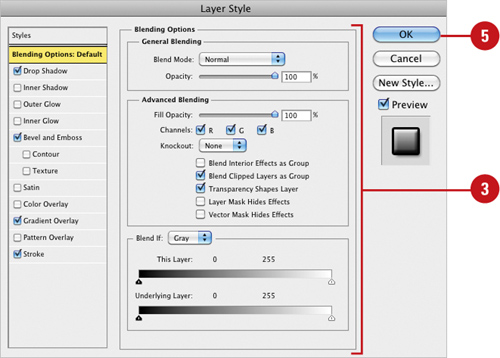
![]() Click Make Default to remember current settings for this effect or click Reset to Default to change settings to the default (New!); not available on all screens.
Click Make Default to remember current settings for this effect or click Reset to Default to change settings to the default (New!); not available on all screens.
![]() Click OK.
Click OK.
Creating and Modifying a Drop Shadow
The Drop Shadow style is probably the most common layer style used (next to Bevel and Emboss). Since Photoshop needs somewhere to apply the drop shadow, you will need a layer that contains an object surrounded by a transparent background. For example, you could create a type layer or use the shape drawing tools to create a unique object, add a drop shadow with a click of the mouse, and then use the layer style options to control the color, shape, and direction of the shadow. Once the shadow is created, it can be transferred to other objects in other layers—not only making the process easy, but consistent.
Work with a Drop Shadow
![]() Select the Layers panel.
Select the Layers panel.
![]() Click the layer to which you want to apply the Drop Shadow style.
Click the layer to which you want to apply the Drop Shadow style.
![]() Click the Add Layer Style button, and then click Drop Shadow.
Click the Add Layer Style button, and then click Drop Shadow.
![]() Select from the following Drop Shadow options:
Select from the following Drop Shadow options:
• Blend Mode. Click the list arrow, and then select how you want the color of the shadow to blend with underlying layers (default: Multiply).
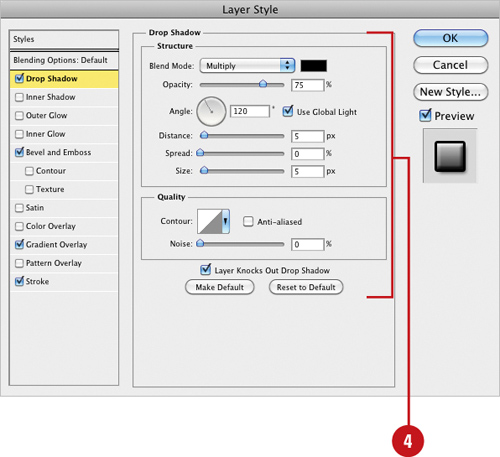
• Color. Click the Color Swatch, and then select a color for the shadow (default: Black).
• Opacity. Specify an Opacity percentage value for the shadow, or drag the slider left or right (default: 75%).
• Angle. Enter a value from 0 to 360 degrees, or drag the radius slider left or right to set the angle of the shadow (default: 30).
• Use Global Light. Select the check box to conform the angle of the drop shadow to any other effects applied to other layers.
• Distance. Enter a value from 0 to 30,000 pixels, or drag the slider left or right. Distance determines the amount the shadow is offset from the original image (default: 5).
• Spread. Enter a value from 0% to 100%, or drag the slider left or right. Spread determines the amount of image used for the spread of the shadow (default: 0%).
• Size. Enter a value from 0 to 250 pixels, or drag the slider left or right. Size determines the amount of blur applied to the shadow (default: 5).
• Contour. Click the list arrow, and then select from the available options. Contours are mathematical curves that determine the brightness of the shadow at different levels (default: Linear).
• Anti-aliased. Select the check box to create a visually smooth drop shadow.
• Noise. Enter a value from 0% to 100%, or drag the slider left or right. The noise option introduces a random shift to the colors of the Drop Shadow.
• Layer Knocks Out Drop Shadow. Select the check box to create a knockout in the underlying layers.
![]() Click Make Default to remember current settings for this effect or click Reset to Default to change settings to the default (New!).
Click Make Default to remember current settings for this effect or click Reset to Default to change settings to the default (New!).
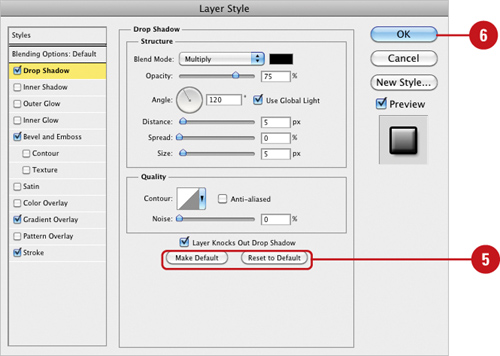
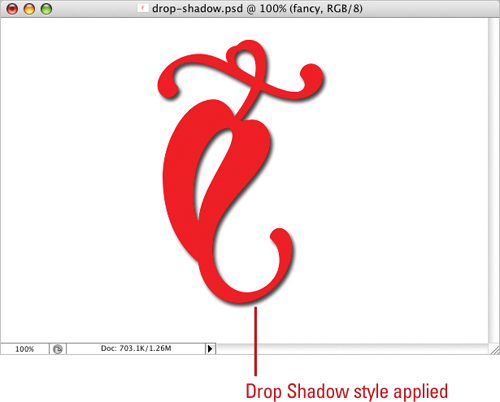
![]() Click OK.
Click OK.
Working with Bevel and Emboss
The Bevel and Emboss style, second only to Drop Shadow in popularity, creates a 3D illusion of roundness to a flat surface. You can apply the Bevel layer style to text to get the impression of 3D text. If the layer you’re applying the Bevel and Emboss to has no transparent areas, the style will be applied to the outer edge of the image, and if you want to experiment beyond the standard rounded bevel, you can use a Chisel Hard Technique that makes text appear as if it’s carved out of stone.
Work with Bevel and Emboss
![]() Select the Layers panel.
Select the Layers panel.
![]() Select the layer to which you want to apply the Bevel and Emboss style.
Select the layer to which you want to apply the Bevel and Emboss style.
![]() Click the Add Layer Style button, and then click Bevel And Emboss.
Click the Add Layer Style button, and then click Bevel And Emboss.
![]() Select from the available Bevel and Emboss options:
Select from the available Bevel and Emboss options:
• Style. Click the list arrow, and then select from Outer Bevel, Inner Bevel (default), Emboss, Pillow Emboss, and Stroke Emboss.
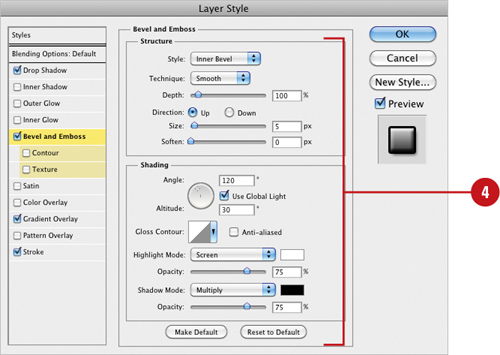
• Technique. Click the list arrow, and then select from Smooth (default), Chisel Hard, and Chisel Soft.
• Depth. Enter 0% to 1,000%, or drag the slider left or right. Higher Depth values increase the intensity of the bevel or emboss.
• Direction. Click the Up or Down option to reverse the highlights and shadows of the bevel or emboss.
• Size. Enter 0 to 250 pixels, or drag the slider left or right. Size determines how much of the image is used to create the Bevel/Emboss style.
• Soften. Enter 0 to 16 pixels, or drag the slider left or right. The higher the value, the softer the edge of the bevel (default: 0).
• Angle. Enter 0 to 360 degrees. Angle determines the angle of the light source in relation to the bevel/emboss (default: 30).
• Use Global Light. Select the check box to conform the angle of the bevel and emboss to any other styles applied to other layers.
• Altitude. Enter a value from 0 to 90 degrees. Altitude determines the height of the light source in relationship to the image.
• Gloss Contour. Click the list arrow, and then select from the available options. Gloss Contours are mathematical curves that determine the brightness of the bevel/emboss at different levels.
• Highlight Mode. Click the list arrow and Color box, and then select a blending mode and color for the highlights (default: Screen, White).
• Opacity for Highlight Mode. Enter a value from 0% to 100%. Opacity determines the overall transparency of the highlights. Higher values equate to more aggressive highlights.
• Shadow Mode. Click the list arrow and Color box, and then select a blending mode and color for the shadows (default: Multiply, Black).
• Opacity for Shadow Mode. Enter a value from 0% to 100%. Opacity determines the overall transparency of the shadows. Higher values equate to more aggressive shadows.
![]() Click Make Default to remember current settings for this effect or click Reset to Default to change settings to the default (New!).
Click Make Default to remember current settings for this effect or click Reset to Default to change settings to the default (New!).
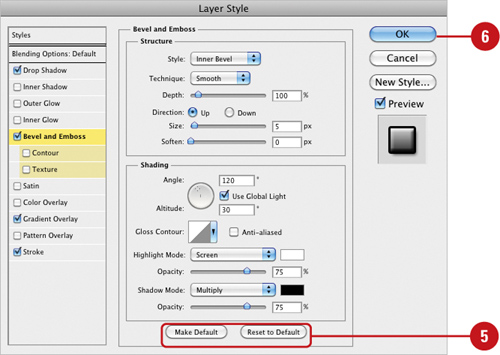
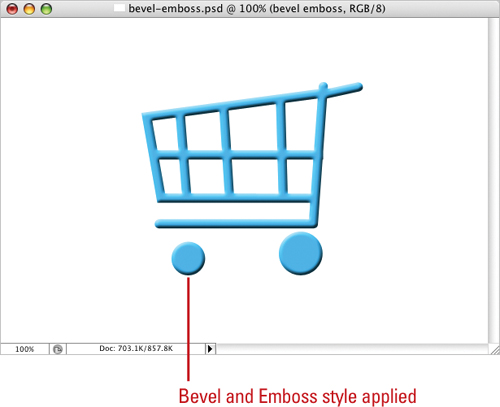
![]() Click OK.
Click OK.
Working with Contour and Texture
The Bevel and Emboss layer styles have two powerful options: the ability to add a contour or a texture to the active bevel or emboss. This lets you give your creative elements more of a realistic texture. When you apply the Contour and Texture options, the image takes on a three dimensional texture, based on a selected pattern. Once applied, the relative depth and intensity of the texture can be precisely controlled to create rough rock-like surfaces, as well as brushed metal. In addition, the Contour option lets you shape the appearance of the shadow areas of the texture style, creating even more realistic surfaces.
Work with Contour and Texture
![]() Select the Layers panel.
Select the Layers panel.
![]() Select the layer to which you want to apply the Bevel and Emboss style.
Select the layer to which you want to apply the Bevel and Emboss style.
![]() Click the Add Layer Style button, and then click Bevel and Emboss.
Click the Add Layer Style button, and then click Bevel and Emboss.
![]() Select the appropriate bevel or emboss.
Select the appropriate bevel or emboss.
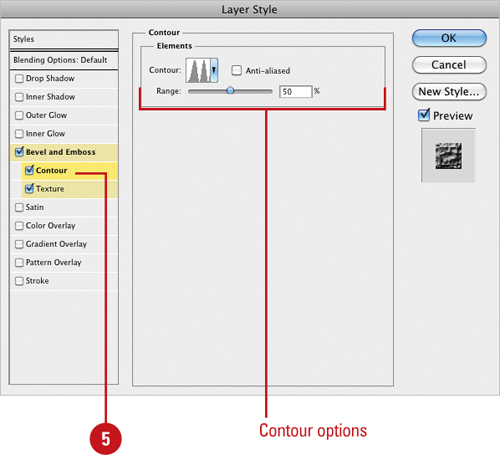
![]() Click Contour, and then select from the available options:
Click Contour, and then select from the available options:
• Contour. Click the list arrow, and then select from the available options. Contours are mathematical curves that determine the brightness of the bevel or emboss at different levels (default: Linear).
• Anti-aliased. Select the check box to create a visually smooth bevel or emboss.
• Range. Enter a value from 1% to 100%, or drag the slider left or right. Range determines the range of the contour as it is applied to the image (default: 50%).
See Also
See “Working with Bevel and Emboss” on page 290 for more information on using the Contour option.
![]() Click Texture, and then select from the available options:
Click Texture, and then select from the available options:
• Pattern. Click the list arrow, and then select from the available patterns. To add additional patterns from the Photoshop pattern library, click the Pattern Options button, located in the upper right of the Pattern dialog box, and then select from the available pattern options.
• Add To Presets. Click the button to add the current pattern to Photoshop’s list of presets.
• Snap To Origin. Click the button to begin the pattern tiling from the upper left corner of the document layer.
• Scale. Enter a value from 1% to 1,000%. Scale determines the size of the pattern as it applies to the active image (default: 100%).
• Depth. Enter a value from -1000% to 1000%. Depth determines the intensity of the highlight and shadow areas in the texture. Negative numbers reverse the highlights and shadows (default: 100%).
• Invert. Select the check box to reverse the color set of the pattern.
• Link With Layer. Select the check box to physically link the active pattern with the active layer (default: checked).


![]() Click OK.
Click OK.
Applying a Color Overlay
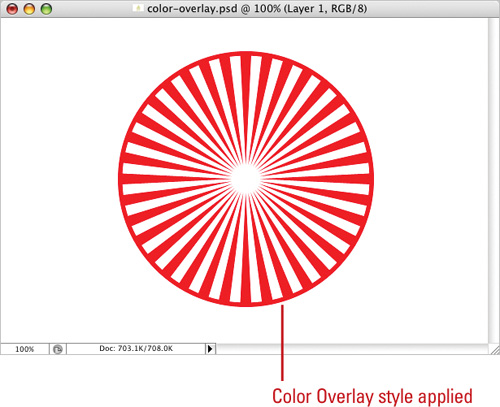
The Color Overlay style covers the elements of a layer with any color you choose. For example, you create some black text and you want to experiment with other colors, without changing the original color values of the text. Or, possibly you want to change the Blend Mode option, so you can see how a specific color blends into the image. Whatever the case, Color Overlay temporarily masks the image with whatever color you choose. In addition, you can use the Color Overlay style with other layer styles to produce hundreds, if not thousands, of style combinations.
Apply a Color Overlay
![]() Select the Layers panel.
Select the Layers panel.
![]() Click the layer to which you want to apply the Color Overlay style.
Click the layer to which you want to apply the Color Overlay style.
![]() Click the Add Layer Style button, and then click Color Overlay.
Click the Add Layer Style button, and then click Color Overlay.
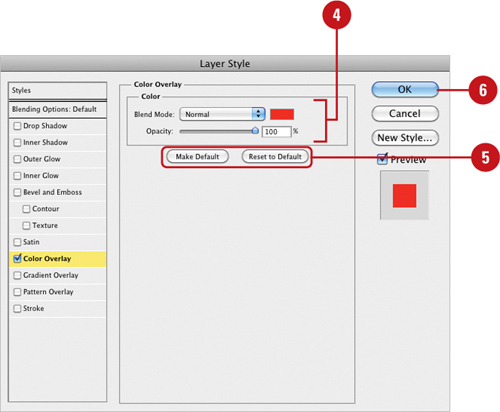
![]() Select from the available Color Overlay options:
Select from the available Color Overlay options:
• Blend Mode. Click the list arrow, and then select from the available options. The Blend Mode option instructs Photoshop how to blend the selected Color Overlay with the colors of the active image (default: Normal).
• Color. Click the Color swatch box, and then select any color from the Color Picker (default: red).
• Opacity. Enter a value from 0% to 100%. Opacity determines how much of the Color Overlay masks the original image pixels (default: 100%).
![]() Click Make Default to remember current settings for this effect or click Reset to Default to change settings to the default (New!).
Click Make Default to remember current settings for this effect or click Reset to Default to change settings to the default (New!).
![]() Click OK.
Click OK.
Using the Stroke Layer Style
The Stroke Layer style lets you apply a stroke around any layer object. Since the stroke will be applied to the edge of the object, it must be surrounded by transparent pixels. For example, you could use the stroke feature to apply a solid color around text outlines, or apply a stroke around an image. Strokes are not limited to solid colors; you can also use gradients and even patterns as a stroke. The Stroke Layer style can provide you with many interesting styles.
Use the Stroke Layer Style
![]() Select the Layers panel.
Select the Layers panel.
![]() Select the layer to which you want to apply the Stroke Layer style.
Select the layer to which you want to apply the Stroke Layer style.
![]() Click the Add Layer Style button, and then click Stroke.
Click the Add Layer Style button, and then click Stroke.
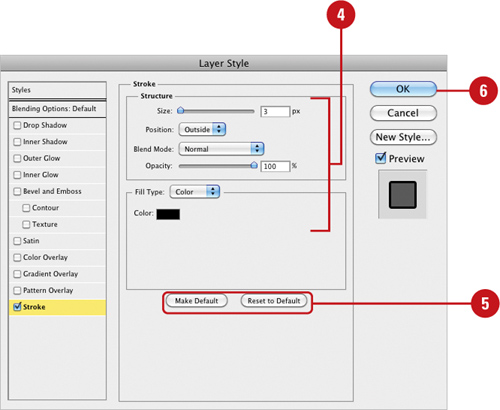
![]() Select from the Stroke options:
Select from the Stroke options:
• Size. Enter 1 to 250 pixels to define the width of the stroke.
• Position. Click the list arrow, and then select to place the stroke on the Outside, Inside, or Center of the layer object.
• Blend Mode. Click the list arrow, and then select from the available options. The Blend Mode option instructs Photoshop how to blend the selected Stroke color with the colors of the active image.
• Opacity. Enter a value from 0% to 100%, or drag the slider left or right. Opacity determines how much of the Stroke masks the original image pixels.
• Fill Type. Click the list arrow, and then select to create a stroke from a solid color, gradient, or pattern.
• Color. Click the color box, and then select a color.

![]() Click Make Default to remember current settings for this effect or click Reset to Default to change settings to the default (New!).
Click Make Default to remember current settings for this effect or click Reset to Default to change settings to the default (New!).
![]() Click OK.
Click OK.
Using Pattern Overlays
Pattern Overlays replace the pixels in the active layer with a specific pattern. Photoshop comes equipped with dozens of preexisting patterns, or you can create and save your own. Patterns can be used to spice up an otherwise dull area of an image—like covering a completely white wall in your house with decorative wallpaper. When you apply a pattern, the original image is overlaid with the selected pattern, and once that’s accomplished you can use blending modes and opacity to control the effect the pattern has on the original image.
Use Pattern Overlay
![]() Select the Layers panel.
Select the Layers panel.
Important
Pattern Overlays, like all of Photoshop’s layer styles, are applied to all the nontransparent pixels in the image. You cannot use a selection to control what areas of the image are affected by the layer style.
![]() Click the layer to which you want to apply the Pattern Overlay style.
Click the layer to which you want to apply the Pattern Overlay style.
![]() Click the Add Layer Style button, and then click Pattern Overlay.
Click the Add Layer Style button, and then click Pattern Overlay.
![]() Select from the available Pattern Overlay options:
Select from the available Pattern Overlay options:
• Blend Mode. Click the list arrow, and then select from the available options. The Blend Mode option instructs Photoshop how to blend the selected Pattern Overlay with the colors of the active image (default: Normal).
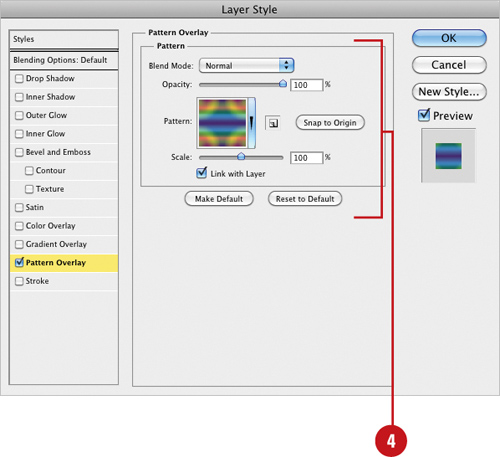
• Opacity. Enter a value from 0% to 100%. Opacity determines how much of the Pattern Overlay masks the original image pixels (default: 100%). For example, 50% opacity would let 50% of the original colors blend with the Pattern Overlay.
• Pattern. Click the list arrow, and then select from the available patterns. To add additional patterns from the Photoshop pattern library, click the Pattern Options button, located in the upper right of the pattern dialog box, and then choose from the available pattern options.
• Add To Presets. Click the button to add the current pattern to Photoshop’s list of presets.
• Snap To Origin. Click the button to begin the pattern tiling from the upper left corner of the document layer.
• Scale. Enter a value from 1% to 1,000%. Scale determines the size of the pattern as it applies to the active image (default: 100%).
• Link With Layer. Select the check box to physically link the active pattern with the active layer (default: checked).
![]() Click Make Default to remember current settings for this effect or click Reset to Default to change settings to the default (New!).
Click Make Default to remember current settings for this effect or click Reset to Default to change settings to the default (New!).
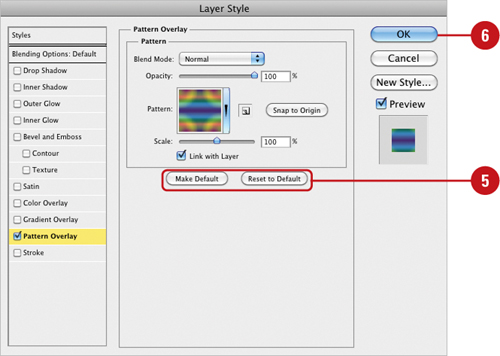
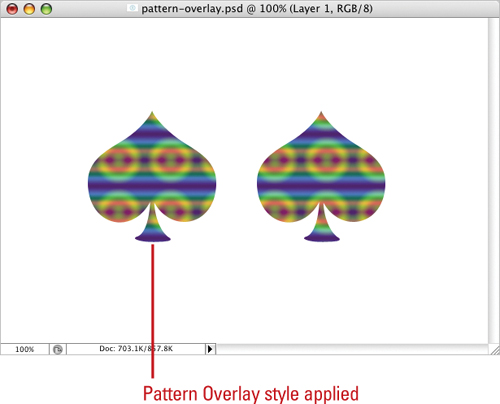
![]() Click OK.
Click OK.
Did You Know?
You can reposition any Pattern Overlay. Open the Layer Style dialog box and click any pattern from the Pattern library. However, before you click OK, move into the document window and drag. The pattern is repositioned as you drag. Click the Snap To Origin button to return the pattern to its default position.
Working with Outer Glow and Inner Shadow
Outer Glow applies a glow in any color you choose to all objects within the active layer. Since the Outer Glow style needs an area in which to work, the objects must be surrounded by transparent pixels. The Outer Glow style is an excellent way to create a neon effect on text. The Inner Shadow style applies a shadow to the inside of an object. Since the shadow is applied directly to the image, the Inner Shadow style does not require an image object surrounded by transparent pixels. When you apply the Inner Shadow style, the shadow effect appears on the inside edges of the image—like a reverse drop shadow.
Apply an Outer Glow and Inner Shadow Style
![]() Select the Layers panel.
Select the Layers panel.
![]() Click the layer to which you want to apply the Outer Glow style.
Click the layer to which you want to apply the Outer Glow style.
![]() Click the Add Layer Style button, and then click Outer Glow.
Click the Add Layer Style button, and then click Outer Glow.
![]() Select from the available Outer Glow options:
Select from the available Outer Glow options:
• Structure. Allows you to change Blending Mode and Opacity (determines how much of the Outer Glow masks the original image pixels), plus you can add a bit of Noise (introduces a random shift to the colors of the Outer Glow), and even change the Color or use a Gradient on the Outer Glow.

For example, 50% opacity would let 50% of the original colors blend with the Outer Glow.
• Elements. Allows you to change the Technique used (softer or more precise glow), as well as change the Spread and Size of the glow. The precise option creates a realistic, but more complex Outer Glow. Spread determines the amount of image that is used for the spread of the glow.
• Quality. Allows you to access the Contour of the glow to create interesting special effects. Select the Anti-aliased check box to visibly smooth the glow (or drop shadow), as well as change the Range of the contour and Jitter (random value of gradients) of the glow.
Contours are mathematical curves that determine the brightness of the glow at different levels.
![]() Click Inner Shadow from the available styles.
Click Inner Shadow from the available styles.
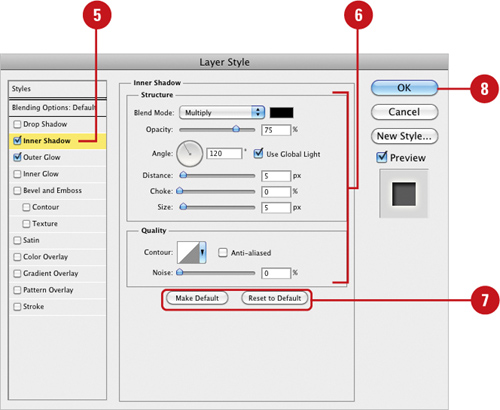
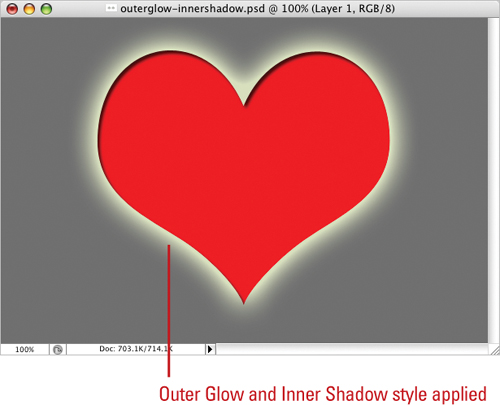
![]() Select from the available Inner Shadow options:
Select from the available Inner Shadow options:
• Structure. Allows you to change Blending Mode and Opacity, as well as the Angle of the shadow. In addition, you can control the shadow’s Distance, Choke and Size.
• Quality. Allows you to access the Contour of the shadow to create interesting special effects. Select the Anti-aliased check box to visibly smooth the glow (or drop shadow), as well as add a bit of Noise to the final product.
![]() Click Make Default to remember current settings for this effect or click Reset to Default to change settings to the default (New!).
Click Make Default to remember current settings for this effect or click Reset to Default to change settings to the default (New!).
![]() Click OK.
Click OK.
Applying an Inner Glow Style
The Inner Glow style creates the appearance of a glow on the inside of an object. For example, creating black text and applying an Inner Glow style changes the object by lightening the edges of the text. Once you apply an Inner Glow, you can control the color size and intensity of the glow style to create the exact special effect you’re after. You can also apply the Outer Glow style to the image, and the glow effect spreads out into the surrounding transparent areas of the layer.
Apply an Inner Glow Style
![]() Select the Layers panel.
Select the Layers panel.
![]() Click the layer to which you want to apply the Inner Glow style.
Click the layer to which you want to apply the Inner Glow style.
![]() Click the Add Layer Style button, and then click Inner Glow.
Click the Add Layer Style button, and then click Inner Glow.
![]() Select from the available Inner Glow options:
Select from the available Inner Glow options:
• Blend Mode. Click the list arrow, and then select from the available options. The Blend Mode option instructs Photoshop how to blend the selected Inner Glow with the colors of the active image (default: Screen).
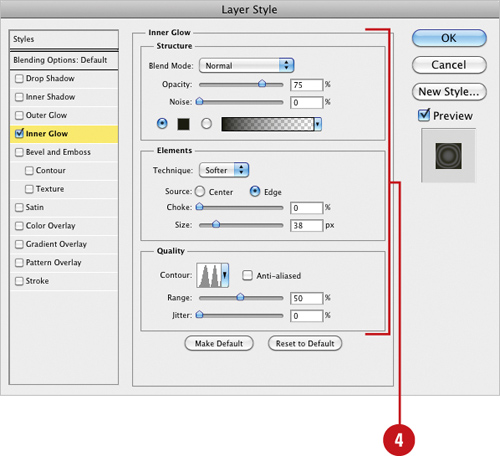
• Opacity. Enter a value from 0% to 100%, or drag the slider left or right. Opacity determines how much of the Inner Glow masks the original image pixels (default: 75%).
• Noise. Enter a value from 0% to 100%, or drag the slider left or right. The noise option introduces a random shift to the colors of the Inner Glow (default: 0%).
• Solid Color. Click the Solid Color swatch box, and then select a color from the Color Picker dialog box (default: light yellow).
• Gradient. Click the Gradient list arrow, and then select a gradient (as opposed to a solid color) for the Inner Glow.
• Technique. Click the list arrow, and then select between a Softer, and a Precise glow. The precise option creates a realistic, but more complex Inner Glow.
• Source. Click the Center option to have the glow illuminate from the center, or the Edge option to have the glow illuminate from the edge.
• Choke. Enter a value from 0% to 100%, or drag the slider left or right. Choke reduces the layer mask prior to blurring (default: 0%).
• Size. Enter a value from 0 to 250 pixels, or drag the slider left or right. Size determines the size of the glow (default: 5)
• Contour. Click the list arrow, and then select from the available options.
• Anti-aliased. Select the check box to create a visually smooth Inner Glow.
• Range. Enter a value from 1% to 100%, or drag the slider left or right. Range determines the range of the contour as it is applied to the image (default: 50%).
• Jitter. Enter a value from 1% to 100%, or drag the slider left or right. Jitter increases or decreases the random value of gradients applied to the Inner Glow (default: 0%).
![]() Click Make Default to remember current settings for this effect or click Reset to Default to change settings to the default (New!).
Click Make Default to remember current settings for this effect or click Reset to Default to change settings to the default (New!).
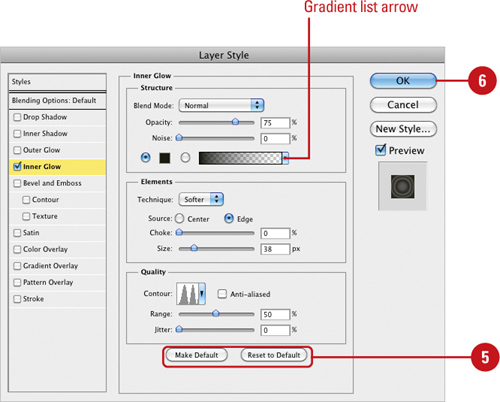

![]() Click OK.
Click OK.
Creating Customized Layer Styles
Layer styles can be one style or a combination of many styles. For example, you could create a layer style that includes a Stroke, Bevel, Emboss, and Gradient Overlay. Once you create a layer style, it’s possible you might want to use it again. If that’s the case, Photoshop gives you an easy way to create a layer style directly from the Layer Style dialog box, or by using the Styles panel. Creating customized styles is a great time-saving feature, and not only speeds up the process of applying a style to a layer, but ensures that the style is applied in exactly the same way every time. That gives your designs a consistent look and feel.
Create Customized Layer Styles
![]() Select the Layers panel.
Select the Layers panel.
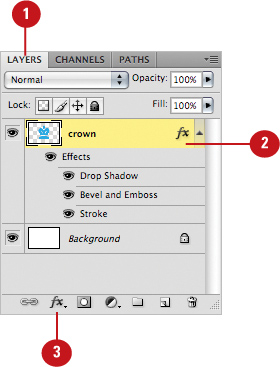
![]() Click the layer to which you want to apply a layer style.
Click the layer to which you want to apply a layer style.
![]() Click the Add Layer Style button, and then click a style.
Click the Add Layer Style button, and then click a style.
![]() To add a style to an existing style, select the style from the styles list.
To add a style to an existing style, select the style from the styles list.

![]() To modify an existing style, select from the various style options.
To modify an existing style, select from the various style options.
Did You Know?
You can combine elements of one layer style with another. Drag from one layer style into another. If you have two layers, both containing layer styles, and you want the drop shadow from one layer style added to the second layer, simply drag the drop shadow layer element to the other layer to create a copy of the drop shadow. In addition, you can drag layer styles between two open documents.
![]() Click New Style, and then select from the following options:
Click New Style, and then select from the following options:
• Name. Enter a name for the new layer style.
• Include Layer Effects. Select the check box to include any layer effects applied to the style.
• Include Layer Blending Options. Select the check box to include any blending mode options applied to the style.
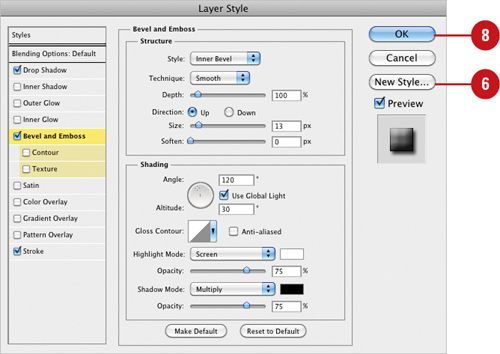
![]() Click OK.
Click OK.

![]() Click OK.
Click OK.
If you open the Styles panel or click Styles in the Layer Style dialog box, you’ll see the new style is added to the bottom of the current list.

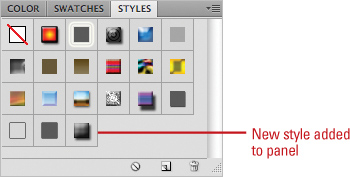
Creating Customized Styles Using the Styles Panel
Creating customized styles using the Styles panel requires that you have a layer with an applied style and you would like to save the style to use again later. You’re only a button click away from saving the style into the Styles panel. When you create a layer style, the style appears as a sub-element of the layer. For example, when you create a Drop Shadow and Inner Glow layer style, two sub-elements are created directly below the layer to which the styles are attached—one for the Drop Shadow and one for the Inner Glow. When you save a customized style, you select a layer, not an individual style, and save all the sub-elements of that layer. To save a customized style with only the Inner Glow, you must first drag the Drop Shadow to the Delete Layer button.
Create Customized Styles
![]() Select the Layers panel.
Select the Layers panel.

![]() Select a layer that contains a layer style.
Select a layer that contains a layer style.
![]() Select the Styles panel.
Select the Styles panel.

![]() Move to the bottom of the Styles panel, and then click your mouse when you see the cursor change to a paint bucket.
Move to the bottom of the Styles panel, and then click your mouse when you see the cursor change to a paint bucket.
Did You Know?
You can download additional styles from Adobe. In your web browser, go to www.adobe.com and navigate to Adobe Studio Exchange for more styles.
![]() Select from the following options:
Select from the following options:
• Name. Enter a name for the new layer style.
• Include Layer Effects. Select the check box to include any layer effects applied to the style.
• Include Layer Blending Options. Select the check box to include any blending mode options applied to the style.

![]() Click OK.
Click OK.
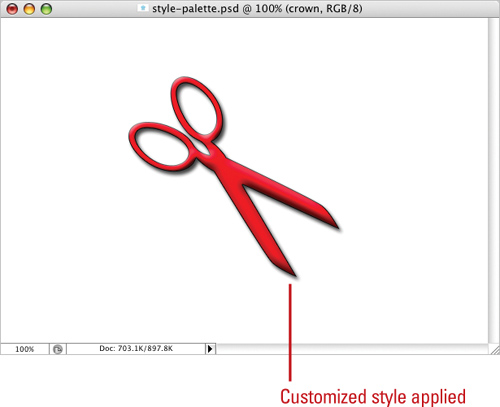
If you open the Styles panel, you’ll see the new style is added to the bottom of the current list.
Did You Know?
You can share your styles with other Photoshop users. First click the Styles Options button, and then click Save Styles. The styles are now a file that can be e-mailed to any other Photoshop user. All the user has to do is click the Styles Options button, and then click the Load Styles option to load and use the new styles.
Moving Existing Layer Styles
Once a layer style is applied to a layer, it can be moved to other layers, or into another document. This kind of flexibility and control lets you create specific layer styles and then apply them effortlessly to other layers or move them into other documents. In most cases it would make sense to save the style in the Styles panel. However, there are times when you will only use the style once or twice. In that case, a quick drag-and-drop is more efficient.
Move Existing Layer Styles
![]() Select the Layers panel.
Select the Layers panel.
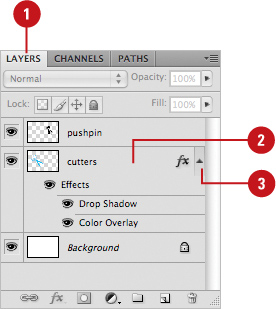
![]() Click a layer that contains a layer style.
Click a layer that contains a layer style.
![]() Click the triangle to expand the grouped layer styles.
Click the triangle to expand the grouped layer styles.
![]() Press the Alt (Win) or Option (Mac) key, and drag the grouped layer styles over another layer.
Press the Alt (Win) or Option (Mac) key, and drag the grouped layer styles over another layer.
Photoshop makes a copy of all the styles and applies them to the new layer.
Did You Know?
You can move individual styles between layers. Drag the named style, instead of the Effects group, to move a single layer style instead of the entire group. When you release your mouse, the single layer style will be copied and applied to the new image.

