4. Mastering the Art of Selection
Introduction
Mastering Adobe Photoshop requires skill in many diverse areas. While modifying an image’s color, enhancing an old photograph, or removing dust and scratches may require different skills, they have one common thread—selection. Without a selection, any changes you apply are made to the whole image. For example, if you choose to paint a black stroke, you would select the Paintbrush tool, choose the color black, and begin painting. Photoshop will let you apply black paint to any and all portions of the image. Selections are your way to instruct Photoshop what portions of the active document you want to change and which you want to protect from change.
The Marquee tools are considered Photoshop’s “good old” selection tools. In fact they’ve been a part of Photoshop since the early days. Where the marquee tools let you select areas of an image in a structured way (using squares, circles, lines), the lasso tools add a bit of freeform selection to the mix. Lasso tools require a certain amount of hand/eye coordination. For example, you can use the lasso tool to create a customized selection area around just about any object in a document, be it an animal, vegetable, or mineral. It just requires a good eye, a steady hand, and a really big mouse pad (I hate it when I run out of mouse pad).
Creating a selection lets you influence a specific area of the image. For example, If you are changing the color of a car from red to blue, this is where making a selection really shines. When you select an area of a Photoshop document, the selection becomes the work area—filters, adjustments, and brushes will only work within the selection boundary. Since selection is such an important aspect of controlling what happens in a document, Photoshop gives you many ways to create your desired selection. Mastering the art of selection gives you control over not just what you do, but where you do it.
Using the Rectangular Marquee Tool
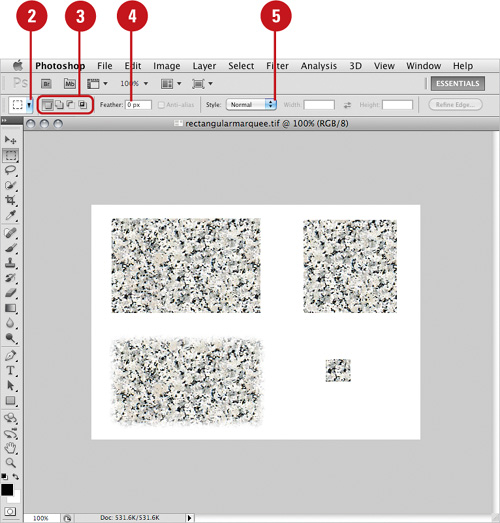
The Rectangular Marquee tool lets you create rectangular and square selection marquees. The Rectangular Marquee tool is excellent for a quick crop, or selecting and moving blocks of image information. Select the Rectangular Marquee tool on the toolbox from the available Marquee options, and then drag the tool using the mouse (or drawing tablet) to control your movements. To further control a selection, hold down the Shift key to produce a perfect square, and hold down the Alt (Win) or Option (Mac) key to create a selection marquee that starts from the center and moves outwards. Releasing the mouse instructs the Rectangular Marquee tool to create the selection.
Use the Rectangular Marquee Tool
![]() Select the Rectangular Marquee tool on the toolbox.
Select the Rectangular Marquee tool on the toolbox.
![]() Click the Tool Preset list arrow, and then select from the available tool presets.
Click the Tool Preset list arrow, and then select from the available tool presets.
![]() Use the selection options on the Options bar to create a new selection, or add to, subtract from, or intersect with an existing selection.
Use the selection options on the Options bar to create a new selection, or add to, subtract from, or intersect with an existing selection.
![]() Enter a numerical value (0 to 250) in the Feather box to create a feathered selection edge or click the Refine Edge box to visually fine-tune your feather size.
Enter a numerical value (0 to 250) in the Feather box to create a feathered selection edge or click the Refine Edge box to visually fine-tune your feather size.
![]() Click the Style list arrow, and then select from the available styles:
Click the Style list arrow, and then select from the available styles:
• Normal. Lets you create freeform rectangular, or square marquee selections.
• Fixed Ratio. Lets you create selections using a specific ratio, such as a 2 to 1 ratio. Enter the Fixed Ratio values in the Width and Height boxes.
• Fixed Size. Lets you create selections based on an absolute size such as 30 pixels by 90 pixels. Enter the Fixed Size values in the Width and Height boxes.
![]() Drag the selection area you want.
Drag the selection area you want.
Using the Elliptical Marquee Tool
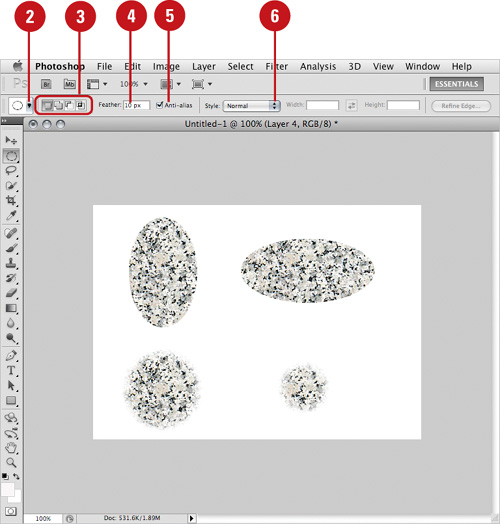
The Elliptical Marquee tool lets you create oval or circular selection marquees. When used with the Layer Mask option, and a couple of creative filters, you can create some awesome vignettes. Select the Elliptical Marquee tool on the toolbox from the available Marquee options, move into the document, and then drag with the tool using the mouse to control your movements. To further control a selection, hold down the Shift key to produce a perfect circle, and hold down the Alt (Win) or Option (Mac) key to create a selection marquee that starts from the center and moves outwards. Releasing the mouse instructs the Elliptical Marquee tool to create the selection.
Use the Elliptical Marquee Tool
![]() Select the Elliptical Marquee tool on the toolbox.
Select the Elliptical Marquee tool on the toolbox.
![]() Click the Tool Preset list arrow, and then select from the available tool presets.
Click the Tool Preset list arrow, and then select from the available tool presets.
![]() Use the selection options on the Options bar to create a new selection, or add to, subtract from, or intersect with an existing selection.
Use the selection options on the Options bar to create a new selection, or add to, subtract from, or intersect with an existing selection.
![]() Enter a numerical value (0 to 250) in the Feather option to create a feathered selection edge or click the Refine Edge box to visually fine-tune your feather size.
Enter a numerical value (0 to 250) in the Feather option to create a feathered selection edge or click the Refine Edge box to visually fine-tune your feather size.
![]() Select the Anti-alias check box to create a softer selection.
Select the Anti-alias check box to create a softer selection.
![]() Click the Style list arrow, and then select from the available styles:
Click the Style list arrow, and then select from the available styles:
• Normal. Lets you create freeform elliptical or circular marquee selections.
• Fixed Ratio. Lets you create selections using a specific ratio. Enter the Fixed Ratio values in the Width and Height boxes.
• Fixed Size. Lets you create selections based on an absolute size. Enter the Fixed Size values in the Width and Height boxes.
![]() Drag the selection area you want.
Drag the selection area you want.
Using the Single Row and Single Column Marquee Tools
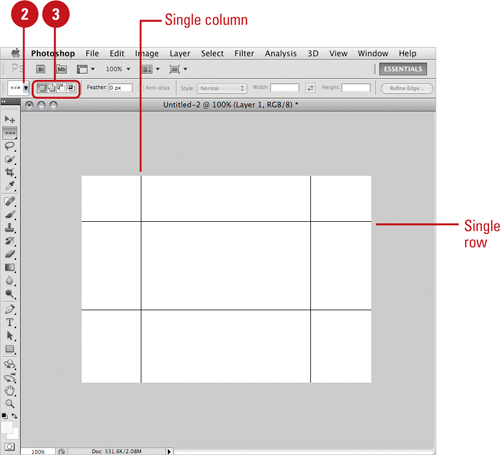
The Single Row/Single Column Marquee tools let you create a 1-pixel wide horizontal or vertical selection. Select the Single Row or Single Column Marquee tool on the toolbox from the available Marquee options, and then click the tool within the active document to create a single-pixel horizontal or vertical selection. To move the selection, place your cursor on the selection; when you see the cursor change to an arrow, then click and drag. Release the mouse when you have the selection correctly positioned. For precise positioning, press the arrow keys to move the selection 1 pixel at a time.
Use the Single Row and Column Marquee Tool
![]() Select the Single Row Marquee or Single Column Marquee tool on the toolbox.
Select the Single Row Marquee or Single Column Marquee tool on the toolbox.
![]() Click the Tool Preset list arrow, and then select from the available tool presets.
Click the Tool Preset list arrow, and then select from the available tool presets.
![]() Use the selection options on the Options bar to create a new selection, or add to, subtract from, or intersect with an existing selection.
Use the selection options on the Options bar to create a new selection, or add to, subtract from, or intersect with an existing selection.
![]() Drag the selection area you want.
Drag the selection area you want.
Did You Know?
The Column Marquee tools don’t have an Anti-Alias option. The reason is that a monitor displays digital information using pixels. Since the pixels fit together just like bricks in a wall, and the Column Marquee tools can only draw vertical or horizontal lines, there is no need to make them look smoother because they’re following the horizontal and vertical lines of the pixels.
Using the Lasso Marquee Tool
The Lasso Marquee is a freeform tool that requires a bit of hand-to-eye coordination. Select the Lasso tool on the toolbox from the available Lasso options, move into the active document, and then drag the tool, using the mouse (or drawing tablet) to control your movements. Hold down the Alt (Win) or Option (Mac) key, and then drag to draw straight-line segments. Releasing the mouse instructs the Lasso tool to close the selection shape. That’s all there is to it. I did mention that it requires good hand-to-eye coordination, didn’t I? When you use this tool, don’t drink too much coffee, and have a really big mouse pad.
Use the Lasso Marquee Tool
![]() Select the Lasso tool on the toolbox.
Select the Lasso tool on the toolbox.
![]() Click the Tool Preset list arrow, and then select from the available tool presets.
Click the Tool Preset list arrow, and then select from the available tool presets.

![]() Use the selection options on the Options bar to create a new selection, or add to, subtract from, or intersect with an existing selection.
Use the selection options on the Options bar to create a new selection, or add to, subtract from, or intersect with an existing selection.
![]() Enter a numerical value (0 to 250) in the Feather box to create a feathered selection edge or click the Refine Edge box to visually fine-tune your feather size.
Enter a numerical value (0 to 250) in the Feather box to create a feathered selection edge or click the Refine Edge box to visually fine-tune your feather size.
![]() Select the Anti-alias check box to create a softer selection (useful with intensely rounded or curved selections).
Select the Anti-alias check box to create a softer selection (useful with intensely rounded or curved selections).
![]() Drag the selection area you want.
Drag the selection area you want.
Did You Know?
You can temporarily convert the Lasso tool into a straight-line drawing tool (called the Polygonal Lasso tool). Hold down the Alt (Win) or Option (Mac) key, then release the mouse, move to a different area of the document window and click to draw a straight line between the two points.
Using the Magnetic Lasso Tool
The Magnetic Lasso creates a selection by following along the edge of a visible object. For example, it will follow around the edge of a building set against a bright blue sky. In reality there are no edges in a photographic document, so the tool follows along the shifts of brightness created when one tonal value is next to another. Select the Magnetic Lasso tool in the toolbox from the available Lasso options. Click on the visible edge of an object within your image, and then move (don’t drag) around the object. The Magnetic Lasso will follow the visible edge of the object, occasionally adding anchor points to the line as you move. Double-clicking the mouse instructs the Magnetic Lasso tool to close the selection shape.
Use the Magnetic Lasso Tool
![]() Select the Magnetic Lasso tool on the toolbox.
Select the Magnetic Lasso tool on the toolbox.
![]() Click the Preset Tool list arrow, and then select from the available tool presets.
Click the Preset Tool list arrow, and then select from the available tool presets.

![]() Use the selection options on the Options bar to create a new selection, or add to, subtract from, or intersect with an existing selection.
Use the selection options on the Options bar to create a new selection, or add to, subtract from, or intersect with an existing selection.
![]() Enter a numerical value (0 to 250) in the Feather box to create a feathered selection edge or click the Refine Edge box to visually fine-tune your feather size.
Enter a numerical value (0 to 250) in the Feather box to create a feathered selection edge or click the Refine Edge box to visually fine-tune your feather size.
![]() Select the Anti-alias check box to create a softer selection (useful with intensely rounded or curved selections).
Select the Anti-alias check box to create a softer selection (useful with intensely rounded or curved selections).
![]() Enter a Width value (0 to 256) to instruct the Magnetic Lasso tool how many pixels to consider for the edge.
Enter a Width value (0 to 256) to instruct the Magnetic Lasso tool how many pixels to consider for the edge.
![]() Enter an Edge Contrast value (0% to 100%) to instruct the Magnetic Lasso how much of a shift in the brightness values to use in determining the edge.
Enter an Edge Contrast value (0% to 100%) to instruct the Magnetic Lasso how much of a shift in the brightness values to use in determining the edge.

![]() Enter a Frequency value (0 to 100) to instruct the Magnetic Lasso where points are added to the selection line.
Enter a Frequency value (0 to 100) to instruct the Magnetic Lasso where points are added to the selection line.
![]() Click once to create an anchor point, and then move the pointer along the edge you want to trace.
Click once to create an anchor point, and then move the pointer along the edge you want to trace.
![]() If the border doesn’t snap to the desired edge, click once to add a anchor point manually. Continue to trace the edge, and add anchor points as needed.
If the border doesn’t snap to the desired edge, click once to add a anchor point manually. Continue to trace the edge, and add anchor points as needed.
![]() Double-click or click the starting point to complete the selection.
Double-click or click the starting point to complete the selection.
Did You Know?
You can remove anchor points. When you’re using the Magnetic Lasso tool and you want to reverse the selection, simply backtrack the mouse all the way back to the last anchor point. To move even farther backwards, press the Backspace (Win) or Delete (Mac) key to remove the last anchor.
You can temporarily use the Magnetic Lasso tool as a freeform Lasso tool. Hold down the Alt (Win) or Option (Mac) key, and then drag to draw. Release the mouse to return to the Magnetic Lasso tool.
Using the Polygonal Lasso Tool
The Polygonal Lasso creates straight-line selections, perfect for creating a selection around a windowpane or the roofline of a house. Select the Polygonal Lasso tool in the toolbox from the available Lasso options, and click to create a point; then, move and click to create straight lines between the two points. Keep clicking and moving your mouse until the desired selection shape appears. Double-clicking the mouse instructs the Polygonal Lasso tool to close the selection shape.
Use the Polygonal Lasso Tool
![]() Select the Polygonal Lasso tool on the toolbox.
Select the Polygonal Lasso tool on the toolbox.
![]() Click the Tool Preset list arrow, and then select from the available tool presets.
Click the Tool Preset list arrow, and then select from the available tool presets.

![]() Use the selection options on the Options bar to create a new selection, or add to, subtract from, or intersect with an existing selection.
Use the selection options on the Options bar to create a new selection, or add to, subtract from, or intersect with an existing selection.
![]() Enter a numerical value (0 to 250) in the Feather box to create a feathered selection edge or click the Refine Edge box to visually fine-tune your feather size.
Enter a numerical value (0 to 250) in the Feather box to create a feathered selection edge or click the Refine Edge box to visually fine-tune your feather size.
![]() Select the Anti-alias check box to create a softer selection (useful with intensely rounded or curved selections).
Select the Anti-alias check box to create a softer selection (useful with intensely rounded or curved selections).
![]() Click to create anchor points, and then double-click or click the starting point to complete the selection.
Click to create anchor points, and then double-click or click the starting point to complete the selection.
Did You Know?
You can temporarily use the Polygonal Lasso tool as a freeform Lasso tool. Hold down the Alt (Win) or Option (Mac) key, and then drag to draw. Release the mouse to return to the Polygonal Lasso tools.
Using the Quick Selection Tool
The Quick Selection tool makes it easier to select the areas of an image you want. Simply paint a loose selection using an adjustable round brush tip to select the area you want. As you paint with the Quick Selection tool, the selection expands outward and automatically finds and follows defined edges in the image. You can also enable the Auto-Enhance option to reduce roughness and pixelation in the selection edge.
Use the Quick Selection Tool
![]() Select the Quick Selection tool on the toolbox.
Select the Quick Selection tool on the toolbox.

![]() Click the Tool Preset list arrow, and then select from the available tool presets.
Click the Tool Preset list arrow, and then select from the available tool presets.
![]() Use the selection options on the Options bar to create a new selection, or add to/subtract from an existing selection.
Use the selection options on the Options bar to create a new selection, or add to/subtract from an existing selection.
![]() Click the Brush list arrow, and then select the brush options you want: Diameter, Hardness, Spacing, Angle, Roundness, and Size.
Click the Brush list arrow, and then select the brush options you want: Diameter, Hardness, Spacing, Angle, Roundness, and Size.
![]() Select the Sample All Layers check box to create a selection based on all layers, not just the currently selected one.
Select the Sample All Layers check box to create a selection based on all layers, not just the currently selected one.
![]() Select the Auto-Enhance check box to reduce roughness and pixelation in the selection edge.
Select the Auto-Enhance check box to reduce roughness and pixelation in the selection edge.
![]() Paint with the Quick Selection tool to create the selection you want.
Paint with the Quick Selection tool to create the selection you want.
Timesaver
Press the right bracket (]) or left bracket ([) to increase or decrease the Quick Selection tool brush size.
Using the Magic Wand Tool
The Magic Wand tool (so named since it looks like a magic wand) is unique in the fact that you do not drag and select with this tool; you simply click. The Magic Wand tool creates a selection based on the shift in brightness ranges within an image. If there is a definable shift in the brightness of the pixels, it can be a very powerful tool for the selection of odd-shaped areas. For example, a brightly colored sunflower contrasted with a bright blue sky would be a snap for the Magic Wand tool. To use the Magic Wand, click on the Magic Wand Tool button in the toolbox. Sometimes it’s easier to select what you don’t want. In this example, the blue sky was selected and removed. However, you might have wanted to select the sunflower, and move it into another image. If that’s the case, it is still easier to select the sky using the Magic Wand, click the Select menu, and then click Inverse to reverse the selection.
Use the Magic Wand Tool
![]() Select the Magic Wand tool on the toolbox.
Select the Magic Wand tool on the toolbox.
![]() Use the Preset Tool list arrow, and then select from the available tool presets.
Use the Preset Tool list arrow, and then select from the available tool presets.

![]() Use the selection options on the Options bar to create a new selection, or add to, subtract from, or intersect with an existing selection.
Use the selection options on the Options bar to create a new selection, or add to, subtract from, or intersect with an existing selection.
![]() Enter a Tolerance value (0 to 255). The higher the value, the more information the Magic Wand tool selects.
Enter a Tolerance value (0 to 255). The higher the value, the more information the Magic Wand tool selects.
![]() Select the Anti-alias check box to create a softer selection (useful with intensely rounded or curved selections).
Select the Anti-alias check box to create a softer selection (useful with intensely rounded or curved selections).
![]() Select the Contiguous check box to select adjacent pixels within the active document.
Select the Contiguous check box to select adjacent pixels within the active document.
![]() Select the Sample All Layers check box to sample image information from all layers.
Select the Sample All Layers check box to sample image information from all layers.
![]() Click an area to make a selection.
Click an area to make a selection.
Selecting by Color Range
Photoshop makes selection easy by giving you ways to draw selection borders in any shape, size, or form. However, selection is more than dragging your mouse across the screen to create a selection. In addition to standard drawing tools, Photoshop lets you select image information based on channel color information. Maybe it’s that bright red car in your background, or the white stucco finish adorning an adobe house. It doesn’t matter, because Photoshop lets you choose the color and the maximum range to select. When you work with the Color Range option, the image displayed in the dialog box becomes a mix of black and white. The white areas represent the selected portions of the image, while the black areas represent the masked portions of the image.
Selection by Color Range
![]() Click the Select menu, click Color Range, and then select an option:
Click the Select menu, click Color Range, and then select an option:
• Select. Lets you choose Sampled Colors, a specific color, or Out-of-Gamut colors.
• Localized Color Clusters. Select when you want to constrain your color selection to a specific area. Use the Range slider to fix the distance to use with the localized color selection.
• Selection or Image. Lets you view the Selection Mask or the Image.
• Selection Preview. Changes the view of the image in the document window. Select None, Grayscale, Black Matte, White Matte, or Quick Mask.
![]() Click the eyedroppers to add to or subtract from colors from the selection, and then click within the image.
Click the eyedroppers to add to or subtract from colors from the selection, and then click within the image.


![]() Click the Fuzziness slider to increase or decrease the color values selected (0 to 200).
Click the Fuzziness slider to increase or decrease the color values selected (0 to 200).
![]() Select the Invert check box to reverse the Selection Mask.
Select the Invert check box to reverse the Selection Mask.
![]() Click OK to turn the color range information into a selection.
Click OK to turn the color range information into a selection.
Refining a Selection Edge
After you make the initial selection, you can use the Refine Edge tool to fine-tune the selection to your exact specifications. The Refine Edge tool is useful for selecting elements with different edge types. For example, you can select the edge around a ship in the ocean and then place it in front of a different background. With the Smart Radius and Decontaminate Colors options (New!), you can create precise selections for complex elements. Smart Radius automatically creates the best selection for the elements changing edge, while Decontaminate Colors removes the background color around the edge. If the selection is not quite right, you can use the Refine Radius and Erase Refinements tools (New!) to expand the selection or restore it back to the original selection. These tools also work well with the Decontaminate Colors option to remove residual background color from around the edges of a selection. In addition, you can make selection adjustments using the following slider options: Radius, Smooth, Feather, Contrast, and Shift Edge. As you work with a selection, you can change the view mode (New!) to preview the selection against different backgrounds—such as overlay, on black or white, or on layers—in order to fine-tune it.
Use the Refine Edge Tool
![]() Use one of the selection tools to make a selection.
Use one of the selection tools to make a selection.

![]() Click Refine Edge on the Options bar, or click the Select menu, and then click Refine Edge.
Click Refine Edge on the Options bar, or click the Select menu, and then click Refine Edge.
![]() To change the view size or position, use the Zoom or Hand tools.
To change the view size or position, use the Zoom or Hand tools.
![]() To change the view modes, click a Selection View list arrow, and then select a view (New!).
To change the view modes, click a Selection View list arrow, and then select a view (New!).
• Show Radius. Select to view by the radius defined selection.
• Show Original. Select to view by the original selection.
![]() Specify an edge detection option.
Specify an edge detection option.
• Smart Radius. Select to automatically apply the best radius to create an accurate selection (New!).
• Radius. Drag the slider to specify the size of the selection. Increase to create a more exact selection.
![]() To refine the selection, use any of the following tools (New!):
To refine the selection, use any of the following tools (New!):
• Refine Radius Tool. Select and drag to expand the selection area.
• Erase Refinements Tool. Select and drag to restore the original selection edge.

![]() Drag the sliders to adjust the edge of the selection.
Drag the sliders to adjust the edge of the selection.
• Smooth. Smooths out the rough edges of the selection (0-100).
• Feather. Creates a soft edge around the selection (0-250 px).
• Contrast. Sharpens the selection edges and removes fuzziness.
• Shift Edge. Decreases or increases the selection edge.
![]() Click the Output To list arrow, and then select an option, such as Selection, Layer Mask, or New Document (New!).
Click the Output To list arrow, and then select an option, such as Selection, Layer Mask, or New Document (New!).
• Decontaminate Colors. Removes background color around the edge by the amount (%).
• You can also use this option along with the Refine Radius and Erase Refinements tools to remove residual background color from around the edges of a selection.

![]() To remember your settings for use next time, select the Remember Settings check box (New!).
To remember your settings for use next time, select the Remember Settings check box (New!).
![]() Click OK.
Click OK.
Adding and Subtracting a Selection
To say that Photoshop helps you make selections easily would be an understatement. Not only can you modify selections in any number of ways, Photoshop gives you the option to change your mind by adding and subtracting to an existing selection or even using the selection tools to crop the image. Since most selections are not perfect the first time around, knowing how to modify a selection marquee gives you the control you need to make perfect selections. Adding to and subtracting from an image is accomplished by simple keyboard shortcuts, or by making choices from the Options bar. Either way, you can create complex selections with ease.
Add to an Existing Selection
![]() Create a selection using any of the selection tools.
Create a selection using any of the selection tools.

![]() Add to the selection by holding down the Shift key, and then use a selection tool to add to the existing selection (the selected areas do not need to be contiguous).
Add to the selection by holding down the Shift key, and then use a selection tool to add to the existing selection (the selected areas do not need to be contiguous).
![]() Release the mouse and the Shift key to complete the addition.
Release the mouse and the Shift key to complete the addition.
Subtract from an Existing Selection
![]() Create a selection using any of the selection tools.
Create a selection using any of the selection tools.


![]() Subtract from the selection by holding down the Alt (Win) or Option (Mac) key.
Subtract from the selection by holding down the Alt (Win) or Option (Mac) key.
![]() Create a selection that intersects with the existing selection.
Create a selection that intersects with the existing selection.
![]() Release the mouse and the keys to complete the subtraction.
Release the mouse and the keys to complete the subtraction.
Cropping a Selection
Cropping a document brings focus to the information contained within the image. For example, you take a photograph of an insect on a flower. To increase the focus on the insect, then crop out the flower. Cropping eliminates distractions, which would otherwise take away from the message of the image. With the Crop tool, you can select the cropping area, and then adjust it using a cropping shield and guide overlay (New!).
Crop a Selection
![]() Select the Crop tool on the toolbox.
Select the Crop tool on the toolbox.

![]() Drag a selection around the area of the image you want to crop.
Drag a selection around the area of the image you want to crop.
• To adjust the selection, drag a selection handle.
![]() Click the Crop Guide Overlay list arrow on the Control panel, and then select an option: None, Rule of Thirds, or Grid.
Click the Crop Guide Overlay list arrow on the Control panel, and then select an option: None, Rule of Thirds, or Grid.
![]() To display a shield in the cropped area, select the Shield check box on the Control panel.
To display a shield in the cropped area, select the Shield check box on the Control panel.
• Color. Select a shield color.
• Opacity. Specify a shield transparency percentage.
![]() Click the Commit or Cancel button to keep or cancel the change.
Click the Commit or Cancel button to keep or cancel the change.
Did You Know?
You can crop an existing selection. Create a selection using any of the selection tools, click the Image menu, and then click Crop.
Once a selection is made, it’s possible to modify the selection using standard transform tools. To transform a selection, click the Select menu, and then click Transform Selection. You can expand, contract, and even rotate the selection marquee. To exit Transform Selection, simply double-click in the selection marquee, or press the Enter (Win) or Return (Mac) key.
Using Channels to Create and Store Selections
Photoshop’s primary method of creating selections is through the use of tools from the toolbox, such as the Marquee, Lasso, and Magic Wand, and while they create impressive and complex selections, Photoshop has other ways to capture that tricky selection using the Channels panel. The Channels panel primarily holds color information, but that’s not all it can hold. You can use the Channels panel to create and store complex selections. Photoshop holds selection information using black (masked), white (selected), and shades of gray (percentages of selection). In addition, channels can be saved with the image file.
Create Selections with Channels
![]() Select the Channels panel.
Select the Channels panel.

![]() Click the individual color channels.
Click the individual color channels.
![]() Look for a channel that represents a brightness difference between what you want to select and what you want to mask.
Look for a channel that represents a brightness difference between what you want to select and what you want to mask.
![]() Make a copy of the channel by dragging it down over the New Channel button on the Channels panel.
Make a copy of the channel by dragging it down over the New Channel button on the Channels panel.
![]() Select the new channel.
Select the new channel.
![]() Click the Image menu, point to Adjustments, and then click Threshold.
Click the Image menu, point to Adjustments, and then click Threshold.
![]() Drag the Threshold slider left or right until the visible image represents a black and white mask of your selection.
Drag the Threshold slider left or right until the visible image represents a black and white mask of your selection.

![]() Click OK.
Click OK.
Did You Know?
Selection masks created from color channels will not always be perfect. For example, you may see unwanted spots of white or black. When that happens, do the best you can using the Threshold command, and then paint with white or black to clean up the mask.
Apply Selection Masks to an Image
![]() Click the Select menu, and then click Load Selection.
Click the Select menu, and then click Load Selection.

![]() Click the Channel list arrow, and then select the newly created channel.
Click the Channel list arrow, and then select the newly created channel.
![]() Click OK.
Click OK.

See Also
See “Creating Channel Masks from Selections” on page 255 for more information on using channel masks as selections.
Modifying an Existing Selection
Selections can be as simple as dragging a circle or square with one of the marquee tools or as complicated as a freeform selection. Whatever the case, Photoshop allows you to enhance any selection with its useful modification tools. After creating a selection, you can modify it with the various options that Photoshop offers in order to make complex selections easier to use.
Modify an Existing Selection
![]() Create a selection, click the Select menu, and then select an option:
Create a selection, click the Select menu, and then select an option:
• All. Selects all pixels within the active document.

• Deselect or Reselect. Removes the active selection or recreates the last active selection.
• Inverse. Lets you reverse the previous selection.
• All Layers. Lets you select all the layers in the Layers panel (excluding the Background).
• Deselect Layers. Deselects all layers in the Layers panel.
• Similar Layers. Selects similar layers such as: all type layers, or all shape layers.
• Color Range. Creates a selection based on a range of colors within the active document.
• Redefine Edge. Creates a selection from a complex image.
• Modify. Lets you modify the border, Expand, Contract, or Smooth the selection in the active document.
• Grow. Lets you increase a selection by adding pixels.
• Similar. Lets you increase a selection by adding non-contiguous pixels.
• Transform Selection. Creates a bounding box around the active selection that you can modify.
• Edit in Quick Mask Mode. View your selection in Quick Mask Mode.
• Load or Save Selection. Lets you load or save a previously saved channel mask selection.

Copying and Pasting a Selection
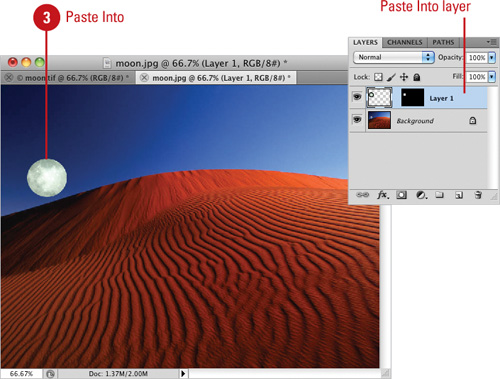
After you make a selection in a Photoshop document, you can copy or cut it to the Clipboard where you can paste it to another place in your active document or in another document. Using the Copy or Cut and Paste commands have been around for a long time, however, Photoshop has added some variation to it. You can use the Paste Special menu to provide more direction to the paste location by using the Paste In Place (New!), Paste Into, and Paste Outside (New!) commands. If the content of the Clipboard doesn’t contain pixels from a Photoshop document, the special paste commands work just like the Paste command.
Copy or Cut and Paste
![]() Select an area of an image using any of the selection tools in a Photoshop document.
Select an area of an image using any of the selection tools in a Photoshop document.

![]() Click the Edit menu, and then click Copy (active layer), or Copy Merged (all layers), or Cut (move).
Click the Edit menu, and then click Copy (active layer), or Copy Merged (all layers), or Cut (move).
![]() Use any of the following paste commands:
Use any of the following paste commands:
• Paste. Pastes the selection as a new layer. Click the Edit menu, and then click Paste.
• Paste In Place. Pastes selection into the same relative location between source and destination documents. Click the Edit menu, point to Paste Special, and then click Paste In Place (New!).
Timesaver
Press Shift+Ctrl+V (Win) or Shift+![]() +V (Mac).
+V (Mac).
• Paste Into or Paste Outside. Pastes the selection inside or outside (New!) a selection. This adds a layer and layer mask. The selection is unmasked (white), while the rest of the layer is masked (black). Select a destination, click the Edit menu, point to Paste Special, and then click Paste Into or Paste Outside.
Timesaver
For Paste Into, press Alt+Shift+Ctrl+V (Win) or Option+Shift+![]() +V (Mac).
+V (Mac).
Using Free Transform and Transform
Once a selection is made, the next step is to get to work. Selections are not just useful for correcting color or for image enhancement. It’s possible you may need to use some of Photoshop’s transform commands on your selections before making further modifications. The Transform commands let you move, modify, or resize the area enclosed within the selection area. Unlike the Free Transform command, Transform gives you several options, such as Scale, Distort, Perspective, and Warp, which you can use to modify an existing selection. The selection area is visually defined by a bounding box with nodes, or anchor points, in the four corners and the center of each axis.
Use the Free Transform Command
![]() Select an area of an image using any of the selection tools.
Select an area of an image using any of the selection tools.
![]() Click the Edit menu, and then click Free Transform.
Click the Edit menu, and then click Free Transform.
![]() Move to any of the four corners, and then drag to expand or contract the size of the selection.
Move to any of the four corners, and then drag to expand or contract the size of the selection.
Move outside the bounding box selection until your cursor resembles a curved arrow, and then drag to rotate the selection.
You can also drag the horizontal or vertical nodes to expand the image.

![]() Press Enter (Win) or Return (Mac), or double-click inside the bounding box to apply the transformation.
Press Enter (Win) or Return (Mac), or double-click inside the bounding box to apply the transformation.
Did You Know?
You can create proportional transform boundaries. Holding down the Shift key while dragging a corner handle maintains the proportions of the original image.
You can use the Free Transform command to create distorted images. Hold down the Ctrl (Win) or ![]() (Mac) key, while dragging a corner handle to create a distorted selection.
(Mac) key, while dragging a corner handle to create a distorted selection.
Use the Transform Command
![]() Select an area of an image using any of the selection tools.
Select an area of an image using any of the selection tools.
![]() Click the Edit menu, point to Transform, and then select an option:
Click the Edit menu, point to Transform, and then select an option:
• Again. Lets you repeat the previous Transform command.
• Scale. Lets you increase or decrease the size of the selected area.
• Rotate. Lets you rotate the selection area 0 to 360 degrees.
• Skew. Lets you select a node and drag it in a vertical or horizontal direction without affecting the other nodes.
• Distort. Lets you select a node and drag it in any direction desired without affecting the other nodes.
• Perspective. Lets you change the perspective of a selection.
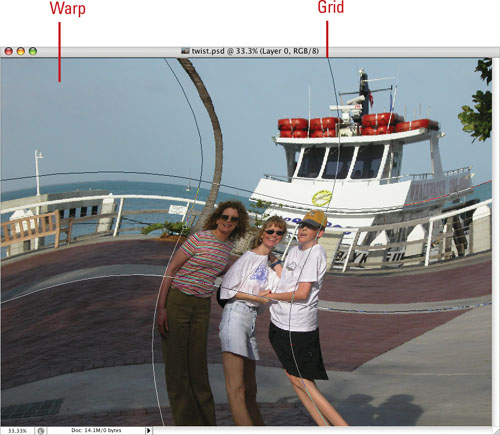
• Warp. Lets you wrap an image around any shape using a modifiable grid. To warp an image using a specific shape, click the Warp Style list arrow on the Options bar, and then select a shape, such as Twist, Flag, Fisheye, or Inflate.

Timesaver
To show or hide the warp grid and anchor points, click the View menu, and then click Extras.
![]() Select any settings you want on the Options bar and modify the transformed image as desired using the anchor points, a segment of the bounding box or grid, or an area within the grid.
Select any settings you want on the Options bar and modify the transformed image as desired using the anchor points, a segment of the bounding box or grid, or an area within the grid.
Using Puppet Warp
The Puppet Warp tool (New!) allows you to push and pull elements within an image. You can adjust an element to add an artistic flare or make it fit into a specific space by simply adding or removing handles, known as pins, as needed and then dragging them to adjust (warp, stretch, or reposition) all or part of the image.
Use Puppet Warp
![]() Select one or more areas of an image using any of the selection tools, or select an entire layer.
Select one or more areas of an image using any of the selection tools, or select an entire layer.
![]() Click the Edit menu, and then click Puppet Warp.
Click the Edit menu, and then click Puppet Warp.
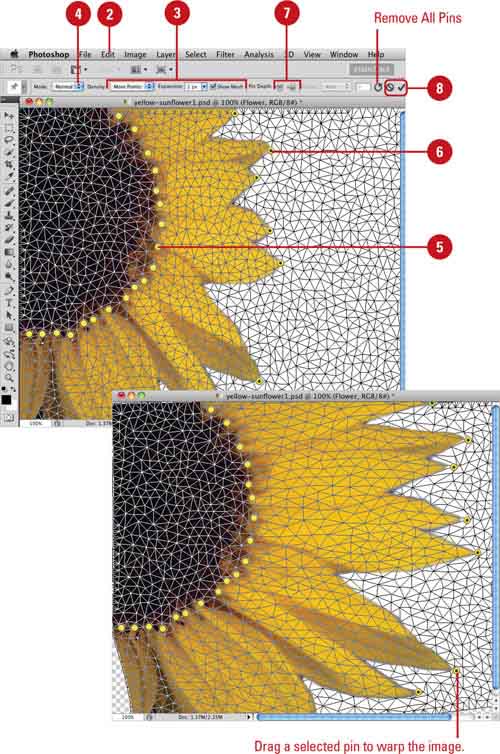
![]() To modify the mesh, use any of the following on the Control panel:
To modify the mesh, use any of the following on the Control panel:
• Show Mesh. Select to show or deselect to hide the mesh.
• Density. Click the list arrow, and then select Fewer Points, Normal, or More Points.
• Expansion. Specify a pixel size to increase or decrease the mesh.
![]() Click the Mode list arrow, and then select a warp mode: Rigid, Normal, or Distort.
Click the Mode list arrow, and then select a warp mode: Rigid, Normal, or Distort.
![]() Click on the mesh to place pins creating points that don’t move.
Click on the mesh to place pins creating points that don’t move.
![]() Select one or more pins that move, and then drag one or use the arrow keys to warp the image.
Select one or more pins that move, and then drag one or use the arrow keys to warp the image.
• Select or Deselect Pins. Shift+ click a pin, or press Ctrl+A (Win) or ![]() +A (Mac) to select all or press Ctrl+D (Win) or
+A (Mac) to select all or press Ctrl+D (Win) or ![]() +D (Mac) to deselect all.
+D (Mac) to deselect all.
• Remove Pins. Alt+click (Win) or Option+click (Mac) a pin, or click the Remove All Pins button.
• Temporarily Hide Pins. Press H.
![]() To adjust overlap from background areas, click the Forward or Backward Pin Depth buttons.
To adjust overlap from background areas, click the Forward or Backward Pin Depth buttons.
![]() Click the Commit or Cancel button to keep or cancel the change.
Click the Commit or Cancel button to keep or cancel the change.
Using Content-Aware Scaling
The Content-Aware Scale command allows you to resize an image without affecting important parts of the image, such as people, buildings, etc. When you normally scale an image, all the pixels in the image are affected. With Content-Aware scaling, only the pixels in non-important areas are affected. You can upscale or downscale images to fit them on a page or change the orientation. If you want to preserve specific areas of an image, you can use an alpha channel to protect the selected area.
Use Content-Aware Scaling
![]() Open a document with the image that you want to scale.
Open a document with the image that you want to scale.
![]() To protect content when scaling, select the area that you want to protect using any selection tool.
To protect content when scaling, select the area that you want to protect using any selection tool.
![]() If you’re scaling a Background layer, click the Select menu, and then click All.
If you’re scaling a Background layer, click the Select menu, and then click All.
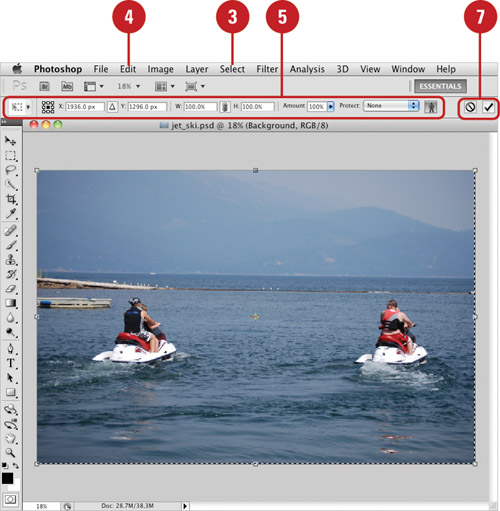
![]() Click the Edit menu, and then click Content-Aware Scale.
Click the Edit menu, and then click Content-Aware Scale.
![]() Use any of the following:
Use any of the following:
• Reference Point Location. Click a square to select a scale point.
• Relative Positioning for Reference Point. Click to specify a new position in relation to its current position.
• Image Size. Enter specific sizes.
• Scaling Percentage. Enter specific percentages for scaling.
• Amount. Specify a ratio of content-aware scaling to normal scaling.
• Protect. Select an alpha channel that specifies an area to protect.
• Protect Skin Tones. Click to preserve areas with skin tones.
![]() Drag a handle on the bounding box to scale the image. Use the Shift key to scale proportionately.
Drag a handle on the bounding box to scale the image. Use the Shift key to scale proportionately.

![]() Click the Commit or Cancel button to keep or cancel the change.
Click the Commit or Cancel button to keep or cancel the change.
Using Content-Aware Fill
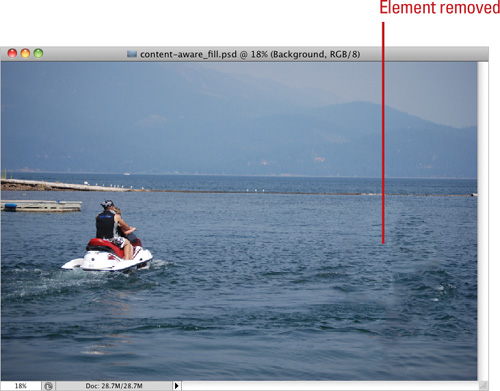
The Content-Aware Fill option (New!) with the Spot Healing Brush tool or in the Fill dialog box allows you to replace content in a selection. This is useful when you want to remove an unwanted element and replace it with details that match the surrounding area; the result is a seamless removal of an element. You can select the element to be removed, and then use the Content-Aware option in the Fill dialog box to replace the selection with details from the area surrounding the selection. If you prefer using a brush, you can also use the Content-Aware option on the Options bar for the Spot Healing Brush tool. As you paint, the Spot Healing brush fills in the area with the details that surround the painted area.
Use Content-Aware Fill with the Spot Healing Brush Tool
![]() Select the Spot Healing Brush tool on the toolbox.
Select the Spot Healing Brush tool on the toolbox.
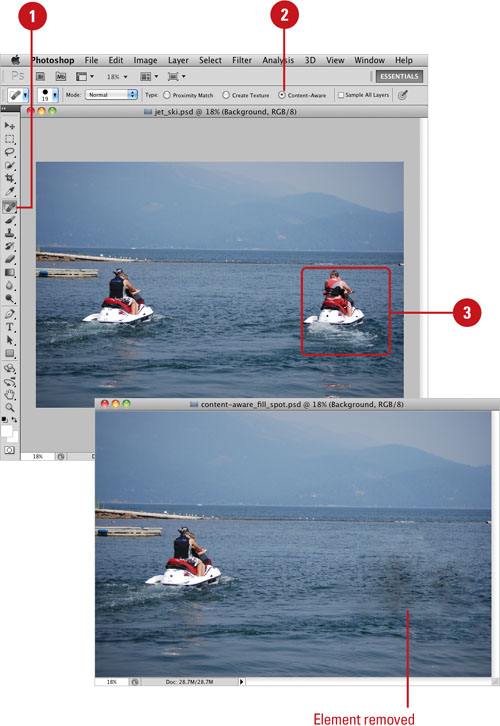
![]() Click the Content-Aware option on the Control panel.
Click the Content-Aware option on the Control panel.
![]() Start painting where you want to remove an element in a continuous stroke (fill in the entire area).
Start painting where you want to remove an element in a continuous stroke (fill in the entire area).
When you release the mouse, Photoshop automatically removes the element and fills in the area using details from the painted edge.
Use Content-Aware Fill with the Fill Dialog Box
![]() Create a selection using any of the selection tools.
Create a selection using any of the selection tools.
• To create an exact selection, use the Quick Selection tool on the toolbox, and use the Refine Edge button on the Control panel.

![]() Click the Edit menu, and then click Fill.
Click the Edit menu, and then click Fill.
![]() Click the Use list arrow, and then click Content-Aware.
Click the Use list arrow, and then click Content-Aware.
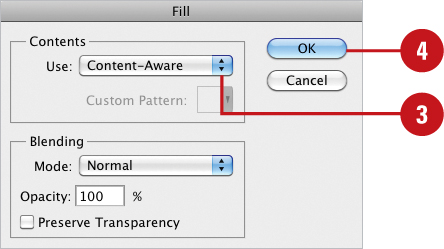
![]() Click OK.
Click OK.
