2. Understanding Navigation and Measurement Systems
Introduction
When you go on a road trip, you need two things to make the trip a success: good navigational aids (maps), and an understanding of how to measure distances between two points on a road map (1 inch typically equals 100 miles). When you are working with Adobe Photoshop, one of the keys to making the journey a success is to understand the navigational and measurement aids available. Photoshop lets you choose a measurement system to fit a specific project. For example, if you’re working on images destined for the Web or a monitor, you’ll be using pixels as a measurement system.
Conversely, if you’re outputting to paper, or possibly a 4-color press, you’ll likely choose inches or picas. Selecting between different measurement systems does not impact the quality of the final image, only how you measure distance. Trust me on this one; understanding how to measure distance helps to make the journey an enjoyable experience (I know from experience).
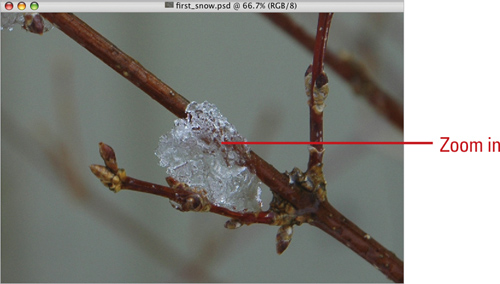
Having problems squinting at the small details of a photographic image? Using the Zoom tool is a great way to get you focused where you need to be. Zooming into a specific section of a document makes touching up the fine details just that much easier. In addition, the Info panel gives you up-to-date information on the exact position of the cursor inside the document, as well as detailed color information that can be indispensable in color-correcting an image.
The ability to create text annotations allows you to record document information that might be vital to the processing of the image and pass it on to anyone who opens the document. Photoshop’s navigation and measurement systems are more than just information; they represent control of the document and control of the creative process.
Changing the View Size with the Navigator Panel
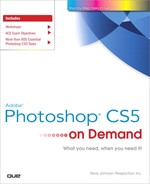
Photoshop’s Navigator panel gives you an overall view of the image and the ability to navigate through the document or change the zoom size. Viewing images at different sizes gives you the ability to focus on small elements of the design without actually changing the image in any way. Once small areas of an image are enlarged, it’s easier for you to make minute changes. Zoom size determines the visible size of an image; the zoom percentage can be seen in the document window. Zooming in (enlarging the image) by using the handy magnifying glass lets you work on and manipulate fine details, and then you can zoom out (reduce the image) to view how the changes impact the entire image. The Navigator panel contains a thumbnail view of the image, and under the thumbnail are easy-to-use controls that let you adjust the zoom of the image. In addition, changes made in the Navigator panel are immediately viewable in the active document window (what you see is what you get).
Change the View Size with the Navigator Panel
![]() Select the Navigator panel.
Select the Navigator panel.
![]() Use one of the following methods to change the view size:
Use one of the following methods to change the view size:
• Drag the triangular slider to the right to increase the zoom or to the left to decrease the zoom.
• Click the small and large mountain icons, located to the left and right of the triangular slider, to decrease or increase the zoom.
• Enter a value from .33% to 1600% into the Zoom box.
Did You Know?
There are additional ways to zoom in using the Navigator panel. In the View box, hold down the Ctrl key, and then drag to resize the active document.
You can constrain the view box to drag horizontally or vertically. Hold down the Shift key, and then drag the view box horizontally or vertically.
Changing the View Area with the Navigator Panel
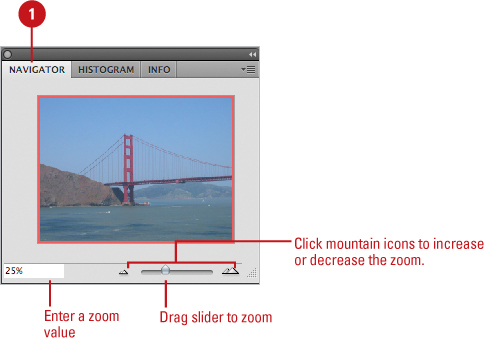
Zoomed images are typically larger than the size of the document window. When this happens, Photoshop adds navigational scroll bars to the bottom and the right of the document window. However, using scroll bars is not the only way to change your position within the image; the Navigator panel gives you a visible approach to changing the viewable area of the image. The view box in the Navigator panel represents the visible boundaries of the active document window, which is the viewable area of the image.
Change the View Area with the Navigator Panel
![]() Select the Navigator panel.
Select the Navigator panel.

![]() Drag the view box in the thumbnail of the active image.
Drag the view box in the thumbnail of the active image.
![]() Click within the thumbnail.
Click within the thumbnail.
The position of the view box changes, which also changes the viewable area of the image in the document window.
Did You Know?
You can show the Navigator panel. If the Navigator panel is not visible, click the Window menu, and then click Navigator.
You can change the Zoom size of an image using the Navigator thumbnail. Hold down the Ctrl key (Win) or the ![]() key (Mac), and then drag in the thumbnail. When you release your mouse, the selected area expands. It’s just like using the Zoom tool, except you’re dragging in the Navigator’s thumbnail. Conversely, if you drag a second time (this time using a larger rectangle), the image zooms out.
key (Mac), and then drag in the thumbnail. When you release your mouse, the selected area expands. It’s just like using the Zoom tool, except you’re dragging in the Navigator’s thumbnail. Conversely, if you drag a second time (this time using a larger rectangle), the image zooms out.
Changing the Color of the Navigator Panel View Box
The colored box in the Navigator panel (proxy preview area) defines the viewable area of the image. It’s important for the colored lines of the view box to stand out clearly against the image. The default color of the view box is a light red; however, some documents contain images that are predominantly the same color as the colored lines of the viewable area, making the viewing area difficult to identify. By changing the color of the lines, you can make sure they stand out against the image. This may seem like a small thing, but choosing a color that contrasts with my image significantly cuts down on my frustration level when I’m attempting to identify the viewable area.
Change the View Box Color
![]() Select the Navigator panel.
Select the Navigator panel.
![]() Click the Navigator Options button, and then click Panel Options.
Click the Navigator Options button, and then click Panel Options.
![]() Click the Color list arrow, and then click a predefined color, or click Custom to select a color from the Color Picker dialog box.
Click the Color list arrow, and then click a predefined color, or click Custom to select a color from the Color Picker dialog box.
![]() Click OK.
Click OK.

Did You Know?
You can increase the size of the Navigator panel’s thumbnail. Drag the lower right corner of the Navigator panel to expand the size of the panel. As the Navigator panel increases in size, so does the thumbnail.
Changing the Screen Display Mode
In Photoshop, the Screen Display mode determines the background displayed behind the active image. For example, you can choose a Screen Mode that changes the background to black, and then hides all the panels. Since monitor backgrounds, combined with Photoshop’s panels, add distracting colors to your workspace, changing the Screen Mode gives you a chance to isolate your image against a solid color background. Viewing your images against a black or gray background helps your eyes identify the true colors within an image.
Change the Screen Mode
![]() Click Change Screen Mode button to toggle between screen modes or click the Change Screen Mode button arrow, and then select the mode you want:
Click Change Screen Mode button to toggle between screen modes or click the Change Screen Mode button arrow, and then select the mode you want:
• Standard Screen Mode. Displays the image against a gray, black, or custom color background (Win), or with the visible desktop (Mac). All menus and panels are visible.
• Full Screen Mode with Menu Bar. Centers the image, and displays it against a gray, black, or custom color background.
• Full Screen Mode. Centers the image, and displays it against a gray, black, or custom color background. (Default: Black)


Timesaver
Press F to toggle between the screen modes.
Did You Know?
You can temporarily hide all of the panels and toolbox. Press the Tab key to hide the toolbox and panels. Press the Tab key a second time to display the hidden toolbox and panels. Hold down the Shift key, and then press the Tab key to hide the panels, but not the Toolbox or Options bar. In Interface preferences, you can choose to have either a border, a drop shadow or no effect for each screen mode.

Changing the View with the Zoom Tool
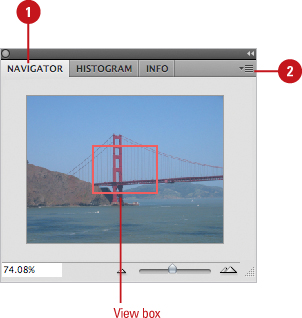
Working with the Zoom tool gives you one more way to control exactly what you see in Photoshop. Just like the Navigator panel, the Zoom tool does not change the active image, but allows you to view the image at different magnifications. The Zoom tool is located towards the bottom of Photoshop’s toolbox, and resembles a magnifying glass. The maximum magnification of a Photoshop document is 1600%, and the minimum size is 1 pixel. Increasing the magnification of an image gives you control over what you see and gives you control over how you work. Large documents are difficult to work with and difficult to view. Many large documents, when viewed at 100%, are larger than the maximum size of the document window, requiring you to reduce the zoom in order to view the entire image.
Zoom In the View of an Image
![]() Select the Zoom tool on the toolbox.
Select the Zoom tool on the toolbox.
![]() Use one of the following methods:
Use one of the following methods:
• Click on the document.
The image increases in magnification centered on where you clicked.
• Drag to define an area with the Zoom tool.
The image increases in magnification based on the boundaries of the area you dragged. When you zoom in to 500% or more magnification, a Pixel Grid will appear, making it easy to make pixel-specific modifications.
• Bird’s Eye View.
If you are zoomed into an image, you can press and hold the H key, click with your mouse and zoom out. Then reposition the viewing rectangle to the next spot you want to zoom into and it will zoom you into that specific spot.

Zoom Out the View of an Image
![]() Select the Zoom tool on the toolbox.
Select the Zoom tool on the toolbox.

![]() Hold down the Alt (Win) or Option (Mac) key, and then click on the screen to reduce the zoom of the active document.
Hold down the Alt (Win) or Option (Mac) key, and then click on the screen to reduce the zoom of the active document.

The zoom reduction centers on where you click on the active document.
Important
Since images viewed in Photoshop are composed of pixels (like bricks in a wall), the only way to really see what the printed results of your artwork will look like is to view the image (even if it is too big for the screen) at 100%.
Did You Know?
You can zoom in or out using shortcut keys regardless of what tool you’re currently using. To zoom in, press Ctrl+Spacebar (Win) or ![]() +Spacebar (Mac) and click or drag to define an area. To zoom out, press Ctrl+Spacebar+Alt (Win) or
+Spacebar (Mac) and click or drag to define an area. To zoom out, press Ctrl+Spacebar+Alt (Win) or ![]() +Spacebar+Option (Mac) and click or drag to define an area.
+Spacebar+Option (Mac) and click or drag to define an area.
You can always display a clear view. When you zoomed into your image at 33% or 66% in previous versions of Photoshop, you would get a jaggy preview. Now, no matter what magnification size you choose, the preview is crisp and clear.
Increasing or Decreasing Magnification
Since easily changing the magnification of an image is fundamental to an optimal workflow, Photoshop gives you several ways to accomplish zooming. One way to zoom is using the options on the Options bar. To access the Zoom tool options, you must have the Zoom tool selected. Photoshop gives you two handy zoom preset values. To automatically zoom the document to 100%, double-click the Zoom tool. To automatically fit the image into the Photoshop workspace, double-click the Hand tool.
Increase the Magnification of an Image
![]() Click the Zoom In or Zoom Out buttons on the Options bar, and then click in the document window to increase or decrease the zoom.
Click the Zoom In or Zoom Out buttons on the Options bar, and then click in the document window to increase or decrease the zoom.

![]() Select the Resize Windows To Fit check box on the Options bar to resize the active document to fit the zoomed window.
Select the Resize Windows To Fit check box on the Options bar to resize the active document to fit the zoomed window.

![]() Select the Zoom All Windows check box to zoom all open document windows to the same magnification.
Select the Zoom All Windows check box to zoom all open document windows to the same magnification.
![]() Select the Scrubby Zoom check box to zoom with a scrubby slider (New!). If grayed out, enable OpenGL Drawing in Performance Preferences.
Select the Scrubby Zoom check box to zoom with a scrubby slider (New!). If grayed out, enable OpenGL Drawing in Performance Preferences.

![]() Click Actual Pixels, Fit Screen, Fill Screen, or Print Size on the Options bar to quickly zoom the screen to a preset size.
Click Actual Pixels, Fit Screen, Fill Screen, or Print Size on the Options bar to quickly zoom the screen to a preset size.
Timesaver
It’s possible to change the zoom of a document without ever leaving the keyboard. Hold the Ctrl (Win) or ![]() (Mac) key, and then press the plus “+”, or minus “−” keys. The plus key increases the zoom size, and the minus key decreases the zoom size.
(Mac) key, and then press the plus “+”, or minus “−” keys. The plus key increases the zoom size, and the minus key decreases the zoom size.
Moving Images in the Document Window
One of those little used, but handy, tools is Photoshop’s Hand tool. The Hand tool (so named because it resembles an open hand) lets you quickly move the active image within the document window without ever using the scroll bars. For example, you’ve zoomed the image beyond the size that fits within the document window and you need to change the visible portion of the document. It’s a simple operation, but a handy one to know. If you have OpenGL on your computer, you can use the Rotate View tool to tilt the canvas for a more comfortable working angle, which is helpful when working with drawing tablets.
Move an Image in the Document Window
![]() Select the Hand or Rotate View tool on the toolbox.
Select the Hand or Rotate View tool on the toolbox.

![]() Drag in the active document to move or rotate the image.
Drag in the active document to move or rotate the image.

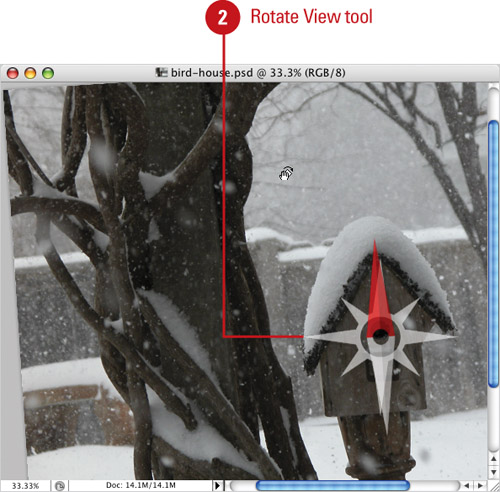
When you rotate the image to a different canvas angle, a compass appears to indicate north in the image regardless of the current canvas angle.
• To rotate a specific angle, enter a value in the Rotation Angle field.
![]() To restore the image back to the normal canvas angle from a rotation, click Reset View.
To restore the image back to the normal canvas angle from a rotation, click Reset View.
Did You Know?
You can quickly access the Hand tool whenever you need it. Hold down the Spacebar to temporarily change to the Hand tool. Drag in the active document to the desired position, and then release the Spacebar. You’re instantly returned to the last-used tool. It’s important to note that you cannot use the Spacebar to access the Hand tool if you are currently using the Type tool.
Working with Multiple Documents
When you open multiple documents, you can use the Window menu or tabs at the top of the Document window to switch between them. You can click a tab name to switch and activate the document. By default, tabs are displayed in the order in which you open or create documents. However, you can change the order. When you want to move or copy information between documents, it’s easier to display several Document windows at the same time and move them around. The Arrange Documents menu makes it easy to display open document windows on the screen for better views.
Work with Multiple Documents
![]() Open more than one document.
Open more than one document.

![]() Click a tab name to switch to the document.
Click a tab name to switch to the document.
Timesaver
Press Ctrl+Tab or Ctrl+Shift+Tab to cycle to a tab.
• You can also click the Window menu, and then click a document name at the bottom of the menu.
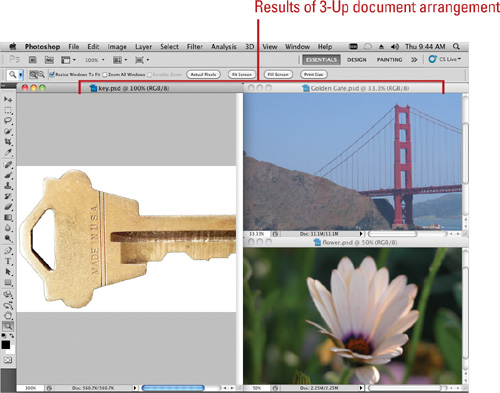
![]() Click the Arrange Documents menu on the Application bar, and then select an arrangement button icon:
Click the Arrange Documents menu on the Application bar, and then select an arrangement button icon:
• Consolidate All. Displays the active document.
• Tile All In Grid. Displays all open documents in a grid.
• Tile All Vertically. Displays all open documents vertically.
• Tile All Horizontally. Displays all open documents horizontally.
• 2-Up, 3-Up, 4-Up, 5-Up, or 6-Up. Displays the number of documents in a pattern.
![]() To move a document window around, do any of the following:
To move a document window around, do any of the following:
• To rearrange the order of documents, drag a window’s’ tab to a new location.
• To dock or undock a document window, drag the window’s tab out of the group or into the group.
Working with One Image in Multiple Windows
There are times when you’re working on an image in Photoshop, and you need to see two separate views of the image. For example, you’re working on retouching a photo and you need a zoomed-in view to do fine detail work. At the same time, you want to see a normal view to get an idea of how the retouching is affecting the full-sized image. Being able to view one image at two different magnifications is a valuable tool. You can also use the Arrange Documents menu to rearrange open document windows on the screen for better views.
Create Two Views of One Image
![]() Open a document.
Open a document.

![]() Click the Arrange Documents menu, and then click New Window.
Click the Arrange Documents menu, and then click New Window.
A copy of the active document is created in a new window.
![]() If you want to arrange multiple documents, click the Arrange Document menu, and then select an arrangement button icon (see the For Your Information for more details).
If you want to arrange multiple documents, click the Arrange Document menu, and then select an arrangement button icon (see the For Your Information for more details).
![]() Select the Zoom tool on the toolbox, and then increase the zoom of the new document to the desired level.
Select the Zoom tool on the toolbox, and then increase the zoom of the new document to the desired level.
![]() Select an editing or painting tool, and then begin work on the new image in the zoomed window.
Select an editing or painting tool, and then begin work on the new image in the zoomed window.
The effects of your work instantly display in the normal image window.
![]() When you’re done with the new window, click the Close button.
When you’re done with the new window, click the Close button.
Did You Know?
You can prevent the zoomed window from expanding. With the Zoom tool selected, move into the Options bar and deselect Resize Windows To Fit.
Moving Layers Between Two Open Documents
Photoshop has a lot of tricks up its electronic sleeves, and one of the handiest is the ability to move layers between open documents. For example, you have an image of a landscape and sky, but you don’t like the sky, so you erase it. You then open another document with a sky that suits the design of your document. It’s a simple matter to move the layer containing the preferred sky into any other open document.
Move Layers Between Documents
![]() Open two or more documents.
Open two or more documents.
![]() Click on the document containing the layer you want to move to make it the active document.
Click on the document containing the layer you want to move to make it the active document.

![]() Select the Move tool on the toolbox.
Select the Move tool on the toolbox.
![]() Drag the layer you want to move from the open document window into the second document.
Drag the layer you want to move from the open document window into the second document.
Important
If the document you’re moving a layer into contains more than one layer, Photoshop places the layer you’re moving directly above the active layer in the second document. If the layer is in the wrong stacking order, drag it up and down in the Layers panel until it’s correctly positioned.
Did You Know?
You can also drag a layer thumbnail onto a document. Drag the layer thumbnail from the Layers panel into the document window of the second document.
Creating Notes
Notes can be found everywhere—you see them stuck to the side of refrigerators, bulletin boards, and even covering your computer monitor. Notes remind you of important tasks and events. When you work in Photoshop, the ability to save notes can help you remember an important part of the design, or they can instruct another designer in the how’s and why’s of your document. For example, you can attach specific instructions in the form of Photoshop Notes to your service bureau on the printing of a document to obtain the best output. Text input is done through the Notes panel. When you place a note, it doesn’t become part of the image, but it is saved with the image.
Create a Note
![]() Select the Note tool on the toolbox.
Select the Note tool on the toolbox.

![]() Click on the active document or the canvas to create a blank note.
Click on the active document or the canvas to create a blank note.

![]() Enter the text for your note.
Enter the text for your note.

Timesaver
Click the note icon to select it and click again to deselect the note. You can also right-click a note icon to access a shortcut menu with note commands.
![]() Click the Next or Previous button to scroll through multiple notes one at a time.
Click the Next or Previous button to scroll through multiple notes one at a time.
![]() Click the Close button.
Click the Close button.
Did You Know?
You can change the Author and the default color of a Note. Select a note, and then use the Author and color options on the Options bar to create a personalized note. You can show and hide note icons by choosing View/Extras/Notes.
Working with Notes

Working with the Info Panel
Photoshop’s Info panel gives you a wealth of data on the current document’s color space, as well as information on the x and y (horizontal/vertical) position of your mouse cursor within the active document window. In addition, when you’re using one of Photoshop’s drawing or measuring tools, the Info panel gives you up-to-date information on the size of the object you’re creating. Photoshop works with black, white, shades of gray, and every color in-between. By creating color markers you can identify the location of specific color points within an image, which is indispensable for performing color correction. The Info panel also displays color information about the marked color and on how the color has shifted after you’ve made changes.
Create a Specific Size Object
![]() Select the Info panel.
Select the Info panel.
![]() Select a drawing tool on the toolbox.
Select a drawing tool on the toolbox.

![]() Drag in the document window to create a shape.
Drag in the document window to create a shape.
![]() Release the mouse when the Info panel displays the correct dimensions.
Release the mouse when the Info panel displays the correct dimensions.
Important
The bottom of the Info panel now displays tips on how to use the current tool, and the current size of the working document.
Create a Color Marker
![]() Select the Info panel.
Select the Info panel.

![]() Select the Eyedropper tool on the toolbox.
Select the Eyedropper tool on the toolbox.
![]() In the document, hold down the Shift key, and then click once to create a color marker. You can have a maximum of four Color Markers in a single document.
In the document, hold down the Shift key, and then click once to create a color marker. You can have a maximum of four Color Markers in a single document.
Repositioning a marker is easy, simply press the Ctrl (Win) or ![]() (Mac) key, and then click and drag the marker to a new position, or drag it off the document window to delete it.
(Mac) key, and then click and drag the marker to a new position, or drag it off the document window to delete it.
Changing How the Info Panel Measures Color
Knowledge of the colors used in a document is important, but so is a thorough understanding of the color mode of the document. Different documents require different color modes. For example, images displayed on a monitor use the RGB (Red, Green, and Blue) color mode, and images sent to a 4-color press use CMYK (Cyan, Magenta, Yellow, and Black). Not only does the Info panel measure color, it also measures color in specific color modes.
Change How the Info Panel Measures Color
![]() Select the Info panel.
Select the Info panel.

![]() Click the Info Options button, and then click Panel Options.
Click the Info Options button, and then click Panel Options.
![]() Click the Mode list arrows for First Color and Second Color Readout, and then select from the available options.
Click the Mode list arrows for First Color and Second Color Readout, and then select from the available options.
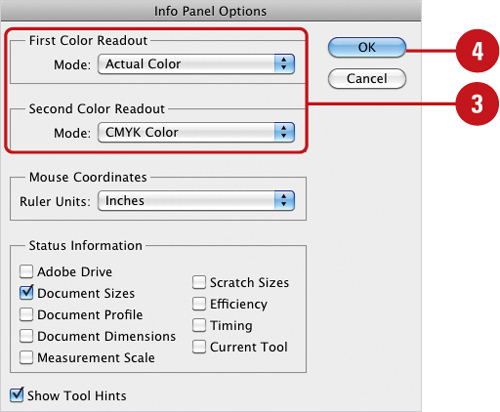
![]() Click OK.
Click OK.
The Info panel now measures color based on your selections.
Did You Know?
The Info panel now allows you to display information such as: Document Sizes, Efficiency, Scratch Sizes, and more. Simply click the Info Options button, and then select from the available options. The Info panel also displays whether the image is using 8-, 16-, or 32-bit color channels.

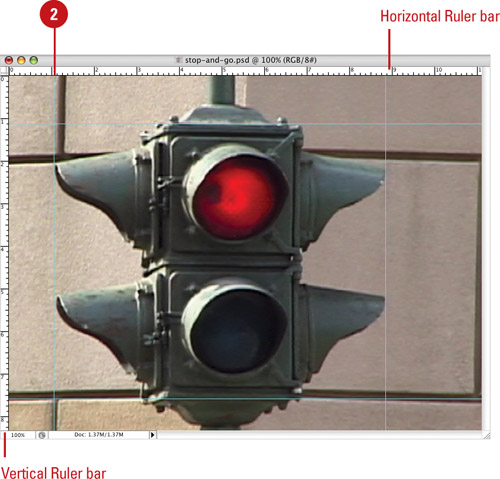
Working with Rulers
Carpenters know that precise measurements are essential to making things fit, so they have a rule: Measure Twice, Cut Once. The designers of Photoshop also know that measurements are essential and give you several measuring systems—among them are the rulers. Rulers are located on the top and left sides of the active document window, and serve several purposes. They let you measure the width and height of the active image, they let you place guides on the screen to control placement of other image elements, and they create markers that follow your cursor as you move. In addition to the rulers, you can also use the Ruler tool to measure the distance between two points by using a non-printing line. The Option bar displays point and distance amounts and allows you to straighten (New!) or clear the line. As you can see, rulers are critical in the design of a document by helping you correctly align image elements. By using guides, you have access to precise alignment systems. To use the Ruler guides, the rulers must first be visible.
Use the Ruler Tool
![]() Select the Ruler tool on the toolbox.
Select the Ruler tool on the toolbox.

![]() Drag from the starting point to the end point you want.
Drag from the starting point to the end point you want.
• Create 45 Degree Lines. Hold down Shift as you drag.
• Create Protractor. Alt (Win) or Option (Mac) drag at an angle from one end of the line, or double-click the line and drag. Hold down Shift as you drag to create 45 degree lines.
![]() Use any of the following to edit or remove the measuring line:
Use any of the following to edit or remove the measuring line:
• Resize or Move. Drag an end point of the line to resize the line, or drag the line to move it.
• Straighten. Click the Straighten button (New!).
• Remove. Click the Clear button.
See Also
See “Working with Units & Rulers” on page 62 for more information on setting Units and Rulers preferences.
Use Ruler Guides
![]() Click the View menu, and then click Rulers to display the ruler bars within the document window.
Click the View menu, and then click Rulers to display the ruler bars within the document window.
![]() Move to the vertical or horizontal Ruler bar, and then click and drag into the document.
Move to the vertical or horizontal Ruler bar, and then click and drag into the document.
![]() Return to the Ruler bar and continue to drag until you have all your guides properly set.
Return to the Ruler bar and continue to drag until you have all your guides properly set.
![]() Click the View menu, and then click Lock Guides to lock the existing guides in place, or click Clear Guides to remove all guides.
Click the View menu, and then click Lock Guides to lock the existing guides in place, or click Clear Guides to remove all guides.
![]() Click the Move tool on the toolbox to drag existing guides to a new position (make sure Lock Guides is not selected).
Click the Move tool on the toolbox to drag existing guides to a new position (make sure Lock Guides is not selected).
Did You Know?
You can remove one guide at a time. Make sure Lock Guides is clear, and then click the Move tool. Drag the existing guide you want removed back to the corresponding Ruler bar.
You can switch guides on the fly. If you’re dragging a vertical or horizontal guide onto the document window, when in fact you wanted the opposite guide, press the Alt (Win) or Option (Mac) key, while still dragging the guide. Vertical guides become horizontal, and horizontal guides become vertical.
See Also
See “Working with Guides, Grid & Slices” on page 64 for more information on setting guide preferences.
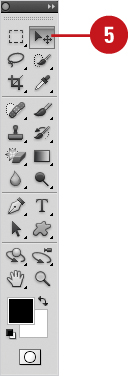
Creating Tool Presets
Photoshop provides you with a variety of tools to modify images. Each tool provides additional options you can choose from on the Options bar. If you frequently use the same tool with specific settings, you can save and reuse tool settings to save time in the future. You can load, edit, and create libraries of tool presets using the Tool Preset picker on the Options bar, the Tool Presets panel, or the Preset Manager.
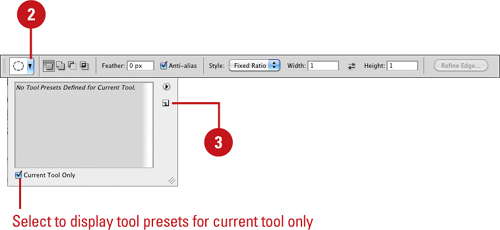
Create and Use Tool Presets
![]() Click the tool and set the options on the Options bar you want to save.
Click the tool and set the options on the Options bar you want to save.
![]() Click the Tool Preset button arrow next to the tool on the left side of the Options bar.
Click the Tool Preset button arrow next to the tool on the left side of the Options bar.
![]() Click the Create New Tool Preset button.
Click the Create New Tool Preset button.
![]() Enter a name for the tool preset.
Enter a name for the tool preset.

![]() Click OK.
Click OK.
![]() To use the tool preset, use one of the following:
To use the tool preset, use one of the following:
• Tool Preset button. Click the Tool Preset picker on the Options bar, and then select the tool preset you want.
• Tool Panel. Click the Window menu, click Tool Preset, and then select the tool preset you want.

Did You Know?
You can change the list of tool presets. Click the triangle on the Tool Preset picker, and then click the display option you want: Sort By Tool, Show All Tool Presets, Show Current Tool Presets, or Text Only, Small List, or Large List.