
Rating and Labeling Images
Ratings give you a way to separate keepers from rejects. Labels let you mark images for any reason. Ratings and labels become part of the image’s metadata that you can use to search and to filter which images are displayed.
You can get around in the Content panel using the usual keyboard shortcuts—arrow keys and the Home, End, Page Up, and Page Down keys. The fastest way to apply ratings and labels is with the keyboard. Many photographers and photo editors are used to looking at image after image and pressing a key to rate them. All of the ratings and labels shortcuts are listed on the Label menu in Bridge. You can use the same shortcuts in Camera Raw if you’ve opened multiple images in filmstrip mode. When you see a row of stars under a thumbnail, you can rate by clicking or dragging in the row until you see the number of stars you want.
Tip
![]()
To work more efficiently in Camera Raw, apply a label to images you want to process together in Bridge (you can apply a label with a single-key shortcut). Then filter the view to show each labeled group.
Bridge and Camera Raw support a rating called Reject, which came about because many photographers requested a way to mark images that they didn’t even want to rate. You might think that you could just leave the rating blank, but it was not always clear whether no rating meant “have not rated yet” or “do not want.” Some photographers used a label to mark rejects, but this also caused problems because labels aren’t defined the same way by different users or programs, while ratings are used more consistently. The Reject rating unambiguously solves all of these problems. Reject is also safer than deleting images immediately, in case you change your mind.
You can rapidly narrow the field by applying ratings and using the Filter panel to show you files that still need to be rated.
Tip
![]()
You can rate or label a selected image by pressing a number key alone (without the Command or Ctrl modifier) if you open the Metadata pane of the Preferences dialog and turn on the check box Require the Command/Ctrl Key to Apply Labels and Ratings. You might prefer to leave that preference off to avoid applying ratings accidentally through stray keypresses. (You must still press Command/Ctrl to rate images in Camera Raw.)
Choose a Rating View or Workspace. You can apply ratings in the Content panel, Preview panel, Full Screen preview, Review mode, or Camera Raw. In the Bridge window you’ll probably want the Filter panel open (you’ll see why soon). Try different workspaces to see which one supports your rating workflow most effectively.
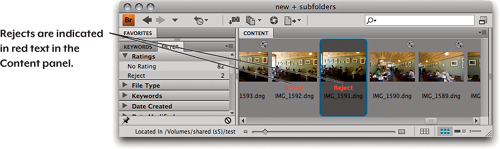
Mark the Rejects. Select the first image and decide whether you want to keep using it. If you don’t want it at all, reject it by pressing Option-Delete (Mac) or Alt-Delete (Windows). The word “Reject” will appear in red below the image (see Figure 5-87). Your rejects don’t have to be definitive at this point, because they aren’t permanently deleted yet. You can add more rejects later or change your mind. Rejects should be images that are just plain unusable—bad compositions, unwanted facial expressions, exposures that can’t be saved with any tools, and so on.
Figure 5-87 Marking rejected images
Rate the Rest. In the Filter panel, click to check No Rating (see Figure 5-81) and make sure no other rating levels are checked. You are now seeing all of the images that haven’t been rated. The great thing about the No Rating filter is that as you rate images they become hidden, so you see only the images that still need to be rated without being distracted by the rest. Of course, if you want to see images that have already been rated, just turn on the Filter panel check boxes for other rating levels.
Tip
![]()
The Reject rating is useful as a safety valve. Instead of trashing unwanted images right away, mark them with the Reject rating. When you’re ready to trim down the number of images, set the Filter panel to show only rejects, review them to make sure you aren’t going to delete something you want to keep, and then trash them all at once.
From here on out, it’s pretty easy. Just press the keyboard shortcut for the star rating you want to apply to each image: Press Command (Mac) or Ctrl (Windows) together with a number key from 1 to 5. To remove the rating from selected images, press Command-0 (zero) (Mac) or Ctrl-0 (zero) (Windows). Those shortcuts apply a specific rating, but if you want to bump an image’s current rating up or down, press the Command/Ctrl key along with the comma key (,) to lower the rating by one star, or the period key (.) to raise the rating. It may make more sense to remember those two keys by their Shift meanings, the less-than sign (<) and greater-than sign (>), because that’s what they do to the rating. Don’t press Shift to apply them, though. To toggle one star on or off, press Command-’ (apostrophe) in Mac OS X or Ctrl-’ (apostrophe) in Windows. A slower but sometimes convenient alternative is to click and drag in the rating area of the thumbnail—dragging to the right increases the rating, and dragging to the left reduces it.
Don’t feel that you have to get all your ratings right the first time. You can always go back and adjust them. Some photographers prefer to rate shots all in one pass. Others use a multiple-pass method, applying one star first, then making another pass to add another star to the standouts, and repeating that until they find their four- or five-star images. It’s all up to you.
Tip
![]()
If thumbnails appear without label and rating information under them, check the View menu to make sure that the Show Thumbnail Only command is not checked.
Labels. While the stars are incremental, labels are not—they’re simply arbitrary markers. You can apply any of the first four labels by pressing the Command (Mac) or Ctrl (Windows) key together with a number key from 6 to 9 (see Figure 5-88). If you don’t want to have to press the Command or Ctrl key, open the Preferences dialog in Bridge, click Labels, and turn off Require the Command/Ctrl Key to Apply Labels and Ratings. You can also edit the label text in the Label preferences. Label text is searchable in Bridge.
Figure 5-88 Labeled images in the Filter and Content panels

Labels are less portable than ratings. Your labels will show up as white on any machine that uses a different label definition than yours, which is almost certain to happen if you use something other than the default label definitions (red, yellow, green, blue, and purple). They can always search for your label text, but it’s probably simpler to use keywords or ratings.
Tip
![]()
To move to another image in the Content view or Camera Raw filmstrip after you rate an image, press an arrow key.
Applying Labels with the Keyboard. Look on the Label menu to see the keyboard shortcuts for each label. Inside Camera Raw, the purple label can be toggled using Command-Shift-0 (Mac) or Ctrl-Shift-0 (Windows).
Applying Metadata and Keywords
The key to being efficient with metadata and keywords is the same as it is when applying Camera Raw edits: Select all of the images that need the same treatment, and deal with them all at once. Metadata includes the EXIF data saved into a photo by a camera, IPTC metadata such as captions and keywords, and labels and star ratings. To read more about metadata, see the sidebar “All About Metadata,” earlier in this chapter.
Applying Metadata
View and edit metadata in the Metadata panel (see Figure 5-89). Bridge and Photoshop give you access to several types of metadata, and not all of them can be edited directly. File Properties describe how the file was saved, so to change them you resave the file from Photoshop. EXIF data records the settings in use when an image was captured, such as shutter speed, so it can’t be altered by Bridge or Photoshop after the fact. You can edit other types of metadata, such as IPTC metadata. It’s easy to tell which metadata fields you can edit, because they’re marked by a pencil icon along the right side.
Figure 5-89 The Metadata panel (top) and Keywords panel (bottom)
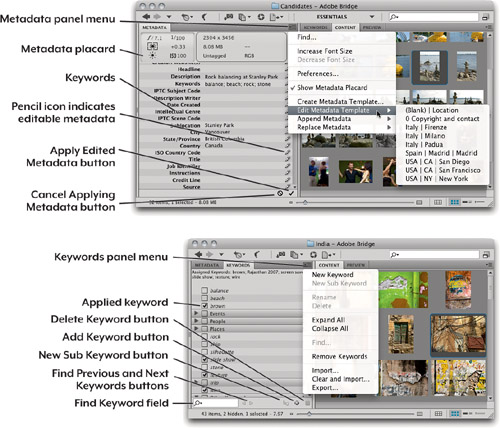
To enter metadata for one or more images selected in Bridge, click in an editable metadata field, enter the information, and press Tab to advance to the next field. When you’re done, click the check mark icon at the lower right of the panel to commit the entries, or press Alt-Return (Mac OS X) or Alt-Enter (Windows). Some metadata fields, such as Description, allow more than one line; in these fields you can enter a line break by pressing Return (Mac) or Enter (Windows), and that’s why you can’t use those keys to apply changes in multiline fields.
Tip
![]()
On Mac desktop keyboards, the main keyboard contains the Return key while the numeric keypad contains the Enter key. On Mac laptop keyboards, press Fn-Return to turn it into an Enter key. Windows keyboards have an Enter key only.
For recurring metadata, such as copyright notices, metadata templates provide a very convenient way to apply them quickly (see “Using Metadata Templates,” later in this chapter).
The Metadata and Keywords Panel Menus. The Metadata and Keywords panel menus (see Figure 5-89) provide commands for managing those panels. They also give you another way to start the Edit > Find command.
Editing the Metadata Panel List. In the Metadata panel menu, the Preferences command takes you directly to the Metadata panel of the Bridge preferences. It’s definitely worth taking the few minutes needed to decide which fields you want to display—very few Photoshop users need to see them all! The Show Metadata Placard option displays the section at the top of the Metadata panel that contains EXIF information (and resembles a camera LCD), and the section next to it contains file properties. The Metadata placard duplicates information already shown in the Camera Data EXIF and File Properties sections of the Metadata panel, but if you find the Metadata placard useful as a quick reference, you can leave the option on.
Tip
![]()
Trying to figure out where to enter a caption? It usually goes in the Description field.
One set of metadata you’ll notice in the Metadata preferences is the older IIM (Information Interchange Model) set. It’s there for compatibility with legacy images but has been superseded by the IPTC Core schema for XMP metadata. You can read more at www.iptc.org.
Applying Keywords
In the Keywords panel (see Figure 5-90), you can apply keywords to selected images by clicking the check boxes for the keywords you want to add. If the keyword isn’t in the list, click the New Keyword button to add it. Applying keywords to an image saves them with the IPTC metadata for that image.
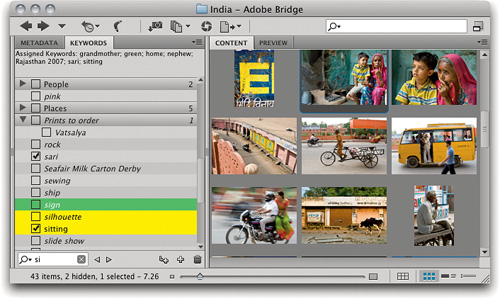
Figure 5-90 The results of searching for a keyword. Matches are highlighted; the keyword highlighted in green will be applied if you press Return or Enter.
Tip
![]()
When a keyword is highlighted in the list, you can apply or remove it by pressing the spacebar. But be careful—if a cursor is still blinking in the search field, the spacebar types a space.
Tip
![]()
In the Keywords panel search field, you can type multiple keywords separated by commas. This also works in the Keywords field in the Metadata panel.
I like to type keywords into the search field at the bottom of the Keywords panel because it has a type-ahead feature: To enter “airliner” in a keyword list that already contains many “air . . .” words, such as “airplane” and “aircraft,” you have to type in only “airl” and the Keywords panel will highlight that keyword for you. Now all you have to do is press Return or Enter to apply the selected keyword. Applying keywords by typing is especially convenient when the keyword list is very long, saving you the time and trouble of scrolling the list. Note that the search field in the Keywords panel searches for keywords in the keyword list, not in images.
If a keyword is highlighted in yellow, it’s an alternate match that you must select manually, either by turning on its check box with the mouse or pressing the up arrow and down arrow keys to highlight the keyword in gray and then pressing Return or Enter. If nothing’s highlighted, the keyword doesn’t exist yet, so simply press Return or Enter to apply the keyword and add it to the list of keywords. You can also move among highlighted alternates by clicking the Find Previous Keyword and Find Next Keyword buttons at the bottom of the Keywords panel, next to the search field.
Keeping Keywords Around. The Keywords panel doesn’t permanently list every keyword it finds—only the keywords used by the files in the current view (displayed in italics). The keywords you see that aren’t in italics are persistent keywords; they stick around no matter which images you’re viewing.
Deleting Keywords from the Keywords Panel and from Images. Deleting a keyword from the Keywords panel doesn’t delete the keyword from any images to which it has been applied; only from the panel. As long as a keyword is applied to an image, Bridge lists that keyword. To remove a keyword from a selected image, you must uncheck it in the Keywords panel. If you want to remove all keywords from an image, select the image and choose Remove Keywords from the Keywords panel menu (see Figure 5-89).
Tip
![]()
You can use the keyboard to turn off a selected keyword’s check box in the same way you turn it on: by pressing the Return or Enter key, or the spacebar.
Hierarchical Keywords. Bridge supports hierarchical keywords (see Figure 5-91). To create a sub-keyword (child keyword), click the New Sub Keyword button at the bottom of the Keywords panel. Click the triangle to the left of a parent keyword to expand and collapse the list of its sub-keywords.
Figure 5-91 Hierarchical keywords
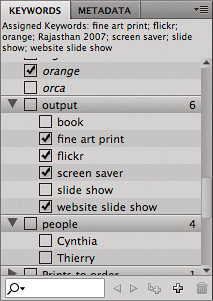
Clicking a parent keyword doesn’t apply all of the child keywords, and by default, clicking a sub-keyword doesn’t apply the parent keyword. If you want a parent keyword to be applied when you apply one of its child keywords, open Bridge preferences, click the Keywords panel, and turn on the Automatically Apply Parent Keywords option (see Figure 5-92). Applying a parent keyword doesn’t apply its child keywords by default. To apply both a child keyword and its parent, Shift-click the child keyword’s check box.
Figure 5-92 Keywords preferences
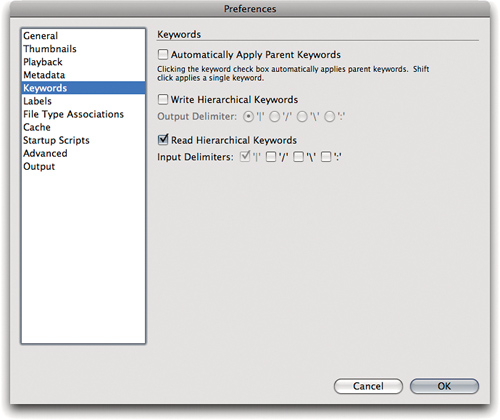
Bridge and Lightroom support hierarchical keywords, but other programs might not. If you send images to colleagues such as stock-photo agencies that might use other software, consult with them before using hierarchical keywords. You may be required to modify how your applications write those keywords into the image metadata. In the Keywords pane of the Bridge Preferences dialog, the options Write Hierarchical Keywords and Read Hierarchical Keywords determine whether keywords written to image metadata are written or read as a hierarchy or as a flat list of keywords. Both options let you customize the character Bridge uses to recognize keyword hierarchies when the character appears between keywords. Setting these options may become easier in the future if hierarchical keywords catch on and standards for handling them emerge.
Tip
![]()
You can temporarily reverse the behavior of the Keywords preference Automatically Apply Parent Keywords by Shift-clicking a sub-keyword’s check box. For example, if the preference is on, Shift-clicking a sub-keyword’s check box won’t apply the parent keyword.
Using Metadata Templates
Metadata templates go a long way toward making metadata entry less of a chore. A metadata template is simply a preset that contains any prefilled metadata you want. In addition to being faster than entering metadata by hand, you can also apply a metadata template as you import images from a camera (see “Copying Files from a Camera” earlier in this chapter) so that images already have your fundamental metadata as soon as they appear in Bridge.
Exchanging Metadata with Lightroom
Adobe works hard to ensure that you can exchange metadata and Camera Raw settings between Bridge CS5 and Adobe Photoshop Lightroom 3. Version numbers are important—as Adobe updates products their feature sets change, and one product may gain features that the other product doesn’t know about and can’t render or support. Watch your updates and read the ReadMe files to be aware of compatibility changes. As I write this, Camera Raw 6, Bridge CS5, and Lightroom 3 settings are completely compatible.
Even when the versions are compatible and the files are present, you’ve got two programs writing to the same files, and that can lead to synchronization problems. You sometimes have to be a traffic cop to make sure data goes where it’s supposed to. Here are the rules of the road:
Bridge to Lightroom. If you’re using DNG files, you’re OK because the settings are inside the files that Lightroom will be opening. For other file types, in the General pane of the Camera Raw Preferences dialog, the “Save image settings in” pop-up menu should be set to Sidecar .xmp Files. If it isn’t, after you edit images in Camera Raw you must choose Export Settings to XMP from the Camera Raw Settings menu to create the sidecar files. (You don’t want to choose Camera Raw Database, because Lightroom doesn’t read it.)
Tip
![]()
After making edits in Bridge and Camera Raw, you can update file metadata in Lightroom using its folder synchronization feature. In the Lightroom Library module, choose Library > Synchronize Folder, make sure Scan for Metadata Updates is checked, and click Synchronize.
If you’re in Lightroom and for some reason you don’t see changes you made in Bridge, select the out-of-date images in the Library module and choose Metadata > Read Metadata from File.
Lightroom to Bridge. In Lightroom, you may want to choose File > Catalog Settings and turn on Automatically Write Changes into XMP so that you don’t have to do it manually. The reason I say you may want to choose it is because that option can cause a lot of CPU and disk activity in the background as Lightroom checks and updates every image in your catalog. If that option is off, select the images in the Library module in Lightroom and choose Metadata > Save Metadata to File. That updates the metadata so that Bridge will now see current data.
You might see your Lightroom changes the next time you view that folder in the Content panel in Bridge. If you don’t see the changes in Bridge, press F5 (the shortcut for View > Refresh). If that doesn’t do it, try purging that folder’s cache (choose Tools > Cache > Purge Cache for Folder).
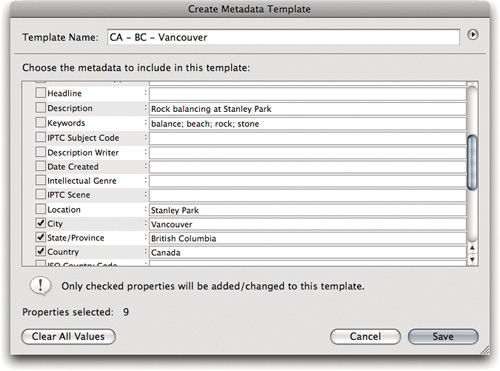
Use the Create Metadata Template dialog (see Figure 5-93) to make a new metadata template. As with all metadata commands, you can find this command under the Tools menu (choose Tools > Create Metadata Template), or you may find it easier to click the Metadata panel menu and choose the command there (see Figure 5-89). Now you can create your template.
1. To use an existing template as a starting point, choose it from the pop-up menu at the top-right corner of the dialog.
Tip
![]()
When creating a metadata template, always verify your spelling. You don’t want an error to creep into the hundreds of images that may be altered by a metadata template!
2. Enter a Template Name, and fill out any metadata fields that you want to include in the template.
3. Make sure you turn on the check box to the left of any field you want to include in the template. To force a field to be blank, leave it blank and check its check box. Unchecked fields don’t affect existing data.
4. Click Save.
Figure 5-93 The Create Metadata Template dialog
To edit a metadata template, choose its name from the Edit Metadata Template submenu (the same menu as the Create Metadata Template command).
To apply a metadata template, select the images you want to change. Then choose the name of the template from the Append Metadata or Replace Metadata submenu, accessed from the same menu as the Create Metadata Template command. The difference between Append Metadata and Replace Metadata requires a little explanation.
Append Metadata. The data in a metadata template field (such as City) is applied to the image only if the same field in the image is empty. If there’s already data in that field in the image, the template data for that field isn’t applied to the image, which keeps the existing data for that field.
Replace Metadata. The data in a metadata template field always replaces the data in the same field in an image.
Append Metadata and Replace Metadata change image metadata only for the fields for which the check box is on. If a field’s check box is off in a metadata template, neither Append nor Replace will change that field.
Looking at Metadata with File Info
The File Info dialog (see Figure 5-94) is another way of viewing metadata of files selected in Bridge. It’s a relatively inefficient way to apply keywords and other metadata when compared to the Metadata and Keywords panels, but it’s still useful for taking image-specific keywords that you don’t want to save in a keyword set and adding them to small numbers of images and for examining metadata in something close to raw form. For example, in File Info you can see exactly how the camera encodes things like shutter speed and aperture value by looking in the Advanced pane.
Figure 5-94 The File Info dialog
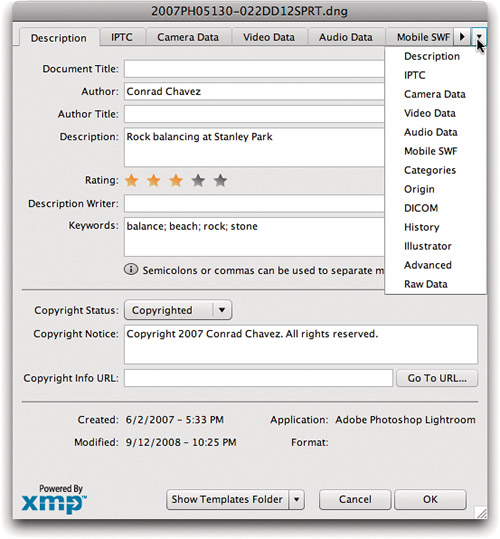
In Bridge CS5 and Photoshop CS5, you can rearrange the tabs in File Info by dragging them around. As of Photoshop CS4, File Info is now based on Adobe Flash and Adobe Flex technologies, which means that Flash/Flex developers can add their own customized metadata panels for media types that aren’t already supported. As a side effect, you can speed up File Info loading by removing some of the modules it uses; in Mac OS X go to LibraryApplication SupportAdobeXMPCustom File Info Panels2.0panels, and in Windows go to C:Program FilesCommon FilesAdobeXMPCustom File Info Panels2.0panels.
Tip
![]()
To go to the next or previous tab in File Info, press the left arrow or right arrow key. If the tab list is still too wide to see them all, you can resize the window or click the pop-up menu in the top-right corner, where all of the tabs are listed, and choose the tab you want to see.
You can choose an existing metadata template from the pop-up menu next to the OK button at the bottom of the File Info dialog. To create a metadata template using the current File Info metadata, choose Export from that pop-up menu; to apply a metadata template, choose Import. In that pop-up menu, Show Templates Folder takes you straight to the Adobe default Metadata Templates folder on your disk.
Finding and Filtering Files
When you’re looking for a file in Bridge, don’t think only of the Find command. Bridge provides several approaches to finding files:
• To do a quick search, use the Find field at the top-right corner of the Bridge window. To enter more specific criteria, choose Edit > Find.
• To quickly find files based on criteria in the files’ metadata, use the Filter panel. If the criteria you want aren’t there, choose Edit > Find.
• To save a search so that you can return to it at any time, create a Smart Collection based on your search criteria.
Indexing. The first time you do a Bridge search, it may take longer than usual as Bridge creates and caches an index of the content within the scope that you specified, such as a folder and its subfolders. The Find dialog lets you skip folders that haven’t been indexed. You might want to leave this option deselected because there’s no way to tell which folders have been indexed. The point is, searches should go faster as time goes on.
The Find Field
In the Find field at the top-right corner of a Bridge window (see Figure 5-95), enter a search term, including metadata, and press Return or Enter. The Find field can search using either the index generated by Bridge or the index generated by Spotlight (Mac) or Windows Search (Windows). You make this choice by clicking the magnifying glass icon in the Find field. This not only potentially speeds searches but should make it easier for you to use Bridge to look for any type of file, reducing the need to leave Bridge for your desktop just to use your operating system’s search feature.
Figure 5-95 The Find field and its menu

Tip
![]()
(Windows only) If you don’t see Windows Search options in the Find field, you can download the installer from www.microsoft.com/windows/products/winfamily/desktopsearch/
The Find Command
The Find command lets you perform searches using a wide range of search criteria (see Figure 5-96), including a handy selection of metadata fields such as ISO (speed). To use it, choose Edit > Find or press Command-F (Mac OS X) or Ctrl-F (Windows).

The Find dialog also provides the following important features:
• The Match menu lets you choose whether to find files if any criterion is met (equivalent to an “or” between the criteria) or to find files only if all criteria are met (equivalent to an “and” between the criteria).
• Include All Subfolders does what it says—it extends the search to include any subfolders in the folder specified in the “Look in” menu.
• Include Non-indexed Files looks at files that have not yet been added to the Bridge cache. Turning this option on may add time to the search, because nonindexed files need to be indexed.
Save as Collection. When you perform a search, you have the option to save the search criteria as a collection. When you click the Save as Collection button, you can save the search results in any folder you want, and optionally add it to your Bridge Favorites. When you open a collection, the saved search runs and the current results appear. To refine the search, click Search Again; the Find dialog appears so you can edit the criteria.
Tip
![]()
To return to the window view before returning search results, choose it from the Recent Folders menu. Or you can choose File > New Window and perform the search in that window.
Smart Collections
A Smart Collection is really a saved search (or like a saved version of the Filter panel). If you’ve used this type of feature in programs like Apple iTunes, you already know the concept and how much time it can save. You don’t have to put anything into a Smart Collection, because it fills itself with any item matching the criteria you’ve specified and keeps itself up to date, automatically adding files as they match the criteria, or removing them when they no longer match the criteria. For example, you could have a Smart Collection that lists only files for which the Copyright Notice metadata is empty, so that you can fill it in; as you fill in those images, they stop appearing in the Smart Collection. You could also keep a Smart Collection of all your five-star images or images rated greater than three stars.
To create a Smart Collection, in the Collections panel click the New Smart Collection button (see Figure 5-97), specify options (see “The Find Command,” earlier), and click Save.
Figure 5-97 Smart Collections appear in the Collections panel as blue icons with gears.

Filtering the Current View
The Filter panel (see Figure 5-98) lists some of the more useful metadata found in images in the Content panel, such as creation dates, file types, ratings, labels, and keywords so you can quickly show subsets of images. For example, if you want to see only the images in the Content panel that have no keywords, just click to add a check mark to the left of No Keywords in the Filter panel. In the Filter panel menu you can control which categories are visible in the panel.

If your filtering needs are simple, try the Filter menu on the Path bar. Click the star button on the Path bar and choose the filter you want from the menu; this modifies the Filter panel settings to match, and the star on the Path bar turns blue. However, it doesn’t necessarily work in reverse; if you choose Filter panel settings that don’t match up with any of the Filter menu options, the star won’t turn blue, even though a filter is active. You can still use the Filter menu on the Path bar to ensure that no filters are active because the first option on that menu is Clear Filter (press Command-Option-A in Mac OS X or press Ctrl-Alt-A in Windows).
Presenting Your Photos
Whether you’re showing images to a client or reviewing what you’ve shot, Bridge provides several ways to make your image library more presentable than it is in the Content or Preview panel. Some viewing modes were covered in detail in “Evaluating and Comparing Images” earlier in this chapter.
Slideshow. Choose View > Slideshow to present selected images as a slideshow; you can also enter the slideshow by pressing Command-L (Mac) or Ctrl-L (Windows). While you’re in the slideshow, you can rate, rotate, and zoom the image while enjoying the benefits of a large image preview. Press H (with no modifier) to display all the keyboard shortcuts that apply in the slideshow (see Figure 5-99).
Figure 5-99 A full-screen slideshow with the Slideshow Commands help screen (press H while in the slideshow) and the Slideshow Options dialog (press L in the slideshow)
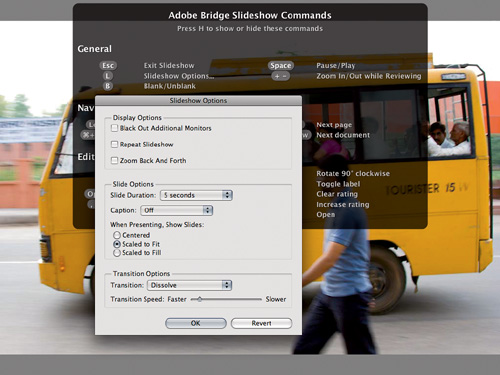
Choose View > Slideshow Options to adjust how the slideshow displays, such as how the image fits on the screen and whether to display its caption. It’s easier to use the Slideshow Options dialog (see Figure 5-93) while the slideshow is running (in the slideshow, press L) because you will see the effects of your changes interactively.
Full Screen Preview. If you want full-screen display but don’t need the features of a self-running slideshow (such as transitions), choose View > Full Screen Preview. Full Screen Preview can be better if you need to switch frequently between it and the Bridge window, because it opens and closes faster than the Slideshow—just press the spacebar.
Tip
![]()
To zoom in the slideshow, press the − (minus) or + (plus) key. To toggle between the current view and 100 percent (Actual Pixels) magnification, click the image. At magnifications above 100 percent, drag to pan the image.
Review Mode. To see multiple images in a full-screen display, select them and choose View > Review Mode (see “Evaluating and Comparing Images” earlier in this chapter).
Preview Panel. If you want to see images larger than you can in the Content panel while being able to continue to work in other panels, you might prefer the Preview panel (see “Evaluating and Comparing Images” earlier in this chapter) instead of a full-screen view. The Preview panel is especially useful when placed in a second synchronized window on another monitor. To do this, choose Window > New Synchronized Window, move the new window to another monitor, and fill it with just the Preview panel. As you select images in the Content panel in the first Bridge window, they’ll fill the Preview panel in the second window.
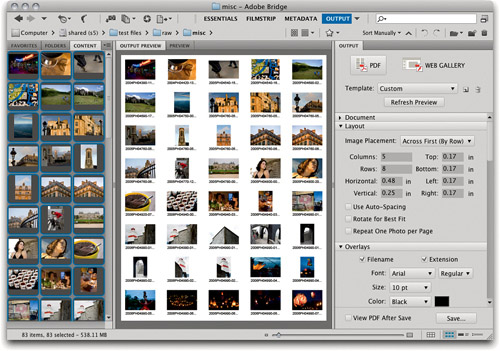
PDF Contact Sheets. In Bridge CS5 and Photoshop CS5 you generate contact sheets from the Output panel in Bridge. To display the Output panel, click Output in the workspace strip at the top of a Bridge window. It’s important to note that changes don’t appear in real time; you must click Refresh Preview to update the Output Preview panel (or to make the Output Preview panel appear if it isn’t already there), and no file is generated until you click Save at the bottom of the Output panel.
Tip
![]()
If you preferred the old Contact Sheet, Picture Package, and Web Photo Gallery plug-ins for Photoshop, they are unsupported since their functions were moved to the Output panel. However, they’re still available on the Adobe Web site. Go to www.adobe.com/support/photoshop, click Get Updates (for your platform), and look in the list for Optional Plug-ins.
Start by clicking PDF and choosing a template on which to base your design (see Figure 5-100), then work your way down the panes in the Output panel. The options are easier to understand if you’ve created documents using Adobe Acrobat, because most of them map directly to standard PDF options. I go over the options that need the most explanation below.
• Document pane. Choosing a Page Preset sets the Size, Width, Height, and orientation of the page for your contact sheet. Quality controls the compression level of the images you include in the PDF. Setting the Open password will cause a PDF reader to ask for a password when the PDF document is opened, while setting the Permissions Password affects whether the PDF reader lets the recipient edit the document.
• Layout. Specify the rows and columns of the contact sheet itself. Rotate for Best Fit means that, for example, if your contact sheet cells are tall but an image is wide, the wide image will be rotated 90 degrees to make the best use of the cell space.
Tip
![]()
To use specific images in a slideshow, client presentation, or Web gallery and control their sequence, arrange the images in advance using a collection.
• Overlays. Add filenames, filename extensions, and page numbers.
• Playback. Control automatic playback in a PDF reader, based on the playback options you’d find in Acrobat; for example, for a PDF slideshow.
• Watermark. Add a watermark at the center of the page or over each image. You can enter text or use a watermark image you’ve already got.
Figure 5-100 The Output panel for PDF in the right pane, and the Output Preview panel simulating output in the middle pane
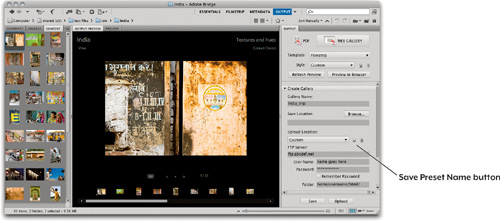
Web Galleries. Click Web Gallery and choose a template on which to base your design (see Figure 5-101). Most of the templates are based on Adobe Flash; if you prefer HTML, choose the HTML Gallery template. Finally, work your way down the panes in the Output panel to set the options below:
• Site Info. Enter the information you’d like to display on the Web pages.
Tip
![]()
Trying to use your mouse’s scroll wheel in the Output panel? If it doesn’t work, position the mouse over the scroll bar and then try the scroll wheel.
• Color Palette. Change colors if you want them to vary from the template.
• Appearance. Specify presentation options for the Web gallery.
• Create Gallery. Set options for the gallery files you save. These options don’t affect the visible content of the Web gallery pages in your browser; they set the names of the paths, folders, and files you export.
To keep the Web gallery on your machine, first click Browse to set the folder location on disk, then click Save at the bottom of the panel.
Tip
![]()
You can zoom the Output Preview panel. Click to zoom in, and Option-click (Mac OS X) or Alt-click (Windows) to zoom out.
To send the Web gallery to your Web site using FTP, fill out the server options and then click Upload. The Gallery Name is actually the name of the folder to be created on the FTP server, so enter a server-friendly name (for example, no spaces or punctuation). In the Folder field, enter the path to the gallery on the server—but be sure to leave out the FTP server domain name and the gallery name, because they have their own fields. Right below the Upload button is a pop-up menu and two buttons; these control FTP presets. To add the current settings to the preset pop-up menu, click the Save Preset Name button. To delete the preset currently selected in the menu, click the trash can icon.
Figure 5-101 The Output panel for Web in the right pane, and the Output Preview panel simulating the Web site in the middle pane
Output Panel Preferences. If you use the Output panel, you may want to customize its settings. In the Bridge Preferences dialog, click Output and adjust the following options as needed:
• Use Solo Mode for Output Panel Behavior. By default this option is off, which means you can freely open or close any of the panes in the Output panel. If you turn this option on, opening a pane closes the pane that was previously open so that you see only one pane at a time. The advantage of this mode is that the other pane names remain visible more often, so you don’t have to scroll as much.
Tip
![]()
When you use an automated Web gallery generator, remember to feed it images that are already sharpened and color-corrected for the Web. For example, if you work in Adobe RGB (1998) or ProPhoto RGB, and you forget to convert the images to sRGB color, their colors look flat on the Web.
• Convert Multi-Byte Filenames to Full ASCII. If you’re uploading the output to a server that doesn’t deal well with multibyte filenames (for example, one using accents), this option lets you work with that server.
Tip
![]()
Another shortcut to the Output panel is to click the Output button (not the Output Workspace button) at the top of a Bridge window; see Figure 5-71.
• Preserve Embedded Color Profile. By default this option is off, which means the Output panel converts all images to sRGB. For most Web galleries and common PDF presentations, this is fine. But if your originals have embedded profiles other than sRGB profiles and you don’t want the Output panel to convert them to sRGB, turn this option on.
Saving Template Styles. You can save Output panel settings for later use by clicking the Save Style button next to the Style pop-up menu. Each style is available only when its parent template is selected; for example, if you saved a style based on the Left Filmstrip Web Gallery template you’ll have to choose Left Filmstrip before you see your style listed.
Exporting to Online Albums and Folders on Disk
The Export panel (see Figure 5-102) is new in Bridge CS5. It generates JPEG images from any content in Bridge (including previews of non-image files). While that seems kind of bland on the surface, you may be one of the many people who export JPEG images regularly to the same destinations, such as Flickr and Facebook. The Export panel can greatly streamline this process by integrating the ability to log in to online image services and upload your images directly. Each of the Export panel modules share similar options:
Note
![]()
If you don’t see the Export panel, in Bridge choose Help > Updates to make sure you’ve got the latest version of Bridge CS5. The Export panel appeared in Bridge CS5 4.0.1.
Saving Your Own Export Presets. When you first use any module, double-click it to create a new named preset that will save all of your settings for the next time you want to export the same way; for example, to the same Facebook account. You name a preset at the bottom of the Add Preset dialog that appears after you double-click a module (see Figure 5-103).
Tip
![]()
You can make multiple instances of any Export panel module. For example, you can have five Facebook presets that update different albums, or two Flickr presets that update the same album but with different image or metadata settings.
Destination Tab. For online services, you might first be asked to log in to your account on that service. Once logged in, you may see options such as a list of your online albums to which you can upload new images, and other options your online service may provide, such as privacy controls.
Image Options Tab. Here you’ll find settings about the images themselves, such as resizing, compression quality, and metadata you want to include (see Figure 5-103). The Constrain to Fit option keeps the long side of the image within the value you specify. The Resample Methods are the same as the ones explained in Chapter 2.
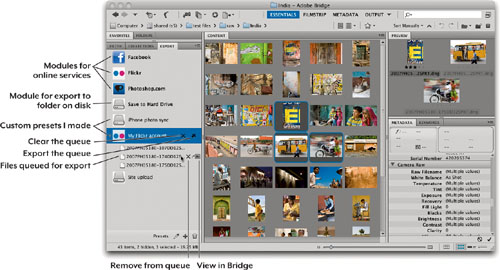
Figure 5-103 Destination options and Image options

Save to Hard Drive Module. Use this module when all you need is a bunch of JPEG images in a folder. For example, I made a Save to Hard Drive-based preset that exports images to a folder, and I set up iTunes to sync that folder to the Photos app on my iPhone. You can use this module to set up images for online services that don’t have an Export Panel module yet; after exporting you upload the files yourself from the destination folder.
Once you’ve got your preset set up, drag and drop images onto your preset in the Export panel. At that point, the images are queued and new icons appear with your preset so that you can view the queued files, cancel the job, or proceed with the export. Click the Export My Preset Job button to finish.
One Little Gotcha. The Export panel doesn’t provide any output sharpening, which I find to be a disappointing omission. The closest you can get is choosing the Bicubic Sharper Resample Method in the Image Options tab and always starting with images that are larger than the Constrain to Fit size. If that doesn’t do it for you, try the Image Processor or a custom Photoshop action, or you can export JPEGs from Adobe Camera Raw, which has output sharpening in its Output Options dialog.
The Image Processor
The Output and Export panels are newer, more task-oriented ways to generate specific kinds of batch output. For more general bulk output tasks, you may prefer using the Image Processor included with Photoshop. For example, the Image Processor can output TIFF and PSD files and run a Photoshop action as a last step.
You can open Image Processor in Bridge by choosing Tools > Photoshop > Image Processor (in Photoshop, choose File > Scripts > Image Processor). The Image Processor dialog (see Figure 5-104) presents a simple four-step process for resizing, converting, and saving a set of images in up to three different formats at once.
Figure 5-104 The Image Processor dialog
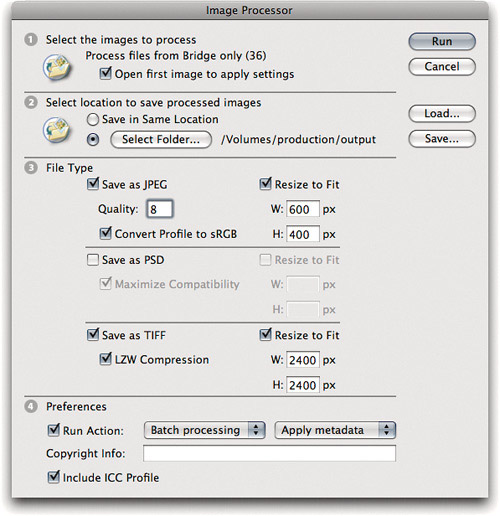
Image Processor is an easy way to do certain common tasks, but as you think of more advanced tasks that you could automate you’ll find yourself hitting its limitations. For example, the only color conversion you can do is to sRGB, and only for JPEGs. The Image Processor is great for jobs like a quick batch of JPEGs for a Web site, but a lot of production tasks can be accomplished only by batch actions.
About Automating with Actions
Even as Photoshop and Bridge have added more ways to process and export images automatically, features such as the Output panel and the Image Processor can’t handle every situation. For specialized tasks that you need to repeat frequently or apply to large batches of images, Photoshop has the Batch command, which lets you apply any action to entire folders of images. I’ve provided important tips about the Batch command as a bonus section that you can download online from www.peachpit.com/realworldphotoshopcs5.
Using Mini Bridge
Have you been using Photoshop long enough to remember the File Browser in Photoshop 7? It was a window that let you locate and open images from your hard drive—the precursor to Bridge. A lot of users miss File Browser; since it was part of Photoshop you didn’t have to switch to a different program like Bridge just to bring in some images. Mini Bridge brings back the File Browser idea, but in a more convenient form. Full Bridge is for culling, comparing, rating, and organizing images, and for entering keywords and other metadata; Mini Bridge is for locating and opening files from inside Photoshop or the other CS5 programs that use it.
Launching Mini Bridge. Open Mini Bridge by clicking the Mini Bridge icon in the Application bar (see Figure 5-105). If the Application bar (Window > Application Bar) is hidden, choosing Window > Extensions > Mini Bridge also opens the panel.
Figure 5-105 The Mini Bridge icon is the one labeled Mb.
![]()
Tip
![]()
If you’re looking at a folder in Bridge and you want to see the same folder in Mini Bridge, click Recent Folders in the Navigation pane in Mini Bridge and select the name of the folder you were viewing in Bridge.
When you open Mini Bridge (see Figure 5-106), Adobe Bridge starts up in the background, so Mini Bridge doesn’t use less RAM than Bridge. It just gives you easy access to Bridge features from inside Photoshop.
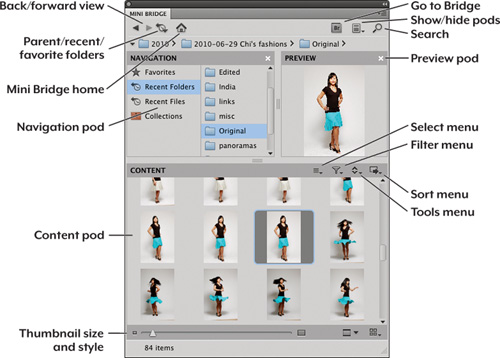
The Mini Bridge Panel. At the top of the default Mini Bridge view are a toolbar and a Path bar that are similar to those in Bridge. Use the Navigation pane to select a folder; whatever’s inside the folder is displayed in the Content pod. As in Bridge, you can open a Content panel item in Photoshop by double-clicking it or by selecting it and pressing Enter/Return. The icons across the top of the Content panel let you sort and filter the contents; icons across the bottom control content display. You’ve seen these controls before in Bridge, earlier in this chapter.
When you resize Mini Bridge, making it horizontal puts the Navigation panel on the left and the Content panel on the right. Because Mini Bridge is a panel, you can dock it to the bottom or side of your workspace.
Tip
![]()
If you’re keyboard oriented like I am, pay attention to the blue focus border in Mini Bridge. It highlights the panel that can be navigated with the keyboard. Press Option-Tab (Mac) or Alt-Tab (Windows) to switch focus among panes.
The Tools Menu. The Tools menu, at the top-right corner of the Content pod, brings key file-management commands over from Bridge. There’s a Place command for opening the selected Mini Bridge item as a Smart Object in Photoshop, and there’s the Photoshop menu, which contains powerful batch-processing commands such as Batch, Merge to HDR Pro, and Photomerge.