Chapter 12. Scripting
Most of the time, we tell a program (an application, a plug-in, or our system software) what to do by manipulating the program’s user interface—we click, drag, and type. Scripting is a way of telling a program to perform the same tasks and accomplish the same things. The difference is that, with scripting, we don’t have to click the buttons, type the characters, or choose the menu items. The script does it for you. Scripting is what computing is supposed to be about: having your computer take over boring, repetitive tasks so that you can spend more time playing World of Warcraft. Er, we mean, concentrating on your creative work.
Scripting also gives you the ability to add the features you need to InDesign now, rather than waiting for Adobe to give them to you. Even better than that, scripting gives you a way to customize InDesign to match your publications and habits to a degree that Adobe is never going to provide.
We’re convinced that the reason many people have not taken up scripting is that they’re scared. They think scripting is difficult, and is only for people with advanced computer science degrees. And they tell themselves that they’re too “intuitive” and “artistic” to master the minimal analytical skills required to write a script.
Be Not Afraid
You do not need to know how to write scripts to be able to run scripts. This is a misunderstanding that prevents many people from even trying scripting, even though existing scripts might save them enormous amounts of time and trouble.
Even if you don’t want to write scripts, or know anything about how they’re written, you can use scripts. For that matter, chances are quite good that you know someone who is interested in writing scripts for you, and would be willing to do so for the occasional expression of admiration (or beer).
Installing Scripts
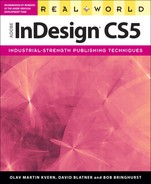
All you need to know is how to install scripts—and that’s very simple: just put the script in the Scripts Panel folder in the Scripts folder inside your InDesign folder. When you do this, the script will appear in the Scripts panel in InDesign.
Here’s a tip for finding the Scripts panel folder. Open the Scripts panel, select a folder such as User, and then choose Reveal in Finder or Reveal in Explorer. That’s where you keep your scripts.
That’s pretty simple, right? If not, we’re not certain you should be using a computer at all (or driving a car, for that matter).
Running a Script
To run a script, double-click the script name in the Scripts panel. There are a few other options, as discussed in “Using the Scripts Panel and the Script Label Panel,” later in this chapter. Many scripts will display a dialog box (or other user interface item).
Writing Scripts: How Hard Could It Be?
Next, we encourage everyone to consider learning to write scripts.
Ole says: “Look. I’m practically a high school dropout, and my background is in illustration, not computer science. I have never taken a single class on programming. As a rebellious teenager I did my best to ignore the sciences and to panic at the sight of even simple equations (in psychoanalytical terms this makes sense: my father was a high school algebra teacher).
“I got over it. These days, I write scripts. You can, too.”
System Requirements
What do you need to write and run scripts for InDesign? The following things:
• The InDesign scripting documentation and sample scripts.
• A good understanding of the way InDesign works.
• The standard scripting system for your computer (if you plan to use the platform-specific scripting languages rather than JavaScript). You probably already have this.
• Confidence.
It also helps to have a repetitive task that you wish you would never have to do again. This is not required, but it helps.
JavaScript
InDesign supports an Adobe version of JavaScript called ExtendScript. ExtendScript complies with the ECMA JavaScript 1.5 standard, and adds a few features to make it more useful for scripting a desktop application (as opposed to a web browser).
InDesign JavaScripts are cross-platform—they run in both the Windows and Mac OS versions of InDesign. There are a few minor differences between platforms—but they’re limited to the way that the scripts work with files and the operating system (as you’d expect).
If JavaScript is cross-platform, why does Adobe bother supporting the platform-specific languages? First, because scripters might prefer those languages. Adobe’s goal should be to increase the number of languages that can be used, not to limit them. Next, because InDesign’s JavaScript does not know how to communicate with other applications on your system (such as FileMaker or Access); the platform-specific languages do that very well.
Luckily, we can use both, and we can tie the platform-specific and platform-independent languages together with InDesign’s “do script” method, which lets scripts run other scripts. A JavaScript, for example, can run an AppleScript, or a VBScript can run a JavaScript.
Note: Some InDesign JavaScripts have the file extension “.js”, which is the standard extension for JScripts in Windows, they will not work if run from the operating system (at best, you’ll get an error message). Instead, run these scripts using InDesign’s Scripts panel. Try to get in the habit of using the “.jsx” extension, rather than “.js”.
Mac OS
On the Mac OS, all you need is AppleScript. You almost certainly already have it installed, but in case you don’t, it comes on the Mac installation CD. If you can’t find your installation CD, you can download AppleScript directly from Apple (http://www.apple.com). What’s the easiest way to tell if it’s installed? Search for a file named “Script Editor” (this is the application you use to write and run AppleScripts). If you can’t find it, you’ll have to install it from the Mac OS X installation CD.
Alternative script editors are available—if you’re planning to do serious AppleScript development, we strongly recommend Script Debugger, from Late Night Software (http://www.latenightsw.com). Script Debugger is an astonishingly good piece of software, well worth its purchase price. And no, we are not paid to say this.
InDesign can run uncompiled AppleScripts—script files saved as text. To use an uncompiled AppleScript, save the file with the file extension “.applescript” (or “.as”) in the Scripts Panel folder inside the Scripts folder in your InDesign folder, and then run the script from the Scripts panel.
Windows
On the Windows side, you’ve got a number of options. There are (at least) three different scripting systems claiming to be the system standard: Visual Basic Script (VBScript), Visual Basic for Applications (VBA), and various forms of Visual Basic (VB)—including Visual Basic 6, Visual Basic .NET, and Visual Basic 5 Control Creation Edition (VB5 CCE). They’re all from Microsoft, and they’re all variants of the Basic programming language. Almost all of them work.
Our Recommendation: Use VBScript. To write a VBScript, all you need is a text editor. Notepad does the job quite handily. You don’t need anything to run a VBScript—you can run them from Explorer or from InDesign’s Scripts panel. If you run them from InDesign’s Scripts panel, though, they’ll run much faster.
Using VBScript makes distributing and deploying your scripts easier, too. Since they’re just text, they’re easy to post on web pages or send to other people.
The InDesign sample scripts are provided in VBScript, so you’ll have a lot of code to work with that won’t require much translation (as it would if you were to try to use them in VB.NET, for example).
Our Further Recommendation: Use VBA to develop VBScripts. Troubleshooting (debugging) VBScripts can be difficult. All you can do is run the script and then note any error messages that appear—and they’re not particularly useful. What you need is a real programming environment, where you can step through the lines of your script one by one, as you can when you use Visual Basic.
Visual Basic for Applications, the version of Visual Basic that’s built into most Microsoft Office applications, works quite well for developing VBScripts for InDesign. Chances are pretty good that you’ve already got an Office application.
VBA works very well for developing VBScripts for use in InDesign. You can write your VBScript in VBA, making certain that you don’t use part of Visual Basic that does not exist in VBScript; debug the script, and then, when everything works the way you want it to, copy the contents of the subroutine to a text editor and save it as a VBScript (.vbs) file. We’ll talk more about this later in the chapter.
Other Scripting Languages
We know of InDesign scripters who are using C#, C, C++, Perl, Python, JScript, OSA JavaScript, Delphi, and other languages to drive InDesign. If your favorite programming language can connect to the platform standard means of passing messages between applications (that’s OSA/AppleEvents on the Mac OS and DDE/COM in Windows), it can probably communicate with InDesign.
We’re not going to spend any time on those languages, however, because, frankly, we have more than enough to do explaining VBScript, AppleScript, and JavaScript. Forgive us.
Learning About InDesign Scripting
Once you’ve gathered and installed the software you need to start scripting, you need to learn about how InDesign implements scripting. You’re in luck—you’ll find the scripting documentation, sample scripts, on the InDesign scripting home page:
http://www.adobe.com/products/indesign/scripting/index.html
Once you’re there, you’ll need to click the Scripting Resources tab to display the scripting-specific goodies.
The Adobe InDesign CS5 Scripting Tutorial is a PDF that contains an introduction to scripting, and basic tutorials (including introductory scripts). The Adobe InDesign CS5 Scripting Guide comes in three flavors: AppleScript, JavaScript, and Visual Basic. Pick the one that matches the language you want to work with.
In addition, the InDesign scripting forum is at:
http://forums.adobe.com/community/indesign/indesign_scripting
The forum is a great source of scripting information—it’s the center of the InDesign scripting community. The forum is the place to find example scripts (literally hundreds of them), ask questions, and generally hang out with other scripters. Do not be afraid to ask “newbie” questions—we’ve all been there!
Example Scripts
You’ll find a number of sample scripts in the Scripts Panel folder inside the Scripts folder in your InDesign folder (you can also see them in the Scripts panel). Even if you don’t intend to write scripts of your own, you might find something useful in the sample scripts. Note that the InDesign scripting home page mentioned above also contains a downloadable archive of these scripts.
• AddGuides. Draws guides around the currently selected object or objects. This script shows you how to get positioning information back from InDesign, and how to create ruler guides.
• AddPoints. Adds points to a path: each point is added at the midpoint of each line segment in a path. This script demonstrates simple Bezier math and path and point manipulations.
• AdjustLayout. Moves the page items of even/odd pages by specified distances. Use this script to move objects back into the correct position after adding pages or applying master pages.
• AlignToPage. How many times have you wanted to position an object in the center of the page? This script does that, and many other page alignments—including the ability to align the objects relative to the page margins.
• AnimationEncyclopedia. Creates a new document with a number of different buttons and animated objects. Use the Preview panel to see the animated objects in action.
• BreakFrame. Removes the selected text frame and its contents from the story. This feature has been frequently requested by PageMaker users. Doesn’t really work when tables span multiple text frames.
• CornerEffects. Ever want to round one or two corners of a rectangle, while leaving the other corners square? If you have, then this script is for you. The script redraws the path and applies a corner effect to a pattern of corners you specify.
• CreateCharacterStyle. When you create a character style in InDesign by basing the style on the selected text, InDesign records only those attributes that differ from the default formatting of the surrounding text. While this is a powerful and flexible way of working with character styles, it’s also different from the way that other applications (such as QuarkXPress and FrameMaker) work. In those applications, character styles apply every formatting attribute. The CreateCharacterStyle script creates a new character style based on the selected text and defines every formatting attribute.
• CropMarks. Draws crop and registration marks around the selected object or objects. Like AddGuides, this script shows how to create new objects around existing objects.
• ExportAllStories. Exports all of the stories in a document to a specified folder using the file format of your choice (RTF, tagged text, or text only). Shows how to traverse all stories in a document and how to export text.
• FindChangeByList. Runs a sequence of find/change operations on the selected text. The find/change parameters are stored in a tab-delimited text file (it should be in a folder named FindChangeSupport inside the same folder as the sample script). By default, these searches cover the standard stuff: changing double spaces to single spaces, changing double returns to single returns, changing double dashes to em dashes, and so on—but you can add your own favorite searches to the text file (including the ability to find/change formatting). You’ll find instructions at the beginning of the script, and in the corresponding find/change file.
• ImageCatalog. Places all of the graphics in a folder in a grid in an InDesign document.
• MakeGrid. Splits the selected frame into a grid of frames. If the frame contains content, the script can duplicate the frame.
• Neon. Creates a simple “glow” effect by duplicating the selected path or paths. Each copy of the path is slightly smaller than the original, and slightly lighter. The final duplicate path is a white hairline. The resulting group of paths is something like an Illustrator blend.
• PathEffects. This script includes the ever-popular Illustrator, path effects “Bloat” and “Punk,” as well as a few others. If you want to learn about scripting InDesign paths, path points, control handles, and Bezier math, this is a good place to start.
• PlaceMultipagePDF. InDesign can place all of the pages in a multi-page PDF, but it’s a manual process—you have to click the place icon for each PDF page you want to place. This script places all of the pages of a PDF on sequential pages, placing one PDF page per page, adding pages to the document if necessary as it does so.
• SelectObjects. Selects all of the objects on a spread that belong to a specific object type (or set of types). This script is only slightly useful by itself, but it shows you how to traverse the objects on a spread to find objects based on their type or content. It’s a great starting point for any graphic “search and replace” operation.
• SortParagraphs. Alphabetically sorts the paragraphs in the selection. Shows how to sort text using a simple “bubble sort” algorithm, and how to move text in an InDesign story.
• SplitStory. Converts each text frame in the selected story to an independent text frame (story), retaining the content in the frames. Doesn’t really work when tables span multiple text frames.
• TabUtilities. This script automates two tasks: setting a right tab stop at the right margin of a paragraph, and setting a left tab at the current cursor position.
InDesign Scripting Philosophy
When you launch InDesign, you’re probably aware that you’re not really launching a single program—you probably know that you’re starting a plug-in manager and several hundred plug-ins.
What you probably don’t know is that each plug-in is responsible for its own scripting support, and that InDesign’s scripting object model—the library of objects and the properties and methods of those objects that make scripting work—is created anew each time you change your plug-in configuration.
In other applications that support scripting, the developers try to determine what features users of their product might want to automate. They then provide scripting support for those features. The trouble with this approach, of course, is that they always miss something—and their users, in the field, are stymied. The users then complain, and are generally given the response, “Why would anyone want to do that?” (Translation: “We didn’t think of that.”)
InDesign scripting doesn’t work that way. InDesign provides scripting access to everything (well, almost everything) you can do to the database that is an InDesign document.
Thinking About Scripting
Because scripting is a great tool for automating large, repetitive tasks, many of us think that that’s all it’s good for. But there’s far more to scripting than that. Scripting is also good at little things—operations that might save you only a few seconds a day, but can make your work easier or more precise.
By “little things,” we means scripts that save you only a few mouse clicks, drags, or key presses at a time. It’s these tiny tasks, repeated dozens, hundreds, or even thousands of times day by day, that add up to fatigue, irritation, and repetitive motion injuries. When you take a common task that involves some number of actions and replace it with a simple double-click or keystroke (all it takes to run a script), you reduce the difficulty and complexity of your work.
Scripting, which many of us think of as being somehow opposed to the creative process, can be a powerful creative tool. We often imagine effects we’d like to use in a publication layout that would be difficult to accomplish by hand. When there’s time, we turn to scripting for help. Frequently, in the course of working on a script, we’ll find a variation on the effect that leads us in an entirely new creative direction. Scripting gives us time to experiment—and we think experimentation has a lot to do with creativity.
What we’re getting at here is that scripting is what you make of it, and how you think about it. If you only think of scripting as something applicable to massive projects, you’re missing out on many of the benefits—and most of the fun.
Using the Scripts Panel and the Script Label Panel
InDesign includes two scripting-related plug-ins: the Scripts panel and the Script Label panel. The Scripts panel gives you a way to run scripts without leaving InDesign, and significantly speeds script execution; the Script Label panel gives you a way to enter text into the Label property of a page item.
Scripts Panel
To display the Scripts panel, choose Scripts from the Utilities submenu of the Window menu (see Figure 12-1). The Scripts panel displays the scripts (and folders) stored inside the Scripts Panel folder inside the Scripts folder in your InDesign folder.
In general, we think it’s better to store your scripts somewhere else, and place aliases (on the Mac OS) or shortcuts (in Windows) in this folder. Why? We’ve accidentally deleted all of our scripts by re-installing InDesign more than once. It’s painful.
To run a script, double-click the script in the Scripts panel. To edit a script, hold down Option/Alt and double-click the script. InDesign will open the script in your script editor (or in the ExtendScript Toolkit, for JavaScript files). To delete scripts from the Scripts panel, open the Scripts Panel folder inside the Scripts folder in your InDesign folder and move the scripts to another location (or delete them).
To open the folder containing a script, hold down Command-Shift/Ctrl-Shift and double-click the script name in the Scripts panel. InDesign will open the folder containing the script in the Finder or Windows Explorer.
Adding Keyboard Shortcuts to Scripts. You can add keyboard shortcuts to scripts, just as you can to menu items. When you open the Edit Shortcuts dialog box, you’ll find a list of installed scripts in the Scripts section. You assign a keyboard shortcut to a script in the same way that you assign any other keyboard shortcut.
There’s a catch. The keyboard shortcut you apply is tied to a specific location in the list of scripts displayed in the Scripts section of the Edit Shortcuts dialog box. If you add or remove scripts, the shortcut could very well end up pointing to a different script.
Controlling Script Order. You can control the order in which scripts appear in the Scripts panel by entering numbers (from 00 to 99) followed by a close parenthesis character (“)”) before the first character of the file name. The Scripts panel hides the numbers, leaving only the name of the script visible. In any folder in the Scripts Panel folder, the file or folder with a name beginning with “00)” will appear first in the Scripts panel; the file beginning with “01)” will appear next.
Script Label Panel
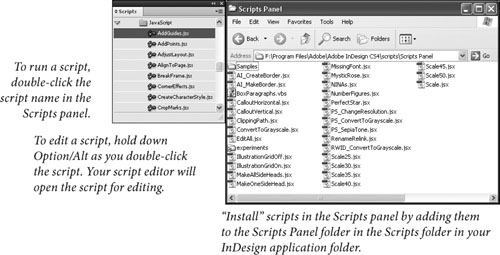
To display the Script Label panel, choose Script Label from the Utilities submenu of the Window menu (see Figure 12-2). The Script Label panel has only one purpose—it gives you a way to enter text into the label of an object. Once you work with scripting for a bit, you’ll realize how useful the label property of a page item is.
Figure 12-2 Script Label Panel
An object’s label can store an apparently unlimited amount of text, so you could store quite complex scripts (which are just text, after all) inside an object. Or a label could contain an XML representation of the object, or any other type of text data you can think of.
A page item can have more than one label, thanks to the “insert label” method and the corresponding “extract label” method. If a single label on an object isn’t enough for your needs, you can always add your own.
Getting Started
Work through the Adobe InDesign CS5 Scripting Tutorial. Don’t type the scripts yourself—download the Zip archive from the scripting home page. Use your script editor to open the first script file—HelloWorld—in the language or your choice. Try running it. Once you’ve gotten it working, you can move on to the more advanced scripts.
There are only three scripts in the tutorial. They’re short, they show you how to create a new document, create a new text frame, add text to the text frame, and apply formatting to that text.
Once you’re done with the tutorial, start thinking about the tasks in your work that you’d like to automate, and look through the example scripts for something related to the things you’d like to do.
At this point, you’re ready to move on to the Adobe InDesign CS5 Scripting Guide for the scripting language of your choice. When you need to look something up, use the bookmarks in the PDF and/or Acrobat’s search feature to find likely terms. Scripting terms tend to mirror the terms you see used in the user interface.
Again, use the scripts from the Zip archive (there are around 200 of them for each language). Don’t try to copy/paste from the Scripting Guide PDF. Not only does copying/pasting from a PDF introduce extra characters and line breaks that can cause the script to fail, but most of the scripts shown in the Scripting Guide are not complete scripts—they’re “snippets,” intended to show only the feature or technique being discussed.
Where to Get the Scripts
You can download all of the scripts listed in this chapter from the web site David co-hosts. Don’t type them yourself—most of the scripts shown here are not complete.
http://www.indesignsecrets.com/downloads/RWCS5scripts.zip
We’re only able to show the JavaScript version of the scripts, but you can find AppleScript and VBScript versions online (see “Where to Get the Scripts,” earlier in this chapter)
Overriding All Overrides
We admit that we feel a thrill of pride when we look at our neatly ordered lists of paragraph styles in the Paragraph Styles panel. We don’t get out enough. But a “+” (plus sign, indicating a local formatting override) after a style name drives us crazy. What’s that doing there? Evil, local formatting is interfering with our dream of formatting and organizational goodness!
It doesn’t matter how the local formatting crept into the document (be it something in a Word file or an errant co-worker)—it’s easy to get rid of, as long as you use the following script. It’s very short, but it can save you hours of work.
Follow the steps shown earlier in this chapter for creating a JavaScript, then enter the following text or download the script (see “Where to Get the Scripts,” earlier in this chapter).
To create the JavaScript, follow these steps.
1. Start the ExtendScript Toolkit and target InDesign. If InDesign is not already running, you’ll be prompted to start it.
2. Enter the following text (note that it’s one line).
app.documents.item(0).stories.everyItem().clearOverrides();
3. Save the script as a plain text file with the file extension “.jsx” to the Scripts Panel folder inside the Scripts folder in your InDesign folder.
4. To test the script, double-click the script in the Scripts panel.
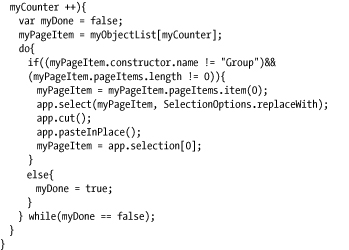
A Short, But Useful, Example
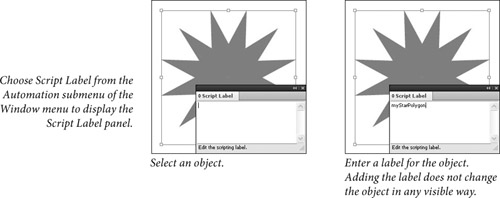
When you want to get an object or series of objects out of a frame you’ve pasted them into, you end up doing a lot of selecting, cutting, and pasting. A script that could remove all of the objects from a frame (while maintaining the positions they occupied in the frame) would save you time and trouble. Right? Let’s go!
This script assumes you have an object selected, and that the object contains at least one other object. The script will not ungroup a group as it processes the objects.
Follow the same steps as above to create the script. Don’t worry about the indents, JavaScript doesn’t care about them—they’re just here to make reading the script a little bit easier.
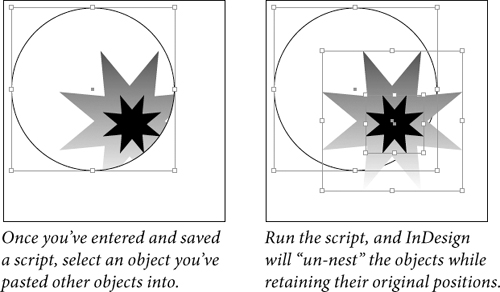
Testing the CutContents Script
Now that you’ve saved the script, switch to InDesign. Select a path that contains one or more objects. Double-click the script name in the Scripts panel. InDesign will remove each nested object inside the frame and paste it into the same position as it occupied while inside the frame (see Figure 12-3).
Figure 12-3 CutContents Script
More Fun with Scripting
It’s a shame that we’re under so much pressure to reduce our page count, because there are a lot of other things we’d like to show you. Instead, we’ll talk about a couple of creative things you can do with scripting, and show examples. You can find the script files online (see “Where to Get the Scripts,” earlier in this chapter).
Drawing NINAs
Have you ever played with a Spirograph? Or been fascinated by one of the geometric patterns created by M. C. Escher? The authors admit a fondness (well, more like an obsession) for geometric art. While writing this book, we stumbled across a very interesting web site: http://www.washington.edu/bibsys/mattf/nina/. Matt Freedman, at the University of Washington, invented (or is it “discovered”?) a very nifty new algorithm for drawing shapes he’s named NINAs (NINA being an acronym for “Nina Is Not An Acronym”). NINAs are fascinating shapes, and we had to see if we could write InDesign scripts that make use of the NINA algorithm (with Mr. Freedman’s permission). Figure 12-4 shows some of the NINAs drawn by our script.

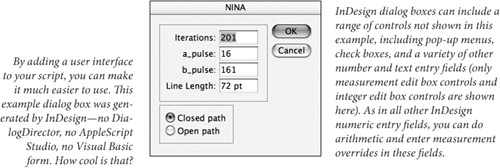
Adding a User Interface
InDesign scripts can create their own dialog boxes, and can populate those dialog boxes with static text labels, check box controls, pop-up menus, text entry fields, and a variety of number entry fields (measurement units, integers, percentages, and real numbers).
There’s good news and bad news about InDesign script dialog boxes. The good news is that InDesign takes care of all spacing and sizing issues. The bad news? InDesign takes care of all spacing and sizing issues. This means that you don’t have to worry about setting pixel coordinates for every control, but it also means that you have very little control over the appearance of your dialog boxes. At the same time, it’s easy to create a dialog box (see Figure 12-5).
Figure 12-5 NINA User Interface
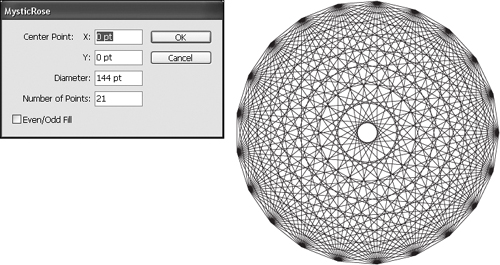
Mystic Rose
Another interesting geometric figure is the “Mystic Rose”—a polygon where every point connects to every other point. Ole thought it would be fun to have a script that would draw these, so he wrote one (see Figure 12-6). We’ve included this script with the other scripts in the Zip archive you can download from David’s web site (see “Where to Get the Scripts in this Chapter,” earlier in this chapter).
End Script
Scripting is all about empowerment. Don’t just sit around telling yourself that the reason you’re working late is that InDesign can’t do something you’d like it to do. Sure, there are things in every program we’d like the manufacturer to fix, but, with InDesign’s scripting features, we’ve finally got the tools we need to fix them ourselves.
By urging you to take up scripting, we’re urging you to take control of InDesign, your publications, your work, and your life. We know you can do it!