
One of the greatest things about Expression Web is that it provides many tools that make it easy to dig into the makeup of a Web page. The Tag Properties task pane is one of those tools. It is a powerful way of examining the makeup of specific HTML tags. Not only that, but you can also easily set tag properties using the Tag Properties task pane.
When an HTML element is selected in either Design View or Code View, properties of the selected tag are displayed in the Tag Properties task pane, as shown in Figure 12.1.

Tip
The Tag Properties task pane is context-sensitive. The properties that are visible in it depend on the type of element selected on your page.
Note

If the Tag Properties task pane is not visible, see “Tag Properties Task Pane Not Visible” in the “Troubleshooting” section of this chapter.
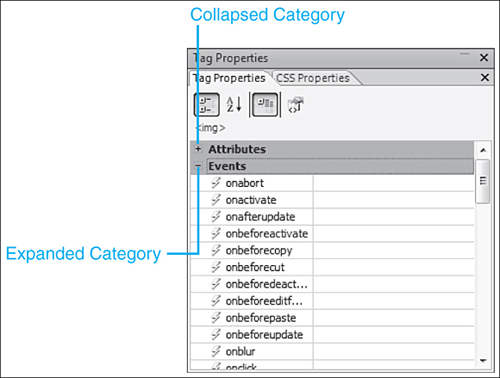
By default, the Tag Properties task pane shows you properties grouped into three categories: attributes, events, and miscellaneous. (Any attribute that is not standards-compliant will be categorized as miscellaneous.) You can collapse any category by clicking on the minus sign next to the category name, as shown in Figure 12.2. To expand a collapsed category, click the plus sign next to the category name.
Tip
The events displayed in the Tag Properties task pane are technically attributes as well. However, Expression Web divides them into their own category to make it easier to write code to handle a particular event.
As shown in Figure 12.3, the following buttons are available at the top of the Tag Properties task pane:

Show Categorized List—. When this button is clicked, the properties displayed in the task pane will be categorized as attributes and events.
Show Alphabetized List—. When this button is clicked, the properties displayed in the task pane will be displayed alphabetically.
Show Set Properties on Top—. When this button is clicked, properties for which a value has been specified will always appear at the top of the list.
Show Tag Properties—. When this button is clicked, the Properties dialog that corresponds to the selected tag will be displayed.
To view the properties of an HTML tag, select an HTML element in Design View or click inside an HTML tag in Code View. The Tag Properties task pane will display all the properties that are applicable to the selected tag.
Tip
Each property listed in the Tag Properties task pane has an icon at the left of the property name. The icon indicates the type of the property. A finger pointing to a page indicates an attribute and a lightning bolt indicates an event.
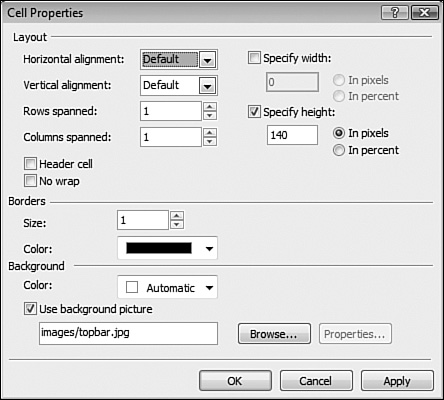
If a property is set for the selected tag, the property name will appear as bolded blue text (see Figure 12.4). The name of the selected tag also appears at the top of the Tag Properties task pane. If you hover over the tag name, the HTML code for that tag appears inside a screen tip.
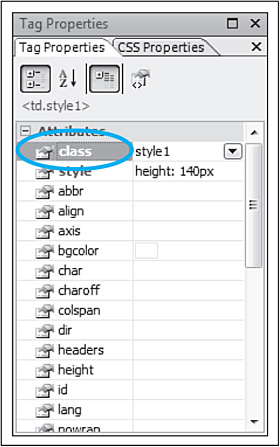
If you’d like more details on a tag’s properties, click the Show Tag Properties button, as shown previously in Figure 12.3. In Figure 12.4, the properties for a <td> tag are displayed. Figure 12.5 shows the Cell Properties dialog that is displayed when the Show Tag Properties button is clicked. Note that the cell height shown in the Cell Properties dialog matches the height displayed in the Tag Properties task pane in Figure 12.4. The other properties for the cell are applied using the inline style named style1.
The Tag Properties task pane provides a quick and convenient way to set tag attributes. Setting an attribute of a particular tag differs based on the attribute you are setting. For example, some attributes (such as the alt attribute of an <img> tag) are free text. Other attributes (such as the align attribute of an <img> tag) have only certain values that are valid. Other attributes (such as the style attribute) have a fairly complex syntax. The Tag Properties task pane makes setting all these attributes fast and easy.
Let’s create a page so we can more easily work with setting tag attributes.
Create a new Web page.
Add a new table with the default settings.
Add an image of your choice to one of the table cells.
Add a hyperlink to one of the table cells.
→ | For more information on adding tables to a Web page, see “Using Tables and Layout Tables”, p. 149 (Chapter 9). |
→ | For more information on adding images to a Web page, see “Using Graphics and Multimedia”, p. 241 (Chapter 14). |
→ | For more information on adding hyperlinks to a Web page, see “Creating Pages and Content”, p. 103 (Chapter 7). |
Click to select the image you inserted on the page. The Tag Properties task pane will show that the src, height, and width attributes have been set for the image. However, the current standards require an alt attribute for all <img> tags.
Note
The alt attribute is important for images because screen readers will read the text in the alt attribute aloud so that people with poor vision can better utilize your Web page.
To set the alt attribute using the Tag Properties task pane:
If the image is not selected, select it first.
In the Tag Properties task pane, locate the
altattribute.Enter some text of your choice for the
altattribute.
The Tag Properties task pane should now look like Figure 12.6.

Note
If newly set properties don’t show up at the top of the list even when the task pane is configured to show set properties on top, see “Set Properties Don’t Appear First” in the “Troubleshooting” section of this chapter.
Now let’s add a screen tip to the hyperlink. Screen tips are added to hyperlinks using the title attribute.
Click on the hyperlink so the Tag Properties task pane shows the properties of the
<a>tag.Locate the
titleattribute in the Tag Properties task pane and add the text you would like to appear in the screen tip.
In Figure 12.7, the title attribute has been specified for the hyperlink.

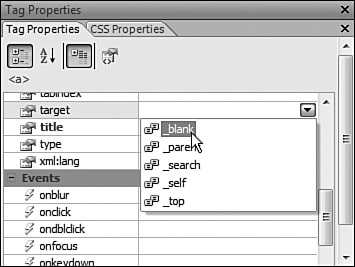
Sometimes, you may want a hyperlink to open a new window. The HTML target attribute allows you to do this easily. You can specify a specific frame name for the target attribute or you can use one of several predefined values. For example, to specify that a link should open in a new window, set the target attribute to a value of _blank.
Click inside the hyperlink to make the
<a>tag active.Locate and select the
targetattribute in the Tag Properties task pane.Click the down arrow for the
targetattribute’s value and select_blank, as shown in Figure 12.8.
Now the hyperlink will open in a new window when clicked. There are several ways you can make the same change to a hyperlink. In addition to selecting the desired value for the target attribute, you can also click the Show Tag Properties button on the Tag Properties task pane (see Figure 12.3) and make the change in the Edit Hyperlink dialog box.
In addition to examining and setting tag attributes, the Tag Properties task pane is also a convenient way to connect event handlers for page elements.
Note
For an overview of events, see the sidebar “Attributes and Events” on page 218.
Let’s configure the image on the page so that clicking it will link to a different Web site. We could wrap the image in an <a> tag and make it a hyperlink, but for this example, we’ll use the click event for the image. By using the click event, you can perform a specified action when the image is clicked. In this case, we will run some JavaScript code when the image is clicked.
Switch to Code View and add the following code before the closing </head> tag:
<script language="javascript" type="text/javascript">

  function openLink(url)
  {
   window.navigate(url);
  }

</script>
This code will open the URL passed to it.
→ | For more information on JavaScript, see “Client-side Scripting”, p. 415 (Chapter 24). |
We now need to hook up the click event to the image. When the image is clicked, we want to run the openLink JavaScript function we just added. To do that:
I have a page open and I’ve selected something on the page, but I don’t see a Tag Properties task pane.
If the Tag Properties task pane isn’t visible, select Task Panes, Tag Properties from the main menu to enable the task pane.
I’ve got the Tag Properties task pane configured so that set properties appear first in the list of properties, but newly set properties don’t appear first. What’s wrong?
For newly set properties to appear first in the task pane, you need to refresh it. The easiest way to refresh the task pane is to click the Show Set Properties On Top button once to turn off that setting and then click it again to turn the setting back on. This will refresh the task pane and set properties should appear first in the list as expected.
To ensure that your Web pages comply with current Web standards, be careful when setting properties using the Tag Properties task pane. It’s easy to accidentally fall out of compliance when setting attributes using this tool.
For example, if you select the image you added to the sample page for this chapter and set the border attribute to 4 in the Tag Properties task pane, Expression Web will add a border attribute with a value of 4. However, the border attribute is considered a deprecated attribute and it will be flagged as such by Expression Web’s Code View, as shown in Figure 12.9.

Is this a bug in Expression Web? Not at all. Expression Web is simply doing what you asked it to do. In this case, you explicitly told Expression Web to add code that is not compliant with current standards. Expression Web will warn you when you do this, but it won’t stop you.
When setting attributes using the Tag Properties task pane, check Code View often for HTML incompatibilities.