
In the Internet scenario, the clients or services may not use WCF or even Windows. If you are writing a service or a client, you cannot assume the use of WCF on the other end. In addition, an Internet application typically has a relatively large number of clients calling the service. These client calls originate from outside the firewall. You need to rely on HTTP for transport, and multiple intermediaries are possible. In an Internet application, you typically do not want to use Windows accounts and groups for credentials and instead the application needs to access some custom credentials store. That said, you could still be using Windows security, as demonstrated later on.
In the Internet application, you must use message security for transfer security to provide for end-to-end security across all intermediaries. The client should provide credentials in the form of username and password. For the Internet scenario you should use the WSHttpBinding
and WSDualHttpBinding. In addition, if you have an intranet application that uses the NetTcpBinding but you do not wish to use Windows security for user accounts and groups, you should follow the same configuration as with the WS-based bindings. This is done uniformly across these bindings by selecting MessageCredentialType.Username for the client credentials type used with the message security. You need to configure the bindings this way both at the client and at the service.
WSHttpBinding offers the Security property of the type WSHttpSecurity:
public class WSHttpBinding : WSHttpBindingBase
{
   public WSHttpBinding( );
   public WSHttpBinding(SecurityMode securityMode);
   public WSHttpSecurity Security
   {get;}
   //More members
}
With WSHttpSecurity, you need to set the Mode property of the type SecurityMode to SecurityMode.Message. The Message property of WSHttpSecurity will then take effect:
public sealed class WSHttpSecurity
{
   public SecurityMode Mode
   {get;set;}
   public NonDualMessageSecurityOverHttp Message
   {get;}
   public HttpTransportSecurity Transport
   {get;}
}
Message is of the type NonDualMessageSecurityOverHttp, which derives from MessageSecurityOverHttp:
public class MessageSecurityOverHttp
{
   public MessageCredentialType ClientCredentialType
   {get;set;}
   //More members
}
public sealed class NonDualMessageSecurityOverHttp :
                                               MessageSecurityOverHttp
{...}
You need to set the ClientCredentialType property of MessageSecurityOverHttp to MessageCredentialType.Username. Recall that the default Message credentials type of WSHttpBinding is Windows (see Table 10-3).
Because Message security is the default security mode of WSHttpBinding (see Table 10-1), these three definitions are equivalent:
WSHttpBinding binding1 = new WSHttpBinding( );
binding1.Security.Message.ClientCredentialType = MessageCredentialType.UserName;

WSHttpBinding binding2 = new WSHttpBinding(SecurityMode.Message);
binding2.Security.Message.ClientCredentialType = MessageCredentialType.UserName;

WSHttpBinding binding3 = new WSHttpBinding( );
binding3.Security.Mode = SecurityMode.Message;
binding3.Security.Message.ClientCredentialType = MessageCredentialType.UserName;
Or when using a config file:
<bindings>
   <wsHttpBinding>
      <binding name = "UserNameWS">
         <security mode = "Message">
            <message clientCredentialType = "UserName"/>
         </security>
      </binding>
   </wsHttpBinding>
</bindings>
And since Message security is the default, you can omit explicitly setting the mode in the config file:
<bindings>
   <wsHttpBinding>
      <binding name = "UserNameWS">
         <security>
            <message clientCredentialType = "UserName"/>
         </security>
      </binding>
   </wsHttpBinding>
</bindings>
Figure 10-4 shows the security-related elements of the WSHttpBinding.

WSHttpBinding has a reference to WSHttpSecurity, which uses the SecurityMode enum to indicate the transfer security mode. When transport security is used, WSHttpSecurity will use an instance of HttpTransportSecurity. When Message security is used, WSHttpSecurity will use an instance of NonDualMessageSecurityOverHttp containing the client credential type via the MessageCredentialType enum.
WSDualHttpBinding offers the Security property of the type WSDualHttpSecurity:
public class WSDualHttpBinding : Binding,...
{
   public WSDualHttpBinding( );
   public WSDualHttpBinding(WSDualHttpSecurityMode securityMode);
   public WSDualHttpSecurity Security
   {get;}
   //More members
}
With WSDualHttpSecurity, you need to set the Mode property of the type WSDualHttpSecurityMode to WSDualHttpSecurityMode.Message. The Message property of WSDualHttpSecurity will then take effect:
public sealed class WSDualHttpSecurity
{
   public MessageSecurityOverHttp Message
   {get;}
   public WSDualHttpSecurityMode Mode
   {set;set;}
}
Message is of the type MessageSecurityOverHttp presented earlier.
You need to set the ClientCredentialType property of MessageSecurityOverHttp to MessageCredentialType.Username. Recall that the default Message credentials type of WSDualHttpBinding is Windows (see Table 10-3).
Because Message security is the default transfer security mode of WSDualHttpBinding (see Table 10-1), these definitions are equivalent:
WSDualHttpBinding binding1 = new WSDualHttpBinding( );
binding1.Security.Message.ClientCredentialType = MessageCredentialType.UserName;

WSDualHttpBinding binding2 = new WSDualHttpBinding(WSDualHttpSecurityMode.Message);
binding2.Security.Message.ClientCredentialType = MessageCredentialType.UserName;

WSDualHttpBinding binding3 = new WSDualHttpBinding( );
binding3.Security.Mode = WSDualHttpSecurityMode.Message;
binding3.Security.Message.ClientCredentialType = MessageCredentialType.UserName;
Or when using a config file:
<bindings>
   <wsDualHttpBinding>
      <binding name = "WSDualWindowsSecurity">
         <security mode = "Message">
            <message  clientCredentialType = "UserName"/>
         </security>
      </binding>
   </wsDualHttpBinding>
</bindings>
And since Message security is the default, you can omit explicitly setting the mode in the config file:
<bindings>
   <wsDualHttpBinding>
      <binding name = "WSDualWindowsSecurity">
         <security>
            <message  clientCredentialType = "UserName"/>
         </security>
      </binding>
   </wsDualHttpBinding>
</bindings>
Figure 10-5 shows the security-related elements of WSDualHttpBinding.

WSDualHttpBinding has a reference to WSDualHttpSecurity, which uses the WSDualHttpSecurityMode enum to indicate the transfer security mode: Message or None. When Message security is used, WSDualHttpSecurity will use an instance of MessageSecurityOverHttp containing the client credential type via the MessageCredentialType enum.
Since in the Internet scenario the client’s message sent to the service is transferred over plain HTTP, it is vital to protect its content (both the client’s credentials and the body of the message) by encrypting it. Encryption will provide for message integrity and privacy. One technical option for encryption is to use the client’s password. However, WCF never uses the client’s password for encrypting the message, for a number of reasons. First, there are no guarantees that the password is strong enough, so that anyone monitoring the communication could not break the encryption. Second, it will force the service (more precisely, its host) to have access to the password, and thus couple the host to the credential store. Finally, while the password may protect the message, it will not provide for service authenticity toward the client.
To protect the message, WCF uses an X509 certificate. The certificate provides strong protection, and it uniquely authenticates the service toward the client. The way a certificate works is by using two keys, called the public and private keys, as well as a common name (CN) such as MyServiceCert. What is important about those keys is that anything encrypted with the public key can only be decrypted with the private one. The certificate contains the public key and the common name, and the private key is kept in some secure storage on the host machine that the host has access to. The host makes the certificate (and its public key) publicly available; that is, any client can access the host’s endpoints and obtain the public key.
In a nutshell, what happens during a call is that WCF on the client’s side will use the public key to encrypt all messages to the service. Upon receiving the encrypted message, WCF on the host side will decrypt the message using the private key. Once the message is decrypted, WCF will read the client’s credentials from the message, authenticate the client, and allow it to access the service. The real picture is a bit more complex, because WCF also needs to secure the reply messages and callbacks from the service to the client. One of the standards WCF supports deals with setting up such a secure conversation. There are, in fact, several calls done before the first request message from the client to the service, where WCF on the client’s side generates a shared secret it passes encrypted (using the service certificate) to the service. The service will then use that to encrypt the reply messages as well as the callbacks if any.
The ServiceHostBase class offers the Credentials property of the type ServiceCredentials. ServiceCredentials is a service behavior:
public abstract class ServiceHostBase : ...
{
   public ServiceCredentials Credentials
   {get;}
   //More members
}
public class ServiceCredentials : ...,IServiceBehavior
{
   public X509CertificateRecipientServiceCredential ServiceCertificate
   {get;}
   //More members
}
ServiceCredentials provides the ServiceCertificate property of the type X509CertificateRecipientServiceCredential:
public sealed class X509CertificateRecipientServiceCredential
{
   public void SetCertificate(StoreLocation storeLocation,
                              StoreName storeName,
                              X509FindType findType,
                              object findValue);
   //More members
}
You can use the SetCertificate( ) method to instruct WCF where and how to load the service certificate. You typically provide this information in the host config file as a custom behavior under the serviceCredentials section, as shown in Example 10-8.
Example 10-8. Configuring the service certificate
<services>
   <service name = "MyService" behaviorConfiguration = "Internet">
      ...
   </service>
</services>
<behaviors>
   <serviceBehaviors>
      <behavior name = "Internet">
         <serviceCredentials>
            <serviceCertificate
               findValue     = "MyServiceCert"
               storeLocation = "LocalMachine"
               storeName     = "My"
               x509FindType  = "FindBySubjectName"
            />
         </serviceCredentials>
      </behavior>
   </serviceBehaviors>
</behaviors>The client developer can obtain the service certificate using any out-of-band mechanism (such as an email or via a public web page). The client can then include in its config file in the endpoint behavior section detailed information about the service certificate, such as where it is stored on the client side and how to find it. This is by far the most secure option from the client’s perspective, because any attempt to subvert the client’s address resolving and redirect the call to a malicious service will fail since the other service will not have the correct certificate. This is the least flexible option as well, however, because every time the client needs to interact with a different service, the client administrator will need to rework the client’s config file.
A reasonable alternative to explicitly referencing the certificates of all services the client may interact with is to store those certificates in the client’s Trusted People certificate folder. The administrator can then instruct WCF to allow calls only to a service whose certificate is in that folder. The client in that case will need to obtain the service certificate at runtime as part of the initial pre-call negotiation, check to see if it is in the Trusted People store and if so, proceed to use it to protect the message. In fact, certificate negotiation this way is the default behavior of WCF, but you can disable it (and use a hard-configured certificate) with both WSHttpBinding and WSDualHttpBinding. For the Internet scenario, I recommend the use of certificate negotiation coupled with storing the certificates in the Trusted People store.
To instruct WCF as to what degree to validate and trust the service certificate, add a custom endpoint behavior to the client’s config file. The behavior should use the ClientCredentials section. ClientCredentials is an endpoint behavior that offers the ServiceCertificate property of the type X509CertificateRecipientClientCredential:
public class ClientCredentials : ...,IEndpointBehavior
{
   public X509CertificateRecipientClientCredential ServiceCertificate
   {get;}
   //More members
}
X509CertificateRecipientClientCredential offers the Authentication property of the type X509CertificateRecipientClientCredential:
public sealed class X509CertificateRecipientClientCredential
{
   public X509ServiceCertificateAuthentication Authentication
   {get;}
   //More members
}
X509CertificateRecipientClientCredential provides the CertificateValidationMode property of the enum type X509CertificateValidationMode:
public enum X509CertificateValidationMode
{
   None,
   PeerTrust,
   ChainTrust,
   PeerOrChainTrust,
   Custom
}

public class X509ServiceCertificateAuthentication
{
   public X509CertificateValidationMode CertificateValidationMode
   {get;set;}
   //More members
}
Example 10-9 demonstrates setting the service certificate validation mode in the client’s config file.
Example 10-9. Validating the service certificate
<client>
   <endpoint behaviorConfiguration = "ServiceCertificate"
      ...
   </endpoint>
</client>
<behaviors>
   <endpointBehaviors>
      <behavior name = "ServiceCertificate">
         <clientCredentials>
            <serviceCertificate>
               <authentication certificateValidationMode = "PeerTrust"/>
            </serviceCertificate>
         </clientCredentials>
      </behavior>
   </endpointBehaviors>
</behaviors>
X509CertificateValidationMode.PeerTrust instructs WCF to trust the negotiated service certificate if it is also present in the Trusted People store of the client. X509CertificateValidationMode.ChainTrust instructs WCF to trust the certificate if it was issued by a trusted root authority
(such as VeriSign or Thwart) whose certificate is found in the Trusted Root Authority folder. X509CertificateValidationMode.ChainTrust is the default value used by WCF. X509CertificateValidationMode.PeerOrChainTrust allows either of these options.
Developers often do not have access to their organization’s certificate, and therefore resort to using test certificates
such as the ones generated by the MakeCert.exe command-line utility. There are two problems with test certificates. The first is that they will fail the default certificate validation on the client side since the client uses X509CertificateValidationMode.ChainTrust by default. That can easily be overcome by installing the test certificate in the client’s Trusted People store and using X509CertificateValidationMode.PeerTrust or X509CertificateValidationMode.PeerOrChainTrust. The second problem is that WCF by default expects the service certificate name to match the service host’s domain (or machine name). To compensate, the client must explicitly specify the test certificate name in the endpoint identity’s DNS section:
<client>
   <endpoint
      address  = "http://localhost:8001/MyService"
      binding  = "wsHttpBinding"
      contract = "IMyContract"><identity>
         <dns value = "MyServiceCert"/>
      </identity>
   </endpoint>
</client>
The client needs to provide its credentials to the proxy. The ClientCredentials property (presented earlier) of the ClientBase<T> base class has the UserName property of the type UserNamePasswordClientCredential:
public class ClientCredentials : ...,IEndpointBehavior
{
   public UserNamePasswordClientCredential UserName
   {get;}
   //More members
}

public sealed class UserNamePasswordClientCredential
{
   public string UserName
   {get;set;}
   public string Password
   {get;set;}
}
The client uses UserNamePasswordClientCredential to pass to the service its username and password as demonstrated in Example 10-10.
Tip
The client need not provide a domain name (if Widows security is used) or application name (if ASP.NET providers are used). The host will use its service domain or a configured application name as appropriate.
Example 10-10. Providing username and passwords credentials
MyContractClient proxy = new MyContractClient( );

proxy.ClientCredentials.UserName.UserName = "MyUsername";
proxy.ClientCredentials.UserName.Password = "MyPassword";

proxy.MyMethod( );
proxy.Close( );
Unlike the intranet scenario (see Example 10-3) where the client has to instantiate a new NetworkCredential object, with the Internet scenario there is no need (or way) to assign a new UserNamePasswordClientCredential object.
When working with a channel factory instead of a proxy class, set the Credentials property of the factory with the credentials:
ChannelFactory<IMyContract> factory = new ChannelFactory<IMyContract>("");

factory.Credentials.UserName.UserName = "MyUsername";
factory.Credentials.UserName.Password = "MyPassword";

IMyContract proxy = factory.CreateChannel( );
using(proxy as IDisposable)
{
   proxy.MyMethod( );
}
Note that you cannot use the static CreateChannel( ) methods of ChannelFactory<T> since you have to instantiate a factory in order to access the Credentials property.
Once the username and password credentials are received by the WCF on the service side, the host can choose to authenticate them as either Windows credentials, ASP.NET membership provider’s credentials, or even custom credentials. Whichever option you choose, make sure it matches your role-based policy configuration.
The ServiceCredentials class (the Credentials property of ServiceHostBase) provides the UserNameAuthentication property of the type UserNamePasswordServiceCredential:
public class ServiceCredentials : ...,IServiceBehavior
{
   public UserNamePasswordServiceCredential UserNameAuthentication
   {get;}
   //More members
}
UserNamePasswordServiceCredential has the UserNamePasswordValidationMode property of a matching enum type:
public enum UserNamePasswordValidationMode
{
   Windows,
   MembershipProvider,
   Custom
}
public sealed class UserNamePasswordServiceCredential
{
   public MembershipProvider MembershipProvider
   {get;set;}
   public UserNamePasswordValidationMode UserNamePasswordValidationMode
   {get; set;}
   //More members
}
By setting the UserNamePasswordValidationMode property, the host chooses how to authenticate the incoming username and password credentials.
While not necessarily common, WCF lets the Internet-facing service authenticate the incoming credentials as Windows credentials. To authenticate the client’s username and password as Windows credentials, you need to set UserNamePasswordValidationMode to UserNamePasswordValidationMode.Windows. Because UserNamePasswordValidationMode.Windows is the default value of the UserNamePasswordValidationMode property, these two definitions are equivalent:
ServiceHost host1 = new ServiceHost(typeof(MyService));

ServiceHost host2 = new ServiceHost(typeof(MyService));
host2.Credentials.UserNameAuthentication.UserNamePasswordValidationMode =
                                            UserNamePasswordValidationMode.Windows;
When using a config file, add a custom behavior that assigns the username and password authentication mode along with the service certificate information, as shown in Example 10-11.
Example 10-11. Internet security with Windows credentials
<services>
   <service name = "MyService" behaviorConfiguration = "UsernameWindows">
      ...
   </service>
</services>
<behaviors>
   <serviceBehaviors>
      <behavior name = "UsernameWindows">
         <serviceCredentials>
            <userNameAuthenticationuserNamePasswordValidationMode = "Windows"/>
            <serviceCertificate
               ...
            />
         </serviceCredentials>
      </behavior>
   </serviceBehaviors>
</behaviors>
As with the programmatic case, adding this line to the config file:
<userNameAuthentication userNamePasswordValidationMode = "Windows"/>
is optional because it is the default setting.
If the PrincipalPermissionMode property of ServiceAuthorizationBehavior is set to its default value of PrincipalPermissionMode.UseWindowsGroups, once the username and password are authenticated against Windows, WCF installs a Windows principal object and attaches it to the thread. This enables the service to freely use Windows NT groups for authorization, just as with the intranet case, both declaratively and programmatically.
As long as the principal permission mode is set to PrincipalPermissionMode.UseWindowsGroups, the identity management aspect is just as with the intranet scenario, including the identities of the security call context, as shown in Table 10-4. The main difference between an intranet application and an Internet application that uses Windows credentials is that the client cannot dictate the allowed impersonation level, and the host can impersonate at will. This is because WCF will assign TokenImpersonationLevel.Impersonation to the Windows identity of the security call context.
By default, WCF role-based security uses Windows user groups for roles and Windows accounts for security identities. There are several drawbacks to this default policy. First, you may not want to assign a Windows account for every client of your Internet application. Second, the security policy is only as granular as the user groups in the hosting domain. Often you do not have control over your end customer’s IT department. If you deploy your application in an environment in which the user groups are coarse or in which the user groups don’t map well to actual roles users play in your application, or if the group names are slightly different, Windows rolebased security is of little use to you. Roles localization presents yet another set of challenges because role names will differ between customer sites in different locales. Consequently, Internet applications hardly ever use Windows accounts and groups. .NET 2.0 provides out-of-the-box custom credential management called the ASP.NET Provider Model, though non-ASP.NET applications (like WCF applications) can easily use it to authenticate users and authorize them, without ever resorting to Windows accounts.
One of the concrete implementations of the architecture includes a SQL Server store. SQL Server is often the repository of choice for Internet applications and so I will use it in this scenario. To use the SQL Server provider, run the setup file aspnet_regsql.exe found under %Windir%Microsoft.NETFramework<Version>. The setup program will create a new database called aspnetdb, containing the tables and stored procedures required to manage the credentials.
The SQL Server credential store is well designed, using the latest best practices for credentials management, such as password salting, stored procedures, and so on. This infrastructure helps productivity, saving developers valuable time and effort, not to mention providing a high quality, secure solution. That said, the credential management architecture is that of a provider model, and you can easily add other storage options such as an Access database.
Figure 10-6 shows the architecture of the ASP.NET 2.0 credentials providers.
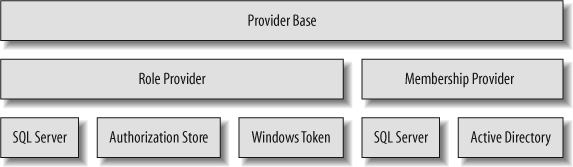
Membership providers are responsible for managing users (usernames and passwords), and role providers are responsible for managing roles. Out of the box, ASP.NET offers support for membership stores in SQL Server or Active Directory, and roles can be stored in SQL Server, a file (authorization store), or NT groups (Windows token).
Username and password authentication is done using a class called MembershipProvider from the System.Web.Security namespace, defined as:
publicabstract class MembershipProvider : ProviderBase
{
   public abstract string ApplicationName
   {get;set;}
   public abstract bool ValidateUser(string name,string password);
   //Additional members
}
MembershipProvider’s goal is to encapsulate the actual provider used and the details of the actual data access, as well as to enable changing the membership provider without affecting the application itself. Depending on the configured security provider in the host config file, WCF will use a concrete data access class such as SqlMembershipProvider targeting SQL Server or SQL Server Express:
public class SqlMembershipProvider : MembershipProvider
{...}
However, WCF interacts only with the MembershipProvider base functionality. WCF obtains the required membership provider by accessing the Provider static property of the Membership class, defined as:
public sealed class Membership
{
   public static string ApplicationName
   {get;set;}
   public static MembershipProvider Provider
   {get;}
   public static bool ValidateUser(string username,string password);
   //Additional members
}
Membership offers many members, which support the many aspects of user management. Membership.Provider retrieves the type of the configured provider from the System.Web section in the host config file. Unspecified, the role provider defaults to SqlMembershipProvider.
Tip
Because all membership providers derive from the abstract class MembershipProvider, if you write your own custom credential provider, it needs to derive from MembershipProvider as well.
Since a single credential store can serve many applications, those applications could define the same usernames. To allow for that, every record in the credentials store is scoped by an application name (similar to the way usernames in Windows are scoped by a domain or machine name).
The ApplicationName property of Membership is used to set and retrieve the application name, and the ValidateUser( ) method, which authenticates the specified credentials against the store, and returns true if they match and false otherwise. Membership.ValidateUser is shorthand for retrieving and using the configured provider.
If you configure your application to use the ASP.NET credentials store for authorization and if you enabled roles support, after authentication WCF installs an instance of the internal class RoleProviderPrincipal and attaches it to the thread invoking the operation:
sealed class RoleProviderPrincipal : IPrincipal
{...}
RoleProviderPrincipal uses the abstract class RoleProvider for authorization:
publicabstract class RoleProvider : ProviderBase
{
   public abstract string ApplicationName
   {get;set;}
   public abstract bool IsUserInRole(string username,string roleName);
   //Additional members
}
The ApplicationName property of RoleProvider binds the role provider to the particular application. The IsUserInRole( ) method verifies the user’s role membership. Like the membership providers, all role providers (including custom role providers) must derive from RoleProvider.
RoleProvider encapsulates the actual provider used, and the role provider to use is specified in the host config file. Depending on the configured role provider, RoleProviderPrincipal uses a corresponding data access class such as SqlRoleProvider to authorize the caller:
public class SqlRoleProvider : RoleProvider
{...}
You can obtain the required role provider by accessing the Provider static property of the Roles class, defined as:
public sealed class Roles
{
   public static string ApplicationName
   {get;set;}
   public static bool IsUserInRole(string username,string roleName);
   public static RoleProvider Provider
   {get;}
   //Additional members
}
Roles.IsUserInRole( ) is shorthand for accessing Roles.Provider first and then calling IsUserInRole( ) on it. Roles.Provider retrieves the type of the configured provider from the host config file. Unspecified, the role provider defaults to SqlRoleProvider.
If you choose either Windows or Active Directory to store your application’s users and roles, then you need to administer the user credentials using the dedicated tools for those stores, such as the Computer Management control panel applet or the Active Directory tools.
If you use SQL Server, .NET 2.0 installs web site administration pages under Inetpubwwwrootaspnet_webadmin<version number>. Developers can configure the application directly from within Visual Studio 2005. When selecting ASP.NET Configuration from the Web Site menu, Visual Studio 2005 will browse to the ASP.NET administration pages and allow you to configure various parameters, including security configuration. You can configure the following aspects for your application:
Create new users and delete existing ones
Create new roles and delete existing ones
Allocate users to roles
Retrieve a user’s details
Set a user’s status
Use additional features not relevant to this chapter
There are a number of significant shortcomings to the Visual Studio 2005-driven administration pages. First, you need Visual Studio 2005. It is unlikely that application or system administrators will have Visual Studio 2005, let alone know how to use it. The administration pages use “/” by default for the application name, and do not offer any visual way to modify that. You must create a web application to activate the administration pages and there is no remote access: the application and Visual Studio 2005 must be co-located so that Visual Studio 2005 can access the application’s configuration file. The browser-based user interface is somewhat annoying (you need to frequently click the Back button) and rather dull. Many features that administrators are likely to want to use are not available via the administration pages. This is in spite of the fact that the features are supported by the underlying provider classes. Some of the things missing from the Visual Studio 2005-driven administration pages include the ability to:
Update most if not all of the details in a user account
Retrieve a user’s password
Change a user’s password
Reset a user’s password
Retrieve information about the number of current online users
Remove all users from a role in one operation
Retrieve information about the password management policy (such as length, reset policy, type of passwords, etc.)
Test user credentials
Verify user role membership
Moreover, there are additional features that administrators are likely to want, and yet they are not supported, not even by the provider classes. These features include the ability to retrieve a list of all of the applications in the database, the ability to remove all users from an application, the ability to remove all roles from an application, the ability to delete an application (and all its associated users and roles), and the ability to delete all applications.
This tools disparity motivated me to develop the Credentials Manager application—a smart client application that compensates for all of the shortcomings just listed. Figure 10-7 shows a screenshot of Credentials Manager.[*]

Credentials Manager is available with the source code of this book at http://www.oreilly.com/catalog/9780596526993
I wrapped the ASP.NET providers with a WCF service (that can be self-hosted or be IIS-hosted), and added the missing features, such as deleting an application.
Credentials Manager uses these endpoints to administer the credential store. In addition, it lets administrators to select at runtime the address of the credentials service, and using the MetadataHelper class presented in Chapter 2 it verifies that the address provided does indeed support the required contracts.
To authenticate the client’s username and password using an ASP.NET provider, set the UserNamePasswordValidationMode property to UserNamePasswordValidationMode.MembershipProvider:
ServiceHost host = new ServiceHost(typeof(MyService));
host.Credentials.UserNameAuthentication.UserNamePasswordValidationMode =
                                UserNamePasswordValidationMode.MembershipProvider;
Which provider is used depends on the host config file. In addition, the host config file must contain any provider-specific settings such as a SQL Server connection string, as shown in Example 10-12.
Example 10-12. Internet security using an ASP.NET SQL Server provider
<connectionStrings>
   <add name= "AspNetDb" connectionString = "data source=(local);
                         Integrated Security=SSPI;Initial Catalog=aspnetdb"/>
</connectionStrings>

<system.serviceModel>
   <services>
      <service name = "MyService" behaviorConfiguration = "ASPNETProviders">
         <endpoint
            ...
         />
      </service>
   </services>
   <behaviors>
      <serviceBehaviors>
         <behavior name = "ASPNETProviders">
            <serviceCredentials>
               <userNameAuthenticationuserNamePasswordValidationMode = "MembershipProvider"/>
               <serviceCertificate
                 ...
               />
            </serviceCredentials>
         </behavior>
      </serviceBehaviors>
   </behaviors>
</system.serviceModel>
The default application name will be a useless /, so you must set your specific application name. Once ASP.NET providers are configured, WCF initializes the MembershipProvider property of UserNamePasswordServiceCredential with an instance of the configured membership provider. You can programmatically access that membership provider and set its application name:
ServiceHost host = new ServiceHost(typeof(MyService));
Debug.Assert(host.Credentials.UserNameAuthentication.MembershipProvider != null);Membership.ApplicationName = "MyApplication";
You can also configure the application name in the config file, but for that you need to define a custom ASP.NET membership provider, as shown in Example 10-13.
Example 10-13. Configuring the application name for the membership provider
<system.web>
   <membership defaultProvider = "MySqlMembershipProvider">
      <providers>
         <add name = "MySqlMembershipProvider"
           type  = "System.Web.Security.SqlMembershipProvider"
            connectionStringName = "AspNetDb"applicationName = "MyApplication"
         />
      </providers>
   </membership>
</system.web>
<connectionStrings>
   <add name = "AspNetDb"
     ...
   />
</connectionStrings>
In Example 10-13, you add a system.Web section with a providers section, where you add a custom membership provider and you set that to be the new default membership provider. Next you need to list the fully qualified type name of the new provider. Nothing prevents you referencing any existing implementation of a membership provider, such as SqlMembershipProvider, as in Example 10-13. When using the SQL provider, you must also list the connection string to use, and you cannot rely on the default connection string from machine.config. Most importantly, set the ApplicationName tag to the desired application name.
To support authorizing the users, the host must enable role-based security by adding this to the config file:
<system.web>
   <roleManager enabled = "true"/>
</system.web>
Enabling roles this way will initialize the Roles class and have its Provider property set to the configured provider. To use the ASP.NET role provider, set the PrincipalPermissionMode property to PrincipalPermissionMode.UseAspNetRoles:
ServiceHost host = new ServiceHost(typeof(MyService));
host.Authorization.PrincipalPermissionMode=PrincipalPermissionMode.UseAspNetRoles;
Or when using a config file, add a custom behavior to that effect:
<services>
   <service name = "MyService" behaviorConfiguration = "ASPNETProviders">
      ...
   </service>
</services>
<behaviors>
   <serviceBehaviors>
      <behavior name = "ASPNETProviders">
         <serviceAuthorization principalPermissionMode = "UseAspNetRoles"
         ...
      </behavior>
   </serviceBehaviors>
</behaviors>
After authenticating the client, the RoleProvider property of ServiceAuthorizationBehavior will be set to the configured role provider:
public sealed class ServiceAuthorizationBehavior : IServiceBehavior
{
   public RoleProvider RoleProvider
   {get;set;}
   //More members
}
The default application name will be a useless /, so you must set your specific application name. Unlike the membership provider, you cannot access the RoleProvider property of ServiceAuthorizationBehavior to set the application name, because its value will be null until after authentication. Instead, use the static helper class Roles:
ServiceHost host = new ServiceHost(typeof(MyService));
Debug.Assert(host.Credentials.UserNameAuthentication.MembershipProvider != null);Roles.ApplicationName = "MyApplication";
You can also configure the application name in the config file, but for that you need to define a custom ASP.NET role provider, as shown in Example 10-14.
Example 10-14. Configuring the application name for the role provider
<system.web>
   <roleManager enabled = "true" defaultProvider = "MySqlRoleManager">
      <providers>
         <add name = "MySqlRoleManager"
            type = "System.Web.Security.SqlRoleProvider"
            connectionStringName = "AspNetDb"
           applicationName = "MyApplication"
         />
      </providers>
   </roleManager>
</system.web>
<connectionStrings>
   <add name = "AspNetDb"
     ...
   />
</connectionStrings>
As with the membership provider, you add a system.Web section with a providers section, where you add a custom roles provider and you set that to be the new default role provider. Next you need to list the fully qualified type name of the new provider. As with the membership provider, you can reference any existing implementation of a role provider, such as SqlRoleProvider, in which case you must also list the connection string to use. Finally, set the ApplicationName tag to the desired application name.
You can use the PrincipalPermission attribute to verify role membership just as with the intranet scenario because all the attribute does is access the principal object attached to the thread, which has already been set by WCF to RoleProviderPrincipal. Example 10-15 demonstrates declarative role-based security using the ASP.NET providers.
Example 10-15. ASP.NET role provider declarative role-based security
class MyService : IMyContract
{
   [PrincipalPermission(SecurityAction.Demand,Role = "Manager")]
   public void MyMethod( )
   {...}
}
The only noticeable difference between the intranet and Internet scenarios is that in the Internet scenario, when specifying role name, you do not prefix it with the application or domain name.
In the Internet scenario, when using ASP.NET providers, the identity associated with the principal object is a GenericIdentity wrapping the username provided by the client. That identity is considered authenticated. The security call context’s primary identity will match the principal identity. The Windows identity, on the other hand, will be set to a Windows identity with a blank username; that is, unauthenticated. Table 10-5 shows the identities in this scenario.
When you use the ASP.NET providers, while the callback message is protected, all calls into the callback object come in with an unauthenticated principal. As a result, the principal identity will be set to a Windows identity with a blank username, which will preclude authorization and role-based security, as it is considered anonymous. While the callback does have a security call context, the Windows identity will be set to a WindowsIdentity instance with a blank identity, which will preclude impersonation. The only meaningful information will be in the primary identity that will be set to an instance of the X509Identity class, with a name set to the common name of the service host certificate suffixed by a thumbprint (a hash) of the certificate:
class MyClient : IMyContractCallback
{
   public void OnCallback( )
   {
      IPrincipal principal = Thread.CurrentPrincipal;
      Debug.Assert(principal.Identity.IsAuthenticated == false);

      ServiceSecurityContext context = ServiceSecurityContext.Current;
      Debug.Assert(context.PrimaryIdentity.Name ==
                   "CN=MyServiceCert; D6E33B50BCF6D9609E68762F2C6A14F65679268B");
      Debug.Assert(context.IsAnonymous == false);
   }
}
I recommend avoiding any sensitive work in the callback, since you cannot easily use role-based security.
[*] I first published an earlier version of Credentials Manager in my article “Manage Custom Security Credentials the Smart (Client) Way,” CoDe Magazine, November 2005. Credentials Manager has since become the de facto standard way of administering the ASP.NET SQL Server credentials store.