
Many applications perform similar functions, such as opening and saving files, or selecting fonts. Ever since Windows 3.1, the Windows API has provided standard dialog boxes to perform many of these common operations. Not only does this save the developer from having to reinvent the wheel, but, more importantly. Providing a common dialog used by all applications means that users have to learn how to perform each function only once.
The .NET Framework provides five common dialog boxes. These dialogs are contained in classes that derive from the System.Windows.Forms.CommonDialog class. They are:
FileDialog
ColorDialog
FontDialog
PageSetupDialog
PrintDialog
The common dialogs share many properties, methods and events, some of which are listed in Table 6-5.
Table 6-5. CommonDialog common properties, methods, and events
|
Member |
Type |
Description |
|---|---|---|
|
Container |
Public Property |
Returns the IContainer that contains the dialog box. |
|
Reset |
Public Method |
Resets the properties of the dialog box to its default values. |
|
ShowDialog |
Public Method |
Runs the common dialog box. |
|
HelpRequest |
Public Event |
Raised when user clicks the Help button of a common dialog box. |
The following sections describe each of the common dialogs provided in the CommonDialog class. A single example is used to demonstrate all of the common dialogs. The example consists of a form with a TextBox control for entering and editing text. The form has buttons for opening and loading a file into the TextBox and saving the contents of the TextBox to a file, changing the background color of the TextBox and changing the text color, changing the font, printing the contents of the TextBox, and setting page properties for printing. The completed example with all the buttons is shown in Figure 6-6.

To start this example, open Visual Studio .NET and create a new Windows Application project. Name it CommonDialogs. Drag a TextBox and eight buttons on to the form until it looks like Figure 6-6. Set the properties of the form and the controls to the values shown in Table 6-6.
Table 6-6. CommonDialogs application control properties
|
Control type |
Property |
Value |
|---|---|---|
|
Form |
(Name) |
Form1 |
|
Text |
Common Dialogs | |
|
Textbox |
(Name) |
txtFile |
|
Multiline |
True | |
|
TabIndex |
0 | |
|
Text |
blank | |
|
Anchor |
Top, Bottom, Left, Right | |
|
Button |
(Name) |
btnOpenFile |
|
TabIndex |
1 | |
|
Text |
Open File | |
|
Anchor |
Bottom, Left | |
|
Button |
(Name) |
btnSaveFile |
|
TabIndex |
2 | |
|
Text |
Save File | |
|
Anchor |
Bottom, Left | |
|
Button |
(Name) |
btnBackColor |
|
TabIndex |
3 | |
|
Text |
Background Color | |
|
Anchor |
Bottom, Left | |
|
Button |
(Name) |
btnTextColor |
|
TabIndex |
4 | |
|
Text |
Text Color | |
|
Anchor |
Bottom, Left | |
|
Button |
(Name) |
btnFont |
|
TabIndex |
5 | |
|
Text |
Change Font | |
|
Anchor |
Bottom, Left | |
|
Button |
(Name) |
btnPrint |
|
TabIndex |
6 | |
|
Text |
| |
|
Anchor |
Bottom, Left | |
|
Button |
(Name) |
btnPrintPreview |
|
TabIndex |
7 | |
|
Text |
Print Preview | |
|
Anchor |
Bottom, Left | |
|
Button |
(Name) |
btnPageSetup |
|
TabIndex |
8 | |
|
Text |
Page Setup | |
|
Anchor |
Bottom, Left |
The FileDialog class is an abstract class, so it cannot be instantiated directly. Instead, you can instantiate one of the two classes derived from this class: OpenFileDialog and SaveFileDialog. Both derived classes will be demonstrated in the CommonDialogs example.
OpenFileDialog and SaveFileDialog classes are sealed; they cannot be inherited from. In fact, the FileDialog class cannot be inherited from either.
The FileDialog class provides many properties, methods, and events that are common to both the OpenFileDialog and the SaveFileDialog classes. Table 6-7 lists many of the commonly used properties, all of which are read/write.
Table 6-7. FileDialog common properties
|
Property |
Type |
Description |
|---|---|---|
|
AddExtension |
Boolean |
If |
|
CheckFileExists |
Boolean |
If |
|
CheckPathExists |
Boolean |
If |
|
DefaultExt |
string |
Default filename extension, not including the period (.). The default value is an empty string (""). |
|
FileName |
string |
The single filename selected, including both the file path and the extension. The default value is an empty string (""). If no file is selected, it returns an empty string. |
|
FileNames |
string array |
Array of strings containing all the filenames selected, including both the file path and the extension for each filename. If no files are selected, it returns an empty array. |
|
Filter |
string |
A string that determines the choices available in the File of type: drop-down menu (in the OpenFileDialog) or the Save as type: drop-down menu (in the SaveFileDialog). The string consists of filter description text followed by a filter pattern, separated by a vertical bar (|). Multiple descriptions and patterns can be concatenated, separated by a vertical bar. Examples will be shown in Example 6-11 and Example 6-12. |
|
FilterIndex |
integer |
The one-based index of the currently selected filter. Default value is 1. |
|
InitialDirectory |
string |
Initial directory displayed in the dialog box. Default value is an empty string (""). |
|
RestoreDirectory |
Boolean |
If |
|
ShowHelp |
Boolean |
If |
|
Title |
string |
The dialog box title. Default value is empty string
(""). If the value is an empty
string, default titles are used: |
|
ValidateNames |
Boolean |
If |
Implement the OpenFileDialog box by double-clicking on the Open File button named btnOpenFile. This will open up the code window with the cursor inside a skeleton for the Click event handler for the button. Insert the highlighted code shown in Example 6-11 for C# or in Example 6-12 for VB.NET. Before doing so, however, you need to reference the System.IO namespace (unless you don't want to do any actual file IO with the selected filename). This is done by adding the following line of code to the very top of the code window:
using System.IO;
imports System.IO
Referencing this namespace is not strictly necessary for the operation of the OpenFile dialog, if you only wanted to get the name of a file as a string. But if you actually want to do any file IO, then the System.IO namespace must be referenced.
In addition, you must declare two private member variables. The first is a string variable to hold the name of the file that is being opened. It is declared as a member variable, so both the OpenFileDialog and the SaveFileDialog will have access to the same filename. Add the following line of code inside the Form1 class definition:
private String strFileName;
private strFileName as String
The second member variable is of type OpenFileDialog:
private OpenFileDialog ofd = new OpenFileDialog( );
dim ofd as new OpenFileDialog( )
Instantiating the open file dialog in this manner, rather than inside the button-click event handler, causes the dialog box to remember where it was pointing the last time it was opened, rather than reinitializing to the specified InitialDirectory with every invocation.
Tip
Interestingly, the VB.NET version of the program, shown in Example 6-12, remembers the directory last accessed with the Open File button whether the OpenFileDialog object is instantiated as a member variable or in the event handler method. In fact, it remembers the directory last accessed even from one program execution to the next, ignoring the value of the InitialDirectory property set in the code.
This event handler uses a StreamReader to read the contents of a file and populate the TextBox with those contents. The Stream class allows a program to read and write data, such as a sequence of bytes, from a source to a target. A StreamReader, used here, transfers the data from a text file into a data structure, while a StreamWriter, used shortly in the Save File button, writes the data from a data structure to a file.
Example 6-11. btnOpenFile Click event handler in C#
private void btnOpenFile_Click(object sender, System.EventArgs e)
{
   ofd.InitialDirectory = @"c:";
                     ofd.Filter = "Text files (*.txt)|*.txt|" +
               "All files (*.*)|*.*";
                     ofd.FilterIndex = 1;                     //  1 based index

                     if (ofd.ShowDialog(  ) =  = DialogResult.OK)
                     {
                     StreamReader reader = new StreamReader(ofd.FileName);
                     try
                     {
                     strFileName = ofd.FileName;
                     txtFile.Text = reader.ReadToEnd(  );
                     }
                     catch (Exception ex)
                     {
                     MessageBox.Show(ex.Message);
                     return;
                     }
                     finally
                     {
                     reader.Close(  );
                     }
                     }
}
Example 6-12. btnOpenFile Click event handler in VB.NET
Private Sub btnOpenFile_Click(ByVal sender As System.Object, _
                              ByVal e As System.EventArgs) _
                              Handles btnOpenFile.Click
   ofd.InitialDirectory = "c:\"
   ofd.Filter = "Text files (*.txt)|*.txt|" + _
                  "All files (*.*)|*.*"
   ofd.FilterIndex = 1                     '  1 based index

                     if ofd.ShowDialog(  ) = DialogResult.OK then
                     dim reader as new StreamReader(ofd.FileName)
                     try
                     strFileName = ofd.FileName
                     txtFile.Text = reader.ReadToEnd(  )
                     catch ex as Exception
                     MessageBox.Show(ex.Message)
                     return
                     finally
                     reader.Close(  )
                     end try
                     end if
End Sub
The first several lines of code in the event handler method set three properties of the OpenFileDialog member variable initialized earlier. The InitialDirectory property of the OpenFileDialog is set to the root of Drive C. This looks like the following:
ofd.InitialDirectory = @"c:";
In VB.NET, it looks like this:
ofd.InitialDirectory = "c:\"where the backslash must be escaped with a second backslash.
Note
The @ character is used to create a verbatim
string. The code shown is equivalent to the following:
ofd.InitialDirectory = "c:\";
The next two lines of code set the Filter property of the OpenFileDialog. This property dictates the contents of the File of type: drop-down menu (or the Save as type: drop-down menu in the SaveFileDialog). It can be confusing. Each line in the drop-down menu requires two entries in the Filter property string, separated by a vertical bar character (|). The first entry contains the descriptive text displayed in the drop-down, and the second entry contains the actual wildcard mask that describes the specified files. Each subsequent line in the drop-down menu gets another two entries. Every entry in the string, except for the very first and very last, is delineated by the vertical bar. Looking at the C# example (the VB.NET is nearly identical), you have:
ofd.Filter = "Text files (*.txt)|*.txt|All files (*.*)|*.*";
There are two entries in the drop-down menu. The first displays
Text
files
(*.txt), and the wildcard mask that applies is
*.txt. The second line of the drop-down menu will
be All files (*.*), and the wildcard mask will be
*.*.
The next line of code selects the first filter entry as the current filter.
The if statement calls the ShowDialog method of the OpenFileDialog class, displaying the instance of the dialog box modally. When the dialog box is terminated, the DialogResult property is tested. If it is OK, then the code in the try/catch/finally block is executed. Otherwise, nothing happens. Try...catch blocks are used to manage exceptions, as described in detail in Chapter 21.
It is wise to put all file operations inside a try/catch/finally block so if any unforeseen problems arise, you can control the error message presented to the user. The StreamReader is instantiated outside the try block, so its scope will span both the try and finally clauses. (Remember that a variable declared inside a try block is scoped only to that try block) If any errors occur, the StreamReader Close method is guaranteed to be called, since it is in the finally block.
A new StreamReader is instantiated, using the selected filename as the input:
StreamReader reader = new StreamReader(ofd.FileName);
dim reader as new StreamReader(ofd.FileName)
Next, the member variable strFileName is assigned the filename. This will be used when saving the file to remember the previously used filename.
The ReadToEnd method of the StreamReader class reads the entire file and assigns the contents to the Text property of the TextBox. Finally, the StreamReader is closed inside the finally block.
When the button is clicked, the dialog box shown in Figure 6-7 is presented. If a file is selected and the Open button clicked, the contents of the file will be displayed in the Form's txtFile TextBox.

The SaveFileDialog is similar to the OpenFileDialog. It is shown in Figure 6-8.

To implement this dialog, double-click on the Open File button on the form. This will open the code window with the cursor inside a skeleton for the button's Click event handler. Insert the highlighted code shown in Example 6-13 for C# and in Example 6-14 for VB.NET.
Example 6-13. btnSaveFile Click event handler in C#
private void btnSaveFile_Click(object sender, System.EventArgs e)
{
   SaveFileDialog sfd = new SaveFileDialog(  );
                     sfd.InitialDirectory = @"c:";
                     sfd.Filter = "Text files (*.txt)|*.txt|" +
                "All files (*.*)|*.*";
                     sfd.FilterIndex = 1;                     //  1 based index

                     if (strFileName != null)
                     sfd.FileName = strFileName;
                     else
                     sfd.FileName = "*.txt";

                     if (sfd.ShowDialog(  ) =  = DialogResult.OK)
                     {
                     StreamWriter writer = new StreamWriter(strFileName,false);
                     try
                     {
                     strFileName = sfd.FileName;
                     writer.Write(txtFile.Text);
                     }
                     catch(Exception ex)
                     {
                     MessageBox.Show(ex.Message);
                     return;
                     }
                     finally
                     {
                     writer.Close(  );
                     }
                     }
}
Example 6-14. btnSaveFile Click event handler in VB.NET
   Private Sub btnSaveFile_Click(ByVal sender As System.Object, _
                                 ByVal e As System.EventArgs) _
                                 Handles btnSaveFile.Click
      dim sfd as SaveFileDialog = new SaveFileDialog(  )
                     sfd.InitialDirectory = "c:\"
      sfd.Filter = "Text files (*.txt)|*.txt|" + _
                     "All files (*.*)|*.*"
      sfd.FilterIndex = 1                     '  1 based index

                     if (strFileName <> Nothing) then
                     sfd.FileName = strFileName
                     else
                     sfd.FileName = "*.txt"
      end if

                     if sfd.ShowDialog(  ) = DialogResult.OK then
                     dim writer as new StreamWriter(strFileName,false)
                     try
                     strFileName = sfd.FileName
                     writer.Write(txtFile.Text)
                     catch ex as Exception
                     MessageBox.Show(ex.Message)
                     return
                     finally
                     writer.Close(  )
                     end try
                     end if
   End Sub
The code for the SaveFileDialog in Example 6-13 and Example 6-14 is similar to that shown previously for the OpenFileDialog. Instead of instantiating a SaveFileDialog object as a member variable, a SaveFileDialog object is instantiated within the event handler. Although this entails a bit of extra overhead, it better encapsulates the logic within the method. Since the dialog box FileName property is initialized with the previously opened or saved filename, as described shortly, there is little functional difference between the two techniques.
The InitialDirectory, Filter, and FilterIndex properties are set the same as before.
The next several lines test to see if the strFileName member variable
has been previously assigned a value. If so (i.e., if it is not
null in C# or Nothing in
VB.NET), then that value is assigned to the FileName property of the
SaveFileDialog. If it has not yet been assigned a value, then the
FileName property is set to *.txt. In either case,
this property will initially be displayed in the dialog box as the
selected file. Setting the FileName property in this manner filters
the filenames displayed in the dialog box, which, in this example, is
the same as one of the filters set with the Filter property.
As with the OpenFileDialog in the previous code examples, the SaveFileDialog is displayed modally using the ShowDialog method and the DialogResult property tested in an if statement. If the user terminated the dialog box by clicking OK, then the code in the try/catch block is executed. This code instantiates a StreamWriter object that writes the contents of the txtFile TextBox out to the specified filename.
The ColorDialog class opens a common dialog box for selecting colors. The ColorDialog displays basic system colors, with the optional ability to define custom colors, as shown in Figure 6-9.

The ColorDialog class exposes the read/write properties shown in Table 6-8, which allow you to control the appearance and capabilities of the dialog box.
Table 6-8. ColorDialog initial properties
|
Property |
Type |
Description |
|---|---|---|
|
AllowFullOpen |
Boolean |
If |
|
AnyColor |
Boolean |
If |
|
Color |
Color |
Color selected by the user. Default value is
|
|
CustomColors |
Integer array |
An array of integers representing custom colors shown in the dialog
box. Each integer contains the alpha, red, green, and blue values to
create the color. Custom colors are only available if AllowFullOpen
is set Default value is |
|
FullOpen |
Boolean |
If |
|
ShowHelp |
Boolean |
If |
|
SolidColorOnly |
Boolean |
If |
The ColorDialog can be used anywhere you need to set a Color. In the example shown in Figure 6-6, this dialog is called by two different buttons: the Background Color button calls the ColorDialog to set the BackColor property of the TextBox and the Text Color button calls it to set the ForeColor property.
To implement these buttons, double-click on each to open a code skeleton for the Click event handler in the code window. Then enter the highlighted code shown in Example 6-15 for C# and in Example 6-16 for VB.NET.
Example 6-15. btnBackColor and btnTextColor Click event handlers in C#
private void btnBackColor_Click(object sender, System.EventArgs e)
{
   ColorDialog cd = new ColorDialog(  );
                  cd.AllowFullOpen = true;
                  cd.AnyColor = true;
                  cd.ShowHelp = false;
                  cd.Color = txtFile.BackColor;
                  cd.ShowDialog(  );
                  txtFile.BackColor = cd.Color;
}

private void btnTextColor_Click(object sender, System.EventArgs e)
{
   ColorDialog cd = new ColorDialog(  );
                  cd.AllowFullOpen = false;
                  cd.ShowHelp = true;
                  cd.Color = txtFile.ForeColor;
                  cd.ShowDialog(  );
                  txtFile.ForeColor = cd.Color;
}
Example 6-16. btnBackColor and btnTextColor Click event handlers in VB.NET
Private Sub btnBackColor_Click(ByVal sender As System.Object, _
                               ByVal e As System.EventArgs) _
                               Handles btnBackColor.Click
   dim cd as new ColorDialog(  )
                  cd.AllowFullOpen = true
                  cd.AnyColor = true
                  cd.ShowHelp = false
                  cd.Color = txtFile.BackColor
                  cd.ShowDialog(  )
                  txtFile.BackColor = cd.Color
End Sub

Private Sub btnTextColor_Click(ByVal sender As System.Object, _
                               ByVal e As System.EventArgs) _
                               Handles btnTextColor.Click
   dim cd as New ColorDialog(  )
                  cd.AllowFullOpen = false
                  cd.ShowHelp = true
                  cd.Color = txtFile.ForeColor
                  cd.ShowDialog(  )
                  txtFile.ForeColor = cd.Color
End Sub
In each event-handler method, a new ColorDialog is instantiated, and then properties are set to control the dialog box. The default color is set from the current BackColor or ForeColor of the TextBox, as appropriate, and then the dialog box is displayed modally.
There is no need to test the DialogResult property of the terminated dialog box. If the dialog box is cancelled, nothing changes. If it is terminated with an OK, then the color is automatically set to the current color.
Changing font size, family, style, and effect is a very common occurrence in Windows applications, so there is a CommonDialog to handle that chore for you, shown in Figure 6-10.

Tip
Text and fonts will be covered in detail in Chapter 9.
As with the other members of the CommonDialog class, FontDialog exposes several read/write properties that allow programmatic control of the dialog box. Table 6-9 lists the most commonly used properties.
Table 6-9. FontDialog properties
|
Property |
Type |
Description |
|---|---|---|
|
AllowVectorFonts |
Boolean |
If |
|
AllowVerticalFonts |
Boolean |
If |
|
AllowScriptChange |
Boolean |
If |
|
Color |
Color |
Gets or sets the color of the selected font. The default value is Color.Black. |
|
FixedPitchOnly |
Boolean |
If |
|
Font |
Font |
Gets or sets the font selected by the FontDialog. |
|
MaxSize |
integer |
The maximum point size a user can select. Default is 0. |
|
MinSize |
integer |
The minimum point size a user can select. Default is 0. |
|
ShowApply |
Boolean |
If |
|
ShowColor |
Boolean |
If |
|
ShowEffects |
Boolean |
If |
|
ShowHelp |
Boolean |
If |
To implement a FontDialog dialog box, double-click on the Change Font button and add the highlighted code shown in Example 6-17 for C# and in Example 6-18 for VB.NET. Each code listing comprises two methods. The first is the button Click event handler, for which the method skeleton is provided for you by Visual Studio .NET. The second method is the event handler for the Apply button enabled in the FontDialog.
Since the FontDialog is instantiated in one method (btnFont_Click) and referenced in another (fd_Apply), the FontDialog must be declared such that its scope will span both methods. Also, the printing features in this application, described shortly, will need to know what font has been set, so a member variable of type Font must be declared. To accomplish both goals, add the following lines of code somewhere inside the Form1 class definition:
private FontDialog fd;
private Font fnt;
private fd as FontDialog
private fnt as Font = Nothing
Example 6-17. btnFont Click event handler in C#
private void btnFont_Click(object sender, System.EventArgs e)
{
   fd = new FontDialog(  );
                  fd.ShowHelp = false;
                  fd.ShowApply = true;
                  fd.Apply += new System.EventHandler(this.fd_Apply);

                  if (txtFile.Font != null)
                  {
                  fd.Font = txtFile.Font;
                  }

                  if (fd.ShowDialog(  ) =  = DialogResult.OK)
                  {
                  txtFile.Font = fd.Font;
                  fnt = fd.Font;
                  }
}

private void fd_Apply(object sender, System.EventArgs e)
                  {
                  txtFile.Font = fd.Font;
                  }
Example 6-18. btnFont Click event handler in VB.NET
   Private Sub btnFont_Click(ByVal sender As System.Object, _
                             ByVal e As System.EventArgs) _
                             Handles btnFont.Click
      fd = new FontDialog(  )
                  fd.ShowHelp = false
                  fd.ShowApply = true
                  AddHandler fd.Apply, AddressOf fd_Apply

                  if not (txtFile.Font is Nothing) then
                  fd.Font = txtFile.Font
                  End If

                  if fd.ShowDialog(  ) = DialogResult.OK then
                  txtFile.Font = fd.Font
                  fnt = fd.Font
                  end if
   End Sub

   private sub fd_Apply(ByVal sender As System.Object, _
                        ByVal e As System.EventArgs)
                  txtFile.Font = fd.Font
                  End Sub
The first line of code in the btnFont_Click event handler method
instantiates a new FontDialog object, which was previously declared
as a member variable. The ShowHelp property is set to
false to suppress the Help button, and the
ShowApply property is set to true to enable an
Apply button.
The next line of code adds the fd_Apply method as an event handler for the Apply button enabled in the FontDialog.
The last few lines in the Click event handler displays the dialog modally and tests the DialogResult property in an if statement. If the user clicked OK, then the Font property of the TextBox is set accordingly. Also, the member variable fnt, of type Font, is set for use by the printing methods, although you could just as easily retrieve the current font from the Font property of the TextBox.
The Apply event handler is very simple: it just changes the Font property of the TextBox.
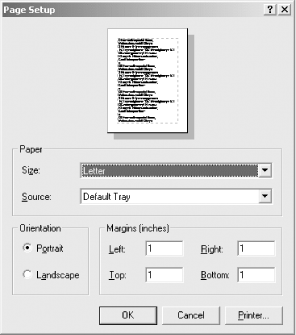
Printing is a key aspect of many Windows applications. Setting up the page for printing is a closely related activity. The PageSetupDialog class provides a common dialog to implement this functionality. A typical PageSetupDialog is shown in Figure 6-11.
Clicking on the Printer... button (enabled with the AllowPrinter property of the PageSetupDialog class) brings up a Page Setup Printer dialog box, shown in Figure 6-12.

Tip
The FinePrint 2000 printer selected in Figure 6-12
is one of the handiest utilities we've ever used.
This shareware installs as a printer on the system and can print any
job as one up, two up (two pages per piece of paper), four up, or
eight up. It also lets you print or delete selected pages from a
print job, although it sometimes acts as a print preview on steroids.
You can find out more about FinePrint at http://www.fineprint.com/.
Both the PageSetupDialog and the PrintDialog (described in the next section) use a Document, which is a property of the PageSetupDialog class. The properties that are set in the PageSetupDialog apply to an instance of a Document. When the PrintDialog prints that Document, those settings will pertain.
As with the other members of the CommonDialog class, the PageSetupDialog exposes several read/write properties that allow programmatic control of the dialog box. The most commonly used properties are listed in Table 6-10.
Table 6-10. PageSetupDialog properties
|
Property |
Type |
Description |
|---|---|---|
|
AllowMargins |
Boolean |
If |
|
AllowOrientation |
Boolean |
If |
|
AllowPaper |
Boolean |
If |
|
AllowPrinter |
Boolean |
If |
|
Document |
PrintDocument |
A PrintDocument instance that holds the settings and is subsequently printed by the PrintDialog. |
|
MinMargins |
Margins |
The minimum margins that can be set. The Margins class contains the
properties Left, Right, Top, and Bottom. The default is
|
|
PageSettings |
PageSettings |
Specifies settings that modify the way a page is printed. Properties include Bounds, Color, Landscape, Margins, PaperSize, PaperSource, PrinterResolution, and PrinterSettings. |
|
PrinterSettings |
PrinterSettings |
Printer settings that will be modified if the Printer button is
clicked. This is typically accessed via
|
|
ShowHelp |
Boolean |
If |
|
ShowNetwork |
Boolean |
If |
To implement the PageSetupDialog in the ongoing example, double-click on the Page Setup button to bring up a code skeleton for the button Click event handler. Then enter the code highlighted in Example 6-19 for C# and in Example 6-20 for VB.NET.
Even with this code entered, the button still will not work correctly. To complete the implementation, a few more lines of code are needed. Notice that the second line of code in the btnPageSetup_Click method assigns a variable named pd, which is not declared in the method, to the PageSetupDialog.Document property. This variable must be a member variable so that it's scope will cover the Print button Click event handler as well as the Page Setup Click event handler. But before you can declare an object of type PrintDocument, the System.Drawing.Printing namespace must be referenced. Add the following line of code at the very top of the code window:
using System.Drawing.Printing;
imports System.Drawing.Printing
Now declare and initialize the PrintDocument object as a member variable by including one of the following lines of code inside the Form1 class definition:
private PrintDocument pd = new PrintDocument( );
dim pd as new PrintDocument( )
The PrintDialog common dialog box provides a standard printing UI for the user. However, it does not make the printing process easy for the developer, as you will see in the next example.
Implement printing in the CommonDialogs application by adding code to the Print button Click event handler. In addition, implement an event handler for the PrintPage event, which is raised every time a page is sent to the printer. The PrintPage event handler must keep track of how many lines have been printed on the page and compute the distance down the page for each line to begin. It then prints each line. If the example were more sophisticated, it would also keep track of the length of each line and handle line wrapping. As it is, long lines in this example will truncate at the right margin.
Figure 6-13 shows a typical PrintDialog common dialog box.

This example uses Streams, which were used previously in the OpenFileDialog example. Consequently, your code should already have a reference to the System.IO namespace:
using System.IO;
imports System.IO
Tip
There are other techniques for feeding the text to the PrintPage event handler, such as passing the entire string as a whole, keeping track of what actually got printed (knowing the size of the font), and using substrings to print the remainder, or using the Lines property of the TextBox.
Specifically, this example uses the StringReader class derived from the TextReader class. A TextReader is used for character input, which suits the contents of the TextBox. A StreamReader object is used for generalized byte input, and a BinaryReader object is used for reading binary data.
Since the StringReader object must be referenced by the Print button, the Print Preview button Click event handlers, and the PrintPage event handler, it should be declared as a Form1 class member variable. Insert the following line of code inside the Form1 class definition:
private StringReader sr;
private sr as StringReader
If you wanted to print a file rather than the contents of a TextBox, you would use a StreamReader object. In that case, the C# member variable would be:
private StreamReader sr;
and the VB.NET declaration would be:
private sr as StreamReader
The btnPrint_Click event handler calls the Print( ) method on the print document pd declared earlier. This raises a PrintPage event for every page sent to the printer. To print something, you must put the print code into the PrintPage event handler, which in this example is called pdPrintPage.
pdPrintPage must be registered with the event delegate as an event handler method for the PrintPage event. This is done once, in the form constructor. The event handler is added to the delegate with the following line of code:
pd.PrintPage += new PrintPageEventHandler(pdPrintPage);
AddHandler pd.PrintPage, AddressOf pdPrintPage
The StringReader is used in pdPrintPage, the PrintPage event handler, but it must be instantiated before that method is entered. The fundamental reason is that for multipage print jobs, you want only one StringReader, or else you will just get infinite copies of the first page. You could just instantiate the StringReader in the btnPrint_Click event handler, except that it will also be used by the Print Preview dialog box, described shortly.
To accomplish this, you will use two events of the PrintDocument class: BeginPrint and EndPrint. As their names suggest, they are raised at the beginning and end of the print job, respectively. Both take an event argument of type PrintEventArgs. This event argument offers a Cancel property, which allows the print job to be cancelled. Event handlers for these two events will also be registered in the form constructor:
pd.BeginPrint += new PrintEventHandler(pdBeginPrint);
pd.EndPrint += new PrintEventHandler(pdEndPrint);
AddHandler pd.BeginPrint, AddressOf pdBeginPrint
AddHandler pd.EndPrint, AddressOf pdEndPrint
Implement the Print button Click event handler by double-clicking on the Print button and entering the highlighted code from Example 6-21 for C# and Example 6-22 for VB.NET. Notice that these code examples include both the code for the btnPrint_Click event handler and the separate PrintPage event-handler method, pdPrintPage, just described.
Example 6-21. btnPrint Click, PrintPage, BeginPrint, and EndPrint event handlers in C#
private void btnPrint_Click(object sender, System.EventArgs e)
{
   PrintDialog pdlg = new PrintDialog(  );
                  pdlg.Document=pd;

                  if (pdlg.ShowDialog(  ) =  = DialogResult.OK)
                  {
                  try
                  {
                  pd.Print(  );
                  }
                  catch(Exception ex)
                  {
                  MessageBox.Show("Print error: " + ex.Message);
                  }
                  }
}

private void pdPrintPage(object sender, PrintPageEventArgs e)
                  {
                  float linesPerPage = 0;
                  float verticalOffset = 0;
                  float leftMargin = e.MarginBounds.Left;
                  float topMargin = e.MarginBounds.Top;
                  int linesPrinted = 0;
                  String strLine = null;

                  linesPerPage = e.MarginBounds.Height / fnt.GetHeight(e.Graphics);

                  while (linesPrinted < linesPerPage &&
                  ((strLine = sr.ReadLine(  ))!= null ))
                  {
                  verticalOffset = topMargin + (linesPrinted * fnt.GetHeight(e.Graphics));
                  e.Graphics.DrawString(strLine, fnt, Brushes.Black, leftMargin,
                            verticalOffset);
                  linesPrinted++;
                  }

                  if (strLine != null)
                  e.HasMorePages = true;
                  else
                  e.HasMorePages = false;
                  }   //  close pdPrintPage

                  private void pdBeginPrint(object sender, PrintEventArgs e)
                  {
                  //  Use the following line to print the contents of a TextBox
                  sr = new StringReader(txtFile.Text);

                  //  Use the following line to print a file
                  //  sr = new StreamReader("c:\test.txt");

                  fnt = txtFile.Font;
                  }

                  private void pdEndPrint(object sender, PrintEventArgs e)
                  {
                  sr.Close(  );
                  MessageBox.Show("Done printing.");
                  }
Example 6-22. btnPrint Click, PrintPage, BeginPrint, and EndPrint event handlers in VB.NET
   Private Sub btnPrint_Click(ByVal sender As System.Object, _
                              ByVal e As System.EventArgs) _
                              Handles btnPrint.Click
      dim pdlg as New PrintDialog(  )
                  pdlg.Document=pd

                  if pdlg.ShowDialog(  ) = DialogResult.OK then
                  try
            ' Set the font from the current font of the TextBox
                  fnt = txtFile.Font

                  pd.Print(  )
                  catch ex as Exception
                  MessageBox.Show("Print error: " + ex.Message)
                  end try
                  end if
   End Sub

private sub pdPrintPage(ByVal sender As System.Object, _
                        ByVal e As PrintPageEventArgs)
                  dim linesPerPage as single = 0
                  dim verticalOffset as Single = 0
                  dim leftMargin as Single = e.MarginBounds.Left
                  dim topMargin as Single = e.MarginBounds.Top
                  dim linesPrinted as Integer = 0
                  dim strLine as String = Nothing

                  linesPerPage = e.MarginBounds.Height / fnt.GetHeight(e.Graphics)

                  strLine = sr.ReadLine(  )
                  dim boolDone as Boolean = false
                  while ((linesPrinted < linesPerPage) and not boolDone)
                  try
                  if strLine.Length >= 0 then
                  verticalOffset = topMargin + (linesPrinted * _
                  fnt.GetHeight(e.Graphics))
                  e.Graphics.DrawString(strLine, fnt, Brushes.Black, _
                  leftMargin, verticalOffset)
                  linesPrinted += 1
                  strLine = sr.ReadLine(  )
                  end if
                  catch
                  boolDone = true
                  end try
                  end while

                  if strLine <> Nothing then
                  e.HasMorePages = true
                  else
                  e.HasMorePages = false
                  end if
                  end sub   '  close pdPrintPage

                  private sub pdBeginPrint(ByVal sender As System.Object, _
                         ByVal e As PrintEventArgs)
   '  Use the following line to print the contents of a TextBox
                  sr = new StringReader(txtFile.Text)

   '  Use the following line to print a file
   'sr = new StreamReader("c:	est.txt")

   ' Set the font from the current font of the TextBox
                  fnt = txtFile.Font
                  End Sub

                  private sub pdEndPrint(ByVal sender As System.Object, _
                       ByVal e As PrintEventArgs)
                  sr.Close(  )
                  MessageBox.Show("Done printing.")
                  End Sub
The first two lines of code in the btnPrint_Click method instantiates a new PrintDialog common dialog box and assigns the already declared PrintDocument pd to its Document property. (The PrintDocument was instantiated as a form member variable and used as part of the PageSetupDialog example in the previous section.) If the PageSetupDialog had been called from the Page Setup button, then any changes made to the page setup would be contained in the PrintDocument and therefore applied to the current print job.
The next line is an if statement that displays the dialog box modally and tests the DialogResult property to see if the user terminated the dialog by clicking OK. If so, then the code inside the if block is executed, which is the single line of code that actually performs the printing:
pd.Print( )
This line is wrapped in a try/catch block. This way, if any problems arise during the printing process, say because the printer is not available, they can be handled gracefully.
The PageDocument Print( ) method is called to print the document. However, the fun is just beginning. Before the print job actually begins, the PageDocument BeginPrint event is raised, which causes the event handler, pdBeginPrint, to execute. The StringReader is instantiated here. (There is also a commented-out line of code that could be used instead of the StringReader if you wanted to print the contents of a file, rather than a text box.) The font is set based on the current Font property of TextBox.
As each page is printed, the PrintPage event is raised, which is handled by the event handler method pdPrintPage. This event handler is passed an event argument of type PrintPageEventArgs, which has the properties (read/write, except where noted) listed in Table 6-11.
Table 6-11. PrintPageEventArgs properties
|
Property |
Type |
Description |
|---|---|---|
|
Cancel |
Boolean |
If |
|
Graphics |
Graphics |
Gets the Graphics to paint the page. Read-only. |
|
HasMorePages |
Boolean |
If |
|
MarginBounds |
Rectangle |
The rectangular area inside the page margins. Read-only. |
|
PageBounds |
Rectangle |
The rectangular area representing the entire page. Read-only. Note that most printers cannot print to the edge of the page. |
|
PageSettings |
PageSettings |
Page settings for the current page. Read-only. |
The first several lines of code in the pdPrintPage method declare and instantiate variables for use in the method.
linesPerPage is a calculated floating-point number (single in VB.NET) which indicates the number of lines of text on the page, based on the heights of the page and the current font. This calculation is:
linesPerPage = e.MarginBounds.Height / fnt.GetHeight(e.Graphics);
As shown in Table 6-11, MarginBounds is a property of the PrintPageEventArgs event argument. As an object of type Rectangle, it has the properties shown in Table 6-12 (read/write, except where noted). Thus, the linesPerPage is calculated by dividing the height of the page inside the margins by the height of the current font.
Table 6-12. Rectangle properties
|
Property |
Type |
Access |
Description |
|---|---|---|---|
|
Height |
integer |
Height of this Rectangle. | |
|
Width |
integer |
Width of this Rectangle. | |
|
X |
integer |
X-coordinate of the upper-left corner of this Rectangle. | |
|
Y |
integer |
Y-coordinate of the upper-left corner of this Rectangle. | |
|
Location |
Point |
Upper-left corner of this Rectangle. | |
|
Bottom |
integer |
Read-only |
Y-coordinate of the bottom of this Rectangle. |
|
Top |
integer |
Read-only |
Y-coordinate of the top edge of this Rectangle. |
|
Left |
integer |
Read-only |
X-coordinate of the left edge of this Rectangle. |
|
Right |
integer |
Read-only |
X-coordinate of the right edge of this Rectangle. |
|
Size |
Size |
Width and height of this Rectangle. | |
|
IsEmpty |
Boolean |
Read-only |
Returns |
The next several lines are the meat of the method, reproduced here:
while (linesPrinted < linesPerPage &&
      ((strLine = sr.ReadLine(  ))!= null ))
{
   verticalOffset = topMargin + (linesPrinted * fnt.GetHeight(e.Graphics));
   e.Graphics.DrawString(strLine, fnt, Brushes.Black, leftMargin,
                         verticalOffset);
   linesPrinted++;
}
strLine = sr.ReadLine(  )
dim boolDone as Boolean = false
while ((linesPrinted < linesPerPage) and not boolDone)
   try
      if strLine.Length >= 0 then
         verticalOffset = topMargin + (linesPrinted * _
            fnt.GetHeight(e.Graphics))
         e.Graphics.DrawString(strLine, fnt, Brushes.Black, _
            leftMargin, verticalOffset)
         linesPrinted += 1
         strLine = sr.ReadLine(  )
      end if
   catch
      boolDone = true
   end try
end while
The code here is somewhat different in the two languages. In either case, a while loop tests if the number of lines printed exceeds the number of lines previously calculated per page.
The C# version also tests if the current line is
null, indicating that it has read past the end of
the StringReader. The C# version is able to assign the string value
to strLine from the StringReader in-line with the latter test because
the assignment operator (=) in C# is distinct from the equality
operator (= =).
In the VB.NET version, the assignment is initially done outside the
while loop, and again at the end of each iteration through the while
loop. However, a simple test to see if the string strLine is Nothing
returns false if the string consists only of a
carriage return/line feed, as well as if the string is truly Nothing.
This causes the print job to end prematurely if there are any empty
lines in the text file being printed. To work around this problem,
the Length property of the string is tested in an if statement. If
the string is truly Nothing, an exception will be raised, which is
trapped by the try/catch block, setting a flag.
If there is something to print, then the vertical offset from the top of the page is calculated based on the Top property of the MarginsBounds property of the PrintPageEventArgs event argument, plus the product of the font height times the number of lines already printed. Then the DrawString method of the Graphics class is called to actually print the line of text. This version of the overloaded method takes five arguments: the string to print, the font, a Brush color, the left margin, and the vertical offset.
Tip
Printing of text will be further detailed in Chapter 10.
Once the line of text is printed, the linesPrinted counter is incremented. In the VB.NET version only, the next string to be printed is fetched from the StringReader, and the while loop is traversed again if the test still passes.
Once the page is printed—i.e., the test in the while loop fails—then the code tests to see if there is still more to print. This is reproduced here:
if (strLine != null)
   e.HasMorePages = true;
else
   e.HasMorePages = false;
if strLine <> Nothing then
   e.HasMorePages = true
else
   e.HasMorePages = false
end if
If there is nothing more to print, then strLine will be empty and the
HasMorePages property of the PrintPageEventArgs event argument will
be set to false; otherwise it will be set
true. As long as it is true, the PrintPage event
will be raised at the conclusion of each page and pdPrintPage, the
PrintPage event handler, will be called again.
When the print job is complete, the PrintDocument EndPrint event is raised, invoking the pdEndPrint event handler. This method closes the StringReader and puts a message up for the user.
In addition to the common dialogs discussed so far, all of which are derived from the CommonDialog class, the framework includes a PrintPreviewDialog that derives from System.Windows.Forms.Form. This class contains a PrintPreview control, which you could also place directly on a form.
The PrintPreviewDialog, shown in Figure 6-14, uses the same PrintDocument used previously in this example by the PageSetup and Print dialogs. Any changes made to the print document in the PageSetup dialog are reflected in the print preview. The Preview dialog allows the user to zoom in on previewed page, set the number of pages displayed at one time (1, 2, 3, 4, or 6), and to print directly from this dialog.

This dialog is called using the btnPrintPreview button. The Click event handler for the button is shown in Example 6-23 in C# and in Example 6-24 in VB.NET.
This event handler instantiates the PrintPreview dialog box and assigns the Document property. Then a single line of code displays the dialog box modally. All work of displaying the preview is handled by the PageDocument PrintPage event handler, already implemented for the Print dialog.