
We are going to allow users to bookmark images from external websites. The user will provide the URL of the image, a title, and optional description. Our application will download the image and create a new Image object in the database.
Let's start by building a form to submit new images. Create a new forms.py file inside the images application directory and add the following code to it:
from django import forms
from .models import Image

class ImageCreateForm(forms.ModelForm):
    class Meta:
        model = Image
        fields = ('title', 'url', 'description')
        widgets = {
            'url': forms.HiddenInput,
        }
As you can see, this form is a ModelForm built from the Image model including only the title, url, and description fields. Our users are not going to enter the image URL directly in the form. Instead, they are going to use a JavaScript tool to choose an image from an external site and our form will receive its URL as a parameter. We override the default widget of the url field to use a HiddenInput widget. This widget is rendered as an HTML input element with a type="hidden" attribute. We use this widget because we don't want this field to be visible to users.
In order to verify that the provided image URL is valid, we are going to check that the filename ends with a .jpg or .jpeg extension to only allow JPG files. Django allows you to define form methods to clean specific fields using the notation clean_<fieldname>(). This method is executed for each field, if present, when you call is_valid() on a form instance. In the clean method, you can alter the field's value or raise any validation errors for this specific field when needed. Add the following method to the ImageCreateForm:
def clean_url(self):
    url = self.cleaned_data['url']
    valid_extensions = ['jpg', 'jpeg']
    extension = url.rsplit('.', 1)[1].lower()
    if extension not in valid_extensions:
        raise forms.ValidationError('The given URL does not '
                                  'match valid image extensions.')
    return url
In this code, we define a clean_url() method to clean the url field. The code works as follows:
- We get the value of the
urlfield by accessing thecleaned_datadictionary of the form instance. - We split the URL to get the file extension and check if it is one of the valid extensions. If it is not a valid extension, we raise a
ValidationErrorand the form instance will not be validated. We are performing a very simple validation. You could use more advanced methods to check whether the given URL provides a valid image file or not.
In addition to validating the given URL, we will also need to download the image file and save it. We could, for example, use the view that handles the form to download the image file. Instead, we are going to take a more general approach by overriding the save() method of our model form to perform this task every time the form is saved.
As you know, ModelForm provides a save() method to save the current model instance to the database and return the object. This method receives a boolean commit parameter, which allows you to specify whether the object has to be persisted to the database. If commit is False, the save() method will return a model instance but will not save it to the database. We are going to override the save() method of our form in order to retrieve the given image and save it.
Add the following imports at the top of the forms.py file:
from urllib import request
from django.core.files.base import ContentFile
from django.utils.text import slugify
Then add the following save() method to the ImageCreateForm:
def save(self, force_insert=False,
               force_update=False,
               commit=True):
    image = super(ImageCreateForm, self).save(commit=False)
    image_url = self.cleaned_data['url']
    image_name = '{}.{}'.format(slugify(image.title),
                              image_url.rsplit('.', 1)[1].lower())

    # download image from the given URL
    response = request.urlopen(image_url)
    image.image.save(image_name,
                     ContentFile(response.read()),
                     save=False)
    if commit:
        image.save()
    return image
We override the save() method keeping the parameters required by ModelForm. This code is as follows:
- We create a new
imageinstance by calling thesave()method of the form withcommit=False. - We get the URL from the
cleaned_datadictionary of the form. - We generate the image name by combining the
imagetitle slug with the original file extension. - We use the Python
urllibmodule to download the image and then we call thesave()method of the image field passing it aContentFileobject that is instantiated with the downloaded file contents. In this way we save the file to the media directory of our project. We also pass the parametersave=Falseto avoid saving the object to database yet. - In order to maintain the same behavior as the
save()method we override, we save the form to the database only when the commit parameter isTrue.
Now we need a view for handling the form. Edit the views.py file of the images application and add the following code to it:
from django.shortcuts import render, redirect
from django.contrib.auth.decorators import login_required
from django.contrib import messages
from .forms import ImageCreateForm

@login_required
def image_create(request):
    if request.method == 'POST':
        # form is sent
        form = ImageCreateForm(data=request.POST)
        if form.is_valid():
            # form data is valid
            cd = form.cleaned_data
            new_item = form.save(commit=False)

            # assign current user to the item
            new_item.user = request.user
            new_item.save()
            messages.success(request, 'Image added successfully')

            # redirect to new created item detail view
            return redirect(new_item.get_absolute_url())
    else:
        # build form with data provided by the bookmarklet via GET
        form = ImageCreateForm(data=request.GET)

    return render(request,
                  'images/image/create.html',
                  {'section': 'images',
                   'form': form})
We add a login_required decorator to the image_create view to prevent access for non-authenticated users. This is how this view works:
- We expect initial data via GET in order create an instance of the form. This data will consist of the
urlandtitleattributes of an image from an external website and will be provided via GET by the JavaScript tool we will create later. For now we just assume that this data will be there initially. - If the form is submitted we check if it is valid. If the form is valid we create a new
Imageinstance, but we prevent the object from being saved into the database yet by passingcommit=False. - We assign the current user to the new
imageobject. This is how we can know who uploaded eachimage. - We save the image object to the database.
- Finally, we create a success message using the Django messaging framework and redirect the user to the canonical URL of the new image. We haven't implemented the
get_absolute_url()method of the Image model yet, we will do that later.
Create a new urls.py file inside your images application and add the following code to it:
from django.conf.urls import url
from . import views

urlpatterns = [
    url(r'^create/$', views.image_create, name='create'),
]
Edit the main urls.py file of your project to include the patterns we just created for the images application as follows:
urlpatterns = [
    url(r'^admin/', include(admin.site.urls)),
    url(r'^account/', include('account.urls')),
    url(r'^images/', include('images.urls', namespace='images')),
]
Finally, you need to create a template to render the form. Create the following directory structure inside the images application directory:
templates/
    images/
        image/
            create.html
Edit the new create.html template and add the following code to it:
{% extends "base.html" %}

{% block title %}Bookmark an image{% endblock %}

{% block content %}
  <h1>Bookmark an image</h1>
  <img src="{{ request.GET.url }}" class="image-preview">
  <form action="." method="post">
    {{ form.as_p }}
    {% csrf_token %}
    <input type="submit" value="Bookmark it!">
  </form>
{% endblock %}
Now open http://127.0.0.1:8000/images/create/?title=...&url=... in your browser, including a title and url GET parameters providing an existing JPG image URL in the latter.
For example, you can use the following URL: http://127.0.0.1:8000/images/create/?title=%20Django%20and%20Duke&url=http://upload.wikimedia.org/wikipedia/commons/8/85/Django_Reinhardt_and_Duke_Ellington_%28Gottlieb%29.jpg.
You will see the form with an image preview like the following one:

Add a description and click the Bookmark it! button. A new Image object will be saved into your database. You will get an error indicating that the Image model has no get_absolute_url() method. Don't worry about this for now, we are going to add this method later. Open http://127.0.0.1:8000/admin/images/image/ in your browser and verify that the new image object has been saved.
A bookmarklet is a bookmark stored in a web browser that contains JavaScript code to extend the browser's functionality. When you click the bookmark, the JavaScript code is executed on the website being displayed in the browser. This is very useful for building tools that interact with other websites.
Some online services such as Pinterest implement their own bookmarklets to let users share content from other sites onto their platform. We are going to create a bookmarklet, in a similar way, to let users share images from other sites in our website.
We are going to use jQuery to build our bookmarklet. jQuery is a popular JavaScript framework that allows you to develop client-side functionality faster. You can read more about jQuery at its official website http://jquery.com/.
This is how your users will add a bookmarklet to their browser and use it:
- The user drags a link from your site to his browser's bookmarks. The link contains JavaScript code in its
hrefattribute. This code will be stored in the bookmark. - The user navigates to any website and clicks the bookmark. The JavaScript code of the bookmark is executed.
Since the JavaScript code will be stored as a bookmark, you will not be able to update it later. This is an important drawback, but you can solve it by implementing a simple launcher script that loads the actual JavaScript bookmarklet from a URL. Your users will save this launcher script as a bookmark and you will be able to update the code of the bookmarklet anytime. This is the approach we are going to take to build our bookmarklet. Let's start!
Create a new template under images/templates/ and name it bookmarklet_launcher.js. This will be the launcher script. Add the following JavaScript code to this file:
(function(){
    if (window.myBookmarklet !== undefined){
        myBookmarklet();
    }
    else {
        document.body.appendChild(document.createElement('script')).src='http://127.0.0.1:8000/static/js/bookmarklet.js?r='+Math.floor(Math.random()*99999999999999999999);
    }
})();
This script discovers if the bookmarklet is already loaded by checking if the myBookmarklet variable is defined. By doing so, we avoid loading it again if the user clicks on the bookmarklet repeatedly. If myBookmarklet is not defined, we load another JavaScript file adding a <script> element to the document. The script tag loads the bookmarklet.js script using a random number as parameter to prevent loading the file from the browser's cache.
The actual bookmarklet code will reside in the bookmarklet.js static file. This will allow us to update our bookmarklet code without requiring our users to update the bookmark they previously added to their browser. Let's add the bookmarklet launcher to the dashboard pages, so that our users can copy it to their bookmarks.
Edit the account/dashboard.html template of the account application and make it look like the following:
{% extends "base.html" %}

{% block title %}Dashboard{% endblock %}

{% block content %}
  <h1>Dashboard</h1>

  {% with total_images_created=request.user.images_created.count %}
    <p>Welcome to your dashboard. You have bookmarked {{ total_images_created }} image{{ total_images_created|pluralize }}.</p>
  {% endwith %}

  <p>Drag the following button to your bookmarks toolbar to bookmark images from other websites → <a href="javascript:{% include "bookmarklet_launcher.js" %}" class="button">Bookmark it</a><p>

  <p>You can also <a href="{% url "edit" %}">edit your profile</a> or <a href="{% url "password_change" %}">change your password</a>.<p>
{% endblock %}
The dashboard displays now the total number of images bookmarked by the user. We use the {% with %} template tag to set a variable with the total number of images bookmarked by the current user. We also include a link with an href attribute that contains the bookmarklet launcher script. We are including this JavaScript code from the bookmarklet_launcher.js template.
Open http://127.0.0.1:8000/account/ in your browser. You should see the following page:

Drag the Bookmark it! link to the bookmarks toolbar of your browser.
Now create the following directories and files inside the images application directory:
static/js/bookmarklet.js
You will find a static/css/ directory under the images application directory, in the code that comes along with this chapter. Copy the css/ directory into the static/ directory of your code. The css/bookmarklet.css file provides the styles for our JavaScript bookmarklet.
Edit the bookmarklet.js static file and add the following JavaScript code to it:
(function(){
  var jquery_version = '2.1.4';
  var site_url = 'http://127.0.0.1:8000/';
  var static_url = site_url + 'static/';
  var min_width = 100;
  var min_height = 100;

  function bookmarklet(msg) {
    // Here goes our bookmarklet code
  };

  // Check if jQuery is loaded
  if(typeof window.jQuery != 'undefined') {
    bookmarklet();
  } else {
    // Check for conflicts
    var conflict = typeof window.$ != 'undefined';
    // Create the script and point to Google API
    var script = document.createElement('script');
    script.setAttribute('src',
      'http://ajax.googleapis.com/ajax/libs/jquery/' +
      jquery_version + '/jquery.min.js');
    // Add the script to the 'head' for processing
    document.getElementsByTagName('head')[0].appendChild(script);
    // Create a way to wait until script loading
    var attempts = 15;
    (function(){
      // Check again if jQuery is undefined
      if(typeof window.jQuery == 'undefined') {
        if(--attempts > 0) {
          // Calls himself in a few milliseconds
          window.setTimeout(arguments.callee, 250)
        } else {
          // Too much attempts to load, send error
          alert('An error ocurred while loading jQuery')
        }
      } else {
          bookmarklet();
      }
    })();
  }
})()
This is the main jQuery loader script. It takes care of using jQuery if it's already loaded in the current website, or it loads jQuery from Google's CDN otherwise. When jQuery is loaded it executes the bookmarklet() function that will contain our bookmarklet code. We also set some variables at the top of the file:
jquery_version: The jQuery version to loadsite_urlandstatic_url: The base URL for our website and base URL for static files respectivelymin_widthandmin_height: minimum width and height in pixels for the images our bookmarklet will try to find in the site
Now let's implement the bookmarklet function. Edit the bookmarklet() function to make it look like this:
function bookmarklet(msg) {
// load CSS
var css = jQuery('<link>');
css.attr({
rel: 'stylesheet',
type: 'text/css',
href: static_url + 'css/bookmarklet.css?r=' + Math.floor(Math.random()*99999999999999999999)
});
jQuery('head').append(css);
// load HTML
box_html = '<div id="bookmarklet"><a href="#" id="close">×</a><h1>Select an image to bookmark:</h1><div class="images"></div></div>';
jQuery('body').append(box_html);
// close event
jQuery('#bookmarklet #close').click(function(){
jQuery('#bookmarklet').remove();
});
};This code works as follows:
- We load the
bookmarklet.cssstylesheet using a random number as parameter to avoid the browser's cache. - We add custom HTML to the document
<body>element of the current website. This consists of a<div>element that will contain the images found on the current website. - We add an event that removes our HTML from the document when the user clicks the close link of our HTML block. We use the
#bookmarklet#closeselector to find the HTML element with an ID namedclose, which has a parent element with an ID namedbookmarklet. A jQuery selectors allow you to find HTML elements. A jQuery selector returns all elements found by the given CSS selector. You can find a list of jQuery selectors at http://api.jquery.com/category/selectors/.
After loading the CSS styles and the HTML code for the bookmarklet we need to find the images in the website. Add the following JavaScript code at the bottom of the bookmarklet() function:
// find images and display them
jQuery.each(jQuery('img[src$="jpg"]'), function(index, image) {
  if (jQuery(image).width() >= min_width && jQuery(image).height() >= min_height)
  {
    image_url = jQuery(image).attr('src');
    jQuery('#bookmarklet .images').append('<a href="#"><img src="'+ image_url +'" /></a>');
  }
});
This code uses the img[src$="jpg"] selector to find all <img> HTML elements, whose src attribute finishes with a jpg string. This means that we are finding all JPG images displayed in the current website. We iterate over the results using the each() method of jQuery. We add to our <div class="images"> HTML container the images with a size larger than the one specified with the min_width and min_height variables.
The HTML container now includes the images that can be bookmarked. We want the user to click on the desired image and bookmark it. Add the following code at the bottom of the bookmarklet() function:
// when an image is selected open URL with it
jQuery('#bookmarklet .images a').click(function(e){
  selected_image = jQuery(this).children('img').attr('src');
  // hide bookmarklet
  jQuery('#bookmarklet').hide();
  // open new window to submit the image
  window.open(site_url +'images/create/?url='
              + encodeURIComponent(selected_image)
              + '&title='
              + encodeURIComponent(jQuery('title').text()),
              '_blank');
});
This code works as follows:
- We attach a
click()event to the images' link elements. - When a user clicks on an image we set a new variable called
selected_imagethat contains the URL of the selected image. - We hide the bookmarklet and open a new browser window with the URL for bookmarking a new image in our site. We pass the
<title>element of the website and the selected image URL asGETparameters.
Open a website of your own choice in your browser and click on your bookmarklet. You will see that a new white box appears on the the website, displaying all JPG images found with higher dimensions than 100 x 100 px. It should look like the following example:
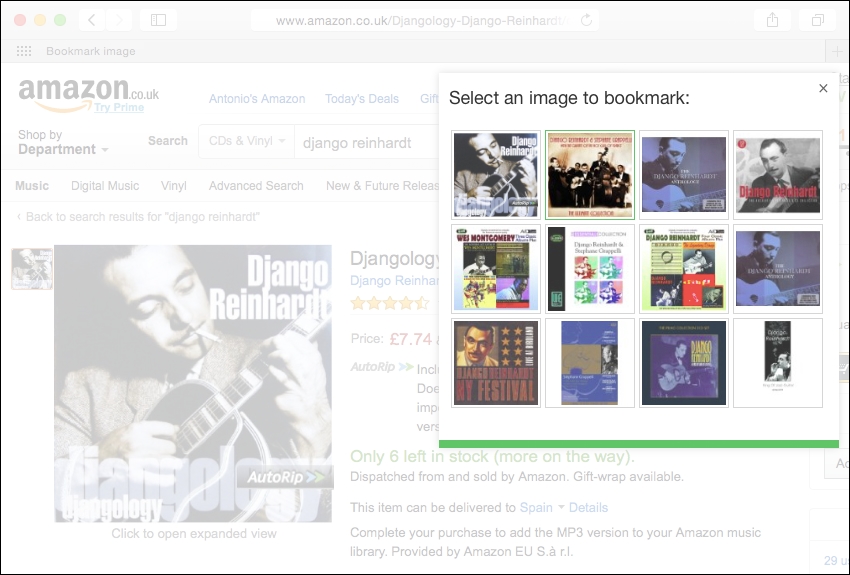
Since we are using the Django development server, and we are serving pages via HTTP, the bookmarklet will not work in websites served via HTTPS due to security restrictions of the browser.
If you click on an image, you will be redirected to the image create page, passing the title of the website and the URL of the selected image as GET parameters:

Congratulations! This is your first JavaScript bookmarklet and it is fully integrated into your Django project.