
You might also want to add social authentication to your site using services such as Facebook, Twitter, or Google. Python-social-auth is a Python module that simplifies the process of adding social authentication to your website. By using this module, you can let your users log in to your website using their account of other services. You can find the code of this module at https://github.com/omab/python-social-auth.
This module comes with authentication backends for different Python frameworks, including Django.
To install the package via pip, open the console and run the following command:
pip install python-social-auth==0.2.12
Then add social.apps.django_app.default to the INSTALLED_APPS setting in the settings.py file of your project:
INSTALLED_APPS = (
    #...
    'social.apps.django_app.default',
)
This is the default application to add python-social-auth to Django projects. Now, run the following command to sync python-social-auth models with your database:
python manage.py migrate
You should see that the migrations for the default application are applied as follows:
Applying default.0001_initial... OK
Applying default.0002_add_related_name... OK
Applying default.0003_alter_email_max_length... OK
Python-social-auth includes backends for multiple services. You can see a list of all backends at https://python-social-auth.readthedocs.org/en/latest/backends/index.html#supported-backends.
We are going to include authentication backends for Facebook, Twitter, and Google.
You need to add social login URL patterns to your project. Open the main urls.py file of the bookmarks project and add the following URL pattern to it:
url('social-auth/',
    include('social.apps.django_app.urls', namespace='social')),
In order to make social authentication work, you will need a hostname, because several services will not allow redirecting to 127.0.0.1 or localhost. In order to fix this, under Linux or Mac OS X, edit your /etc/hosts file and add the following line to it:
127.0.0.1 mysite.com
This will tell your computer to point the mysite.com hostname to your own machine. If you are using Windows, your hosts file is located at C:WinwowsSystem32Driversetchosts.
To verify that your host redirection worked, open http://mysite.com:8000/account/login/ in your browser. If you see the log in page of your application, everything was done correctly.
In order to let your users log in with their Facebook account to your site, add the following line to the AUTHENTICATION_BACKENDS setting in the settings.py file of your project:
'social.backends.facebook.Facebook2OAuth2',
In order to add social authentication with Facebook, you need a Facebook developer account, and you have to to create a new Facebook application. Open https://developers.facebook.com/apps/?action=create in your browser and click on the Add new app button. Click on Website platform and enter Bookmarks for your app name. When asked, enter http://mysite.com:8000/ as your Site URL. Follow the quickstart and click on Create App ID.
Go to the Dashboard of your site. You will see something similar to the following:

Copy the App ID and App Secret keys and add them to the settings.py file of your project as follows:
SOCIAL_AUTH_FACEBOOK_KEY = 'XXX' # Facebook App ID
SOCIAL_AUTH_FACEBOOK_SECRET = 'XXX' # Facebook App Secret
Optionally, you can define a SOCIAL_AUTH_FACEBOOK_SCOPE setting with the extra permissions you want to ask Facebook users for:
SOCIAL_AUTH_FACEBOOK_SCOPE = ['email']
Finally, open your registration/login.html template and append the following code to the content block:
<div class="social">
  <ul>
    <li class="facebook"><a href="{% url "social:begin" "facebook" %}">Sign in with Facebook</a></li>
  </ul>
</div>
Open http://mysite.com:8000/account/login/ in your browser. Now your login page will look as follows:

Click the Login with Facebook button. You will be redirected to Facebook, and you will see a modal dialog asking for your permission to let the Bookmarks application access your public Facebook profile:

Click the Okay button. Python-social-auth handles the authentication. If everything goes well, you will be logged in and redirected to the dashboard page of your site. Remember that we have used this URL in the LOGIN_REDIRECT_URL setting. As you can see, adding social authentication to your site is pretty straightforward.
For social authentication using Twitter, add the following line to the
AUTHENTICATION_BACKENDS setting in the settings.py file of your project:
'social.backends.twitter.TwitterOAuth',
You need to create a new application in your Twitter account. Open https://apps.twitter.com/app/new in your browser and enter the details of your application including the following settings:
- Website:
http://mysite.com:8000/ - Callback URL:
http://mysite.com:8000/social-auth/complete/twitter/
Make sure you mark the checkbox Allow this application to be used to Sign in with Twitter. Then click on Keys and Access Tokens. You should see the following information:
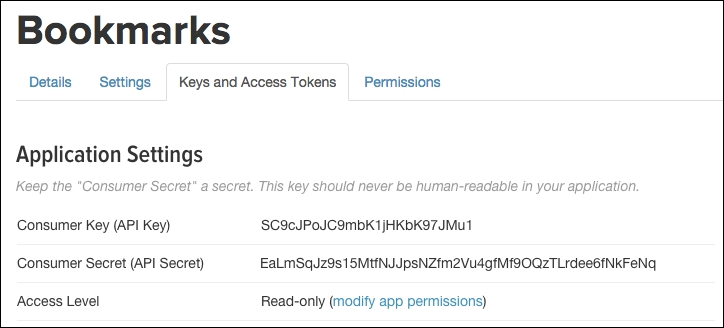
Copy the Consumer Key and Consumer Secret keys into the following settings in the settings.py file of your project:
SOCIAL_AUTH_TWITTER_KEY = 'XXX' # Twitter Consumer Key
SOCIAL_AUTH_TWITTER_SECRET = 'XXX' # Twitter Consumer Secret
Now, edit the login.html template and add the following code in the <ul> element:
<li class="twitter"><a href="{% url "social:begin" "twitter" %}">Login with Twitter</a></li>Open http://mysite.com:8000/account/login/ in your browser and click the Login with Twitter link. You will be redirected to Twitter and it will ask you to authorize the application:

Click on Authorize app button. You will be logged in and redirected to the dashboard page of your site.
Google offers OAuth2 authentication. You can read about Google's OAuth2 implementation at https://developers.google.com/accounts/docs/OAuth2.
First, you need to create an API key in your Google Developer Console. Open https://console.developers.google.com/project in your browser and click the Create project button. Give it a name and click the Create button as follows:

After the project is created, click the APIs & auth link on the left menu and then click on Credentials section. Click the Add credentials button and choose OAuth 2.0 client ID as follows:

Google will ask you to configure the consent screen first. This is the page that will be shown to users to give their consent to access your site with their Google account. Click the Configure consent screen button. Select your e-mail address, enter Bookmarks as Product name, and click the Save button. The consent screen for your application will be configured and you will be redirected to finish creating your Client ID.
Fill in the form with the following information:
The form should look as follows:

Click the Create button. You will get the Client ID and Client Secret keys. Add them to your settings.py file, like this:
SOCIAL_AUTH_GOOGLE_OAUTH2_KEY = '' # Google Consumer Key
SOCIAL_AUTH_GOOGLE_OAUTH2_SECRET = '' # Google Consumer Secret
In the left menu of the Google Developers Console, under the APIs & auth section, click the APIs link. You will see a list that contains all Google APIs. Click on Google+ API and then click the Enable API button in the following page:

Edit the login.html template and add the following code to the <ul> element:
<li class="google"><a href="{% url "social:begin" "google" %}">Login with Google</a></li>Open http://mysite.com:8000/account/login/ in your browser. The login page should now look as follows:

Click the Login with Google button. You should be redirected to Google and asked for permissions with the consent screen we previously configured:

Click the Accept button. You will be logged in and redirected to the dashboard page of your website.
We have added social authentication to our project. The python-social-auth module contains backends for other popular on-line services.