
Known as a Photoshop expert, I help other photographers understand how to use this tool by providing seminars and by teaching at Photoshop World and through online Photoshop classes at kelbytraining.com.
I truly enjoy teaching Photoshop for three main reasons. One, it gives me opportunities to help photographers enhance the quality of their photographs by showing them how to correct (some) technical mistakes. Two, I can help photographers motivate and encourage the artist that lies within them. Three, it's fun to play with Photoshop!
In this chapter, I'll show you a little of each: fixing, awaking and having fun. And from a business standpoint, if you master a few of these techniques, you'll have more to offer your clients.

A RAW file has a wider exposure latitude (exposure-recording and correcting range) than a JPEG file. This means, when working with a RAW file in Photoshop (or Lightroom, Aperture or your camera's software program) you can rescue overexposed areas of an image (up to one f-stop). Many photographers (including me) shoot only RAW files and process their images in Adobe Camera RAW (ACR), which has many image-processing options.
But wait! Even if you shoot JPEGs, you can take advantage of ACR by going to File > Open and then choosing Camera RAW as the format. You won't be able to rescue highlights as well on JPEGS as you can on RAW files, but you will find many creative and correction options at your fingertips in ACR for JPEGs.
So while this section is focused on Photoshop adjustments and enhancements, ACR is a good place to start for standard image adjustments.
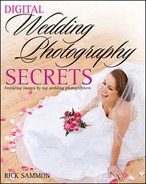
The Camera RAW dialog is where the magic of image adjustment takes place. Experiment with the Tool bar at the top of the window. As in Photoshop, ACR provides many tools for enhancing and correcting your images. On the right side of the window are the Adjustment panels. Basic is shown here, and it's sufficient for making most of your adjustments.

After you play around with Basic adjustments, click the tabs for Tone Curve, Detail, Lens Correction and HSL/ Grayscale for even more fine-tuning capabilities.
Sure, all this takes time, but when you really need to fix an image, RAW rules.

Don't get down over seemingly lost detail in a bride's gown. Use Photoshop's Shadows/Highlights to easily rescue those beautiful details.
One of the last things you want to do as a wedding photographer is disappoint the bride with a photograph that does not show all the gorgeous detail in her gown. That can easily happen when you are shooting fast and/ or don't set your exposure properly. The fix is touse Shadows/ Highlights.

Step 1: Open your document and reveal the Layers panel. Click (and don't release) on the background layer and then hold down the Control key. That brings up the Layers Properties dialog.
Select Convert to Smart Object. You do this for two reasons. One, you don't want to use the Shadows/ Highlights adjustment directly on your original file. Two, this process lets you use Shadows/ Highlights as you would use a layer mask—on which you can mask in and out an adjustment or effect. How cool!

Step 2: Next, go to Image >Adjustment > Shadows/ Highlights.

Step 3: Tone down the highlights by moving the Highlight slider to the right. Move it just far enough so that the details in the bride's gown are revealed. Don't worry about how the bride looks! At this point, she may look a bit off color and incorrectly exposed. That will be corrected later.

Step 4: In your Layers panel, you'll see that a layer mask has been applied to your image (because you converted the image to a Smart Object). Here is how to mask that effect.
First, set black as your foreground color in the Color Picker, located at the bottom of the Tool bar. Select a soft-edge brush. Click on the Smart Filter mask in the Layer's panel and mask out (paint over) the areas of the image, including the bride and other areas that you don't want affected by your adjustment.
If you mask out part of the bride's gown accidentally, press the X key on your keyboard. This will change the foreground color from black to white and vice versa. Then paint back in the effect.
Voilá! No more disappointed brides, thanks to this easy-to-use adjustment.

The headliner of a wedding is the bride. At least that's the case for most weddings!
You can quickly and easily draw more attention to the bride in a photograph by darkening the edges of the image. Hey, it's what the Renaissance painters did when they wanted the viewer's attention to be focused on a specific subject.
The technique is to create a quick vignette.

Step 1: Open your file and go to Filter > Distort > Lens Correction.
Step 2: Uncheck the Show Grid box at the bottom of the dialog, so you can see what the heck you're doing!
Step 3: Move the vignette sliders to the left until you are pleased with the effect.
Optional Step: If the bride looks too dark after you apply the vignette, use the History Brush(on the Tool bar). Paint back the original exposure by brushing over her.

Often, when we look at an image, we wish we had used a different lighting technique. Perhaps we wish we could change the direction of the main light. Or, maybe the shot was taken outdoors when lighting conditions were not ideal. These issues are easy to fix in Photoshop.
The technique is to use the Lighting Effects filter.

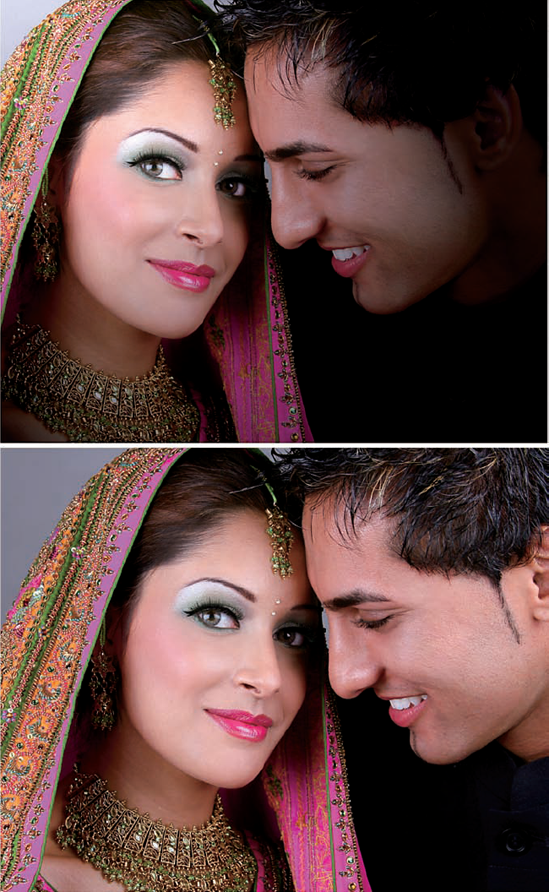
Step 1: Open your image and go to Filter > Render > Lighting Effects. Don't panic when that window opens. There's a lot going on there, but you only need to know a few basic controls.
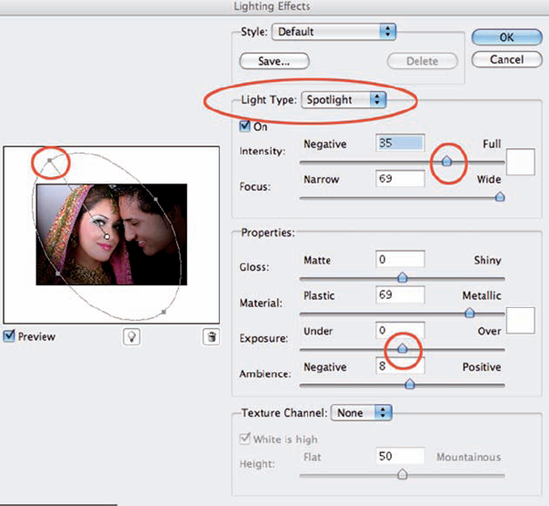
Step 2: Select Spotlight as the Light Type. Other options are available, but start with this one. Grab one of the handles in the Preview window to create the direction and angle of the light. Next, adjust the Intensity and Exposure until you are pleased with the lighting on your subject(s).
It's that easy ... and that much fun!

Sure, there are hundreds of creative and corrective adjustments and effects available in Photoshop that can help you make a client happy with the photographs you deliver. But in your quest for client bliss, don't overlook the basic enhancements.
Dodging, burning, cropping, sharpening and saturation are covered here.

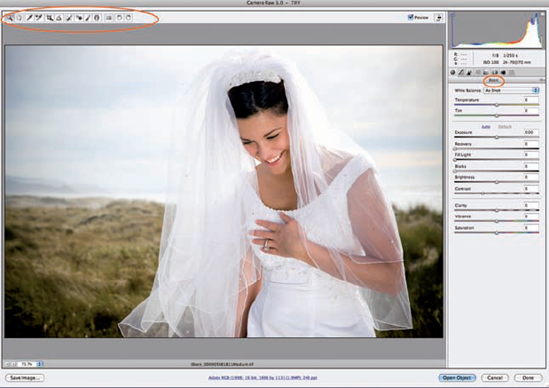
The photographer had a good idea here, which is to pose the subject in a nice setting—one with a fence foreground and flower background. However ... because the fence is bright in the scene, it's distracting.
Use the Burn tool, located on the Tool bar, for a quick fix in this situation.
Also, look closely and you'll see that the bride's eyes in the lower image are brighter than they are in the top image. To create this effect, use the Dodge tool, set at a low opacity (5%), to whiten just the whites of her eyes.
Eliminate unnecessary elements from your image using the Crop tool, located on the Tool bar. Although, when you crop, be mindful of the image size. If it's not a standard format—8×10 inches for example—you'll need to make a custom matte if the photograph is going to be framed.

Sharpen your image to give it more "pop."
To boost the saturation of an image to give it more life, use a Hue/ Saturation Adjustment Layer.

When you remove some sharpness from a scene, you also remove some reality. When some reality is removed, an image becomes more artistic.
Use the Radial Blur filter to add a sense of motion—and an artistic touch—to an image.

Step 1: Open the image file and go to Filter > Convert to Smart Filter.
Step 2: Go to Filter > Blur > Radial Blur.

Step 3: Select Spin, and play around with the Amount slider. Don't overdo it though.
You can place the center of the blur effect anywhere in the image by clicking the center of the window and moving it.

Step 4: Go to the Levels panel.
When you converted the filter to a Smart Filter, you added a layer mask to the file. Now, with black selected as the foreground color and with a soft-edge brush selected, use a circular motion to mask out (some call it paint out) the blur over your subjects.
Here is an important tip: As you move out from the center of the image (the main subjects), go to the Options bar at the top of your monitor and reduce the Opacity of the brush. The idea is to have a smooth transition between the sharp and blurred areas of your image.
How often have you wanted to selectively adjust the colors in an image? Well, if you are like me, the answer is quite often!
The solution starts with a black-and-white adjustment layer, believe it or not.

Step 1: Open an image and create a Black-and-White adjustment layer by clicking on the New Adjustment Layer icon in the Layers panel.

Step 2: In the Layers panel, change the Blending mode from Normal to Luminosity.

Step 3: In the Adjustments dialog, click on the hand/ double-arrow icon.

Step 4: Move your cursor onto the image. (It appears as a hand/ double-arrow icon.) Now, simply move the cursor left or right to adjust the tones found in the area on which you are clicking. Cool, eh?

Okay, so you come back from shooting a wedding with hundreds of RAW files. You need to post several files quickly on your web site. Here is a fast and easy way to convert all those super-large RAW files to much smaller JPEGs quickly and easily—maybe even while you take a nap.
The Image Processor is your key.

Step 1: Open Bridge and go to Tools > Photoshop > Image Processor.
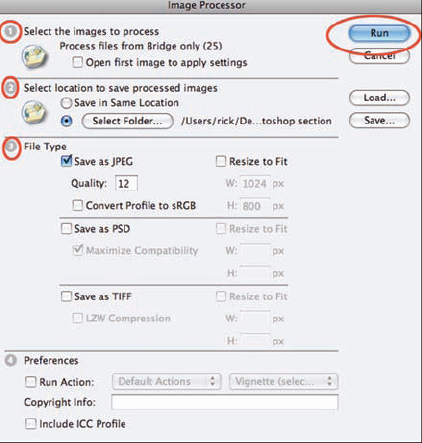
Step 2: In the Image Processor dialog, follow these steps:
Process the selected files from Bridge.
Choose a location for the folder with the processed images (which should probably be different from the folder that holds the RAW files).
Select JPEG (or TIFF or PSD...or all three). If you choose JPEG, choose your quality setting and size setting. You can leave the images at the same size or resize them.
Click Run...as long as you don't want to apply any Preferences.

If you use Photoshop, you can process files of folders without having to access them through Bridge. In Photoshop, go to File > Automate > Scripts > Image Processor and then follow steps two through four as described above.

I am sure you've seen this cool effect in fashion, beauty and bridal magazines. It shows the subject in color and the background in black-and-white. Easy as pie!
The trick is to selectively choose which areas you want in color ... and which areas you want in black and white.

Step 1: In the Layers panel, choose a Black & White adjustment layer. You can also go to Layer > New Adjustment Layer > Black & White.

Step 2: When you create an adjustment layer in the Layers panel, a layer mask is automatically added. Now, with black selected as your foreground color, choose a soft-edge brush and paint over the areas of the image you want in color.

Step 3: Check the Layers panel and look for areas you may have missed.
Step 4: Don't tell your clients how easy it was to create this effect...wink.

Most brides have a natural, beautiful glow. In Photoshop, you can enhance that glow for an artistic image.
The secret is to use the Diffuse Glow filter.

Step 1: Open an image and go to Mode > Grayscale. Converting an image to a grayscale image is not the best way to make a black-and-white image, but it's okay for this technique.

Step 2: Go to Filter > Distort > Diffuse Glow.

Step 3: In the Diffuse Glow dialog, play around with the sliders to create your customized diffuse-glow effect.
Step 4: Click OK.
In just a few minutes, you transformed a straight image into a wonderful image that glows!

You probably noticed that some of Davide's photographs have a titled horizon line, as in this image. That's done on purpose to add more interest to a picture. It's called the disequilibrium effect, because it sets the viewer's sense of equilibrium slightly off balance.
Wedding photographers are not the only shooters who use this effect. Fashion and beauty photographers use it, too, in order to create more artistic images.
Here is how you can mimic the technique.

Step 1: The first step to creating this effect actually takes place during your photo session... if you know then that you want to create this effect.
Basically, you need to compose your picture with plenty of "dead space" around the subject, because you'll crop out part of the image area to execute this technique. In the cropping process, you don't want to eliminate an important part of the subject.

Step 2: Go to the Tool bar and select the Crop tool. Crop the entire image but don't press Return. Rather, move your cursor outside of the image area. When you do, you get a double-sided arrow. Swiveling that arrow tilts the image.
When you are pleased with the effect, press Return and enjoy this dynamic effect.

Light illuminates; shadows define. That's one of my favorite photographic sayings.
Shadows can make or break a picture. They can also turn a flat shot into a much more dramatic image.
Oh, you have shadow issues in your photographs? No problem to fix them in Photoshop when you use a few adjustments and change the blending mode.

Step 1: Duplicate your layer by going to Layer > Duplicate Layer or by pressing Command/ J.

Step 2: With the top layer activated, go to Image > Adjustment > Hue/ Saturation. Completely de-saturate the image by moving the triangle on the Saturation slider all the way to the left.

Step 3: On the same layer, go to Image > Adjustment > Brightness/ Contrast. Boost the contrast all the way up by moving the triangle on the slider as far as possible to the right.

Step 4: In the Layers panel, change the blending mode to Overlay.
Step 5: Watch the expression on your client's face when(s)he sees this dramatically lit shot.

No doubt that this bride has beautiful skin. But you don't encounter that on every shoot. Here's a quick and easy method for softening skin while retaining details in a subject's eyes.
This is one of my favorite image-enhancement techniques—made possible by the magic of Photoshop.

Step 1: Open a file and duplicate it by going to Layer > Duplicate Layer, or by pressing Command/ J.

Step 2: Change the Blending mode to Overlay.
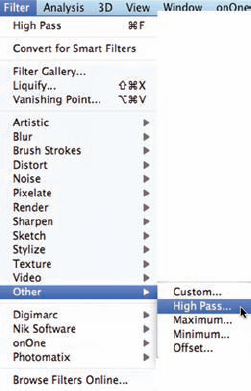
Step 3: Go to Filter > Other > High Pass.

Step 4: Don't panic. Your image will look a bit wacky after you apply this filter.
Experiment with the Radius slider. The higher the resolution, the higher you should set your radius.
After you click OK, press Command/ I to invert the image. This is VERY important. After you press Command/ I, your image should have the desired soft touch. If it looks too soft, reduce the Opacity of the layer in the Layers panel.

Step 5: Add a Layer mask by clicking on the Add Layer Mask icon at the bottom of the Layers panel.
With black selected as your foreground color and with a soft-edge brush selected—set to Opacity around 25%—carefully mask out the soft areas over the eyes and mouth.
That's it! Don't forget to press Command/ I.

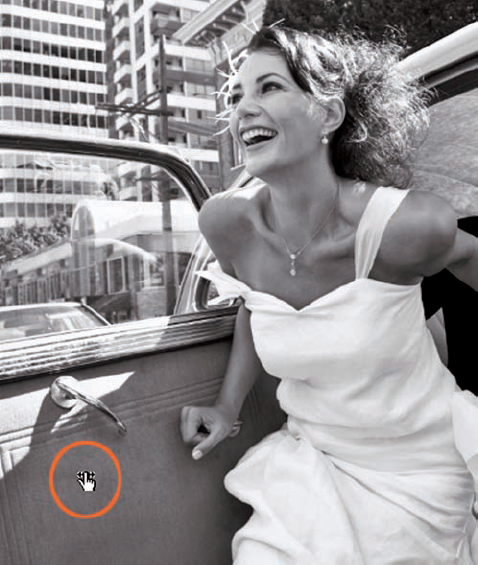
The background can enhance or detract from the main subject. At weddings, backgrounds are not always the greatest.
Enhancing the background is no problem in Photoshop, especially when you use the Gaussian Blur filter.
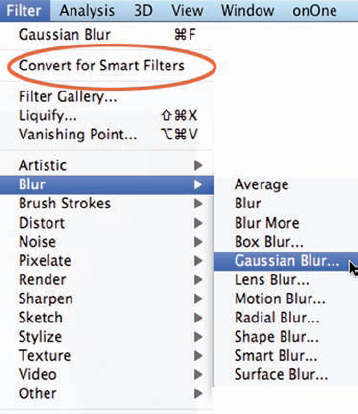
Step 1: Go to Filter > Convert for Smart Filters (which allows you to use a filter like an adjustment layer with a layer mask). Then select Blur > Gaussian Blur.
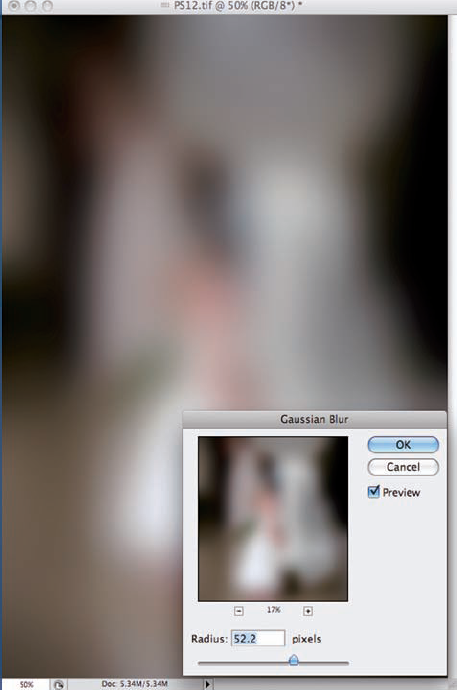
Step 2: Blur the image until you are pleased with the background blur. Don't be concerned with the blurred main subject.

Step 3: In the Layers panel, click on the Layer mask and, with black selected as the foreground color and with a soft-edge brush selected, mask out (paint over) the main subject.
For a smooth transition between the sharp and blurred areas of your image, reduce the Opacity (on the Menu bar at the top of your monitor) as you move back and forth from one area to the other. Start with the Opacity set at 100% when painting over the main subject, and end with the Opacity set at 10% or even 5%.
Of course, cropping a picture can help draw more attention to the main subject, as can shooting tight and using a telephoto lens set at a wide aperture for shallow depth-of-field.

Your web site is your calling card—your portfolio and best sales tool. Dress up your images and your site by adding cool drop shadows to your images.
Drop shadows are easy to create when you use Layer Styles.

Step 1: Open an image file and go to Image > Canvas Size. Add an inch or two to the size of your image. The size really does not matter at this point.

Step 2: Go to Layer > Layer Style > Drop Shadow. Move the slider to the left to create your own custom drop shadow. Click OK. Your image will appear to be floating on the page!

Want to do a nice favor for your clients...or maybe make a few extra bucks? Create a nice thank you e-card for them.
Adding text to an image is easy in Photoshop.

Step 1: Open an image and select the Type tool in the Tool bar.
Step 2: Select the color of your text by clicking on the Set Foreground Color icon at the bottom of the Tool bar.

Step 3: In the Menu bar at the top of your monitor, select the typeface. Here, I chose Apple Chancery.

Step 4: Also on the Menu bar, choose the size of your type.
Step 5: Type your message.
You can use different typefaces set at different sizes and in different colors (as I did here) for different message lines in your file. Just hit Return after each line, and then select the Type tool again for each new line. You can also place and reposition each line by clicking on the individual type layer and using the Move tool.

Black-and-white images tend to look a bit more creative and artistic than color images. That's why brides and grooms love 'em. Here is an easy way to have the most control over all the tones in a file.
Create a Black & White adjustment layer.

Step 1: Open an image file. Go to Layer > New Adjustment Layer > Black & White.

Step 2: In the Layer panel under Adjustments, you'll see your tone controls along with a hand/ double-arrow icon. Click that icon.
Step 3: Move your cursor (now the hand/ double-arrow icon) into your image and place it on a tone you want to change. Move your cursor from left to right to change that tone.
This is a totally awesome control, because you make your adjustments live while working on the image—not in the Adjustments panel.

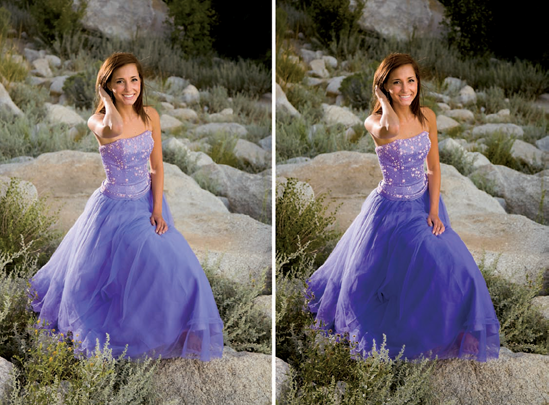
Since the early days of wedding (and portrait) photography, photographers have been using vignettes to create more artistic and creative images.
You can do this, too, by simply using Photoshop Vignette Action.

Step 1: Open an image. Using the Elliptical Marquee tool on the Tool bar, draw an oval around the main subject.

Step 2: Open Actions by going to Window Actions. Click on Vignette (selection).

When you click on Vignette (selection), you get a pop-up window in which you should choose the Feather Radius. A low setting results in a hard-edge vignette, as illustrated by the middle image. A high setting results in a much softer-edge vignette, as illustrated by the image on the right.
As a starting point, use a Feather Radius of 100 when working on an image with a resolution of 300 PPI.
Click OK. Voilá!

How cool! Thanks to Photoshop, we can add a sense of motion to a still image, which adds more life and more excitement to your photographs.
The Radial Blur filter is the secret to creating this effect.

Step 1: Open an image and go to Filter > Convert to Smart Filter.

Step 2: Go to Filter > Blur > Radial Blur > Zoom. Play around with the amount. (I usually don't go above 50.)
You can place the center of the blur anywhere in the image by clicking in the Blur Center window and moving the center of the blur.
Click OK.

Step 3: In the Layers panel, click on the Layer mask. Set black as the foreground color in the Tool bar and choose a soft-edge brush.
Start masking out the blur over the subjects with the Opacity (an option on the Menu bar at the top of your monitor) set at 100%. As you move outward from the main subjects, gradually reduce the Opacity. Your goal is to make a smooth transition between the blurred and sharp areas of the image.
In the screen shot, the black areas represent the Opacity set at 100 percent, while the gray areas show where Opacity is reduced.

How would you like to apply sophisticated effects to your images ... the kind of effects top wedding photographers use? Well, most of them typically require a bizillion enhancements, tweaks and adjustment layers—not to mention years of digital darkroom experience.
But not with a Photoshop plug-in! Plug-ins are available via the Internet and on CDs, and they dramatically expand the capability of Photoshop (and other plug-in compatible programs, such as Lightroom and Aperture). After downloading, they are usually placed in your plug-in folder automatically.
Dozens of these expert effects are available at the click of a mouse with Photoshop plug-ins. Those that I use most often are PhotoTools and PhotoFrame. Both are available through onOne Software (www.ononesoftware.com).
Above you see, from left to right, my original image, the effect of applying onOne's Light Ray and the effect of applying onOne's 30's Noire.
Here's an idea for playing with PhotoTools: After you apply an effect, try fading it (an option in the main window). Want even more creative options? Apply more than one effect to a photograph.

OnOne PhotoFrame offers limitless custom digital frames ... in all shapes, sizes, colors, textures and forms. Like in PhotoTools, you have total control of the frame you select and can place it around your image how and where you want.
Here you see, from left to right, the original image, the effect of applying Emulsion frame (with a white background) and the effect of applying the same Emulsion frame (with a black background).
Black and white, by the way, are only two colors from which to choose for the background. You can literally choose any color in the rainbow to complement your subject and to make your photographs stand out from your competition.
Want more creative plug-in ideas? Check out Plug-in Experience (www.pluginexperience.com). I started this web site to share the latest and greatest plug-in info and to showcase the artistic plug-in work of some of today's top photographers. You'll find some nice discounts on plug-ins here, too.


Nik Software's Color Efex Pro (www.niksoftware.com) is another of my favorite plug-ins. The main window is shown above; it's where you take creative control of your image.

To apply an effect, first click it from the panel on the left. Then, for total creative control, adjust and fine-tune the effect to your own liking.
Here you see, from left to right, the original image, the image with the Vignette Blur effect applied, and the image with the Midnight filter applied.
You also have viewing options, including side-by-side, which you select at the top of the panel.