


FUJITSU Enterprise Postgres cluster on Red Hat OpenShift Container Platform
This chapter introduces the concepts of container orchestration and management and how they can be applied to set up a container platform for software delivery on IBM infrastructure, including setting up a FUJITSU Enterprise Postgres SQL database cluster.
This chapter covers steps for setup, configuration, and operational management of a FUJITSU Enterprise Postgres cluster within a customer's DevOps by using agile software delivery practices that use Red Hat OpenShift on an IBM LinuxONE platform. Multiple factors come together with FUJITSU Enterprise Postgres cloud-native deployment on the IBM and Red Hat hybrid multi-cloud solution. A reliable and robust relational database that is based on open source PostgreSQL is containerized, which implements the operator pattern and is oriented around micro-services.
FUJITSU Enterprise Postgres deploys on IBM LinuxONE, which is an enterprise server platform in IBM systems that is designed for security, resilience, and scalability. It is server hardware that is combined with the openness of the Linux operating system (OS) and enterprise scale Kubernetes from Red Hat.
This chapter covers the following topics:
10.1 Container-based FUJITSU Enterprise Postgres
As organizations continue to focus on their digital transformation, they must change the way that they manage their existing data assets. Migration to cloud is often seen as a fundamental step in an organization's digital transformation, and as applications migrate to the cloud, often databases naturally follow them into cloud environments such as AWS, Azure, and
IBM Cloud. The proliferation of the number of cloud-hosted applications with a tremendous increase in the scale of the data generated, and the data that is consumed by such applications, creates an unprecedented demand for cloud-hosted databases.
IBM Cloud. The proliferation of the number of cloud-hosted applications with a tremendous increase in the scale of the data generated, and the data that is consumed by such applications, creates an unprecedented demand for cloud-hosted databases.
Containers and container orchestration have matured to the point where they are now positioned at the core of digital transformation by using cloud-native initiatives. Databases are increasingly popular candidates for containerization, and are becoming an on-demand utility as part of the shift toward microservices and serverless architectures, which are becoming a critical component in the software stack of these new digital applications.
An installation that is composed of an enterprise-grade database such as FUJITSU Enterprise Postgres running in a container environment can provide many advantages over a standard cloud database. With the transition of applications to a microservices architecture, the container deployment of relational database management systems (RDBMSs) is moving to the mainstream, and PostgreSQL is the third most popular technology to run in containers on a Kubernetes platform that manages applications at massive scale.
Containerized databases have emerged as building blocks for shifting large, monolithic applications to workloads based on microservices and serverless architectures. However, containerizing a database is not as straightforward as containerizing an application. Fujitsu has leveraged its Enterprise PostgreSQL knowledge and experience and created a Managed Postgres Cluster offering to organizations to use as part of their cloud-native container journey.
Containerized FUJITSU Enterprise Postgres key benefits
The FUJITSU Enterprise Postgres Database can be easily set up in a container platform to provide an enterprise-level database that is comparable to the cloud-managed Amazon RDS DBaaS without the disadvantages of the latter, such as data breaches, data loss, and inflexibility. The FUJITSU Enterprise Postgres Database in managed containerized environment provides the following benefits:
•On-demand utility: The microservices architecture of smaller container applications can have their own dedicated database that is configured on an as-needed basis.
•Capacity planning and provisioning: Using separate storage nodes, Kubernetes Storage Class, and Persistent Volume features, storage performance and capacity can be scaled independently of compute resources, which provide more flexibility in upfront database capacity and makes changes easier to implement.
•High-velocity DevOps: Software-defined containerized databases provide a crucial missing link in high-velocity DevOps cycles, allowing DevOps teams to collaborate seamlessly.
•High-throughput and low-latency networking: The emergence of container orchestration such as Red Hat OpenShift provides networking and data storage and network resource isolation that is necessary to achieve the required performance.
•Managing numerous tuning parameters: Custom database configuration parameters that use ConfigMaps and Custom Resource Definitions (CRDs) within the Kubernetes cluster can be passed into the container at run time to provide easier version control and dynamic control of DB management.
•High availability (HA) and failover management: Using an automated scripted deployment of containerized databases and an orchestration framework of Red Hat OpenShift provides a built-in HA for failover scenarios without needing to maintain a failover cluster replica. This setup saves resources that are idle much of the time.
•Hybrid cloud / multi-cloud deployments: FUJITSU Enterprise Postgres running on a Red Hat OpenShift based Kubernetes platform provides a cloud-neutral RDBMS solution that can be deployed across any cloud environment-supporting hybrid / multi-cloud strategy without needing to change the application code.
•Software upgrades: By leveraging the Red Hat OpenShift Operator framework, it is easier to plan and run a database software upgrade with or without schema changes. The software upgrade can be easily managed to minimize business disruptions, including the option to skip upgrades to keep compatibility with other applications, which removes a critical dependency with Amazon RDS. This level of control interferes with an automatic environment upgrade process.
10.1.1 Containerized FUJITSU Enterprise Postgres Database on IBM hardware
FUJITSU Enterprise Postgres is available in a cloud-native containerized configuration that can be deployed on Red Hat OpenShift on various IBM infrastructure options. IBM hardware and software that is combined with Red Hat platform middleware can help organizations with establishing a true enterprise-class, hybrid multi-cloud solution that is highly scalable and open. IBM LinuxONE is the enterprise server platform with security and reliability in the hardware and software that is designed to run millions of containers. To make the best decisions to run FUJITSU Enterprise Postgres on Red Hat OpenShift, there are choices to consider.
|
Note: At the time of writing, a container version of FUJITSU Enterprise Postgres was made available for IBM LinuxONE and tested for deployment on Red Hat OpenShift on the
IBM LinuxONE platform. |
10.2 Container orchestration: Red Hat OpenShift on an IBM infrastructure
Kubernetes and container technologies emerged when the cloud expanded beyond provider-offered infrastructures to platform-as-a-service (PaaS) or software-as-a-service (SaaS). For over a decade now, cloud computing has rapidly evolved, which left many organizations behind due to the lack of service experiences, such as managing compute and storage resources on demand, and running modular pieces of code in a serverless environment. More often, moving to a cloud-native infrastructure is the only path to maintain a competitive advantage. There are enterprise-grade Kubernetes distributions and container infrastructures that can simplify that journey.
10.2.1 Containers and Kubernetes
Containers run on top of the host OS to abstract away the underlying infrastructure and allow grouping and isolation of the processes of the application. They gained popularity among developers and IT operations in various cloud computing models, whether as private, public, or hybrid. Deploying, maintaining, and scaling containers on different platforms and clouds is easier than virtual servers.
Software that is built with containers encapsulates the entire execution environment, including an application, and its runtime, dependencies, and configuration files, which are packaged into one image (Figure 10-1). A containerized application can install and run in a predictable way because it is less sensitive to the differences in the infrastructure, platform, library versions, OS level, and distribution. Containers can be deployed on many hardware platforms, including Intel x86, IBM Power, IBM LinuxONE, and IBM Z.
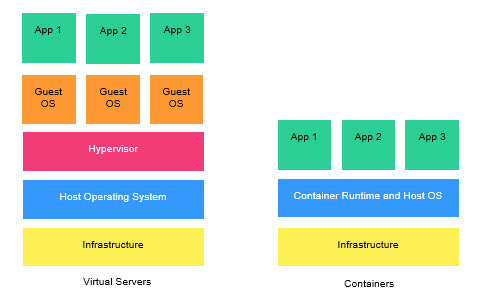
Figure 10-1 Containers encapsulate the entire execution environment
Containers offer great portability across hybrid cloud environments. However, complex applications consist of multiple containers and require mechanisms of availability and scalability to run in production. Kubernetes is an open source framework with a rich set of complex features to orchestrate and manage containers in production, staging, and development environments. As a layer over containers and container engine, it handles the workload scheduling and operation within an application and more (Figure 10-2).
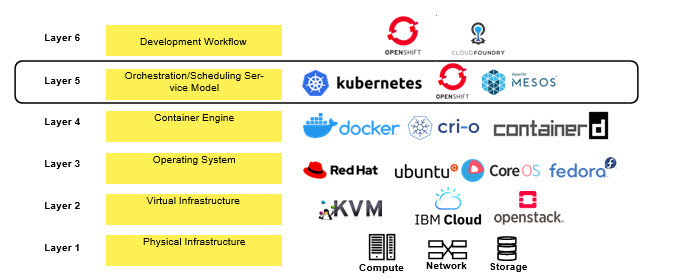
Figure 10-2 Orchestration layer in the software development workflow
As a cluster management system, Kubernetes automates deployment, scaling, and management of containers. It is the environment that ensures availability and scalability of the applications, and it supports DevOps processes for continuous integration and delivery. When containers are deployed, the Kubernetes scheduler automatically places them across the nodes in the cluster based on the resource requirements and constraints. Lifecycle orchestration helps with scaling and updating applications. When containers fail or do not respond, the self-healing mechanism of Kubernetes replaces or stops them to ensure the availability of the application. Service discovery and load-balancing can expose services of an application through a hostname or IP address, and balance the traffic across multiple containers depending on the workload.
10.2.2 Red Hat OpenShift 4
Organizations want flexibility, simplicity, and a better economic equation with their applications in the cloud. IBM hardware and software that is combined with Red Hat platform middleware can help organizations with establishing a true enterprise-class hybrid multi-cloud solution that is highly scalable and open. They want faster development cycle times, lower costs, security and availability, and consistency in managing, building, and operating the cloud.
As one of the on-premises cloud configurations, Red Hat OpenShift provides enterprise-scale Kubernetes on an enterprise-grade IBM LinuxONE server. IBM LinuxONE offers a flexible compute function with horizontal scalability that can grow to thousands of Linux guests and millions of containers, and vertical scalability that can non-disruptively grow databases without requiring any partitioning or sharding. Red Hat OpenShift Container Platform (RHOCP) 4 is a supported Kubernetes installation that uses leading enterprise practices; security, performance, and defect fixes; and includes validated and tested integrations for third-party plug-ins with enterprise lifecycle support.
Unlike Kubernetes that requires an OS to be installed separately, the Red Hat OpenShift 4 package comes with Red Hat Enterprise Linux CoreOS (RHCOS) included. It provides the required interfacing with the hardware, including IBM LinuxONE for the S390x package. RHCOS was designed and optimized to be deployed in the RHOCP platform (Figure 10-3).

Figure 10-3 Red Hat OpenShift 4: Kubernetes platform
Upon initial deployment, RHCOS is hardened for security to a limited immutability. Some special features such as kernel options, disk encryption, and networking settings can be configured before the installation. The ignition configuration offers the opportunity to add custom systemd services and files to the RHCOS nodes. Finally, after the RHOCP cluster is running, DaemonSet and MachineConfig allow hardening of more services or subsets of ignition configurations on the nodes. Machine Config Operator also handles OS upgrades, where the OS is upgraded as an atomic unit.
10.2.3 Red Hat OpenShift 4 for Kubernetes developer experience
Red Hat OpenShift 4 is Kubernetes as fully open source and non-proprietary but way smarter. APIs to the Red Hat OpenShift cluster are 100% Kubernetes. Running a container on any Kubernetes and Red Hat OpenShift does not require any changes in the application. Red Hat OpenShift brings added-value features that make it a turn-key platform from both a PaaS developer perspective and a container-as-a-service (CaaS) operations perspective.
Red Hat OpenShift runs on a trusted OS foundation: RHCOS with a Red Hat Enterprise Linux server. It comes with automated installation, admin, and upgrade operations. Because of the rich infrastructure of operators, many containerized products can be easily installed from the catalog and operated from a unified interface within the Red Hat OpenShift cluster.
The developer experience is achieved by using a developer console and CodeReady Workspaces. Developers can easily deploy applications from different sources, including git repos, external registries, and Dockerfiles; get a visual representation of components; and modify code in a fully containerized web IDE that runs on Red Hat OpenShift itself.
Red Hat OpenShift can run containerized traditional stateful applications alongside microservices and serverless cloud-native applications. Achieving enterprise-grade qualities of the applications is simplified by using cluster services, like monitoring and alerts.
Application and line-of-business teams benefit from Red Hat OpenShift self-service capabilities for the resources that they need, which reduces wait times for productivity. Developers can take advantage of both containerized applications and orchestration without knowing the details, which give them a better focus on the code instead of spending time writing Dockerfiles and running Docker builds. Containers and cloud-native applications increase complexity for IT teams, who can benefit from Red Hat OpenShift improved automation, which means less manual and interrupt-driven work. Red Hat OpenShift gives operations teams the capability for more uniform, policy-driven control across multiple teams.
Here are the Red Hat OpenShift advantages for various teams:
•Developers: Container platform and cloud-native applications:
– Who: Application architects, application development leads, and individual developers
– Key benefits:
• Reduced wait times for resource provisioning
• Flexible choice of tools and workflows
• Consistency between environments
•IT operations: Container platform and hybrid cloud infrastructure:
– Who: Infrastructure, operations, and DevOps leaders and their teams
– Key benefits:
• Security controls, for example, do-it-yourself (DIY) solutions
• Platform installations and updates
• Less downtime
• Enabling application development teams
•Technical executives: Business innovation:
– Who: Chief technology officer (CTO) office, chief information officer (CIO) office, enterprise architect, and line-of-business leaders
– Key benefits:
• Cohesion between siloed teams
• Faster speed to market
• Higher return on investment (ROI)
• Lower cost of operations
Red Hat OpenShift has everything that you need for a hybrid cloud, enterprise containers, and Kubernetes development and deployments. The platform has the following features:
•Enables broad application support.
•Drives continuous security.
•Supports on-demand as-a-service marketplaces.
•Is based on standards around interoperability and portability.
•Helps to avoid vendor lock-ins.
It includes an enterprise-grade Linux OS, container runtime, networking, monitoring, container registry, authentication, and authorization solutions that are tested together for unified operations on a complete Kubernetes platform spanning every cloud infrastructure.
10.2.4 Modernizing core business applications by using IBM Cloud Paks
IBM Software along with Red Hat and IBM LinuxONE further accelerate the digital transformation by unleashing open innovations. IBM Cloud Paks are enterprise-ready, containerized software solutions that give companies an open, faster, and more secure way to move core business applications to any cloud. IBM Cloud Paks for Application, Data, Integration, Automation, Multicloud, and Security run on Red Hat OpenShift on various infrastructure options. Refer to the latest release schedule for their availability on
IBM LinuxONE.
IBM LinuxONE.
Table 10-1 compares client-created containers to certified containers.
Table 10-1 Client-created versus IBM Cloud Paks certified containers
|
Feature
|
Containers alone: Client creates containers or receives software as stand-alone containers
|
IBM Cloud Paks:
Complete solutions certified for enterprise use cases
|
|
Runs anywhere.
|
Yes
|
Yes
|
|
Scans for vulnerabilities.
|
Yes
|
Yes
|
|
Red Hat container certification.
|
Depends on product.
|
Yes
|
|
Complete solution with a container platform.
|
No
|
Yes
|
|
Flexible and modular: Pay for what you use.
|
No
|
Yes
|
|
IBM certified or orchestrated for production (built for Kubernetes by experts, and certified against 250+ criteria).
|
No
|
Yes
|
|
Multicloud validation.
|
No
|
Yes
|
|
Integrated deployment experience.
|
No
|
Yes
|
|
Full stack support by IBM (base OS, software, and container platform).
|
No
|
Yes
|
|
License metering integration.
|
No
|
Yes
|
|
Scalable and resilient.
|
No
|
Yes
|
|
Encrypted secrets / limited privileges.
|
Do it yourself.
|
Yes
|
|
Management and operations.
|
Build your own.
|
Yes
|
|
Lifecycle management
|
Manage it yourself.
|
Yes
|
|
Note: At the time of this writing, IBM Cloud Pak® for Applications, major parts of IBM Cloud Paks for Integration and Multicloud Manager, and a subset of IBM Cloud Pak for Data were made available for IBM LinuxONE.
|
With all the benefits of cost, speed, user experience, security, and core ownership of the hybrid clouds, there are complexities that cannot be mastered by enterprises alone. The industry expertise and best practices that are packed into IBM Cloud Paks provide significant value to companies because these containers provide pre-packaged and integrated solutions on top of Red Hat OpenShift. They are IBM-certified, enterprise-ready, containerized, and pre-integrated software solutions that provide an open, faster, and more reliable way to build, move, and manage on any cloud. Each IBM Cloud Pak includes RHOCP, IBM certified containerized software and open source components, and common software services for development and management on top of a common integration layer.
10.2.5 Private and public hosting options
With the rise of expectations for a better user experience and connectivity among various devices, application developers strive to deliver intelligence and submillisecond response times. A centralized cloud architecture alone cannot keep up with such requirements, so the flexibility of splitting workloads into on-premises and cloud-based areas in hybrid multicloud environments is necessary. Faster response times and deeper data insights might be achieved by hosting data and processing it closer to where it originates, that is, at the edge. Unlocking new sources of value might be achieved by interconnecting applications across sites and an infrastructure of partners in the public cloud.
Red Hat OpenShift is built on the Kubernetes platform with portability in mind. It is offered on various public and private clouds, which make cloud differences invisible to developers. Many enterprises realize the future of cloud computing is in multicloud solutions, where hybrid environments span on-premises, public, and private clouds from multiple providers. The IBM complete hybrid cloud stack includes a public (IBM Cloud) cloud and systems for on-premises offerings (IBM LinuxONE/IBM Z and IBM Power) (Figure 10-4).
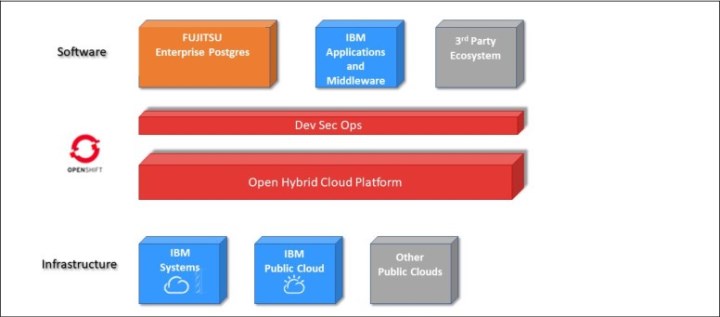
Figure 10-4 FUJITSU Enterprise Postgres on the Red Hat OpenShift hybrid multicloud platform
Red Hat OpenShift on IBM Cloud is an starter solution for adopting the Kubernetes offering as a simplified deployment and configuration of the Red Hat OpenShift Container Platform. As a managed service, IBM takes care of the ongoing maintenance, including OS patches, vulnerability remediation, and any updates in the Red Hat OpenShift stack. Workloads are moved to other worker nodes in the cluster during maintenance, which in combination with the HA application architecture of FUJITSU Enterprise Postgres ensures that there is no disruption to customers.
Red Hat OpenShift on IBM LinuxONE/IBM Z offers flexible computability with horizontal scalability on a single on-premises system that can grow to millions of containers, and vertical scalability that can non-disruptively grow databases without requiring any partitioning or sharding while maintaining response times and throughput.
In addition, IBM LinuxONE provides advanced security for confidential cloud computing, including FIPS 140-2 Level 4 certification and maximum isolation that meets Common Criteria Evaluation Assurance Level (EAL) 5+. IBM LinuxONE provides secure key technology with built-in tamper proof security, including tamper sensing and tamper responding to zeroize keys when attacked, and cryptographic cards and co-processors to perform encryption functions.
10.2.6 Red Hat OpenShift on IBM LinuxONE: System requirements
Red Hat OpenShift Container Platform 4.x is supported on IBM LinuxONE as several deployment options. The minimum resource-required deployment is installing Red Hat OpenShift 4.6 on a single partition (logical partition (LPAR)) with three Integrated Facility for Linux (IFL) cores and one Open System Adapter (OSA) network adapter. In a preferred deployment, you need three LPARs with six IFL processors and multiple OSA or RoCE network adapters. To further expand capacity, performance, and HA, you add worker nodes and storage options, and deploy across multiple systems.
A Red Hat OpenShift cluster is installed on IBM LinuxONE by following a user-provisioned infrastructure (UPI) scenario. General steps include the following actions:
•Partitioning IBM LinuxONE into one or multiple LPARs
•Allocating IFL cores, memory, and network adapters
•Preparing FICON or Fibre Channel Protocol (FCP)-attached disk storage
•Installing z/VM hypervisor and creating guest virtual machines (VMs) with RHCOS images
•Configuring and running the Red Hat OpenShift installer to ignite the instances of the cluster and perform the installation
|
Note: Red Hat OpenShift Container Platform has been available on IBM LinuxONE since Version 4.2. Version 4.6 is the latest version that is released at the time of writing.
|
10.2.7 Minimum system requirements
This scenario covers the installation of the smallest Red Hat OpenShift Container Platform cluster. For the recommended production or performance testing, see 10.2.8, “Preferred system requirements” on page 383.
The minimum system requirements are the following ones:
•IBM LinuxONE, or IBM z13/z13s and later
•One LPAR with z/VM Hypervisor 7.1 that uses three IFL processors in SMT2 mode, with 80 GB of memory
•FICON or FCP-attached disk storage
•A direct-attached OSA or RoCE network adapter, or virtual z/VM VSwitch networking
On z/VM, set up six guest VMs with the following components:
•One temporary bootstrap machine
•Three control plane (or master) machines
•At least two compute (or worker) machines
Here are the disk storage options for the z/VM guest VMs:
•FICON attached disk storage (direct-access storage devices (DASDs)). These DASDs can be z/VM minidisks, full-pack minidisks, or dedicated DASDs. To reach the minimum required DASD size for RHCOS installations, you need extended address volumes (EAVs). If available, use HyperPAV to ensure optimal performance.
•FCP-attached disk storage with logical units (LUNS) and SCSI devices.
•Shared file storage for Red Hat OpenShift Persistent Volume Claims (PVCs), which in this scenario is an NFS v4 server with more than 100 GB of disk storage.
Network configuration options include:
•A single vNIC for the z/VM VMs, direct-attached OSA or RoCE to each guest VM
•A single vNIC for the z/VM VMs, z/VM VSwitch with OSA (optionally, using link aggregation)
Each cluster machine must meet the minimum requirements that are shown in Table 10-2.
Table 10-2 Red Hat OpenShift minimum infrastructure requirements
|
Machine
|
OS
|
vCPU
|
Virtual RAM
|
Storage
|
|
Bootstrap
|
RHCOS
|
|
16 GB
|
120 GB
|
|
Control plane
|
RHCOS
|
|
16 GB
|
120 GB
|
|
Compute
|
RHCOS
|
|
8 GB
|
120 GB
|
Figure 10-5 shows the minimal resource deployment with NFS file storage for a Red Hat OpenShift dynamic storage provisioner.

Figure 10-5 Red Hat OpenShift minimal deployment with NFS storage
10.2.8 Preferred system requirements
This scenario covers the installation of the recommended Red Hat OpenShift Container Platform cluster for production or performance testing. For experimentation or non-essential deployments, see 10.2.7, “Minimum system requirements” on page 382.
Here are the recommended system requirements:
•IBM LinuxONE, or IBM z13/z13s and later.
•Three LPARs with z/VM Hypervisor 7.1 that use six IFL processors, each in SMT2 mode (total 18 IFL processors) with 80 GB of memory.
•FICON or FCP-attached disk storage.
•One or two direct-attached OSA or RoCE network adapters, or HiperSockets, which are attached to a node either directly as a device or by bridging with one z/VM VSWITCH to be transparent to the z/VM guest. To directly connect HiperSockets to a node, you must set up a gateway to the external network through a Red Hat Enterprise Linux 8 guest to bridge to the HiperSockets network.
Set up two or three instances of z/VM for HA. On z/VM instances, set up six guest VMs for the following purposes:
•One temporary bootstrap machine
•Three control plane (or master) machines, one per z/VM instance
•At least six compute (or worker) machines that are distributed across the z/VM instances
Disk storage options for the z/VM guest VMs:
•FICON attached disk storage (DASDs). These DASDs can be z/VM minidisks, full-pack minidisks, or dedicated DASDs. To reach the minimum required DASD size for RHCOS installations, you need EAV. If available, use HyperPAV and High-Performance FICON (zHPF) to ensure optimal performance.
•FCP-attached disk storage with LUNs and SCSI devices.
•Shared block storage for Red Hat OpenShift PVCs uses an IBM Spectrum Virtualize storage back end with more than 100 GB of disk storage.
Network configuration options include the following ones:
•A single vNIC for the z/VM VMs, direct-attached OSA or RoCE, to each guest VM (multiple adapters can be bonded for higher throughput).
•A single vNIC for the z/VM VMs, with a z/VM VSwitch with OSA (using link aggregation).
Each cluster machine must meet at least the requirements that are shown in Table 10-3.
Table 10-3 Red Hat OpenShift recommended infrastructure requirements
|
Machine
|
OS
|
vCPU
|
Virtual RAM
|
Storage
|
|
Bootstrap
|
RHCOS
|
|
16 GB
|
120 GB
|
|
Control plane
|
RHCOS
|
|
16 GB
|
120 GB
|
|
Compute
|
RHCOS
|
|
8 GB
|
120 GB
|
Figure 10-6 on page 385 depicts the preferred resources deployment with IBM Spectrum block storage for a Red Hat OpenShift dynamic storage provisioner.
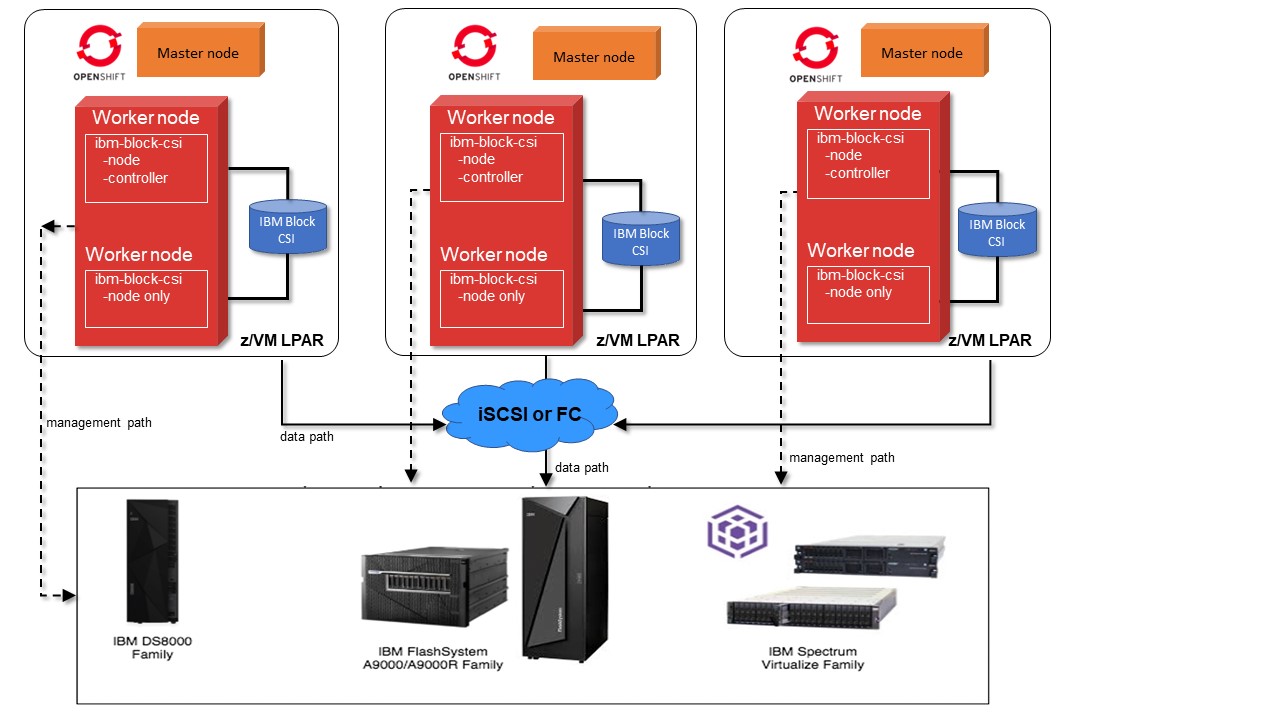
Figure 10-6 Red Hat OpenShift preferred deployment with integration of IBM block storage systems and Container Storage Interface driver
10.2.9 Red Hat OpenShift Deployment procedure on IBM LinuxONE
This section describes the installation sequence and configuration procedure flow for RHOCP on IBM LinuxONE. The requirements for either a minimum or preferred resources deployment must be met. The installation procedure takes about 90 minutes to complete.
Installation begins with setting up the UPI, including the helper (bastion) server that runs the DNS service, load-balancing, and the local HTTP Server that hosts the CoreOS files. The full list of tested integrations is available online at OpenShift Container Platform 4.x Tested Integrations.
Creating a user-provisioned infrastructure
To create the underlying infrastructure, complete the following steps.
1. Partition the machine into the required number of LPARs. Allocate IFL cores, memory, and network adapters. Prepare FICON or FCP-attached disk storage.
2. Install z/VM instances and provision guest VMs:
a. Set up networking and static IP addresses.
b. Set up an FTP server or use VMUR z/VM spool file queues to punch RHCOS bootable files and boot (IPL) the guest VMs.
3. Set up the helper/bastion node:
a. Set up the DNS service for the cluster nodes (named).
b. Set up the load balancer for the cluster rules (HAproxy).
c. Set up the http repository for the ignition files (HTTPd).
d. Configure the ports to be accessible in the local firewall.
The network connectivity between machines must be configured to allow cluster components to communicate. Each machine must be able to resolve the hostnames of all other machines in the cluster.
All machines require the ports that are shown in Table 10-4 to be open.
Table 10-4 Allowed ports from all machines to all machines
|
Protocol
|
Port
|
Description
|
|
ICMP
|
N/A
|
Network reachability tests
|
|
TCP
|
9000 - 9999
|
Host level services, including the node exporter on ports 9100 - 9101 and the Cluster Version Operator on port 9099
|
|
10250 - 10259
|
The default ports that Kubernetes reserves
|
|
|
10256
|
openshift-sdn
|
|
|
UDP
|
4789
|
VXLAN and Geneve
|
|
6081
|
VXLAN and Geneve
|
|
|
9000 - 9999
|
Host level services, including the node exporter on ports 9100 - 9101
|
|
|
TCP/UDP
|
30000 - 32767
|
Kubernetes NodePort
|
All machines to the control panel require that the ports shown in Table 10-5 to be open.
Table 10-5 Allowed ports from all machines to the control panel
|
Protocol
|
Port
|
Description
|
|
TCP
|
2379 - 2380
|
etcd server, peer, and metrics ports
|
|
6443
|
Kubernetes API
|
Setting up the DNS server for use with a Red Hat OpenShift cluster
You must install and configure the DNS server. The domain name server that is available with the Red Hat Enterprise Linux Server distribution can be used to create the cluster DNS server. Complete the following steps:
1. Install the bind OS package by using the following command:
yum install bind-chroot
2. Update the configuration file (/etc/named.conf) to implement the records from Table 10-6 on page 387, which lists the DNS records that are required for an Red Hat OpenShift Container Platform cluster that uses user-provisioned infrastructure (UPI).
Table 10-6 DNS records for Red Hat OpenShift Container Platform cluster.
|
Component
|
Record
|
Description
|
|
Kubernetes API
|
api.<cluster_name>.<base_domain>.
|
This DNS A/AAAA or CNAME record must point to the load balancer for the control plane machines. This record must be resolvable by both clients that are external to the cluster and from all the nodes within the cluster.
|
|
api-int.<cluster_name>.<base_domain>.
|
This DNS A/AAAA or CNAME record must point to the load balancer for the control plane machines. This record must be resolvable from all the nodes within the cluster.
Note: The apiserver must be able to resolve the worker nodes by the hostnames that are recorded in Kubernetes. If it cannot resolve the node names, proxied API calls can fail, and you cannot retrieve logs from pods.
|
|
|
Routes
|
*.apps.<cluster_name>.<base_domain>.
|
A wildcard DNS A/AAAA or CNAME record that points to the load balancer that targets the machines that run the ingress router pods, which are the worker nodes by default. This record must be resolvable by both clients that are external to the cluster and from all the nodes within the cluster.
|
3. Start or restart the server and enable the named service by using the following commands:
systemctl restart named-chroot
systemctl enable named-chroot
Setting up a web server for hosting the ignition files for Red Hat OpenShift
You must install and configure a web server (HTTPd) for hosting the ignition files. The web server is available in the Red Hat Enterprise Linux distribution and can be installed by completing the following steps:
1. Install the HTTPd OS package by using the following yum command:
yum install HTTPd
2. Update the configuration file httpd.conf to point to the location of the RHCOS images and ignition files that are generated and copied during the installation. Because ports 80 and 443 are already reserved for Red Hat OpenShift, HTTPd must be configured to listen on another port, for example, 8080.
3. Start or restart the server and enable the HTTPd service by using the following commands:
systemctl restart HTTPd
systemctl enable HTTPd
A required service in the UPI is a load balancer. The load balancer (haproxy) that is available with the Red Hat Enterprise Linux Servers distribution can be used to create the haproxy server. Complete the following steps:
1. Install the haproxy OS package by using the following command:
yum install haproxy
2. Update the configuration files (/etc/haproxy/haproxy.cfg) to implement the rules from Table 10-7 and Table 10-8. For more examples, see “HAProxy” in Deploying a UPI environment for Red Hat OpenShift 4.1 on VMs and Bare Metal.
3. Start or restart the haproxy service by using the following commands:
systemctl restart haproxy
systemctl enable haproxy
The haproxy rules that are shown in Table 10-7 must be configured for balancing the traffic between multiple master and worker nodes.
The API load balancer requires the ports that are shown in Table 10-7 to be open.
Table 10-7 Internal and external ports for API load balancer
|
Port
|
Back-end machines (pool members)
|
Internal
|
External
|
Description
|
|
6443
|
Bootstrap and control plane. You remove the bootstrap machine from the load balancer after the bootstrap machine initializes the cluster control plane. You must configure the /readyz endpoint for the apiserver health check probe.
|
X
|
X
|
Kubernetes apiserver
|
|
22623
|
Bootstrap and control plane. You remove the bootstrap machine from the load balancer after the bootstrap machine initializes the cluster control plane.
|
X
|
|
Machine config server
|
The application, Ingress, load balancer requires the ports that are shown in Table 10-8 to be open.
Table 10-8 Internal and external ports for application Ingress load balancer
|
Port
|
Back-end machines (pool members)
|
Internal
|
External
|
Description
|
|
443
|
The machines that run the Ingress router pods, compute nodes, or worker nodes by default.
|
X
|
X
|
HTTPS traffic
|
|
80
|
The machines that run the Ingress router pods, compute nodes, or worker nodes by default.
|
X
|
X
|
HTTP traffic
|
Installation Red Hat images and ignition configurations
The underlying infrastructure is complete. Before moving on with the installation, the RHCOS images must be installed on each z/VM guest of the Red Hat OpenShift Cluster Platform. Download the latest RHCOS images whose minor release versions are less than or equal to the version of the Red Hat OpenShift installer that you plan to use. Create kernel parameter (PARAM) files for each node of the cluster with the URLs coreos.inst.image_url and coreos.inst.ignition_url pointing to the RHCOS images and ignition files on the HTTPd server.
10.2.10 Creating the Red Hat OpenShift cluster
To create the cluster, perform the following steps.
1. Download the Red Hat OpenShift installer.
2. Download the Red Hat OpenShift client.
3. Download the Red Hat OpenShift Cluster Platform 4 pull_secret file by using your account at https://cloud.redhat.com.
4. Create the working directory.
5. Generate install-config.yaml and prepare the ignition files.
6. Prepare the SSH keys.
7. Prepare the kubeconfig files.
8. Wait for the bootstrap and nodes to the installation are complete.
The version of the openshift-installer that matches the minor version of the RHCOS images (for example, 4.5) must be downloaded, extracted, and copied to the directory in the PATH of the root user on the client machine. Example 10-1 shows the commands that we used in our environment.
Example 10-1 Downloading, extracting, and copying openshift-installer
wget https://mirror.openshift.com/pub/openshift-v4/s390x/clients/ocp/latest-4.5/openshift-install-linux.tar.gz
tar zxvf openshift-install-linux.tar.gz
cp openshift-install /usr/local/sbin/
chmod 755 /usr/local/sbin/openshift-install
10.2.11 Downloading the Red Hat OpenShift client
The latest version of the openshift-client must be downloaded, extracted, and copied to the directory in the PATH of the root user on the client machine, as shown in Example 10-2.
Example 10-2 Downloading, extracting, and copying openshift-client
wget https://mirror.openshift.com/pub/openshift-v4/s390x/clients/ocp/latest/openshift-client-linux.tar.gz
tar zxvf openshift-client-linux.tar.gz
cp oc /usr/local/sbin/
chmod 755 /usr/local/sbin/oc
10.2.12 Preparing the ssh keys
Generate the ssh keys by using the following command. The key generation parameters may be changed as needed.
ssh-keygen -t rsa -b 2048 -N '' -C 'OCP-4-Admin' -f /root/.ssh/id_rsa
10.2.13 Creating the installation configuration file
Unlike in an installer-provisioned infrastructure, for installations of Red Hat OpenShift Container Platform that use a UPI, you must manually create your installation configuration file. To do this task, perform the following steps:
1. Create an installation directory to store your required installation assets in by using the following command:
mkdir <installation_directory>
2. Customize install-config.yaml and save it in the <installation_directory>. Make a backup copy so that you can reinstall the cluster. A sample of the install-config yaml file is shown in Example 10-3.
Example 10-3 Sample install-config.yaml file for IBM Z
apiVersion: v1
baseDomain: example.com
compute:
hyperthreading: Enabled
name: worker
replicas: 0
architecture : s390x
controlPlane:
hyperthreading: Enabled
name: master
replicas: 3
architecture : s390x
metadata:
name: test
networking:
clusterNetwork:
- cidr: 10.128.0.0/14
hostPrefix: 23
networkType: OpenShiftSDN
serviceNetwork: - 172.30.0.0/16
platform:
none: {}
fips: false
pullSecret: '{"auths": ...}'
sshKey: 'ssh-ed25519 AAAA...'
10.2.14 Creating the Kubernetes manifest and ignition config files
Because you must modify some cluster definition files and manually start the cluster machines, you must generate the Kubernetes manifest and Ignition config files that the cluster needs to make its machines.
|
Note: As a best practice, perform a backup of the file before running the openshift-install command.
|
Complete the following steps:
1. Generate the Kubernetes manifests for the cluster by using the following command:
openshift-install create manifests --dir=<installation_directory>
2. Modify the <installation_directory>/manifests/cluster-scheduler-02-config.yml Kubernetes manifest file to prevent pods from being scheduled on the control plane machines by completing the following steps:
a. Open the <installation_directory>/manifests/cluster-scheduler-02-config.yml file and complete the following steps:
i. Locate the mastersSchedulable parameter and set its value to False.
ii. Save and exit the file.
b. Obtain the Ignition configuration files by completing the following steps:
i. Run the following command:
openshift-install create ignition-configs --dir=<installation_directory>
i. For <installation_directory>, specify the same installation directory.
The files that are shown in Figure 10-7 are generated in the directory.

Figure 10-7 Ignition configuration files in the installation directory
10.2.15 Creating the cluster
To create the Red Hat OpenShift Container Platform cluster, wait for the bootstrap process to complete on the machines that you provisioned by using the ignition config files that you generated with the installation program.
Monitor the bootstrap process by using the following command:
openshift-install --dir=<installation_directory> wait-for bootstrap-complete --log-level=debug
After the bootstrap process completes, remove the bootstrap machine from the load balancer.
10.2.16 Installing the NFS server and setting up a storage class in Red Hat OpenShift Container Platform
To dynamically provision persistent file volumes that are attached to the Red Hat OpenShift pods, you must have an NFS server on the network and an NFS dynamic provisioner in Red Hat OpenShift cluster. The provisioner allows volumes creation on demand and eliminates the need for cluster administrators to pre-provision storage. Stateful containers, such as FUJITSU Enterprise Postgres, require many volumes to be created. The dynamic provisioner and storage class that are present in the cluster create the volumes and bind them automatically to the pods during the FUJITSU Enterprise Postgres deployment.
For other dynamic file storage provisioners that are supported on the platform, see Introduction to IBM Spectrum Scale Container Storage Interface driver.
Complete the following steps:
1. Install the NFS server and create a nfs directory. Volumes are dynamically created in that location. The basic installation of an NFS server can be done on the bastion node. Run the following commands:
sudo yum install -y nfs-utils rpcbind
sudo mkdir /home/nfsshare -p
2. Configure the NFS server by specifying the domain and hostname permissions by running the following commands:
sudo echo "Domain = ${cluster_domain}" >> /etc/idmapd.conf
sudo echo "/home/nfsshare ${hostname}(rw,no_root_squash)" >> /etc/exports
3. Enable the NFS service and update the local firewall rules by using the following commands:
sudo systemctl enable --now rpcbind nfs-server
sudo firewall-cmd --add-service=nfs --permanent
sudo firewall-cmd --add-service={nfs3,mountd,rpc-bind} --permanent
sudo firewall-cmd --reload
The NFS server installation is complete. Proceed with deploying an NFS dynamic provisioner to the Red Hat OpenShift cluster by using Helm charts. The Helm chart is parameterized in the yaml file, and the following commands make a directory for the yaml file and create the file:
mkdir ~/nfs-helm-provisioner
vi ~/nfs-helm-provisioner/nfs_helm_values.yaml
The values that the yaml file specifies for a S390x image of the nfs-client-provisioner, nfs server IP address, and path are shown in Example 10-4.
Example 10-4 YAML file parameters
# This is a YAML-formatted file.
replicaCount: 1
strategyType: Recreate
image:
repository: docker.io/ibmcom/nfs-client-provisioner-s390x
tag: latest
pullPolicy: IfNotPresent
nfs:
server: ${nfs_ip}
path: /home/nfsshare
mountOptions:
# For creating the StorageClass automatically:
storageClass:
create: true
defaultClass: true
name: nfs-client
# Allow volume to be expanded dynamically
allowVolumeExpansion: true
# Method used to reclaim an obsoleted volume
reclaimPolicy: Delete
# When set to false your PVs will not be archived by the provisioner upon deletion of the PVC.
archiveOnDelete: true
# Set access mode - ReadWriteOnce, ReadOnlyMany or ReadWriteMany
accessModes: ReadWriteOnce
## For RBAC support:
rbac:
# Specifies whether RBAC resources should be created
create: true
# If true, create and use Pod Security Policy resources
# https://kubernetes.io/docs/concepts/policy/pod-security-policy/
podSecurityPolicy:
enabled: true
serviceAccount:
# Specifies whether a ServiceAccount should be created
create: true
# The name of the ServiceAccount to use.
# If not set and create is true, a name is generated using the fullname template
name:
resources: {}
nodeSelector: {}
tolerations: []
affinity: {}
Run the helm install command while using a user-defined or a system namespace. Specify the yaml file with the following values:
helm install nfs-client-provisioner --values ~/nfs-helm-provisioner/nfs_helm_values.yaml --namespace kube-system stable/nfs-client-provisioner
10.2.17 Installing IBM Spectrum Virtualize and setting up a storage class
Red Hat OpenShift supports dynamic provisioning of block storage persistent volumes. IBM provides a block storage CSI driver that enables Red Hat OpenShift to dynamically provision block storage that is used with stateful containers. Volumes creation on demand eliminates the need for cluster administrators to pre-provision storage in IBM storage systems. Stateful containers, such as FUJITSU Enterprise Postgres, require several volumes to be created. A dynamic provisioner and storage class that are present in the cluster create the volumes and bind them to the pods automatically during the FUJITSU Enterprise Postgres deployment.
The basic installation of the IBM block storage CSI driver begins with setting up the storage systems and access to them, whether over iSCSI or FCP storage area network (SAN) protocols. Supported IBM storage systems for Version 1.3 are:
•The IBM Spectrum Virtualize Family (including IBM Flash family members built with IBM Spectrum Virtualize (IBM FlashSystem® 5010, IBM FlashSystem 5030, IBM FlashSystem 5100, IBM FlashSystem 7200, IBM FlashSystem 9100, IBM FlashSystem 9200, and IBM FlashSystem 9200R) and IBM SAN Volume Controller (SVC) models SV2, SA2)
•IBM FlashSystem A9000/R
•IBM DS8880
•IBM DS8900
To install IBM Spectrum Virtualize, complete the following steps:
1. Download the IBM block storage operator manifest by using the following command:
curl -L https://github.com/IBM/ibm-block-csi-operator/releases/download/v1.1.0/ibm-block-csi-operator-z.yaml > ibm-block-csi-operator.yaml
2. Modify the version of the operator in the yaml file as necessary, for example, from 1.1.0 to 1.3.0:
sed -i "s/1.1.0/1.3.0/g" ibm-block-csi-operator.yaml
3. Install the operator while connected to a user-defined or a system namespace:
oc apply -f ibm-block-csi-operator.yaml
4. Verify that the operator is running:
oc get pod -l app.kubernetes.io/name=ibm-block-csi-operator
5. Install the IBM block storage CSI driver by creating an IBMBlockCSI custom resource (CR). Download the manifest of the CSI driver from GitHub:
curl -L https://github.com/IBM/ibm-block-csi-operator/releases/download/v1.1.0/csi.ibm.com_v1.1_ibmblockcsi_cr_ocp.yaml > csi.ibm.com_v1_ibmblockcsi_cr.yaml
6. Modify the version of the operator in the yaml file as needed, for example, from 1.1.0 to 1.3.0:
sed -i "s/1.1.0/1.3.0/g" csi.ibm.com_v1_ibmblockcsi_cr.yaml
7. Install the CSI driver to your Red Hat OpenShift cluster:
oc apply -f csi.ibm.com_v1_ibmblockcsi_cr.yaml
After the driver is installed and running, configure the array secrets and storage classes by completing the following steps.
1. Create an array secret:
oc create secret generic <NAME> --from-literal=username=<USER> --from-literal=password=<PASSWORD>--from-literal=management_address=<ARRAY_MGMT>
2. Create a storage class yaml file that is called storageclass-gold.yaml, as shown in Example 10-5 on page 395.
Example 10-5 Storage class YAML file
kind: StorageClass
apiVersion: storage.k8s.io/v1
metadata:
name: gold
provisioner: block.csi.ibm.com
parameters:
SpaceEfficiency: <VALUE>
pool: <VALUE_POOL_NAME>
csi.storage.k8s.io/provisioner-secret-name: <VALUE_ARRAY_SECRET>
csi.storage.k8s.io/provisioner-secret-namespace: <VALUE_ARRAY_SECRET_NAMESPACE>
csi.storage.k8s.io/controller-publish-secret-name: <VALUE_ARRAY_SECRET>
csi.storage.k8s.io/controller-publish-secret-namespace: <VALUE_ARRAY_SECRET_NAMESPACE>
# csi.storage.k8s.io/fstype: <xfs>
# volume_name_prefix: <prefix_name>
3. Apply the storage class by using the following command:
oc apply -f storageclass-gold.yaml
Now, create a Persistent Volume Claims (PVC) object. Example 10-6 provides a sample yaml file that specifies a PVC with 1 GB of storage with a raw block volume that is called ibm-pvc-raw-block.yaml.
Example 10-6 Sample YAML file
kind: PersistentVolumeClaim
apiVersion: v1
metadata:
name: demo-pvc-raw-block
spec:
volumeMode: Block
accessModes:
- ReadWriteOnce
resources:
requests:
storage: 1Gi
storageClassName: gold
Apply the PVC configuration by using the following command:
oc apply -f ibm-pvc-raw-block.yaml
10.3 FUJITSU Enterprise Postgres on Red Hat OpenShift
To facilitate the installation and configuration of FUJITSU Enterprise Postgres on Red Hat OpenShift, two container images are available: FUJITSU Enterprise Postgres Server and FUJITSU Enterprise Postgres Operator.
The FUJITSU Enterprise Server container contains the FUJITSU version of Postgres software that runs the database engine. The FUJITSU Enterprise Operator container contains the logic to deploy and maintain a HA Postgres cluster. With these two container images, the users can set up a FUJITSU Enterprise Postgres cluster for data serving needs on Red Hat OpenShift Platform running on an IBM LinuxONE platform.
The FUJITSU Enterprise Postgres Operator allows you to take advantage of the unique features of FUJITSU Enterprise Postgres and operational management of database clusters, such as:
•Stand-up single node and multi-node cluster
•Operational management of a FUJITSU Enterprise Postgres server by using FUJITSU Enterprise Postgres Operator
10.3.1 Multi-architectural container images
Container technology is usually branded as cloud-neutral. The same container image can run on different cloud technology. Container images are still platform- or architecture-specific. An image that is built for the Intel/AMD platform (x86_64/amd64 architecture) cannot run on an ARM platform (arm/arm64 architecture) or IBM LinuxONE (s390x architecture) platform.
In 2016, a new specification, Image Manifest V2, Schema 2, also known as a manifest list, was introduced. The specification defines a manifest that combines multiple container image information, including architecture and O/S support, as an image digest into a single bundle. With this manifest, you can pull an image from a container registry by using one reference, regardless of the underlying platform/architecture. Using a busy box as an example, it is now possible to pull the image by referencing busybox1.0 on all platforms (architectures) that are supported by the bundle.
Both FUJITSU Enterprise Postgres Server and FUJITSU Enterprise Postgres Operator are built by following the Version 2 specification and providing multi-architectural container images. The container images can be deployed to a platform based on the amd64 architecture and a platform that is based on the S390x architecture. Hence, Red Hat OpenShift clusters running on an Intel/AMD system and on IBM LinuxONE can use the same deployment definitions for installing FUJITSU Enterprise Postgres.
10.3.2 FUJITSU Enterprise Postgres server
Setting up an HA Postgres cluster is a challenging task for the database administrator. It requires in-depth knowledge of how Postgres replication works and how to coordinate the failover process if the master node fails. The FUJITSU Enterprise Postgres server container image provides enterprise-grade Postgres server engine functions. You can set up an HA cluster with proper configuration on a software level by using automated installation. The Postgres server uses a leader election process to ensure only one pod in the cluster runs as the master (see Figure 10-8 on page 397). All other pods in the cluster run as replicas.

Figure 10-8 High availability FUJITSU Enterprise Postgres cluster with leader election
10.3.3 FUJITSU Enterprise Postgres Operator
The FUJITSU Enterprise Postgres Operator automates the deployment and management of FUJITSU Enterprise Postgres Server clusters on Red Hat OpenShift platform. By using FUJITSU Enterprise Postgres Operator, you can do the following tasks:
•Deploy a single pod Postgres cluster.
•Deploy a multiple pod HA Postgres cluster by using streaming replication, both synchronous and asynchronous.
•Configure all Postgres parameters.
•Install a certificate and enforce secure TLS communication between applications and the Postgres cluster.
•Enable (by default) FUJITSU Enterprise Postgres unique features:
– Transparent Data Encryption (TDE) and create an encrypted table space.
– Data Masking.
– In-Memory Columnar Index (Vertical Clustered Index (VCI)).
– Dedicated audit logs.
– Global Meta Cache (GMC).
•Perform an orchestrated minor version upgrade with minimal downtime on the cluster.
10.4 FUJITSU Enterprise Postgres Operator operations
In this section, we describe an example installation and deployment of FUJITSU Enterprise Postgres Cluster by using FUJITSU Enterprise Operator V2.2.0. When working on other FUJITSU Enterprise Postgres Operator versions or a configuration that is specific to your needs, see FUJITSU Enterprise Postgres manuals.
10.4.1 FUJITSU Enterprise Postgres Operator installation
The FUJITSU Enterprise Postgres Operator is available in the Red Hat Ecosystem Catalog. The FUJITSU Enterprise Postgres Operator can be installed by using the Red Hat OpenShift Console (GUI) or command-line interface (CLI). For more information about the installation of the Red Hat OpenShift Console CLI command, see 10.2.11, “Downloading the Red Hat OpenShift client” on page 389.
Prerequisites
Here are the prerequisites to install the FUJITSU Enterprise Postgres Operator:
•Red Hat OpenShift V4.5+.
•Minimum of three worker nodes are required for an HA deployment with synchronous replication.
•Four or more worker nodes are required for an HA deployment with synchronous replication and anti-affinity enabled.
•Cluster administrator privilege for the initial deployment.
•The oc CLI for the installation through a CLI.
•NFS as the default storage class, as described in 10.2.16, “Installing the NFS server and setting up a storage class in Red Hat OpenShift Container Platform” on page 392.
|
Note: To obtain a copy of the Red Hat OpenShift CLI tool, see Where can I download the Red Hat OpenShift command-line tool?
|
Ports
The Postgres server exposes the ports that are shown in Table 10-9 by default.
Table 10-9 Default TCP ports that are exposed by the container
|
Service
|
Port
|
|
Postgres
|
27500
|
|
Patroni API
|
25001
|
Preparation
To prepare for the installation, complete the following steps:
1. Log in to Red Hat OpenShift by using an account with Cluster Admin privileges.
3. Click Create Project to create a project that is called znprj, as shown in Figure 10-9 on page 399.

Figure 10-9 Creating a project
|
Note: For illustration purposes, all the actions are performed under the znprj project.
|
Operator installation and Postgres cluster deployment
Complete the following steps:
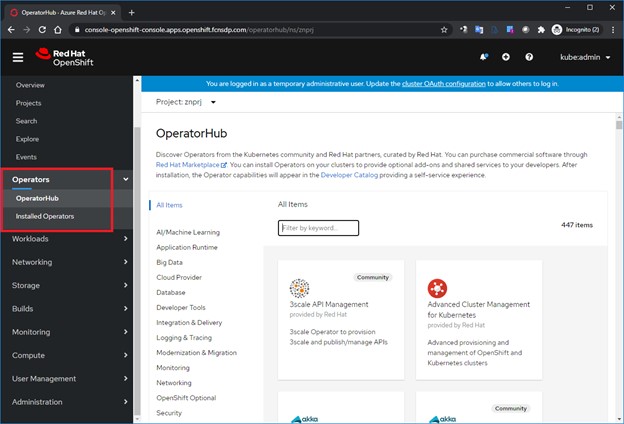
Figure 10-10 Red Hat OpenShift OperatorHub
2. In the search box, enter fujitsu. When the result comes back, click the FUJITSU Enterprise Postgres 12 Operator icon, as shown in Figure 10-11.

Figure 10-11 Red Hat OpenShift OperatorHub: Search
3. On the Install Operator window, select Update Channel and Installation Mode. We selected stable and A specific namespace on the cluster, and selected znprj from the drop-down menu (Figure 10-12).

Figure 10-12 Red Hat OpenShift OperatorHub: FUJITSU Enterprise Postgres 12 Operator Install menu

Figure 10-13 Operator installation
|
Note: The Red Hat OpenShift Operator can be installed to all namespaces or to a specific namespace. When the Red Hat OpenShift Operator is installed to all namespaces, it is available to every namespace in the Red Hat OpenShift Cluster, including namespaces/projects that are created after the Red Hat OpenShift Operator is installed. When an updated Red Hat OpenShift Operator is available, it will be updated globally on the whole Red Hat OpenShift cluster.
When the Red Hat OpenShift Operator is installed to a specific namespace, it is restricted to that namespace/project. Each namespace/project can have a different version of Red Hat OpenShift Operator. Depending on the Approval Strategy for the Red Hat OpenShift Operator in a specific namespace, the Red Hat OpenShift Operator version in one namespace/project can be different from another namespace/project.
|
5. The FUJITSU Enterprise Postgres 12 Operator appears under Installed Operators after the installation completes (Figure 10-14).

Figure 10-14 Operator installed
10.4.2 Deploying a single-node FUJITSU Enterprise Postgres cluster by using the command-line interface
FUJITSU Enterprise Postgres Operator leverages the Kubernetes Custom Resource Definitions (CRD) to deploy the FUJITSU Enterprise Postgres server cluster. Using the Custom Resource (CR), the user can specify the characteristics of FUJITSU Enterprise Postgres cluster to be deployed. The FUJITSU Enterprise Postgres 12 Operator uses the CR configuration file to define the required Kubernetes objects, such as config maps, secrets, storage volumes, services, and stateful sets (HA) to deploy a working FUJITSU Enterprise Postgres cluster within a few minutes.
Different aspects of cluster can be managed by updating corresponding CRs as needed, such as changing the parameters of postgresql.conf, that is, pg_hba.conf or pg_audit.conf. The changes in CRs, if allowed, are reflected in the required Kubernetes resources and passed to running FUJITSU Enterprise Postgres containers in a cluster to take effect.
|
Note: For more information about the various parameters that can be specified by using a CR configuration file to deploy the cluster and how to change the deployed parameter as required, see the FUJITSU Enterprise Postgres 12 Operation Guide.
|
The following examples show how to deploy a FUJITSU Enterprise Postgres cluster with a single pod (stand-alone mode) and multiple pods (HA) by using the FUJITSU Enterprise Postgres 12 Operator. The FUJITSU Enterprise Postgres 12 Operator can be used by using the oc CLI and the Red Hat OpenShift Console.
Stand-alone FUJITSU Enterprise Postgres server deployment by using a CLI
To create a stand-alone FUJITSU Enterprise Postgres server deployment by using a CLI, complete the following steps:
1. Create a CR configuration file that is used as deployment file to define a FUJITSU Enterprise Postgres cluster. In this example, a CR file that is called standalone.yaml is created, as shown in Example 10-7 on page 405.
Example 10-7 Stand-alone FUJITSU Enterprise Postgres Cluster deployment file
ngz@W10T-FAS200307:~/deploy$ cat standalone.yaml
apiVersion: fep.fujitsu.io/v2
kind: FEPCluster
metadata:
name: standalone-fep
spec:
fep:
forceSsl: true
image:
pullPolicy: IfNotPresent
image: "quay.io/fujitsu/fujitsu-enterprise-postgres-server:ubi8-12-1.0"
mcSpec:
limits:
cpu: 500m
memory: 700Mi
requests:
cpu: 200m
memory: 512Mi
podAntiAffinity: false
podDisruptionBudget: false
instances: 1
servicePort: 27500
syncMode: "off"
sysExtraLogging: false
fepChildCrVal:
# The values that are specified below are used ONLY at start-up to create #child Custom Resources - FEPVolume, FEPConfig, FEPUser
#customPgAudit: |
# define pg audit custom params here to override defaults.
The CR configuration file includes a reference to the FUJITSU Enterprise Postgres server specification, that is, name, SSL termination, CPU, memory, FUJITSU Enterprise Postgres server Image, and other items. Table 10-10 describes some of the fields that can be modified by using the CR configuration file.
Table 10-10 CR configuration parameter details
|
Field
|
Value
|
Details
|
|
metadata:
name:
|
standalone-fep
|
Name of the FUJITSU Enterprise Postgres cluster. Must be unique within a namespace.
|
|
spec:
fep:
forceSsl:
|
true
|
The FUJITSU Enterprise Postgres cluster accepts only a TLS encrypted connection from a client.
|
|
spec:
fep:
image:
|
quay.io/fujitsu/xxx
|
FUJITSU Enterprise Postgres server image.
|
|
spec:
fep:
mcSpec:
|
limits:
cpu: 500m
memory: 700Mi
requests:
cpu: 200m
memory: 512Mi
|
Resource allocation to this container.
|
|
spec:
fep:
syncMode:
|
off
|
Replication mode.
|
|
spec:
fepChildCrVal:
customPgAudit:
|
[output]
logger = 'auditlog'
log_directory = '/database/log/audit'
log_truncate_on_rotation = on
log_filename = 'pgaudit-%a.log'
log_rotation_age = 1d
log_rotation_size = 0
[rule]
|
pgAudit configuration.
|
|
spec:
fep:
instances:
|
|
Number of FUJITSU Enterprise Postgres pods in the cluster. For a stand-alone deployment, change it to 1.
|
|
spec:
fepChildCrVal:
customPgParams:
|
shared_preload_libraries='pgx_datamasking,pg_prewarm'
session_preload_libraries='pg_prewarm'
|
Custom values to go into postgresql.conf. The two lines listed here enable the FUJITSU Enterprise Postgres
unique features.
|
|
spec:
fepChildCrVal:
sysUsers
|
|
Password for Postgres system users.
|
For this example, the CR configuration file, which is named standalone.yaml, is used to stand up a single FUJITSU Enterprise Postgres server with the configurable parameters that are defined in Table 10-10 on page 405. The CR configuration parameter details are shown in Table 10-10 on page 405 and highlighted in red in Example 10-8.
Example 10-8 CR configuration parameters that are used in our example
apiVersion: fep.fujitsu.io/v2
kind: FEPCluster
metadata:
name: standalone-fep
namespace: znprj
spec:
fep:
forceSsl: true
image:
pullPolicy: IfNotPresent
image: "quay.io/fujitsu/fujitsu-enterprise-postgres-server:ubi8-12-1.0"
mcSpec:
limits:
cpu: 500m
memory: 700Mi
requests:
cpu: 200m
memory: 512Mi
podAntiAffinity: false
podDisruptionBudget: false
instances: 1
servicePort: 27500
syncMode: "off"
sysExtraLogging: false
fepChildCrVal:
# The values specified below are used ONLY at start-up to create child
# Custom Resources - FEPVolume, FEPConfig, FEPUser
customPgAudit: |
# define pg audit custom params here to override defaults.
[output]
logger = 'auditlog'
log_directory = '/database/log/audit'
log_truncate_on_rotation = on
log_filename = 'pgaudit-%a.log'
log_rotation_age = 1d
log_rotation_size = 0
[rule]
customPgHba: |
# define pg_hba custom rules here to be merged with default rules.
# TYPE DATABASE USER ADDRESS METHOD
customPgParams: |
# define custom postgresql.conf parameters below to override defaults.
# Current values are as default FUJITSU Enterprise Postgres deployment
shared_preload_libraries='pgx_datamasking,pg_prewarm'
session_preload_libraries='pg_prewarm'
max_prepared_transactions = 100
max_worker_processes = 20
max_connections = 100
work_mem = 1MB
maintenance_work_mem = 12MB
shared_buffers = 128MB
effective_cache_size = 384MB
checkpoint_completion_target = 0.8
# tcp parameters
tcp_keepalives_idle = 30
tcp_keepalives_interval = 10
tcp_keepalives_count = 3
# logging parameters in default fep installation
# if log volume is not defined, log_directory should be
# changed to '/database/userdata/data/log'
log_filename = 'logfile-%a.log'
log_file_mode = 0600
log_truncate_on_rotation = on
log_rotation_age = 1d
log_rotation_size = 0
log_checkpoints = on
log_line_prefix = '%e %t [%p]: [%l-1] user=%u,db=%d,app=%a,client=%h'
log_lock_waits = on
log_autovacuum_min_duration = 60s
logging_collector = on
log_directory = '/database/userdata/data/log'
pgaudit.config_file='/opt/app-root/src/pgaudit-cfg/pgaudit.conf'
log_replication_commands = on
log_min_messages = WARNING
log_destination = stderr
# wal_archive parameters in default fep installation
archive_mode = on
archive_command = '/bin/true'
wal_level = replica
max_wal_senders = 12
wal_keep_segments = 64
storage:
dataVol:
size: "5Gi"
walVol:
size: "1200Mi"
sysUsers:
pgAdminPassword: admin-password
pgdb: mydb
pgpassword: mydbpassword
pguser: mydbuser
pgrepluser: repluser
pgreplpassword: repluserpwd
tdepassphrase: tde-passphrase
systemCertificates:
key: |-
-----BEGIN RSA PRIVATE KEY-----
MIIEowIBAAKCAQEA4AI33yvHZws+jta6qpV6wzJqF8odIfTIpCfbrVcUUtLFKJ1I
2e4SceTKi6O3C/I1XuvWlpng5IO65+fQQLO06z1/AuQT78YUn/Wlm9x1aHVsv4AN
B5JWWqDOjrRT3o7nRPGXfilabP0rGE2mJJcVR9nExJ3IeaktgT3sb8YlXvtchyYp
mjdbfxabTz07ig0+6/cwKoRRxOK8Uf7f5euE0cI/490J6r5Rs4lgD8sIQNCUFlTF
YvmAH7gcdssSFBt8NPlUATHEsoFmlW0DKCJWNhTLOht+s6L/1zwTHLjPG2pdkG6W
dgmu5H2pDml8CDNLDv98Aj7i+I5SRKKcVPlnuQIDAQABAoIBAFPQYKlOzw/+BA0b
yMIUpdctIMb/54CR/xR0mVw1DbSjigNVPjHUQvB8Y1B2FAITQObgJO06bAv0QdWN
Rb0/v/yYiNJDFjaLjaIAHlO/2+oWrXbFaZqgpVDJhB+e1xaZr2x7XGxm+p925k30
l6pvIRY+I8JRKvZiV1VZHwL/R3JOtPr++xMZtLVjVOI+f+ySqJ+TZHuAjm49EKxj
cEmmJ28b7QcziXsvKy00f+zbqLIBKXQdZAFU5eEr1BsDRXdRW+Kf0XIvftuy4BJZ
voKT+VGhEvF/qysswL4+6IAO6tpuYnnM0Y2d3sOGoWPkTcQK0MekYKzL/WmtCjNs
9hodJtECgYEA5EWyhEOf4uOKe5TDp697UCUvXLoOR58FDe/S8XNvScn29jjOkqIg
OMoqo9xAkJTNTzqn5UUdt1x/pgM2NxlPLFijrc0zQlX3SoOO2ryDd9WNi7YKtN16
KJqa536WeZu2OEbuAZ+S3GALVy1RPeTNPnUOmKnF06DjDUGzLNCZy10CgYEA+zfw
952DWuz1U0Z4wvAEqqcgUKXPKrkTXV/iUnjkDkrLYVr0ZofDNTXrdHl+UedFmaOC
cieZn6DNhcdz5tKtyysGMH3g/qs9PfoGUngvcXsy0Egk04l3x1jc8TTCLqXZXYaQ
HMsx51n+R58oncPtzYSUOr9qQ6PbC2CstTbFJA0CgYEAjGEsUliAB/jknfEzjXjG
PdhQUxb8VyE864Az2lah9t/kJzFyIAziAeqZ5GE7t247AGFTBRTHHI8e1Qoemi3P
Wbc9GVIbFs1lIYbcIDpUIyrKPEP8O5QEXtoNLxXTFgAjRGKiVY87spjCAJ+W2ZhO
e/1it5GYXfgQCYQA2yuBmOUCgYANRkR2YR1axaCk+NlSu6oTdmdPu6M5x7PNQE7O
OtMaKjua9lppvIzFGAdMDUtueoEEAE7ZR1xnwfB6PDLUpJdIYAqgr1YfPt8qkjaZ
Tv56yZ7CwL0pbF8m6nwqRrZoDp1wwraEvvvxFKFKGY/k3kCHlpTakdjEoDjn3gDi
RnWeVQKBgCEneMSzucei5LRppRtRaJw/Btll8qlPMlX3W7dxQ3cLwpmLOn0m51Fp
PIZ44zYK8R6fu4+/sSrlfaIg86Ugeufp6YNxyNROKxUGza5vDIu5OftwWtBeg+UK
Z8lLWNdX6pp7WMujmF3H1DrkBbauYMUKZ4UxUYtelgHERMePIxwb
-----END RSA PRIVATE KEY-----
crt: |-
-----BEGIN CERTIFICATE-----
MIIDUTCCAjmgAwIBAgIRAMocW3qMoHrD6qRvMPppMkMwDQYJKoZIhvcNAQELBQAw
NzEQMA4GA1UECgwHRnVqaXRzdTEjMCEGA1UEAwwaRkVQIFJvb3QgQ0EgZm9yIEt1
YmVybmV0ZXMwHhcNMjEwMjA2MDQzMjM2WhcNMjYwMjA1MDQzMjM2WjA/MRAwDgYD
VQQKEwdGdWppdHN1MSswKQYDVQQDEyJGVUpJVFNVIEVudGVycHJpc2UgUG9zdGdy
ZXMgU2VydmVyMIIBIjANBgkqhkiG9w0BAQEFAAOCAQ8AMIIBCgKCAQEA4AI33yvH
Zws+jta6qpV6wzJqF8odIfTIpCfbrVcUUtLFKJ1I2e4SceTKi6O3C/I1XuvWlpng
5IO65+fQQLO06z1/AuQT78YUn/Wlm9x1aHVsv4ANB5JWWqDOjrRT3o7nRPGXfila
bP0rGE2mJJcVR9nExJ3IeaktgT3sb8YlXvtchyYpmjdbfxabTz07ig0+6/cwKoRR
xOK8Uf7f5euE0cI/490J6r5Rs4lgD8sIQNCUFlTFYvmAH7gcdssSFBt8NPlUATHE
soFmlW0DKCJWNhTLOht+s6L/1zwTHLjPG2pdkG6Wdgmu5H2pDml8CDNLDv98Aj7i
+I5SRKKcVPlnuQIDAQABo1AwTjAdBgNVHSUEFjAUBggrBgEFBQcDAQYIKwYBBQUH
AwIwDAYDVR0TAQH/BAIwADAfBgNVHSMEGDAWgBQcwrrUO0u+FhIUuVdrDRCQRsi6
ZjANBgkqhkiG9w0BAQsFAAOCAQEAm5dxBoI9pScOCvRAchg4CprdRDSJb9K6yB3O
nCAxnM47iHeXnY3WlnI388kHu8DU7O4ba1tJbGs3KY9KzioPk43pU12jWkO1onoF
+mTDjx/Ef1cYWA9r5q/LtgTa6Q2sxV4O2x67QW82aAnaxO34dV5zWCPIvAoovZBV
HRT+BgCg3r2vD1RGKK2nl1aYJtWhO1SZubam+VttdZ/vbM9oOJctxmImsEtBXjkY
KteePdQtLL5o03JhyXWyRshCq+HMmKf2KgyY8gvydGcP4eLQdBWcW40LcnVq6UjT
0kJycJEKngMVademq1ZWHGaiYB7hyT6GhgIcHUJ2cKrPgbEh1Q==
-----END CERTIFICATE-----
cacrt: |-
-----BEGIN CERTIFICATE-----
MIIDTzCCAjegAwIBAgIUYssQ8I74US5g+1+Z7CHuaDgkZnEwDQYJKoZIhvcNAQEL
BQAwNzEQMA4GA1UECgwHRnVqaXRzdTEjMCEGA1UEAwwaRkVQIFJvb3QgQ0EgZm9y
IEt1YmVybmV0ZXMwHhcNMjEwMjA2MDM1MjI4WhcNMzEwMjA0MDM1MjI4WjA3MRAw
DgYDVQQKDAdGdWppdHN1MSMwIQYDVQQDDBpGRVAgUm9vdCBDQSBmb3IgS3ViZXJu
ZXRlczCCASIwDQYJKoZIhvcNAQEBBQADggEPADCCAQoCggEBAMs97gUF0xkUzCgL
7MiiDju9ySr/ziwjvcYU7jA9ML+SLmftMs3HtcYbAmSntqI+MDBSR/FAJTOoytuT
pV+mCFcGj2YAjDpliHPeNcUpbryy4YMChF3+MovkIwGCksxo5rhiWhGmoBYpA48P
4Xe8SPlzqMzhFvNeKzyiUhvjutS2Y1Ss38lsTaurFPx64vQ2PaC54XzdwMptXtpb
tYmWSzCpJWwxZ6lF3vitdA2w0tnBWNyctAd0+RIM/fvArxiIqseAux9t0uogm5to
lRIhvekuxOpXBPEqtIYQ4j9XUW2JH8vUDnzPkPvjrq+A3Ug8OyyfGVrW7+VYXozu
c4aP7P0CAwEAAaNTMFEwHQYDVR0OBBYEFBzCutQ7S74WEhS5V2sNEJBGyLpmMB8G
A1UdIwQYMBaAFBzCutQ7S74WEhS5V2sNEJBGyLpmMA8GA1UdEwEB/wQFMAMBAf8w
DQYJKoZIhvcNAQELBQADggEBAMDwD85RAaWEBptFgLzKw+9xEUy1vcZaonAuA1qc
T342XTueyAugxkC11HwdCGgGS34VyctfMGqj4AW6pA2ez4tLrbOps4DmV4sw8uBL
8pgRDgfly3ob9FEg2wa0hmrwX9jH5Bt4vySUE2785uPAqaspT2UNtTBxS85BUi1T
sKId2Rtil6an281Z81wyWVI6Jm2D4MG0mbsiGcTPlCtdg/UljvDYymXlAvd4vNhl
k9hDa13TgDqJKgKdTIcmZoNQdpEVgFcO0h9AEUy5AuLqxHq60dLfZ6ESGPlMI7Lm
i4PzYbCnBmOe+7TnHcPSyrnehs66Ik+oifRd82eYS7vKjFw=
-----END CERTIFICATE-----
2. Apply the CR configuration file standalone.yaml by using the command that is shown in Example 10-9.
Example 10-9 Deploying the stand-alone cluster
ngz@W10T-FAS200307:~/deploy$ oc get fepcluster standalone-fep
NAME AGE
standalone-fep 4m1s
ngz@W10T-FAS200307:~/deploy$ oc get pod -l app=standalone-fep-sts -L feprole
NAME READY STATUS RESTARTS AGE FEPROLE
standalone-fep-sts-0 1/1 Running 0 4m37s master
3. The single node cluster is deployed, and the deployment status can be checked by using the command that is shown in Example 10-10 (standalone-fep-sts-0 is the master stateful set for the cluster name standalone-fep, which is specified in the CR configuration file). The status shows Running after the cluster is ready.
Example 10-10 Checking the stand-alone cluster deployment status
ngz@W10T-FAS200307:~/deploy$ oc get fepcluster standalone-fep
NAME AGE
STANDALONE-FEP 4m1s
ngz@W10T-FAS200307:~/deploy$ oc get pod -1 app-standalone-fep-sts -L feprole
NAME READY STATUS RESTARTS AGE FEPROLE
standalone-fep-sts-0 1/1 Running 0 2,
ngz@W10T-FAS200307:~/deploy$
10.4.3 Deploying a single node FUJITSU Enterprise Postgres cluster by using the Red Hat OpenShift console
1. In the Red Hat OpenShift Console, select Operators → Installed Operators.
2. Select the FUJITSU Enterprise Postgres 12 Operator, as shown in Figure 10-15.

Figure 10-15 Installed Operators

Figure 10-16 Creating a stand-alone FUJITSU Enterprise Postgres cluster
4. In the Create FEPCluster window, change the display to the YAML view and update the values, as shown in Table 10-10 on page 405. Click Create to create a cluster, as shown in Figure 10-17.

Figure 10-17 Updating the deployment parameters
After a while, check the deployment status by selecting Workloads → Pods.
The single node cluster is deployed, and the deployment status can be checked by selecting Workloads → Pods (standalone-fep-sts-0 is the master stateful set for the cluster name standalone-fep that is specified in the CR configuration file). The status shows Running after the cluster is ready (Figure 10-18 on page 413).

Figure 10-18 Checking the status of the deployment
Deploying a three-node HA FUJITSU Enterprise Postgres cluster by using a CLI
In the following example, we deploy a FUJITSU Enterprise Postgres cluster with three pods by using the oc CLI with a CR configuration file.
The cluster has one Postgres master and two Postgres replicas running in HA mode. If the master node fails, the built-in mechanism fails over that role to a different node with a minimal outage. Complete the following steps:
1. Create a CR Configuration file that is used as deployment file to define a FUJITSU Enterprise Postgres cluster. In this example, a CR file that is called ha.yaml is created, as shown in Example 10-11.
Example 10-11 HA cluster deployment YAML file
ngz@W10T-FAS200307:~/deploy$ cat standalone.yaml
apiVersion: fep.fujitsu.io/v2
kind: FEPCluster
metadata:
name: ha-fep
spec:
fep:
forceSsl: true
image:
pullPolicy: IfNotPresent
image: "quay.io/fujitsu/fujitsu-enterprise-postgres-server:ubi8-12-1.0"
mcSpec:
limits:
cpu: 500m
memory: 700Mi
requests:
cpu: 200m
memory: 512Mi
podAntiAffinity: false
podDisruptionBudget: false
instances: 3
servicePort: 27500
syncMode: "on"
sysExtraLogging: false
fepChildCrVal:
# The values specified below are used ONLY at start-up to create child
# Custom Resources - FEPVolume, FEPConfig, FEPUser
customPgAudit: |
# define pg audit custom params here to override defaults.
The CR configuration file includes references to the FUJITSU Enterprise Postgres server specification: name, SSL termination, CPU, memory, FUJITSU Enterprise Postgres server, and other items. Table 10-11 describes some of the fields that can be modified by using the CR configuration file.
Table 10-11 CR configuration file details
|
Field
|
Value
|
Details
|
|
metadata:
name:
|
ha-fep
|
Name of the FUJITSU Enterprise Postgres Cluster. Must be unique within a namespace.
|
|
spec:
fep:
forceSsl:
|
true
|
The FUJITSU Enterprise Postgres cluster accepts only a TLS encrypted connection from the client.
|
|
spec:
fep:
image:
|
quay.io/fujitsu/xxx
|
FUJITSU Enterprise Postgres server image.
|
|
spec:
fep:
mcSpec:
|
limits:
cpu: 500m
memory: 700Mi
requests:
cpu: 200m
memory: 512Mi
|
Resource allocation to this container.
|
|
spec:
fep:
instances:
|
|
Number of FUJITSU Enterprise Postgres pods in the cluster. For a stand-alone deployment, change this value to 1.
|
|
spec:
fep:
syncMode:
|
on
|
Replication mode (on for sync and off for async and stand-alone).
|
|
spec:
fepChildCrVal:
customPgAudit:
|
[output]
logger = 'auditlog'
log_directory = '/database/log/audit'
log_truncate_on_rotation = on
log_filename = 'pgaudit-%a.log'
log_rotation_age = 1d
log_rotation_size = 0[rule]
|
pgAudit configuration.
|
|
spec:
fepChildCrVal:
customPgParams:
|
shared_preload_libraries='pgx_datamasking,pg_prewarm'
session_preload_libraries='pg_prewarm'
|
Custom values to go into postgresql.conf. The two lines that are listed here enable FUJITSU Enterprise Postgres unique features.
|
|
spec:
fepChildCrVal:
sysUsers:
|
|
Password for Postgres system users.
|
The CR configuration parameter details are shown in Table 10-11 on page 414 and highlighted in red in Example 10-12.
Example 10-12 Configuration parameter details
apiVersion: fep.fujitsu.io/v2
kind: FEPCluster
metadata:
name: ha-fep
spec:
fep:
forceSsl: true
image:
pullPolicy: IfNotPresent
image: "quay.io/fujitsu/fujitsu-enterprise-postgres-server:ubi8-12-1.0"
mcSpec:
limits:
cpu: 500m
memory: 700Mi
requests:
cpu: 200m
memory: 512Mi
podAntiAffinity: false
podDisruptionBudget: false
instances: 3
servicePort: 27500
syncMode: "on"
sysExtraLogging: false
fepChildCrVal:
# The values specified below are used ONLY at start-up to create child
# Custom Resources - FEPVolume, FEPConfig, FEPUser
customPgAudit: |
# define pg audit custom params here to override defaults.
[output]
logger = 'auditlog'
log_directory = '/database/log/audit'
log_truncate_on_rotation = on
log_filename = 'pgaudit-%a.log'
log_rotation_age = 1d
log_rotation_size = 0
[rule]
customPgHba: |
# define pg_hba custom rules here to be merged with default rules.
# TYPE DATABASE USER ADDRESS METHOD
customPgParams: |
# define custom postgresql.conf parameters below to override defaults.
# Current values are as per default FUJITSU Enterprise Postgres deployment
shared_preload_libraries='pgx_datamasking,pg_prewarm'
session_preload_libraries='pg_prewarm'
max_prepared_transactions = 100
max_worker_processes = 20
max_connections = 100
work_mem = 1MB
maintenance_work_mem = 12MB
shared_buffers = 128MB
effective_cache_size = 384MB
checkpoint_completion_target = 0.8
# tcp parameters
tcp_keepalives_idle = 30
tcp_keepalives_interval = 10
tcp_keepalives_count = 3
# logging parameters in default fep installation
# if log volume is not defined, log_directory should be
# changed to '/database/userdata/data/log'
log_filename = 'logfile-%a.log'
log_file_mode = 0600
log_truncate_on_rotation = on
log_rotation_age = 1d
log_rotation_size = 0
log_checkpoints = on
log_line_prefix = '%e %t [%p]: [%l-1] user=%u,db=%d,app=%a,client=%h'
log_lock_waits = on
log_autovacuum_min_duration = 60s
logging_collector = on
log_directory = '/database/userdata/data/log'
pgaudit.config_file='/opt/app-root/src/pgaudit-cfg/pgaudit.conf'
log_replication_commands = on
log_min_messages = WARNING
log_destination = stderr
# wal_archive parameters in default fep installation
archive_mode = on
archive_command = '/bin/true'
wal_level = replica
max_wal_senders = 12
wal_keep_segments = 64
storage:
dataVol:
size: "5Gi"
walVol:
size: "1200Mi"
sysUsers:
pgAdminPassword: admin-password
pgdb: mydb
pgpassword: mydbpassword
pguser: mydbuser
pgrepluser: repluser
pgreplpassword: repluserpwd
tdepassphrase: tde-passphrase
systemCertificates:
key: |-
-----BEGIN RSA PRIVATE KEY-----
MIIEowIBAAKCAQEA4AI33yvHZws+jta6qpV6wzJqF8odIfTIpCfbrVcUUtLFKJ1I
2e4SceTKi6O3C/I1XuvWlpng5IO65+fQQLO06z1/AuQT78YUn/Wlm9x1aHVsv4AN
B5JWWqDOjrRT3o7nRPGXfilabP0rGE2mJJcVR9nExJ3IeaktgT3sb8YlXvtchyYp
mjdbfxabTz07ig0+6/cwKoRRxOK8Uf7f5euE0cI/490J6r5Rs4lgD8sIQNCUFlTF
YvmAH7gcdssSFBt8NPlUATHEsoFmlW0DKCJWNhTLOht+s6L/1zwTHLjPG2pdkG6W
dgmu5H2pDml8CDNLDv98Aj7i+I5SRKKcVPlnuQIDAQABAoIBAFPQYKlOzw/+BA0b
yMIUpdctIMb/54CR/xR0mVw1DbSjigNVPjHUQvB8Y1B2FAITQObgJO06bAv0QdWN
Rb0/v/yYiNJDFjaLjaIAHlO/2+oWrXbFaZqgpVDJhB+e1xaZr2x7XGxm+p925k30
l6pvIRY+I8JRKvZiV1VZHwL/R3JOtPr++xMZtLVjVOI+f+ySqJ+TZHuAjm49EKxj
cEmmJ28b7QcziXsvKy00f+zbqLIBKXQdZAFU5eEr1BsDRXdRW+Kf0XIvftuy4BJZ
voKT+VGhEvF/qysswL4+6IAO6tpuYnnM0Y2d3sOGoWPkTcQK0MekYKzL/WmtCjNs
9hodJtECgYEA5EWyhEOf4uOKe5TDp697UCUvXLoOR58FDe/S8XNvScn29jjOkqIg
OMoqo9xAkJTNTzqn5UUdt1x/pgM2NxlPLFijrc0zQlX3SoOO2ryDd9WNi7YKtN16
KJqa536WeZu2OEbuAZ+S3GALVy1RPeTNPnUOmKnF06DjDUGzLNCZy10CgYEA+zfw
952DWuz1U0Z4wvAEqqcgUKXPKrkTXV/iUnjkDkrLYVr0ZofDNTXrdHl+UedFmaOC
cieZn6DNhcdz5tKtyysGMH3g/qs9PfoGUngvcXsy0Egk04l3x1jc8TTCLqXZXYaQ
HMsx51n+R58oncPtzYSUOr9qQ6PbC2CstTbFJA0CgYEAjGEsUliAB/jknfEzjXjG
PdhQUxb8VyE864Az2lah9t/kJzFyIAziAeqZ5GE7t247AGFTBRTHHI8e1Qoemi3P
Wbc9GVIbFs1lIYbcIDpUIyrKPEP8O5QEXtoNLxXTFgAjRGKiVY87spjCAJ+W2ZhO
e/1it5GYXfgQCYQA2yuBmOUCgYANRkR2YR1axaCk+NlSu6oTdmdPu6M5x7PNQE7O
OtMaKjua9lppvIzFGAdMDUtueoEEAE7ZR1xnwfB6PDLUpJdIYAqgr1YfPt8qkjaZ
Tv56yZ7CwL0pbF8m6nwqRrZoDp1wwraEvvvxFKFKGY/k3kCHlpTakdjEoDjn3gDi
RnWeVQKBgCEneMSzucei5LRppRtRaJw/Btll8qlPMlX3W7dxQ3cLwpmLOn0m51Fp
PIZ44zYK8R6fu4+/sSrlfaIg86Ugeufp6YNxyNROKxUGza5vDIu5OftwWtBeg+UK
Z8lLWNdX6pp7WMujmF3H1DrkBbauYMUKZ4UxUYtelgHERMePIxwb
-----END RSA PRIVATE KEY-----
crt: |-
-----BEGIN CERTIFICATE-----
2. Apply the CR configuration file ha.yaml by using the following command, as shown in Example 10-13:
oc apply -f ha.yaml
Example 10-13 Deploying an HA cluster
ngz@W10T-FAS200307:~/deploy$ oc apply -f ha.yaml
fepcluster.fep.fujitsu.io/ha-fep created
ngz@W10T-FAS200307:~/deploy
3. The HA cluster is deployed, and the deployment status can be checked by using the commands that are shown in Example 10-14 (ha-fep-sts-0 is the master stateful set and ha-fep-sts-1 and ha-fep-sts-2 are replica master sets for the cluster name ha-fep that is specified in the CR configuration file). The status shows Running after the cluster is ready.
Example 10-14 Checking the HA cluster deployment status
ngz@W10T-FAS200307:~/deploy$ oc get fepcluster ha-fep
NAME AGE
ha-fep 2m12s
ngz@W10T-FAS200307:~/deploy$ oc get pod -l app=ha-fep-sts -L feprole
NAME READY STATUS RESTARTS AGE FEPROLE
ha-fep-sts-0 1/1 Running 0 4m37s master
ha-fep-sts-1 1/1 Running 0 4m37s replica
ha-fep-sts-2 1/1 Running 0 4m37s replica
10.4.4 Deploying a three-node HA FUJITSU Enterprise Postgres cluster by using a Red Hat OpenShift console
To deploy a three-node HA FUJITSU Enterprise Postgres cluster by using a Red Hat OpenShift console, complete the following steps:
1. In the Red Hat OpenShift Console, select Operators → Installed Operators.
2. Select the FUJITSU Enterprise Postgres 12 Operator, as shown in Figure 10-19.

Figure 10-19 Installed Operators

Figure 10-20 Creating a cluster
4. In the Create FEPCluster window, change the display to YAML View, update the values as shown in Table 10-11 on page 414 and the CR configuration parameters as shown in Figure 10-21, and click Create to create a cluster.

Figure 10-21 HA cluster deployment
5. The single node cluster is deployed, and the deployment status can be checked by selecting Workloads → Pods, as shown in Figure 10-22 (ha-fep-sts-0 is the master stateful set, and ha-fep-sts-1 and ha-fep-sts-2 are the replica master sets for the cluster name ha-fep that is specified in the CR configuration file). The status shows Running after the cluster is ready.

Figure 10-22 HA Cluster Deployment result
All FUJITSU Enterprise Postgres pods must show the status as Running.
10.4.5 Changing FUJITSU Enterprise Postgres cluster configurations
It is possible to change the FUJITSU Enterprise Postgres cluster configurations after deployment. There are several types of changes, and some of them involve redeploying the pod, some trigger a Postgres restart, and others reload Postgres without restarting the pod (Table 10-12).
Table 10-12 Changes to cluster configurations
|
Type of change
|
Behavior
|
Follow-up action
|
|
Changing the pod definition, such as CPU/Memory allocation, except for the FUJITSU Enterprise Postgres container image.
|
New settings are applied to a stateful set. To minimize outage, the pods are not redeployed automatically.
|
The user should schedule a time to delete the pods and let them redeploy with new settings.
|
|
Changing the FUJITSU Enterprise Postgres container image.
|
The new image name is applied to a stateful set. The Pods are redeployed in a controlled manner, starting with all the replica pods. The FUJITSU Enterprise Postgres Operator performs a switchover and updates the master pod last. There is a small outage on the cluster.
|
No additional action is required by the user.
|
|
Changing Postgres parameters that require restarting the FUJITSU Enterprise Postgres server.
|
New settings are applied to postgresql.conf on all pods. To minimize outages, the change is in a pending stage until a restart is performed by a user.
|
The user should schedule a time to restart the FUJ ITSU Enterprise Postgres server.
|
|
Changing Postgres parameters that can take effect by reloading FUJITSU Enterprise Postgres.
|
New settings are applied to postgresql.conf on all pods. FUJITSU Enterprise Postgres is reloaded, and new parameters take effect immediately.
|
No additional action is required by the user.
|
10.4.6 Changing the FUJITSU Enterprise Postgres cluster configuration by using the Red Hat OpenShift console
In this example, we demonstrate how to change FUJITSU Enterprise Postgres parameters that are reflected immediately. In this example, a three-node HA FUJITSU Enterprise Postgres Cluster is used. Complete the following steps:
1. In the Red Hat OpenShift Console, select Workloads → Pods.
2. Select one of the pods, as shown in Figure 10-23.

Figure 10-23 Inspecting a pod
3. In the Pod Details window, select the Terminal tab.
4. In the terminal shell, connect to the database and issue the command that is shown in Example 10-15 to check the current value of the configured parameter checkpoint_completion_target.
Example 10-15 Checking the current value of the configured parameter
sh-4.4$ psql -U postgres postgres
Password for user postgres:
psql (12.1)
Type "help" for help.
postgres=# show checkpoint_completion_target ;
checkpoint_completion_target
-----------------------------
0.8
(One row)
postgres=#
|
Note: The value is 0.8 for the parameter checkpoint_completion_target.
|
5. Select Operators → Installed Operators.
6. Select the FUJITSU Enterprise Postgres 12 Operator.
8. Select the ha-fep cluster that we deployed.

Figure 10-24 FEPConfig
9. In the FEPConfig Details window, select the YAML tab.
10. Locate the line checkpoint_completion_target and update the value from 0.8 to 0.9, as shown in Figure 10-25 on page 423.

Figure 10-25 Updating the FEPConfig CR
11. Click Save to apply the change.
12. Wait for a minute for FUJITSU Enterprise Postgres Operator to apply the change.
13. Repeat steps 1 on page 421 - 4 on page 421 to check the value again. The results are shown in Figure 10-26.

Figure 10-26 Checking the updated results
|
Note: The value for parameter checkpoint_completion_target is updated to 0.9 without a server restart.
|
10.5 FUJITSU Enterprise Postgres cluster CR configuration file explanation
FUJITSU Enterprise Postgres 12 Operator creates the FUJITSU Enterprise Postgres cluster and associated child CRs with the specified information in a CR YAML file. The descriptions and constraints of each field are provided in Table 10-13.
Table 10-13 Cluster parameters
|
FEPCluster CR parameters (with default values)
|
Remarks
|
|
apiVersion: fep.fujitsu.io/v2
|
Mandatory as is.
|
|
kind: FEPCluster
|
Mandatory as is.
|
|
metadata:
|
|
|
name: new-fep
|
The name of the cluster, which must be unique in the namespace.
|
|
namespace: <demo>
|
The namespace, which OCP populates as current.
|
|
spec:
|
|
|
fep:
|
|
|
forceSsl: true
|
•True: Forces all connections to FUJITSU Enterprise Postgres to use SSL.
•False: Connections can be with or without SSL.
|
|
image:
|
|
|
pullPolicy: IfNotPresent
|
Image-pull policy from Kubernetes.
|
|
image: "quay.io/fujitsu/fep-server-test:ubi8-patroni_79"
|
FUJITSU Enterprise Postgres image URL. Update this URL to a new image URL to upgrade all FUJITSU Enterprise Postgres containers to run a new image. When you save a new image, the upgrade process starts, and pods restart one-by-one.
Before restarting the original master pod, switch over the master role to one of the upgraded pods. Now, the original master pod starts as a replica to get the new image.
|
|
mcSpec:
|
|
|
limits:
|
|
|
cpu: 500m
|
Maximum CPU that is allocated to a FUJITSU Enterprise Postgres container.
|
|
memory: 700Mi
|
Maximum memory that is allocated to a FUJITSU Enterprise Postgres container.
|
|
requests:
|
|
|
cpu: 200m
|
Initial CPU allocation for a FUJITSU Enterprise Postgres container.
|
|
memory: 512Mi
|
Initial memory allocation for a FUJITSU Enterprise Postgres container.
|
|
podAntiAffinity: true
|
•True: Multiple FUJITSU Enterprise Postgres pods should not run a node.
•False: Many FUJITSU Enterprise Postgres pods can run on a node.
|
|
podDisruptionBudget: true
|
True: A maximum of one node can be unavailable.
|
|
instances: 3
|
Number of FUJITSU Enterprise Postgres nodes in a cluster.
|
|
servicePort: 27500
|
FUJITSU Enterprise Postgres service port.
|
|
syncMode: "on"
|
•On: FUJITSU Enterprise Postgres cluster with sync replicas.
•Off: FUJITSU Enterprise Postgres cluster with async replicas.
|
|
sysExtraLogging: false
|
To turn on extra debugging, set the value to true. It can be turned on or off at any time.
|
|
changeSecurityContext: true (Not defined on OCP.)
|
Defined only on a cloud-native platform.
This key must not be defined for the Red Hat OpenShift platform.
|
|
fepChildCrVal: The values that are specified below are used only at start-up to #create a child. The CRs are FEPVolume, FEPConfig, FEPUser, and EPCert.
|
All values under this section are used only when creating child CRs FEPConfig, FEPVolume, FEPUser, and FEPCert.
Afterward, all changes that are needed for values under this section must be done by using child CRs.
|
|
customPgAudit: Define the pgaudit custom parameters here to override the defaults. If the log volume is not defined, log_directory should be changed to '/database/userdata/data/log'.
[output]
logger = 'auditlog' log_directory = '/database/log/audit' [rule] |
The initial values for FEPConfig for pgAudit configuration. The log_directory location depends on logVol:
•If logVol is defined, then log_directory = '/database/log/audit'.
•If logVol is not defined, then log_directory = '/database/userdata/data/log’.
|
|
customPgHba: Define the pg_hba custom rules here so that they merge with the default rules.
# TYPE DATABASE USER ADDRESS METHOD
|
The initial values for FEPConfig for the pg_hba.conf data. All the lines that must be inserted into pg_hba.conf in addition to the default configuration.
|
|
customPgParams: Define the custom postgresql.conf parameters below to override the defaults. The current values are per the default FUJITSU Enterprise Postgres deployment.
shared_preload_libraries='pgx_datamasking,vci,
pgaudit,pg_prewarm'
session_preload_libraries='vci,pg_prewarm'
max_prepared_transactions = 100
max_worker_processes = 20
max_connections = 10
work_mem = 1MB
maintenance_work_mem = 12MB
shared_buffers = 128MB
effective_cache_size = 384MB
checkpoint_completion_target = 0.8
|
The initial values for FEPConfig for the postgresql.conf data. This section defines the values of the parameters that would overwrite the values that are defined in the default postgresql.conf.
The values are currently used for a typical deployment of a cluster. They can be modified as needed except for the value of log_directory.
The log_directory location depends on logVol:
•If logVol is defined, then log_directory = '/database/log'.
•If logVol is not defined, then log_directory = '/database/userdata/data/log’.
In a typical deployment, all FUJITSU Enterprise Postgres advanced features are enabled by default, and parameters are set. These features are TDE, data masking, VCI, and GMC.
|
|
Logging parameters in a default FUJITSU Enterprise Postgres installation. If the log volume is not defined, log_directory should be changed to '/database/userdata/data/log'.
log_directory = '/database/log'
log_filename = 'logfile-%a.log' log_file_mode = 0600 log_truncate_on_rotation = on log_rotation_age = 1d log_rotation_size = 0 log_checkpoints = on log_line_prefix = '%e %t [%p]: [%l-1] user=%u, db=%d,app=%a,client=%h' log_lock_waits = on log_autovacuum_min_duration = 60s logging_collector = on pgaudit.config_file='/database/pgaudit.conf' log_replication_commands = on log_min_messages = WARNING log_destination = stderr # tcp parameters
tcp_keepalives_idle = 30 tcp_keepalives_interval = 10 tcp_keepalives_count = 3 The wal_archive parameters in a default FUJITSU Enterprise Postgres installation:
archive_mode = on
archive_command = 'pgbackrest --stanza=backupstanza --config=/database/userdata/pgbackrest.conf archive-push %p' wal_level = replica max_wal_senders = 12 wal_keep_segments = 64 |
Typical values of postgresql.conf continue.
|
|
storage:
|
Defines start-up values for the FEPVolume CR. Volumes for a cluster can be defined only at the start. Volumes cannot be created and mounted later.
Limited changes can be done by using the FEPVolume CR, and only if the underlying storage allows it. For example, the size of a volume may be increased if the underlying storageClass allows it. However, the size of a volume cannot be shrunk.
|
|
dataVol:
|
Mandatory to store a database.
|
|
size: "2Gi"
|
The size for the data volume, which must be defined.
|
|
storageClass: default (optional entry)
|
storageClass for a data volume is optional if it is omitted. It uses the default storage class of the system.
|
|
accessModes: [“ReadWriteOnce”] (optional entry)
|
accessModes for the data volume is optional. If it is omitted, use “ReadWriteOnce”. Other values are “ReadWriteMany” or “ReadOnly”, as defined by Kubernetes.
Multiple modes can be used if separated by commas. ReadWriteMany works only if the underlying storage supports shared volumes.
|
|
tablespaceVol:
|
tablespaceVol is optional. Volumes are required to use TDE, but are optional for FUJITSU Enterprise Postgres clusters.
|
|
size: "512Mi"
|
The size for a table space volume must be defined.
|
|
storageClass: default (optional entry)
|
storageClass for the tablespaceVol is optional. If it is if omitted, the default storage class of system is used.
|
|
accessModes: [“ReadWriteOnce”] (optional entry)
|
accessModes for tablespaceVol is optional. If it is omitted, “ReadWriteOnce” is used. Other values, such as “ReadWriteMany” or “ReadOnly” as defined by Kubernetes, may be used. Multiple modes can be used if they are separated by commas. ReadWriteMany work only if the underlying storage supports shared volumes.
|
|
walVol:
|
walVol is mandatory.
|
|
size: "1200Mi"
|
The size for walVol must be defined.
|
|
storageClass: default (optional entry)
|
storageClass for walVol is optional. If it is omitted, use the default storage class of system.
|
|
accessModes: [“ReadWriteOnce”] (optional entry)
|
accessModes for walVol is optional. If it is omitted, use “ReadWriteOnce”. Other values like “ReadWriteMany” or “ReadOnly” as defined by Kubernetes may be used. Multiple modes can be used by being separated by commas. ReadWriteMany works only if the underlying storage supports shared volumes.
|
|
archivewalVol:
|
archivewalVol is optional.
|
|
size: "1Gi"
|
size for archivewalVol must be defined if archivewalVol is defined.
|
|
storageClass: default (optional entry)
|
storageClass for archivewalVol is optional. If it is omitted, use the default storage class of system.
|
|
accessModes: [“ReadWriteOnce”] (optional entry)
|
accessModes for archivewalVol is optional. If it is omitted, use “ReadWriteOnce”. Other values like “ReadWriteMany” or “ReadOnly” as defined by Kubernetes may be used. Multiple modes can be used if separated by commas. ReadWriteMany work only if the underlying storage supports shared volumes.
|
|
logVol:
|
logVol is optional.
|
|
size: "1Gi"
|
size for logVol must be defined if logVol is defined.
|
|
storageClass: default
|
storageClass for logVol is optional. If it is omitted, use the default storage class of system.
|
|
accessModes: [“ReadWriteOnce”] (optional entry)
|
accessModes for logVol is optional. if it is omitted, use “ReadWriteOnce”. Other values like “ReadWriteMany” or “ReadOnly” as defined by Kubernetes may be used.
Multiple modes can be used if separated by commas. ReadWriteMany work only if the underlying storage supports shared volumes.
|
|
backupVol:
|
backupVol is optional.
|
|
size: "2Gi"
|
size for backupVol must be defined if backupVol is defined.
|
|
storageClass: default (optional entry)
|
storageClass for backupVol is optional. If it is omitted, use the default storage class of system.
|
|
accessModes: [“ReadWriteOnce”] (optional entry)
|
accessModes for backupVol is optional. If it is omitted, use “ReadWriteOnce”. Other values like “ReadWriteMany” or “ReadOnly” as defined by Kubernetes may be used. Multiple modes can be used if separated by commas. ReadWriteMany works only if the underlying storage supports shared volumes.
|
|
sysUsers:
|
This section defines start-up values for the FEPUser child CR. Subsequent changes to passwords and passphrase can be done by using the FEPUser CR. After the CRs are created, the passwords and passphrase are masked in both places for FEPCluster and FEPUser.
|
|
pgAdminPassword: admin-password
|
Password for the postgres superuser.
|
|
pgdb: mydb
|
Name of a created user DB (for example, mydb). This value cannot be changed after initial creation.
|
|
pgpassword: mydbpassword
|
Password for pguser (next field).
|
|
pguser: mydbuser
|
Name of the user for the created user DB (for example, the user for mydb) This value cannot be changed after initial creation.
|
|
pgrepluser: repluser
|
Name of a replication user. It is used for setting up replication between a primary and a replica in FUJITSU Enterprise Postgres Cluster. This value cannot be changed after initial creation.
|
|
pgreplpassword: repluserpwd
|
Password for the created user for replication (for example, repluser).
|
|
tdepassphrase: tde-passphrase
|
Passphrase for TDE. This field is mandatory because TDE is enabled by default.
|
|
systemCertificates:
|
This section defines the start-up values for the FEPCert child CR. Subsequent changes to certs and key can be done by using the FEPCert CR. After the CRs are created, certs and key are masked at both places in FEPCluster and FEPCert. These fields are mandatory to secure communication to FUJITSU Enterprise Postgres containers.
|
|
key: |-
-----BEGIN RSA PRIVATE KEY----- key value in terms of string of characters specified between the lines -----END RSA PRIVATE KEY----- |
Specify the RSA private key value between the BEGIN and END lines.
|
|
crt: |-
-----BEGIN CERTIFICATE----- certificate value in terms of string of characters specified
between the lines
-----END CERTIFICATE----- |
Specify the certificate value between the BEGIN and END lines.
|
|
cacrt: |-
-----BEGIN CERTIFICATE----- certificate value in terms of string of characters specified
between the lines
-----END CERTIFICATE----- |
Specify the CA certificate value between the BEGIN and END lines.
|
..................Content has been hidden....................
You can't read the all page of ebook, please click here login for view all page.