

Setting up the 4-site environment
This chapter provides a step-by-step description of the initial setup process that used for a CSM 4-site replication session with Metro Mirror and Global Mirror. Also explained is how to combine it with z/OS HyperSwap.
This chapter includes the following topics:
3.1 Metro Mirror - Global Mirror with 4-site replication session
Complete the following steps to create and configure a 4-site replication session with CSM:
1. Start the CSM GUI and log on.
2. From the CSM main menu, click Sessions → Create Session... to start the session creation wizard.
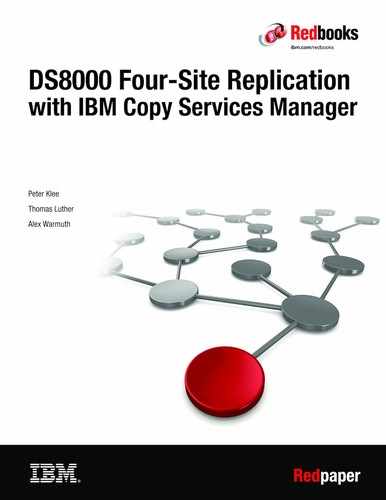
3. In the Create Session window (as shown in Figure 3-1), select the hardware type DS8000. Then, choose the session type Metro Mirror - Global Mirror w/ Site 4 Replication from the menu that is displayed.
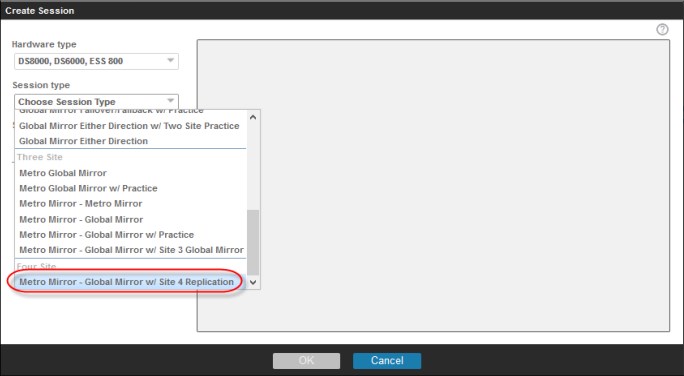
Figure 3-1 Create 4-site session
4. As shown in Figure 3-2, enter a meaningful name for the session and select the four location names that you want to manage in that 4-site session.
|
Tip: The location name helps to limit the usable storage systems on that session site. You can assign one or more storage systems to the same location label. The displayed menu shows only location labels that were defined in the CSM Storage Systems configuration. You can leave the default location labels if you do not want to filter possible storage systems usage per session site.
|

Figure 3-2 Assigning session name and location labels to the session
5. Click OK to create the session. If successful, the message that is shown in Figure 3-3 is displayed. You can start the Add Copy Sets Wizard immediately.

Figure 3-3 Create session successfully completed
6. In the Add Copy Sets wizard that is shown in Figure 3-4 on page 12, select the Host 1 storage system, and then the Host 1 storage logical subsystem (LSS) and finally, a specific volume or All Volumes from the respective displayed menus.
If All Volumes are selected, CSM attempts a 1:1 mapping of all the devices in the selected LSSs for each role in the session. Otherwise, you must select each volume individually per session role.
|
Note: It is also now possible to import a CSV file that contains predefined copy sets. This process is a much more convenient method for bulk volume definitions. For more information about Copy Set importing from a CSV file, see the CSM documentation.
|
Figure 3-4 shows the Host 1 volume copy set definition <<which is missing, the rest of the sentence or the period?>>

Figure 3-4 Host definitions
For each volume role in the Copy Set, such as Journal1, Host2, Host3, Journal3, and Host4, the wizard guides you through the allowed storage systems, LSSs, and volumes. After you make those selections and upon successful matching (the process to validate volume sizes across storage systems), the message that is shown in Figure 3-5 is displayed.

Figure 3-5 Copy Sets selection completed
The next window (see Figure 3-6 on page 13) displays the matching details. In this window, you can select or clear a subset of matched copy sets (rather than using all matched copy sets). The copy set is presented with the Host 1 volume and the full copy set volumes can be verified by clicking the Show link in the Copy Set column. In our example, eight copy sets were selected to participate in the session.
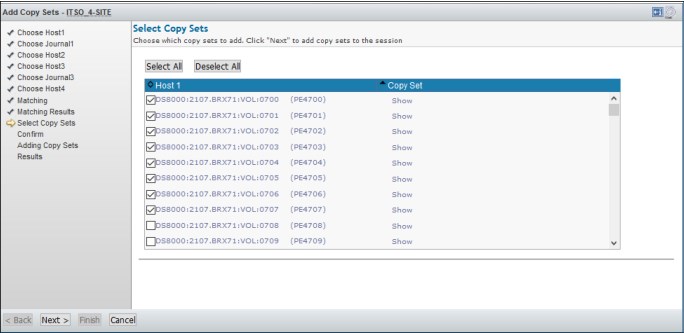
Figure 3-6 Selecting matched copy sets for the session
7. Click Next to get a confirmation message, as shown in Figure 3-7. The information about “unresolved matches” is expected and can be ignored because not all copy sets were selected to be added to this session.

Figure 3-7 Copy Sets creation confirmation message
8. Click Next again to display the results window for the copy set creation, as shown in Figure 3-8.

Figure 3-8 Copy Sets successfully created message
Upon completion of the Add Copy Sets wizard, the session overview window is displayed again, which contains the newly created session (in our example, ITSO_4-SITE) with a status of Inactive and a state of Defined (see Figure 3-9).

Figure 3-9 Session overview window
9. Click the name of the session to open the Session Details window, as shown in Figure 3-10. This window shows the topology and replication state of the 4-site session.

Figure 3-10 Session Actions window
10. The session is now ready to be started. To start replication, click Session Actions and then, Commands → Start... from the displayed menu, as shown in Figure 3-11.

Figure 3-11
11. In the command confirmation window (see Figure 3-12), select Start H1->H2 H1->H3. This option is the typical start option that establishes the multi-target replication with a Metro Mirror from H1 to H2 and a Global Mirror from H1 to H3 as shown in the dynamic topology preview.

Figure 3-12
12. Click Yes to confirm running the selected command and return to the session details window, as shown in Figure 3-13. The session status and state now show as Warning and Preparing while data is copied to the replication targets.

Figure 3-13
You also can monitor the progress of the replication in the topology diagram in the role pair table. Upon completion of the copy, the session status and state changes to Normal and Prepared, which means that the primary data is now protected on both target sites. However, it is only a regular 3-site Metro - Global Mirror protection, as shown in Figure 3-14.

Figure 3-14
13. To engage H4 volumes at the fourth site, click Session Actions and select Commands → Start... from the displayed menu. In the command confirmation window (see Figure 3-15), select StartGC H3->H4 to start the Global Copy.
Figure 3-15 Initiate Global Copy between H3 and H4
14. Click Yes to confirm the start of the copy process between H3 and H4. Upon completion, the topology of the 4-site session looks as shown in Figure 3-16.
|
Note: The status and state do not change in this step because the Global Copy has no protection degradation effect on the replication of the primary leg.
|

Figure 3-16 4-site replication start completed
The 4-site replication session start process is now completed, production runs on H1, and the primary data is protected by having copies of it in two regions and four sites.
You can review the participating volumes and their roles by clicking the View hyperlink name that is next to the Copy Sets count (see Figure 3-16 on page 17).
A list of all volumes in the copy set and their roles (H1, J1, H2, H3, J3, and H4) is displayed, as shown in Figure 3-17.

Figure 3-17 Session Copy Sets Volumes list and role
Hovering with the mouse pointer over a volume displays more information about its capacity, type, or space efficiency. With many volumes, you can conveniently export the copy set list into a CSV file by clicking Export Copy Sets.
The CSV file output looks as shown in Figure 3-18. It does not show the Volsers as in the GUI, but the full DS8000 volume IDs instead.

Figure 3-18 Exporting copy sets to a CSV file
3.2 Combining IBM z/OS HyperSwap with the 4-site session
In an IBM z/OS environment, the 4-site session solution can be enhanced with local High Availability by adding z/OS HyperSwap capability to the session properties, as with regular 2-site or 3-site sessions.
To add HyperSwap to the previously created 4-site session, the session properties must be changed.Complete the following steps:
1. In the session details view, click modify next to the Description field to open the Properties window.
2. Select the tab H1-H2 Options tab.
3. Select the system or sysplex name and then, Manage H1-H2 with HyperSwap, as shown in Figure 3-19.
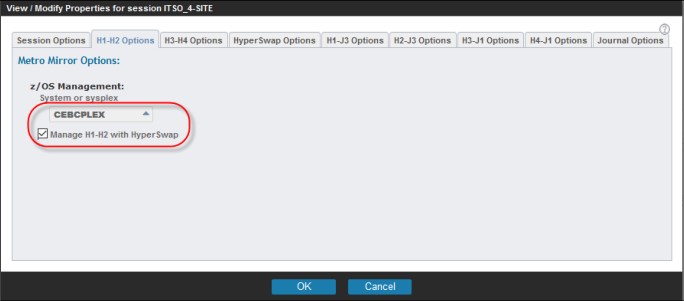
Figure 3-19 Adding HyperSwap
4. Select the H3-H4 Options tab and repeat these steps for the leg H3-H4 if HyperSwap is also wanted in the other region.
|
Note: The systems or sysplex that appear in the displayed list are those systems or sysplexes where CSM is running or to which the CSM server is connected by way of a z/OS host IP connection. These systems or sysplexes are not necessarily all systems of a sysplex.
|
5. Close the properties window by clicking OK to apply the changes.
6. In the session details window, the status for HyperSwap quickly changes to Yes and a HyperSwap arrow is displayed in the connection between H1 and H2, as shown in Figure 3-20.

Figure 3-20 HyperSwap active
Now, no indication is shown for HyperSwap between Site 3 and 4 because this replication is a Global Copy replication. Only after a regional failover to Site 3 occurs does the replication between H3 and H4 have a chance to be converted into a HyperSwap-capable Metro Mirror relation.
..................Content has been hidden....................
You can't read the all page of ebook, please click here login for view all page.