
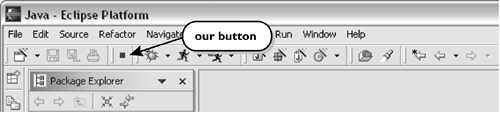
Our “Hello World” plug-in will contribute a button to the toolbar. When the button is pressed, we will pop up a dialog box containing the text “Hello World.”
The developers at Eclipse.org share a consistent set of rules for design. Here's the first rule of Eclipse:
CONTRIBUTION RULE. Everything is a contribution.
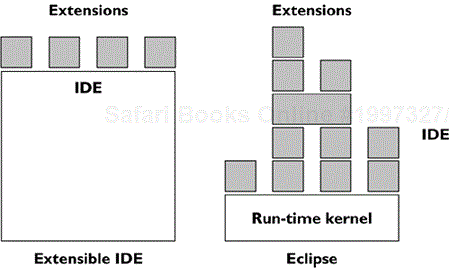
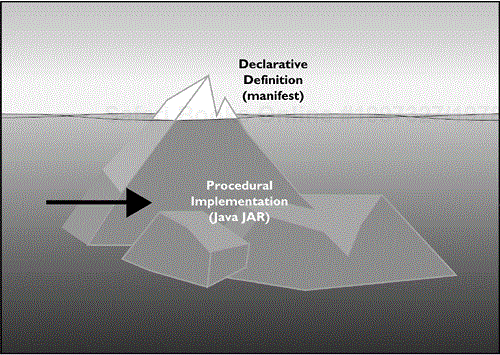
The whole of Eclipse—the Java development tools, the CVS repository explorer, every single tool—is contributed. That is, none of them is “built into” Eclipse. There is no monolithic tool to which a few things are added. There is a tiny little kernel to which many things are contributed, as shown in Figure 3.1.
As a consequence of making everything a contribution you will have lots of contributions. The Java environment and the Eclipse base together are more than 60 large plug-ins. The IBM WebSphere Application Development environment, for example, adds another 500 plug-ins. Assume that you have a system built out of thousands of contributions. If you want the system to start up this century, you can't do much work per contribution on start-up. In particular, the end user should not pay in start-up time for plug-ins that are installed but not used.
While we speak of performance as being the last thing you should pay attention to in development, performance often has profound impact on the architecture. Eclipse is shaped by the need to process thousands of contributions at start-up, yielding a budget of a few milliseconds each.
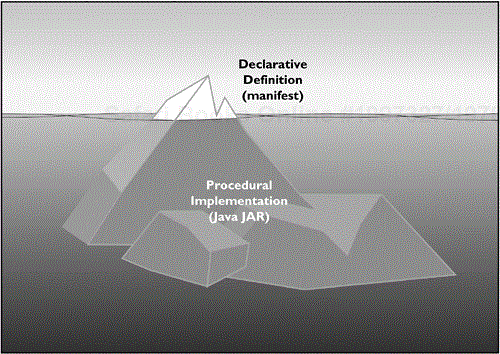
Now we come to a dilemma. The logic contained within a contribution can be substantial. The compiled form of this logic, Java class files (collected in a Java Archive [JAR] file), can easily take seconds to load. Making Java classes that are guaranteed to load quickly is more work than most people want to do. If we want to guarantee snappy start-up, we can't load classes. This leads to the Lazy Loading Rule:
LAZY LOADING RULE. Contributions are only loaded when they are needed.
Good rule, but how is it implemented?
If you only know which contributions are present, even if you haven't loaded their implementation you can already give the user a picture of what operations are available. The plug-in architecture implements this split between declaration and implementation by declaring the “shape” of a contribution in an Extensible Markup Language (XML)-based manifest. The implementation of the contribution is in Java (see Figure 3.2).
The Basic Plug-In Structure
A plug-in is a piece of behavior that is outside the run-time kernel. A plug-in is represented as a directory containing
plugin.xml— The manifest, a description of the contributions of the plug-in
Resources, like icons (optional)
Java code, in a JAR (optional)
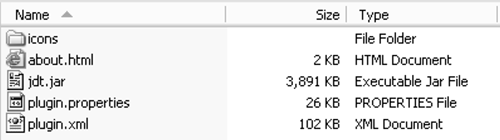
The directory structure for the plug-in org.eclipse.jdt.ui is shown below.
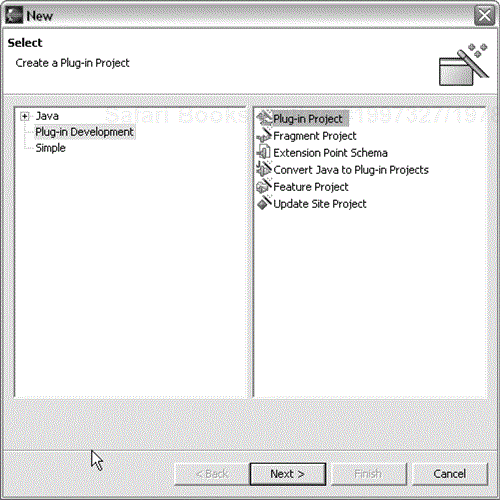
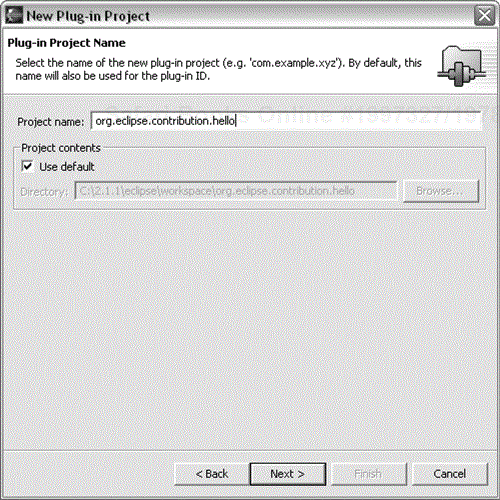
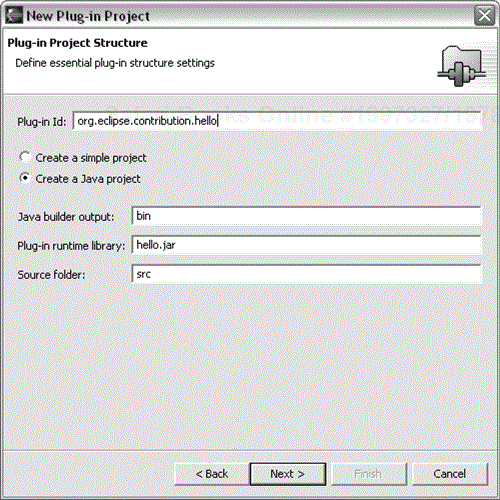
We want to contribute a button to Eclipse. First we have to create a project. Eclipse has wizards to automate tedious work, but if you haven't done it before, the work is hardly tedious. We'll build our examples as much as possible by hand, then you can use the wizards once you understand what they are doing for you. We'll only use the wizard to give us the basic structure, and we'll explain what it did for us (Figures 3.3–3.7).
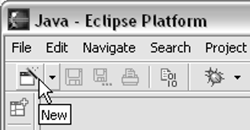
Open the new wizard.
Select Plug-in Project.
Define the name of the plug-in project.
Define the settings related to the plug-in structure.
Create a blank plug-in project without using any of the code generation wizards.
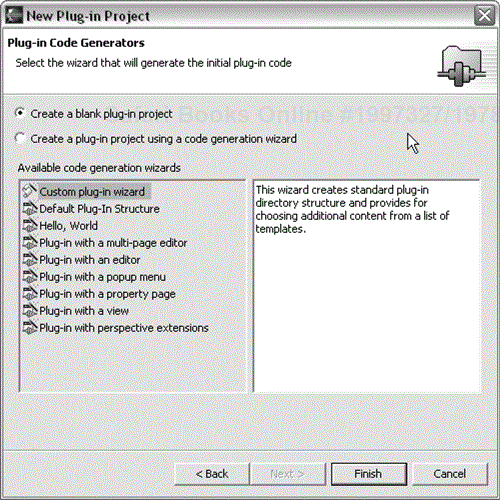
Note that on the last step we selected Create a blank plug-in project so we could have the joy of filling in as many details as possible by hand. When you click Finish, answer No to the dialog asking you if you want to switch to the plug-in development perspective. We prefer to do our plug-in development in the Java perspective.
The result is the basic plug-in project structure shown in Figure 3.8.
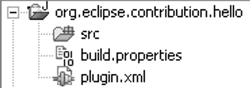
We have a nearly empty manifest file describing the appearance and structure of the plug-in, a build.properties file that tells the Plug-in Development Environment where to find the source code for building the JAR, and an empty src folder.
The manifest file, plugin.xml (shown in its entirety in Section 3.3.2), contains the top-level plug-in description. Opening plugin.xml will show you the manifest editor, a friendly interface to all the details in the manifest. Since we want to explore the whole manifest, click on the Source tab to show the raw XML. You'll see something like this:
Example . org.eclipse.contribution.hello/plugin.xml
<plugin
  id="org.eclipse.contribution.hello"
  name="org.eclipse.contribution.hello"
  version="1.0.0">
</plugin>
You'll also see a run-time entry in the manifest that defines where Eclipse will look for classes in this plug-in.
IDs in manifests are globally unique. Names, however, are expected to be read by humans. Our first change is to make the name of our plug-in a bit friendlier:
Example . org.eclipse.contribution.hello/plugin.xml
<plugin
  id="org.eclipse.contribution.hello"
  name="Hello World"
  version="1.0.0">
The version is mandatory because plug-ins can rely on each other (remember that nearly everything is a plug-in) and you can refer to the particular version of a plug-in you depend on.
Now we have a plug-in, but it doesn't do anything. We will be able to see it when we start a run-time workbench (see Figure 3.9).
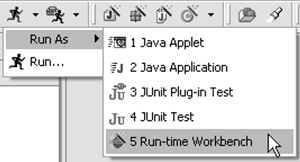
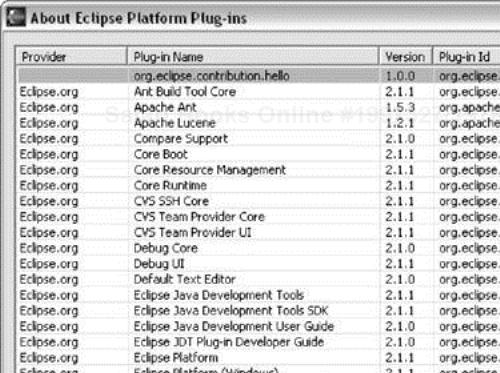
Clicking Run As > Run-time Workbench will bring up another instance of Eclipse, but this one (the run-time workbench) has our new plug-in loaded. You can verify that our plug-in is present by choosing Help > About Eclipse Platform > Plug-in Details in the run-time workbench. Our plug-in is at the top of the list, as shown in Figure 3.10.
Next we need to contribute a button. Here's how we specify our button's appearance:
Example . org.eclipse.contribution.hello/plugin.xml
<extension point="org.eclipse.ui.actionSets">
  <actionSet
    id="org.eclipse.contribution.hello.actionSet"
    label="Hello Action Set">
    <action
      id="org.eclipse.contribution.hello.HelloAction"
      label="Hello">
    </action>
  </actionSet>
</extension>
Each button is supported by an Action, the object that will be invoked when the button is pressed. The buttons in the toolbar are grouped into action sets, sets of related actions, as shown in Figure 3.11. For example, the buttons that create Java elements are an action set. The above declaration states that we are contributing a new action set, point="org.eclipse.ui.actionSets", which contains a single action, labelled “Hello”. Note once again that the IDs are globally unique but the names of elements are intended for human consumption.

When we start a new run-time workbench (clicking the Running Guy will rerun what was run previously), we can see our action set in Window > Customize Perspective... > Other as shown in Figure 3.12.
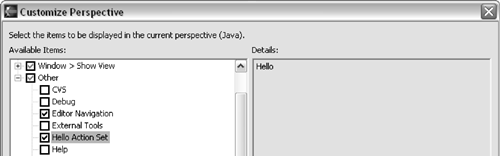
Notice that the values of the label elements in the declaration are used to present our contribution to the user.
Selecting our action set and clicking OK doesn't cause a button to appear. Why? To appear as a button, each action has to be associated with a toolbar path, a hint to Eclipse as to where to put the action. In our case, we don't want to put the action near any other particular actions, so we can make up a toolbar path:
Example . org.eclipse.contribution.hello/plugin.xml
<action
  id="org.eclipse.contribution.hello.HelloAction"
  label="Hello"
  toolbarPath="helloGroup">
</action>
If there were already actions with the toolbar path helloGroup, our Hello action would appear nearby. Since this action is the only one with this toolbar path, our button appears in a group by itself. Because we didn't specify an icon, the button appears as the default red square, as shown in Figure 3.13.
The button placement behavior leads us to the Sharing Rule:
SHARING RULE. Add, don't replace.
When you contribute to Eclipse, your contributions will be added to the contributions already in place. There isn't a way to replace existing functionality. It's your job to find a way to think of your contribution as an addition to the existing functionality and it's Eclipse's job to harmoniously combine the contributions.
Before we implement the functionality behind the button, notice that we have been able to present our contribution to the user purely declaratively. The manifest defines how the contribution appears; the Java code defines how it behaves.
We have finished the user-visible appearance of our plug-in. Now it is time to fill in the implementation side, actually opening a dialog containing the string “Hello”. According to the Lazy Loading Rule, contributions are only loaded when they are first invoked. Eclipse waits until the button is clicked, then looks for code to invoke. The code is represented as a Java class, so the name of the class has to be part of the definition of the action.
Each action has the name of a Java class associated with it. When the action is invoked, an instance of that class is created to process the button click. The Java class is represented as an element of the action declaration:
Example . org.eclipse.contribution.hello/plugin.xml
<action
  id="org.eclipse.contribution.hello.HelloAction"
  label="Hello"
  toolbarPath="helloGroup"
  class="org.eclipse.contribution.hello.HelloAction">
</action>
When we start the run-time workbench and click our button, the console in the host workbench (the one where we are developing the plug-in) tells us that the class can't be found:
Could not create action delegate for id: org.eclipse.contribution. hello.HelloAction Reason: Plug-in org.eclipse.contribution.hello was unable to load class org.eclipse.contribution.hello.HelloAction.
To make the action work, we need to create a class called org.eclipse.contribution.hello.HelloAction. How will the action be invoked? Eclipse needs a protocol common to all actions. This protocol is defined in the interface IWorkbenchWindowActionDelegate.[1] As an extender you are required to conform to this interface, the Conformance Rule (see Figure 3.15):
CONFORMANCE RULE. Contributions must conform to expected interfaces.

Before we can define an implementor of IWorkbenchWindowActionDelegate, we have to help Eclipse find it from within our plug-in. Eclipse doesn't use the usual classpath mechanism of Java to find classes. Instead, each plug-in has its own class lookup path. This “classpath” is defined by a plug-in declaring which other plug-ins it depends on. At runtime, these prerequisite plug-ins will be searched whenever a class needs to be found. This mechanism is more efficient than Java's classpath, and more predictable, since each plug-in can precisely specify the context in which it is intended to be run.
The interface we want to implement, IWorkbenchWindowActionDelegate, is defined in the org.eclipse.ui plug-in, so our plug-in needs to depend on it. We add the following to our manifest:
Example . org.eclipse.contribution.hello/plugin.xml
<requires>
  <import plugin="org.eclipse.ui"/>
</requires>
At this point, we also have to update the build class path. Go to the Dependency tab of the manifest editor. Select Compute Build Path from the context menu. PDE will now look in org.eclipse.ui for classes referenced by our code.
Now we can define our HelloAction.
Create a package
org.eclipse.contribution.helloin the source foldersrcof our project.Create the class
HelloActionimplementing the interfaceIWorkbenchWindowActionDelegate.
Eclipse fills in default implementations for the four methods in the signature of IWorkbenchWindowActionDelegate:
Example . org.eclipse.contribution.hello/HelloAction
public void init(IWorkbenchWindow window) {
}
public void selectionChanged(IAction action, ISelection selection) {
}
public void dispose() {
}
public void run(IAction action) {
}
Extension implementations usually have a zero-argument constructor and are declared public because the extension objects will be created by reflection. In this case, we are lucky. Because we inherit from Object and define no other constructor, the default constructor is generated automatically. In most cases, we will have to define a zero-argument constructor explicitly.
When we bring up the run-time workbench and click the little red square nothing happens. We want to bring up a dialog with a cheery greeting. We replace the implementation of HelloAction.run() with the following:
Example . org.eclipse.contribution.hello/HelloAction
public void run(IAction action) {
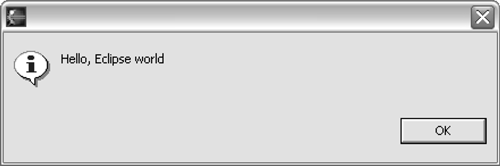
MessageDialog.openInformation(null, null,
"Hello, Eclipse world");
}
Spider
In the book we make use of the Spider to draw diagrams of live objects. We contributed Spider while we wrote this book to help us understand and illustrate how Eclipse works. For example, here are some objects behind a WorkbenchWindow captured with the Spider:
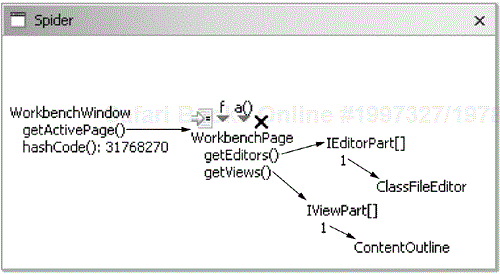
In the Spider diagram we see that a WorkbenchWindow has an active WorkbenchPage which has a collection of IEditorParts and IViewParts.
When you click an object in Spider, a set of handles pops-up around the object. In the above example you see four handles attached to the WorkbenchPage. Clicking a handle allows you to invoke an action on the selected object. From left to right the following handles are shown:
Goto source—. locates the source of the object's class and opens it in an editor.
Expand a field—. shows a pop-up menu with all the fields of the object. Selecting a field adds its value to the drawing.
Expand an attribute—. shows a pop-up menu with all no-argument methods in the object. Selecting a method invokes it and adds the returned value to the drawing.
Delete—. deletes the object from the drawing
To find a starting point for exploration the Spider provides a Spider Navigator. It shows a set of top-level Eclipse objects that serve as entry points for exploration.
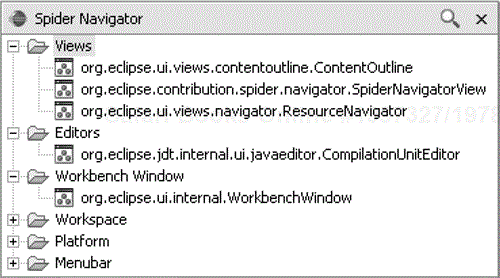
Double clicking an object in the Spider Navigator adds it to the Spider drawing.
You can download the Spider from www.javaspider.org. Once you have the Spider plug-in installed you can start to explore Eclipse by opening the Spider perspective (Window > Open Perspective > Spider). The Spider perspective shows both the Spider Navigator and the Spider drawing view.
Now when we start the run-time workbench and click the button, we see the message we've been expecting, shown in Figure 3.16.
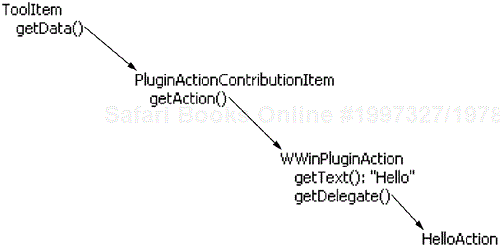
Before leaving our delightful little example, let's see how the Lazy Loading Rule plays out. Here are the objects of the toolbar item after the HelloAction has been made visible, but before the button has been clicked. The WWinPluginAction (for “Workbench Window”) is the Proxy for our action (see Figure 3.17).

When we click the button, the proxy creates the delegate and forwards the request to the delegate, which causes the dialog to appear. Afterwards, our action delegate has been loaded, as shown in Figure 3.18.
Following the Lazy Loading Rule, our HelloAction class is not loaded until the first time it is invoked. Then the class is loaded, the instance is created, and the instance is invoked.
With a dozen lines of Java and a dozen lines of specification in XML we were able to contribute to Eclipse.
The complete contents of the two files are shown in Section 3.3.1 and Section 3.3.2.
package org.eclipse.contribution.hello;

import org.eclipse.jface.action.IAction;
import org.eclipse.jface.dialogs.MessageDialog;
import org.eclipse.jface.viewers.ISelection;
import org.eclipse.ui.IWorkbenchWindow;
import org.eclipse.ui.IWorkbenchWindowActionDelegate;

public class HelloAction implements IWorkbenchWindowActionDelegate {

  public void dispose() {
  }

  public void init(IWorkbenchWindow window) {
  }
  public void run(IAction action) {
    MessageDialog.openInformation(null, null,
     "Hello, Eclipse world");
  }

  public void selectionChanged(IAction action,
    ISelection selection) {
  }

}
<?xml version="1.0" encoding="UTF-8"?>
<plugin
  id="org.eclipse.contribution.hello"
  name="Hello World"
  version="1.0.0">

  <runtime>
    <library name="hello.jar"/>
  </runtime>
  <requires>
    <import plugin="org.eclipse.ui"/>
  </requires>

  <extension
    point="org.eclipse.ui.actionSets">
    <actionSet
      label="Hello Action Set"
      id="org.eclipse.contribution.hello.actionSet">
      <action
        label="Hello"
        class="org.eclipse.contribution.hello.HelloAction"
        toolbarPath="helloGroup"
        id="org.eclipse.contribution.hello.HelloAction">
      </action>
    </actionSet>
  </extension>
</plugin>
Plug-ins don't need to contain code. Documentation plug-ins are written as a combination of XML and HTML.