When we began writing the code for this book, we did it in a classic exploratory style. We thought of some functionality we'd like to add. We browsed in Eclipse to get some ideas about how to implement it. We put some code together. We looked at the result of the new code in the run-time workspace. We repeated as necessary.
As we made progress, we quickly learned developing only in the exploratory style we were not able to write code without errors. Say we had added some functionality. Were we sure we hadn't broken something? We aggressively refactored our code to improve its structure. Were we sure we hadn't broken something? We wanted a way to regain confidence in our code.
The benefits we were looking for from our development strategy were:
Confidence—. We wanted to be able to add and restructure functionality without worrying about breaking something.
Learning—. We wanted to be able to quickly and confidently learn about new areas in Eclipse.
Design—. We wanted encouragement to think appropriately about design, especially the external interface of our code, before thinking about implementation.
One way we develop is with Test-Driven Development (TDD). The TDD cycle looks like this:
Write a test for the next bit of functionality you have in mind. The test should succeed only when the functionality has been implemented correctly.
Make the test compile by creating stubs for all the missing classes and methods referenced by the test.
Run the test. It should fail.
Implement just enough functionality to get the test to succeed.
Clean up the implementation as much as possible, typically by removing duplication.
Running the tests thrown off by TDD provides us with confidence, especially in high-stress situations. The tests can also provide objective feedback about whether we have learned a concept. For us, writing the tests is as much an exercise in design as it is in testing. But how do we apply the TDD cycle to plug-in development?
In this interlude we describe how to do test-driven plug-in development. The resulting picture will be complex. The fact that our example is about a plug-in for running tests makes it even more challenging to describe. We therefore present the plug-in testing picture in three steps:
We start with PDE JUnit. It is an extension to JUnit for running plug-in tests.
Next we introduce a test setup for running plug-in tests.
Finally, we write a plug-in test for our contributed plug-in.
From now on we have to deal with different JUnit test runners and we therefore need to be more precise when talking about them. These are the test runners and how we refer to them:
Eclipse JUnit—. the JUnit support that is integrated in Eclipse.
PDE JUnit—. JUnit support for plug-in tests.
Contributed JUnit—. the JUnit support we implement in our example. It has similar functionality to Eclipse JUnit. It doesn't provide any plug-in testing support as offered by PDE JUnit.
Eclipse JUnit allows you to run tests for normal Java applications. When you run a plug-in test with Eclipse JUnit the test fails since it doesn't run inside an Eclipse workspace.
Therefore, to run plug-in tests you needed an extended version of JUnit that takes care of initializing Eclipse and that runs the tests inside an Eclipse workspace. This is the purpose of PDE JUnit.
After you have installed PDE JUnit the Run As menu has an additional item for starting a PDE JUnit test, as shown in Figure 12.1.
To understand how launching with PDE JUnit works, let's first take a closer look at some of the other launching options. Each of these launching options defines a different setup for running a particular target.
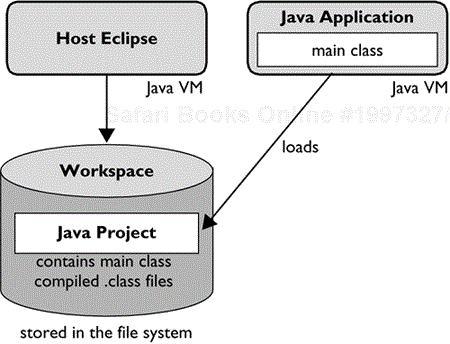
We start with the simplest one: Run As > Java Application. It starts a main class from a project in the workspace in a separate VM, as shown in Figure 12.2.
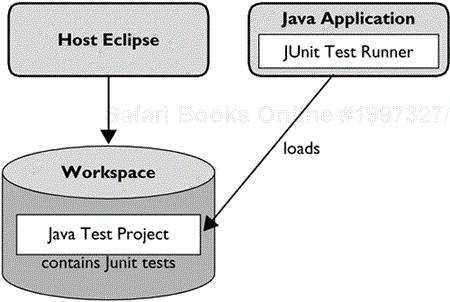
Next let's consider the setup when launching a JUnit test with Run As > JUnit Test. This launching option starts a JUnit test runner executing tests in the workspace in a separate VM, as shown in Figure 12.3.
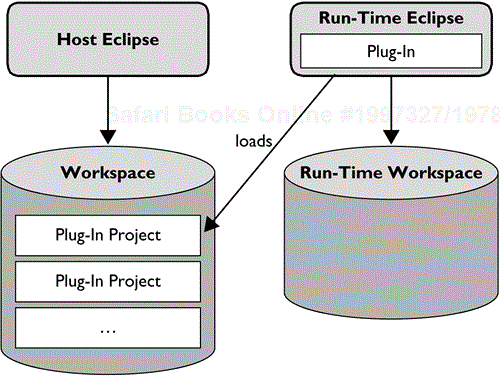
Run As > Run-Time Workbench is a PDE-contributed launching option. It launches a run-time Eclipse with the plug-in projects contained in your workspace.[1] Starting a second Eclipse will also create a run-time workspace that is initially empty (see Figure 12.4).
Now on to the next step: running plug-in tests. Before we can run them we have to write some tests. In Eclipse everything is a plug-in, including the tests. When launching with Run As > JUnit Plug-in Test we get the setup shown in Figure 12.5.
In this setup the following steps are executed:
The run-time Eclipse is started from the workspace.
Control is passed to a JUnit test runner that runs the tests.
The JUnit test runner runs all tests inside the same workspace.
When all tests are finished Eclipse is shut-down.
Now we are ready to implement the simplest plug-in test. Create a new plug-in project, as in the Hello, World example (Chapter 3). To write a test, we have to refer to the JUnit types like junit.framework.TestCase. To do so we need to have access to the JUnit library. Because everything in Eclipse is a plug-in, the JUnit library is also packaged in a separate plug-in called org.junit.
The default dependencies of a new plug-in are org.eclipse.core.resources and org.eclipse.ui. To get access to org.junit at runtime, we need to add it to the requires element of the plug-in manifest:
<requires>
  <import plugin="org.eclipse.core.resources"/>
  <import plugin="org.eclipse.ui"/>
  <import plugin="org.junit"/>
</requires>
To get access to the JUnit class at buildtime we add org.junit to the build class path. Let PDE take care of this by executing Compute Build Path on the Dependencies tab of the manifest editor. Here's the world's simplest JUnit test:
public class ExampleTest extends TestCase {
  public void testNothing() {
  }
}
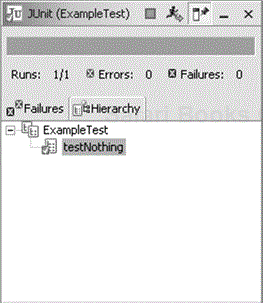
When you run the ExampleTest with Run As > JUnit Plug-in Test, you get the familiar JUnit feedback, but you'll see a new workbench created before the tests are run. When the tests are finished, the workbench will disappear (see Figure 12.6).
PDE JUnit starts a test run in a fresh and empty workspace. Most serious plug-in tests don't run in an empty workspace. They need a workspace containing some data. For example, JDT tests operate on Java projects containing Java source code. Tests for our Contributed JUnit test runner operate on a Java project containing JUnit test cases. To simplify the creation of such test projects in the run-time workspace we implemented the TestProject class. It helps us create the fixture for a test, a predictable initial state so the test can run consistently. TestProject allows us to create a project, create a package inside the project, and create a class inside the package. It goes through all the Eclipse details necessary to create a project and its contents.
How do you use TestProject to create a fixture? First we have to remember that PDE JUnit runs all tests inside the same workspace. This avoids having to start Eclipse for each test and speeds up test runs. However, tests should leave the world exactly as they found it. Therefore, you should create the fixture project inside the setUp() method of a test case and you should dispose the fixture project in tearDown() as shown below:
public class SomePluginTest extends TestCase {
  private TestProject testProject;

  protected void setUp() throws Exception {
    testProject= new TestProject();
  }
  protected void tearDown() throws Exception {
    testProject.dispose();
  }
}
When you forget to implement tearDown() and dispose the fixture project you will get test failures. The next test will not be able to create a fresh test project fixture since the test project already exists.
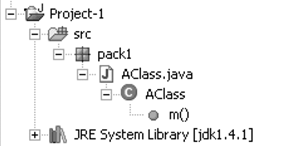
For a particular test you populate the test project using methods provided by TestProject. The testSomeTest() illustrates how to create a Java project with the contents shown in Figure 12.7.
public void testSomeTest() throws CoreException {
  IPackageFragment package= testProject.createPackage("pack1");
  IType type= testProject.createType(package, "AClass.java",
     "public class AClass {public void m(){}}");
  }
}
TestProject provides the following methods:
TestProject()—. Creates a Java project named Project-1 with a folder bin and assigns it the Java nature. This configures the Java builder for the project. The project's build class path is set up to include the system libraries (rt.jar, etc.). The project's output folder is set to the bin folder.IPackageFragment createPackage(String name)—. Returns a package with the given name in the project's source folder, src. A source folder is created if it doesn't exist yet and it is added to the project's build class path.IType createType(IPackageFragment p, String compilationUnit, String source)—. Creates a compilation unit in the given package and returns the top-level type. The argument source defines the contents of the compilation unit.addJar(String plugin, String jar)—. Adds a JAR file from a plug-in contained in your Eclipse installation to the build class path.dispose()—. Deletes the project from the workspace.
Most of these methods throw exceptions. To simplify your tests, you should add throws declarations to your test methods instead of catching them yourself. There is no need to catch them yourself since JUnit does it for you.
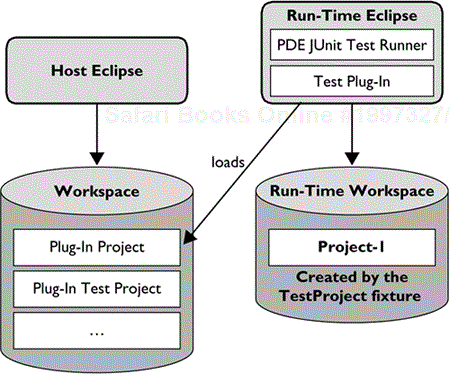
The full source of the TestProject fixture is included in Appendix B. It is a good example of how to create and initialize projects programmatically. To complete our test set-up picture we can now add a TestProject fixture to the run-time workspace, as shown in Figure 12.8.
The techniques so far are useful for plug-in testing in general. Now, let's use these techniques to implement a test case for our Contributed JUnit plug-in. The test is presented here after you've seen the code of the Contributed JUnit plug-in, but we actually wrote it before we wrote the code. The test we show verifies that a test failure properly notifies the ITestRunListener. Here are our initial steps:
Create a plug-in project
org.eclipse.contribution.junit.test.Add the following imports in the plug-in's manifest file:
<import plugin="org.junit"/>
<import plugin="org.eclipse.contribution.junit"/>
<import plugin="org.eclipse.jdt.core"/>
<import plugin="org.eclipse.core.resources"/>
<import plugin="org.eclipse.jdt.launching"/>
We need to import
org.junitsince we are writing JUnit tests. We importorg.eclipse.contribution.junitsince these are the classes we are testing. The other imports are required by theTestProjectclass.Create a package
org.eclipse.contribution.junit.testin the project's source folder src.Copy the
TestProjectinto this package.Create a JUnit test case called
ListenerTestinorg.eclipse.contribution.junit.test.
Now let's start with the ListenerTest's test setup.
Example . org.eclipse.contribution.junit.test.ListenerTest
public class ListenerTest extends TestCase {
  private TestProject project;

  protected void setUp() throws Exception {
    project= new TestProject();
  }

  protected void tearDown() throws Exception {
    project.dispose();
}
Our Contributed JUnit plug-in runs tests. We therefore need to set up a Java project containing test cases. With the help of TestProject we implement a testFailure() method and create a project with a single package pack1 containing a class FailedTest with a failing test method testFailure():
Example . org.eclipse.contribution.junit.test/ListenerTest
public void testFailure() throws Exception {
   IPackageFragment pack= project.createPackage("pack1");
   IType type= project.createType(pack, "FailTest.java",
     "public class FailTest extends junit.framework.TestCase {"+
     "public void testFailure() {fail();}}"
   );
   project.addJar("org.junit", "junit.jar");
}
Since our code refers to JUnit classes the project has to include the JUnit JAR file on its build class path. We can use the JUnit JAR file that is contained in the library plug-in org.junit.
To run the failing test with the Contributed JUnit plug-in we call JUnitPlugin.getPlugin().run(type).
This will run the test contained in the project created by the TestProject fixture using the Contributed JUnit test runner. However, until now we haven't tested anything. We have to verify that the ITestRunListener's testFailure() method is called properly. How can we test such a call back? These are the steps:
Implement a listener inside
ListenerTest.Record the fact that the listener was called in the listener implementation.
Register the listener with the Contributed JUnit plug-in and run the failing test. We will register the listener as a dynamic listener, since it should only be registered during the test run.
Verify with an
assertthat the recorded value is the expected one.
We implement the test listener as a static inner class of ListenerTest. We only implement the testFailure() method; all the other listener methods are implemented to do nothing:
Example . org.eclipse.contribution.junit.test.ListenerTest$Listener
public static class Listener implements ITestRunListener {
  String testFailed;
  public void testFailed(String klass,String method,String trace) {
    testFailed=method + " " + klass;
  public void testsStarted(int testCount) {
  }
  public void testsFinished() {
  }
  public void testStarted(String klass, String method) {
  }
}
In testFailed() we capture the failed test information in a string that we can easily verify with an assertion.[2] We can now complete the testFailure() test:
Example . org.eclipse.contribution.junit.test.ListenerTest
public void testFailure() throws Exception {
  pack= project.createPackage("pack1");
  IType type= project.createType(pack, "FailTest.java",
    "public class FailTest extends junit.framework.TestCase {"+
    "public void testFailure() {fail();}}"
  );
  project.addJar("org.junit", "junit.jar");
  Listener listener= new Listener();
  JUnitPlugin.getPlugin().addTestListener(listener);
  JUnitPlugin.getPlugin().run(type);
  assertEquals("testFailure pack1.FailTest", listener.testFailed);
}
We tested other listener behavior in a single test called testRunning().
Now that we have tests, we run them with PDE JUnit by executing Run > Run As > JUnit Plug-in Test. The dialog with test results will pop up. This dialog comes from the contributed test-run listener. We will implement a better UI for test results in the next chapter and since this dialog gets annoying let's remove this contributed listener. We remove both its declaration in the manifest file and its implementation in the RunTestAction.
Example . org.eclipse.contribution.junit/plugin.xml
<extension
  point="org.eclipse.contribution.junit.listeners">
  <listener
    class="org.eclipse.contribute.junit.RunTestAction$Listener">
  </listener>
</extension>
We will add more test classes as we go. When we want to run all tests, then we let PDE JUnit find all the tests inside the org.eclipse.contribution.junit.test package for us. To do so we select the package and execute Run > Run As > JUnit Plug-in Test. This will run all our tests without having to manually maintain a JUnit TestSuite.
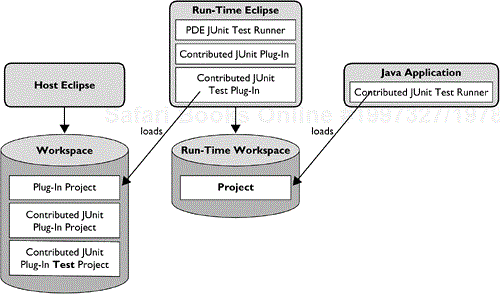
Those who have studied the details of the Contributed JUnit test runner know that the call JUnitPlugin.getPlugin().run(type) creates a separate VM to run tests. Now we have three VMs. Figure 12.9 shows the setup when running tests verifying the proper behavior of the Contributed JUnit plug-in.
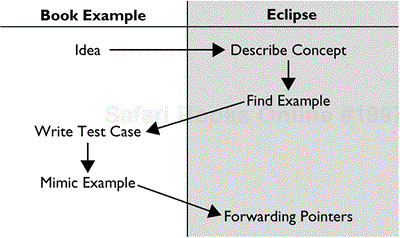
With test-driven development and the beginnings of our new Contributed JUnit plug-in, we're ready to make progress on new functionality. Circle Two will introduce new features to our test runner, forcing us (just coincidentally) to show you new areas in Eclipse. From time to time, we'll extend our discussion to include tests for the functionality we write about (see Figure 12.10). In addition to illustrating how to write plug-in tests, this also allows us to touch on various aspects of the Eclipse APIs.


