
In this chapter, we'll see how to create a context menu that accepts contributions.
Here's the scenario. We've written and run a test. It fails. We change code in various files to try to make the test pass. We'd like to rerun the failing tests without having to navigate back to our test class.
The view is still sitting there on the screen, balefully glaring red. We could add a pop-up menu to the view containing (at the moment) a single menu item to rerun the failing test. There are several other possible user interfaces, but this is one that will allow us to demonstrate implementing a contribution-enabled menu, so we'll go with this one at the moment. In any case, the UI is about to take a dramatic right-angle turn, so even if the current interface design isn't perfect, it won't be a problem for long.
The Invitation Rule says that where possible, we should invite others to contribute to our contributions. Context menus are an excellent example. The contents of context-sensitive menus can be extremely complex:
Different combinations of items based on the selection or combination of selections
Complex enable/disable logic
Trying to express all the combinations in the manifest would result in either hideously complicated XML, or in menus having far too many items. Therefore a view's context menu is typically constructed in code in the view part. However, it is defined in a way that others can contribute to it. A context menu can only be shown when the view is visible, so creating a menu in code doesn't affect lazy loading.
To enable others to contribute, we have to tell Eclipse about our menu so it can still act as an extension point. Where will we find an example to copy? The workbench provides a set of standard views like the Task, Navigator, or Bookmarks views. These are all good examples to mimic. To find their implementation classes we do either of the following:
Using the “Spider Click” to Find Objects of Interest
The Spider allows us to explore an object structure. The Spider Navigator shows top-level objects from the running Eclipse that are of interest for an object exploration. Another way to get at the object of interest is by using the magnifier in the toolbar of the Spider Navigator view. After clicking the toolbar item you can click at any visible object to start the exploration from there.
![]() The clicked-on object is opened in the Spider canvas.
The clicked-on object is opened in the Spider canvas.
Let's take the Task view as the base for mimicking our implementation. In its source we find the following code related to creating a menu:
Example . org.eclipse.ui.views.tasklist/TaskList
MenuManager menuManager = new MenuManager("#PopupMenu");
menuManager.setRemoveAllWhenShown(true);
menuManager.addMenuListener(new IMenuListener() {
  public void menuAboutToShow(IMenuManager manager) {
    TaskList.this.fillContextMenu(manager);
  }
});
Menu menu = menuManager.createContextMenu(table);
table.setMenu(menu);
getSite().registerContextMenu(menuManager, viewer);
To fill a context menu before it pops-up you register an IMenuListener with the menu manager. The listener is notified before the menu is shown so that you can fill its contents. The call to setRemoveAllWhenShown(true) makes sure that the menu is emptied before the listener is called to populate the menu. Finally, registerContextMenu() makes the menu known to Eclipse so that others can contribute to it.
How do menus fit in with views? Here is a picture showing the Task List and how it connects to its menu. The menu itself is associated with a Widget. Inside the menu is a list of items, as shown in Figure 14.1.

Where is our test for all this? We couldn't write one. Eclipse doesn't provide public API to programatically force the creation of the contributed menu items. This is the first case where Eclipse's obsession with lazy loading made our testing job impossible. We had to rely on manual verification to make sure the menu item appeared as expected.
When we start up a run-time workbench and try to pop up a menu, nothing happens. The other examples of context menus we saw were all initialized in createPartControl(), so we'll do the good monkey thing and copy that structure:
Example . org.eclipse.contribution.junit/ResultView
public void createPartControl(Composite parent) {
  listener= new Listener();
  JUnitPlugin.getPlugin().addTestListener(listener);
  control= new Label(parent, SWT.NONE);
  createContextMenu();
}

private void createContextMenu() {
  MenuManager menuManager = new MenuManager();
  menuManager.setRemoveAllWhenShown(true);
  menuManager.addMenuListener(new IMenuListener() {
    public void menuAboutToShow(IMenuManager manager) {
      fillContextMenu(manager);
    }
  });
  Menu menu= menuManager.createContextMenu(control);
  control.setMenu(menu);
}
We register a menu listener so that we can populate the menu before it pops up. To get the correct menu items we look at how this is done in the task list. It populates its menus in fillContextMenu():
Example . org.eclipse.ui.views.tasklist/TaskList
void fillContextMenu(IMenuManager menu) {
  menu.add(newTaskAction);
  menu.add(gotoTaskAction);
  menu.add(new Separator());
  menu.add(new Separator(IWorkbenchActionConstants.MB_ADDITIONS));
  menu.add(new Separator(IWorkbenchActionConstants.MB_ADDITIONS+
    "-end"));
  menu.add(propertiesAction);
}
Here we see the pattern:
Add some items.
Add a separator.
Add more items.
Add two separators with well-known names meaning “put contributed menu items here.”
Eclipse will only show separators as needed, so the adjacent separators aren't a problem. The name of the well-known separator is defined in the MB_ADDITIONS constant provided by the workbench and is defined as “additions.” The convention is to contribute both an MB_ADDITIONS and an MB_ADDITIONS"-end" separator. This gives contributors the choice of making their contributions appear either at the top or at the bottom of the contributed items section.
Most of the context menus in views are built by explicitly adding menu items by calling IMenuManager.add(IAction). The advantage of explicitly adding actions is that you can control the order of presentation of menu items. You can group contributed items, but you can't precisely order them. Another advantage with explicitly built menus is it is easier to eliminate inappropriate items using logic in code, shortening view context menus (Relevance Rule).
This is an example where the Fair Play Rule is violated. A view's context menu is not using the same mechanisms as its clients. In practice, your context menus are likely to be a combination—first a set of items precisely placed by hand followed by a section for contributed items.
Following this pattern, we manually add a not yet implemented rerun action and add the special separators. The other thing we must do to prepare for contributions is to tell the workbench that this menu accepts contributions. In TaskList, the method we saw used was registerContextMenu(). We can try it, too:
Example . org.eclipse.contribution.junit/ResultView
private void createContextMenu() {
  MenuManager menuManager = new MenuManager();
  menuManager.setRemoveAllWhenShown(true);
  menuManager.addMenuListener(new IMenuListener() {
    public void menuAboutToShow(IMenuManager manager) {
      fillContextMenu(manager);
    }
  });
  Menu menu= menuManager.createContextMenu(control);
  control.setMenu(menu);
  getSite().registerContextMenu(menuManager,
     getSite().getSelectionProvider());
}
We don't want to recreate our actions each time the context menu is popped up. We store an action in an field of the ResultView. We mimic the task list and create the action in createPartControl(). We don't want to create it sooner in the constructor. We defer action creation in order to create the action as lazily as possible.
Example . org.eclipse.contribution.junit/ResultView
private Action rerunAction;
public void createPartControl(Composite parent) {
  listener= new Listener();
  JUnitPlugin.getPlugin().addTestListener(listener);
  control= new Label(parent, SWT.NONE);
  createContextMenu();
  rerunAction= new RerunTestAction();
}
We implement fillContextMenu() to populate the menu called from the IMenuListener:
Example . org.eclipse.contribution.junit/ResultView
void fillContextMenu(IMenuManager menu) {
  menu.add(rerunAction);
  menu.add(new Separator(IWorkbenchActionConstants.
    MB_ADDITIONS));
  menu.add(new Separator(IWorkbenchActionConstants.
    MB_ADDITIONS+"-end"));
}
We implement the RerunTestAction as an inner class of ResultView.
Example . org.eclipse.contribution.junit.ResultView$RerunTestAction
private class RerunTestAction extends Action {
  private RerunTestAction() {
    setText("Re-run");
  }

  public void run(){
    rerunTest();
  }
}
The run() method called when the menu item is selected forwards the request to a rerunTest() method. We skip the implementation of the rerunTest() method, because it will not provide us with further insight into Eclipse. At this point the menu item will appear as expected (see Figure 14.2).

Now that the context menu is ready for contributions let's extend it. We extend org.eclipse.ui.popupMenus with a viewer contribution.
Example . org.eclipse.debug.ui/plugin.xml
<extension point = "org.eclipse.ui.popupMenus">
  <viewerContribution
    id="org.eclipse.debug.ui.debugview.popupMenu"
    targetID="org.eclipse.debug.ui.DebugView">
    <action
      id="org.eclipse.debug.ui.debugview.popupMenu.
        copyToClipboard"
      menubarPath="editGroup"
      class="org.eclipse.debug.internal.ui.actions.
        CopyToClipboardActionDelegate"
      label="%CopyToClipboardAction.label">
    </action>
  </viewerContribution>
</extension>
We need to extend popupMenus with an element called viewerContribution. The targetID specifies the unique identifier of the context menu you want to extend. The targetID is defined when a menu is registered with its site by calling registerContextMenu() as we just did.
We will copy the structure of the above extension point definition:
Example . org.eclipse.contribution.junit/plugin.xml
<extension point="org.eclipse.ui.popupMenus">
  <viewerContribution
    id="org.eclipse.contribution.junit.popupMenu"
    targetID="org.eclipse.contribution.junit.resultView"/>
</extension>
Each viewer contribution contains several actions, each of which will translate into a menu item. Copying the structure above, we reach:
Example . org.eclipse.contribution.junit/plugin.xml
<viewerContribution
  id="org.eclipse.contribution.junit.popupMenu"
  targetID="org.eclipse.contribution.junit.resultView">
  <action
    id = "org.eclipse.contribution.junit.popupMenu.item"
    label="Contributed Item"
    menubarPath="additions">
  </action>
</viewerContribution>
The menubar path must be set or the item won't appear. We contribute our action to the “additions” slot, which we added to the menu when we created it as the place holder for contributions. Running in a run-time workbench, the menu item appears (see Figure 14.3).
Where Can You Contribute Actions?
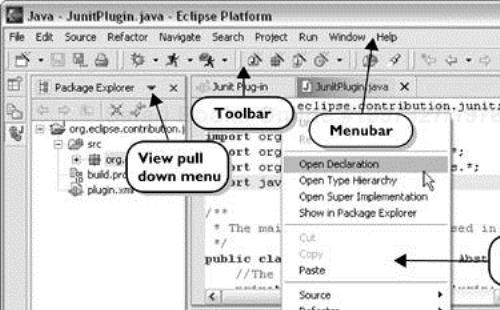
Plug-ins can contribute actions in many places:
The main menubar and toolbar—. The extension point
idisorg.eclipse.ui.actionSets.The action must conform toorg.eclipse.ui.IWorkbenchWindowActionDelegate.The view toolbar and pulldown menu—. The extension point
idisorg.eclipse.ui.viewActions. The action must conform toorg.eclipse.ui.IViewActionDelegate.The editor toolbar and menu—. The extension point is
org.eclipse.ui.editorActions. These actions will only be shown while the associated editor is active. The action must conform toorg.eclipse.ui.IEditorActionDelegate.The view and editor context menus—. The extension point
idisorg.eclipse.ui.popupMenus. To contribute to a selected object, use theobjectContributionelement. In this case, the action must conform toorg.eclipse.ui.IObjectActionDelegate. To contribute to a specific menu independent of the selection, use theviewerContributionelement. In this case, the action must conform toorg.eclipse.ui.IViewActionDelegatewhen contributing to a view menu, andorg.eclipse.ui.IEditorActionDelegatewhen contributing to an edit menu.The screen shot above illustrates the opportunities for extensions.
When we select the menu item, we get an error message because there is no class attached to the item. Since we contributed the class as a viewer contribution to a view, it has to conform to the IViewActionDelegate.
Next we want to leave the UI extensions for a while and look into some extensions at the Eclipse core (non-UI) level. First, we'll review what we did in this chapter. We
Created a context menu
Registered it to receive contributions
Contributed a menu item to a view's context menu
Action filters—. For some object contributions the class of the selected object defined with the attribute
objectClassisn't specific enough to conform to the Relevance Rule. A filter element describes an attribute of the selected object using name-value pairs. For example, to only contribute an action when the selected file is read-only you add the following filter element to the definition of an object contribution:<extension point="org.eclipse.ui.popupMenus"> <objectContribution id="..." objectClass="org.eclipse.core.resources.IFile"> <filter name="readOnly" value="true"/> <action ... /> </objectContribution> </extension>You can define additional filters for your objects using the
IActionFilterinterface.Selection providers—. To enable the workbench to track the current selection, you have to register an
ISelectionProviderwith the site. The selection provider reveals a part's current selection and notifies its listeners about changes. The result view introduced in this chapter doesn't have a selection at all. In this particular case, we could also have created the context menu statically. (See Chapter 23 for a more complex view part example.)