
In This Chapter
Acquiring evidence the right way
Types of common media
Finding the right tool
Bitstream copying
Authentication and integrity
The foundation of a computer forensic investigation isn't the damaging e-mail you find that implicates a company CEO of embezzlement. Your investigation depends on how you forensically transfer the evidence from one location to another without contaminating it and then prove that you found the evidence the way you present it to the judge and jury. Without this foundation to work from, all subsequent work on a case can be called into question and potentially thrown out of court as possibly being tainted. This chapter explains how to prevent this situation. Although the concepts we describe are fairly simple, applying them often stymies even the best investigators.
The bottom line is that you're extracting and fingerprinting potential evidence in a way that is incontestable and easy for the average person to understand.
Because the acquisition of data in a forensically sound manner is the cornerstone of a good computer forensic investigation, you should acquire evidence in the most professional manner possible. The primary obstacle to creating a sound forensic copy of potential evidence is the possibility of changing the data while you're attempting to duplicate it. Due to the large number of devices in circulation that hold data, the equipment you use to duplicate data varies by device type. We can't stress enough that, as a computer forensic professional, you need the proper equipment and training (which you can find out about in Chapters 18 and 20) in order to effectively duplicate data in a manner that leaves no possibility of it's being changed and to prove it in a court of law. The tricky part is doing it with all the various media out there and not messing up!
The first rule to follow when working a computer forensic acquisition is to document everything you can. In Chapter 4, the documentation process is covered in detail, so read that chapter if you need more information.
After reviewing the first rule of computer forensics and committing it to memory, your next step is to begin the process of acquiring a forensic copy of the evidence. The process in a generalized format is:
Determine which type of media you're working with.
You might be working on a magnetic storage device such as a hard drive, on an optical device such as a DVD, or with volatile memory such as a mobile phone.
Find the right tool for the job.
After you know the type of media you have, you have to ensure that you have the correct tools to retrieve the data from the media in a forensically sound manner.
Transfer the data.
You're using the appropriate equipment to transfer the data from the original device to sterile media (if necessary) and ensuring that the process to check the integrity of the transfer is in place.
Authenticate the preserved data.
Digital data is easy to change, and court systems like to ensure that the data doesn't change after it's acquired. You do that by authenticating — running a checksum — after the data is in your possession.
Make a duplicate of the duplicate.
After the data is safely off the original device, you can make a duplicate copy of the evidence from the copy so that you have a working copy of the evidence. This step is critically important, no matter which type of media you're working with, because you need the working copy.
Note
Always follow this standard rule: Touch the original once, the forensic copy twice, and your working copy as many times as needed.
We discuss each of the preceding steps in more detail in the following sections.
The first step in any computer forensic investigation is to identify the type of media you're working with. The various types of media you might encounter are described in this list:
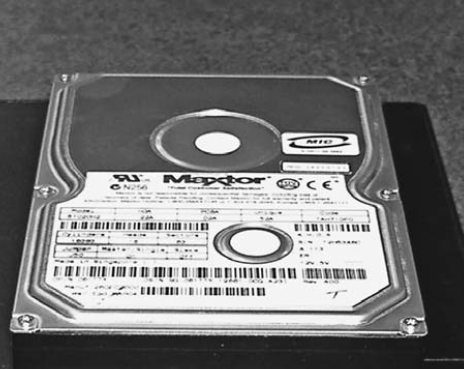
Fixed storage device: Any device that you use to store data and that's permanently attached to a computer is a fixed storage device. The type of storage device you're probably most familiar with is the classic magnetic-media hard drive, which is inside almost every personal computer (see Figure 6-1). Traditional hard drives are mechanisms that rotate disks coated with a magnetic material; however, new technology uses chip-based storage media known as the solid-state drive (SSD), shown in Figure 6-2. It's as though your thumb flash drive is 1,000 times larger than its current size!
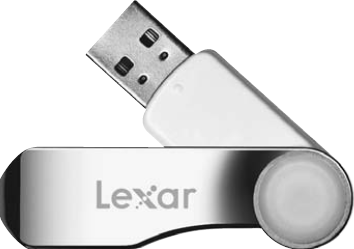
Portable storage device: Most people consider floppy disks (remember those?) or flash memory drives, shown in Figure 6-3, to be the only true portable storage devices, but any device that you can carry with you qualifies. iPods (shown in Figure 6-4), MP3 players, mobile phones, and even some wristwatches are also portable storage devices.
Note
Unlike fixed storage, where most interfaces are standardized, mobile devices have different interfaces, which adds to the complexity of your case. We discuss the complexity of mobile devices in Chapter 12.
Memory storage area: With the move from desktop computers to mobile devices, investigators are seeing increasingly more evidence that's found only in memory. The obvious type of device is a mobile phone (such as the Apple iPhone, shown in Figure 6-5) or personal digital assistant that often saves data only in volatile memory. After the battery dies, your data evidence also dies. Not-so-obvious places to find evidence in volatile memory are the RAM areas of regular computers and servers as well as some network devices.
Network storage device: With the growth of the Internet and the exponential increase in the power of network devices, data can be found on devices that until now haven't held forensic data of any value. Devices such as routers (see the Cisco routers shown in Figure 6-6), switches, and even wireless access points can now save possible forensic information and even archive it for future access.
Memory card: In addition to using built-in RAM memory, many devices now use digital memory cards to add storage. Common types are SD (shown in Figure 6-7) and MMC flash cards. To read this type of memory device, you often have to use a multimedia card reader.


When you acquire a forensic image, you're making a bitstream copy. In this rather simple process, you copy every bit of the original media, from the physical start of the media to the physical end of the media. The concept is simple, but the execution in practice can be difficult unless you have the proper equipment that's designed for the purpose.
Acquiring a bitstream image is difficult for two reasons: An operating system doesn't recognize the entire hard drive where data may be lurking, and the integrity of the system might be compromised. We discuss both problems in the following sections. Then, we go into the tools we find indispensable when acquiring images.
Operating systems allocate space on their storage media, but a little part of the hard drive is always left over and not accessible by the operating system. For example, a Microsoft Windows operating system might recognize 55.8 gigabytes (GB) of hard drive space, when in fact the hard drive measures 60GB of physical space, as shown in Figure 6-8.
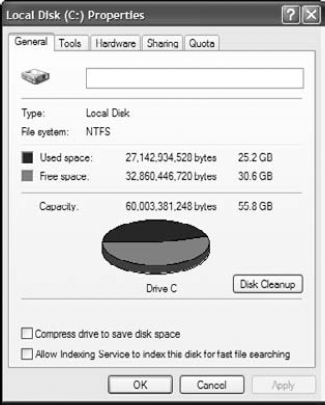
This statement doesn't mean that you can't access the "extra" space by using the right software tools; it just means that the operating system cannot.
Because most operating systems work this way, you must rely on a tool that doesn't use the operating system to retrieve the bits from the storage media. A tool made specifically for computer forensics, such as FTK or EnCase, is a good candidate for the job.
If you're a power user and know how to use tools such as Linux dd, you're in good shape, but you should always use the right tool for the right job such as:
FTK/EnCase/Paraben: Tools for working with most operating systems such as Windows, Linux, and Apple. Also extremely easy to use for relatively newer users.
Hex editors/system level utilities: Software tools for digging deeper into the structure of file systems and their files. Power users use these tools for deeper analysis, but require a fair amount of knowledge of file structures.
Disk duplicators: Hardware devices such as Logicube's Forensic Talon duplicate storage media quickly and forensically to the tune of 4 gigabytes per minute.
Write protectors: Devices such as Weibetech's Forensic Ultradock keep you from accidentally writing to storage devices during a preview or acquisition from a suspect's media device.
If writing to the original media where the potential evidence is stored is disastrous, what can you do? The answer to this technological dilemma is the use of a write blocker that (obviously) blocks any attempts to write to the original media. The process sounds simple, but what happens in the background is complex.
To put this concept in practical terms, the write blocker responds to the write requests of the operating system with the responses that the operating system is expecting as though the write operation had really taken place on the storage device. The write blocker is telling the operating system what it wants to hear. To see an eye-opening example of this process, you can format a hard drive (pick one you don't need) with a write blocker attached. Notice that the operating system formats the hard drive, just like in a regular format operation, but if you reboot the computer system and plug the hard drive back in, the hard drive looks like it was never formatted! Of course, if it did format, your write blocker isn't working, and you have a big problem, forensically speaking.
Two forms of write blockers exist, and both work in the same conceptual fashion but use different mechanisms:
Physical: Physically intercepts the data signals that leave the data bus on the computer and responds with the appropriate data signals by way of the data bus to the operating system. Write blockers of this type are operating system independent and can be classified even further as either native or tailgate:
Native: Has the same media interface on both the target and acquisition sides.
Tailgate: Can be a combination of IDE, SATA, USB, FireWire, and even wireless.
Figure 6-9 shows a typical write block device that you install in the drive bay of a desktop forensic workstation.
Logical: Usually bundled with computer forensic software as part of its feature set; works by intercepting write calls at the software level and responding to operating system calls. This type of write blocker is operating system specific — a Linux software write blocker doesn't work on a Windows computer, for example, and vice versa.

It's always embarrassing when you find smoking gun evidence of a crime only to find out that the evidence you found was left over from a previous case on media that you didn't properly erase or wipe.
Imagine that you have on videocassette tape a movie that you don't want to view any more and you decide to record your child's birthday party over the movie. Unless you erase the cassette, whichever part of the movie the birthday party doesn't record over is still on the tape. So, immediately after the birthday party footage ends, the movie pops up on the screen and rolls the credits for you. The same concept is obvious in storage media on a computer in that you mix two different cases on one examination media.
The use of wiping software on storage media is necessary to make sure that no cross contamination of cases or evidence occurs because not to do so dooms the investigation and your credibility in one fell swoop. The basic process to wipe a drive is to write a sequence of binary digits over the media in its entirety to make sure that no pre-wipe data is on the storage media.
Wiping software is usually included with any professional computer forensic tool, but you can find third-party wiping software quite easily. Here are two:
LSoft Technologies Hard Drive Eraser (
www.lsoft.net): Conforming to the Department of Defense (DOD) standards for data destruction, this free tool works fairly well.White Canyon's Wipe Drive 5 (
www.whitecanyon.com): This wiping software is not free, but it is so inexpensive for the features it includes it might as well be free.
Most wiping software do the job of cleaning up a storage device fairly well because all they really have to do is write over the storage device. The only problem you encounter with every software wiper that actually works is that they take a long time to complete their job. On large devices, it may take days to wipe a storage device!
You can take data off a computer in many ways, but only a few are forensically sound. The use of any one of these forensic techniques is dictated in large part by the circumstances around your computer forensic investigation. The biggest decision you have to make is whether to do the work in the field or in your lab. Those two differing environments dictate to a large degree what your toolkit looks like — a simple toolkit or full-blown field kit that requires a small RV for transportation. (It's the geek version of a SWAT team.) The methods described in the following sections are commonly used by computer forensic examiners.
The following steps illustrate how the process of making a bitstream copy works. By using a field kit and professional forensic software, these steps illustrate a forensic situation in the field:
Determine the media you're working with.
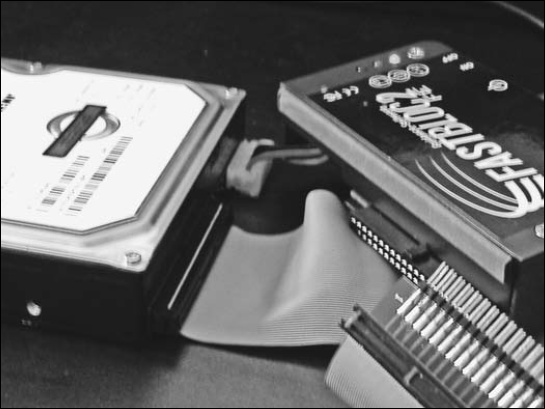
Position the write blocking hardware and hard drive.
In Figure 6-10, an EIDE write block device is positioned to connect to the target media. The power is turned off. Notice that the hard drive and write block device are placed on an antistatic mat.
Connect the data and power cables to the acquisition hard drive.
Connect the data cable to the hard drive, and connect the power cable as shown in Figure 6-11. Make sure that no power is applied to the write block device yet.
Connect the data cable to the write-protect device.
In Figure 6-12, the adaptor to connect the EIDE interface by using the EIDE data cable is being connected.
Warning
Do not bend the pins or stretch the cable!
Make sure that all cables are connected correctly.
Double-check to ensure that all cables are securely connected, as shown in Figure 6-13. Note the red line on the data cable. If you don't see the red stripe on Pin 1, the connection doesn't work. If you did it backward, take off the connector and reverse it.
Power on the write blocker.
After all the cables are connected, you can power on the write block device (see Figure 6-14). Within a couple of seconds, the computer forensic workstation detects the presence of a new drive and lists it as an available drive if it can read it. Don't worry if your operating system doesn't see the hard drive — the computer forensic software detects it.
Acquire the bitstream image with your computer forensic software.
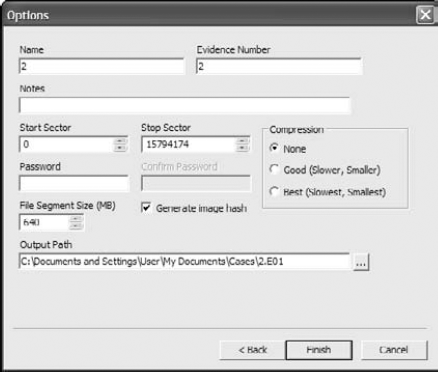
Depending on which computer forensic software package you're using, the details of how each software tool acquires a bit stream image will vary, but the general principles still apply. In Figure 6-15, the computer forensic software is being set up to acquire the bitstream image and to make a hash (which is explained in greater detail later in this chapter) of the data being transferred.
Acquiring the bitstream copy.
Most computer forensic software keeps you up-to-date on the progress of the transfer — notice the status indicator in the lower-right corner of the window shown in Figure 6-16. As a secondary way to double-check whether your software is accessing the hard drive, check the write-protect device for any telltale LED lights.
Wrap things up.
After the forensic software has finished the acquisition and the software reports the hash values match, save the new image file. After making sure that the image file is saved, turn off the power to the write block device and reverse the process to disconnect all cables. Put the hard drive in a secure storage area.


In a computer-to-computer acquisition, you use the suspect computer as the platform to extract the data to your forensic examination computer. Of all the data-transfer methods, this one is most likely to cause accidental data corruption, because of the manner in which data must be retrieved.
Warning
Unless you have experience in performing this procedure or have practiced it until you can do it in your sleep, we recommend using a different method.
You use one of these two cable options to link the two computers:
Parallel: The slowest method, but the best one to use if you have the time. Most computer geeks recognize the parallel cable as the one you normally use to connect your computer to a printer. The only difference here is that both ends have the connection designed to be connected to the back of the computer and not to the printer.
Network: Slightly faster than using a parallel cable and typically used to connect computers to a network. If you look behind your computer and see an oversized phone jack with a couple of blinking lights next to it and a skinny-looking cable attached, that's your network cable.
A limiting factor in both these methods is the restricted amount of data you can transfer at a time. Both methods are useful, however, for previewing a data drive forensically to see whether it has obvious evidence, although they're extremely slow to forensically copy entire drives that are larger than 50GB.
Another problem is the potential for a catastrophic data-corruption event — or tainting the evidence. Using this method, you boot (load) the operating system on the suspect computer with forensic boot media. It acts as the software write blocker that links to your forensic computer to enable the data transfer. The boot media can be a floppy disk, compact disc (CD), digital video disc (DVD), or even USB device.
Warning
Unless you follow the extraction procedure exactly, chances are good that the computer will boot up using the suspect's hard drive and potentially erase data that might be useful in your investigation — and possibly affect the credibility of your case.
To copy data between two computers using the parallel or network cable method, follow these general steps:
Unplug the power source to the computer.
Open the computer case and disconnect the storage device power supply from the computer.
You have to ensure that there's no physical way for the storage device to boot up during the computer power-up.
Reconnect the power supply on the computer, boot the computer, and enter the BIOS setup area.
How you enter the BIOS setup area is determined by the computer manufacturer. Some computers require you to press F1, and others want you to press F2. Still others use combinations of keyboard keys. Check with the manufacturer to make sure that you know which keyboard sequence works.
Look for the Boot Sequence tab or page.
Change the order in which the computer boots to the boot media you're using so that your boot media is number one on the list.
You can choose a floppy disk, CD, DVD, or USB boot media depending on which one you use to boot your computer.
Save the changes you made to the boot sequence.
Don't connect the suspect storage device yet.
Insert the bootable media you're using and then restart the computer. Make sure that your bootable media boots correctly and that the software runs properly.
After everything is working correctly, turn off the computer and reconnect the suspect storage device to the computer.
Turn on the power and carefully watch the computer to make sure that it boots from your forensic media.
If at any time you think the computer is booting from the suspect storage device, pull the power plug from the back of the computer and troubleshoot why your forensic media didn't boot first. Then begin from Step 1.
If all devices boot correctly, use your forensic software to connect, and then begin to either preview or acquire.
Acquiring data by copying it from a storage device to a computer is faster than using the computer-to-computer method, because better safeguards are in place to prevent the writing of data to the original storage device. Also, the circuitry is much faster at this level of technology.
Note
Always check with the manufacturer of the forensic equipment — and your own policies and procedures — for any detailed steps you need to complete in your unique circumstances.
The following step list shows how to extract data while you transfer it from a storage device to a computer:
Figure out the type of media you're working with.
The type of media dictates which equipment you use, from EIDE, SATA, or SCSI connections for hard drives to the type of interface you need for devices such as mobile phones, cameras, or even MP3 players. (Playing MacGyver or flying by the seat of your pants isn't an option!)
Use the proper write blocker.
Having the proper write blocker while you're working in the field can be a challenge simply because some forensic field kits limit their selection of interfaces. On the other hand, if you have a forensic workstation in your lab, chances are good that you have just about every interface type attached to it.
If you're using equipment that connects to the forensic workstation by using the USB port, see the Technical Stuff paragraph at the end of this step list.
Tip
Check your write block equipment monthly to ensure that it's still working correctly. Document your maintenance checks in a log, if possible.
Use your forensic software.
After all your connections are secure and the media is connected correctly, open your forensic software and follow its instructions to acquire an image or make a transfer.
Disconnect the media.
The image is transferred, and all the integrity checks indicate perfection, so now you have to disconnect the media and put it in a secure storage facility. Be sure to save the image file or data transfer before you disconnect.
Tip
Always turn off the suspect media device power source before you begin to disconnect data cables. Unless you have a hot swappable device, pulling cables while electricity is still running can damage either the media or your equipment.
Make a working copy.
If you have made an image file, all you have to do is copy the file and run the integrity checks to ensure that no changes have been made. If you created a duplicate disc, the process is the same as before except that the copy is now in the place of the original.
Note
In some instances, you use equipment that connects to the forensic workstation by using the USB port. When you use it, you must write-block it. You can use Windows XP with Service Pack 2 or Vista for this task by changing these Registry settings:
Back up your Registry by using a restore point or the Export function within the Registry Editor (RegEdit).
To open RegEdit:
Choose Start

In the dialog box that appears, type regedit and press Enter.
To save your Registry settings, choose File
Navigate to My Computer/HKEY_LOCAL_MACHINESYSTEMCurrentControlSetControl.
Right-click Control, and then choose New
Right-click StorageDevicePolicies and select DWORD. Name the value WriteProtect and press Enter.
Right-click WriteProtect and set the value to 1 to enable the write-protect feature.
Tip
To reverse this process, just put the value 0 in the WriteProtect value instead of 1. To automate this process, choose File
Because digital data is extremely easy to change, court systems have demanded a way to ensure that the data doesn't change after it's acquired and analyzed. For this purpose, several methods are used to prove conclusively the integrity of the potential evidence after it's in the hands of investigators.
The primary method used by all major forensic software packages to accomplish this integrity check is the use of a checksum, which is simply a method of performing a calculation on the entire original suspect data to generate a sum. When the data is transferred to the forensic computer, the same operation is performed on the data in its new home, and if the calculated sum is the same, the assumption is that the data hasn't changed. Not just any algorithm can be used for this type of operation because some checksum algorithms are easy to "fake out" or bypass.
The key to a good hash value is to use cryptographic hashing — an algorithm that can be used in only one direction. In other words, there's no way to reverse-engineer the original data stream based on the computed value. Cryptographic hash algorithms are designed to run an algorithm on an input block of data and then produce a fixed-length sequence of characters. Theoretically, the chances of two different input values having the same output value are in the range of 265 (which equates to a number with lots of zeros behind it).
As of this writing, the two most popular cryptographic hash algorithms have some security issues that can be exploited, but the statistical probabilities of this happening are so small that the insecurities are considered an acceptable risk. As computing power increases, the probability that these insecurities will be exploited increases.
Cryptographic algorithms you commonly use for now (new algorithms are always in development) are described in this list:
Message-Digest algorithm 5 (MD5): The most commonly used cryptographic hashing since approximately 1991. It has been shown to have a flaw in its design, but because no other hash has been shown to be flawless, MD5 is still actively used.
Secure Hash Algorithm (SHA): Developed by the National Security Agency (NSA) as a family of cryptographic hash algorithms to replace the MD5 hash. SHA is in fact slightly more secure than the MD5, although a flaw has been discovered in the SHA-1 algorithm family. Increasingly more forensic investigators are migrating to this standard because of its increased security over MD5.
To see how this process works, a hash value is generated from the input of a block of data, and a sequence of characters is generated that's unique to that input string. Suppose that you make a slight change in the letter case of the first letter of each word in the phrase computer forensics:
MD5 Hash: ("Computer Forensics") = 7e48ea010d29aa81311d0fa10afa9ea4
MD5 Hash: ("computer forensics") = 982952ca09c9f9a6e11f0db4ed4c1b39
The hash values are dramatically different after a change only in the upper- to lowercase values of the input string! Even though only two bytes (not a bit) have changed, the hash value output is obviously different.
Tip
From a purely practical point of view, if your hash values match, there's no way that the data could have been modified in the normal course of your investigation.
Sometimes the hash values don't match, for technical reasons that you must articulate to a judge. The two most common reasons are described in this list:
The acquisition media you're extracting data from begins to fail. Usually, the problem is that your software has taken a hash value from the original media and because the software cannot copy the data correctly because of physical errors on the media, the software generates a different hash value. In this scenario, you have to prove that the original media is failing to prove the discrepancy.
You're using faulty transfer equipment. The original media may be stable, and the target media may be stable, but the transfer media, such as write protect devices or wiring, may be failing. (This reason is much less common than the one described in the first bullet.) The equipment may introduce errors in the transfer and change your hash value by default.
These causes of mismatched hash values aren't common, but you need to be aware of them in case you encounter these situations. The basic idea used in making most bitstream copies is to generate a checksum report on the source media that is then used as a comparison against the data after it is copied to the destination. Here's how a checksum works in practice:
The software applies an algorithm to the original media and generates a sum.
You transfer the data, and the software generates a sum for the transferred data.
The software program compares the original sum with the calculated sum to ensure that they match.
If the two sums match, the assumption is that the data wasn't altered in any way. If the sums don't match, you know with mathematical certainty that the data changed during the transfer and that the potential evidence therefore was also damaged or changed during transfer.
As with other operations in the computer forensic world, this one appears to be simple, but the exception to matching checksums will always occur when you're working with live operating systems, such as those found in mobile phones, or with mobile computing devices, such as PDAs. The original data can change by the second because the time function creates a new checksum literally every second. In most of these special cases, courts have allowed some leeway, but be aware that a smart attorney can always argue that the checksums are different and convince the judge and jury the evidence is tainted unless you can explain the reasons why the checksums are different. If you have no plausible argument to counter that argument, your case may just sink.
In an earlier section, you read that making a copy of your forensic copy is a deal breaker in computer forensics if not done. The reason for this is quite simply that you want a working forensic copy of the evidence in case there catastrophe occurs. If you accidentally destroy your first copy without having a working copy, you would have to access the original media and then run the risk of contaminating original evidence.
To make this duplicate, use the forensic software to duplicate your first forensic copy as though the first copy were the original evidence. This strategy serves two purposes:
A hash value is computed for comparison.
The computer forensic software probably saved the first copy in a proprietary format, and the computer forensic software can read its own proprietary file to make the copy correctly.
From this point forward, all you do is use the working copy to do your analysis.