

Generating Alpha with Keyers and Mattes
Alpha channels, which provide transparency information for After Effects layers, are an important part of the compositing process. Although source files may carry their own alpha channels, as may be the case with 3D renders and Photoshop artwork, other source files may lack alpha completely. For example, video footage, whether it arrives in the form of a self-contained movie or as an image sequence, carries no transparency information. This becomes problematic if a nonalpha layer needs only partially occluded lower layers.
As a solution, you can create alpha information in After Effects by borrowing values from other channels, such as red, green, or blue. This practice is most commonly applied through chroma key tools. Chroma keyers target specific colors, such as the green in a green screen (Figure 2.1). You can also generate alpha information by creating custom alpha mattes. A matte may take the form of a rotoscope shape or manipulated values from a specific channel, such as luma.
This chapter includes the following critical information:
• Application of common keyers
• Improvement of alpha matte edges
• Creating custom luma mattes and activating Track Matte

FIG 2.1 A green screen setup on a stage. Photo © Steve Lovegrove / Dollar Photo Club.
Generating Alpha with Chroma Key Techniques
Chroma key is a compositing process that layers multiple pieces of footage by targeting and removing a specific color. The technique was first developed during the early stages of motion picture production, at which time the visual effects were created through optical printing techniques. The process has survived to this day and remains in common use for live television broadcast, studio photography and videography, and postproduction visual effects work. Early chroma key relied on the color blue and blue screen backdrops. Green screen has since become more widely used due the technical traits of digital video (see Figure 2.1). As a technique, chroma key can target any color. Hence, you can apply the approaches discussed in this chapter to a red backdrop, an orange sunset sky, and so on. Nevertheless, for the ease of discussion, I will refer to green screen as a general term for a chroma key backdrop. Chroma key tools are generally referred to as keyers whereby you key a shot or piece of footage. When discussing keying, the green screen is referred to as the background, while the non–green screen area (the part that is to be saved) is referred to as the foreground. In terms of color theory, chroma refers to the colorfulness of a color relative to what is perceived as white. Colorfulness is the degree of difference between a color and gray. Saturation is the intensity (brightness) of a particular color.
After Effects provides several different keyers, each with its own set of unique advantages and disadvantages. Although there is not sufficient space to cover every option of every keyer, we’ll cover the most critical and most useful keyer components. The keyers are located in the Effect > Keying menu.
The Foundry’s Keylight is the most advanced keyer that is provided with After Effects. Assuming that the green screen is properly set up, you can follow these basic steps to quickly key out the green:
1. Apply the Keylight effects to the layer that carries the green screen footage (Effect > Keying > Keylight 1.2). Go to the effect in the Effect Controls panel (Figure 2.2).

FIG 2.2 The Keylight 1.2 effect with default values with the Screen Matte section expanded.
2. Using the Screen Colour eyedropper, select a background color in the Composition view panel. For example, select the green of the green screen. Select a mid-tone color if the green screen is unevenly lit.
3. Switch the effect’s View menu to Combined Matte (Figure 2.3). The alpha matte is displayed in the Composition view. The goal is to make the white areas (the opaque part of the alpha) as white as possible and the black areas (the transparent part of the alpha) as black as possible.

FIG 2.3 The Combined Matte view of a green screen before adjustment.
4. Expand the Screen Matte section. Raise the Clip Black value until any gray left in the green screen area disappears. Be careful not to erode into any alpha edges you want to maintain, such as those around a person’s hair. Any pixel value lower than the Clip Black value is given a 0 value (100 percent transparent). Lower the Clip White value until the gray areas within the opaque white disappear (Figure 2.4). Again, be careful not to erode any desired edge. Any pixel value higher than the Clip White value is given a maximum value in the current color space (e.g. 255 in 8-bit space, equating to 100 percent opaqueness).

FIG 2.4 Clip Black and Clip White are adjusted so that the whites are more white and the blacks are more black.
5. After the adjustments in step 4 are satisfactory, return the View menu to Final Result. You can continue to adjust Keylight settings in the Final Result view. To determine how well the green screen removal is working, temporarily place a brightly colored Solid layer below the green screen layer. You can create a Solid by choosing Layer > New > Solid.
These few steps work in many green screen situations. However, green screen setups often suffer from imperfect conditions and thus make the process more difficult. For a review of potential problems and possible solutions using Keylight, see the next two sections.
Keylight mini-tutorial
Using the recommendations in the prior section, “Using Keylight,” remove the green screen in the shot illustrated by Figure 2.5. The shot is saved as mini_greenscreen.aep in the ProjectFilesaeFilesChapter2 directory.
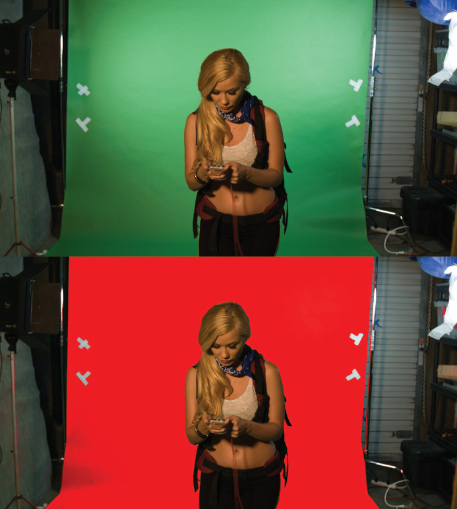
FIG 2.5 Top: Raw plate. Bottom: Plate with Keylight keyer applied. A red solid sits at a lower layer in order to gauge the success of the keyer.
Note that the motion tracking marks at the edge of the set must be removed by creating a garbage mask (a hand-drawn matte that removes unwanted elements). Garbage masks and their counterparts, holdout masks, are demonstrated in the next chapter. In addition, a slight noise may remain along the bottom left and bottom right of the green screen. Leaving this noise may be necessary to maintain a slightly soft edge around the actress and to prevent excess erosion of the matte edge. You can remove the noise with a garbage mask so long as the noise does not appear directly behind the actress.
A finished version of this shot, with an adjusted Keylight effect, is saved as mini_keylight_finished.aep. The finished version uses the following settings:
• Screen Colour = Mid-tone green (73, 154, 87 in 0-255 RGB)
• Clip Black = 30
• Clip White = 83
• Replace Method = Source
Note that the Replace Method property is discussed in the section “Working with Spill in Keylight” later in this chapter.
Working with Imperfect Green Screen
A visual effects compositor rarely receives footage with a perfect green screen setup. The most common problem is the presence of undesirable and unkeyable objects. These may include:
• Film, video, or stage equipment, including lights, flags, stands, and rigging
• The edge of the set or location where the green screen stops short
• Crew members operating practical effects, puppets, and the like
In this situation, you can rotoscope or otherwise create a garbage mask or holdout mask to remove the unwanted objects. Rotoscoping and masks are addressed in detail in Chapter 3.
Some artifacts or features within a piece of footage may prevent keyers from creating a clean alpha channel. These include the following:
• Heavy video noise or film grain
• Shadows falling across the green screen
• Significantly uneven lighting
• Heavy motion blur created by moving subjects
• Green screen that appears as part of a reflection
• Wrinkles in green screen fabric or irregularities in green screen paint
• Heavy green spill caused by subjects sitting too close to the green screen
• Motion tracking marks placed directly on the green screen backdrop
• Very small or thin detail in front of the green screen (e.g. hair, wires, threads, or fur)
As an example, Figure 2.6 features a green screen setup that suffers from shadows, wrinkles, tracking marks, and very fine hair. This green screen is the subject of the tutorial at the end of this chapter.

FIG 2.6 A challenging green screen.
Working with one or more of these artifacts may require the adjustment of additional keyer options, the creation of custom mattes, rotoscoping or masking, or the breakdown of the green screen footage into multiple layers. Custom mattes are discussed later in this chapter. The breakdown of footage is explored in Chapter 3.
Applying Additional Keylight Properties
The Keylight effect provides a number of properties that you can adjust when tackling difficult green screen footage. These are detailed in this section. (See Figure 2.2 earlier in this chapter for the location of properties.)
Screen Pre-Blur averages the pixel values before attempting to key the Screen Colour. This may create a more successful result if the footage has heavy noise or grain. The property also has the effect of simplifying the alpha matte edge. See Chapter 9 for a more detailed look at noise and grain.
Screen Gain and Screen Balance
Screen Gain determines the aggressiveness with which the background color, as defined by Screen Colour, is removed from the resulting matte. The higher the value, the more aggressive the removal. It may not be necessary to change this property from its default value of 100. Adjusting Clip Black and Clip White often produces better results. Nevertheless, the adjustment of Screen Gain may aid in the removal of fine noise in the alpha. Screen Balance, on the other hand, interprets the saturation of the targeted Screen Colour by comparing the strongest color component (such as green) to the remaining two components (such as red and blue). Shifting the property toward 100 causes the saturation to be compared to the least intense of the remaining components. A value shifted toward 0 causes the saturation to be compared to the most intense of the remaining components. The default of 50 causes both remaining components to be equally weighted. It may not be necessary to change this property from its default value of 50. Changes to the Screen Balance value generally produce subtle variations in the matte.
Clip Rollback, Screen Shrink/Grow, and Screen Softness
These properties erode or expand the alpha matte (see Figure 2.7). That is, they either erode into the opaque area or expand the opaque area. Clip Rollback restores information to the alpha edge that may have been lost through the adjustment of other properties. This may be useful for restoring a slight edge transparency and softness that was otherwise lost. Note that high Clip Rollback values may introduce banding along semitransparent edges.

FIG 2.7 Left: Close-up of alpha matte edge. Gray pixels are semitransparent. Right: Same edge with Clip Rollback set to 1.0. The area of semitransparency is expanded, thereby softening the edge.
Screen Shrink/Grow fulfills its name by eroding or expanding while roughly maintaining the current degree of semitransparency along the alpha edge. Small negative values may be useful for eroding away unwanted dark lines that appear along the edge in the RGB channels. (The lines may result from the Replace Method property, which is discussed in the “Suppressing Spill” section later in this chapter.)
Screen Despot Black and Screen Despot White
The Despot properties simplify the resulting matte. This aids in the removal of noisy spots that other properties are unable to remove. Use caution when adjusting these, however, as high values will overly smooth alpha edges. This may result in unrealistic edges. For example, dips or holes may cut into a person’s hands, hair, or neck. Screen Despot Black attacks isolated spots of black within the white, opaque areas. Screen Despot White does the opposite.
There are a number of third-party plug-ins you can use to key green screen footage. In particular, Primatte Keyer, released by Red Giant Software, has enjoyed a long history of success. Primatte’s main advantage is its semiautomated, interactive workflow. The following mini-tutorial steps you through the Primatte keying process. You can download a trial version of Primatte Keyer at www.redgiant.com/products/all/primatte-keyer/.
Primatte mini-tutorial
The following steps represent the general approach you can take with any green screen footage. For practice, apply these steps to the mini_greenscreen.aep project saved in the ProjectFilesaeFilesChapter2 directory.
1. Select the green screen layer and choose Effect > Primatte > Primatte Keyer. Go to the effect in the Effect Controls panel.
2. Click the Auto Compute button in the Keying section (Figure 2.8). Primatte automatically detects the background color and removes/reduces it. Alpha transparency automatically appears.
3. Change the View menu to Matte. If there is gray noise in the background area of the alpha, click the Select BG button and LMB-drag your mouse in the Composition view over the gray pixels. The drag path is indicated by a series of white dots. Primatte automatically targets the selected pixels and readjusts the alpha values. You can LMB-drag as many times as you like. You can also select a rectangular block of pixels by switching the Sampling Style menu to Rectangle.
4. If there is gray noise in the foreground area of the alpha, click the Clean FG button and LMB-drag your mouse over those pixels. Feel free to go back and forth between the Select BG tool and Select FG tool. Should you need to start from scratch, you can click the word Reset at the top of the Primatte effect.
5. After the alpha is sufficiently clean with white whites and black blacks, change the View menu to Comp. Zoom into the Viewer and examine the alpha edges and any green spill that may be present. To reduce green spill, click the Spill Sponge button, and LMB-drag your mouse of the spill area. The spill is instantly reduced. Make short selections with your mouse, else there is a danger of pulling too much background color out of the entire foreground. You can press Ctrl/Cmd + Z to undo the previous mouse sample. Feel free to place a new solid layer below the green screen layer to check the quality of the alpha matte.

FIG 2.8 The Primatte Keyer Keying section in its default state.
6. If any edge becomes too eroded or overly semitransparent, you can restore foreground pixel opacity by clicking the Matte Sponge button and LMB-dragging over the edge area. Use this option carefully, as it may add noise back into the previously transparent background. Feel free to switch the Sampling Style menu between Rectangle and Point to help make sampling more efficient.
7. If an edge is too hard and lacks appropriate semitransparency and softness, click the Restore Detail button and LMB-drag of the edge area. Use this option carefully, as it may add noise back into the previously opaque foreground. You can jump back to any of the buttons at any time.
8. To soften the matte edge slightly, raise the Defocus Matte value. To erode into the matte, raise the Shrink Matte value. You can fine-tune various components of the matte by expanding the Refinement subsection and choosing the Spill, Matte, or Detail buttons, each of which has a + (plus) and − (minus) variation (Figure 2.9). With these buttons, you can restore or remove the spill, foreground, or background values.

9. Much like Keylight, Primatte automatically removes and reduces the background color in the foreground area. By default, it replaces the background color with a complimentary color (on the opposite side of the RGB color wheel), as set by the Edge Color Replace menu. You can change the menu to Color, whereby the color set by Replacement Col property is added. You can change the menu to BG Defocus, which uses a blurred version of the layer listed by the BG Defocus Layer menu. You can set BG Defocus Layer to the green screen layer and thus have it add back original pixel values.
A finished version of this tutorial, with an adjusted Primatte effect, is saved as mini_primatte_finished.aep.
Difference keyers note differences between corresponding pixels across two layers or note differences in color distribution across one layer. These effects include Difference Matte and Color Difference Key.
The Difference Matte effect compares a source layer (the layer that has the effect applied to it) and a difference layer. Any corresponding pixel that does not match between the two layers is assigned opaque alpha. Any corresponding pixel that matches is assigned transparent alpha. For this effect to be successful, a clean plate should be provided. A clean plate is a version of the shot that lacks the foreground objects. For example, if the shot features an actor, the clean plate version leaves the actor out of the frame. A successful clean plate requires a locked-off camera (or a motion control camera that can precisely repeat the camera move each time). As an example, in Figure 2.10, an actress is separated from the background with a Difference Matte and a static clean plate. Although a solid matte is produced, the effect has difficulty interpreting RGB edge values—particularly when heavy film grain or video noise is present. Hence, green is trapped along the edges of the actress, requiring matte erosion that must be provided by another effect. (The erosion is demonstrated in the “Refining with Simple Choker and Matte Choker” section later in this chapter.)

FIG 2.10 Top: Clean plate. Middle: Plate with actress. Bottom: Resulting key. This project is saved as difference_matte.aep in the ProjectFilesaeFilesChapter2 directory.
To apply the effect, include the clean plate as part of the composition. You can hide the clean plate or place it below the lowest opaque layer. The clean plate can be a single frame. As for adjusting the effect settings, change the Difference Layer menu to the clean plate layer. Adjust the Matching Tolerance to make the pixel matching more or less accurate. If heavy grain or noise is present, consider raising the Blur Before Difference to soften the footage. You can also soften the matte by raising Matching Softness.
The Color Difference Key effect is unusual in that it creates two separate mattes and combines them into a final alpha matte. One matte, called Matte Partial B, is derived by targeting the background color. The second matte, called Matte Partial A, is derived by targeting a second, nonbackground color. Although the Color Difference Key is not as intuitive as Keylight or Primatte, it can produce clean alpha channels with difficult, semitransparent foregrounds, such as those with smoke or thin cloth. For an application of the effect, see the following mini-tutorial.
Color difference key mini-tutorial
The following steps represent the general approach you can take with the Color Difference Key effect. For practice, apply these steps to the mini_smoke.aep project saved in the ProjectFilesaeFilesChapter2 directory.
1. Select the green screen layer and choose Effect > Keying > Color Difference Key. Go to the effect in the Effect Controls panel.
2. Using the Key Color eyedropper, select the green background color. Matte Partial A and Matte Partial B are created. You can view a thumbnail of the mattes by clicking the A and B buttons at the top right of the effect section (the thumbnail appears in the top right box). You can view a thumbnail of the final, combined matte by clicking the a button (Figure 2.11). Change the View menu to Matte Corrected to display the combined matte in the Composition view.
3. Click the middle, Black eyedropper button and LMB-click a gray area of the background in the Composition view. You can reapply the Black eyedropper and resample multiple times to update the matte. When the background area is relatively free of gray pixels, click the bottom White eyedropper button. LMB-click a gray area of the foreground in the Composition view. You can reapply the White eyedropper and resample multiple times. You can go back and forth between the Black and White eyedroppers.
4. To fine-tune the result, you can adjust the various sliders. The sliders are broken into In White, In Black, Out White, Out Black, and Gamma sets for Partial A and Partial B mattes, plus the final output matte, labeled Matte. The In sliders determine what values are used by the effect. Values below the In Black values are ignored. Values above the In White values are ignored. The Out sliders determine the maximum range of values output by the effect. For example, if Partial A Out White is set to 175, no values above 175 are output for Matte Partial A. Ultimately, the best way to produce a quality matte is to experiment with all the sliders. When you are satisfied with the matte, return the View menu to Final Output. You can improve the quality of the effect by changing the Color Matching Accuracy menu to More Accurate.

FIG 2.11 An adjusted Color Difference Key separates smoke from a green background.
Note that the Color Difference Key has the tendency to create posterization (color banding) when the project is set to 8-bit. Thus, it’s recommended that you set the project to 16-bit by choosing File > Project Settings and changing the Depth menu in the Project Settings window to 16 Bits Per Channel. For more information on color spaces, see Chapter 1. A finished version of this tutorial, with an adjusted Color Difference Key effect, is saved as mini_difference_finished.aep.
Range keyers convert color ranges to transparency information. These effects include Color Range and Linear Color Key.
The Color Range effect creates transparency by targeting a range of colors in RGB, YUV, or Lab color space. The effect provides a means to generate a luma (luminance) matte through the L (lightness) channel of Lab color space or the Y (luma) channel of YUV color space. (The a and b channels of Lab and U and V channels of YUV encode the color components.) The Color Range effect includes interactive eyedroppers to refine the matte. For an application of the effect, see the following mini-tutorial.
The following steps represent the general the general workflow required by the Color Range effect. For practice, apply these steps to the mini_green screen.aep project saved in the ProjectFilesaeFilesChapter2 directory.
1. Apply the Color Range effect (Effect > Keying > Color Range) to the green screen layer. Select the background color with the Color Key eyedropper (the top eyedropper button). The alpha matte is updated with transparency. A thumbnail of the matte appears beside the eyedropper buttons (Figure 2.12).

FIG 2.12 The adjusted Color Range effect. The thumbnail of the resulting alpha matte appears beside the eyedropper buttons.
2. Using the + eyedropper, sample additional areas to which you wish to add transparency. For example, click darker areas of the green screen. You can click in the matte thumbnail or click within the Composition view panel. You can apply the eyedropper multiple times.
3. Optionally, use the – eyedropper to sample areas to which you wish to return opaqueness. Fine-tune the results by adjusting the Min and Max sliders. The sliders are divided into first, second, and third channels. If you are working in Lab, the first two sliders set the range for the L channel, the middle two sliders set the range for the a channel, and the final two sliders set the range for the b channel.
A finished version of this project is saved as mini_range_finished.aep in the ProjectFilesaeFilesChapter2 directory. For more information on luma mattes, see the “Creating a Custom Luma Matte” later in this chapter.
The Linear Color Key effect utilizes a range of colors to create transparency. The targeted background color is established by the Key Color swatch. The size of the color range is established by the Matching Tolerance property. If the Matching Tolerance is 0 percent, only the exact color set by Key Color is keyed. The larger the percentage, the wider the range of similar colors is keyed. The effect also provides Color Key, +, and − eyedroppers for interactive adjustment of the resulting matte. As a working example, in Figure 2.13, Linear Color Key is used to quickly remove a blue sky.

FIG 2.13 The Linear Color Key effect is used to remove a blue sky. This project is saved as linear_color.aep in the ProjectFilesaeFilesChapter2 directory.
In general, the Linear Color Key effect is best suited for footage that contains little spill or has background with colors that are distinct from the foreground. In addition, the effect may be useful for targeting a secondary color ignored by a primary keyer, such as Keylight. For example, you can use the Linear Color Key effect to remove motion-tracking tape marks placed on a green screen.
Spill is the unwanted appearance of the chroma key color within a foreground subject that needs to remain opaque. Green spill is common with green screen when the person sits or stands too close to the green screen backdrop. Spill often appears in hair (particularly light-colored hair), within skin tone, and within clothing.
Working with Spill in Keylight
The Keylight effect provides an integrated method for removing or diminishing spill. When the effect targets the background color as defined by the Screen Colour, it turns the corresponding alpha pixels transparent or semitransparent. At the same time, it reduces the presence of the background color within RGB. The color is not completely removed; that is, the green channel is not left with 0 values. However, the balance between red, green, and blue is shifted towards red and blue. You can control the type of shift by changing the Replace Method menu, in the Screen Matte section, to Source, Hard Colour, or Soft Colour (Figure 2.14). The Source option reintroduces the original RGB pixel values. If there is a heavy amount of spill in the footage, the spill reappears. If the spill is light, the Source option often creates good results. The Soft Colour option introduces a solid color, as defined by the Replace Colour swatch. Soft Colour attempts to retain the same luminance (brightness) of the original pixels. Hard Colour, in contrast, adds the Replace Colour color, but does not try to match the luminance.

FIG 2.14 Top: Replace Method set to Soft Colour. Replace Colour is set to default gray. This results in hair that is slightly darker and redder. Bottom: Replace Method is set to Source. The hair becomes light and retains a yellow-green balance. However, green spill is more visible along the top and right hair edge. This project is saved as mini_keylight_finished.aep in the ProjectFilesaeFilesChapter2 directory. Note that the saturation in this figure is exaggerated so that the color variations are visible in print.
Aside from properties carried by keying effects, After Effects supplies standalone spill suppression effects. These include Spill Suppressor and Advanced Spill Suppressor.
The Spill Suppressor effect targets the spill color through the Color To Suppress color swatch. You can set the swatch to the same color used by the keyer or select a color from the keyed layer in the Composition view panel via the eyedropper. The degree of suppression is controlled through the Suppression property. Spill Suppressor is located in the Effect > Keying menu in After Effects CC 2013.
After Effects CC 2014 and CC 2015 replace Spill Suppressor with the Advanced Spill Suppressor effect. If you set the effect’s Method menu to Standard, it detects the dominant background color and removes or reduces its presence. If you set the menu to Ultra, you have access to the following properties:
Key Color allows you select your own spill color.
Tolerance filters the background color out of the foreground areas. Adjusting this property may be useful for reducing spill within skin tone, although the result is often very subtle. The default value of 50 disables the property.
Spill Color Correction determines the saturation of colors that replace the spill color. If green spill is removed, the color balance in the spill areas shifts toward red and blue (producing purple). Thus, increasing the Spill Color Correction value produces a greater degree of saturated purple. Setting the value to 0 essentially turns the property off and the affected area appears gray.
Desaturate desaturates resulting colors within the image. This aids in the prevention of intense colors appearing in areas that are affected by spill. Higher values make the desaturation more aggressive. Very high values may desaturate the entire image. A value of 0 turns the desaturation off.
Luma Correction sets the intensity of spill-corrected pixels, with higher values making the spill areas brighter.
Spill Range sets the aggressiveness of the spill color removal, with higher values removing a greater degree of spill. Changes to this property are most noticeable when the Spill Color Correction value is high.
Figure 2.15 compares different spill removal approaches. The top image of the figure shows the original green screen plate. The second-from-the-top image shows the result of the Keylight effect with the Replace Method menu set to None; with this setting, the spill is not replaced and appears as blue-green trapped within the hair. The third-from-the-top image applies the Advanced Spill Suppressor with Spill Color Correction set to 100, thus inserting purple into the spill area. The bottom image also uses the Advanced Spill Suppressor effect with Desaturate set to 48, Spill Range set to 22, Spill Color Correction set to 5, and Luma Correction set to 17, leaving the hair closer to its original blonde coloration. This project is saved as spill_suppressor.aep in the ProjectFilesaeFilesChapter2 directory. Note that the saturation in this figure is exaggerated so that the color variations are visible in print.

FIG 2.15 A series of spill suppression steps.
Although chroma key tools are commonly used for visual effects compositing, there are many situations that the tools can’t address. For example, the footage might not contain green screen or an otherwise solid-colored backdrop. As such, it may be necessary to generate alpha mattes through other means. After Effects provides the Track Matte function and several channel effects for this reason.
If a composition has at least two layers, lower layers are given a Track Matte option menu. The menu appears under the TrkMat column. (If this is not visible, click the Toggle Switches/Modes button at the bottom of the layer outline.) Track Matte provides a means to borrow alpha information from the layer directly above the layer where Track Matte is activated. The layer above can remain hidden (which is usually desirable so it doesn’t occlude the Track Matte result).
If the Track Matte menu is set to Alpha Matte, the alpha information is transferred as is. If the menu is set to Alpha Inverted Matte, the alpha values are inverted and transferred. As an example, in Figures 2.16 and 2.17, the sides of the set are removed by setting the green screen layer’s Track Matte menu to Alpha Matte. The alpha is taken from the layer above, which is a scaled and positioned solid. The empty area surrounding the solid layer is considered transparent. Note that this Track Matte technique works in conjunction with a keyer, which removes the green screen.
You can also use Track Matte to generate a luma matte. A luma matte converts RGB brightness values to alpha values. (As a term, luma represents gamma-adjusted pixel brightness in digital video systems.) If the Track Matte menu is set to Luma Matte, a grayscale version of the layer directly above is transferred to the alpha channel of the layer where Track Matte is activated. The values are inverted if the menu is set to Luma Inverted Matte.
You can create your own luma matte by moving values between channels. As discussed in Chapter 1, a channel carries pixel brightness values, whether that channel is a color channel or an alpha channel.
The Set Matte effect (Effect > Channel > Set Matte) allows you to transfer non-alpha-channel values from any layer within the composition to the alpha channel of the layer that carries the effect. To make this transfer, change the Take Matte From Layer to the layer that has the desired channel information. Change the Use For Matte menu to the channel you wish to use. As an example, in Figure 2.18, the red channel of a fireworks layer is transferred to the same fireworks layer as alpha information. Thus, the fireworks cut themselves out so they may be placed over a lower layer, which feature a city with an otherwise empty sky.
FIG 2.16 Top: A scaled solid sits on a top layer. Middle: A keyed green screen sits on the middle layer and a red solid sits on the lowest layer. Bottom: The middle layer Track Matte menu is set to Alpha Matte, which causes it to take alpha information from the top solid and thereby cut off the set edges. This project is saved as track_matte.aep in the ProjectFilesaeFilesChapter2 directory.

FIG 2.17 The three layers used for the Track Matte operation. The top solid is ultimately hidden by turning off the Video eye icon.

FIG 2.18 The Set Matte effect transfers the red channel values of a fireworks layer to the same layer’s alpha, allowing the fireworks to appear on top of a city layer. Fireworks photo © James Pintar/Dollar Photo Club. City photo © Simone Simone/Dollar Photo Club.
In addition, you can use the Set Channels effect (Effect > Channel > Set Channels) to generate a similar result. To make the transfer between channels, set the Source Layer 1, Source Layer 2, and Source Layer 3 menus to the layer that has the RGB information you wish to keep. Change the Source Layer 4 menu to the layer that will provide the luma values. Change the Set Alpha To Source 4’s menu to Alpha. The Set Channels effect also provides a means to transfer values between color channels to create stylistic results; for example, you can change the Set Color To Source Number menus to mismatching colors.
Alpha matte edges resulting from the application of a chroma key tool or luma matte may not be ideal. Hence, After Effects provides several effects designed to alter and refine matte edges. You can find these in the Effect > Matte menu. Any tool that erodes a matte edge is commonly referred to as a choker.
Refining with Simple Choker and Matte Choker
The Simple Choker effect provides a single slider, Choke Matte, to erode or expand the matte. Negative values erode while positive values expand. The effect tends to tighten the tapered, semitransparent region of soft matte edge.
The Matte Choker effect provides two “chokers” within one tool. Each choker is provided with three controls: Geometric Softness, Choke, and Gray Level Softness. Geometric Softness specifies the maximum pixel width of the semitransparent edge taper, as created by the effect. Choke sets the size of the matte erosion (positive values) or matte expansion (negative values). Gray Level Softness sets the edge softness, with a value of 0 percent creating a hard edge with no semitransparent pixels and 100 percent creating the maximum softness available based on the other two settings. Note that it is not necessary to use both chokers—choker 2 is off by default as the Choke 2 property is set to 0. As a demonstration, in Figure 2.19 a keyed alpha edge is improved with the Matte Choker effect.

FIG 2.19 Left: Close-up of a keyed green screen that carries a hard edge with green spill. Right: The Matte Choker effect refines the edge through erosion and softening. This project is saved as matte_choker.aep in the ProjectFilesaeFilesChapter2 directory.
Using Refine Soft Matte
The Refine Soft Matte effect offers a significant improvement over the older Simple Choker and Matte Choker effects. In particular, the effect is able to maintain subtle edge semitransparency around small details such as loose hairs. In addition, the effect maintains proper motion blur on fast-moving objects, something that standard keyers are unable to fully address. The improvement is achieved by tapering the edge transparency while remaining sensitive to small foreground detail that should otherwise remain more opaque.
You can alter the size of the semitransparent edge by adjusting the Additional Edge Radius value. You can visualize this edge area by selecting the View Edge Region check box. The region is colored yellow. Higher Additional Edge Radius values have the tendency to fill in otherwise desirable holes, so a default value of 0 often creates the best quality. You can further fine-tune the result by adjusting the Smooth, Feather, Contrast, and Shift Edge sliders, which control their namesakes.
As mentioned, the effect is able to maintain semitransparency created by motion blur trails (Figure 2.20). You can artificially increase the softness of these trails by selecting the More Motion Blur check box. Much like other keyers, Refine Soft Matte attempts to remove or reduce the detected background color. This is controlled by the Decontaminate Edge Colors check box. You can adjust the aggressiveness of the background color reduction by adjusting the Decontamination Amount slider.

FIG 2.20 Left: A plate with a large amount of motion blur is keyed with Keylight, producing dark edges in the blur areas. Right: The Refine Soft Matte effect is applied with More Motion Blur selected, eroding the dark lines while maintaining semitransparent motion blur streaks. The blue background is added as a solid on a lower layer. This project is saved as refine_soft_matte.aep in the ProjectFilesaeFilesChapter2 directory.
Note that Refine Soft Matte is particularly sensitive to the image fed to it. For example, a noisy key can cause the effect to perform poorly. In addition, unpremultiplied pixels can create harsh edges. The premultiplication process multiplies alpha values by RGB values for the sake of mathematical efficiency. Unpremultiplication does the opposite. By default, Keylight unpremultiplies its output. Hence, to create clean alpha with Keylight and Refine Soft Matte effects, deselect Keylight’s Unpremultiply Result check box. Refine Soft Matte is also prone to jittering over time. Hence, the effect includes the Chatter Reduction and Reduce Chatter properties. These properties are explored further in the tutorial at the end of this chapter.
Despite the similarity in names and properties, the underlying algorithms used by the Refine Soft Matte and Refine Hard Matte effects vary. The most significant difference is that Refine Hard Matte lacks the ability to examine foreground edge detail or expand the semitransparent matte edge. As such, Refine Hard Matte does not carry the Calculate Edge Details, Additional Edge Radius, View Edge Region, and More Motion Blur properties. Of the two effects, Refine Soft Matte generally produces superior results.
Chapter Tutorial: Keying a Difficult Green Screen, Part 1
As discussed in this chapter, green screen plates are rarely perfect. Limitations of time and money may cause the plate to carry such imperfections as uneven lighting, shadows, wrinkles, and visible tracking marks. For this tutorial, we’ll work with a green screen plate that has all those problems (see Figure 2.6 earlier in this chapter). By the end, we’ll produce a clean key.
1. Start with a new project in After Effects. Choose File > Import > File. Browse to the ProjectFilesPlatesGreenscreen1_3f_2sing directory. Select the first frame of the PNG image sequence. Make sure that PNG Sequence remains selected near the bottom right of the Import File window. Click the Import button.
2. The image sequence is brought into the Project panel as a single unit. With the sequence selected, check the thumbnail at the top of the Project panel. The desired frame rate is 24 fps. If a different frame rate is listed, RMB-click over the sequence and choose Interpret Footage > Main. In the Interpret Footage window, change the Assume This Frame Rate field to 24 and click the OK button to close the window.
3. LMB-drag the footage into the empty timeline. A new composition is automatically created that carries the same resolution, frame rate, and duration as the image sequence. This sequence is 1920x1080 with a duration of 72 frames. To rename the composition, RMB-click the composition in the Project panel and choose Rename. You can type a new name over the old one and press the Enter key to finalize it.
4. With the new layer selected, choose Effect > Keying > Keylight 1.2. Go to the Effect Controls panel. (If the panel is missing, choose Window > Effect Controls.) Using the Screen Colour eyedropper, select the green of the green screen in the Composition view panel. Select a mid-tone. For example, with the eyedropper active, click a green area near the left arm of the actress. The alpha matte is automatically generated.
5. Although the matte appears fairly clean, there is noise created by the wrinkles in the green screen fabric, shadows, and uneven lighting. To see this, change Keylight’s View menu to Combined Matte (Figure 2.21).
6. Expand Keylight’s Screen Matte section. Slowly raise Clip Black and note the results. With a value of 33, Clip Black removes the noise from the background area. However, the fine hair is slightly eroded. Slowly lower the Clip White value and note the result. At a value of 72, Clip White returns opaqueness to the majority of the foreground (the actress). The hair is slightly restored. If you lower the Clip White slider further, any remaining black and gray pixels disappear in the foreground; however, the hair becomes hard-edged.

7. Return the View menu to Final Result. Skip across the timeline to look at several frames. Zoom into the edges and examine them. The edge along the hair remains rough. Some hairs are broken into multiple parts. In addition, the hair along the edges is somewhat gray and colorless. The gray is inserted by the Replace Method menu, which is set to Soft Colour by default. Change the Replace Method menu to Source, which adds back the original pixel values. Green spill reappears (Figure 2.22). Change the Replace Method menu to None. This deactivates the color replacement and significantly affects the alpha edge. The fine hairs reappear. Return the View menu to Combined Matte. Note that the restored area is mostly semitransparent. To see how this affects the layer, return View to Final Result and place a new solid at the bottom of the layer outline. You can create a new solid by choosing Layer > New > Solid. For example, if an orange solid is placed below the green screen layer, the outer fine hairs appear bright and glowy (Figure 2.23).

FIG 2.22 Left: Replace Method is set to Source, which reintroduces the green spill. Right: Replace Method is set to None, which creates bright outer hairs when the layer is placed over a second layer, such as an orange solid.
8. Return Replace Method to Source. We’ll remove the green spill through the use of Refine Soft Matte. In anticipation of this, deselect the Unpremultiply Result check box (below the View menu). The hair edge temporarily gains a dark line. Choose Effect > Matte > Refine Soft Matte. The hair edge becomes softer. However, some areas of the hair remain blurry. Reduce the Additional Edge Radius to 0.5 to remove the blurred areas but retain some of the finer hairs.
9. The spill removal function of Refine Soft Matte causes the hair edge to become more blue-green. Return to Keylight and change the Replace Method menu to Soft Colour. Change the Replace Colour swatch to dark red (RGB values 22, 13, 7). You can use the Replace Colour eyedropper to sample a dark area of the hair. The spill area shifts slightly toward red, thus reducing the amount of blue-green (Figure 2.23).

FIG 2.23 The spill area of the hair is shifted from the blue-green produced by Refine Soft Matte toward a more neutral, slightly reddish color by changing Keylight’s Replace Method to Soft Colour and Replace Colour to dark red.
10. To judge the quality of the key over time, play back the timeline. The Refine Soft Matte effect causes some areas of the hair to jitter and bubble. To reduce these artifacts, deselect Calculate Edge Details. This prevents the effect from reconstructing small edge detail. Although this causes the loss of some fine hairs, the resulting key stays more consistent. Reduce the Decontamination Amount to 50 percent. This reduces the aggressiveness of the spill removal along the edges, making the colors more consistent over time. Change the Chatter Reduction menu to More Detailed and Reduce Chatter to 100 percent. These properties specifically target inconsistent edge interpretation over time. Play back the timeline again. The hair is more stable.
11. The steps thus far have failed to address the tracking tape marks and the edge of the set that appears on screen left. In addition, Refine Soft Matte effect creates a gray smudged area at the top left (Figure 2.24). Rotoscoping offers means to solve these problems. In addition, rotoscoping can provide a way to refine any edge quality that we are not completely satisfied with. Hence, we’ll return to this tutorial in Chapter 3. The project, at this juncture, is saved as tutorial_2_1.aep in the ProjectFilesaeFilesChapter2 directory.

FIG 2.24 The key at the end of Part 1, as seen on frame 6.