
Chapter 6. Configuring Cassandra
In this chapter, we look at how to configure Cassandra. We walk through creating keyspaces, setting up replication, and using a proper replica placement strategy.
Cassandra works out of the box with no configuration at all; you can simply download and decompress, and then execute the program to start the server with its default configuration.
We will focus on aspects of Cassandra that affect node behavior in a cluster, performance, and meta-operations such as replication, partitioning, and snitches. Performance tuning is considered a separate topic and gets its own treatment in Chapter 11.
Note
Cassandra development is moving quickly, and there have been many inveterate changes. I’ve tried my best to keep up with them here.
Keyspaces
Keyspaces used to be defined statically in an XML configuration file, but as of 0.7, you can use the API to create keyspaces and column families.
In Cassandra version 0.6 and prior, configuration for your cluster and column families was stored in a file called storage-conf.xml. Then there was a transitional conversion from XML to YAML, so you will see references to storage-conf.xml and cassandra.yaml. But version 0.7 introduced dynamic loading, so all creation and modification of keyspace and column family definition is done through the Thrift API or the command-line interface (CLI).
Starting with version 0.7 of Cassandra, you can use API operations
to make changes to your schemas,
much like you would in SQL by issuing Data Definition Language (DDL)
statements, such as CREATE TABLE or ALTER
TABLE.
Once your schema has been loaded into the system keyspace (Cassandra’s internal keyspace for cluster metadata), any changes to your schema must be done using the Thrift interface. These methods are all prefixed with “system”, presumably in order to remind you that they are highly impactful schema modification operations that modify the system keyspace:
system_add_keyspacesystem_rename_keyspaceChanges the name of a keyspace after taking a snapshot of it. Note that this method blocks until its work is done.
system_drop_keyspacesystem_add_column_familysystem_drop_column_familysystem_rename_column_familyChanges the name of a column family after taking a snapshot of it. Note that this method blocks until its work is done.
For example, to create a new keyspace using the CLI in 0.7, you can launch the command-line client as shown here:
[default@unknown] connect 127.0.0.1/9160
Connected to: "Test Cluster" on 127.0.0.1/9160
[default@unknown] create keyspace Test1 with replication_factor=0
610d06ed-a8d8-11df-93db-e700f669bcfc
[default@unknown] describe keyspace Test1
Keyspace: Test1
The convention default@unknown is similar to
MySQL, where the authenticated username (if one is required) and the
keyspace name you’re currently using act as the prompt. So we can switch
to a different keyspace using the use keyspace command:
use <keyspace> [<username> 'password']
Now that we’ve switched to our new keyspace on the CLI, we can add a column family to it:
[default@Test1] create column family MyCF
4105a82f-ad51-11df-93db-e700f669bcfc
You can specify additional settings as you like when creating the
keyspace or column family using the with flag, and more
settings using the and flag:
[default@MyKeyspace] create keyspace NewKs with replication_factor=1
There are other keyspace-related CLI commands you can invoke as necessary:
drop keyspace <keyspace>
drop column family <cf>
rename keyspace <keyspace> <keyspace_new_name>
rename column family <cf> <new_name>
It’s also possible to use the API to do this, as shown in Example 6-1.
package com.cassandraguide.config;

import java.util.ArrayList;
import java.util.List;

import org.apache.cassandra.thrift.Cassandra;
import org.apache.cassandra.thrift.CfDef;
import org.apache.cassandra.thrift.KsDef;
import org.apache.thrift.protocol.TBinaryProtocol;
import org.apache.thrift.protocol.TProtocol;
import org.apache.thrift.transport.TFramedTransport;
import org.apache.thrift.transport.TSocket;
import org.apache.thrift.transport.TTransport;

public class ConfigAPI {

	private static final String HOST = "localhost";
	private static final int PORT = 9160;

	/**
	 * Creates a new keyspace and CF.
	 */
	public static void main(String... args) throws Exception {

		String keyspaceName = "DynamicKeyspace";
		System.out.println("Creating new keyspace: "+ keyspaceName);

		//Create Keyspace
		KsDef k = new KsDef();
		k.setName(keyspaceName);
		k.setReplication_factor(1);
        k.setStrategy_class("org.apache.cassandra.locator.RackUnawareStrategy");

        List<CfDef> cfDefs = new ArrayList<CfDef>();
        k.setCf_defs(cfDefs);

        //Connect to Server
        TTransport tr = new TSocket(HOST, PORT);
        TFramedTransport tf = new TFramedTransport(tr);
        TProtocol proto = new TBinaryProtocol(tf);
        Cassandra.Client client = new Cassandra.Client(proto);
        tr.open();

        //Add the new keyspace
        client.system_add_keyspace(k);
        System.out.println("Added keyspace: "+ keyspaceName);

	}
}
So all you need to do to create a new keyspace is give it a name, a
replica placement strategy (see Replica Placement Strategies), and a replication factor,
then define any column families you want that keyspace to hold, and you’re
set. Now you are ready to start inserting values into your new
MyCF column family.
Note
Cassandra will provide the default replication strategy if you don’t name one; I’m just trying to be explicit in this example to show the syntax.
Creating a Column Family
To create a column family, you also use the CLI or the API. Here are the options available when creating a column family:
column_typeclock_typecomparatorValid options include
AsciiType,BytesType,LexicalUUIDType,LongType,TimeUUIDType, andUTF8Type.subcomparatorName of comparator used for subcolumns when the
column_typeisSuper. Valid options are the same as comparator.reconcilerName of the class that will reconcile conflicting column versions. The only valid value at this time is
Timestamp.commentrows_cachedpreload_row_cachekey_cache_sizeread_repair_chance
Here’s an example:
[default@Keyspace1] create column family MyRadCF with
column_type='Standard' and comparator='UTF8Type' and rows_cached=40000
3ae948aa-ae14-11df-a254-e700f669bcfc
Transitioning from 0.6 to 0.7
The cassandra.yaml file in the
conf directory appears to be the replacement for
storage-conf.xml, the configuration file from
version 0.6 and earlier. But this YAML file is intended only for users upgrading their
config files from XML to YAML. Instead, use the Thrift API calls prefixed with
system_ to configure your keyspaces and column families, as
shown previously.
If you do have an existing storage-conf.xml
file from using version 0.6, you will first need to convert it to YAML
using the bin/config-converter tool, which can
generate a cassandra.yaml file from a
storage-conf.xml. There is an operation exposed
through JMX in the
org.apache.cassandra.service.StorageServiceMBean
called loadSchemaFromYAML, which you can
invoke to force Cassandra to load your schema changes from the
cassandra.yaml file in your seed node. New
nodes in your cluster will get schema updates as they are started. The
seed node is not special here. You can run this method against any one
node (though running it against more than one node is not recommended),
and all nodes will receive the schema changes and gossip about changes
to the schema. This is a one-time operation that stores the definition
in Cassandra’s system keyspace, and you don’t want to modify the YAML
file after running this. For any subsequent changes, you’ll need to use
the API or CLI. This operation will be deprecated once the transition is
complete.
Although it’s simple enough for testing to just use the defaults, let’s examine how to configure the replica placement strategy, replication factor, and end point snitch. These settings are configurable within a keyspace, so that different keyspaces can have different settings for each.
Replicas
The replica placement strategy becomes more important the more nodes you add to your cluster. In Cassandra, the term node refers to the most general case; it means a server running the Cassandra software, participating in a ring of one or more Cassandra servers.
Every Cassandra node is a replica for something. For a given key
range, there may be some Cassandra nodes that are not replicas for that
range. If the replication factor is set to 1, writes are written only to a
single node. If that node goes down, the values stored on that node are
not accessible. If the replication factor is set to 2, two of the nodes in
your cluster will get the value written to them on every write, and they
will be replicas for each other. So if your replication factor is set to
N, then each node will act as a replica for N ranges, even if N is set to
1.
A Cassandra cluster, or collection of hosts, is typically referred
to as a ring, for reasons we’ll see now. Each node in the ring
is assigned a single, unique token. Each node claims ownership of the
range of values from its token to the token of the previous node. This is
captured in the org.apache.cassandra.dht.Range
class. Exactly how a token is represented is dependent on the partitioner
you’re using. (For more information on partitioners, see Partitioners later in this chapter.)
When creating a replica, the first replica is always placed in the node claiming the key range of its token. All remaining replicas are distributed according to a configurable replication strategy, which we’ll look at now.
Replica Placement Strategies
In its simplest terms, to satisfy the replica placement strategy for
the configuration file, you just need to
provide the name of a Java class that extends the
org.apache.cassandra.locator.AbstractReplicationStrategy
class. The purpose of this setting is to configure the way that
the node picker works.
Note
For determining replica placement, Cassandra implements the Gang
of Four Strategy pattern. The strategy is outlined in the common
abstract class, allowing different implementations of an algorithm
(different strategies for accomplishing the same work). Each algorithm
implementation is encapsulated inside a single class that adheres to the
interface. So you can provide the
strategy framework a variety of different implementations of the
algorithm, all of which are interchangeable to the runtime. Clients do
not have to be concerned about which strategy is used. A common use of
the Strategy pattern is for sorting. Imagine a
SortStrategy interface with a single
sort operation and different implementations
for Quicksort, Mergesort,
and so on. Each sorts in different ways, depending on your
needs.
The interface provides 11 public methods that require implementation; if your strategy can make use of some of the method implementations provided in the abstract parent, then you can override only the methods you want. Of course, you don’t have to implement this yourself. Out of the box, Cassandra provides three implementations of this interface (extensions of the abstract class): Rack-Aware Strategy, Rack-Unaware Strategy, and Data Center Shard Strategy.
Choosing the right replication strategy is important because the strategy determines which nodes are responsible for which key ranges. The implication is that you’re also determining which nodes should receive which write operations, which can have a big impact on efficiency in different scenarios. If you set up your cluster such that all writes are going to two data centers—one in Australia and one in Reston, Virginia—you will see a matching performance degradation. The variety of pluggable strategies allows you greater flexibility, so that you can tune Cassandra according to your network topology and needs.
The first replica will always be the node that claims the range in which the token falls, but the remainder of the replicas are placed according to the replica placement strategy you use.
Note
As I write this chapter, the names of the strategies are changing.
The new names in 0.7 will be
SimpleStrategy (formerly known as
RackUnawareStrategy),
OldNetworkTopologyStrategy (formerly known as
RackAwareStrategy),
and NetworkTopologyStrategy (formerly known as
DatacenterShardStrategy).
Simple Strategy
Simple Strategy is the new name for Rack-Unaware Strategy.
The strategy used by default
in the configuration file is
org.apache.cassandra.locator.RackUnawareStrategy.
This strategy only overrides the
calculateNaturalEndpoints method from the
abstract parent implementation. This strategy places replicas
in a single data center, in a manner that is not aware of their
placement on a data center rack. This means that the implementation is
theoretically fast, but not if the next node that has the given key is
in a different rack than others. This is shown in Figure 6-1.
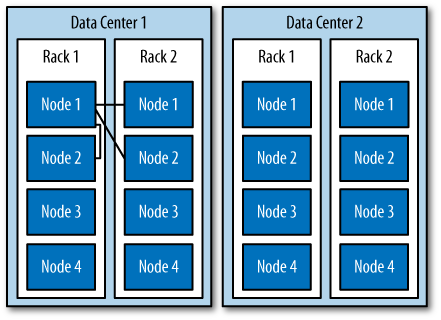
What’s happening here is that the next N nodes on the ring are chosen to hold replicas, and the strategy has no notion of data centers. A second data center is shown in the diagram to highlight the fact that the strategy is unaware of it.
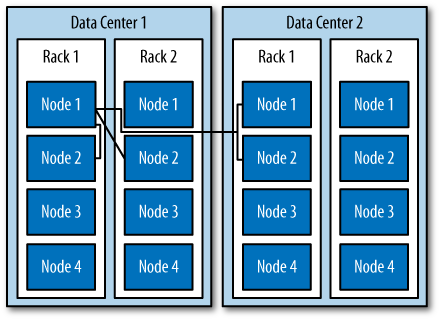
Old Network Topology Strategy
The second strategy for replica placement that Cassandra provides
out of the box is
org.apache.cassandra.locator.RackAwareStrategy,
now called Old Network Topology Strategy. It’s mainly used to distribute
data across different racks in the same data center. Like
RackUnawareStrategy, this strategy only overrides
the calculateNaturalEndpoints method from the
abstract parent implementation. This class, as the original name
suggests, is indeed aware of the placement in data center
racks.
Say you have two data centers, DC1 and DC2, and a set of Cassandra servers. This strategy will place some replicas in DC1, putting each in a different available rack. It will also ensure that another replica is placed in DC2. The Rack-Aware Strategy is specifically for when you have nodes in the same Cassandra cluster spread over two data centers and you are using a replication factor of 3. This strategy is depicted in Figure 6-2.
Use this strategy when you want to ensure higher availability at the potential cost of some additional latency while the third node in the alternate data center is contacted. There is no point in using Rack-Aware Strategy if you are only running Cassandra in a single data center. Cassandra is optimized for running in different data centers, however, and taking advantage of its high availability may be an important consideration for you. If your Cassandra cluster does span multiple data centers, consider using this strategy.

If you use the Rack-Aware Strategy, you must also use the Rack-Aware Snitch. Snitches are described in Snitches.
Network Topology Strategy
This strategy, included with the 0.7 release of Cassandra, allows
you to specify more evenly than the
RackAwareStrategy how replicas should be placed
across data centers. To use it, you supply parameters in which you
indicate the desired replication strategy for each data center. This file is read and
executed by the
org.apache.cassandra.locator.DataCenterShardStrategy
class, so the implementation is somewhat flexible. The data
center shard strategy is depicted in Figure 6-3.
This strategy used to employ a file called datacenter.properties. But as of 0.7, this metadata is attached directly to the keyspace and strategy as a map of configuration options.
Replication Factor
The replication factor specifies how many copies of each piece of
data will be stored and distributed
throughout the Cassandra cluster. It is specified by the
replication_factor setting.
It may seem intuitive that the more nodes you have in your cluster, the more you want to increase the replication factor. However, you don’t want to follow this rule of thumb alone; instead, increase the replication factor in order to satisfy your required service level.
With a replication factor of one, your data will exist only in a single node in the cluster. Losing that node means that data becomes unavailable. It also means that Cassandra will have to do more work as coordinator among nodes; if all the data for a given key is on node B, every client request for that key that enters through node A will need to be forwarded.
You must not set this value higher than the number of nodes in your cluster, as this wouldn’t make any sense. But you also don’t want to use this setting to tune Cassandra. Cassandra will achieve high consistency when the read replica count plus the write replica count is greater than the replication factor.
So if you have 10 nodes in your cluster, you
could set the replication factor to 10 as the
maximum. But you might not want to do that, as it robs Cassandra of what
it’s good at and stymies its availability, because if a single node goes
down, you won’t be able to have high consistency. Instead, set the
replication factor to a reasonable number and then tune the consistency
level up or down. The consistency level never allows you to write to more
than the number of nodes specified by the replication factor. A
“reasonable number” here is probably fairly low. ONE seems
like the lowest number; however, ANY is similar to
ONE but even less consistent, since you might not see the
written value until a long time after you wrote it. If any node in the
cluster is alive, ANY should succeed.
Note
If you’re new to Cassandra, the replication factor can sometimes be confused with the consistency level. The replication factor is set per keyspace, and is specified in the server’s config file. The consistency level is specified per query, by the client. The replication factor indicates how many nodes you want to use to store a value during each write operation. The consistency level specifies how many nodes the client has decided must respond in order to feel confident of a successful read or write operation. The confusion arises because the consistency level is based on the replication factor, not on the number of nodes in the system.
Increasing the Replication Factor
The replication factor is not a setting that is intended to be changed on a live cluster and should be determined ahead of time. But as your application grows and you need to add nodes, you can increase the replication factor. There are some simple guidelines to follow when you do this. First, keep in mind that you’ll have to restart the nodes after a simple increase in the replication factor value. A repair will then be performed after you restart the nodes, as Cassandra will have to redistribute some data in order to account for the increased replication factor. For as long as the repair takes, it is possible that some clients will receive a notice that data does not exist if they connect to a replica that doesn’t have the data yet.
A faster way of increasing the replication factor from 1 to 2 is
to use the node tool. First, execute a drain on the original node to
ensure that all the data is flushed to the SSTables. Then, stop that
node so it doesn’t accept any more writes. Next, copy the datafiles from
your keyspaces (the files under the
directory that is your value for the
DataFileDirectory element in the config). Make
sure not to copy the values in the internal Cassandra keyspace.
Paste those datafiles to the new node. Change the settings in the
configuration of both nodes so that the replication factor is set to 2.
Make sure that autobootstrap is set to false in both nodes.
Then, restart both nodes and run node tool repair. These steps will
ensure that clients will not have to endure the potential of false empty
reads for as long.
To illustrate this, I have three nodes with IP addresses ending in 1.5, 1.7, and 1.8, and their replication factor is set to 1. I will connect to node 1.5 and perform a write to a column that hasn’t previously existed anywhere:
cassandra> connect 192.168.1.5/9160
Connected to: "TDG Cluster" on 192.168.1.5/9160
cassandra> set Keyspace1.Standard2['mykey']['rf']='1'
Value inserted.
Now I shut down node 1.5 and connect to the other node, 1.7, and try to get the value I just set:
cassandra> connect 192.168.1.7/9160
Connected to: "TDG Cluster" on 192.168.1.7/9160
cassandra> get Keyspace1.Standard2['mykey']['rf']
Exception null
Because my replication factor was 1, the value was written only to
the 1.5 node, so when I lost that node, the other node in the cluster
didn’t have the value. No client will be able to read the value of the
rf column until 1.5 comes back online.
But let’s see the effect of updating the replication factor. We
change it from 1 to 2 in the 1.5 and 1.7 nodes and restart. Let’s insert
a new value to our rf column on node 1.7:
cassandra> connect 192.168.1.7/9160
Connected to: "TDG Cluster" on 192.168.1.7/9160
cassandra> get Keyspace1.Standard2['mykey']['rf']
Exception null
cassandra> set Keyspace1.Standard2['mykey']['rf']='2'
Value inserted.
The Exception null response in the preceding example
proves that the value didn’t exist on node 1.7 beforehand. Now we shut
down node 1.7 and connect to 1.5, and we see the value because it was
replicated to 1.5 on our write to 1.7, due to our replication
factor:
cassandra> connect 192.168.1.5/9160
Connected to: "TDG Cluster" on 192.168.1.5/9160
cassandra> get Keyspace1.Standard2['mykey']['rf']
=> (column=rf, value=2, timestamp=1279491483449000)
As a general guideline, you can anticipate that your write throughput capacity will be the number of nodes divided by your replication factor. So in a 10-node cluster that typically does 10,000 writes per second with a replication factor of 1, if you increase the replication factor to 2, you can expect to do around 5,000 writes per second.
Partitioners
The future is already here; it’s just not evenly distributed yet.
The purpose of the partitioner is to allow you to specify how row keys should be sorted, which has a significant impact on how data will be distributed across your nodes. It also has an effect on the options available for querying ranges of rows. There are a few different partitioners you can use, which we look at now.
Note
The choice of partitioner does not apply to column sorting, only row key sorting.
You set the partitioner by updating the value of the
Partitioner element in the config file or in the API. It
takes as a value the name of a class that implements the
org.apache.cassandra.dht.IPartitioner interface.
Out of the box, Cassandra provides three of these: the random partitioner,
which is the default; the order-preserving partitioner; and collating order-preserving
partitioner. Because of Cassandra’s generally pluggable design, you can
also create your own partitioner by implementing the
org.apache.cassandra.dht.IPartitioner class and
placing it on Cassandra’s classpath.
Warning
Keep in mind that the partitioner can modify the on-disk SSTable representations. So if you change the partitioner type, you will have to delete your data directories.
Random Partitioner
The random partitioner is implemented
by
org.apache.cassandra.dht.RandomPartitioner and is
Cassandra’s default. It uses a BigIntegerToken
with an MD5 hash applied to it to determine where to place the
keys on the node ring. This has the advantage of spreading your keys
evenly across your cluster, because the distribution is random. It has
the disadvantage of causing inefficient range queries, because keys
within a specified range might be placed in a variety of disparate
locations in the ring, and key range queries will return data in an
essentially random order.
Order-Preserving Partitioner
The order-preserving partitioner is implemented by
org.apache.cassandra.dht.OrderPreservingPartitioner,
which implements IPartitioner<StringToken>.
Using this type of partitioner, the token is a UTF-8 string, based on a
key. Rows are therefore stored by key order, aligning the physical
structure of the data with your sort order. Configuring your column family to use
order-preserving partitioning (OPP) allows you to perform range
slices.
It’s worth noting that OPP isn’t more efficient for range queries
than random partitioning—it just provides ordering. It has the
disadvantage of creating a ring that is potentially very lopsided,
because real-world data typically is not written to evenly. As an
example, consider the value assigned to letters in a Scrabble game. Q
and Z are rarely used, so they get a high value. With OPP, you’ll likely
eventually end up with lots of
data on some nodes and much less data on other nodes. The nodes
on which lots of data is stored, making the ring lopsided, are often
referred to as “hot spots.” Because of the ordering aspect, users are
commonly attracted to OPP early on. However, using OPP means that your
operations team will need to manually rebalance nodes periodically using
Nodetool’s loadbalance or move
operations.
If you want to perform range queries from your clients, you must use an order-preserving partitioner or a collating order-preserving partitioner.
Collating Order-Preserving Partitioner
This partitioner orders keys according to a United States English
locale (EN_US). Like OPP, it requires that the keys are
UTF-8 strings. Although its name might imply that it extends the OPP, it doesn’t. Instead, this class
extends AbstractByteOrderedPartitioner. This
partitioner is rarely employed, as its usefulness is
limited.
Byte-Ordered Partitioner
New for 0.7, the team added
ByteOrderedPartitioner, which is an
order-preserving partitioner that treats the data as raw bytes, instead
of converting them to strings the way the order-preserving partitioner
and collating order-preserving partitioner do. If you need an
order-preserving partitioner that doesn’t validate your keys as being
strings, BOP is recommended for the performance improvement.
Snitches
The job of a snitch is simply to determine relative host proximity. Snitches gather some information about your network topology so that Cassandra can efficiently route requests. The snitch will figure out where nodes are in relation to other nodes. Inferring data centers is the job of the replication strategy.
Simple Snitch
By default, Cassandra uses
org.apache.cassandra.locator.EndPointSnitch. It
operates by simply comparing different octets in the IP addresses of
each node. If two hosts have the
same value in the second octet of their IP addresses, then they are
determined to be in the same data center. If two hosts have the same
value in the third octet of their IP addresses, then they are determined
to be in the same rack. “Determined to be” really means that Cassandra
has to guess based on an assumption of how your servers are located in
different VLANs or subnets.
Note
Simple Snitch was renamed in 0.7; prior to that it was called endpoint snitch.
You configure which endpoint snitch implementation to use by
updating the value for the <EndPointSnitch> element
in the configuration file. The other choice is the PropertyFileSnitch.
PropertyFileSnitch
The
org.apache.cassandra.locator.PropertyFileSnitch
used to be in contrib, but was moved into the main code
base in 0.7. This snitch allows you more control when using a Rack-Aware
Strategy by specifying node locations in a standard key/value properties
file called cassandra-rack.properties.
This snitch was contributed by Digg, which uses Cassandra and regularly contributes to its development. This snitch helps Cassandra know for certain if two IPs are in the same data center or on the same rack—because you tell it that they are. This is perhaps most useful if you move servers a lot, as operations often need to, or if you have inherited an unwieldy IP scheme.
The default configuration of cassandra-rack.properties looks like this:
# Cassandra Node IP=Data Center:Rack
10.0.0.10=DC1:RAC1
10.0.0.11=DC1:RAC1
10.0.0.12=DC1:RAC2

10.20.114.10=DC2:RAC1
10.20.114.11=DC2:RAC1
10.20.114.15=DC2:RAC2

# default for unknown nodes
default=DC1:r1
Here we see that there are two data centers, each with two racks. Cassandra can determine an even distribution with good performance.
Update the values in this file to record each node in your cluster to specify which rack contains the node with that IP and which data center it’s in. Although this may seem difficult to maintain if you expect to add or remove nodes with some frequency, remember that it’s one alternative, and it trades away a little flexibility and ease of maintenance in order to give you more control and better runtime performance, as Cassandra doesn’t have to figure out where nodes are. Instead, you just tell it where they are.
Note
The
PropertyFileSnitch used to be called
PropertyFileEndPointSnitch and was in the
contrib directory before being promoted to part
of the standard distribution, in case you see references to that
online.
Creating a Cluster
You can run Cassandra on a single machine, which is fine for getting started as you learn how to read and write data. But Cassandra is specifically engineered to be used in a cluster of many machines that can share the load in very high-volume situations. In this section, we see what you have to do to get multiple Cassandra instances to talk to each other in a ring.
Note
During the writing of this book, the entire configuration mechanism was changing dramatically. This section covers how to create a cluster using version 0.6.
What we want to do here is just use the sample keyspace that ships with Cassandra to make sure that we can get multiple machines in a ring together. So we’ll start with the default configuration file and keyspace definition, and change only those settings required to create a simple cluster.
For this exercise, let’s say that we have two boxes we want to set up as a Cassandra cluster, with the IP addresses 192.168.1.5 and 192.168.1.7. When you start Cassandra, it reads the configuration file to determine how you want the current node to broadcast—that is, what host or IP address and what port to use. You need to tell the current node about the other nodes with which it should participate in a ring. Doing this is a simple matter of opening the config file in a text editor and updating a few values, as we’ll examine here.
A new node in a cluster needs what’s called a seed
node. If node A acts as a seed for node B, when node B comes
online, it will use node A as a reference point from which to get data.
Seed nodes will ignore the AutoBootstrap setting because it
is assumed that they will be the first nodes in the cluster.
Changing the Cluster Name
Cassandra clusters are given names in order to prevent machines in
one cluster from joining another that you don’t want them to be a part
of. The name of the default cluster
in the config file is “Test Cluster”. You can change the name
of the cluster by updating the <ClusterName>
element—just make sure that you have done this on all nodes that you
want to participate in this cluster.
Note
If you have written data to an existing Cassandra cluster and then change the cluster name, Cassandra will warn you with a cluster name mismatch error as it tries to read the datafiles on startup, and then it will shut down.
Adding Nodes to a Cluster
The configuration file has an element that is set to false by
default. Say that you have been running a cluster or a single node and
added data to it, and now you want to introduce more nodes to the
cluster. You can do this using the autobootstrap
element. I have a single Cassandra server running on an IP ending in
1.5, as shown by NodeTool:
$ bin/nodetool -h 192.168.1.5 ring
Address       Status     Load        Range                                    Ring
192.168.1.5   Up         433.43 MB   126804671661649450065809810549633334036  |<--|
This server has its own address as a seed. We leave autobootstrap set to false, because this node is acting as a seed. If you want to add a new seed node, then you should autobootstrap it first, and then change it to a seed afterward. For node B to use node A as a seed, node B needs to reference node A as its seed in its configuration file. But node A does not have to declare itself as a seed.
Now I’d like to add another node to share the load. This node’s address ends in 1.7. First, make sure that the nodes in the cluster all have the same name and the same keyspace definitions so that the new node can accept data. Edit the config file on the second node to indicate that the first one will act as the seed. Then, set autobootstrap to true.
When the second node is started up, it immediately recognizes the first node, but then sleeps for 90 seconds to allow time for nodes to gossip information about how much data they are storing locally. It then gets the bootstrap token from the first node, so it knows what section of the data it should accept. The bootstrap token is a token that splits the load of the most-loaded node in half. Again, the second node sleeps for 30 seconds and then starts bootstrapping.
 INFO 11:45:43,652 Starting up server gossip
 INFO 11:45:43,886 Joining: getting load information
 INFO 11:45:43,901 Sleeping 90000 ms to wait for load information...
 INFO 11:45:45,742 Node /192.168.1.5 is now part of the cluster
 INFO 11:45:46,818 InetAddress /192.168.1.5 is now UP
 INFO 11:45:46,818 Started hinted handoff for endPoint /192.168.1.5
 INFO 11:45:46,865 Finished hinted handoff of 0 rows to endpoint /192.168.1.5
 INFO 11:47:13,913 Joining: getting bootstrap token
 INFO 11:47:16,004 New token will be 41707658470746813056713124104091156313 to a
ssume load from /192.168.1.5
 INFO 11:47:16,019 Joining: sleeping 30000 ms for pending range setup
 INFO 11:47:46,034 Bootstrapping
Depending on how much data you have, you could see your new node
in this state for some time. You can use Nodetool’s streams
command to watch the data being transferred for bootstrap. Watching the
logfile is a good way to determine that the node is
finished bootstrapping, but to watch for progress
while it’s happening, use nodetool streams. Eventually, the
new node will accept the load from the first node, and you’ll see a
successful indication that the new node has started up:
 INFO 11:52:29,361 Sampling index for /var/lib/cassandra/dataKeyspace1Standard
1-1-Data.db
 INFO 11:52:34,073 Streaming added /var/lib/cassandra/dataKeyspace1Standard1-1
-Data.db
 INFO 11:52:34,088 Bootstrap/move completed! Now serving reads.
 INFO 11:52:34,354 Binding thrift service to /192.168.1.7:9160
 INFO 11:52:34,432 Cassandra starting up...
As you can see, it took around four minutes to transfer data.
During bootstrapping, the first (seed) node at 1.5 looks like this:
 INFO 11:48:12,955 Sending a stream initiate message to /192.168.1.7 ...
 INFO 11:48:12,955 Waiting for transfer to /192.168.1.7 to complete
 INFO 11:52:28,903 Done with transfer to /192.168.1.7
Now we can run node tool again to make sure that everything is set up properly:
$ bin/nodetool -h 192.168.1.5 ring
Address       Status     Load        Range                                    Ring
                                     126804671661649450065809810549633334036
192.168.1.7   Up         229.56 MB   41707658470746813056713124104091156313   |<--|
192.168.1.5   Up         459.26 MB   126804671661649450065809810549633334036  |-->|
Cassandra has automatically bootstrapped the 1.7 node by sending it half of the data from the previous node (1.5). So now we have a two-node cluster. To ensure that it works, let’s add a value to the 1.5 node:
cassandra> connect 192.168.1.5/9160
Connected to: "TDG Cluster" on 192.168.1.5/9160
cassandra> set Keyspace1.Standard2['mykey']['col0']='value0'
Value inserted.
Now let’s open a second CLI client and read that value from the 1.7 node:
cassandra> connect 192.168.1.7/9160
Connected to: "TDG Cluster" on 192.168.1.7/9160
cassandra> get Keyspace1.Standard2['mykey']['col0']
=> (column=col0, value=value0, timestamp=1278878907805000
You can repeat these steps to add additional nodes to your cluster.
If there’s something wrong with one of the nodes in your cluster (perhaps it’s offline, but Cassandra is not sure), you may see a question mark when you run node tool:
$ bin/nodetool -h 192.168.1.5 ring
Address       Status     Load        Range                                      Ring
                                     112711146095673746066359353163476425700
192.168.1.5   Up         459.26 MB   27647275353297313886547808446514704912     |<--|
192.168.1.7   ?          229.53 MB   112711146095673746066359353163476425700    |-->|
Multiple Seed Nodes
Cassandra allows you to specify multiple seed nodes. A seed node is used as a contact point for other nodes, so Cassandra can learn the topology of the cluster, that is, what hosts have what ranges.
By default, the configuration file will have only a single
seed entry:
seeds:
    - 127.0.0.1
To add more seed nodes to your ring, just add another seed element. We can set two servers to be seeds just by indicating the IP address or hostname of this node and then adding our second instance:
seeds:
    - 192.168.1.5
    - 192.168.1.7
Note
Make sure that the autobootstrap element is set to false if you’re using a node’s own IP address as a seed. One approach is to make the first three or five nodes in a cluster seeds, without autobootstrap—that is, by manually choosing tokens or by allowing Cassandra to pick random tokens. The rest of your nodes will not be seeds, so they can be added using autobootstrap.
Next, we need to update the listen address for this machine so it’s not just on loopback. Listen address is how nodes identify each other, and it’s used for all internal communication.
listen_address: 192.168.1.5
Finally, we need to change the address on which our RPC client
will broadcast because this is how other nodes will see this one. By
default, the configuration file will have an rpc_address
entry that uses localhost. We’ll change this value to the actual IP
address of each machine:
rpc_address: 192.168.1.5
The rpc_address setting is used only for connections
made directly from clients to Cassandra nodes.
Note
rpc_address used to be called
ThriftAddress, but because of the upcoming possible
change to Avro instead of Thrift as the RPC mechanism, it has been
changed to a more general name.
Now you can restart Cassandra and start the installations on the other machines. If you have successfully added multiple nodes to your cluster, you will see output similar to this (yours might be a little less verbose, as I’m showing debug-level output here):
 INFO 15:45:15,629 Starting up server gossip
 INFO 15:45:15,677 Binding thrift service to /192.168.1.5:9160
 INFO 15:45:15,681 Cassandra starting up...
DEBUG 15:45:16,636 GC for ParNew: 13 ms, 12879912 reclaimed leaving 11233080 used;
max is 1177812992
DEBUG 15:45:16,647 attempting to connect to /192.168.1.7
DEBUG 15:45:17,638 Disseminating load info ...
 INFO 15:45:19,744 Node /192.168.1.7 is now part of the cluster
DEBUG 15:45:19,746 Node /192.168.1.7 state normal, token
41654880048427970483049687892424207188
DEBUG 15:45:19,746 No bootstrapping or leaving nodes -> empty pending ranges
for Keyspace1
 INFO 15:45:20,789 InetAddress /192.168.1.7 is now UP
DEBUG 15:45:20,789 Started hinted handoff for endPoint /192.168.1.7
DEBUG 15:45:20,800 Finished hinted handoff for endpoint /192.168.1.7
DEBUG 15:46:17,638 Disseminating load info ...
This output shows that I have two nodes in my cluster: the node I just started, which is listening on 192.168.1.5, and the node that was already up and running, which is listening on 192.168.1.7.
Dynamic Ring Participation
Nodes in a Cassandra cluster can be brought down and brought back up without disruption to the rest of the cluster (assuming a reasonable replication factor and consistency level). Say that we have started a two-node cluster as described earlier in Creating a Cluster. We can cause an error to occur that will take down one of the nodes, and then make sure that the rest of the cluster is still OK:
INFO 15:34:18,953 Starting up server gossip
INFO 15:34:19,281 Binding thrift service to /192.168.1.7:9160
INFO 15:34:19,343 Cassandra starting up...
INFO 15:45:19,396 Node /192.168.1.5 is now part of the cluster
INFO 15:45:20,176 InetAddress /192.168.1.5 is now UP
INFO 16:13:36,476 error writing to /192.168.1.5
INFO 16:13:40,517 InetAddress /192.168.1.5 is now dead.
INFO 16:21:02,466 error writing to /192.168.1.5
INFO 16:21:02,497 error writing to /192.168.1.5
The error message will repeat until the 1.5 node comes back up. Running Nodetool will indicate that it’s down now, while the other node is still up.
So we bring it back up and check the logs at 1.7. Sure enough, Cassandra has automatically detected that the other participant has returned to the cluster and is again open for business:
INFO 16:33:48,193 error writing to /192.168.1.5
INFO 16:33:51,235 error writing to /192.168.1.5
INFO 16:34:20,126 Standard2 has reached its threshold; switching in a fresh Mem
table at CommitLogContext(file='/var/lib/cassandra/commitlogCommitLog-127759165
782.log', position=752)
INFO 16:34:20,173 Enqueuing flush of Memtable(Standard2)@7481705
INFO 16:34:20,251 Writing Memtable(Standard2)@7481705
INFO 16:34:20,282 LocationInfo has reached its threshold; switching in a fresh
Memtable at CommitLogContext(file='/var/lib/cassandra/commitlogCommitLog-127759
658782.log', position=752)
INFO 16:34:20,298 Enqueuing flush of Memtable(LocationInfo)@24804063
INFO 16:34:20,579 Completed flushing c:varlibcassandradataKeyspace1Standa
d2-1-Data.db
INFO 16:34:20,594 Writing Memtable(LocationInfo)@24804063
INFO 16:34:20,797 Completed flushing c:varlibcassandradatasystemLocationI
fo-2-Data.db
INFO 16:34:58,159 Node /192.168.1.5 has restarted, now UP again
INFO 16:34:58,159 Node /192.168.1.5 state jump to normal
The state jump to normal for the 1.5 node indicates that it’s part of the cluster again:
eben@morpheus$ bin/nodetool -host 192.168.1.5 ring
Address       Status     Load        Range                                    Ring
                                     41654880048427970483049687892424207188
192.168.1.5   Up         1.71 KB     20846671262289044293293447172905883342   |<--|
192.168.1.7   Up         2 KB        41654880048427970483049687892424207188   |-->|
Security
By default, Cassandra allows any client on your network to connect to your cluster. This does not mean that no security is set up out of the box, but rather that Cassandra is configured to use an authentication mechanism that allows all clients, without requiring that they provide credentials. The security mechanism is pluggable, which means that you can easily swap out one authentication method for another, or write your own.
The authenticator that’s plugged in by default is the
org.apache.cassandra.auth.AllowAllAuthenticator. If
you want to force clients to provide credentials, another alternative
ships with Cassandra, the
org.apache.cassandra.auth.SimpleAuthenticator. In
this section, we see how to use this second authenticator.
Using SimpleAuthenticator
There are two files included in the config directory: access.properties and passwd.properties. The access file uses a key/value pair to specify which users are allowed access to which keyspaces, specified by a comma-separated list. The example provided looks like this:
Keyspace1=jsmith,Elvis Presley,dilbert
This indicates that there are three users allowed to access
Keyspace1, and spaces are allowed in the
usernames.
The file passwd.properties must contain a list of these users and specify the password for each of them. Here is the example passwd.properties file:
jsmith=havebadpass
Elvis Presley=graceland4evar
dilbert=nomoovertime
Note that because the user Elvis Presley has a space in his username, a backslash must be used to escape the space.
To use the Simple Authenticator, replace the value for the
authenticator element in cassandra.yaml. Change it
from
org.apache.cassandra.auth.AllowAllAuthenticator
to the name of the implementing class that requires a login:
org.apache.cassandra.auth.SimpleAuthenticator.
If you haven’t configured the authentication files properly, you’ll see an error like this:
ERROR 10:44:27,928 Fatal error: When using org.apache.cassandra.auth.SimpleAuth
enticator
access.properties and passwd.properties properties must be defined.
That’s because there is one more step: we have to tell Cassandra the location of the access and passwords files, using the bin/cassandra.in.sh include script. We pass the file locations to the JVM by pasting the following code at the bottom of this file. My include file now looks like the snippet here, indicating the full path to the files:
JVM_OPTS="
        -Dpasswd.properties=/home/eben/books/cassandra/dist/
apache-cassandra-0.7.0-beta1/
conf/passwd.properties
        -Daccess.properties=/home/eben/books/cassandra/dist/
apache-cassandra-0.7.0-beta1/
conf/access.properties"
If you have specified an incorrect location or name for either of these files, the server log will let you know:
ERROR 11:13:55,755 Internal error processing login
java.lang.RuntimeException: Authentication table file given by property
passwd.properties
could not be found: /somebadpath/my.properties (No such file or directory)
Now we can log into the command-line interface with a username and password combination:
[default@unknown] connect localhost/9160
Connected to: "Test Cluster" on localhost/9160
[default@unknown] use Keyspace1 jsmith 'havebadpass'
Authenticated to keyspace: Keyspace1
[jsmith@Keyspace1]
If you enter an incorrect password, the CLI tells you:
[default@unknown] use Keyspace1 jsmith 'havebadpassfdfdfd'
Exception during authentication to the cassandra node: verify keyspace exists,
and you are using correct credentials.
If you enter a username that doesn’t exist or try to authenticate to a keyspace that the user doesn’t have access to, you’ll see something like this:
[default@unknown] use Keyspace1 dude 'dude'
Login failure. Did you specify 'keyspace', 'username' and 'password'?
[default@unknown]
Somewhat confusingly, if you just try to use a keyspace that you don’t have access to, you’ll see an authentication message, but then you won’t be able to perform operations. In the following example, we switch to a keyspace that requires authentication. The CLI appears to let us do that, but then we can’t read a column:
[default@Keyspace1] get Standard1['user123']['name']
Your credentials are not sufficient to perform READONLY operations
[default@Keyspace1]
Assuming we have set the 'name' value for this user,
if we supply the proper credentials, we can perform the
operation:
[default@Keyspace1] use Keyspace1 eben 'pass'
Authenticated to keyspace: Keyspace1
[eben@Keyspace1] get Standard1['user123']['name']
=> (column=6e616d65, value=bootsy, timestamp=1284316537496000)
[eben@Keyspace1]
We can also specify the username and password combination when we connect on the CLI:
eben@morpheus:~/books/cassandra/dist/apache-cassandra-0.7.0-beta1$
  bin/cassandra-cli --host localhost --port 9160
  --username jsmith --password havebadpass --keyspace Keyspace1

Connected to: "Test Cluster" on localhost/9160
Welcome to cassandra CLI.

Type 'help' or '?' for help. Type 'quit' or 'exit' to quit.
[jsmith@Keyspace1] get Standard1['user123']['name']
=> (column=6e616d65, value=bootsy, timestamp=1284316537496000)
[jsmith@Keyspace1]
Executing a query now returns us a result.
Note
In 0.6, there was no login operation provided by the Thrift API, so if you’ve gotten used to starting the CLI and then connecting in a separate operation, that won’t work if you are requiring authentication. A login operation was added in 0.7.
Note
In 0.7, authenticators have been split into an
IAuthenticator (which handles authentication)
and IAuthority (which handles authorization).
The SimpleAuthenticator class has had
authorization split out into SimpleAuthority.
SimpleAuthenticator reads only
passwd.properties, and
SimpleAuthority reads only
access.properties.
Programmatic Authentication
If you have set up authentication on your keyspace, your client application code will need to log in. You can use Example 6-2 as a guide.
package com.cassandraguide.config;

import java.util.HashMap;
import java.util.Map;

import org.apache.cassandra.thrift.AccessLevel;
import org.apache.cassandra.thrift.AuthenticationRequest;
import org.apache.cassandra.thrift.Cassandra;
import org.apache.thrift.protocol.TBinaryProtocol;
import org.apache.thrift.protocol.TProtocol;
import org.apache.thrift.transport.TFramedTransport;
import org.apache.thrift.transport.TSocket;
import org.apache.thrift.transport.TTransport;

/**
 * How to connect if you've set up SimpleAuthenticator
 */
public class AuthExample {

	public static void main(String[] args) throws Exception {

		TTransport tr = new TSocket("localhost", 9160);
		TFramedTransport tf = new TFramedTransport(tr);
		TProtocol proto = new TBinaryProtocol(tf);
		Cassandra.Client client = new Cassandra.Client(proto);
		tr.open();

		AuthenticationRequest authRequest = new AuthenticationRequest();
		Map<String, String> credentials = new HashMap<String, String>();
		credentials.put("username", "jsmith");
		credentials.put("password", "havebadpass");
		authRequest.setCredentials(credentials);

		client.set_keyspace("Keyspace1");

		AccessLevel access = client.login(authRequest);
		System.out.println("ACCESS LEVEL: " + access);
		tr.close();
	}
}
In this case, the program just prints out FULL
because that’s this user’s access level.
There are a couple of things to note here. First, the credentials
map uses username and password as keys; it’s
not username as the key and password as the
value. Second, you need to call set_keyspace separately, to
indicate what keyspace you’re trying to authenticate to.
Using MD5 Encryption
The SimpleAuthenticator class has two modes for
specifying passwords: plain text and MD5 encrypted. So far, we’ve used
the default, plain text. Let’s look at how to improve security a bit by
using MD5. MD5 is a cryptographical algorithm that stands for “Message-Digest algorithm version 5” (the
“5” indicates an improvement in strength over version 4). It’s a widely
used one-way hash function that generates a 128-bit hash value from an
input. It’s also worth noting that MD5 is not going to be radically
secure for you; it’s just a little harder to break in.
You enable MD5 in the cassandra.in.sh file by
passing the passwd.mode switch to the JVM:
JVM_OPTS="
        -da
//other stuff...
        -Dpasswd.mode=MD5"
Now if you try to authenticate using an unencrypted password, you’ll see an error like this:
Exception during authentication to the cassandra node, verify you are using correct
credentials.
You can use a variety of tools to generate an MD5-encrypted version of the plain-text username and password as a one-way hash. Here’s a short Python program to create an MD5 hash from a plain string:
$ python
Python 2.6.5 ...
>>> from hashlib import md5
>>> p = "havebadpass"
>>> h = md5(p).hexdigest()
>>> print h
e1a31eee2136eb73e8e47f9e9d13ab0d
Now you can replace the password for jsmith in the
passwd.properties file with the encrypted
value.
Providing Your Own Authentication
You can provide your own method of authenticating to Cassandra if
you want to make special requirements, such as a Kerberos ticket or
encryption, or if you want to store passwords in a different location,
such as an LDAP directory. To create your own authentication scheme, simply implement
the IAuthenticator interface. This interface requires two
methods, as shown here:
public AccessLevel login(String keyspace, AuthenticationRequest authRequest)
    throws AuthenticationException, AuthorizationException;

public void validateConfiguration() throws ConfigurationException;
The login method must return a Thrift
AccessLevel instance, indicating what degree of
access the authenticating user is allowed. The
validateConfiguration method simply allows a check to ensure that the
authentication mechanism is properly set up. For example, with the
SimpleAuthenticator, it just checks that the
required access and passwd
files have been specified.
Miscellaneous Settings
There are a few settings related to general configuration that don’t quite seem to belong in any other category, so I’ve grouped them together here.
column_index_size_in_kbThis indicates the size in kilobytes that a row is allowed to grow to before its columns will be indexed. If you have very large column values, you’ll want to increase this value. Super columns are not indexed, so this setting refers only to column indexes. You do not want this setting to be very large because all the index data is read for each read access, so you could slow Cassandra down if you make it read more than is necessary. This becomes especially important if you frequently read partial rows.
in_memory_compaction_limit_in_mbThis value represents the size limit for rows being compacted in memory. If a row is larger than this, it will be staged onto disk and compacted in a slower, two-step process. The setting’s value is set to 64MB by default. Prior to Cassandra version 0.7, this was called the
row_warning_threshold_in_mb.gc_grace_secondsThis indicates the amount of time in seconds to wait before garbage-collecting tombstones. Tombstones are markers indicating that a value was deleted, but they persist until this threshold is met. By default it is set to 864,000, which is 10 days. This might seem like an inordinately long time, but you have to allow enough time for tombstones to propagate through the entire cluster to any replicas. That may still seem like a long time, but the idea is that you could have hardware failures, and you’ll need time to get those nodes back up and operational so that tombstones can replicate to them too. If a downed node that did not receive tombstone notifications comes back up after the tombstones have been truly deleted, read repair will allow the untombstoned, undeleted data to slowly be introduced back into the cluster.
Of course, if you do a lot of deleting, you could tune this setting back for the sake of tidiness, but it’s probably not going to make a huge difference.
phi_convict_thresholdThis marks the Phi value that must be reached in order for Cassandra to conclude that the server is down. By default, this is set to 8, and in general you will not want to change this setting. However, if your network is not performing optimally or you have other reasons to suspect that Cassandra could get a false read on this, you can increase this setting to allow more leniency in determining whether a node is actually down.
Additional Tools
This section discusses miscellaneous tools that ship with Cassandra to help you configure it.
Viewing Keys
You can see which keys are in your SSTables using a script called
sstablekeys. To run it, just use the location of the
SSTable for which you want to see keys, as shown here:
eben@morpheus$ bin/sstablekeys /var/lib/cassandra/data/Hotelier/Hotel-1-Data.db
 WARN 10:56:05,928 Schema definitions were defined both locally and in cassandra.yaml.
Definitions in cassandra.yaml were ignored.
415a435f303433
415a535f303131
4341535f303231
4e594e5f303432
Importing Previous Configurations
If you had a keyspace defined in 0.6 using the configuration file
that you’d like to import into Cassandra
0.7 or higher, you can use a special JMX operation,
StorageService.loadSchemaFromYaml(). Note
that this method has two important caveats: first, it is
intended to be used only once; second, it will probably be removed by
version 0.8.
Starting with version 0.7, the user keyspaces defined in cassandra.yaml are not loaded by default when the server starts. So you might see a message like this as your Cassandra server starts up for the first time:
INFO config.DatabaseDescriptor: Found table data in data directories.
Consider using JMX to call org.apache.cassandra.service.StorageService.
loadSchemaFromYaml().
In order to load them, you need to invoke the
loadSchemaFromYaml JMX operation. But in order to invoke
this command, you need to do a couple of things. First, get
mx4j-tools.jar from Sourceforge.net. Download and
extract the ZIP file into any directory. Then, copy the JAR named
mx4j-tools.jar in its lib
directory into Cassandra’s lib directory. This will allow you to make JMX
connections to interact with Cassandra in really rich ways. We’ll see
more about using JMX with Cassandra later, but for now we just want to
get a keyspace up for testing. Restart Cassandra after adding the
JAR.
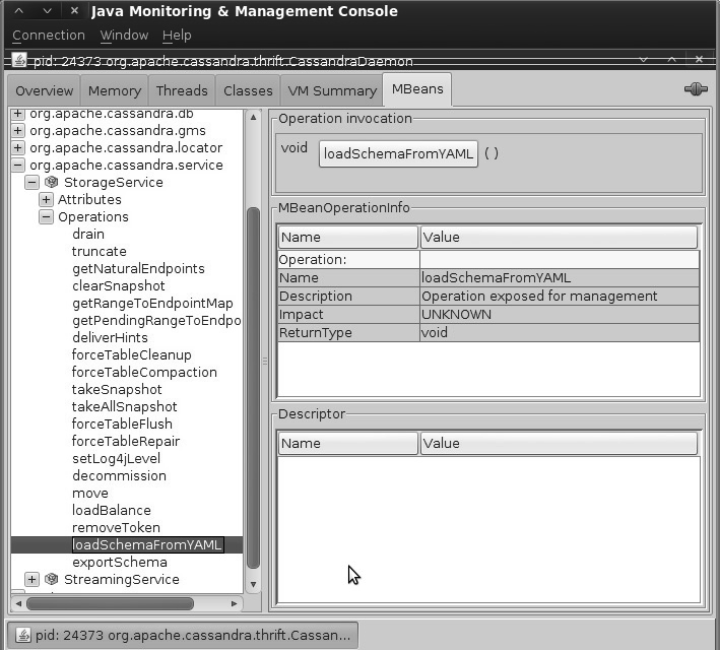
Next, open a new terminal and issue the command jconsole. A GUI will start and load the JConsole tool that ships with Java. This tool can introspect the Java Virtual Machine and allow you to view runtime data and invoke operations that are exposed via JMX.
To load the keyspaces defined in
cassandra.yaml, click the MBeans tab in the
JConsole GUI. Expand the org.apache.cassandra.service bean,
then StorageService, then Operations. Click the
loadSchemaFromYAML operation and click the button. This
will execute the command on the Cassandra service and load your schemas
in the cassandra.yaml file.
To perform the once-only operation to import a 0.6 configuration
into 0.7, use the loadSchemaFromYaml operation
on the StorageService MBean. This is shown in
Figure 6-4.
Now you should see output similar to the following in your logs:
17:35:47 INFO thrift.CassandraDaemon: Cassandra starting up...
17:35:48 INFO utils.Mx4jTool: mx4j successfuly loaded
HttpAdaptor version 3.0.2 started on port 8081
17:40:43 INFO config.DatabaseDescriptor: UTF8Type
17:40:43 INFO config.DatabaseDescriptor: BytesType
17:40:43 INFO config.DatabaseDescriptor: UTF8Type
17:40:43 INFO config.DatabaseDescriptor: TimeUUIDType
17:40:43 INFO config.DatabaseDescriptor: BytesType
17:40:43 INFO config.DatabaseDescriptor: BytesType
17:40:43 INFO config.DatabaseDescriptor:
The database descriptor logs are a good thing, as this indicates that the operation loaded your schemas.
You can also use the
org.apache.cassandra.config.Converter class to
assist you in converting from storage-conf.xml to a
cassandra.yaml file. If you are upgrading from
0.6 to 0.7, this should be your first step.
To run the converter, use the
config-converter script in the
bin directory. It will read in the old file,
convert it, and dump the contents.
Summary
In this chapter we looked at how to configure Cassandra, including using the new dynamic configuration ability in the API and some of the utilities that ship with the server to dig into your raw datafiles. We saw how to set the replication factor and the snitch, and how to use a good replica placement strategy.
If you prefer to use a graphical interface instead of the CLI, you can get information regarding your Cassandra setup using Chiton, which is a Python GTK-based Cassandra browser written by Brandon Williams. You can find it at http://github.com/driftx/chiton.