Xcode on Mac OS X
Simply put, Apple's Xcode is the kind of development environment programmers are used to paying hundreds of dollars for. It's a top-notch IDE, with loads of features and support for many languages. All of the code in this book was written on and tested using Xcode, so we highly recommend Mac OS X users to use it as well.
Xcode is part of a series of Developer Tools Apple releases with the operating system. If you have a set of Mac OS X discs, you should check for the Developer Tools CD to save yourself a large download. If you don't already have a copy or if you want the latest version, Xcode is freely available from Apple's Developer Connection (ADC) Web site (http://developer.apple.com/tools/download/). You'll need to be an ADC member, but membership is free.
Once you've installed Xcode, take this quick tour to learn how to use it to create C applications.
To use Xcode
1. | Launch Xcode. |
2. | Select File > New Project. |
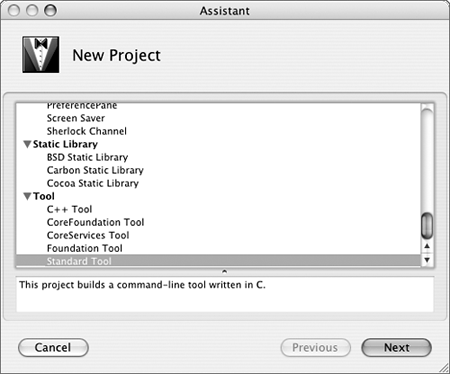
3. | In the resulting window (Figure A.8), select Standard Tool (the last item) and click Next. Figure A.8. Xcode's New Project window.
As you can see in the description (at the bottom), this option is intended for building command-line tools written in C, which is exactly what you're doing in this book. |
4. | Enter the project name, select the project directory, and click Finish (Figure A.9). Figure A.9. Selecting the project's name and location.
For your project name, use the basename of whatever file is being created. So if the example is making a file called hello.c, name your project hello. Each example has its name near the very top of the step-by-step sequence, so you shouldn't have to go hunting around for the name. |
5. | Click on main.c in the project window. Xcode uses these project windows to manage your projects. After you choose a Standard Tool type of project, Xcode automatically creates some files for you. The most important in terms of this book is the main.c file, which is your main C source code. |
6. | Click the Show Editor button (to the right of the stop sign). You can edit main.c by double-clicking on it—which will make it appear in its own window—or by using the built-in editor. If you click on Show Editor, the project window will be broken into three panes (Figure A.10). Figure A.10. The Xcode project window, with the editor in the lower-right panel.
|
7. | After you've entered your code, select File > Save or press Command+S. |
8. | Select Build > Build and Run or press Command+R to compile and execute the application. |
9. | Press Command+R again to rerun your application. Alternatively, you can double-click on the application's name in thetop of the project window to run it in a terminal window. Or, the executable application itself can be found in the project_name/build folder. |
✓ Tips
Even if you don't want to use Xcode, you'll want to install the Developer Tools, which also installs the gcc compiler on your Mac.
Cocoa is Apple's primary technology for creating Mac OS X applications. It uses Objective-C, a version of C that incorporates objects. Knowing C, after reading this book, you should be able to learn Cocoa with relative ease.
The Developer Tools also include Interface Builder, for creating the graphical front end to an application. Search the Web for tutorials on creating applications using Xcode and Interface Builder.


