Chapter 9
Error Handling
What’s in This Chapter
- Understanding bugs and unexpected conditions
- Using assertions and code contracts to detect bugs
- Handling exceptions with
try-catch-finally - Creating custom exception classes
Wrox.com Downloads for This Chapter
Please note that all the code examples for this chapter are available as a part of this chapter’s code download on the book’s website at www.wrox.com/go/csharp5programmersref on the Download Code tab.
Although it is theoretically possible to write a program that perfectly predicts every conceivable situation that it might encounter, in practice that’s difficult for nontrivial programs. For large applications, it’s practically impossible to plan for every eventuality. Errors in the program’s design and implementation can introduce bugs that give unexpected results. Even if you correctly anticipate every normal condition, users, corrupted databases, and unreliable network communications may give the application values that it doesn’t expect.
Similarly, changing requirements over time may introduce data that the application was never intended to handle. The Y2K bug is a good example. When engineers wrote accounting, auto registration, financial, inventory, and other systems in the 1960s and 1970s, they never dreamed their programs would still be running in the year 2000. At the time, disk storage and memory were relatively expensive, so they stored years as 2-byte values (for example, 89 meant 1989). When the year 2000 rolled around, the applications couldn’t tell whether the value 01 meant the year 1901 or 2001. In one humorous case, an auto registration system started issuing horseless carriage license plates to new cars because it thought cars built in 00 must be antiques. The Y2K problem wasn’t actually a bug. It was a case of software used with data that wasn’t part of its original design.
This chapter explains different kinds of exceptional conditions that can arise in an application. These range from unplanned data (as in the Y2K problem), to unexpected inputs (as when the user types “ten” into a numeric field), to bugs where the code is just plain wrong. With some advance planning, you can build a robust application that can keep running gracefully, even when the unexpected happens.
Bugs Versus Undesirable Conditions
Several different types of unplanned conditions can derail an otherwise high-quality application. How you should handle these conditions depends on their nature.
For this discussion, a bug is a mistake in the application code. Some bugs become apparent right away and are easy to fix. These usually include simple typographic errors in the code and cases in which you misuse an object (for example, by using the wrong property). Other bugs are subtler and may be detected only long after they occur. For example, a data-entry routine might place invalid characters into a rarely used field in a Customer object. Only later when the program tries to access that field will you discover the problem. This kind of bug is difficult to track down and fix, but you can take some proactive steps to make these sorts of bugs easier to find.
An undesirable condition is some predictable condition that you don’t want to happen, but that you know could happen despite your best efforts. For example, there are many ways that a simple printing operation can fail. The printer might be unplugged, disconnected from its computer, disconnected from the network, out of toner, out of paper, experiencing a memory fault, clogged by a paper jam, or just plain broken. These are not bugs because the application software is not at fault. There is some condition outside of the program’s control that must be fixed.
Another common undesirable condition occurs when the user enters invalid data. You may want the user to enter a value between 1 and 10 in a text box, but the user might enter 0, 9999, or “lunch” instead.
You can’t fix undesirable conditions but you can try to make your program handle them gracefully and produce some meaningful result instead of crashing.
Catching Bugs
By definition, bugs are unplanned. No reasonable programmer sits down and thinks, “Perhaps I’ll put a bug in this variable declaration.”
Because bugs are unpredictable, you cannot know ahead of time where a bug will lie. However, you can watch for behavior in the program that indicates that a bug may be present. For example, suppose that you have a method that sorts a purchase order’s items by cost. If the method receives an order with 100,000 items, something is probably wrong. If one of the items in the order is a computer keyboard with a price of $73 trillion, something is probably wrong. If the customer who placed the order doesn’t exist, something is probably wrong.
This method could go ahead and sort the 100,000 items with prices ranging from a few cents to $73 trillion. Later, the program would try to print a 5,000-page invoice with no shipping or billing address. Only then would the developers realize that there was a problem.
Rather than trying to work around the weird data and continue running, it would be better if the program immediately told developers that something was wrong so that they could start looking for the problem. Bugs are easier to find the sooner they are detected. This bug will be easier to find if the sorting method notices it, rather than waiting until the application tries to print an invalid invoice. Your methods can protect themselves and the program as a whole by proactively validating inputs and outputs, and reporting anything suspicious to developers.
Some developers object to making methods spend a lot of time validating data that they “know” is correct. After all, one method generated this data and passed it to another, so you know that it is correct because the first method did its job properly. That’s only true if every method that touches the data works perfectly. Because bugs are by definition unexpected, you cannot safely assume that all the methods are perfect and that the data remains uncorrupted.
To prevent validation code from slowing down the application, you can use the System.Diagnostics.Debug class’s Assert method to check for strange conditions. The idea is that the method asserts that some statement is true.
The Debug.Assert method comes in several overloaded versions. The simplest form takes two parameters, a boolean expression and a string. If the boolean expression evaluates to false, the assertion fails and the method displays an error message.
The Debug class’s Fail method is similar to the Assert method except it always displays an error message. Normally, you would use C# code to determine when to call this method. For example, if a switch statement has case sections to handle all the possible values of an enumerated type, you could add a default section that calls Debug.Fail. Then if an unexpected value appears, the program tells you.
When you debug the program, Debug.Assert and Debug.Fail statements immediately notify you if an assertion fails. When you make a release build to send to customers, the Debug.Assert and Debug.Fail code is automatically removed from the application. That makes the application faster and doesn’t inflict cryptic error messages on the user.
You can also use the DEBUG and TRACE preprocessor symbols to add other input and output validation code. By default, both of these symbols are defined in debug builds. Only TRACE is defined in release builds.
Example program UseDebug, which is available for download from the book’s website, uses the following code to validate a method’s inputs. (This program doesn’t actually do anything; it just demonstrates input and output validation code.)
        // Sort an order's items.
        // Use the Debug class to validate inputs and outputs.
        private void SortOrderItems(Order order)
        {
            // Validate inputs.
            Debug.Assert(order.Customer != null, "No customer");
            Debug.Assert(order.Items != null, "No Items list");
            Debug.Assert(order.Items.Count > 0, "Empty Items list");
            Debug.Assert(order.Items.Count < 100, "Too many order items");

            // Sort the items.
            //...
            Console.WriteLine(order.ToString());

            // Validate outputs.
#if DEBUG
            // Verify that the items are sorted.
            for (int i = 1; i < order.Items.Count; i++)
            {
                OrderItem order_item1 = order.Items[i - 1];
                OrderItem order_item2 = order.Items[i];
                Debug.Assert(order_item1.Price <= order_item2.Price,
                    "Order items not properly sorted");
            }
#endif
}The method starts by validating its inputs. It verifies that the Order object’s Customer property and Items collection are not null. It also verifies that the order contains at least 1 and fewer than 100 items. If a larger order comes along during testing, developers can increase this number to 200 or whatever value makes sense, but there’s no need to start with an unreasonably large default.
After the method sorts the order’s items (that code isn’t shown), it uses the directive #if DEBUG to make its output validation code disappear from release builds. If this is a debug build, the code loops through the sorted items and verifies that each item’s Price is at least as large as the Price of the preceding item in the list.
After you have tested the application long enough, you should have discovered most of the errors that are caused by incorrect program logic. When you make the release build, the compiler automatically removes the validation code, making the finished executable smaller and faster.
Code Contracts
The .NET Framework version 4.0 added the Contract class to formalize the idea of using assertions to validate method inputs and outputs.
The idea is for a method to begin with a contract stating preconditions, things that must be true when the method is called, and postconditions, things that the method guarantees are true when it finishes. The program can also define invariant conditions that should remain true while the program is running.
Preconditions and Postconditions
The Contract class’s Requires method represents a precondition that the method requires to be true when it starts. The Ensures method represents a postcondition that the method guarantees to be true when it finishes.
Example program UseCodeContracts, which is available for download from the book’s website, uses the following code to validate a method’s inputs and outputs.
// Sort an order's items.
// Use the Debug class to validate inputs and outputs.
private void SortOrderItems(Order order)
{
    // Preconditions.
    Contract.Requires(order.Customer != null, "No customer");
    Contract.Requires(order.Items != null, "No Items list");
    Contract.Requires(order.Items.Count > 0, "Empty Items list");
    Contract.Requires(order.Items.Count < 100, "Too many order items");

    // Postconditions.
    Contract.Ensures(OrderItemsAreSorted(order),
        "Order items not properly sorted");

    // Sort the items.
    //...
    Console.WriteLine(order.ToString());
}

// Return true if the items in this list are sorted.
[Pure()]
private bool OrderItemsAreSorted(Order order)
{
    for (int i = 2; i < order.Items.Count; i++)
    {
        OrderItem order_item1 = order.Items[i - 1];
        OrderItem order_item2 = order.Items[i];
        if (order_item1.Price > order_item2.Price) return false;
    }
    return true;
}
This program is similar to the UseDebug program described in the preceding section except it uses code contracts instead of the Debug.Assert method to validate preconditions and postconditions.
Notice that the code places all the contract’s preconditions and postconditions at the beginning of the method. This makes it easier to find all the required conditions. For example, if you use Debug.Assert statements to validate outputs, they must go at the end of the method and any other place where the method might exit. When you use code contracts, all the conditions are at the beginning.
Placing the conditions at the beginning of the method also encourages test-driven development. Here developers write tests to verify a method’s correctness before they write its code. That makes it more likely that the tests will be effective and thorough. When developers write the method before the tests, they often skip some tests because they “know” that the method handles those cases properly.
Also notice that this version handles its postcondition slightly differently from the previous version. The UseDebug program described in the preceding section looped through the order’s items and used Debug.Assert to verify that their prices were in order. The Contract.Ensures method examines a single boolean value so that it cannot perform a loop.
To work around this problem, the new version of the program makes Contract.Ensures call the OrderItemsAreSorted method. That method performs the loop and returns a boolean result that the Contract.Ensures method can use.
If the Contract.Ensures method invokes another method, in this case OrderItemsAreSorted, Visual Studio issues a warning unless that method is marked with the Pure attribute. That attribute indicates that the method does not modify any objects while it is examining them. You need to write your code so that the method has this property. (This makes some sense. It would be confusing if the method verifying a postcondition is modifying the object it is verifying.) In this example, the OrderItemsAreSorted method examines an object’s order items but it doesn’t modify the order or its items.
Making Contracts Work
Unfortunately, even if you put all this code in your program, contracts don’t work automatically.
Just as the Debug and Trace classes don’t do anything unless the DEBUG and TRACE preprocessor symbols are defined, most of the Contract class’s methods don’t do anything unless the CONTRACTS_FULL preprocessor symbol is defined.
If you use a #define directive to define that symbol, the Contract class’s methods will work but they won’t work properly. If you think about how postconditions work, you’ll understand part of the problem. A postcondition should be verified before the method exits, but the contract in the previous example places the Contract.Ensures call before the main body of the method’s code. The method must verify the postcondition before it exits, not just when it starts.
To move the postcondition checks to their correct location and otherwise prepare the contract for use, you need to invoke the rewriter tool ccrewrite.exe. That tool rearranges the IL code generated by the C# compiler so that contracts work properly. If you try to run the program without using the rewriter, the first call to a Contract method fails.
Fortunately there’s an easier way to make contracts work. Don’t bother with the CONTRACTS_FULL preprocessor symbol in your code. Instead select Project ⇒ Properties to open the project’s property pages. Select the Code Contracts tab to see the page shown in Figure 9-1. Click the Perform Runtime Contract Checking box to enable contracts. This defines the CONTRACTS_FULL preprocessor symbol for you and makes Visual Studio automatically invoke the rewriter after it compiles your program.
You can explore the Code Contracts property page to change the way contracts are verified. For example, you can use the drop-down to the right of the Perform Runtime Contract Checking box to check only preconditions and postconditions, or to check only preconditions.
Now if you step through the program’s code in the debugger, you can see it execute the Contract class’s method calls. The code first steps through the preconditions, then the method’s body, and finally the postcondition defined by the Contract.Ensures method.
Invariants
An invariant is some condition that should remain true throughout an object’s lifetime. To create a code contract invariant for a class, give the class a method that checks whatever the variant conditions are and decorate that method with the ContractInvariantMethod attribute.
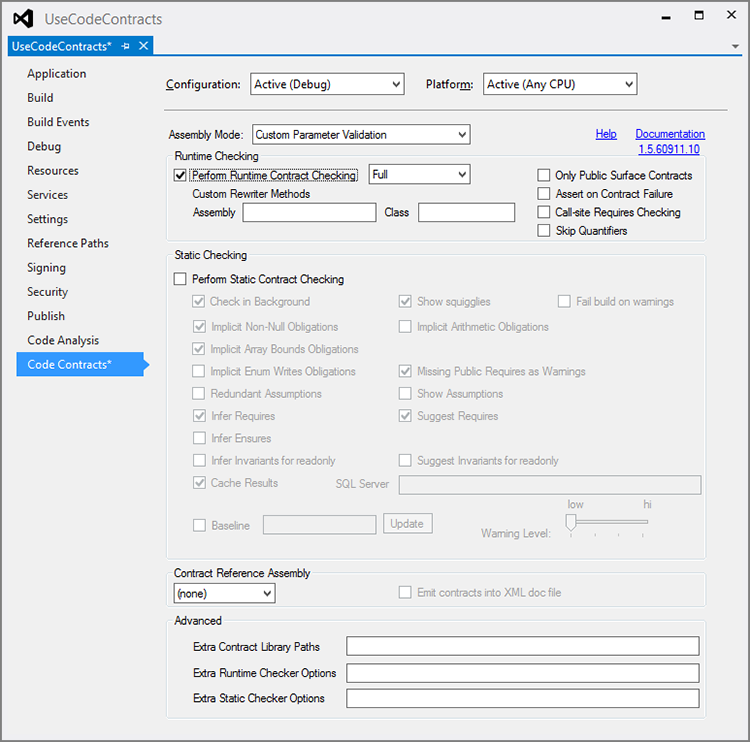
Figure 9-1: Use the Code Contracts property page to turn on code contracts.
Now whenever the program executes a public method from outside of the class’s code, it checks the invariant after that method call returns to make sure the invariant property is still true.
For example, suppose the Order class has a Customer property and that property should never be null throughout the lifetime of the Order object. The following code shows how you might use a contract to enforce that condition in the Order class.
class Order
{
    public List<OrderItem> Items = new List<OrderItem>();

    public Customer Customer { get; set; }

    public Order(Customer customer)
    {
        Customer = customer;
    }
    [ContractInvariantMethod]
    private void CustomerIsNotNull()
    {
        Contract.Invariant(this.Customer != null);
    }
}
Here the CustomerIsNotNull method returns true if the Customer property is not null. Now any time the main program calls one of the Order class’s public methods, the code contract invokes CustomerIsNotNull to see if this invariant has been violated.
The basic process for using an invariant is straightforward, but there are a couple important details.
First, code contracts check invariants only when code outside of the class invokes one of the class’s methods. In this example, the Order class could have methods that set the Customer property to null and the invariant wouldn’t notice.
Actually, if one of the class’s public methods calls a second of the class’s methods, the invariant is not verified after the call to the second method. The idea is that the second method may need to temporarily violate the invariant property and the original method call will fix things up before it returns. In other words, if code outside of the class calls one of the class’s public methods, the variant property is verified only after the outermost call finishes.
The second important detail about invariants is that they apply only to public methods. In this example, the Order class’s Customer value is implemented as a property with get and set accessors. Because the accessors are methods, the code contract system can verify the invariant after they execute.
If the Customer value were implemented as a public field, the code contract system could not verify the invariant after its value was changed.
For more information about code contracts, see the Code Contracts User Manual at research.microsoft.com/projects/contracts/userdoc.pdf.
Catching Undesirable Conditions
Although you don’t want undesirable conditions to happen, with some careful thought, you can often predict where one might occur. Typically, these situations arise when the program must work with something outside of its own code. For example, when the program needs to access a file, printer, web page, floppy disk, or CD-ROM, that item may be unavailable. Similarly, whenever the program takes input from the user, the user may enter invalid data.
Notice how this differs from the bugs described in the previous section. After sufficient testing, you should have found and fixed most of the bugs. No amount of testing can remove the possibility of this kind of undesirable condition. No matter what code you use, the user may still remove a flash drive from the computer before the program is ready or unplug the printer while your program is using it.
Whenever you know that an undesirable condition might occur, you should write code to protect the program. It is generally better to test for these conditions ahead of time before you perform an action that might fail rather than simply attempt to perform the action and then catch the error when the program fails.
Testing for problem conditions generally gives you more complete information about what’s wrong because you know what the program is trying to do at that point. It’s also usually faster than catching an error because try catch blocks (described in the section “try catch Blocks” later in this chapter) come with considerable overhead.
For example, the following statement sets an integer variable to the value entered in a text box:
int numItems = int.Parse(numItemsTextBox.Text);The user might enter a valid value in the text box. Unfortunately, the user may also enter something that is not a number, a value that is too big to fit in an integer, or a negative number when you are expecting a positive one. The user may even leave the field blank.
Often you can make error handling easier and more uniform by writing a validation method. The following method validates an integer value. It takes as parameters an output variable to hold the result, the TextBox holding the text, the value’s name, and the minimum and maximum allowed values.
private bool IsValidInteger(out int result, TextBox txt, string name,
    int min = int.MinValue, int max = int.MaxValue)
{
    // Give result an initial value.
    result = int.MinValue;

    // Get the text.
    string text = txt.Text;

    // If there is something wrong, build an error message.
    string message = "";
    if (text.Length == 0) message = "Please enter " + name + ".";
    else if (!int.TryParse(text, out result))
        message = "Error parsing " + name + " '" + text + "'";
    else if ((result < min) || (result > max))
        message = name + " must be between " +
            min.ToString() + " and " + max.ToString() + ".";

    // See if we have an error message.
    if (message.Length > 0)
    {
        // Display the message, select the TextBox's text,
        // give it focus, and return false.
        MessageBox.Show(message, name + " Error",
            MessageBoxButtons.OK, MessageBoxIcon.Error);
        txt.Select(0, text.Length);
        txt.Focus();
        return false;
    }

    // The value is okay.
    return true;
}
This method initializes the output value to the minimum possible int value. It then gets the text in the TextBox.
Next, the code tests the text to see if it is valid. If the text is blank, cannot be parsed by int.TryParse, or is outside the allowed range, the method composes an appropriate error message.
After it finishes its test, the method checks to see if it has a nonblank error message. If the message is nonblank, the method displays the error message, selects the text in the TextBox, sets focus to the TextBox, and returns false to tell the calling code that the value was invalid.
If the error message is blank, the method returns true to tell the calling code that the value was valid.
Example program ValidateInteger, as shown in Figure 9-2, and available for download on the book’s website, uses the IsValidInteger method to validate the values in three TextBoxes.

Figure 9-2: The ValidateInteger example program validates the values in three TextBoxes.
The following code shows how the ValidateInteger program uses the IsValidInteger method.
// Validate the values.
private void validateButton_Click(object sender, EventArgs e)
{
    int oneToTen, year, positive;

    // Validates the entries.
    if (!IsValidInteger(out oneToTen, oneToTenTextBox, "Value", 1, 10)) return;
    if (!IsValidInteger(out year, yearTextBox, "Year", 2000, 2020)) return;
    if (!IsValidInteger(out positive, positiveTextBox, "Positive Value", 1))
        return;

    // In a "real" application, you would perform other processing here.
    // ...

    MessageBox.Show("OK");
}
This code calls IsValidInteger three times and returns if any of those calls returns false. If all the calls to IsValidInteger return true, all the values are valid, so the program continues processing them.
You can write similar methods to validate other types of data fields such as phone numbers, e-mail addresses, street addresses, and so forth.
Global Exception Handling
Normally, you should try to catch an error as close as possible to the place where it occurs. An error is easiest to fix if you catch it right away in the method where it happens.
However, bugs often arise in unexpected places. Unless you protect every method with error-handling code (a fairly common strategy), a bug may arise in code that you have not protected.
When you write a global exception handler, you probably won’t know where the exception will occur, so it’s hard to figure out how to keep the program running effectively. You can log the error, save data if necessary, and possibly display a message for the user before closing the program. You can make the program attempt to ignore the error and continue running, but it may be difficult to actually fix the problem.
How you install a global error handler depends on the type of program you run. The following sections explain how to install global exception handlers for Windows Forms, WPF, and console applications.
Note that global exception handlers don’t work inside Visual Studio. In all three kinds of programs, if the program throws an unhandled exception, Visual Studio springs into action and catches the error. To test the programs, you need to run a compiled executable program outside of Visual Studio.
Windows Forms Applications
To catch unhandled exceptions in a Windows Forms application, add an event handler to the Application object’s ThreadException event. The WindowsFormsGlobalException example program, which is available for download on this book’s website, uses the following code to install its event handler.
// Install the global exception handler.
private void Form1_Load(object sender, EventArgs e)
{
    Application.ThreadException += ThreadException;
}
The following code shows the example program’s ThreadException event handler.
// Handle global exceptions.
private static void ThreadException(object sender, ThreadExceptionEventArgs e)
{
    try
    {
        string message = e.Exception.Message + '
' +
            "Do you want to try to continue?";
        if (MessageBox.Show(message, "Unhandled Exception",
            MessageBoxButtons.YesNo, MessageBoxIcon.Stop) == DialogResult.No)
        {
            Application.Exit();
        }
    }
    catch
    {
        Application.Exit();
    }
}
The event handler does all its work inside a try catch block. If anything goes wrong, the code simply closes the application.
The code builds and displays a message that describes the exception and asks the user if the program should try to continue. (You might also want to log the error, including a stack trace, into a log file or a system log.) If the user clicks No, the method calls Application.Exit to end the program.
If the user clicks Yes, the program continues running.
When you click the program’s Throw Exception button, the following code executes.
// Throw an exception.
private void throwExceptionButton_Click(object sender, EventArgs e)
{
    throw new ArgumentException();
}
This code simply throws an ArgumentException. Because this code doesn’t use a try catch block, the global exception handler catches it.
WPF Applications
To catch unhandled exceptions in a WPF application, add an event handler to the Application.Current object’s DispatcherUnhandledException event. The WpfGlobalException example program, which is available for download on the book’s website, uses the following code to install its event handler.
// Install the global exception handler.
private void Window_Loaded(object sender, RoutedEventArgs e)
{
    Application.Current.DispatcherUnhandledException += UnhandledException;
}
The following code shows the example program’s UnhandledException event handler.
// Handle global exceptions.
private void UnhandledException(object sender,
    DispatcherUnhandledExceptionEventArgs e)
{
    try
    {
        string message = e.Exception.Message + '
' +
            "Do you want to try to continue?";
        if (MessageBox.Show(message, "Unhandled Exception",
            MessageBoxButton.YesNo, MessageBoxImage.Stop) == MessageBoxResult.No)
        {
            Application.Current.Shutdown();
        }
        e.Handled = true;
    }
    catch
    {
        Application.Current.Shutdown();
    }
}
This event handler is similar to the one used by the previous example. Most of the differences are in the constants and method calls this version uses to perform the same tasks as the previous version.
One important difference is the following statement.
e.Handled = true;This statement tells the program that the event has been handled and the program doesn’t need to close. In a Windows Forms application, continuing is the default action. In a WPF application, closing is the default action.
When you click the program’s Throw Exception button, the following code executes.
// Throw an exception.
private void throwExceptionButton_Click(object sender, RoutedEventArgs e)
{
    throw new ArgumentException();
}
This is similar to the code in the Windows Forms example. The only difference is that this version takes as its second parameter a RoutedEventArgs object instead of an EventArgs object.
Console Applications
To catch unhandled exceptions in a console application, add an event handler to the AppDomain.CurrentDomain object’s UnhandledException event. The Main method used by the ConsoleGlobalException example program, which is available for download on the book’s website, installs its event handler and enters a loop that runs until the program ends.
static void Main(string[] args)
{
    // Install the event handler.
    AppDomain.CurrentDomain.UnhandledException += UnhandledException;

    // Loop forever.
    for (; ; )
    {
        Console.WriteLine("1 - Continue, 2 - Throw exception, 3 - Exit");
        Console.Write("> ");
        string text = Console.ReadLine();
        int choice = int.Parse(text);

        switch (choice)
        {
            case 1:
                // Continue.
                Console.WriteLine("Continuing...
");
                break;

            case 2:
                // Throw an exception.
                Console.WriteLine("Throwing exception...
");
                throw new ArgumentException();

            case 3:
                // Exit.
                return;
        }
    }
}
The method installs the program’s event handler and then enters an infinite loop. Each time through the loop, the method displays a prompt and then waits for the user’s input. It parses the input and uses a switch statement to decide what to do next.
If the user enters 1, the program displays a message and continues its loop. If the user enters 2, the program throws an exception. If the user enters 3, the program exits the Main method and ends.
The following code shows the example program’s UnhandledException event handler.
// Handle an exception.
private static void UnhandledException(object sender,
    UnhandledExceptionEventArgs e)
{
    Console.WriteLine("Caught exception:");
    Exception exception = (Exception)e.ExceptionObject;
    Console.WriteLine(exception.Message);
    Console.WriteLine("


Press Enter to close the application");
    Console.ReadLine();
}
This event handler is different from the previous two in two main ways. First, this is a console application so, instead of displaying messages boxes, it communicates to the user through the console window.
Second, this event handler cannot prevent the application from ending. (Although you could use a try catch block in the Main method to catch exceptions and try to keep the program running there.)
Figure 9-3 shows the ConsoleGlobalException example program after it has caught an exception. Initially, the event handler displayed the information starting at Throwing Exception and ending with Press Enter to Close the Application. When you press Enter, the system automatically displays the following text and the ConsoleGlobalException Has Stopped Working dialog.
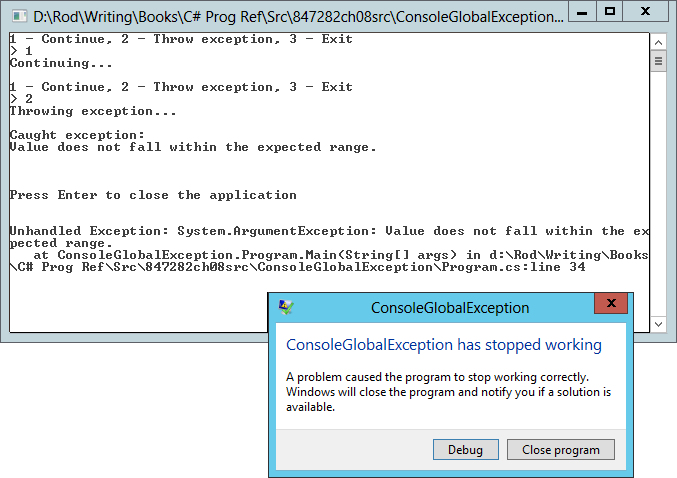
Figure 9-3: An UnhandledException event handler cannot prevent a console application from closing.
try catch Blocks
The try catch block provides structured error handling for C# programs. The syntax is as follows.
try
{
tryStatements...
}
catch (exceptionType1 variable1)
{
exceptionStatements1...
}
catch (exceptionType2 variable2)
{
exceptionStatements2...
}
...
catch
{
finalExceptionStatements...
}
finally
{
finallyStatements...
}
The program executes the code in the tryStatements block. If any of that code throws an exception, the program jumps to the first catch block.
If the exception matches exceptionType1, the program executes the code in exceptionStatements1. The exception type might match the catch statement’s exception class exactly, or it might be a subclass of the listed class.
For example, suppose the tryStatements block performs an integer calculation that divides by zero. That raises a DivideByZeroException. That class inherits from the ArithmeticException class, which inherits from SystemException, which inherits from Exception. That means the code would stop at the first catch statement it finds that looks for DivideByZeroException, ArithmeticException, SystemException, or Exception.
If the raised exception does not match the first exception type, the program checks the next catch statement. The program keeps comparing the exception to catch statements until it finds one that applies, or it runs out of catch statements.
If no catch statement matches the exception, the exception “bubbles up” to the next level in the call stack, and C# moves to the method that called the current one. If that method has appropriate error-handling code, it deals with the error. If that method can’t catch the error, the exception bubbles up again until C# eventually either finds error-handling code that can catch the exception or runs off the top of the call stack. If it runs off the call stack, C# calls the global UnhandledException event handler described in the previous sections, if one exists. If there is no UnhandledException event handler, the program crashes.
If you include a catch statement with no exception type, that block matches any exception. If the raised exception doesn’t match any of the previous exception types, the program executes the finalExceptionStatements block of code. Note that the statement catch (Exception ex) also matches all exceptions, so it’s just as good as catch by itself. It also gives you easy access to the exception object’s properties and methods.
You can figure out what exception classes to use in catch statements in several ways. First, you can spend a lot of time digging through the online help. An easier method is to let the program crash and then look at the error message it produces.
Figure 9-4 shows the error message a program throws when it tries to use the Integer.Parse method to convert the non-numeric string Hello into an integer. The first line in the dialog makes it obvious that the program should catch FormatException.
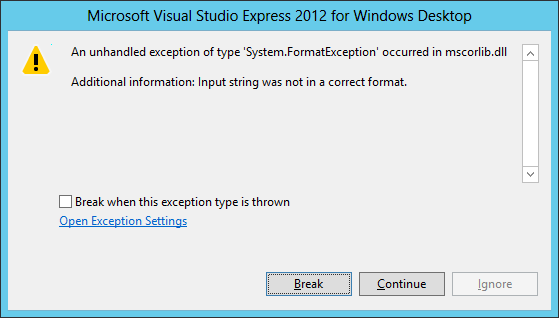
Figure 9-4: When a program crashes, the message it generates tells you the type of exception it threw.
Another way to decide what types of exceptions to catch is to place a final generic catch (Exception ex) statement at the end of the catch list. Place code inside that catch block to display the exception’s type name, as shown in the following code.
try
{
    ...
}

... Catch blocks ...

catch (Exception ex)
{
    MessageBox.Show("Unexpected exception " + ex.GetType().Name);
}
When the final catch block reports a new exception type, you can create a new catch block to handle it.
After it finishes running the code in tryStatements and it executes any necessary exception code in a catch block, the program executes the code in finallyStatements. The statements in the finally section execute whether the code in tryStatements succeeds or fails.
A try catch block must include at least one catch section or a finally section; although, those sections do not need to contain any code. For example, the following try catch block calls method DoSomething and uses an empty catch section to ignore any errors that occur.
try
{
    DoSomething();
}
catch
{
}
Exception Objects
When a catch statement catches an exception, its exception variable contains information about the error that raised the exception.
Different exception classes may provide different features, but they all provide the basic features defined by the Exception class from which they are all derived. The following table lists the most commonly used Exception class properties and methods.
| Item | Purpose |
InnerException | The exception that caused the current exception. For example, suppose that you write a tool library that catches an exception and then throws a new custom exception describing the problem in terms of your library. You should set InnerException to the exception that you caught before you throw the new exception. |
Message | Returns a brief message that describes the exception. |
Source | Returns the name of the application or object that threw the exception. |
StackTrace | Returns a string containing a stack trace giving the program’s location when the error occurred. |
TargetSite | Returns the name of the method that threw the exception. |
ToString | Returns a string describing the exception and including the stack trace. |
Example program ShowExceptionInfo, which is available for download on this book’s website, displays an exception’s Message, StackTrace, and ToString values.
At a minimum, the program should log or display the Message value for any unexpected exceptions so that you know what exception occurred. The program might also log the StackTrace or the result of ToString so that you can see where the exception occurred.
The StackTrace and ToString values can help developers find a bug, but these values can be intimidating to end users. Even the abbreviated format used by the exception’s Message property is usually not useful to a user. When the user clicks the Find Outstanding Invoices button, the message “Attempted to Divide by Zero” doesn’t actually tell the user what the problem is or what to do about it.
When a program catches an exception, a good strategy is to record the full ToString message in a log file or e-mail it to a developer. Then display a message that restates the error message in terms the user can understand. For example, the program might say the following.
Unable to total outstanding invoices. A bug report has been sent to the development team.
The program should then try to continue as gracefully as possible. It may not be able to finish this calculation, but it should not crash, and it should allow the user to continue working on other tasks if possible.
Throwing Exceptions
In addition to catching exceptions, your program may need to generate its own exceptions. Because handling an exception is called catching it, raising an exception is called throwing it. (This is just a silly pun. People also catch lions and colds, but I don’t think many people throw them. It’s as good a term as any, however.)
To throw an exception, the program creates an instance of the type of exception it wants to generate, passing the constructor additional information describing the problem. The program can then set other exception fields if wanted. For example, it might set the exception’s Source property to tell the code that catches the error where it originated. The program then uses the throw statement to throw the exception. If an error handler is active somewhere in the call stack, C# jumps to that point and the error handler processes the exception.
Example program DrawableRect, which is available for download on this book’s website, uses the following code to show how the DrawableRectangle class protects itself against invalid input.
class DrawableRectangle
{
    public DrawableRectangle(int x, int y, int width, int height)
    {
        // Verify that new_width > 0.
        if (width <= 0)
        {
            throw new ArgumentException(
                "DrawableRectangle width must be greater than zero",
                    "width");
        }

        // Verify that new_height > 0.
        if (height <= 0)
        {
            throw new ArgumentException(
                "DrawableRectangle height must be greater than zero",
                    "height");
        }

        // Save the parameter values.
        //...
    }

    // Other code for this class omitted.
    //...
}
The class’s constructor takes four arguments: an X and Y position, and a width and height. If the new object’s width is less than or equal to zero, the program creates a new ArgumentException object. It passes the exception’s constructor a description of the error and the name of the argument that is invalid. After creating the exception object, the program uses the throw statement to raise the exception. The code checks the new object’s height similarly.
The following code shows how a program might use a try catch block to protect itself while creating a new DrawableRectangle object.
try
{
    DrawableRectangle rect = new DrawableRectangle(10, 20, 0, -100);
}
catch (Exception ex)
{
    MessageBox.Show(ex.Message);
}
When your application needs to throw an exception, it’s easiest to use an existing exception class. There are a few ways to get lists of exception classes so that you can find one that makes sense for your application. Appendix O, “Useful Exception Classes,” lists some of the more useful exception classes. The online help topic “Introduction to Exception Handling in Visual Basic” at msdn.microsoft.com/aa289505.aspx also has a good list of exception classes at the end. Microsoft’s web page msdn.microsoft.com/system.exception_derivedtypelist.aspx provides a long list of exception classes derived from the System.Exception class.
Another method for finding exception classes is to open the Object Browser (select View ⇒ Object Browser) and search for Exception.
When you throw exceptions, you must use your judgment about selecting these classes. For example, C# uses the System.Reflection.AmbiguousMatchException class when it tries to bind a method call to an object’s method and it cannot determine which overloaded method to use. This happens at a lower level than your program will act, so you won’t use that class for exactly the same purpose, but it still may be useful to throw that exception. For example, if your program parses a string and, based on the string, cannot decide what action to take, you might use this class to represent the error, even though you’re not using it exactly as it was originally intended.
Be sure to use the most specific exception class possible. Using more generic classes such as Exception makes it much harder for developers to understand and locate an error. If you cannot find a good, specific fit, create your own exception class, as described in the section “Custom Exceptions” later in this chapter.
Rethrowing Exceptions
Sometimes when you catch an exception, you cannot completely handle the problem. In that case, it may make sense to rethrow the exception so that a method higher up in the call stack can take a crack at it.
To rethrow an error exactly as you caught it, just use the throw keyword, as in the following example.
try
{
    // Do something hard here.
    ...
}
catch (ArithmeticException ex)
{
    // We can handle this exception. Fix it.
    ...
}
catch
{
    // We don't know what to do with this one. Re-throw it.
    throw;
}
If your code can figure out more or less why an error is happening but it cannot fix it, it’s sometimes a good idea to rethrow the error as a different exception type. For example, suppose a piece of code causes an ArithmeticException but the underlying cause of the exception is an invalid argument. In that case it is better to throw an ArgumentException instead of an ArithmeticException because that can provide more specific information higher up in the call stack.
At the same time, however, you don’t want to lose the information contained in the original ArithmeticException. The solution is to throw a new ArgumentException but to place the original ArithmeticException in its InnerException property so that the code that catches the new exception has access to the original information.
The following code demonstrates this technique.
try
{
    // Do something hard here.
    ...
}
catch (ArithmeticException ex)
{
    // This was caused by an invalid argument.
    // Re-throw it as an ArgumentException.
    throw new ArgumentException("Invalid argument X in function Whatever. ", ex);
}
catch
{
    // We don't know what to do with this one. Re-throw it.
    throw;
}
Custom Exceptions
When your application needs to throw an exception, it’s easiest to use an existing exception class. Reusing existing exception classes makes it easier for developers to understand what the exception means. It also prevents exception proliferation, where the developer needs to watch for dozens or hundreds of bizarre types of exceptions.
Sometimes, however, the predefined exceptions don’t fit your needs. For example, suppose that you build a class that contains data that may exist for a long time. If the program tries to use an object that has not refreshed its data for a while, you want to raise some sort of “data expired” exception. You could squeeze this into the System.TimeoutException class, but that exception doesn’t quite fit this use. In that case, you can build a custom exception class.
Building a custom exception class is easy. Make a new class that inherits from the System.Exception class. Then, provide constructor methods to let the program create instances of the class. That’s all there is to it.
By convention, an exception class’s name should end with the word Exception. Also by convention, you should provide at least three overloaded constructors for developers to use when creating new instances of the class. (For more information on what constructors are and how to define them, see the section “Constructors” in Chapter 12, “Classes and Structures.”)
The first constructor takes no parameters and initializes the exception with a default message describing the general type of error.
The other two versions take as parameters an error message, and an error message plus an inner exception object. These constructors pass their parameters to the base class’s constructors to initialize the object appropriately.
For completeness, you can also make a constructor that takes as parameters a SerializationInfo object and a StreamingContext object. This version can also pass its parameters to a base class constructor to initialize the exception object, so you don’t need to do anything special with the parameters. (This constructor is useful if the exception will be serialized and deserialized. If you’re not sure whether you need this constructor, you probably don’t. If you do include it, however, you need to import the System.Runtime.Serialization namespace in the exception class’s file to define the SerializationInfo and StreamingContext classes.)
Example program CustomException, which is available for download on the book’s website, uses the following code to define the ObjectExpiredException class.
class ObjectExpiredException : Exception
{
    // No parameters. Use a default message.
    public ObjectExpiredException()
        : base("This object has expired")
    {
    }

    // Set the message.
    public ObjectExpiredException(string message)
        : base(message)
    {
    }

    // Set the message and inner exception.
    public ObjectExpiredException(string message, Exception innerException)
        : base(message, innerException)
    {
    }

    // Include SerializationInfo object and StreamingContext objects.
    public ObjectExpiredException(SerializationInfo info,
      StreamingContext context)
        : base(info, context)
    {
    }
}
After you have defined the exception class, you can throw and catch it just as you can throw and catch any exception class defined by C#. For example, the following code throws an ObjectExpiredException.
throw new ObjectExpiredException("This Customer object has expired.");The parent class System.Exception automatically handles the object’s Message, StackTrace, and ToString properties, so you don’t need to implement them yourself.
Summary
In practice, it’s extremely difficult to anticipate every condition that might occur within a large application. You should try to predict as many incorrect situations as possible, but you should also plan for unforeseen errors. You should write error-checking code that makes bugs obvious when they occur and recovers from them if possible. You may not anticipate every possible bug, but with a little thought you can make the program detect and report obviously incorrect values.
You should also look for unplanned conditions (such as the user entering a phone number in a Social Security number field) and make the program react gracefully. Your program cannot control everything in its environment (such as the user’s actions, printer status, and network connectivity), but it should be prepared to work when things aren’t exactly the way they should be.
You may never remove every last bug from a 100,000-line program, but you can make any remaining bugs relatively harmless and appear so rarely that the users can do their jobs in relative safety.
Visual Studio provides a rich set of tools for debugging an application. Using the development environment, you can stop the program at different lines of code and examine variables, change variable values, look at the call stack, and call methods to exercise different pieces of the application. You can step through the program, executing the code one statement at a time to see what it is doing. You can even make some modifications to the source code and let the program continue running. Chapter 10, “Tracing and Debugging,” describes tools and techniques you can use to debug applications.
Exercises
- Consider the following
Studentclass.public class Student { public string Name; public List<Course> Courses = new List<Course>(); // Constructor. public Student(string name) { Name = name; } }Add
Debug.Assertstatements to the class to require the following conditions.- The
Nameproperty must always be at least 1 character long. - The
Coursesvalue can never benull. (Although the list can be empty.)
- The
- Repeat Exercise 1 using code contract preconditions and postconditions instead of
Debug.Assertstatements. (Put in postconditions even though you “know” they’re unnecessary.) - Repeat Exercise 1 using code contract invariants instead of preconditions, postconditions, or
Debug.Assertstatements. - Suppose you anticipate occasions when the main program might try to violate the conditions listed for Exercise 1. Instead of using
Debug.Assertor code contracts to catch these occasions during testing, you want to raise exceptions and let the main program catch them. Repeat Exercise 1 so it does that. - The section “Console Applications” earlier in this chapter showed a console application that throws an exception if you enter the value 2 in the console window. Can you think of any other ways to make the program throw an exception?
- Rewrite the program described in Exercise 5 so that it can handle any input without throwing an exception (except the input 2, which is supposed to throw an exception).
- The program described in the section “Console Applications” earlier in this chapter uses an
UnhandledExceptionevent handler to catch unhandled exceptions. However, all the code in a console application runs directly or indirectly from theMainmethod. That means you could put atry catchblock in that method to catch all exceptions that aren’t handled anywhere else.Rewrite the example shown in that section to use this technique. What are the advantages and disadvantages of this method compared to using an
UnhandledExceptionevent handler? - Suppose the Factorial program uses the following code.
// Calculate the entered number's factorial.
private void calculateButton_Click(object sender, EventArgs e)
{
    long number = long.Parse(numberTextBox.Text);
    resultLabel.Text = Factorial(number).ToString();
}

// Return number!
private long Factorial(long number)
{
    long result = 1;
    for (long i = 2; i <= number; i++) result *= i;
    return result;
}
What kinds of error-handling statements would be appropriate in this example? Would it make sense to use
Debug.Assert? Code contracts? Add the appropriate error-handling statements to this code.