

Developing software to run on mobile devices such as PDAs and mobile phones can be very challenging because embedded systems generally have slower processors, less permanent storage (flash memory or hard disk), less memory, and smaller displays than desktop computers.
Qt/Embedded Linux (also called Qtopia Core) is an edition of Qt optimized for embedded Linux. Qt/Embedded Linux provides the same API and tools as the desktop versions of Qt (Qt/Windows, Qt/X11, and Qt/Mac), and adds the classes and tools necessary for embedded programming. Through dual licensing, it is available for both open source and commercial development.
Qt/Embedded Linux can run on any hardware that runs Linux—including Intel x86, MIPS, ARM, StrongARM, Motorola/Freescale 68000, and PowerPC architectures.[*] Unlike Qt/X11, it does not need the X Window System; instead, it implements its own window system, QWS, enabling significant storage and memory savings. To reduce its memory footprint even more, Qt/Embedded Linux can be recompiled to exclude unused features. If the applications and components used on a device are known in advance, they can be compiled together into a single executable that links statically against the Qt/Embedded Linux libraries.
Qt/Embedded Linux also benefits from various features that are also part of the desktop versions of Qt, including the extensive use of implicit data sharing (“copy on write”) as a memory-saving technique, support for custom widget styles through QStyle, and a layout system that adapts to make the best use of the available screen space.
Qt/Embedded Linux forms the basis of Trolltech’s embedded offering, which also includes Qtopia Platform, Qtopia PDA, and Qtopia Phone. These provide classes and applications designed specifically for portable devices and can be integrated with several third-party Java virtual machines.
Qt/Embedded Linux applications can be developed on any platform equipped with an appropriate tool chain. The most common option is to build a GNU C++ cross-compiler on a Unix system. This process is simplified by a script and a set of patches provided by Dan Kegel at http://kegel.com/crosstool/. For this chapter, we have used the Qtopia Open Source Edition version 4.2 available from http://www.trolltech.com/products/qtopia/opensource/. This edition is suitable only for Linux and includes its own copy of Qt/Embedded Linux 4.2, along with additional tools to support Qtopia programming on a desktop PC.
Qt/Embedded Linux’s configuration system supports cross-compiling, through the configure script’s -embedded and -xplatform options. For example, to build for the ARM architecture we would type
./configure -embedded arm -xplatform qws/linux-arm-g++
We can create custom configurations by adding new files to Qt’s mkspecs/qws directory.
Qt/Embedded Linux draws directly to the Linux framebuffer (the memory area associated with the video display). The virtual framebuffer shown in Figure 24.1 is an X11 application that simulates, pixel for pixel, the actual framebuffer. To access the framebuffer, you might need to grant write permissions to the /dev/fb0 device.

To run Qt/Embedded Linux applications, we must first start one process to act as a GUI server. The server is responsible for allocating screen regions to clients and for generating mouse and keyboard events. Any Qt/Embedded Linux application can become a server by specifying -qws on its command line or by passing QApplication::GuiServer as the third parameter to the QApplication constructor.
Client applications communicate with the Qt/Embedded Linux server using shared memory and Unix pipes. Behind the scenes, the clients draw themselves into the Linux framebuffer and are responsible for painting their own window decorations.
Clients can communicate with each other using QCOP—the Qt Communication Protocol. A client can listen on a named channel by creating a QCopChannel object and connecting to its received() signal. For example:
QCopChannel *channel = new QCopChannel("System", this);
connect(channel, SIGNAL(received(const QString &, const QByteArray &)),
        this, SLOT(received(const QString &, const QByteArray &)));
A QCOP message consists of a name and an optional QByteArray. The static QCopChannel::send() function broadcasts a message on a channel. For example:
QByteArray data;
QDataStream out(&data, QIODevice::WriteOnly);
out << QDateTime::currentDateTime();

QCopChannel::send("System", "clockSkew(QDateTime)", data);
The preceding example illustrates a common idiom: We encode the data using QDataStream, and we mangle the data format in the message name as though it were a C++ function to ensure that receiver interprets the QByteArray correctly.
Various environment variables affect Qt/Embedded Linux applications. The most important ones are QWS_MOUSE_PROTO and QWS_KEYBOARD, which specify the mouse device and the keyboard type. See http://doc.trolltech.com/4.2/qtopiacore-envvars.html for a complete list of environment variables.
If we use Unix as our development platform, we can test the application using the Qt virtual framebuffer (qvfb), an X11 application that simulates the actual framebuffer. This accelerates the development cycle considerably. To enable virtual buffer support in Qt/Embedded Linux, pass the -qvfb option to the configure script. Be aware that this option is not intended for production use. The virtual framebuffer application is located in tools/qvfb and can be invoked as follows:
qvfb -width 320 -height 480 -depth 32
An alternative to using the X11-specific virtual framebuffer is to use VNC (Virtual Network Computing) to run the applications remotely. To enable VNC support in Qt/Embedded Linux, pass the -qt-gfx-vnc option to configure. Then launch your Qt/Embedded Linux applications with the -display VNC:0 command-line option and run a VNC client pointing at the host on which your applications are running. The display size and bit depth can be specified by setting the QWS_SIZE and QWS_DEPTH environment variables on the host that runs the Qt/Embedded Linux applications (e.g., QWS_SIZE=320x480 and QWS_DEPTH=32).
When installing Qt/Embedded Linux, we can specify features we want to leave out to reduce its memory footprint. Qt/Embedded Linux includes more than one hundred configurable features, each of which is associated with a preprocessor symbol. For example, QT_NO_FILEDIALOG excludes QFileDialog from the QtGui library, and QT_NO_I18N leaves out all support for internationalization. The features are listed in src/corelib/global/qfeatures.txt.
Qt/Embedded Linux provides five example configurations (minimum, small, medium, large, and dist) that are stored in src/corelib/global/qconfig-xxx.h files. These configurations can be specified using the configure script’s -qconfig xxx option, for example:
./configure -qconfig small
To create custom configurations, we can manually provide a qconfig-xxx.h file and use it as though it were a standard configuration. Alternatively, we can use the qconfig graphical tool, located in Qt’s tools subdirectory.
Qt/Embedded Linux provides the following classes for interfacing with input and output devices and for customizing the look and feel of the window system:
Class | Base Class for |
|---|---|
| Screen drivers |
| Screen driver plugins |
| Mouse drivers |
| Mouse driver plugins |
| Keyboard drivers |
| Keyboard driver plugins |
| Input methods |
| Window decoration styles |
| Window decoration style plugins |
To obtain the list of predefined drivers, input methods, and window decoration styles, run the configure script with the -help option.
The screen driver can be specified using the -display command-line option when starting the Qt/Embedded Linux server, as seen in the previous section, or by setting the QWS_DISPLAY environment variable. The mouse driver and the associated device can be specified using the QWS_MOUSE_PROTO environment variable, whose value must have the syntax type:device, where type is one of the supported drivers and device is the path to the device (e.g., QWS_MOUSE_PROTO=IntelliMouse:/dev/mouse). Keyboards are handled similarly through the QWS_KEYBOARD environment variable. Input methods and window decorations are set programmatically in the server using QWSServer::setCurrentInputMethod() and QApplication::qwsSetDecoration().
Window decoration styles can be set independently of the widget style, which is encapsulated by a QStyle subclass. For example, it is entirely possible to set Windows as the window decoration style and Plastique as the widget style. If desired, decorations can be set on a per-window basis.
The QWSServer class provides various functions for customizing the window system. Applications that run as Qt/Embedded Linux servers can access the unique QWSServer instance through the QWSServer::instance() static function.
Qt/Embedded Linux supports the following font formats: TrueType (TTF), PostScript Type 1, Bitmap Distribution Format (BDF), and Qt Pre-rendered Fonts (QPF).
Because QPF is a raster format, it is designed to be faster and more compact than vector formats such as TTF and Type 1 if we need it only at one or two different sizes. The makeqpf tool can be used to pre-render a TTF or a Type 1 file and save the result in QPF format. An alternative is to run our applications with the -savefonts command-line option.
Since Qt/Embedded Linux offers the same API as the desktop editions of Qt, any standard Qt application can be recompiled to run on Qt/Embedded Linux. However, in practice, it is usually wise to create dedicated applications that account for the smaller screens, limited (or non-existent) keyboards, and resource limits that are typical of the small devices that run Qt/Embedded Linux. Furthermore, Qtopia provides additional libraries with features specific to mobile devices that we might want to use in our Qt/Embedded Linux applications.
Before we can start writing applications that make use of the Qtopia APIs, we must build and install the Qtopia SDK, including its own separate copy of Qt/Embedded Linux. Here we are assuming the use of the Qtopia Open Source Edition version 4.2, which includes almost everything in the Qtopia Phone Edition.
Building Qtopia is different from standard Unix practice, because Qtopia should not be built inside its source directory. For example, if we download the package qtopia-opensource-src-4.2.4.tar.gz to our $HOME/downloads directory, we would prepare to build Qtopia as follows:
cd $HOME/downloads
gunzip qtopia-opensource-src-4.2.4.tar.gz
tar xvf qtopia-opensource-src-4.2.4.tar
Now we must make a directory in which Qtopia will be built, for example:
cd $HOME
mkdir qtopia
For convenience, the documentation recommends setting up the QPEDIR environment variable. For example:
export QPEDIR=$HOME/qtopia
Here we have assumed the use of the Bash shell. Now we are ready to build Qtopia:
cd $QPEDIR
$HOME/downloads/qtopia-opensource-src-4.2.4/configure
make
make install
We haven’t specified any options to configure, but you might wish to. Run configure -help to see what options are available.
After installation, all the Qtopia files will be in $QPEDIR/image, and all the files created by the user as a result of interacting with Qtopia will be in $QPEDIR/home. In Qtopia-speak, an “image” is a Qtopia file system that resides on a desktop computer and is used by the Qtopia environment when it is run in the virtual framebuffer.
Qtopia provides its own comprehensive documentation set, and it is well worth becoming familiar with it since Qtopia offers many classes that are not available (or relevant to) the desktop editions of Qt. The starting point is $QPEDIR/doc/html/index.html.
Once building and installing are complete, we can do an initial test by running $QPEDIR/scripts/runqtopia. This script launches the virtual framebuffer with a special skin and qpe, the Qtopia environment that contains the Qtopia application stack. It is possible to start the virtual framebuffer and the Qtopia environment separately, but then we have to start them in the correct order. If we inadvertently start qpe first, Qtopia will write to the X11 framebuffer, which at best will corrupt the screen. The runqtopia script can be executed with -help to see the list of command-line options it supports. These include -skin, with a list of skins to choose from.
The virtual framebuffer has a context menu that can be popped up by right-clicking anywhere except the Qtopia area. The menu lets us adjust the display and terminate Qtopia.
Now that we have Qtopia running in a virtual framebuffer, we can build one of the supplied example applications, just to see how the process works. Then, we will create a very simple application from scratch.
Change directory to $QPEDIR/examples/application. Qtopia has its own version of qmake called qtopiamake, located in $QPEDIR/bin. Run this to create a makefile, and then run make. This will create an executable called example. Now run make install; this will copy example (and some other files) into Qtopia’s image directory. Now, if we terminate Qtopia and then start it again, using runqtopia, our new “Example” application will be available. To run the example, click the ‘Q’ button that is in the middle at the bottom of the Qtopia area, then click the Packages icon (the “boxes” icon, just above the pointing hand), and then click “Example” (see Figure 24.3).
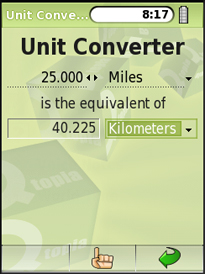
We will finish this section by creating a small but useful Qtopia application from scratch, since there are a few details that we must be aware of. The application is called Unit Converter and is shown in Figure 24.2. It only uses the Qt API and therefore has few surprises. In the next section, we will create a more complex example that uses some of the Qtopia-specific APIs.
The Unit Converter application will be made from three files: main.cpp, unitconverter.h, and unitconverter.cpp. Create a new directory called unitconverter, then cd into it and create the .cpp and .h files as empty files. Now run
qtopiamake -project
to produce a .pro file. The file will look something like this:
qtopia_project(qtopia app)

TARGET        = unitconverter
CONFIG       += qtopia_main no_quicklaunch
HEADERS      += unitconverter.h
SOURCES      += main.cpp
                unitconverter.cpp
pkg.domain    = none
Even if we wrote the code, built the executable, and installed it, it would not appear in Qtopia’s list of applications. To achieve that, we must specify where the application’s pictures are, where its .desktop file is, and where that should go. It is also good practice to provide some packaging information. For these reasons, we hand-edit the .pro file so that it now looks like this:
qtopia_project(qtopia app)

TARGET        = unitconverter
CONFIG       += qtopia_main no_quicklaunch
HEADERS      += unitconverter.h
SOURCES      += main.cpp
                unitconverter.cpp
INSTALLS     += desktop pics

desktop.files = unitconverter.desktop
desktop.path  = /apps/Applications
desktop.hint  = desktop

pics.files    = pics/*
pics.path     = /pics/unitconverter
pics.hint     = pics

pkg.name      = unitconverter
pkg.desc      = A program to convert between various units of measurement
pkg.version   = 1.0.0
pkg.domain    = window
The .pro file now contains an INSTALLS entry that says that the application’s .desktop file and pictures must be installed in addition to the executable when we run make install.
By convention, pictures are stored in a pics subdirectory, and the pics.xxx entries in the .pro file specify where the source pictures are located and where they should be installed. The desktop.xxx entries specify the name of the application’s .desktop file and where it should be installed. Installing it in /apps/Applications ensures that it appears in the list of applications shown when the user clicks the Packages icon. When the application is run on a desktop machine, absolute paths such as /apps/Applications and /pics/expenses are actually relative to Qtopia’s image directory (with apps being replaced by bin).
The unitconverter.desktop file provides some basic information about the application. For our purposes, it is used to ensure that the application shows up in the list of applications. This is the complete file:
[Desktop Entry]
Comment[]=A program to convert between various units of measurement
Exec=unitconverter
Icon=unitconverter/Example
Type=Application
Name[]=Unit Converter
The information we have provided is only a subset of what can be specified. For example, we can provide information about translations. Notice that the icon has no file extension, such as .png; we leave the Qtopia resource system to find and show the appropriate picture.
So far, we have seen a special and manually edited .pro file and a .desktop file. We must do just one more Qtopia-specific thing, and then we can write unitconverter.h and unitconverter.cpp using standard Qt in the standard way. For Qtopia, we must follow a particular idiom to hook into the rest of the environment; the complete main.cpp is reduced to just these lines:
#include <QtopiaApplication>

#include "unitconverter.h"

QTOPIA_ADD_APPLICATION("UnitConverter", UnitConverter)
QTOPIA_MAIN
The name of the main window’s class, included from unitconverter.h, is UnitConverter. Used in conjunction with qtopiamake and the unitconverter.h and unitconverter.cpp files, we can produce a Qtopia application that will run in the Qtopia environment. The main() function is defined by the QTOPIA_MAIN macro.
Since the application, apart from main.cpp, uses only standard Qt classes, it could also be compiled and run as a normal Qt application. To do this, we would need to use the standard qmake and change main.cpp to this:
#include <QApplication>

#include "unitconverter.h"

int main(int argc, char *argv[])
{
    QApplication app(argc, argv);
    UnitConverter converter;
    converter.show();
    return app.exec();
}
In addition, we would have to comment out the qtopia_project() line in the .pro file.
For applications that need only Qt/Embedded Linux, it is often more convenient to develop them as standard Qt applications, perhaps with an explicit resize() of the main window to the dimensions of a phone or PDA, and turn them into Qtopia applications when they are ready for alpha testing. Alternatively, we could have two different main.cpp files, perhaps main_desktop.cpp and main_qtopia.cpp, and two .pro files.
Most of the code for the Unit Converter application is similar to that in the other Qt examples shown throughout the book, so we will not review it here.
To test the application, we must run make, then make install, and then runqtopia. Once Qtopia is running in the virtual framebuffer, we can click the ‘Q’ button, then the Packages icon, then “Unit Converter”. After this, we can exercise the application by changing the amount and by selecting different units in the comboboxes.
Creating Qtopia applications is not very different from creating conventional Qt applications, apart from some initial setup differences (the special .pro file and the .desktop file) and using qtopiamake instead of qmake. Testing embedded applications is reasonably easy since they can be built, installed, and then run from within the virtual framebuffer. As for the applications themselves, although they can simply be conventional Qt applications, in practice it is usually better to write specifically with the limitations of the embedded environment in mind and to use the Qtopia-specific APIs to ensure that they integrate well with the rest of the Qtopia application stack.
Qtopia PDA Edition and Qtopia Phone Edition provide sets of applications that are relevant to mobile device users. Most of these applications have their functionality abstracted out into libraries, or make use of edition-specific libraries. These libraries can be used in our own Qtopia applications, giving us access to device services such as alarms, email, phone dialing, SMS, voice recording, and many others.
If we want to access device-specific features from our applications, we have many options:
We can use Qt/Embedded Linux and write our own code for interacting with the device.
We can take an existing Qtopia application and modify it to have the functionality we want.
We can write using the additional APIs, for example, the Qtopia Phone API or the Qtopia PIM (Personal Information Manager) application’s library.
In this section, we will take the last of these approaches. We will write a small application that records simple information about expenses. It makes use of the Qtopia PIM application’s data to pop up a list of contacts, and then sends an expense report to the selected contact as an SMS message. It also demonstrates how to use Qtopia’s support for the multi-function “soft keys” found on most mobile phones.
As Figure 24.4 shows, the application will end up in the application packages list, just like the example application we built in the previous section. As before, we will begin by looking at the .pro file, then the .desktop file, and finally the application’s source files. Here’s expenses.pro:
qtopia_project(qtopia app)
depends(libraries/qtopiapim)

CONFIG       += qtopia_main no_quicklaunch
HEADERS      += expense.h
                expensedialog.h
                expensewindow.h
SOURCES      += expense.cpp
                expensedialog.cpp
                expensewindow.cpp
                main.cpp
INSTALLS     += desktop pics

desktop.files = expenses.desktop
desktop.path  = /apps/Applications
desktop.hint  = desktop

pics.files    = pics/*
pics.path     = /pics/expenses
pics.hint     = pics

pkg.name      = expenses
pkg.desc      = A program to record and SMS expenses
pkg.version   = 1.0.0
pkg.domain    = window
The qtopia_project() line is the same as before. Since this application relies on the Qtopia PIM library, we use a depends() directive to specify the library. If we want to use multiple libraries, we can do so by separating them with commas. The rest of the .pro file is similar to what we saw in the Unit Converter example, only this time we have a few more source files because the application is more elaborate.
The expenses.desktop file is very similar to the one we saw before:
[Desktop Entry]
Comment[]=A program to record and SMS expenses
Exec=expenses
Icon=expenses/expenses
Type=Application
Name[]=Expenses
The same is true of main.cpp:
#include <QtopiaApplication>

#include "expensewindow.h"

QTOPIA_ADD_APPLICATION("Expenses", ExpenseWindow)
QTOPIA_MAIN
We will now look at the Expenses application’s header files and those parts of the source files that are Qtopia-specific or particularly relevant, starting with the Expense class:
class Expense
{
public:
    Expense();
    Expense(const QDate &date, const QString &desc, qreal amount);

    bool isNull() const;
    void setDate(const QDate &date);
    QDate date() const;
    void setDescription(const QString &desc);
    QString description() const;
    void setAmount(qreal amount);
    qreal amount() const;

private:
    QDate myDate;
    QString myDesc;
    qreal myAmount;
};
This simple class holds a date, a description, and an amount. We won’t review the expense.cpp file since none of its code is Qtopia-specific and it is very simple.
class ExpenseWindow : public QMainWindow
{
    Q_OBJECT
public:
    ExpenseWindow(QWidget *parent = 0, Qt::WFlags flags = 0);

protected:
    void closeEvent(QCloseEvent *event);

private slots:
    void add();
    void edit();
    void del();
    void send();
    void clear();

private:
    void createActions();
    void createMenuOrToolBar();
    void loadData();
    void showData();
    ...
    QList<Expense> expenses;
};
The ExpenseWindow is the application’s main form. It provides functions for the user to add, edit, and delete individual expense items, to send an SMS message with all of them listed, and to clear them. The expenses are held as values in a QList<Expense>.
The constructor creates a QListWidget and two QLabels. One label shows the text “Total”, and the other the sum of the expenses. The actions are created by the createActions() function, and the menu or toolbar is created by the createMenuOrToolBar() function. Both functions are called from the constructor. Any preexisting expenses are loaded at the end of the constructor by calling the loadData() function. We will skip the constructor itself, and instead just review the functions that it calls.
void ExpenseWindow::createActions()
{
    addAction = new QAction(tr("Add"), this);
    addAction->setIcon(QIcon(":icon/add"));
    connect(addAction, SIGNAL(triggered()), this, SLOT(add()));
    ...
    clearAction = new QAction(tr("Clear"), this);
    clearAction->setIcon(QIcon(":icon/clear"));
    connect(clearAction, SIGNAL(triggered()), this, SLOT(clear()));
}
The createActions() function creates the Add, Edit, Delete, Send, and Clear actions. Although it is possible to use Qt resource (.qrc) files, when programming Qtopia applications the standard practice for icons is to store them in a pics subdirectory that gets copied on to the device (thanks to the .pro file’s INSTALLS line). These can then be shared among several applications, and Qtopia optimizes access to them using a special database.
Everywhere Qt or Qtopia expects a file name, we can supply a Qtopia resource name instead. These are identified by a leading colon in the file name, followed by a word specifying the kind of resource. In this case, we specify that we want icons and give a file name, for example, :icon/add, omitting the file extension. Qtopia will look for a suitable icon in a number of standard locations, starting with the application’s pics directory. See http://doc.trolltech.com/qtopia4.2/qtopia-resource-system.html for all the details.
void ExpenseWindow::createMenuOrToolBar()
{
#ifdef QTOPIA_PHONE
    QMenu *menuOrToolBar = QSoftMenuBar::menuFor(listWidget);
#else
    QToolBar *menuOrToolBar = new QToolBar;
    addToolBar(menuOrToolBar);
#endif

    menuOrToolBar->addAction(addAction);
    menuOrToolBar->addAction(editAction);
    menuOrToolBar->addAction(deleteAction);
    menuOrToolBar->addAction(sendAction);
    menuOrToolBar->addAction(clearAction);
}
Some phones have “soft keys”, that is, multi-function keys whose actions are application- or context-specific. The QSoftMenuBar class takes advantage of soft keys where they are available, and provides a popup menu when they are not. For PDAs, we would normally have a toolbar rather than a popup menu. The #ifdef directive ensures that the actions are added to a soft menu if the target is a phone and to a toolbar if the target is a PDA.
Users will expect to be able to close the application without being forced to explicitly save their data. They will also expect the data to be restored when they restart the application at a later time. This is easily taken care of by calling loadData() in the constructor, and saving the data in the application’s closeEvent(). Qtopia offers many choices for data storage, including saving to a table in a SQLite database or saving to a file. Since the expense data is so small, we will save it using QSettings. We will look at how it is saved, and then at how it is loaded.
void ExpenseWindow::closeEvent(QCloseEvent *event)
{
    QByteArray data;

    QDataStream out(&data, QIODevice::WriteOnly);
    out.setVersion(QDataStream::Qt_4_2);

    foreach (Expense expense, expenses) {
        out << expense.date() << expense.description()
            << expense.amount();
    }

    QSettings settings("BookSoft Ltd", "Expenses");
    settings.setValue("data", data);

    event->accept();
}
We create a single QByteArray and write all the data to it. Then we save the byte array as a single value under the key data, before accepting the close event to allow the application to terminate.
void ExpenseWindow::loadData()
{
    QSettings settings("BookSoft Ltd", "Expenses");
    QByteArray data = settings.value("data").toByteArray();
    if (data.isEmpty())
        return;

    expenses.clear();
    QDataStream in(&data, QIODevice::ReadOnly);
    in.setVersion(QDataStream::Qt_4_2);

    while (!in.atEnd()) {
        QDate date;
        QString desc;
        qreal amount;

        in >> date >> desc >> amount;
        expenses.append(Expense(date, desc, amount));
    }
    showData();
}
If data exists from a previous session, we clear the existing data and then read in each new expense item. The showData() function clears the list widget, then iterates over the expenses, adding a new list item for each expense, and finishes by updating the total amount label.
Once the application is running, the user can add, edit, or delete expense items, send them all in an SMS message, or clear them all.
For deleting, we check to see whether there is a valid current row in the list widget, and then we use a standard QMessageBox::warning() static convenience function to ask the user to confirm the deletion. If the user chooses to clear all their expenses, again we use a message box. All of this is standard Qt programming. Qtopia takes care of making the message box display and integrate properly in the Qtopia environment.
If the user chooses the Add option to add a new expense item, the add() slot is called:
void ExpenseWindow::add()
{
    ExpenseDialog dialog(Expense(), this);
    if (QtopiaApplication::execDialog(&dialog)) {
        expenses.append(dialog.expense());
        showData();
    }
}
This slot creates an ExpenseDialog, a class we will look at shortly, but instead of calling the dialog’s QDialog::exec() function, we call QtopiaApplication::execDialog(), passing the dialog as the argument. Calling exec() is perfectly valid and does work, but using execDialog() ensures that the dialog is sized and positioned appropriately for a small device, maximizing it if necessary.
The edit() slot is similar. If the edit() function is called, it checks that there is a valid current row in the list widget, and if there is, it passes the expense that corresponds to that row as the first parameter to the ExpenseDialog’s constructor. If the user accepts the edit, the original expense’s details are overwritten with the edited details.
The last ExpenseWindow function that we will cover is send(), but before that, we will discuss the ExpenseDialog class:
class ExpenseDialog : public QDialog
{
    Q_OBJECT

public:
    ExpenseDialog(const Expense &expense, QWidget *parent = 0);

    Expense expense() const { return currentExpense; }

public slots:
    void accept();

private:
    void createActions();
    void createMenuOrToolBar();

    Expense currentExpense;
    ...
};
One aspect that is immediately apparent is that we have functions for creating actions and a menu or toolbar just like in ExpenseWindow. We will not be creating QPushButtons or a QDialogButtonBox, but instead will create a toolbar or a QSoftMenuBar since these provide much better integration with the Qtopia environment than creating buttons. The code is very similar to what we did for the application’s main window:
void ExpenseDialog::createActions()
{
    okAction = new QAction(tr("OK"), this);
    okAction->setIcon(QIcon(":icon/ok"));
    connect(okAction, SIGNAL(triggered()), this, SLOT(accept()));

    cancelAction = new QAction(tr("Cancel"), this);
    cancelAction->setIcon(QIcon(":icon/cancel"));
    connect(cancelAction, SIGNAL(triggered()), this, SLOT(reject()));
}
void ExpenseDialog::createMenuOrToolBar()
{
#ifdef QTOPIA_PHONE
    QMenu *menuOrToolBar = QSoftMenuBar::menuFor(this);
#else
    QToolBar *menuOrToolBar = new QToolBar;
    menuOrToolBar->setMovable(false);
    addToolBar(menuOrToolBar);
#endif

    menuOrToolBar->addAction(okAction);
    menuOrToolBar->addAction(cancelAction);
}
If the user accepts the dialog, we set the date, description, and amount attributes of the current expense, and leave the caller to retrieve this using the dialog’s expense() function.
If the user chooses the Send action, the send() function is called. This function prompts the user to choose a contact to send the expenses to, prepares the text of a message to send, and then sends the message using the SMS protocol (see Figure 24.5).
void ExpenseWindow::send()
{
    QContactSelector dialog(false, this);
    dialog.setModel(new QContactModel);
    QtopiaApplication::execDialog(&dialog);
    if (!dialog.contactSelected())
        return;
The QContactSelector dialog and the QContactModel model/view class are both provided by the PIM library. QContactModel accesses the user’s centralized contacts database. If there are more than a few contacts,QtopiaApplication::execDialog() will pop up the QContactSelector dialog maximized. If the user does not choose a contact, the contactSelected() function returns a null contact (which evaluates to false), in which case we do nothing. Otherwise, we prepare and then send the expenses:
QTemporaryFile file;
file.setAutoRemove(false);
if (!file.open()) {
    QMessageBox::warning(this, tr("Expenses"),
                         tr("Failed to send expenses: %1.")
                         .arg(file.errorString()));
    return;
}

QString fileName = file.fileName();
qreal total = 0.00;

QTextStream out(&file);
out.setCodec("UTF-8");

out << tr("Expenses
");
foreach (Expense expense, expenses) {
    out << tr("%1 $%2 %3
")
           .arg(expense.date().toString(Qt::ISODate))
           .arg(expense.amount(), 0, 'f', 2)
           .arg(expense.description());
    total += expense.amount();
}
out << tr("Total $%1
").arg(total, 0, 'f', 2);
file.close();
To send an SMS message, we will need to pass the name of a file that contains the SMS message. Here, we write the expenses data to a temporary file using QTextStream. Normally, QTemporaryFile removes the file as soon as we call close(), but we switch off this behavior because the file must be available until the SMS has been sent, at which point Qtopia will automatically remove it.
The total variable is declared with type qreal. This type is a typedef for float or double, depending on the architecture. For example, on ARM, it is defined as a float for performance reasons. Throughout Qt’s API (notably in QPainter), qreal is used rather than double.
QContact contact = dialog.selectedContact();
QtopiaServiceRequest request("SMS",
                             "writeSms(QString,QString,QString)");
request << QString("%1 %2").arg(contact.firstName())
                           .arg(contact.lastName())
        << contact.defaultPhoneNumber() << fileName;
request.send();
}
Qtopia implements the SMS protocol as a service rather than as a library. To send an SMS, we create a QtopiaServiceRequest object, giving it the name of the service, “SMS”, and the name of the function we want to use with the arguments listed in parentheses: “writeSms (QString, QString, QString)”. Under the hood, QtopiaServiceRequest uses QCOP to communicate with the process that provides the “SMS” service.
We populate the request with the recipient’s name and phone number, and the name of the file we created, and we call send() to send the message. When send() is executed, a Create Message dialog is popped up by the Qtopia system with the body of the message filled in from the file. The user can change the text, and then either send or cancel the SMS. The Expenses application can only be properly tested using an actual or simulated device that provides the SMS service.
As this example illustrates, embedded programming means that we must consider how we can use and interoperate with the services and Qtopia-specific APIs that are available. And it requires us to think very differently about user interface design to account for the small screens and limited input facilities that small devices have to offer. From a programmer’s point of view, writing applications for Qtopia is no different than for desktop platforms, except that we must familiarize ourselves with the additional tools, libraries, and services that are available with Qtopia.