

The QtSql module provides a platform- and database-independent interface for accessing SQL databases. This interface is supported by a set of classes that use Qt’s model/view architecture to provide database integration with the user interface. This chapter assumes familiarity with Qt’s model/view classes, covered in Chapter 10.
A database connection is represented by a QSqlDatabase object. Qt uses drivers to communicate with the various database APIs. The Qt Desktop Edition includes the following drivers:
Driver | Database |
|---|---|
QDB2 | IBM DB2 version 7.1and later |
QIBASE | Borland InterBase |
QMYSQL | MySQL |
QOCI | Oracle (Oracle Call Interface) |
QODBC | ODBC (includes Microsoft SQL Server) |
QPSQL | PostgreSQL 7.3 and later |
QSQLITE | SQLite version 3 |
QSQLITE2 | SQLite version 2 |
QTDS | Sybase Adaptive Server |
Due to license restrictions, not all of the drivers are provided with the Qt Open Source Edition. When configuring Qt, we can choose between including the SQL drivers inside Qt itself and building them as plugins. Qt is supplied with the SQLite database, a public domain in-process database.[*]
For users who are comfortable with SQL syntax, the QSqlQuery class provides a means of directly executing arbitrary SQL statements and handling their results. For users who prefer a higher-level database interface that avoids SQL syntax, QSqlTableModel and QSqlRelationalTableModel provide suitable abstractions. These classes represent an SQL table in the same way as Qt’s other model classes (covered in Chapter 10). They can be used stand-alone to traverse and edit data in code, or they can be attached to views through which end-users can view and edit the data themselves.
Qt also makes it straightforward to program the common database idioms, such as master–detail and drill-down, and to view database tables using forms or GUI tables, as the examples in this chapter will demonstrate.
To execute SQL queries, we must first establish a connection with a database. Typically, database connections are set up in a separate function that we call at application startup. For example:
bool createConnection()
{
    QSqlDatabase db = QSqlDatabase::addDatabase("QMYSQL");
    db.setHostName("mozart.konkordia.edu");
    db.setDatabaseName("musicdb");
    db.setUserName("gbatstone");
    db.setPassword("T17aV44");
    if (!db.open()) {
        QMessageBox::critical(0, QObject::tr("Database Error"),
                              db.lastError().text());
        return false;
    }
    return true;
}
First, we call QSqlDatabase::addDatabase() to create a QSqlDatabase object. The first argument to addDatabase() specifies which database driver Qt must use to access the database. In this case, we use MySQL.
Next, we set the database host name, the database name, the user name, and the password, and we open the connection. If open() fails, we show an error message.
Typically, we would call createConnection() in main():
int main(int argc, char *argv[])
{
    QApplication app(argc, argv);
    if (!createConnection())
        return 1;
    ...
    return app.exec();
}
Once a connection is established, we can use QSqlQuery to execute any SQL statement that the underlying database supports. For example, here’s how to execute a SELECT statement:
QSqlQuery query;
query.exec("SELECT title, year FROM cd WHERE year >= 1998");
After the exec() call, we can navigate through the query’s result set:
while (query.next()) {
    QString title = query.value(0).toString();
    int year = query.value(1).toInt();
    std::cerr << qPrintable(title) << ": " << year << std::endl;
}
We call next() once to position the QSqlQuery on the first record of the result set. Subsequent calls to next() advance the record pointer by one record each time, until the end is reached, at which point next() returns false. If the result set is empty (or if the query failed), the first call to next() will return false.
The value() function returns the value of a field as a QVariant. The fields are numbered from 0 in the order given in the SELECT statement. The QVariant class can hold many C++ and Qt types, including int and QString. The different types of data that can be stored in a database are mapped into the corresponding C++ and Qt types and stored in QVariants. For example, a VARCHAR is represented as a QString and a DATETIME as a QDateTime.
QSqlQuery provides some other functions to navigate through the result set: first(), last(), previous(), and seek(). These functions are convenient, but for some databases they can be slower and more memory-hungry than next(). For an easy optimization when operating on large data sets, we can call QSqlQuery::setForwardOnly(true) before calling exec(), and then only use next() for navigating through the result set.
Earlier we specified the SQL query as an argument to QSqlQuery::exec(), but we can also pass it directly to the constructor, which executes it immediately:
QSqlQuery query("SELECT title, year FROM cd WHERE year >= 1998");We can check for an error by calling isActive() on the query:
if (!query.isActive())
    QMessageBox::warning(this, tr("Database Error"),
                         query.lastError().text());
If no error occurs, the query will become “active” and we can use next() to navigate through the result set.
Doing an INSERT is almost as easy as performing a SELECT:
QSqlQuery query("INSERT INTO cd (id, artistid, title, year) "
                "VALUES (203, 102, 'Living in America', 2002)");
After this, numRowsAffected() returns the number of rows that were affected by the SQL statement (or −1 on error).
If we need to insert a lot of records, or if we want to avoid converting values to strings (and escaping them correctly), we can use prepare() to specify a query that contains placeholders and then bind the values we want to insert. Qt supports both the Oracle-style and the ODBC-style syntax for placeholders for all databases, using native support where it is available and simulating it otherwise. Here’s an example that uses the Oracle-style syntax with named placeholders:
QSqlQuery query;
query.prepare("INSERT INTO cd (id, artistid, title, year) "
              "VALUES (:id, :artistid, :title, :year)");
query.bindValue(":id", 203);
query.bindValue(":artistid", 102);
query.bindValue(":title", "Living in America");
query.bindValue(":year", 2002);
query.exec();
Here’s the same example using ODBC-style positional placeholders:
QSqlQuery query;
query.prepare("INSERT INTO cd (id, artistid, title, year) "
              "VALUES (?, ?, ?, ?)");
query.addBindValue(203);
query.addBindValue(102);
query.addBindValue("Living in America");
query.addBindValue(2002);
query.exec();
After the call to exec(), we can call bindValue() or addBindValue() to bind new values, and then call exec() again to execute the query with the new values.
Placeholders are often used to specify binary data or strings that contain non-ASCII or non-Latin-1 characters. Behind the scenes, Qt uses Unicode with those databases that support Unicode, and for those that don’t, Qt transparently converts strings to the appropriate encoding.
Qt supports SQL transactions on databases where they are available. To start a transaction, we call transaction() on the QSqlDatabase object that represents the database connection. To finish the transaction, we call either commit() or rollback(). For example, here’s how we would look up a foreign key and execute an INSERT statement inside a transaction:
QSqlDatabase::database().transaction();
QSqlQuery query;
query.exec("SELECT id FROM artist WHERE name = 'Gluecifer'");
if (query.next()) {
    int artistId = query.value(0).toInt();
    query.exec("INSERT INTO cd (id, artistid, title, year) "
               "VALUES (201, " + QString::number(artistId)
               + ", 'Riding the Tiger', 1997)");
}
QSqlDatabase::database().commit();
The QSqlDatabase::database() function returns a QSqlDatabase object representing the connection we created in createConnection(). If a transaction cannot be started, QSqlDatabase::transaction() returns false. Some databases don’t support transactions. For those, the transaction(), commit(), and rollback() functions do nothing. We can test whether a database supports transactions using hasFeature() on the QSqlDriver associated with the database:
QSqlDriver *driver = QSqlDatabase::database().driver();
if (driver->hasFeature(QSqlDriver::Transactions))
    ...
Several other database features can be tested for, including whether the database supports BLOBs (binary large objects), Unicode, and prepared queries.
It is also possible to access the low-level database driver handle and the low-level handle to a query’s result set, using QSqlDriver::handle() and QSqlResult::handle(). However, both functions are dangerous unless you know exactly what you are doing and are very careful. See their documentation for examples and an explanation of the risks.
In the examples so far, we have assumed that the application is using a single database connection. If we want to create multiple connections, we can pass a name as a second argument to addDatabase(). For example:
QSqlDatabase db = QSqlDatabase::addDatabase("QPSQL", "OTHER");
db.setHostName("saturn.mcmanamy.edu");
db.setDatabaseName("starsdb");
db.setUserName("hilbert");
db.setPassword("ixtapa7");
We can then retrieve a pointer to the QSqlDatabase object by passing the name to QSqlDatabase::database():
QSqlDatabase db = QSqlDatabase::database("OTHER");To execute queries using the other connection, we pass the QSqlDatabase object to the QSqlQuery constructor:
QSqlQuery query(db);
query.exec("SELECT id FROM artist WHERE name = 'Mando Diao'");
Multiple connections are useful if we want to perform more than one transaction at a time, since each connection can handle only a single active transaction. When we use multiple database connections, we can still have one unnamed connection, and QSqlQuery will use that connection if none is specified.
In addition to QSqlQuery, Qt provides the QSqlTableModel class as a higher-level interface, allowing us to avoid using raw SQL for performing the most common SQL operations (SELECT, INSERT, UPDATE, and DELETE). The class can also be used stand-alone to manipulate a database without any GUI involvement, or it can be used as a data source for QListView or QTableView.
Here’s an example that uses QSqlTableModel to perform a SELECT:
QSqlTableModel model;
model.setTable("cd");
model.setFilter("year >= 1998");
model.select();
This is equivalent to the query
SELECT * FROM cd WHERE year >= 1998
Navigating through the result set is done by retrieving a given record using QSqlTableModel::record() and by accessing individual fields using value():
for (int i = 0; i < model.rowCount(); ++i) {
    QSqlRecord record = model.record(i);
    QString title = record.value("title").toString();
    int year = record.value("year").toInt();
    std::cerr << qPrintable(title) << ": " << year << std::endl;
}
The QSqlRecord::value() function takes either a field name or a field index. When operating on large data sets, it is recommended that fields are specified by their indexes. For example:
int titleIndex = model.record().indexOf("title");
int yearIndex = model.record().indexOf("year");
for (int i = 0; i < model.rowCount(); ++i) {
    QSqlRecord record = model.record(i);
    QString title = record.value(titleIndex).toString();
    int year = record.value(yearIndex).toInt();
    std::cerr << qPrintable(title) << ": " << year << std::endl;
}
To insert a record into a database table, we call insertRow() to create a new empty row (record), and we use setData() to set the values of each column (field):
QSqlTableModel model;
model.setTable("cd");
int row = 0;
model.insertRows(row, 1);
model.setData(model.index(row, 0), 113);
model.setData(model.index(row, 1), "Shanghai My Heart");
model.setData(model.index(row, 2), 224);
model.setData(model.index(row, 3), 2003);
model.submitAll();
After the call to submitAll(), the record might be moved to a different row position, depending on how the table is ordered. The submitAll() call will return false if the insertion failed.
An important difference between an SQL model and a standard model is that for an SQL model we must call submitAll() to have any changes written to the database.
To update a record, we must first position the QSqlTableModel on the record we want to modify (e.g., using select()). We then extract the record, update the fields we want to change, and write our changes back to the database:
QSqlTableModel model;
model.setTable("cd");
model.setFilter("id = 125");
model.select();
if (model.rowCount() == 1) {
    QSqlRecord record = model.record(0);
    record.setValue("title", "Melody A.M.");
    record.setValue("year", record.value("year").toInt() + 1);
    model.setRecord(0, record);
    model.submitAll();
}
If there is a record that matches the specified filter, we retrieve it using QSqlTableModel::record(). We apply our changes and overwrite the original record with our modified record.
It is also possible to perform an update using setData(), just as we would do for a non-SQL model. The model indexes that we retrieve are for a given row and column:
model.select();
if (model.rowCount() == 1) {
    model.setData(model.index(0, 1), "Melody A.M.");
    model.setData(model.index(0, 3),
                  model.data(model.index(0, 3)).toInt() + 1);
    model.submitAll();
}
Deleting a record is similar to updating:
model.setTable("cd");
model.setFilter("id = 125");
model.select();
if (model.rowCount() == 1) {
    model.removeRows(0, 1);
    model.submitAll();
}
The removeRows() call takes the row number of the first record to delete and the number of records to delete. The next example deletes all the records that match the filter:
model.setTable("cd");
model.setFilter("year < 1990");
model.select();
if (model.rowCount() > 0) {
    model.removeRows(0, model.rowCount());
    model.submitAll();
}
The QSqlQuery and QSqlTableModel classes provide an interface between Qt and an SQL database. Using these classes, we can create forms that present data to users and that let them insert, update, and delete records.
For projects that use the SQL classes, we must add the line
QT += sql
to their .pro file. This will ensure that the application is linked against the QtSql library.
In the preceding section, we saw how to interact with a database using QSqlQuery and QSqlTableModel. In this section, we will see how to present a QSqlTableModel in a QTableView widget.
The Scooters application, shown in Figure 13.1, presents a table of scooter models. The example is based on a single table, scooter, defined as follows:
CREATE TABLE scooter (
    id INTEGER PRIMARY KEY AUTOINCREMENT,
    name VARCHAR(40) NOT NULL,
    maxspeed INTEGER NOT NULL,
    maxrange INTEGER NOT NULL,
    weight INTEGER NOT NULL,
    description VARCHAR(80) NOT NULL);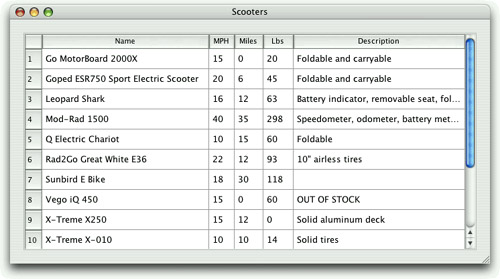
The id field’s values are generated automatically by the database, in this case by SQLite. Other databases may use a different syntax for this.
For ease of maintenance, we use an enum to give meaningful names to the column indexes:
enum {
    Scooter_Id = 0,
    Scooter_Name = 1,
    Scooter_MaxSpeed = 2,
    Scooter_MaxRange = 3,
    Scooter_Weight = 4,
    Scooter_Description = 5
};
Here is all the code that is necessary to set up a QSqlTableModel to display the scooter table:
    model = new QSqlTableModel(this);
    model->setTable("scooter");
    model->setSort(Scooter_Name, Qt::AscendingOrder);
    model->setHeaderData(Scooter_Name, Qt::Horizontal, tr("Name"));
    model->setHeaderData(Scooter_MaxSpeed, Qt::Horizontal, tr("MPH"));
    model->setHeaderData(Scooter_MaxRange, Qt::Horizontal, tr("Miles"));
    model->setHeaderData(Scooter_Weight, Qt::Horizontal, tr("Lbs"));
    model->setHeaderData(Scooter_Description, Qt::Horizontal,
                            tr("Description"));
    model->select();
Creating the model is similar to what we saw in the preceding section. One difference is that we have provided our own column titles. If we had not done so, the raw field names would have been used. We have also specified a sorting order using setSort(); behind the scenes, this is implemented by an ORDER BY clause.
Now that we have created the model and populated it with data using select(), we can create a view to present it:
    view = new QTableView;
    view->setModel(model);
    view->setSelectionMode(QAbstractItemView::SingleSelection);
    view->setSelectionBehavior(QAbstractItemView::SelectRows);
    view->setColumnHidden(Scooter_Id, true);
    view->resizeColumnsToContents();
    view->setEditTriggers(QAbstractItemView::NoEditTriggers);

    QHeaderView *header = view->horizontalHeader();
    header->setStretchLastSection(true);
In Chapter 10, we saw how to use QTableView to present data from a QAbstractItemModel in a table. Since QSqlTableModel is (indirectly) derived from QAbstractItemModel, it can readily be used as the data source of a QTableView. The setModel() call is all that is necessary to connect the view to the model. The rest of the code only customizes the table to make it more user-friendly.
The selection mode specifies what, if anything, the user can select; here we have made individual cells (fields) selectable. This selection is usually shown by a dotted outline around the selected cell. The selection behavior specifies how selections should work visually, in this case by entire rows. This selection is usually shown by using a different background color. We have chosen to hide the ID column because the IDs are not meaningful to the user. We have also set NoEditTriggers to make the table view read-only.
An alternative for presenting read-only tables is to use QSqlTableModel’s base class, QSqlQueryModel. This class provides the setQuery() function, so it is possible to set complex SQL queries to provide particular views of one or more tables—for example, using joins.
Unlike the Scooters database, most databases have lots of tables and foreign key relationships. Qt provides QSqlRelationalTableModel, a subclass of QSqlTableModel that can be used to display and edit tables with foreign keys. A QSqlRelationalTableModel is very similar to a QSqlTableModel, except that we can add QSqlRelations to the model, one for each foreign key. In many cases, a foreign key has an ID field and a name field; by using a QSqlRelationalTableModel, we can ensure that users can see and change the name field while behind the scenes the corresponding ID field is the one that is actually used. For this to work correctly, we must set a QSqlRelationalDelegate (or a custom subclass of our own) on the view that is being used to present the model.
We will show how to enable the presentation and changing of foreign keys in the next two sections, and we will give more coverage of QTableViews in the last section of this chapter.
In this section, we will see how to create a dialog form that displays one record at a time. The dialog can be used to add, edit, and delete individual records, and to navigate through all the records in a table.
We will illustrate these concepts in the context of the Staff Manager application. The application keeps track of which department employees are in, where the departments are located, and some basic information about employees, such as their internal phone extension. The application uses the following three tables:
CREATE TABLE location (
    id INTEGER PRIMARY KEY AUTOINCREMENT,
    name VARCHAR(40) NOT NULL));

CREATE TABLE department (
    id INTEGER PRIMARY KEY AUTOINCREMENT,
    name VARCHAR(40) NOT NULL,
    locationid INTEGER NOT NULL,
    FOREIGN KEY (locationid) REFERENCES location));

CREATE TABLE employee (
    id INTEGER PRIMARY KEY AUTOINCREMENT,
    name VARCHAR(40) NOT NULL,
    departmentid INTEGER NOT NULL,
    extension INTEGER NOT NULL,
    email VARCHAR(40) NOT NULL,
    startdate DATE NOT NULL,
    FOREIGN KEY (departmentid) REFERENCES department));
The tables and their relationships are shown schematically in Figure 13.2. Each location can have any number of departments, and each department can have any number of employees. The syntax for specifying foreign keys is for SQLite 3 and may be different for other databases.

In this section, we will focus on EmployeeForm, the dialog for editing employees. In the next section, we will review MainForm, which provides a master–detail view of departments and employees.
The EmployeeForm class provides a drill-down from the main form’s summary of employees to a particular employee’s full details. When invoked, the form shows the specified employee if a valid employee ID is given, or the first employee otherwise. (The form is shown in Figure 13.3.) Users can navigate through the employees, edit or delete existing employees, and add new employees.

We have provided the following enum in employeeform.h to give meaningful names to the column indexes:
enum {
    Employee_Id = 0,
    Employee_Name = 1,
    Employee_DepartmentId = 2,
    Employee_Extension = 3,
    Employee_Email = 4,
    Employee_StartDate = 5
};
The rest of the header file defines the EmployeeForm class:
class EmployeeForm : public QDialog
{
    Q_OBJECT
public:
    EmployeeForm(int id, QWidget *parent = 0);

    void done(int result);

private slots:
    void addEmployee();
    void deleteEmployee();

private:
    QSqlRelationalTableModel *tableModel;
    QDataWidgetMapper *mapper;
    QLabel *nameLabel;
    ...
    QDialogButtonBox *buttonBox;
};
To access the database, we use a QSqlRelationalTableModel rather than a plain QSqlTableModel because we need to resolve foreign keys. The QDataWidgetMapper is a class that allows us to map the widgets in a form to the corresponding columns in a data model.
The form’s constructor is quite long, so we will review it in parts, omitting the layout code since it isn’t relevant.
EmployeeForm::EmployeeForm(int id, QWidget *parent)
    : QDialog(parent)
{
    nameEdit = new QLineEdit;

    nameLabel = new QLabel(tr("Na&me:"));
    nameLabel->setBuddy(nameEdit);

    departmentComboBox = new QComboBox;

    departmentLabel = new QLabel(tr("Depar&tment:"));
    departmentLabel->setBuddy(departmentComboBox);

    extensionLineEdit = new QLineEdit;
    extensionLineEdit->setValidator(new QIntValidator(0, 99999, this));

    extensionLabel = new QLabel(tr("E&xtension:"));
    extensionLabel->setBuddy(extensionLineEdit);

    emailEdit = new QLineEdit;

    emailLabel = new QLabel(tr("&Email:"));
    emailLabel->setBuddy(emailEdit);

    startDateEdit = new QDateEdit;
    startDateEdit->setCalendarPopup(true);
    QDate today = QDate::currentDate();
    startDateEdit->setDateRange(today.addDays(-90), today.addDays(90));

    startDateLabel = new QLabel(tr("&Start Date:"));
    startDateLabel->setBuddy(startDateEdit);
We begin by creating one editing widget for each field. We also create a label to put beside each editing widget to identify the corresponding field.
We use a QIntValidator to ensure that the Extension line editor will accept only valid extensions, in this case numbers in the range 0 to 99999. We also set a date range for the Start Date editor, and set the editor to provide a pop-up calendar. We do not populate the combobox directly; later on we will give it a model from which it can populate itself.
    firstButton = new QPushButton(tr("<< &First"));
    previousButton = new QPushButton(tr("< &Previous"));
    nextButton = new QPushButton(tr("&Next >"));
    lastButton = new QPushButton(tr("&Last >>"));

    addButton = new QPushButton(tr("&Add"));
    deleteButton = new QPushButton(tr("&Delete"));
    closeButton = new QPushButton(tr("&Close"));

    buttonBox = new QDialogButtonBox;
    buttonBox->addButton(addButton, QDialogButtonBox::ActionRole);
    buttonBox->addButton(deleteButton, QDialogButtonBox::ActionRole);
    buttonBox->addButton(closeButton, QDialogButtonBox::AcceptRole);
We create the navigation buttons (<< First, < Previous, Next >, and Last >>), which are grouped together at the top of the dialog. Then we create the other buttons (Add, Delete, and Close) and put them inside a QDialogButtonBox, located at the bottom of the dialog. The code that creates the layouts is straightforward, so we won’t review it.
At this point, we have set up the user interface’s widgets, so now we can turn our attention to the underlying functionality.
    tableModel = new QSqlRelationalTableModel(this);
    tableModel->setTable("employee");
    tableModel->setRelation(Employee_DepartmentId,
                            QSqlRelation("department", "id", "name"));
    tableModel->setSort(Employee_Name, Qt::AscendingOrder);
    tableModel->select();

    QSqlTableModel *relationModel =
            tableModel->relationModel(Employee_DepartmentId);
    departmentComboBox->setModel(relationModel);
    departmentComboBox->setModelColumn(
            relationModel->fieldIndex("name"));
The model is constructed and set up in much the same way as the QSqlTableModel we saw earlier, but this time we use a QSqlRelationalTableModel and set up a foreign key relation. The setRelation() function takes the index of a foreign key field and a QSqlRelation. The QSqlRelation constructor takes a table name (the foreign key’s table), the name of the foreign key field, and the name of the field to display to represent the foreign key field’s value.
A QComboBox is like a QListWidget in that it has an internal model to hold its data items. We can replace that model with one of our own, and that is what we do here, giving it the relation model that is used by the QSqlRelationalTableModel. The relation has two columns, so we must specify which one the combobox should show. The relation model was created for us when we called setRelation(), so we do not know the index of the name column. For this reason, we use the fieldIndex() function with the field name to get the right index to make the combobox show the department names. Thanks to QSqlRelationalTableModel, the combobox will display department names rather than department IDs.
    mapper = new QDataWidgetMapper(this);
    mapper->setSubmitPolicy(QDataWidgetMapper::AutoSubmit);
    mapper->setModel(tableModel);
    mapper->setItemDelegate(new QSqlRelationalDelegate(this));
    mapper->addMapping(nameEdit, Employee_Name);
    mapper->addMapping(departmentComboBox, Employee_DepartmentId);
    mapper->addMapping(extensionLineEdit, Employee_Extension);
    mapper->addMapping(emailEdit, Employee_Email);
    mapper->addMapping(startDateEdit, Employee_StartDate);
The QDataWidgetMapper reflects one database record’s fields into the widgets it is mapped to, and reflects changes made in these widgets back to the database. We can either take responsibility for submitting (committing) changes ourselves, or tell the mapper to do it for us automatically; here we have chosen the automated option (QDataWidgetMapper::AutoSubmit).
The mapper must be given the model to work on, and in the case of a model that has foreign keys, we must also give it a QSqlRelationalDelegate. This delegate ensures that values from the QSqlRelation’s display column are shown to the user rather than raw IDs. The delegate also ensures that if the user initiates editing, the combobox shows display values, but the mapper actually writes the corresponding index value (the foreign key) back to the database.
In cases where foreign keys refer to tables with large numbers of records, it is probably best to create our own delegate and use it to present a “list of values” form with a search capability rather than relying on QSqlRelationalTableModel’s default comboboxes.
Once the model and delegate are set, we add mappings between the form’s widgets and the corresponding field indexes. The combobox is treated just like the other widgets since all the work of dealing with the foreign key is handled by the relation model we have already set on it.
    if (id != -1) {
        for (int row = 0; row < tableModel->rowCount(); ++row) {
            QSqlRecord record = tableModel->record(row);
            if (record.value(Employee_Id).toInt() == id) {
                mapper->setCurrentIndex(row);
                break;
            }
        }
    } else {
        mapper->toFirst();
    }
If the dialog was called with a valid employee ID, we look for the record with that ID and make it the mapper’s current record. Otherwise, we simply navigate to the first record. In either case, the record’s data will be reflected into the mapped widgets.
    connect(firstButton, SIGNAL(clicked()), mapper, SLOT(toFirst()));
    connect(previousButton, SIGNAL(clicked()),
            mapper, SLOT(toPrevious()));
    connect(nextButton, SIGNAL(clicked()), mapper, SLOT(toNext()));
    connect(lastButton, SIGNAL(clicked()), mapper, SLOT(toLast()));
    connect(addButton, SIGNAL(clicked()), this, SLOT(addEmployee()));
    connect(deleteButton, SIGNAL(clicked()),
            this, SLOT(deleteEmployee()));
    connect(closeButton, SIGNAL(clicked()), this, SLOT(accept()));
    ...
}
The navigation buttons are connected directly to the corresponding mapper slots. (If we were using the manual submit policy, we would need to implement our own slots, and in them we would submit the current record and then perform the navigation to avoid changes being lost.) The data widget mapper allows us to edit and to navigate. To add or delete records, we use the underlying model.
void EmployeeForm::addEmployee()
{
    int row = mapper->currentIndex();
    mapper->submit();
    tableModel->insertRow(row);
    mapper->setCurrentIndex(row);

    nameEdit->clear();
    extensionLineEdit->clear();
    startDateEdit->setDate(QDate::currentDate());
    nameEdit->setFocus();
}
The addEmployee() slot is invoked when the user clicks the Add button. We begin by retrieving the current row since this is lost after submitting. Then we call submit() to make sure no changes to the current record are lost. Although we have set the submit policy to QDataWidgetMapper::AutoSubmit, we must still manually submit. This is because the automatic submit is applied only when the user changes focus—to avoid the overhead of doing a database UPDATE every time the user inserts or deletes a character—and it is possible that the user has edited a field but not tabbed away from it when they click the Add button. Next, we insert a new blank row and make the mapper navigate to it. Finally, we initialize the widgets, and give the focus to the first widget ready for the user to begin typing.
void EmployeeForm::deleteEmployee()
{
    int row = mapper->currentIndex();
    tableModel->removeRow(row);
    mapper->submit();
    mapper->setCurrentIndex(qMin(row, tableModel->rowCount() - 1));
}
For deleting, we begin by noting the current row. Then we delete the row and submit the change. We must manually submit deletions since the automatic submit policy applies only to changes to records. At the end, we make the mapper’s current index the row following the deleted row—or the last row if it was the last row that was deleted.
The QDataWidgetMapper class makes it easy to develop data-aware forms that display information from a data model. In the example, we used a QSqlRelationalTableModel as the underlying data model, but QDataWidgetMapper can be used with any data model, including non-SQL models. An alternative would have been to use QSqlQuery directly to fill in the form with data and to update the database. This approach requires more work, but it is also more flexible.
In the next section, we will review the rest of the Staff Manager application, including the code that uses the EmployeeForm class developed in this section.
In many cases, it is simplest to present users with a tabular view of a data set. In this section, we will present the Staff Manager application’s main form, which consists of two QTableViews in a master–detail relationship. (The form is shown in Figure 13.4.) The master view is a list of departments. The detail view is a list of employees in the current department. Both views use QSqlRelationalTableModels, since both of the database tables they are presenting have foreign key fields. The relevant CREATE TABLE statements are shown on page 324.

As usual, we use an enum to give meaningful names to the column indexes:
enum {
    Department_Id = 0,
    Department_Name = 1,
    Department_LocationId = 2
};
We will begin by looking at the MainForm class definition in the header file:
class MainForm : public QWidget
{
    Q_OBJECT

public:
    MainForm();

private slots:
    void updateEmployeeView();
    void addDepartment();
    void deleteDepartment();
    void editEmployees();

private:
    void createDepartmentPanel();
    void createEmployeePanel();

    QSqlRelationalTableModel *departmentModel;
    QSqlRelationalTableModel *employeeModel;

    QWidget *departmentPanel;
    ...
    QDialogButtonBox *buttonBox;
};
To set up a master–detail relationship, we must make sure that when the user navigates to a different record (row), we update the detail table to show only the relevant records. This is achieved by the private updateEmployeeView() slot. The other three slots do what their names indicate, and the two private functions are helpers for the constructor.
Most of the constructor’s code is concerned with creating the user interface, and setting up suitable signal–slot connections. We will focus on those parts that are relevant to database programming.
MainForm::MainForm()
{
    createDepartmentPanel();
    createEmployeePanel();
The constructor begins by calling two helper functions. The first creates and sets up the department model and view, and the second does the same for the employee model and view. We will look at the relevant parts of these functions after we have finished looking at the constructor.
The next part of the constructor sets up a splitter that contains the two table views, and also sets up the form’s buttons. We will skip all this.
    ...
    connect(addButton, SIGNAL(clicked()), this, SLOT(addDepartment()));
    connect(deleteButton, SIGNAL(clicked()),
            this, SLOT(deleteDepartment()));
    connect(editButton, SIGNAL(clicked()), this, SLOT(editEmployees()));
    connect(quitButton, SIGNAL(clicked()), this, SLOT(close()));
    ...
    departmentView->setCurrentIndex(departmentModel->index(0, 0));
}
We connect the buttons to slots in the dialog, and we make sure that the first department is the current item.
Now that we have seen the constructor, we will look at the code in the createDepartmentPanel() helper function that sets up the department model and view:
void MainForm::createDepartmentPanel()
{
    departmentPanel = new QWidget;

    departmentModel = new QSqlRelationalTableModel(this);
    departmentModel->setTable("department");
    departmentModel->setRelation(Department_LocationId,
            QSqlRelation("location", "id", "name"));
    departmentModel->setSort(Department_Name, Qt::AscendingOrder);
    departmentModel->setHeaderData(Department_Name, Qt::Horizontal,
                                   tr("Dept."));
    departmentModel->setHeaderData(Department_LocationId,
                                   Qt::Horizontal, tr("Location"));
    departmentModel->select();

    departmentView = new QTableView;
    departmentView->setModel(departmentModel);
    departmentView->setItemDelegate(new QSqlRelationalDelegate(this));
    departmentView->setSelectionMode(
            QAbstractItemView::SingleSelection);
    departmentView->setSelectionBehavior(QAbstractItemView::SelectRows);
    departmentView->setColumnHidden(Department_Id, true);
    departmentView->resizeColumnsToContents();
    departmentView->horizontalHeader()->setStretchLastSection(true);

    departmentLabel = new QLabel(tr("Depar&tments"));
    departmentLabel->setBuddy(departmentView);

    connect(departmentView->selectionModel(),
            SIGNAL(currentRowChanged(const QModelIndex &,
                                     const QModelIndex &)),
            this, SLOT(updateEmployeeView()));
    ...
}
The code begins in a similar way to what we saw in the previous section when we set up a model for the employee table. The view is a standard QTableView, but because we have a foreign key, we must use a QSqlRelationalDelegate so that the foreign key’s text appears in the view and can be changed by a combobox, instead of the raw ID.
We have chosen to hide the department’s ID field since this is not meaningful to the user. We also stretch the last visible field, the department’s address, to fill the horizontal space available.
The department view has its selection mode set to QAbstractItemView::SingleSelection, and its selection behavior set to QAbstractItemView::SelectRows. The mode setting means that users can navigate to individual cells in the table, and the behavior setting means that as the user navigates, entire rows are highlighted.
We connect the currentRowChanged() signal from the view’s selection model to the updateEmployeeView() slot. This connection is what makes the master–detail relationship work, and ensures that the employee view always shows the employees for the highlighted department in the department view.
The code inside the createEmployeePanel() helper function is similar, but with some important differences:
void MainForm::createEmployeePanel()
{
    employeePanel = new QWidget;
    employeeModel = new QSqlRelationalTableModel(this);
    employeeModel->setTable("employee");
    employeeModel->setRelation(Employee_DepartmentId,
            QSqlRelation("department", "id", "name"));
    employeeModel->setSort(Employee_Name, Qt::AscendingOrder);
    employeeModel->setHeaderData(Employee_Name, Qt::Horizontal,
                                 tr("Name"));
    employeeModel->setHeaderData(Employee_Extension, Qt::Horizontal,
                                 tr("Ext."));
    employeeModel->setHeaderData(Employee_Email, Qt::Horizontal,
                                 tr("Email"));

    employeeView = new QTableView;
    employeeView->setModel(employeeModel);
    employeeView->setSelectionMode(QAbstractItemView::SingleSelection);
    employeeView->setSelectionBehavior(QAbstractItemView::SelectRows);
    employeeView->setEditTriggers(QAbstractItemView::NoEditTriggers);
    employeeView->horizontalHeader()->setStretchLastSection(true);
    employeeView->setColumnHidden(Employee_Id, true);
    employeeView->setColumnHidden(Employee_DepartmentId, true);
    employeeView->setColumnHidden(Employee_StartDate, true);

    employeeLabel = new QLabel(tr("E&mployees"));
    employeeLabel->setBuddy(employeeView);
    ...
}
The employee view’s edit triggers are set to QAbstractItemView::NoEditTriggers, effectively making the view read-only. In this application, the user can add, edit, and delete employee records by clicking Edit Employees, which invokes the EmployeeForm developed in the previous section.
This time, we hide three columns, not just one. We hide the id column, because again that is not meaningful to the user. We also hide the departmentid column because the only employees shown at any one time are those that are in the currently selected department. Finally, we hide the startdate column because it is rarely relevant and can be accessed by clicking Edit Employees.
void MainForm::updateEmployeeView()
{
    QModelIndex index = departmentView->currentIndex();
    if (index.isValid()) {
        QSqlRecord record = departmentModel->record(index.row());
        int id = record.value("id").toInt();
        employeeModel->setFilter(QString("departmentid = %1").arg(id));
        employeeLabel->setText(tr("E&mployees in the %1 Department")
                                  .arg(record.value("name").toString()));
    } else {
        employeeModel->setFilter("departmentid = -1");
        employeeLabel->setText(tr("E&mployees"));
    }
    employeeModel->select();
    employeeView->horizontalHeader()->setVisible(
            employeeModel->rowCount() > 0);
}
Whenever the current department changes (including at startup), this slot is called. If there is a valid current department, the function retrieves the department’s ID and sets a filter on the employee model. This constrains the employees shown to those with a matching department ID foreign key. (A filter is just a WHERE clause without the WHERE keyword.) We also update the label that is shown above the employee table to show the name of the department the employees are in.
If there is no valid department (e.g., if the database is empty), we set the filter to match a non-existent department ID to ensure that no records match.
We then call select() on the model to apply the filter. This in turn will emit signals that the view will respond to by updating itself. Finally, we show or hide the employee table’s column headers depending on whether or not any employees are shown.
void MainForm::addDepartment()
{
    int row = departmentModel->rowCount();
    departmentModel->insertRow(row);
    QModelIndex index = departmentModel->index(row, Department_Name);
    departmentView->setCurrentIndex(index);
    departmentView->edit(index);
}
If the user clicks the Add Dept. button, we insert a new row at the end of the department table, make this row the current row, and initiate editing of the department name column as though the user had pressed F2 or double-clicked it. If we needed to provide some default values, we would do so by calling setData() immediately after the insertRow() call.
We have not had to concern ourselves with creating unique keys for new records because we have used an auto-incrementing column to handle this for us. If this approach is not possible or not suitable, we can connect to the model’s beforeInsert() signal. This is emitted after the user’s edits, just before the insertion takes place in the database. This is the ideal time to put in IDs or to process the user’s data. There are similar beforeDelete() and beforeUpdate() signals; these are useful for creating audit trails.
void MainForm::deleteDepartment()
{
    QModelIndex index = departmentView->currentIndex();
    if (!index.isValid())
        return;

    QSqlDatabase::database().transaction();
    QSqlRecord record = departmentModel->record(index.row());
    int id = record.value(Department_Id).toInt();
    int numEmployees = 0;

    QSqlQuery query(QString("SELECT COUNT(*) FROM employee "
                            "WHERE departmentid = %1").arg(id));
    if (query.next())
        numEmployees = query.value(0).toInt();
    if (numEmployees > 0) {
        int r = QMessageBox::warning(this, tr("Delete Department"),
                    tr("Delete %1 and all its employees?")
                    .arg(record.value(Department_Name).toString()),
                    QMessageBox::Yes | QMessageBox::No);
        if (r == QMessageBox::No) {
            QSqlDatabase::database().rollback();
            return;
        }

        query.exec(QString("DELETE FROM employee "
                           "WHERE departmentid = %1").arg(id));
    }

    departmentModel->removeRow(index.row());
    departmentModel->submitAll();
    QSqlDatabase::database().commit();

    updateEmployeeView();
    departmentView->setFocus();
}
If the user wants to delete a department, we let them do so without formality if the department has no employees. But if it has employees, we ask the user to confirm the deletion, and if they confirm, we do a cascading delete to ensure that the database’s relational integrity is maintained. To achieve this, at least for databases such as SQLite 3 which don’t enforce relational integrity for us, we must use a transaction.
Once the transaction has been initiated, we execute a query to find out how many employees are in the department. If there is at least one, we pop up a message box asking for confirmation. If the user says no, we roll back the transaction and return. Otherwise, we delete all the department’s employees as well as the department itself, and we commit the transaction.
void MainForm::editEmployees()
{
    int employeeId = -1;
    QModelIndex index = employeeView->currentIndex();
    if (index.isValid()) {
        QSqlRecord record = employeeModel->record(index.row());
        employeeId = record.value(Employee_Id).toInt();
    }

    EmployeeForm form(employeeId, this);
    form.exec();
    updateEmployeeView();
}
The editEmployees() slot is invoked whenever the user clicks the Edit Employees button. We begin by assigning an invalid employee ID. Then we overwrite this with the current employee’s ID if possible. Then we construct the EmployeeForm and show it modally. Finally, we call the updateEmployeeView() slot to make the main form’s detail table view refresh itself since changes to employees may have occurred.
This chapter showed that Qt’s model/view classes make viewing and editing data in SQL databases as easy as possible. In situations where we want to present records using a form view, we can use QDataWidgetMapper to map widgets in the user interface to the fields in a record in the database. Setting up master–detail relationships is quite easy, requiring just one signal–slot connection and the implementation of one simple slot. Drill-down is also straightforward, just requiring us to navigate to the selected record in the drilled-down form’s constructor, or to go to the first record if no record is selected.
[*] SQL support must be enabled when Qt is built. For example, Qt can be compiled with support for SQLite built-in by passing the -qt-sql-sqlite command-line option to the configure script or by setting the appropriate option in the Qt installer.