3
Understanding Istio Control and Data Planes
The previous chapter gave you an overview of Istio, what a simple installation looks like, and how to apply a Service Mesh to a sample application. In this chapter, we will dive deeper into Istio’s control plane and data plane. We will understand the role of each of these components by going through the following topics:
- Components of Istio control plane
- Deployment models for Istio control plane
- Envoy, the Istio data plane
This chapter will help you understand the Istio control plane so you can plan the installation of control planes in a production environment. After reading this chapter, you should be able to identify the various components of the Istio control plane including istiod, along with the functionality they each deliver in the overall working of Istio.
Exploring the components of a control plane
The following diagram summarizes the Istio architecture along with the interaction between various components. We used the Ingress gateway and istio-proxy in the previous chapter so we will not go into further details on those here. We will, however, unravel some of the other components of the Istio control plane not directly depicted in the following illustration.

Figure 3.1 – Istio control plane
Before we delve into the components of the control plane, let’s first get the definition of the term out of the way – the control plane is a set of Istio services that are responsible for the operations of the Istio data plane. There is no single component that constitutes the control plane – rather, there are several.
Let’s look at the first component of the Istio control plane called istiod.
istiod
istiod is one of the Istio control plane components, providing service discovery, configuration, and certificate management. In prior versions of Istio, the control plane was made up of components called Galley, Pilot, Mixer, Citadel, WebHook Injector, and so on. istiod unifies the functionality of these components (Pilot, Galley, and Citadel) into a single binary to provide simplified installation, operation, and monitoring, as well as seamless upgrades between various Istio versions.
Let’s look at the istiod Pod running in the istio-system namespace:
$ kubectl get po -n istio-system
NAME                        READY   STATUS    RESTARTS   AGE
istio-egressgateway-84f95886c7-5gxps    1/1     Running   0          10d
istio-ingressgateway-6cb4bb68df-qbjmq   1/1     Running   0          10d
istiod-65fc7cdd7-r95jk                  1/1     Running   0          10d
$ kubectl exec -it pod/istiod-65fc7cdd7-r95jk -n istio-system -- /bin/sh -c «ps -ef"
UID          PID    PPID  C STIME TTY          TIME CMD
istio-p+       1       0  0 Mar14 ?        00:08:26 /usr/local/bin/pilot-discovery discovery --monitoringAddr=:15014 --log_output_level=default:info --domain cluster.local --keepaliveMaxServerConnectionAge 30m
You must have noticed that the Pod itself is running pilot-discovery and is based on the following image:
$ kubectl get pod/istiod-65fc7cdd7-r95jk -n istio-system -o json | jq '.spec.containers[].image'
"docker.io/istio/pilot:1.13.1"
You must have also noticed that the image for the istiod Pod is different to the istio-proxy image inserted as a sidecar. The istiod image is based on pilot-discovery, whereas the sidecar is based on proxyv2.
The following command shows that the sidecar container is created from proxyv2:
$ kubectl get pod/details-v1-7d79f8b95d-5f4td -n bookinfons -o json|jq '.spec.containers[].image'
"docker.io/istio/examples-bookinfo-details-v1:1.16.2"
"docker.io/istio/proxyv2:1.13.1"
Now that we know that the istiod Pod is based on pilot-discovery, let’s look at some of the functions performed by istiod.
Configuration watch
istiod watches Istio Custom Resource Definitions (CRDs) and any other Istio-related configuration being sent to the Kubernetes API server. Any such configuration is then processed and distributed internally to various subcomponents of istiod. You interact with Istio Service Mesh via the Kubernetes API server, but all interactions with Kubernetes API server are not necessarily destined for the Service Mesh.
istiod keeps an eye on various config resources, typically Kubernetes API server resources identified by certain characteristics such as labels, namespaces, annotations, and so on. These configuration updates are then intercepted, collected, and transformed into Istio-specific formats and distributed via the Mesh Configuration Protocol (MCP) to other components of istiod. istiod also implements configuration forwarding, which we will be looking at in later chapters when we do a multi-cluster installation of Istio. For now, let’s just say that istiod can also pass configurations to another istiod instance over MCP in both pull and push modes.
API validation
istiod also adds an admission controller to enforce the validation of Istio resources before they are accepted by the Kubernetes API server. In the previous chapter, we saw two admission controllers: the mutating webhook and the validation webhook.
The mutating webhook is responsible for augmenting the API calls for resources such as deployments by adding configuration for Istio sidecar injection. Similarly, the validation webhook auto registers itself with the Kubernetes API server to be called for each incoming call for Istio CRDs. When such calls to add/update/delete Istio CRDs arrive at the Kubernetes API server, they are passed to the validation webhook, which then validates the incoming request and, based on the outcome of the validation, the API calls are accepted or rejected.
Istio Certificate Authority
Istio provides comprehensive security for all communication in the mesh. All Pods are assigned an identity through the Istio PKI with x.509 key/cert in Spifee Verifiable Identity Document (SVID) format. The Istio Certificate Authority (CA) is responsible for signing requests from node agents deployed along with istio-proxy. The Istio CA is built on top of Citadel and is responsible for approving and signing the Certificate signature requests(CSRs) sent by Istio node agents. The Istio CA also performs the rotation and revocation of certificates and keys. It offers pluggability of different CAs as well as the flexibility to use the Kubernetes CA.
Some of the other functions and components of the Istio control plane are as follows:
- Sidecar injection: The Istio control plane also manages sidecar injection via mutating webhooks.
- Istio node agent: Node agents are deployed along with Envoy and take care of communication with the Istio CA, providing the cert and keys to Envoy.
- Identity directory and registry: The Istio control plane manages a directory of identities for various types of workloads that will be used by the Istio CA to issue key/certs for requested identities.
- End-user context propagation: Istio provides a secure mechanism to perform end user authentication on Ingress and then propagate the user context to other services and apps within the Service Mesh. The user context is propagated in JWT format, which helps to pass on user information to services within the mesh without needing to pass the end user credentials.
istiod is a key control plane component performing many key functions of the control plane, but is not the only control plane component worth remembering. In the next section, we will examine other components that are not part of istiod but still important components of the Istio control plane.
The Istio operator and istioctl
The Istio operator and istioctl are both control plane components and are optional to install. Both provide administrative functions to install and configure components of the control and data planes. You have used istioctl quite a lot in the previous chapter as a command-line tool to interact with the Istio control plane to pass on instructions. The instructions can be to fetch information and create, update, or delete a configuration related to the workings of the Istio data plane. The Istio operator and istioctl essentially perform the same functions with the exception that istioctl is explicitly invoked to make a change, whereas the Istio operator functions per the operator framework/pattern of Kubernetes.
We will not be using the Istio operator, but if you want, you can install it using the following command:
$ istioctl operator init Installing operator controller in namespace: istio-operator using image: docker.io/istio/operator:1.13.1 Operator controller will watch namespaces: istio-system Istio operator installed Installation complete
The two main components of the Istio operator are the customer resource called IstioOperator, represented by high-level APIs, and a controller that has logic to transform the high-level API into low-level Kubernetes actions. The IstioOperator CRD wraps a second component called IstioOperatorSpec, a status field, and some additional metadata.
You can use the following command to find details of the IstioOperator Custom Resource (CR):
$ kubectl get istiooperators.install.istio.io -n istio-system -o json
You can find the output of the command here: https://github.com/PacktPublishing/Bootstrap-Service-Mesh-Implementations-with-Istio/blob/main/Output%20references/Chapter%203/IstioOperator%20CR.docx
As you can see in the output, the API is structured in line with the control plane components around the base Kubernetes resources, pilot, Ingress and Egress gateways, and finally, the optional third-party add-ons.

Figure 3.2 – The Istio operator
The preceding diagram describes the operations of the IstioOperator, while the following describes the operations of istioctl:

Figure 3.3 – istioctl
istioctl and the operator are very similar to each other except when in the Actuation phase. istioctl is a user-run command that takes an IstioOperator CR as input, while the controller runs whenever the in-cluster IstioOperator CR changes, but the remaining components are similar, if not the same.
The following is a brief summary of the various components of the Istio operator and istioctl:
- Actuation: Triggers the validator component in response to an event, for example, a request for a CR update. For istioctl, the actuation logic is triggered by the operator invoking the istioctl CLI, which is written in Go using Cobra, a library for creating powerful CLI applications.
- Validator: Verifies the input (the IstioOperator CR) against the original schema of the CR.
- Config generator: In this phase, a full-blown configuration is created. The configuration includes parameters and values provided in the original event, as well as parameters that were omitted in the original event. The configuration contains the omitted parameters, along with their respective default values.
- Translator and renderer: The translator maps IstioOperator’s Kubernetes resources specs to Kubernetes resources, while the renderer produces the output manifest after applying all configurations.
- Resource Manager: This is responsible for managing the resources in the cluster. It caches the recent state of resources in a built-in cache, which is then compared with the output manifests, and every time there is a deviation or inconsistency between the state of Kubernetes objects (namespaces, CRDs, ServiceAccounts, ClusterRoles, ClusterRoleBindings, MutatingWebhookConfigurations, ValidatingWebhookConfigurations, Services, Deployments, or ConfigMaps) and the output manifest, then the Resource Manager updates them as per the manifest.
Steps to uninstall IstioOperator
As we will not be using IstioOperator for the rest of book, I suggest uninstalling it using the following commands:
$ istioctl operator remove
Removing Istio operator...
Removed Deployment:istio-operator:istio-operator.
Removed Service:istio-operator:istio-operator.
Removed ServiceAccount:istio-operator:istio-operator.
Removed ClusterRole::istio-operator.
Removed ClusterRoleBinding::istio-operator.
Removal complete
$ kubectl delete ns istio-operator
namespace "istio-operator" deleted
We briefly looked at the istio-proxy in the previous chapter. In the next section, we will examine the Istio agent, which is one of the containers deployed in the istio-proxy.
Istio agent
The Istio agent (also called pilot-agent) is part of the control plane deployed in every istio-proxy to help connect to the mesh by securely passing configuration and secrets to the Envoy proxies. Let’s look at the istio-agent in one of the microservices of bookinfo by listing all running process in the istio-proxy sidecar of details-v1:
$ kubectl exec -it details-v1-7d79f8b95d-5f4td -c istio-proxy -n bookinfons --/bin/sh -c "ps -ef"
UID          PID    PPID  C STIME TTY          TIME CMD
istio-p+       1       0  0 Mar14 ?        00:02:02 /usr/local/bin/pilot-agent p
istio-p+      15       1  0 Mar14 ?        00:08:17 /usr/local/bin/Envoy -c etc/
You must have noticed that pilot-agent is also running within the sidecar. pilot-agent not only bootstraps the Envoy proxy but also generates key and certificate pairs for Envoy proxies to establish the identity of Envoy proxies during mesh communication.
Before we talk about the role of the Istio agent in certificate generation, let’s just briefly talk about the Istio Secret Discovery Service (SDS). The SDS simplifies certificate management and was originally created by the Envoy project to provide a flexible API to deliver secrets/certificates to the Envoy proxy. The components needing the certificates are called SDS clients, and the component generating the certificates is called the SDS server. In the Istio data plane, the Envoy proxy acts as an SDS client and the Istio agent acts as the SDS server. The communication between the SDS client and SDS server happens using the SDS API specifications, mostly implemented over gRPC.
The following steps, also illustrated in Figure 3.4, are performed between the Istio agent, Envoy, and istiod to generate the certificate:
- During sidecar injection, istiod passes information about the SDS, including the location of the SDS server to the Envoy proxy.
- Envoy sends a request to pilot-agent (SDS server) for certificate generation over a Unix domain socket (UDS) via SDS protocols. pilot-agent generates a certificate signing request.
- pilot-agent then communicates with istiod and provides its identity along with the certificate signing request.
- istiod authenticates pilot-agent and if all is OK, signs the certificate.
- pilot-agent passes the certificate and keys to the Envoy proxy over UDS.

Figure 3.4 – Certificate generation for Envoy communication
In this and prior sections, we covered the Istio control plane. Now it’s time to go through various options to deploy the Istio control plane.
Deployment models for the Istio control plane
In the previous chapters, we installed Istio on minikube, which is one local cluster meant for development purposes on your local workstation. When deploying Istio in enterprise environments, the deployment will be not on minikube but rather on an enterprise-grade Kubernetes cluster. The Service Mesh might run on one Kubernetes cluster or be spread across multiple Kubernetes clusters. It might also be the case that all services will be on one network or may be on different networks with no direct connectivity between them. Every organization will have a different network and infrastructure disposition, and the deployment model for Istio will change accordingly.
What is a cluster?
There are many definitions of a cluster depending on what context they are being referred to. In this section, when we say cluster, we are basically referring to a set of compute nodes hosting containerized applications interconnected with each other. You can also think of a cluster as a Kubernetes cluster.
We will be discussing various architecture options for Istio in Chapter 8, but for now, let’s just briefly go through various deployment models for the control plane.
Single cluster with a local control plane
All sidecar proxies across all namespaces in the cluster connect to the control plane deployed in the same cluster. Similarly, the control plane is watching, observing, and communicating with the Kubernetes API server and sidecars within the same cluster where it is deployed.

Figure 3.5 – The data plane and control plane residing in the same Kubernetes cluster
The preceding illustration describes the deployment model we used in the previous chapter to deploy Istio. From the diagram, you can see that the Istio control plane and data plane both reside in the same Kubernetes cluster; in our case, it was minikube. istiod is installed in the istio-system namespace or any other namespace of your choosing. The data plane comprises various namespaces where applications are deployed along with istio-proxy sidecars.
Primary and remote cluster with a single control plane
A Service Mesh cluster, where the data plane and control plane are deployed in the same Kubernetes cluster, is also called a primary cluster. A cluster where the control plane is not collocated with the data plane is called a remote cluster.
In this architecture, there is a primary cluster and a remote cluster both sharing a common control plane. With this model, additional configuration is required to provide interconnectivity between the control plane in the primary cluster and the data plane in the remote cluster. The connectivity between the remote cluster and primary cluster control plane can be achieved by adding an Ingress gateway to protect and route communication to the primary control plane. This is shown in the following diagram:

Figure 3.6 – Uni-cluster control plane with data plane spread across multiple Kubernetes clusters
The Istio control plane also needs to be configured to establish the following communications:
- Communication with the remote plane Kubernetes API server
- Patch mutating webhooks into the remote plane to watch the namespaces configured for automated injection of istio-proxy
- Provide endpoints for CSR requests from Istio agents in the remote plane
Single cluster with an external control plane
In this configuration, instead of running a primary cluster with the control and data planes collocated on the same Kubernetes cluster, you can separate them from each other. This is done by deploying the control plane remotely on one Kubernetes cluster and having the data plane deployed on its own dedicated Kubernetes cluster. This deployment can be seen in the following diagram:

Figure 3.7 – The control plane and data plane residing in separate Kubernetes clusters
For security, separation of concerns, and compliance requirements such as Federal Information Processing Standards (FIPS), we can be required to deploy the Istio control plane separately from the data plane. Separating the control plane from the data plane allows the enforcement of strict traffic and access policies for control plane traffic without impacting the traffic flow of the data plane. Also, in an enterprise environment, where you have teams who can provide control planes as a managed service to project teams, then this model of deploying the control plane is highly suitable.
So far, the deployment models we have discussed reside over one or many Kubernetes clusters within a shared network. Where the network is not shared, the deployment model becomes more complex. We will go through some of those deployment models, along with the ones we covered in this chapter, with some hands-on exercises in Chapter 10.
In the next section, we will look at the Istio data plane and we will do that by understanding Envoy.
Exploring Envoy, the Istio data plane
Envoy is the key component of the Istio data plane. To understand the Istio data plane, it is important to understand and know about Envoy.
Envoy is an open source project and CNCF graduate. You can find more details about Envoy as a CNCF project at https://www.cncf.io/projects/Envoy/. In this section, we will learn about Envoy and why it was selected as the service proxy for the Istio data plane.
What is Envoy?
Envoy is a lightweight, highly performant Layer 7 and Layer 4 proxy with an easy-to-use configuration system, making it highly configurable and suitable for serving as a standalone edge-proxy in the API gateway architecture pattern, as well as running as a sidecar in the Service Mesh architecture pattern. In both architecture patterns, Envoy runs in its own single process alongside the applications/services, which makes it easier to upgrade and manage and also allows Envoy to be deployed and upgraded transparently across the entire infrastructure.
To understand Envoy, let’s look at the following three distinctive features that make Envoy different from other proxies available today.
Threading model
One of the highlights of the Envoy architecture is its unique threading model. In Envoy, the majority of the threads run asynchronously without blocking each other. Instead of having one thread per connection, multiple connections share the same worker thread running in non-blocking order. The threading model helps to process requests asynchronously but in a non-blocking manner, resulting in very high throughput.
Broadly, Envoy has three types of threads:
- Main thread: This owns the startup and shutdown of Envoy and xDS (more on xDS in the next section), API handling, runtime, and general process management. The main thread coordinates all management functionality in general, which does not require too much CPU. Therefore, the Envoy logic related to general management is single-threaded, making the code base simpler to write and manage.
- Worker thread: Generally, you run a worker thread per CPU core or per hardware thread if the CPU is hyper-threaded. The worker threads open one or more network locations (ports, sockets, etc) to which downstream systems can connect; this function of Envoy is called listening. Each worker thread runs a non-blocking event loop to perform listening, filtering, and forwarding.
- File flusher thread: This thread takes care of writing to files in a non-blocking fashion.
Architecture
Another highlight of the Envoy architecture is its filter architecture. Envoy is also an L3/L4 network proxy. It features a pluggable filter chain to write filters to perform different TCP/UDP tasks. A filter chain is basically a set of steps where the output from one step is fed into the input of the second step, and so on, just as with pipes in Linux. You can construct logic and behavior by stacking your desired filters to form a filter chain. There are many filters available out of the box to support tasks, such as raw TCP proxy, UDP proxy, HTTP proxy, and TLS client cert authentication. Envoy also supports an additional HTTP L7 filter layer. Through filters, we can perform different tasks, such as buffering, rate limiting, routing, forwarding, and so on.
Envoy supports both HTTP 1.1 and HTTP 2 and can operate as a transparent proxy in both HTTP protocols. This is particularly useful when you have legacy applications that support HTTP 1.1, but when you deploy them alongside Envoy proxy, you can bridge the transformation – meaning the application can communicate over HTTP 1.1 with Envoy, which then uses HTTP 2 to communicate with others. Envoy supports a comprehensive routing subsystem that allows a very flexible routing and redirection functionality, making it suitable for building Ingress/Egress API gateways as well as being deployed as a proxy in the sidecar pattern.
Envoy also supports modern protocols such as gRPC. gRPC is an open source remote procedure call framework that can run anywhere. It is widely used for service-to-service communication and is very performant and easy to use.
Configuration
The other highlight of Envoy is how it can be configured. We can configure Envoy using static configuration files that describe the services and how to communicate with them. For advanced scenarios where statically configuring Envoy would be impractical, Envoy supports dynamic configuration and can automatically reload configuration at runtime without needing a restart. A set of discovery services called xDS can be used to dynamically configure Envoy through the network and provide Envoy information about hosts, clusters HTTP routing, listening sockets, and cryptographic material. This makes it possible to write different kind of control planes for Envoy. The control plane basically implements the specification of xDS API and keeps up-to-date information of various resources and information required to be fetched dynamically by Envoy via xDS APIs. There are many open source control plane implementations for Envoy; a couple are linked as follows:
Various Service Mesh implementations such as Istio, Kuma, Gloo, and so on., which use Envoy as a sidecar, implement xDS APIs to provide configuration information to Envoy.
Envoy also supports the following:
- Automatic retries: Envoy supports the retrying of requests any number of times or under a retry budget. The request can be configured to be retried for certain retry conditions depending on application requirement. If you want to read further about retry, head to https://www.abhinavpandey.dev/blog/retry-pattern.
- Circuit breaking: Circuit breaking is important for microservices architecture. Envoy provides circuit breaking at network level, so as to protect upstream systems across all HTTP request executions. Envoy provides various circuit breaking limits based on configurations such as maximum number of connections, maximum number of pending requests, maximum request, maximum active retries, and maximum concurrent connection pools supported by upstream systems. More details about circuit breaker pattern are available at https://microservices.io/patterns/reliability/circuit-breaker.html.
- Global rate limiting: Envoy supports global rate limiting to control downstream systems from overwhelming upstream systems. The rate limiting can be performed at the network level as well at HTTP request level.
- Traffic mirroring: Envoy supports the shadowing of traffic from one cluster to another. This is very useful for testing as well as a myriad of other use cases, such as machine learning. An example of traffic mirroring at network level is AWS VPC, which provides options to mirror all traffic to VPC. You can read about AWS traffic mirroring at https://docs.aws.amazon.com/vpc/latest/mirroring/what-is-traffic-mirroring.html.
- Outlier detection: Envoy supports dynamically determining unhealthy upstream systems and removing them from the healthy load-balancing set.
- Request hedging: Envoy supports request hedging to deal with tail latency by issuing requests to multiple upstream systems and returning the most appropriate response to the downstream system. You can read more about request hedging at https://medium.com/star-gazers/improving-tail-latency-with-request-hedging-700c77cabeda.
We discussed earlier how filter chain-based architecture is one of the differentiating features of Envoy. Now let’s read about those filters that make up the filter chain.
HTTP filters
HTTP is one of the most common application protocols, and it’s not unusual for the majority of a given workload to operate over HTTP. To support HTTP, Envoy ships with various HTTP-level filters.
When configuring Envoy, you will have to deal primarily with the following configurations:
- Envoy listeners: These are the ports, sockets, and any other named network locations that downstream systems connect to
- Envoy routes: These are Envoy configurations describing how the traffic should be routed to upstream systems
- Envoy clusters: These are logical services formed of a group of similar upstream systems to which envoy routes or forwards the requests
- Envoy endpoints: These are individual upstream systems that serve requests
Important note
We will now be using Docker to play with Envoy. If you are running minikube, it will be a good idea to stop minikube now. If you don’t have Docker, you can install it by following the instructions at https://docs.docker.com/get-docker/.
Armed with the knowledge we’ve obtained so far, let’s go and create some Envoy listeners.
Download the envoy Docker image:
$ docker pull envoyproxy/envoy:v1.22.2
Once you have pulled the Docker image, go ahead and run the following from the Git repository of this chapter:
docker run –rm -it -v $(pwd)/envoy-config-1.yaml:/envoy-custom.yaml -p 9901:9901 -p 10000:10000 envoyproxy/envoy:v1.22.2 -c /envoy-custom.yaml
In the preceding command, we are mounting the envoy-config-1.yaml file as a volume and passing it to the Envoy container with the -c option. We are also exposing 10000 to the localhost, which is mapped to port 10000 of the Envoy container.
Let’s now check the contents of envoy-config-1.yaml.The root of Envoy configuration is called bootstrap configuration. The first line describes whether it is in static or dynamic configuration. In this instance, we are proving a static configuration by specifying static_resources:
Static_resources:
  listeners:
  - name: listener_http
In this instance, the configuration is very straightforward. We have defined a listener called listener_http, which is listening on 0.0.0.0 and port 10000 for incoming requests:
Listeners:
  - name: listener_http
    address:
      socket_address:
        address: 0.0.0.0
        port_value: 10000
We have not applied any filter specific to the listener, but we have applied a network filter called HTTPConnectionManager, or HCM:
Filter_chains:
    - filters:
      - name: envoy.filters.network.http_connection_manager
        typed_config:
          "@type": type.googleapis.com/envoy.extensions.filters.network.http_connection_manager.v3.HttpConnectionManager
          stat_prefix: chapter3-1_service
The HCM filter is capable of translating raw bytes into HTTP-level messages. It can handle access logging, generate request IDs, manipulate headers, manage route tables, and collect statistics. Envoy also supports defining multiple HTTP-level filters within the HCM filter. We can define these HTTP filters under the http_filters field.
In the following configuration, we have applied an HTTP router filter:
http_filters:
          - name: envoy.filters.http.router
            typed_config:
              "@type": type.googleapis.com/envoy.extensions.filters.http.router.v3.Router
          route_config:
            name: my_first_route_to_nowhere
            virtual_hosts:
            - name: dummy
              domains: ["*"]
              routes:
              - match:
                  prefix: "/"
                direct_response:
                  status: 200
                  body:
                    inline_string: "Bootstrap Service Mesh Implementations with Istio"
The router filter is responsible for performing routing tasks and is also the last filter to be applied in the HTTP filter chain. The router filter defines the routes under the route_config field. Within the route configuration, we can match the incoming requests by looking at metadata such as the URI, headers, and so on., and based on that, we define where the traffic should be routed or processed.
A top-level element in routing configuration is a virtual host. Each virtual host has a name that’s used when emitting statistics (not used for routing) and a set of domains that get routed to it. In envoy-config-1.yaml, for all requests, irrespective of the host header, a hardcoded response is returned.
To check the output of envoy-config1.yaml, you can use curl to test the response:
$ curl localhost:10000
Bootstrap Service Mesh Implementations with Istio
Let’s manipulate the virtual host definition in route_config of envoy-config1.yaml with the following:
          route_config:
            name: my_first_route_to_nowhere
            virtual_hosts:
            - name: acme
              domains: ["acme.com"]
              routes:
              - match:
                  prefix: "/"
                direct_response:
                  status: 200
                  body:
                    inline_string: "Bootstrap Service Mesh Implementations with Istio And Acme.com"
            - name: ace
              domains: ["acme.co"]
              routes:
              - match:
                  prefix: "/"
                direct_response:
                  status: 200
                  body:
                    inline_string: "Bootstrap Service Mesh Implementations with Istio And acme.co"
Here, we have defined two entries under virtual_hosts. If an incoming request’s host header is acme.com, then the routes defined in the acme virtual host will get processed. If the incoming request is destined for acme.co, then the routes defined under the ace virtual host will get processed.
Stop the Envoy container and restart it using the following commands:
docker run –rm -it -v $(pwd)/envoy-config-1.yaml:/envoy-custom.yaml -p 9901:9901 -p 10000:10000 envoyproxy/envoy:v1.22.2 -c /envoy-custom.yaml
Check the output by passing different host headers to curl:
$ curl -H host:acme.com localhost:10000
Bootstrap Service Mesh Implementations with Istio And Acme.com
$ curl -H host:acme.co localhost:10000
Bootstrap Service Mesh Implementations with Istio And acme.co
In most cases, you will not send a hardcoded response to HTTP requests. Realistically, you will want to route requests to real upstream services. To demonstrate this scenario, we will be making use of nginx to mock a dummy upstream service.
Run the nginx Docker container using the following command:
docker run -p 8080:80 nginxdemos/hello:plain-text
Check the output from another terminal using curl:
$ curl localhost:8080
Server address: 172.17.0.3:80
Server name: a7f20daf0d78
Date: 12/Jul/2022:12:14:23 +0000
URI: /
Request ID: 1f14eb809462eca57cc998426e73292c
We will route the request being processed by Envoy to nginx by making use of cluster subsystem configurations. Whereas the Listener subsystem configurations handle downstream request processing and managing the downstream request life cycle, the cluster subsystem is responsible for selecting and connecting the upstream connection to an endpoint. In the cluster configuration, we define clusters and endpoints.
Let’s edit envoy-config-2.yaml and modify the virtual host for acme.co with the following:
                - name: ace
              domains: ["acme.co"]
              routes:
              - match:
                  prefix: "/"
                route:
                  cluster: nginx_service
  clusters:
  - name: nginx_service
    connect_timeout: 5s
    load_assignment:
      cluster_name: nginx_service
      endpoints:
      - lb_endpoints:
        - endpoint:
            address:
              socket_address:
                address: 172.17.0.2
                port_value: 80
We have removed the direct_response attribute and replaced it with the following:
route:
                  cluster: nginx_service
We have added cluster to the definition, which sits at the same level as the listener configuration. In the cluster definition, we defined the endpoints. In this case, the endpoint is the nginx Docker container running on port 80. Please note that we are assuming that both Envoy and nginx are running on the same Docker network.
You can find the IP of the nginx container by inspecting the container. The config is saved in envoy-config-3.yaml. Please update the address value with the correct IP address of the nginx container and run the Envoy container with the updated envoy-config-3.yaml:
$ docker run –rm -it -v $(pwd)/envoy-config-3.yaml:/envoy-custom.yaml -p 9901:9901 -p 10000:10000 envoyproxy/envoy:v1.22.2 -c /envoy-custom.yaml
Perform the curl test and you will notice the response for the request destined for acme.co is coming from the nginx container:
$ curl -H host:acme.com localhost:10000
Bootstrap Service Mesh Implementations with Istio And Acme.com
$ curl -H host:acme.co localhost:10000
Server address: 172.17.0.2:80
Server name: bfe8edbee142
Date: 12/Jul/2022:13:05:50 +0000
URI: /
Request ID: 06bbecd3bc9901d50d16b07135fbcfed
Envoy provides several built-in HTTP filters. You can find the complete list of HTTP filters here: https://www.envoyproxy.io/docs/envoy/latest/configuration/http/http_filters/http_filters#config-http-filters.
Listener filters
We read previously that the listener subsystem handles the processing of incoming requests and the response to and from downstream systems. In addition to defining which addresses and ports Envoy listens on for incoming requests, we can optionally configure each listener with listener filters. The listener filters operate on newly accepted sockets and can stop or subsequently continue execution to further filters.
The order of the listener filters matters, as Envoy processes them sequentially right after the listener accepts a socket and before the connection is created. We use results from the listener filters to do filter matching to select appropriate network filter chains. For example, using a listener filter, we can determine the protocol type, and based on that, we might run specific network filters related to that protocol.
Let’s look at a simple example of listener filters in envoy-config-4.yaml under listener_filters. You will notice that we are using envoy.filters.listener.http_inspector of the following type: type.googleapis.com/envoy.extensions.filters.listener.http_inspector.v3.HttpInspector.
The HTTPInspector listener filter can detect the underlying application protocol and whether it is HTTP/1.1 or HTTP/2. You can read more about the HTTPInspector listener filter here: https://www.envoyproxy.io/docs/envoy/latest/configuration/listeners/listener_filters/http_inspector.
In this example, we are using the listener filter to find the application protocol via the filter chain. Depending on which HTTP protocol is used by the downstream system, we then apply a variety of HTTP filters, as discussed in previous sections.
You can find this example in the envoy-config-4.yaml file. Go ahead and apply the configuration to Envoy, but do also remember to close down the Docker containers you created for previous examples:
$ docker run –rm -it -v $(pwd)/envoy-config-4.yaml:/envoy-custom.yaml -p 9901:9901 -p 10000:10000 envoyproxy/envoy:v1.22.2 -c /envoy-custom.yaml
Perform curl with the HTTP 1.1 and HTTP 2 protocols, and you will see that Envoy is able to figure out the application protocol and route the request to the correct destination:
$ curl localhost:10000 –http1.1
HTTP1.1
$ curl localhost:10000 –http2-prior-knowledge
HTTP2
As I mentioned earlier when introducing Envoy, it is highly configurable and can be configured dynamically. I believe the dynamic configurability of Envoy is what makes it so popular and makes it standout from the other proxies available today. Let’s look more into this next!
Dynamic configuration via xDS APIs
So far, in our previous examples, we have been using static configuration by specifying static_resources at the beginning of the config file. Every time we wanted to change the config, we had to restart the Envoy container. To avoid this, we can make use of dynamic configuration, where Envoy dynamically reloads the configuration either by reading it from disk or over the network.
For dynamic configuration where Envoy fetches the configuration over the network, we need to make use of xDS APIs, which are basically a collection of various service discovery APIs related to various Envoy configurations. To make use of xDS APIs, you need to implement an application that can fetch the latest values of various Envoy configurations and then present them via gRPC # as per the xDS protobuf specifications (also called protocol buffers; you can find details about protocol buffers at https://developers.google.com/protocol-buffers, and more on gRPC at https://grpc.io/). This application is commonly referred to as the control plane. The following diagram describes this concept.
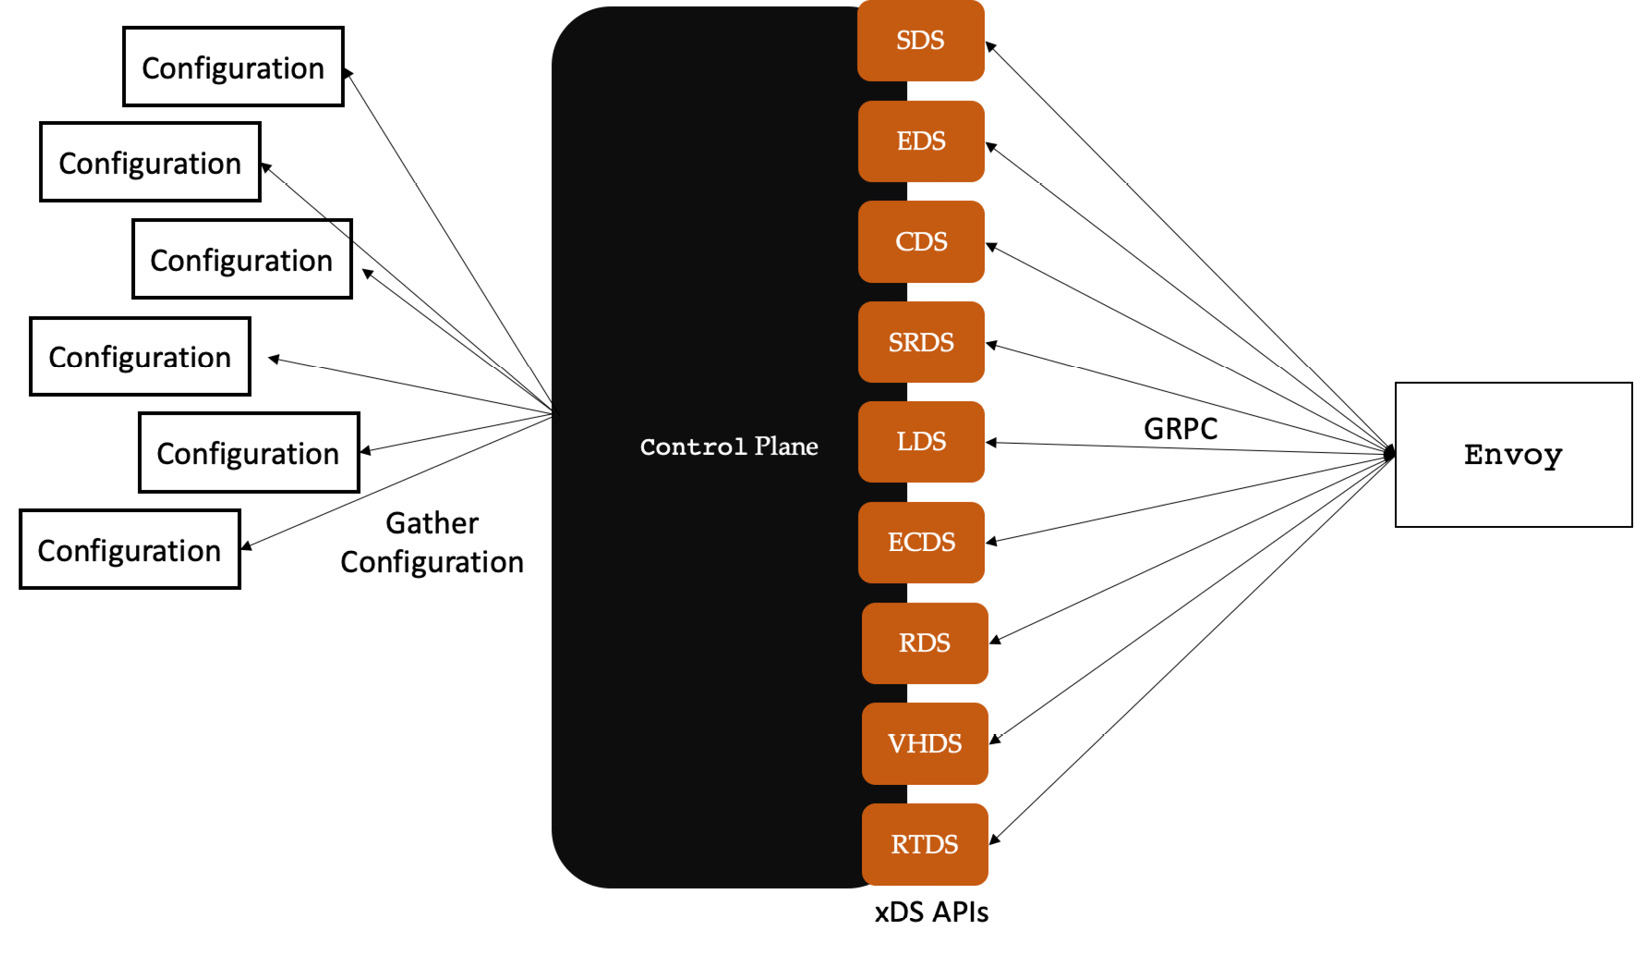
Figure 3.8 – Control plane implementation of the xDS API
Let’s see what the service discovery APIs provide:
- Secret Discovery Service (SDS): Provides secrets, such as certificates and private keys. This is required for MTLS, TLS, and so on.
- Endpoint Discovery Service (EDS): Provides details of members of the cluster.
- Cluster Discovery Service (CDS): Provides cluster-related information including references to endpoints.
- Scope Route Discovery Service (SRDS): Provides route information in chunks when the route confirmation is large.
- Listener Discovery Service (LDS): Provides details of listeners including the ports, addresses, and all associated filters.
- Extension Config Discovery Service (ECDS): Provides extension configuration, such as HTTP filters, and so on. This API helps to fetch information independently from the listener.
- Route Discovery Service (RDS): Provides route information including a reference to the cluster.
- Virtual Host Discovery Service (VHDS): Provides information about the virtual hosts .
- Runtime Discovery Service (RTDS): This service provides information about the runtime. The runtime configuration specifies a virtual filesystem tree that contains reloadable configuration elements. This virtual filesystem can be realized via a series of local filesystems, static bootstrap configuration, RTDS, and admin console-derived overlays.
- Aggregated Discovery Service (ADS): ADS allows all APIs and their resources to be delivered via a single API interface. Through ADS APIs, you can sequence changes related to various resource types, including listeners, routes, and clusters, and deliver them via a single stream.
- Delta Aggregated Discovery Service (DxDS): With other APIs, every time there is a resource update, the API needs to include all resources in the API response. For example, every RDS update must contain every route. If we don’t include a route, Envoy will consider the route to have been deleted. Doing updates this way results in high bandwidth usage and computational costs, especially when a lot of resources are being sent over the network. Envoy supports a delta variant of xDS where we can include only resources we want to add/remove/update to improve on this scenario.
We covered Envoy filters in the previous section, but note that you are not limited to the built-in filters – you can easily build new filters, as we’ll see in the next section.
Extensibility
The filter architecture of Envoy makes it highly extensible; you can make use of various filters from the filter library as part of the filter chain. When you need some functionality not available in the filter library, then Envoy also provides the flexibility to write your own custom filter, which is then dynamically loaded by Envoy and can be used like any other filter. By default, Envoy filters are written in C++, but they can also be written using Lua script or any other programming language compiled into WebAssembly (Wasm).
The following is a brief description of all three options currently available for writing Envoy filters:
- Native C++ API: The most favorable option is to write native C++ filters and then package them with Envoy. But this option requires recompiling Envoy, which might not be ideal if you are not a big enterprise that wants to maintain its own version of Envoy.
- Lua filter: Envoy provides a built-in HTTP Lua filter named envoy.filters.http.lua that allows you to define a Lua script either inline or as an external file, and execute it during both the request and response flows. Lua is a free, fast, portable, and powerful scripting language that runs over LuaJIT, which is a just-in-time compiler for Lua. At runtime, Envoy creates a Lua environment for each worker thread and runs Lua scripts as coroutines. As the HTTP Lua filters are executed during request and response flows, you can do the following:
- Inspect and modify headers and trailers during request/response flows
- Inspect, block, or buffer the body during request/response flows
- Invoke upstream systems asynchronously
- Wasm filter: Last but not least is Wasm-based filters. We write these filters using our preferred programming language and then compile the code into a low-level assembly-like programming language called Wasm, which is then loaded by Envoy dynamically at runtime. Wasm is widely used in the open web, where it executes inside JavaScript virtual machines within web browsers. Envoy embeds a subset of the V8 VM (https://v8.dev/) with every worker thread to execute Wasm modules. We will read more about Wasm and do hands-on exercises in Chapter 9.
The ability to write custom filters makes Envoy extensible enough to implement for custom use cases. Support for Wasm-based filters brings down the learning curve of writing new filters as you can use a language you are most comfortable with. We hope that with the growing adoption of Envoy, there will be more tooling available to the developer to easily extend it using custom filters.
Summary
This chapter provided you with details about Istio control plane components including istiod and its architecture. We also read about the Istio operator, the CLI, and how certificate distribution works. The Istio control plane can be deployed in various architecture patterns, and we had an overview of some of these deployment patterns as well.
After covering the Istio control plane, we read about Envoy, a lightweight, highly performant l3/l4/l7 proxy. It provides a range of configurations via the listener and cluster subsystems to control request processing. The filter-based architecture is easy to use, as well as extensible, as new filters can be written in Lua, Wasm, or C++ and can easily be plugged into Envoy. Last but not least is the ability of Envoy to support dynamic configuration via xDS APIs. Envoy is the best choice for the Istio data plane because of its flexibility and performance when serving as a proxy, as well as its easy configurability via xDS APIs, which are implemented by the Istio control plane. The istio-proxy, as discussed in the previous chapter, is made up of Envoy and the Istio agent.
In the next chapter, we will put Istio to one side and instead immerse ourselves in experiencing a real-life application. We will take the application to a production-like environment and then discuss the problems that engineers would face in building and operating such an application. In Part 2 and Part 3 of this book, we will make use of this application in hands-on exercises. So, sit tight and brace yourselves for the next chapter.