
Chapter 16
Creating Financial Reports
In This Chapter
Understanding birth, death and rebirth — the karmic accounting life cycle
Discovering the mother of all debits and credits — your first trial balance
Transforming the trial balance into something useful
Starting a new accounting cycle
In this chapter, I talk about how to construct Profit & Loss and Balance Sheet reports from scratch. The more computer-savvy of my readers may be wondering why I go to all this trouble. After all, if you use accounting software, generating a Profit & Loss or Balance Sheet report is as simple as clicking a single button, isn’t it?
The reason why I explain how to build these reports from scratch is this: Understanding the mechanics behind the construction of financial reports enables you to understand the whole accounting cycle from beginning to end. This gives you a deeper understanding into how the transactions you record impact on financial reports and, ultimately, into the reports themselves.
Of course, if you have accounting software and you aren’t remotely interested in discovering how financial statements get constructed — maybe you’re the business owner and all you want to know is whether you’re making a profit or not — then by all means skip this chapter. I won’t be in the least offended.
Reviewing the Accounting Cycle
Whether you do books by hand, with a spreadsheet or using accounting software, the accounting cycle remains the same. The difference with accounting software is that much of the work happens automatically.
The first stage of the accounting cycle involves recording everyday transactions in date order. Small cash-based businesses use a payments journal and a receipts journal; larger businesses also use a sales journal and a purchases journal. I cover this stage of the accounting cycle in Chapters 8, 9 and 10 of this book.
In the second stage of the accounting cycle, you transfer totals from these journals to your general ledger, a special ledger that lists transactions in account order, and then in date order within each account. If you use accounting software, this process happens automatically every time you record a transaction. If you do books by hand, you typically use the totals of each column in your various journals as a way of keeping a running total of the balance of each account.
The third (most scary and technical) stage of the accounting cycle arrives at the end of each accounting period, which can be a month, a quarter or a whole year. If you use accounting software, this stage happens automatically, but if you use any other method, this stage involves creating a trial balance and financial statement worksheet, and then assembling financial reports. In this chapter, I explain this process of creating a trial balance right through to assembling financial reports.
The fourth — and last — stage of the accounting cycle involves finalising the accounting period, something that normally happens at the end of each financial year. At this point, you set your revenue and expense balances to zero, recording these accounts in a special equity account called Retained Earnings (and again, if you use accounting software, this process is either automatic or semi-automatic). I mention year-end processes at the end of this chapter, and also in more detail in Chapter 18.
Finally, in the whole spirit of birth, death and rebirth, with the accounting period finalised and all the bookkeepers lying exhausted in a heap on the office floor, you arrive at the next stage, which is when you start afresh with the next period’s transactions. (Sounds tough? Just compare this daily grind to the life cycle of a male wolf spider who, when he finally manages to make love to the fickle female of his species, has an 80 per cent chance of getting killed and eaten by her as his reward.)
Putting Your Accounts on Trial
By the time you get to trial balance stage, I’m assuming that your transaction journals are pretty much complete. If not, feel free to explore earlier chapters in this book to get you up to speed (Chapter 8 explains how to record expenses in your payments journal, Chapter 9 talks about recording income in your receipts journal, Chapter 13 deals with inventory transactions, and Chapter 14 explains general journals).
When you construct financial reports from scratch, you compile the balances from these various ledgers into a trial balance, which is a special report that provides a snapshot of the debit and credit balances of all general ledger accounts at any point in time.
Taking debits and credits to their natural extreme
I reckon the best way to understand a trial balance is to create one. In this chapter, I’m going to build a trial balance using the figures from a straightforward payments journal and receipts journal. In real life, you may have other journals also, but right now, I’m going to keep things as simple as possible.
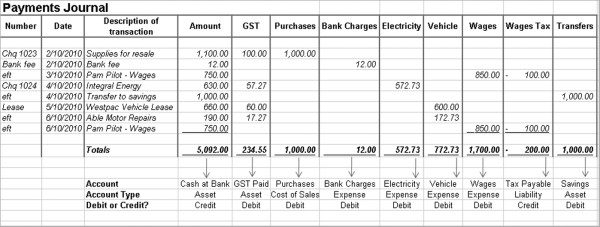
In Figure 16-1, I show a summary payments journal, listing a handful of expenses, with totals at the foot of each column. (In real life, this journal would probably include many more transactions, as bookkeepers normally prepare trial balances at the end of each month.) At the bottom of Figure 16-1, you can see how I’ve drawn a series of arrows pointing to three additional rows of information:
The first row shows what account the total from each column belongs to, such as Cash at Bank, Electricity Expense or whatever.
The second row shows the account type, such as asset, liability, expense and so on.
![]() The third row indicates whether this account is a debit or a credit in the trial balance. If in doubt, remember that assets, cost of sales and expense accounts are debits; liabilities, equity and income accounts are credits. (For more on debits and credits, look back to Chapter 3.)
The third row indicates whether this account is a debit or a credit in the trial balance. If in doubt, remember that assets, cost of sales and expense accounts are debits; liabilities, equity and income accounts are credits. (For more on debits and credits, look back to Chapter 3.)
Figure 16-1: Identifying account balances from your payments journal.
In Figure 16-2, I do the same thing with the receipts journal. For each total, I work out what account the total should go to, what kind of account this is, and whether this account is a debit or credit balance.
Figure 16-2: Identifying account balances from your receipts journal.

Last, in Figure 16-3, I pull the rabbit out of the hat, collating balances from Figures 16-1 and 16-2 into a single report called a trial balance. At the bottom of this report, I total the debits and credits, which magically enough equal one another. (I confess I had a couple of goes before everything balanced!)
![]() In order for your accounts to be correct, your trial balance must balance. If your trial balance doesn’t balance, you need to figure out where you went wrong. Read on for a few tips on this very matter . . .
In order for your accounts to be correct, your trial balance must balance. If your trial balance doesn’t balance, you need to figure out where you went wrong. Read on for a few tips on this very matter . . .
Figure 16-3: Some weird kind of black magic? No, a trial balance report.

Fighting against trial and error
All kinds of things can go wrong when you try to build a trial balance. Here are just some of the goofs that could be tripping you up:
![]() Addition errors: If individual columns in each journal don’t add up correctly, your trial balance won’t balance. A good way to double-check additions is to see whether all the individual expense columns in your payments journal, or individual income columns in your receipts journal, equal the grand total of the Amount column for the bank account.
Addition errors: If individual columns in each journal don’t add up correctly, your trial balance won’t balance. A good way to double-check additions is to see whether all the individual expense columns in your payments journal, or individual income columns in your receipts journal, equal the grand total of the Amount column for the bank account.
Debits or credits back to front: Make sure you don’t put a debit in the credit column of your trial balance, or vice versa. To look for this error, calculate the difference between the debits and credits in your trial balance, divide this difference by two, then see whether you can spot an amount that equals this difference. If you can, chances are this amount is in the wrong column.
Transposed figures: Creative left-brain clever people (which is a lovely way to describe dyslexia, don’t you think?) often get numbers transposed, maybe entering $87 instead of $78, or $690 instead of $960. Calculate the difference between total debits and total credits in your trial balance. If this difference is exactly divisible by nine, then chances are an account transposition is the cause. (Weird, but true.)
![]() If a trial balance doesn’t balance, your accounts can’t be right. However, even if a trial balance does balance, your accounts may still be wrong, as you may have allocated a transaction wrongly. In other words, things can’t be right if a trial balance doesn’t balance, but things may still be wrong even if it does!
If a trial balance doesn’t balance, your accounts can’t be right. However, even if a trial balance does balance, your accounts may still be wrong, as you may have allocated a transaction wrongly. In other words, things can’t be right if a trial balance doesn’t balance, but things may still be wrong even if it does!
Finding Gold at the Rainbow’s End
After you find out how to create a trial balance report, using the totals from your various bookkeeping journals (see ‘Putting Your Accounts on Trial’, earlier in this chapter), the next stage is to identify what figures on the trial balance flow through to the Profit & Loss report, and what figures flow through to the Balance Sheet. Also, unless you have a template for these reports available, you need to figure out how best to present and format these reports.
Preparing the groundwork
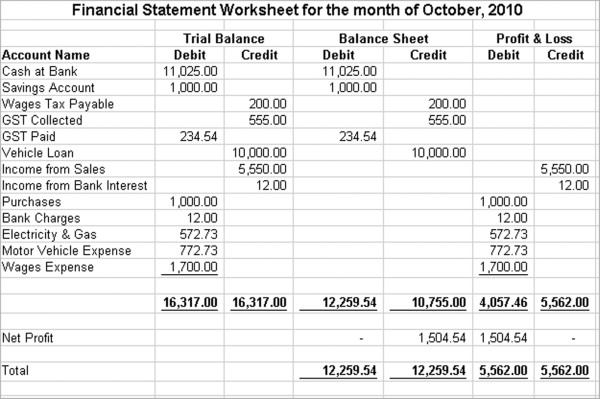
After you create a trial balance report (a process I explain earlier in this chapter, in ‘Taking debits and credits to their natural extreme’), the next step is to create a financial statement worksheet. This simple worksheet, of which Figure 16-4 is a handsome example, consists of seven columns:
The first three columns replicate your trial balance, with one column for account names, a second column for total debits and a third column for total credits.
The fourth and fifth columns repeat all the debits and credits that are asset, liability or equity accounts and that belong to the Balance Sheet.
The sixth and seventh columns repeat all the debits and credits that are income, cost of sales or expense accounts and that belong to the Profit & Loss.
You can see from Figure 16-4 that the debits and credits don’t match up in the last four columns. Don’t freak out — these columns aren’t meant to match, yet. The difference between these columns represents the net profit, which you add as a new line along the bottom of the worksheet. You then recalculate the debit and credit totals to include this profit, as I do in Figure 16-4.
Figure 16-4: Mapping your trial balance report to financial statements.
![]() In the years when accountants assembled financial statements by hand, this worksheet sometimes contained two more columns, which were used for journal adjustments. I talk about journal adjustments in Chapter 14, but in this example, I assume that any necessary adjustments have already been made to the accounts before the trial balance is generated.
In the years when accountants assembled financial statements by hand, this worksheet sometimes contained two more columns, which were used for journal adjustments. I talk about journal adjustments in Chapter 14, but in this example, I assume that any necessary adjustments have already been made to the accounts before the trial balance is generated.
Yeehaa! Creating a Profit & Loss report
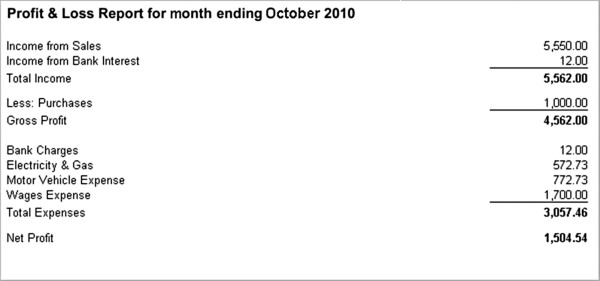
With your financial statement worksheet complete, you’re truly on the home stretch. All you do now is carry across the totals from this worksheet into a typical Profit & Loss format.
1. Write the company name, the report title (Profit & Loss report) and the date range at the top of the report.
![]() Remember that a Profit & Loss report tells a story, and always has a start date and a finish date.
Remember that a Profit & Loss report tells a story, and always has a start date and a finish date.
2. List the income accounts, along with a subtotal.
In Figure 16-5, I group all income together at the top of the report. However, some accountants prefer to group non-trading income, such as interest or investment income, at the bottom of the Profit & Loss report under a separate heading called Other Income.
3. List the cost of sales accounts, along with a subtotal.
Not all businesses, particularly service businesses, have cost of sales accounts. If you’re not sure on this one, refer to Chapter 2, where I talk more about account types.
4. Deduct total cost of sales from total income to arrive at gross profit.
This first section of a Profit & Loss report, showing income, cost of sales and gross profit, is sometimes called a trading statement. If this business has stock, the format of this trading statement is typically a little more complex and shows both opening and closing stock. I explain this format in more detail in Chapter 13.
5. List the expense accounts, along with a subtotal.
6. Deduct total expense from the gross profit, to arrive at the net profit.
Aha, the bottom line! A truly momentous occasion.
Figure 16-5: The Profit & Loss report takes the income, cost of sales and expense totals from the trial balance.
Yippee! Building a Balance Sheet first time around
The very first time you create a Balance Sheet — assuming that this is a new business starting off with no assets and no liabilities — is the easiest. You simply carry across the figures from your financial statement worksheet straight onto your Balance Sheet. Here’s how:
1. Write the company name, the title of this report (Balance Sheet), followed by the date of this report.
![]() Unlike a Profit & Loss report, which tells the story of how a business fared over a period of time, a Balance Sheet is a snapshot of account balances taken at a particular point in time. Usually you present a Profit & Loss and a Balance Sheet together as a pigeon pair, and the date of the Balance Sheet is the date that the Profit & Loss goes up to. For example, Figure 16-5 is a Profit & Loss report from 1 October to 31 October, and Figure 16-6 is a Balance Sheet as at 31 October.
Unlike a Profit & Loss report, which tells the story of how a business fared over a period of time, a Balance Sheet is a snapshot of account balances taken at a particular point in time. Usually you present a Profit & Loss and a Balance Sheet together as a pigeon pair, and the date of the Balance Sheet is the date that the Profit & Loss goes up to. For example, Figure 16-5 is a Profit & Loss report from 1 October to 31 October, and Figure 16-6 is a Balance Sheet as at 31 October.
Figure 16-6: A completed Balance Sheet.

2. List the asset accounts, along with a subtotal.
In Figure 16-6, I only show one total for assets. However, more detailed Balance Sheets separate assets into current, non-current and intangible assets. I talk more about these different categories of assets in Chapter 2.
3. List the liability accounts, along with a subtotal.
Again, in Figure 16-6 I bundle all liabilities together, and don’t separate them into current and non-current liabilities. For more on this topic, head back to Chapter 2.
4. Deduct total liabilities from total assets to arrive at a figure for net assets.
5. List the equity accounts, along with a subtotal.
The format for this section of a Balance Sheet varies depending on whether this report is for a company, partnership or sole trader. See the sidebar ‘Different Balance Sheet formats’ for more details.
Building a Balance Sheet the next time
When you create a trial balance, what you’re actually doing is recording the dollar movement for every account. For example, the savings account in Figure 16-3 shows a debit of $1,000. This debit doesn’t necessarily mean that the balance of the savings account is $1,000; rather, this debit signifies that over the period of time that the trial balance covers, the increase in the balance of this account is $1,000.
The balances of Balance Sheet accounts (in other words, assets, liabilities and equity accounts) always carry across from one period to the next. What this means is that in order to create a Balance Sheet, you need two bits of information:
First, you need the opening figures for your Balance Sheet. For instance, my example trial balance summarises income and expenses for the month of October, 2010. Therefore, in order to create a Balance Sheet for the last day of October, I first need a Balance Sheet for the last day of September.
Second, you need the debits and credits from your financial statement worksheet. (See ‘Preparing the groundwork’ earlier in this chapter for details.)
You can see how I use these two bits of information in Figure 16-7. The second and third columns show the debits and credits from my opening Balance Sheet; the fourth and fifth columns show the debits and credits from the Balance Sheet section of my financial statement worksheet; and the sixth and seventh columns show the results of adding the first two sets of columns together. For example, the savings account has an opening balance of $3,200, the increase over the month of October is $1,000, and the closing balance is $4,200.
Figure 16-7: A trial balance shows the movement in Balance Sheet accounts, not the final balance.

With this worksheet in place, you simply carry across the figures into a Balance Sheet in the same way as I describe earlier in this chapter, under the heading ‘Yippee! Building a Balance Sheet first time around’.
Turning Over a New Leaf
The balances of asset, liability and equity accounts all roll forward from one period to another. For example, if I have $2,000 in my bank account on the last day of the financial year, this balance rolls forward to the first day of the next financial year. (Thank goodness for that.)
Income and expense accounts work differently because at the end of each accounting period, usually a financial year, the balances of these accounts return to zero. For example, if my Sales account shows $55,000 on the last day of the financial year, this balance clears to zero on the first day of the next financial year. In other words, the balances of income and expense accounts don’t accumulate from year to year, so that businesses can track how much they earn or spend for one year at a time.
If you use accounting software, the process of starting a new year happens automatically. (With some software, you have to initiate a new year process; with other software, you simply have to specify date ranges when generating financial reports.) If you do books by hand, you make journal entries to close off profit and loss accounts, transferring to an income summary account and then closing off that income summary account to retained earnings.
Clear as Sydney in a summer smog? Never fear — I devote all of Chapter 18 to explaining the year-end process.